
QuickBooks’ installation process offers two basic options: Install the program from scratch or upgrade from a previous version. When you upgrade, you can run both the old and new versions on your computer at the same time, which is essential if you’re an accountant or bookkeeper who works with company files from several different clients. Even if you use QuickBooks to run your own business, you might want to keep your old version around in case you decide that you don’t like the new version. Be sure to back up your company file before you open it with the new version; once you open it in the new version of QuickBooks, it won’t run in the earlier version (see the box on Installing Multiple Versions of QuickBooks).
This appendix walks you through both paths of the installation process. You’ll also find out how to install QuickBooks 2015 on a company network, including where on a network you can store your company file—and which location to choose for best performance. (If several people need to access your company file at the same time, everyone has to run the same version of QuickBooks, so set aside time to install the program on all those machines.)
Intuit recommends a 2.4 GHz processor and 1 GB of RAM for a single user of QuickBooks Pro. Add another 1 GB of RAM for more than one concurrent user—but doubling the recommended RAM (at least 2 GB, as a rule of thumb) will probably bring you closer to acceptable number-crunching speeds. You also need about 2.5 GB of free disk space and a 4x CD/DVD drive to install the program if you bought it on CD rather than downloading it. QuickBooks 2015 can run on Windows Vista (Service Pack 1 or later releases), Windows 7, Windows 8, Windows Server 2003 (Service Pack 2), Windows Server 2008 R2, and Windows Server 2012. QuickBooks can run on 32-bit and 64-bit editions of these operating systems.
Note
Sometimes, you may have problems running QuickBooks if your computer has a Windows Home edition installed, particularly if you’re working in a multi-user networked environment. The easiest solution (although it might cost you some money) is to install the Pro version of Windows Vista, Windows 7, or Windows 8 on your computer.
If you’re planning to use QuickBooks’ integration features, the versions of your other programs matter, too. For example, writing letters and exporting reports requires Microsoft Word and Excel 2007 or later (either the 32-bit or 64-bit edition), and synchronizing contacts requires Outlook 2007 or later. (QuickBooks Contact Sync integrates only with the 32-bit edition of Outlook 2010.)
If you have several QuickBooks users, plan on upgrading everyone’s copy at the same time. Once you’ve upgraded everyone, you can update the company file to the new version of the program. Then have all your users make sure they can open the company file with the new version of QuickBooks. (If you update the company file first, your colleagues won’t be able to work in it until they have the newest version of the program.)
Tip
If you have a problem installing QuickBooks, you can look for an answer at www.quickbooks.com/installation.
If you have a single-user license for QuickBooks, installing or upgrading the program on a computer running Windows 7 or Windows 8 is pretty simple. Even on a network with a multi-user license, installing QuickBooks is mostly common sense. (If you’re installing it on a computer running Windows Vista, search the Intuit QuickBooks Support web page [QuickBooks Training] for instructions.) This section describes the steps that work whether you’re installing QuickBooks for the first time, installing a new version of the program on a computer that already has one or more older versions on it, or upgrading an existing version to QuickBooks 2015.
If you don’t have any other version of QuickBooks installed on your computer, installing QuickBooks 2015 is straightforward. Here’s what you do:
Log into Windows as a user with administrator rights.
Windows Server, Windows Vista, Windows 7, and Windows 8 require administrator rights to install QuickBooks. If you have trouble installing, try disabling your firewall, too. And shut down any running programs, including your virus-protection program (a good idea when you’re installing any software).
If you downloaded QuickBooks, double-click the file you downloaded. If you have a QuickBooks DVD, put the disc in your DVD drive.
You’ll see the Intuit QuickBooks Installer screen and a “Welcome to QuickBooks!” greeting.
When the Next button becomes active, click it.
The License Agreement screen appears.
After you read the software agreement carefully, turn on the “I accept the terms of the license agreement” checkbox, and then click Next.
You should always read software license agreements so you know the legal terms you’re accepting.
On the “Choose your installation type” screen, select either “Express (recommended)” or “Custom and Network options,” and then click Next.
Because you’re installing QuickBooks for the first time, the Express option sets up QuickBooks for single-user access (Switching Between Multi- and Single-User Mode) and installs the program in C:Program FilesIntuitQuickBooks 2015 on 32-bit computers (C:Program Files(x86)IntuitQuickBooks 2015 on 64-bit computers). If you choose this option, the installation jumps to a screen that asks for the license and product numbers; hop to step 7 of this list for details. (You can change the program’s preferences to allow multiple users after QuickBooks is up and running; see Switching Between Multi- and Single-User Mode.)
The “Custom and Network options” setting lets you choose where to install QuickBooks on your computer, install the program and share a company file with others, or set up the computer only to share the company file (Setting Up QuickBooks on a Network). If you choose this option, continue with step 6 of this list.
If you selected the “Custom and Network options” setting, choose a setting on the “Custom and Network Options” screen, and then click Next.
If you’re the only person who uses QuickBooks, select “I’ll be using QuickBooks on this computer.” This option installs the program on your computer and sets it up for single-user access to your company file. (You can change this preference to allow multiple users once QuickBooks is up and running—see Switching Between Multi- and Single-User Mode.)
If you’re going to run QuickBooks and also want to store the company file on this computer to share with other QuickBooks jockeys, select “I’ll be using QuickBooks on this computer, AND I’ll be storing our company file here so it can be shared over our network.”
The third option, which begins with “I will NOT be using QuickBooks on this computer,” is the one to choose when you’re installing the program on a computer that acts as a file server; in other words, a computer that stores your company files but doesn’t actually run QuickBooks (Setting Up QuickBooks on a Network). When you install the program using this option, you don’t use up one of your QuickBooks licenses.
On the “License and Product Numbers” screen, fill in the License Number and Product Number boxes, and then click Next.
These numbers are hard to miss—they’re in the confirmation email you received if you downloaded the program, or printed somewhere on your QuickBooks DVD packaging if you bought a physical copy. As you finish typing the digits in one box, your insertion point automatically jumps to the next box. So if you’re confident on the keyboard, you can keep your eyes on the email or yellow sticker and type all the digits for the license and product numbers without a break.
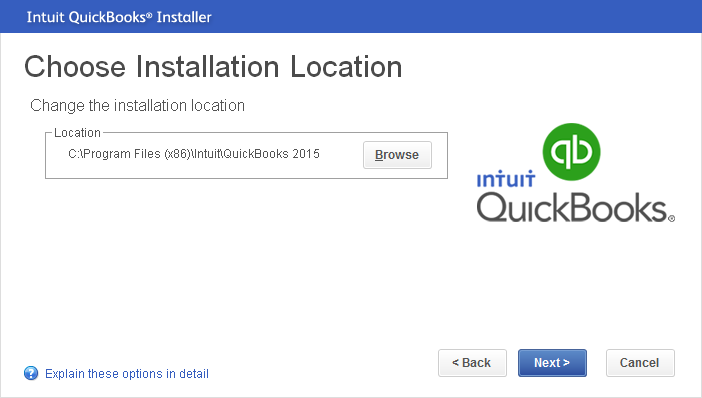
If you chose “Custom and Network options” in step 5, then you see the Choose Installation Location screen, shown in Figure A-1 (if you chose the Express option, you won’t see this screen, so skip to step 9); to change where QuickBooks will be installed, pick a new location, and then click Next.
Initially, the installation location is set to C:Program Files IntuitQuickBooks 2015 or C:Program Files (x86)IntuitQuickBooks 2015 depending on whether your computer is running a 32-bit or 64-bit version of Windows. To choose another spot, click Browse, select the new folder, and then click OK. If the folder you want to use doesn’t exist, click the New Folder icon, which looks like a stylized folder with a starburst on its corner. To view the folders one level up, click the icon that looks like a folder containing an up arrow. To select a folder within the box, double-click it or select it and then click OK.
If the settings on the “Ready to install” screen are the way you want, click Install.
This screen lists the program’s version, its license and product numbers, and the folder where it will be installed. If you want to change, say, the folder you’re installing to, click Back until you get to the appropriate screen, and then make your changes. Then click Next until you’re back at the “Ready to Install” screen.
When you click Install, your computer gets to work. The wizard shows the installation task it’s performing, and progress bars indicate how far it’s gotten.
The installation wizard also displays a User ID text box so you can sign into QuickBooks. If you don’t have an Intuit account yet or don’t want to log into the account you have, click “Skip this” at the window’s bottom right. If you do want to sign in to your Intuit account—for example, to register your copy of QuickBooks, type your email address in the User ID box, and then click Validate. If QuickBooks finds your account, the password box appears. Type your password in the box, and then click Log In at the dialog box’s bottom right.
Note
If you see the “Register your product and get started” message, hop to Registering QuickBooks to get the full scoop on registering your copy of the program. If you want to skip registration for now, click the Remind Me Later link at the window’s lower right.
When the “Congratulations!” screen appears, click Open QuickBooks.
QuickBooks launches and you’re ready to start working. Chapter 1 walks you through launching QuickBooks subsequent times and opening files for day-to-day work.
If you already have a version of QuickBooks installed, it’s easy to install QuickBooks 2015 or to upgrade your existing version. Here’s how:
Log into Windows as a user with administrator rights.
If you have trouble installing QuickBooks, try disabling your firewall. And shut down any running programs, including your virus-protection program (a good idea when you’re installing any software).
If you downloaded QuickBooks, double-click the file you downloaded. If you have a QuickBooks CD, put the disc in your CD drive.
Either way, QuickBooks’ installation dialog box appears on your screen and the installation wizard extracts the files it needs. This step can take a few minutes; you’ll see progress bars that give you an idea of how long the process will take. (If you’re installing from a CD and the dialog box doesn’t appear, use Windows Explorer to open the CD; double-click setup.exe, and then follow the onscreen instructions.)
When you see the Welcome screen in the QuickBooks installation dialog box, click Next.
The License Agreement screen appears.
After you read the software agreement carefully, turn on the “I accept the terms of the license agreement” checkbox, and then click Next.
You should always read software license agreements so you know the legal terms you’re accepting.
On the “Choose your installation type” screen, select either “Express (recommended)” or “Custom and Network options,” and then click Next.
The Express option sets up QuickBooks for single-user access (Switching Between Multi- and Single-User Mode) and installs the program in C:Program FilesIntuitQuickBooks 2015 for computers running a 32-bit version of Windows or C:Program Files (x86)IntuitQuickBooks 2015 for computers running 64-bit Windows. If you choose this option, the installer jumps to a screen that asks for the license and product numbers—hop to step 7 of this list for details. (You can change the preference to allow multiple users after QuickBooks is up and running; see Switching Between Multi- and Single-User Mode.)
The “Custom and Network options” setting lets you choose where to install QuickBooks on your computer, install the program and share a company file with others, or set up the computer only to share the company file (Setting Up QuickBooks on a Network). The next step explains your options.
If you selected the “Custom and Network options” setting, choose a setting on the “Custom and Network Options” screen, and then click Next.
If you’re the only person who uses QuickBooks, select “I’ll be using QuickBooks on this computer.” This option installs the program on your computer and sets it up for single-user access to your company file. (You can change this preference to allow multiple users once QuickBooks is up and running—see Switching Between Multi- and Single-User Mode.)
If you’re going to run QuickBooks and also want to store the company file on this computer to share with other QuickBooks jockeys, select “I’ll be using QuickBooks on this computer, AND I’ll be storing our company file here so it can be shared over our network.”
The third option, which begins with “I will NOT be using QuickBooks on this computer,” is the one to choose when you’re installing the program on a computer that acts as a file server; in other words, a computer that stores your company files but doesn’t actually run QuickBooks (Setting Up QuickBooks on a Network). When you install the program using this option, you don’t use up one of your QuickBooks licenses.
On the “Enter your license and product numbers” screen, click the “Use your user ID instead” link below the Product Number boxes.
The “Install with your user ID” screen appears.
Fill in the User ID and Password boxes with your Intuit account user ID and password, and then click Next.
QuickBooks obtains your license and product number from the registration info associated with your Intuit account.
If you can’t remember your account information, click the “Install with your product and license numbers instead” link to return to the “Enter your license and product numbers” screen, and then fill in the license number and product number from your confirmation email or CD.
If you want to keep your current version of QuickBooks and install QuickBooks 2015 in addition, on the “Upgrade or Change Installation Location” screen, be sure to choose a different folder than the one where your current QuickBooks version is installed. Then jump to step 11.
Initially, the installation location is set to C:Program FilesIntuitQuickBooks 2015 (for computers running a 32-bit version of Windows) or C:Program Files (x86)IntuitQuickBooks 2015 (for computers running 64-bit Windows).
To change the installation location, click Browse, select the new folder, and then click OK. (You don’t have to change this location. To continue the installation without changing the location, simply proceed to step 11.)
If you want to upgrade an existing version of QuickBooks, on the “Upgrade or Change Installation Location” screen, select the “Replace the version selected below with the version I’m installing now” option and then, in the drop-down list, choose the version that you want to upgrade.
When you choose this option, the version you selected to replace will be uninstalled and QuickBooks 2015 will be installed.
Click Next. Then, as long as the settings in the “Ready to install” screen are the way you want, click Install.
This screen includes a summary of the program’s version, its license and product numbers, and the installation folder you chose. If you want to change, say, the folder you’re installing to, click Back until you get to the appropriate screen, and then make your changes. Then click Next until you’re back at the “Ready to Install” screen.
When you click Install, your computer gets to work. The wizard shows the installation task it’s performing, and progress bars indicate how far it’s gotten.
Note
If you see the “Register your product and get started” message, read the next section to learn how to register your copy of the program. Or you can skip registration for the time being by clicking the “I’ll do this later” link at the window’s lower right. But you have to register the program eventually, so go ahead and do it now.
When the Congratulations screen appears, click Open QuickBooks.
QuickBooks launches and you’re ready to start working. Chapter 1 walks you through launching QuickBooks subsequent times and opening files for day-to-day work.
At some point after you’ve installed QuickBooks, you’ll see the Register QuickBooks dialog box. (You can also start the registration process by choosing Help→Register QuickBooks.) You don’t have to register QuickBooks immediately, but you’ll need to eventually—the program runs for only 60 days unless you register your copy. When you register, you’ll also receive any updates that Intuit releases for this version of the program.
In the Register QuickBooks dialog box, click the Begin Registration button. A browser window opens to the QuickBooks Registration page and guides you through the steps. Be sure to keep a copy of the license number, product number, telephone number, and Zip code you use for registration. You’ll need them if you have to reinstall QuickBooks or install it on a new hard drive.
For several people to work on the same company file from different computers, you have to perform two separate steps:
Install the QuickBooks database server on the machine where you store your QuickBooks files.
When you run the QuickBooks installer on this machine, on the “Custom and Network Options” screen, choose the option that begins with “I will NOT be using QuickBooks on this computer” (see step 6 on Installing QuickBooks for the First Time). This installs the database server software so that the computer acts as a file server and doesn’t use up one of your QuickBooks licenses.
Install QuickBooks 2015 on all the computers that you want to run QuickBooks, as explained earlier in this appendix.
You need a separate QuickBooks license for each computer on which you install the program. These computers need to be networked to the machine you use as the QuickBooks database server. They must all run the same version of QuickBooks (QuickBooks 2015, for example) and have permission to read, write, create, and delete in the folder where the company file resides. (A network administrator typically sets up these permissions for each user. If you’re responsible for setting up users but you never wanted “network administrator” as your job title, in the Windows taskbar, choose Start→“Help and Support” and then, in the Search box, type share files to find instructions for sharing files using your operating system.)
Tip
You can simplify access to the company-file folder by mapping a drive to that folder. In Windows’ “Help and Support” window (which you get to from your computer’s Start menu), search for “Map drive.”
QuickBooks Pro and Premier can handle up to five people accessing a company file at the same time. (Intuit is happy to sell you more than five licenses for QuickBooks to install on other people’s computers, but only five of the licensed users can work on the company file simultaneously.) QuickBooks Enterprise comes with 5-, 10-, or 15-user license packs and allows up to 30 simultaneous users.
QuickBooks 2015 has its own favorite spot for company files, but you can save them wherever makes the most sense for your company. For example, if several people work on your company files simultaneously, choose the storage location that gives you the quickest performance (you’ll read about how to do that in a sec).
In Windows 7 and Windows 8, QuickBooks automatically stores company files to C:UsersPublicPublic DocumentsIntuitQuickBooksCompany Files, but you’re free to choose a different folder. You can store company files anywhere you like, so you may as well keep them with the rest of your documents. It also makes sense to create a dedicated folder for your QuickBooks files since, in addition to company files, you’ll probably create backup files, message templates, files that you export from QuickBooks, and files for importing into your company file. With a QuickBooks folder as a container, you can create subfolders for each type of file, as shown in Figure A-2.
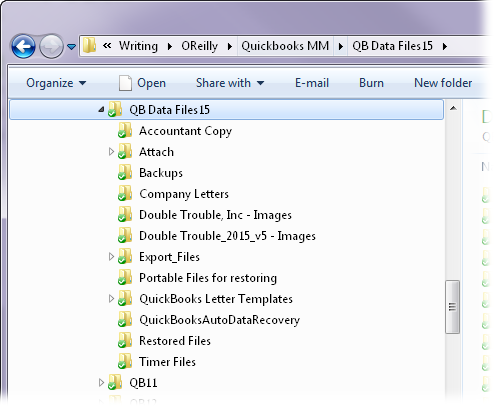
Figure A-2. Having a subfolder for each type of QuickBooks-related file (backups, export files, and so on) makes it easy to find what you want. If you save a copy of your company file at the end of each year, you can create subfolders for each year, too.
Tip
If you aren’t totally at ease working with files in your computer’s operating system, Windows 7: The Missing Manual, Windows 8: The Missing Manual, or Windows 8.1: The Missing Manual will make you an expert in no time.
If several people work on your company files, where you store those files can determine whether those people get blisteringly fast responses or nod off waiting for processes to complete. For the best performance, put company files on the network computer with the most memory, the fastest processor, the most available disk space, and—ideally—the least amount of activity. The best location for your company file depends on the type of network you use:
Peer-to-peer networks don’t use dedicated file servers, so you can store your company file on any computer on the network. The computers running QuickBooks need to use Windows Server, Windows Vista, Windows 7, or Windows 8.
On a client-server network, the company file typically resides on a file server, a dedicated computer for sharing files. Every computer on the network that has QuickBooks installed can access the company files, but one of the computers has to host multi-user access (Switching Between Multi- and Single-User Mode). Intuit recommends installing QuickBooks, QuickBooks Database Manager, and the company files on the server, which has to run Windows Server, Windows Vista, Windows 7, or Windows 8.
However, in some cases, you can’t install QuickBooks on the computer that holds the company files (if you use a file server, for instance). You have to log into the computer that you want to use as the host and open company files in multi-user mode (Switching Between Multi- and Single-User Mode). When QuickBooks asks if you want this computer to host multi-user access, click Yes. This computer then plays traffic cop for several people working on the company files at the same time.
Tip
When you perform resource-gobbling tasks, like running massive reports or reconciling accounts, performance is paramount. On a peer-to-peer network, when you need to perform these tough tasks, log into QuickBooks on the computer that holds the company files. On a client-server network, use the fastest computer on the network.