Sales tax can be complicated, particularly in states where the number of tax authorities has exploded. You might have to pay sales taxes to several agencies, each with its own rules about when and how much. QuickBooks’ sales tax features can’t eliminate this drudgery, but they can help you pay the right tax authorities the right amounts at the right time—and that’s something to be thankful for.
QuickBooks can help you track sales tax based on customers’ locations and sales-tax-paying status. The program can also keep track of non-taxable sales. This chapter shows you how to set up the program to handle all these tasks.
Once the sales tax setup is done, QuickBooks takes over and calculates the sales taxes due on invoices and sales receipts you create. However, after you collect sales taxes from your customers, you need to send those funds to the appropriate tax agencies. In this chapter, you’ll learn how to remit sales taxes to the right organizations on the schedules they require.
If you have to work with sales tax, the first step is turning on the QuickBooks sales tax preference. Then you set up sales tax codes and items to tell the program about the taxes you need to collect and remit. This section shows you how to get started.
When you created your company file, QuickBooks may have turned on sales tax for you if the industry you selected typically tracks sales tax. But if you just started selling taxable goods, you have to turn on the program’s sales tax features yourself. Here are the steps:
Choose Edit→Preferences→Sales Tax, and then click the Company Preferences tab.
Because sales tax applies to your entire company file, you need administrator privileges to change the sales tax setting.
To the right of the “Do you charge sales tax?” label, select the Yes radio button.
If you click OK to close the Preferences dialog box, QuickBooks tells you that you need to specify your most common Sales Tax item. Click OK to close the message box, and then proceed to the next step.
In the Preferences dialog box’s “Your most common sales tax item” drop-down list, choose the Sales Tax item or Sales Tax Group item (described on Sales Tax Items) you apply to most of your customers, if one exists, and then skip to step 6.
If you’re just getting started with sales tax, this drop-down list will contain only the <Add New> entry, because you haven’t set up Sales Tax items yet. (If you don’t know what Sales Tax items are, jump to Sales Tax Items to learn about them and their siblings: sales tax codes. After you do that, proceed to step 4.)
If you need to set up a Sales Tax item, in the Preferences dialog box’s “Your most common Sales Tax item” drop-down list, choose <Add New>.
The New Item dialog box opens.
In the New Item dialog box, fill in the boxes to create a new Sales Tax item (see Sales Tax Items for details), and then click OK.
In the Preferences dialog box, QuickBooks fills in the “Your most common Sales Tax item” box with the item you just created.
Click OK to close the Preferences dialog box.
At this point, the Updating Sales Tax dialog box may appear. In this dialog box, QuickBooks automatically turns on the “Make all existing customers taxable” and “Make all existing non-inventory and inventory parts taxable” checkboxes. If most of your customers and the products you sell are subject to sales tax, leave these checkboxes turned on and click OK to close the message box. Then click OK in the message box telling you that QuickBooks must close all open windows to change the sales tax preference.
Sales tax is now turned on in your company file, so you can create additional sales tax items and codes, as described on Sales Tax Items and Assigning Tax Codes to Items, respectively.
Some of the sales tax preference settings aren’t up to you. Tax agencies decide when your sales taxes are due, usually based on how much sales tax you collect. When you receive a notice about your required payment interval from the state or other tax authority, be sure to update your QuickBooks preferences to match. After you set these preferences and then add sales tax to an invoice for the first time, QuickBooks automatically creates a liability account in your chart of accounts called Sales Tax Payable.
In the Preferences dialog box, on the Sales Tax category’s Company Preferences tab, QuickBooks provides two sets of payment options to satisfy the tax agencies you’re beholden to:
When do you owe sales tax? If your tax agency deems sales taxes due when you add them to customer invoices (known as accrual basis payment), choose the “As of invoice date (Accrual Basis)” option. If your tax agency says sales taxes are due when your customers pay them (known as cash basis payment), choose the “Upon receipt of payment (Cash Basis)” option instead. When you generate sales tax reports (explained on Producing Reports of the Sales Tax You Owe), QuickBooks uses the setting you chose to calculate the sales taxes you have to remit.
When do you pay sales tax? Tax agencies determine how frequently you have to remit sales taxes based on how much sales tax you collect. If your sales taxes are only a few dollars, you might pay only once a year. But if you collect thousands of dollars of sales tax, you can be sure that the tax agency wants its money more quickly, such as quarterly or monthly. When your tax agency informs you of your remittance frequency, choose Monthly, Quarterly, or Annually here, as appropriate.
QuickBooks has two features for dealing with sales tax, codes and items:
Sales tax codes specify whether an item you sell is taxable—that is, whether QuickBooks calculates sales tax for the item when you add it to a sales form. You also apply these codes to customers to specify whether they must pay sales tax or are exempt.
Sales Tax items, on the other hand, provide the nitty-gritty detail: They let you calculate and organize sales taxes charged by state and local authorities for the items on your invoices and other sales forms.
This section describes both features and how to use them.
Tip
If you sell products in a place burdened with multiple sales taxes (state, city, and local, say), you can use a Sales Tax Group item to calculate the total sales tax you have to charge. That way, your sales form shows only the total tax, but QuickBooks keeps track of what you owe to each agency. See the box on Sales Tax Groups for details.
For most product sales in most areas, you have to keep track of the sales taxes you collect and then send them to the appropriate tax agencies. Labor usually isn’t taxable, whereas products usually are. (Groceries are a notable nontaxable exception.) To simplify applying sales tax to the right items or subtotals on your invoices, create separate items for the things you sell that are taxable and the things that are nontaxable. After you assign sales tax codes to your items and customers, QuickBooks takes care of calculating the sales tax that’s due, as shown in the Create Invoices window in Figure 21-1.
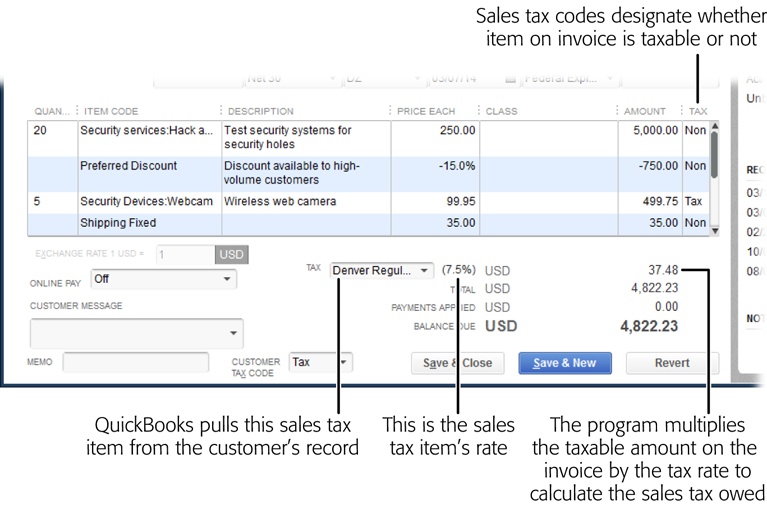
Figure 21-1. QuickBooks fills in the Tax column of the invoice table with tax codes from the items’ records. The program also fills in the Customer Tax Code box and Tax box with the sales tax code and Sales Tax item assigned to the customer’s record. Then, if the customer is taxable, it calculates the sales tax due by multiplying the total taxable amount on the invoice by the Sales Tax item’s rate.
Sales tax codes are QuickBooks’ way of letting you specify whether to apply sales tax. Out of the box, the program’s Sales Tax Code List comes with two self-explanatory options: Tax and Non. If a tax agency requires you to report different types of nontaxable sales, you can add more options, as explained on Assigning Tax Codes to Items. You can apply tax codes to customers and to individual items you sell to designate whether sales taxes apply.
Nonprofit organizations and government agencies are usually tax-exempt, meaning they don’t have to pay sales taxes. To tell QuickBooks whether a customer pays sales tax, open the Edit Customer window (Customers), click the Sales Tax Settings tab, and then choose the appropriate option in the Tax Code field. Here’s how QuickBooks interprets a customer’s sales tax status:
Nontaxable customer. When you assign Non or another nontaxable sales tax code to customers, QuickBooks doesn’t calculate sales tax on any items you sell to them. For example, in a sales form, when you choose a non-taxable customer, the program changes all the Tax cells in the form’s line-item table to Non, which means that the calculated sales tax is zero regardless of the items’ taxable statuses.
Taxable customer. When you assign Tax or any taxable sales tax code to customers, QuickBooks uses items’ sales tax codes to determine whether to charge sales tax; it calculates sales tax only on the taxable items on their invoices and other sales forms.
Note
Customers who buy products for resale usually don’t pay sales tax because that would tax the products twice. (Who says tax authorities don’t have hearts?) To bypass sales tax for a customer, choose Non (for “nontaxable sales”) in the Tax Code drop-down list, and then type the customer’s resale number in the Resale No. field. That way, if tax auditors pay you a visit, the resale number tells them where the sales tax burden should fall.
Some items aren’t taxable regardless of whether a customer pays sales tax. For example, most services and essential goods like food don’t get taxed in most states. If you look carefully at the invoice in Figure 21-1, you’ll notice the code “Non” or “Tax” to the right of each amount. QuickBooks applies the sales tax only to items you designate as taxable to calculate the sales taxes on the invoice.
Items include a Tax Code field so you can designate them as taxable or nontaxable. To assign a tax code to an item, in the Create Item or Edit Item window (Creating Items), choose a code in the Tax Code drop-down list.
Note
Taxable and nontaxable items can live together peacefully assigned to the same income account. QuickBooks figures out what to do with sales taxes based on the sales tax codes and Sales Tax items you’ve assigned to customers and the sales tax codes you’ve assigned to the items you’ve added to customers’ invoices or sales receipts.
The two built-in sales tax codes, Non and Tax, pretty much cover all possibilities, but you may need to create additional codes to classify nontaxable customers by their reason for exemption (nonprofit, government, wholesaler, out-of-state, and so on) to satisfy tax agencies’ reporting requirements. If that’s the case, here’s how to create additional sales tax codes in QuickBooks:
Choose Lists→Sales Tax Code List.
QuickBooks opens the Sales Tax Code List window.
To create a new code, press Ctrl+N or, at the bottom of the window, click Sales Tax Code→New.
In the Sales Tax Code box, type a one- to three-character code.
For example, type Gov for government agencies, Whl for wholesalers who resell your products, Npf for nonprofit customers, and so on.
In the Description box, add some details about the code.
Type a description that explains the purpose of the code, like Government for Gov.
Select the Taxable or Non-Taxable radio button.
Sales tax codes are limited to taxable or nontaxable status.
If you want to add another code, click Next and repeat steps 3–5.
When you’ve added all the codes you want, click OK to close the New Sales Tax Code window.
The codes you created appear in the Sales Tax Code List window.
As you can see, QuickBooks’ sales tax codes don’t let you specify a sales tax percentage or note which tax office to send the collected sales taxes to. That’s where Sales Tax items (described next) come into play.
QuickBooks’ built-in sales tax codes are fine for designating taxable status, but you also have to tell QuickBooks the rate and which tax authority levies the tax. If you sell products in more than one tax location, Sales Tax items are the way to deal with varying tax regulations. (Like the IRS, each tax agency wants to receive the taxes it’s due.) To track what you owe, create a Sales Tax item for each sales tax you must collect.
For example, suppose both local and state taxes apply to products you sell in your store. For customers to whom you ship goods in other states, sales taxes for those states apply. You can create separate Sales Tax items for the tax that applies to your store and the state sales taxes for each state in which you do business. Or, if you have to collect several sales taxes, QuickBooks has a Sales Tax Group feature (Sales Tax Items) so you can collect them all regardless of which tax authorities levy them.
Unlike sales tax codes, which can apply to both customers and products, Sales Tax items apply only to customers, which makes sense, since sales tax rates usually depend on the customer’s location. If the customer is in the boonies, you might assign the state Sales Tax item because the customer pays only that one tax. But a customer smack in the middle of downtown might have to pay state tax, city tax, and a special district tax. Once you assign Sales Tax items to customers (Creating a New Customer), QuickBooks automatically fills in the Sales Tax item on your invoices and other sales forms to calculate the sales taxes incurred.
To create a Sales Tax item, open the Item List (Lists→Item List), and then press Ctrl+N to open the New Item window (Creating Items). From the Type drop-down list, choose Sales Tax Item, and then fill in the fields (shown in Figure 21-2) as follows:
Sales Tax Name. Type in a name for the tax. You can use the same identifiers that the tax authority does, or a more meaningful name like Colorado Sales Tax. You can fit up to 31 characters in this field—more than enough to include the four- or five-digit codes that many states use for sales taxes and your own description.
Figure 21-2. The “Tax Rate (%)” field sets the tax’s percentage. The Tax Agency drop-down list shows the vendors you’ve set up, so you can choose the agency to which you remit the taxes. If you have to collect multiple sales taxes from a customer, a Sales Tax Group item is the way to go (see the box below).
Tax Rate (%). Type the percentage rate for the tax here. QuickBooks automatically adds the percent sign, so simply type the decimal number—for example, 4.3 for a 4.3 percent tax rate.
Tax Agency. In this drop-down list, choose the tax authority that collects the tax. If you haven’t created a vendor record for the tax authority yet, choose <Add New> and create the record now (Creating a Vendor).
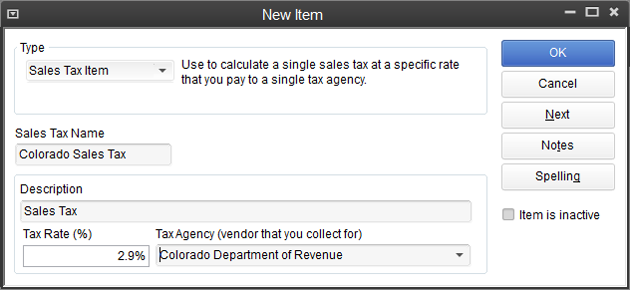
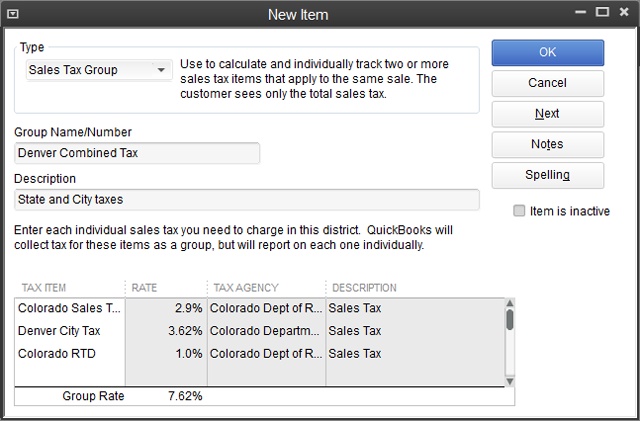
Figure 21-3. Before you can create a Sales Tax Group item, you first need to create each of the Sales Tax items that you plan to include in it. Next, create a Sales Tax Group item, type the name or number of the group and a description, click the Tax Item cell, and then click the drop-down list to choose one of the Sales Tax items to include in the group. QuickBooks fills in the rate, tax agency, and description from the Sales Tax item.
Tax agencies are renowned for their forms. You have to fill out forms to tell the agencies how much sales tax you’ve collected and how much you’re required to remit to them. Fortunately, QuickBooks can take some of the sting out of tax paperwork with reports that collate the sales tax info you need to fill out your sales tax return.
Here are the reports you can generate (they’re listed under Reports→Vendors & Payables, or you can run them from the Manage Sales Tax window [Vendors→Sales Tax→Manage Sales Tax]):
Sales Tax Liability. This report summarizes the sales taxes you’ve collected for each tax agency and breaks sales down into non-taxable and taxable. As shown in Figure 21-4, QuickBooks automatically sets the report’s dates to match the payment interval you chose when you set your sales tax preferences (Setting Up Sales Tax).
Sales Tax Revenue Summary. This report shows the dollar values of taxable and non-taxable sales, which is also shown in the Sales Tax Liability report.
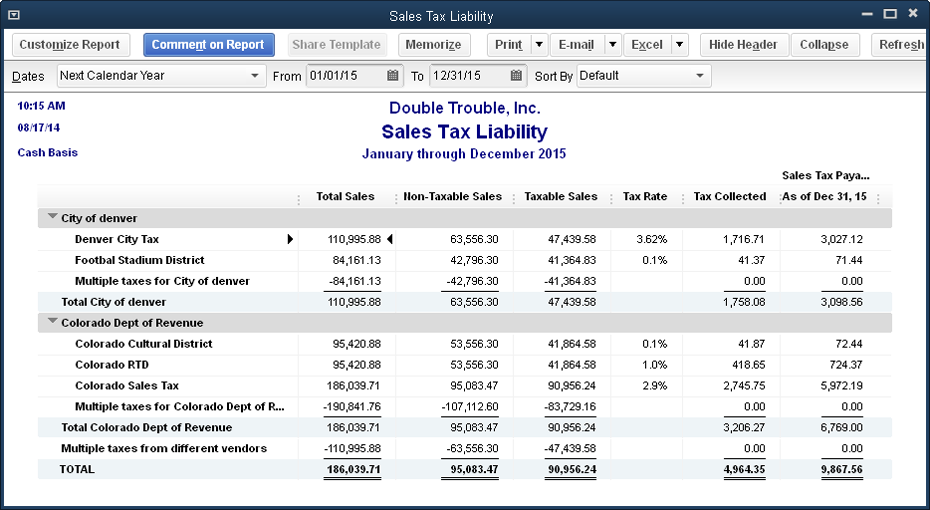
Figure 21-4. If you remit sales taxes to several tax agencies, each with its own payment interval, you can rerun this report with a different interval to calculate the sales tax you owe to other agencies. Simply head to the Dates drop-down list and choose another interval, such as Last Calendar Quarter, and then click Refresh.
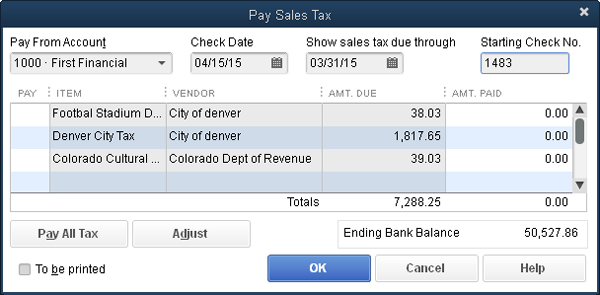
You don’t pay sales taxes using QuickBooks’ Enter Bills or Write Checks windows. Instead, you use the program’s aptly named Pay Sales Tax feature. Here’s how you keep the tax agencies off your back:
Choose Vendors→Sales Tax→Pay Sales Tax, or, in the Manage Sales Tax window (Vendors→Sales Tax→Manage Sales Tax), click Pay Sales Tax.
Either way, QuickBooks opens the Pay Sales Tax dialog box and fills in the amounts you owe for the last collection period (as defined in your Sales Tax preferences [Turning on QuickBooks Sales Tax]), as shown in Figure 21-5.
Note
In some states, you may need to adjust the payments you make to a tax agency; for example, to apply a discount for timely payment, to round sales tax to the nearest dollar, or to include interest and penalties with your payment. In cases like that, click the Adjust button to open the Sales Tax Adjustment dialog box. You can increase or decrease the tax by a dollar value, and you have to specify the account to which you want to post the adjustment (the Sales Tax Payable account, say). If the Entry No. box seems vaguely familiar, that’s because this dialog box actually creates a journal entry (Creating Journal Entries) for the adjustment.
If you use more than one checking account, in the Pay From Account drop-down list, choose the account you want to use.
QuickBooks automatically selects an account here if you set the “Open the Pay Sales Tax form with _ account” preference (Choosing the Bank Accounts You Use).
Figure 21-5. If you remit sales taxes to only one tax agency or all your sales tax payments are on the same schedule, you can click Pay All Tax to select every payment in the table. But if you make payments to different agencies on different schedules, select all the agencies on the same schedule, and then repeat these steps for agencies that are on a different timetable.
In the Pay column, click cells to select the payments you want to make.
QuickBooks adds a checkmark to indicate that a payment is selected and puts the amount of the remittance in the Amt. Paid cell.
If you want to print the sales tax remittance checks from QuickBooks, make sure the “To be printed” checkbox is turned on, and then click OK.
With this checkbox turned on, you’ll see the remittance checks the next time you choose File→Print Forms→Checks.
If you write checks by hand, turn off the “To be printed” checkbox, click OK, and then whip out your checkbook and write those remittance checks.