
Your QuickBooks records are indispensable. They help you invoice customers and pay bills, and also provide the information you need to prepare your tax returns and plan for the future. A company file does so much, yet many companies don’t take the time to keep their financial data safe and secure.
Losing data to a hard disk crash is a shock to your financial system as well as your computer’s. But having someone embezzle money from your accounts could send years of hard work down the drain. Protecting your QuickBooks data takes so little time that there’s no excuse for not doing it. (In addition to QuickBooks security, don’t forget common-sense security like locking the door to your office.)
If you’re the untrusting type or simply have no one else to do your bookkeeping, you can skip this chapter’s discussion of creating users and setting up user permissions. The administrator login is all you need to work on your company file—and QuickBooks creates that automatically. But even if you don’t intentionally let other people access your financial data, that doesn’t mean that someone won’t try to access it without your permission. Good computer security measures like firewalls, up-to-date antivirus software, and passwords that strangers can’t guess go a long way toward preventing unauthorized fiddling with your finances.
When you have several people working on your company file, security is a bit trickier. Each person who accesses your financial data is a potential problem, whether intentional or inadvertent. By setting up users in QuickBooks and specifying which areas of the program they can access, you can delegate work to others without worrying about security quite so much. With the audit trail that QuickBooks keeps (Checking for Problems), every transaction that’s modified or deleted is there for you to review.
In QuickBooks, the administrator is all powerful. Only someone who logs in with administrator privileges can create new users, assign permissions and passwords to other users, and set company preferences. This section explains how to assign the administrator’s user name and password, and turn on the feature for protecting your customers’ credit card information (if you accept credit card payments).
Note
Although QuickBooks doesn’t ask you to set the administrator password, you should do that right away. If you don’t, anyone who opens your company file is automatically logged in as the administrator, with full access to every feature of QuickBooks and every byte of your QuickBooks data.
When you create a company file, QuickBooks automatically creates the administrator user called Admin, but it doesn’t require you to assign a password to that user. But because passwords are so important in helping keep your data secure, you can—and should—edit the administrator user to assign one (and change the administrator’s user name, if you want).
Tip
If you’re the only person who acts as the QuickBooks administrator and you want to transfer those duties to someone else, create a new user and give that user access to all areas of QuickBooks (Restricting Access to Features and Data). That way, the audit trail (Checking for Problems) can differentiate changes made by you from those made by the new administrator. In fact, it’s a good idea to create a separate user with your name and use that login for most of the work you do, and reserve logging in as an administrator for tasks that only administrators can do.
You can use the following process to change the values for the administrator user anytime:
Open the company file using your preferred method and, if necessary, log in as the administrator.
If you don’t use QuickBooks Setup to create your company file, you can create, open, and close the company file without any sign of a login screen. But behind the scenes, QuickBooks automatically logs you in as the administrator without requiring a password.
If the administrator is the only user and has a password assigned, the QuickBooks Login dialog box shows only the Password box. If this dialog box displays the User Name box, type the administrator’s user name. If that user account has a password assigned, type that in the Password box. Otherwise, leave the Password box blank.
Choose Company→Set Up Users and Passwords→Set Up Users.
If the QuickBooks Login dialog box appears, type the administrator password.
In the User List window, click Edit User.
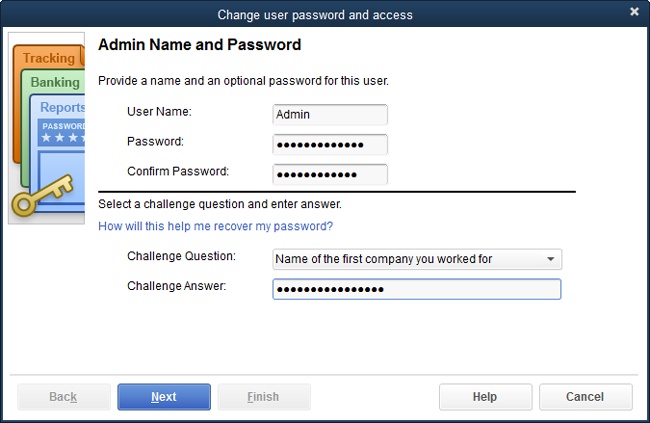
In the User List window, QuickBooks automatically selects whomever you’re logged in as (which, in this case, is the administrator user). When you click Edit User, the “Change user password and access” dialog box (Figure 28-1) opens.
To change the administrator’s name, type a new name in the User Name box.
You don’t have to change the administrator’s name, and it may be less confusing if you leave it as Admin. However, if you do change it, the User List identifies the administrator by adding “(Admin)” after the user name, so that it reads something like “QuickBooks Overlord (Admin).”
In the Password box, type the password for the administrator user. In the Confirm Password box, type the password again.
See the box on Password Guidelines for tips on creating good passwords. Don’t copy and paste the password from the Password box into the Confirm Password box. If you copy a typo from one box to the other, you won’t know what the administrator password is, and you won’t be able to open your company file without jumping through several hoops.
In the Challenge Question drop-down list, choose a question like “Favorite restaurant in college.” In the Challenge Answer box, type the answer to the question.
The next section explains how to reset the administrator password with the help of this challenge question. (The box on What’s the Administrator Password? tells you how to reset your administrator password if you don’t know the password and don’t know the answer to the challenge question.)
Click Next.
The dialog box reminds you that the administrator has access to everything in QuickBooks. Click Finish to close the dialog box.
Warning
If you work on more than one QuickBooks company file, the program throws one user-related curve at you: It fills in the QuickBooks Login dialog box with the last user name you typed—whether or not it goes with the file you just opened. For example, say you open one company file using the user name Admin. When you open another file, the QuickBooks Login dialog box fills in the User Name field with “Admin,” even if the administrator name for the second file is I_Can_Do_Everything. So if QuickBooks won’t let you log in, make sure you’re using the correct user name and password for that company file.
If you can’t remember your password and you selected a challenge question for the administrator user, you can answer that question to reset your password. Here’s how to use this life-saving feature:
In the QuickBooks Login dialog box, click the “I forgot my password” link.
The Reset QuickBooks Administrator Password dialog box opens.
In the Reset QuickBooks Administrator Password dialog box, type the answer to the challenge question that appears, and then click OK.
A Password Removed message box tells you that your password, challenge question, and answer have been removed, which means your company file is no longer password-protected.
Click Close.
QuickBooks nudges you to add a password by immediately opening the Change QuickBooks Password dialog box.
Fill in the boxes as you would to edit the user (Assigning the Administrator User Name and Password), and then click OK.
A QuickBooks Information box tells you that your password has been changed.
Click OK.
From now on, when you correctly fill in the boxes in the QuickBooks Login dialog box, the program opens your company file.
If your company accepts credit cards, you probably already know that you have to comply with standards for protecting your customers’ credit card information (known as the Payment Card Industry Data Security Standard). If you don’t do so, not only is your customers’ financial information at risk, but you also risk paying fines for your oversight.
Part of the standard requires that all users change their passwords every 90 days and use complex passwords (ones that are longer than seven characters and have a combination of numbers and upper- and lowercase letters). Fortunately, the steps you have to take in QuickBooks to comply with these requirements are simple, although you have to be a QuickBooks administrator to perform them:
Choose Company→Customer Credit Card Protection.
The Customer Credit Card Protection dialog box opens and explains a little bit about the feature.
Click Enable Protection.
The Sensitive Data Protection Setup dialog box opens. The fields are the same ones in the “Change user password and access” dialog box (Assigning the Administrator User Name and Password). The only difference is that the New Password and Confirm New Password boxes won’t accept passwords that don’t meet the secure-password criteria.
In the Current Password box, type the current administrator password (which may not meet the criteria). Then fill in the New Password and Confirm New Password boxes with a complex password.
QuickBooks won’t accept the password unless it’s longer than seven characters and has at least one number and one uppercase letter, like “Kath3rine,” for example.
In the Challenge Question drop-down list, choose a question that you can answer in case you need to reset the password, like “Best friend’s last or first name.” Then type the answer in the Answer box.
Answers to QuickBooks’ challenge questions aren’t case-sensitive.
Click OK.
After 90 days pass, QuickBooks asks you to set a new password.
Setting up users in QuickBooks has the same advantages as setting up users in the Windows operating system or on your network: You can restrict people’s access to just the data they need to see and keep track of what they’re doing. Setting up user logins for the people who work on your company file helps you do several things:
Keep sensitive data confidential. User names, passwords, and permissions (What the Access Areas Represent) help protect both your and your customers’ sensitive data from prying eyes.
Prevent financial hanky-panky. By limiting each employee’s access to job-relevant data and checking the audit trail for changes or deletions (Checking for Problems), you can prevent embezzlement—or catch the culprit early. These measures also help protect your data from unintentional errors by new or careless employees.
Let several people work in QuickBooks at the same time. QuickBooks has no way of knowing whether several people share the same user name. If you want to protect your data and identify who’s doing what in your financial records, each person who accesses your company file needs a unique user name and password. If more than one person works on your company file simultaneously, you have to switch it to multi-user mode, as the box below explains.
Only the QuickBooks administrator can create additional users. After you log in as the administrator, here’s how you create other users:
Choose Company→Set Up Users and Passwords→Set Up Users.
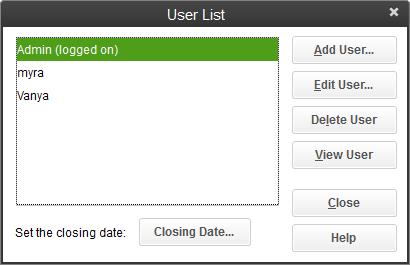
If you’ve set up an administrator password, the QuickBooks Login dialog box opens, asking you for your password. This extra request for the administrator password prevents someone from walking up to your computer while you’re away and creating an account for herself. After you enter your password, the program opens the User List dialog box shown in Figure 28-2.
Click Add User.
QuickBooks opens the “Set up user password and access” dialog box.
In the User Name box, type a user name for the person to use to access the company file. And in the Password box, type a password for the person.
In the Confirm Password box, retype the password.
To allocate one of your licenses for QuickBooks to the user you’re creating, turn on the “Add this user to my QuickBooks license” checkbox.
With this setting turned on, this user can open your company file at the same time as other users (as long as you have licenses for all of them). If people work on the company file one at a time, leave this checkbox turned off.
Click Next to begin setting permissions.
In the list that appears, QuickBooks automatically selects the “Selected areas of QuickBooks” option, which lets you control exactly what the user can do in various parts of the program. See What the Access Areas Represent for details.
Selecting the “All areas of QuickBooks” option instead gives this user access to all your financial data, as shown in Figure 28-3. That’s why QuickBooks asks you to confirm that you want the person to have such broad access.
Note
The external accountant user has access to all parts of your company file except sensitive customer information—perfect if you want to set up a QuickBooks user for your accountant or bookkeeper. To learn how to set up an external accountant user, see Canceling an Accountant’s Review Copy.
Users can change their own passwords, which makes your company data even more secure, since that way only users know their own passwords. That means users can’t log in as someone else and perform transactions they shouldn’t (like writing checks to themselves). To change their passwords, users simply choose Company→Set Up Users and Passwords→Change Your Password. They have to type their current password and then type the new one.
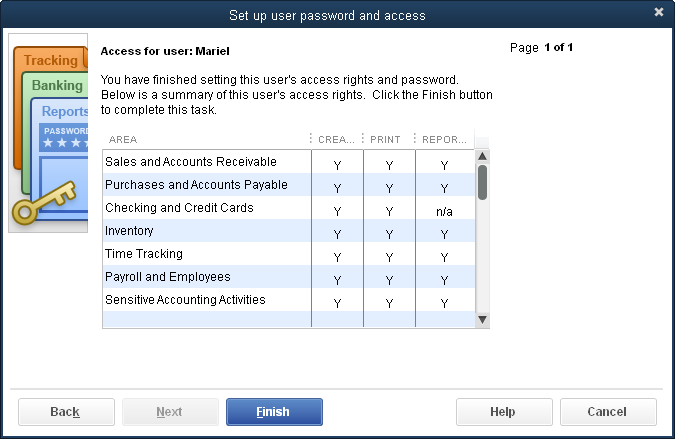
Figure 28-3. If you click Yes when QuickBooks asks you to confirm this user’s full access, the “Set up user password and access” dialog box summarizes the person’s access. All you have to do is click Finish, and her user name appears in the User List dialog box, ready to log into QuickBooks.
The administrator can also change anyone’s password. If you’re logged in as the administrator, choose Company→Set Up Users and Passwords→Set Up Users. In the User List dialog box, select the user whose password you want to change, and then click Edit User. In the “Change user password and access” dialog box, fill in the Password and Confirm Password boxes with the new password, and then click Next. On the “Access for user:” screen, click Next. When the next screen appears, the Finish button becomes active. Click it to save the user with the new password.
Note
If someone leaves your company, be sure to delete his QuickBooks user account so no one else can use it. Choose Company→Set Up Users and Passwords→Set Up Users. In the User List dialog box, select the user you want to delete, and then click Delete User. In the confirmation message box, click Yes, and that user account is history.
When several people work on your company file, it’s safer to limit what each person can do. For example, Trusty Ted has earned his nickname, so you could give him access to every QuickBooks feature, including sensitive financial reports and accounting activities. And Myra Meddler can’t keep a secret, but there’s no one faster at data entry, so you want to make sure that she gets no further than doing the checking, credit cards, and bill paying. The box on Commonsense Security Measures offers additional tips for keeping your data safe.
If a person chooses a feature and doesn’t have permission for that feature, QuickBooks displays a message that identifies the permission needed to perform that action. In case the lack of permission was a mistake or an oversight, the message also suggests asking the QuickBooks administrator to grant that permission.
When you tell QuickBooks that a user should have access only to selected areas of the program (step 5 on Resetting a User Password), you have to tell QuickBooks which areas the person can use. For each area, you can give the user either full access or selective access, as explained in the next section. As you click Next, the “Set up user password and access” dialog box steps through one area at a time, as shown in Figure 28-4. There’s some overlap, because each area actually covers a lot of ground:
Sales and Accounts Receivable. This area includes creating sales transactions with any kind of sales form (invoices, sales receipts, statements, and so on) and with any additional features (receiving payments, reimbursable expenses, finance charges, and so on). With sales and Accounts Receivable permissions, you can open the Customer Center and modify sales-related lists (such as the Customer:Job, Customer Type, and Ship Via lists), and customize sales forms. Full access includes printing and creating sales-related reports.
Figure 28-4. In the upper-right corner of the “Set up user password and access” dialog box, QuickBooks shows which page you’re on (1 of 10, 2 of 10, and so on). Each area of QuickBooks appears on its own page. When you’re done, the 10th page shows a summary of the features that this user can access.
The “View complete customer credit card numbers” checkbox (visible in Figure 28-4) helps protect your customers’ financial data. QuickBooks automatically turns this setting off to restrict who can see a customer’s full credit card information. If you don’t accept plastic, leave this setting as it is. Otherwise, turn the checkbox on for only the people you trust to work with customer credit card numbers.
Purchases and Accounts Payable. These permissions include all aspects of dealing with bills and vendors: entering and paying bills, working with purchase orders, entering reimbursable expenses and credit card charges, and paying sales tax. You can grant people permission to open the Vendor Center and modify purchase lists—such as the Vendor and Vendor Type Lists—and to customize purchase forms. Full access includes printing 1099s and reports about vendors or purchases.
Checking and Credit Cards. Permissions in this area let people write expense checks and refund checks (but not payroll checks), enter credit card charges, and make deposits.
Inventory. If you’ve turned on QuickBooks’ inventory features, this screen appears so you can give people permissions to maintain the inventory items on the Item List, receive products into inventory, adjust inventory quantities, work with purchase orders, and generate inventory reports.
Time Tracking. These permissions include the ability to enter time transactions in the weekly and single-activity timesheets, import and export Timer data, and generate time reports.
Payroll and Employees. Payroll permissions include opening the Employee Center and the Payroll Center, writing and printing paychecks, setting up and paying payroll liabilities, using your selected payroll service, maintaining the Employee and Payroll Items lists, and generating payroll forms and reports.
Sensitive Accounting Activities. The features covered by these permissions don’t belong to any one area of QuickBooks. Reserve these permissions for people who are not only trustworthy, but who also understand how your accounting system works. With these permissions, someone can maintain your chart of accounts, make journal entries, transfer funds, reconcile accounts, access accounts through online banking, work in balance sheet account registers, and create budgets. Other permissions include condensing data (which removes details of past transactions), using the Accountant’s Review feature, and generating the payroll reports.
Sensitive Financial Reporting. These permissions let someone print every report in QuickBooks, regardless of any reporting restrictions from the other access settings you choose.
Changing or Deleting Transactions. As an extra precaution, you can give people permission to create transactions in an area, but not let them change or delete the transactions they’ve created. For example, for trainees just learning the ropes, you might remove their permission to edit transactions so they need to ask someone more experienced to make changes. An additional option lets people change transactions prior to the closing date for your books (Closing the Books for the Year). Ideally, give this permission only to those who really know what they’re doing—like your accountant.
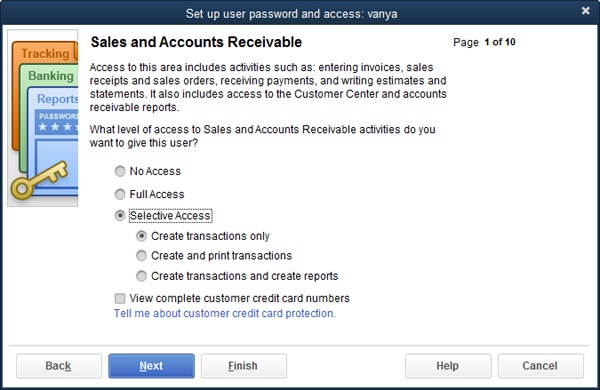
When you’re setting up a new user in the “Set up user password and access” dialog box (Adding New Users), choosing the “Selected areas of QuickBooks” option takes you on a journey of specifying access to areas of the program (listed above). As you click Next to set permissions for each area of the program, you can give someone no access at all, full access, or the right to perform some tasks in that area, as shown in Figure 28-4. Here’s a guide to what each level of access lets people do:
No Access. The person can’t open any windows or dialog boxes for that area of QuickBooks, meaning he can’t perform any actions in that area. QuickBooks automatically chooses this option; to give someone any access to an area, you have to choose either Full Access or Selective Access instead.
Full Access. The person can perform every task in that area of QuickBooks except ones reserved for the administrator user.
Selective Access. Selective Access separates tasks into creating transactions, creating and printing transactions, or creating transactions and generating associated reports.
The final screen of the “Set up user password and access” dialog box—shown in Figure 28-3—summarizes the access rights you chose for that person. The summary screen separates access into the same categories as the Selective Access level: Create, Print, and Reports. In most cases, giving someone full access means that “Y” appears in all three columns; giving her no access usually displays “N” in all three columns. When a permission isn’t applicable to an area, QuickBooks displays “n/a”; for example, there aren’t any reports associated with the right to change or delete transactions.