
QuickBooks can zip you through the two basic ways of producing and distributing invoices and other forms: on paper and electronically. Within those two camps, you can choose to produce and send forms as soon as you complete them or place them in a queue to process in batches. For sporadic forms, it’s easier to print or email them as you go. But when you generate dozens or even hundreds of sales orders, invoices, statements, or checks, printing and emailing batches is a much better use of your time.
If you have workhorse transactions that you enter again and again, QuickBooks can memorize them and then fill in most, if not all, of the fields in future transactions for you. For transactions that happen on a regular schedule—like monthly customer invoices or vendor bills—the program can remind you when it’s time to record them, or even add the transactions without any help from you. You can also memorize transactions that you use occasionally, such as estimates, and call on them only when you need them.
Once you’ve created lots of transactions, you’ll need a way to locate them. QuickBooks’ search features can help you track down financial info, which you can appreciate if you’ve ever hunted frantically for a transaction. Whether you want to correct a billing problem on a customer’s invoice, check whether you paid a vendor’s bill, or look for the item you want to add to an estimate, QuickBooks gives you several ways to search. You can look for different types of transactions within various date ranges in the Customer, Vendor, and Employee centers—and the Inventory Center, if you use QuickBooks Premier or Enterprise. The Item List window sports a few search boxes for finding the items you want. Form windows, such as Create Invoices, have a Find button on their Main tabs so you can quickly find transactions of the corresponding type. You can use the program’s Search feature to search throughout your company file or QuickBooks. And the full-blown Find feature is perfect for surgical searches.
This chapter explains all your options.
Note
QuickBooks’ Attachments feature lets you attach files to records, such as customers and vendors, and to transactions, such as invoices. See the box on Keeping Related Info Near at Hand for more info.
Before you can start printing, you have some setup to do. But once QuickBooks’ print settings are in place and there’s paper in your printer, you can print forms with just a click or two.
If you want to apply special settings to certain types of forms, then for each one, QuickBooks needs to know the printer you want to use, the paper you print to (like preprinted forms or letterhead), and a few other details. (The program remembers these settings, so you have to go through this process only once for each type of form.) From then on, QuickBooks fills in the Print dialog box’s settings automatically when you choose a type of form to print, although you can change the settings before you print.
With these prep tasks behind you, you’re ready to print. You can either print a form right away or add it to a queue to print in batches. This section explains how to accomplish all these printing tasks.
Tip
To make sure you don’t forget to process forms, you can create reminders (Reminders) for invoices, credit memos, sales receipts, and—if you use QuickBooks Premier or Enterprise—sales orders that are queued up to print.
For the forms you print using basic settings—such as printing to your workhorse printer on blank paper using portrait orientation—you don’t have to bother specifying print options. But if you print invoices on multipart forms, paychecks on preprinted check forms, statements on letterhead, and reports on plain paper, you can assign a different printer and settings to the forms with special printing needs. Keep each printer stocked with the right type of paper, and you can print your documents with barely a glance at the print options. If you set up print settings in QuickBooks before you print, the program will fill in those settings for you automatically when you choose a type of form. (However, print dialog boxes still appear, so you can change any print options before committing your documents to paper.)
Tip
Many of the options in the “Printer setup” dialog box are the same as options you can set within your operating system, as Figure 12-1 shows. However, QuickBooks keeps the options you choose in its “Printer setup” dialog box separate from your operating system settings. So, for example, if you use Windows’ printer options to set your most popular printer to use portrait orientation, you can set that same printer to use landscape orientation in QuickBooks.
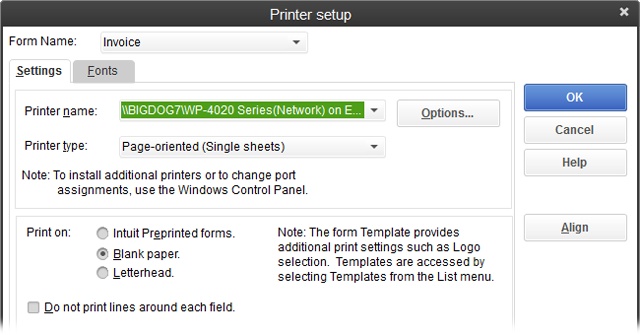
Figure 12-1. The printers that you’ve set up in your operating system are the ones that appear in the “Printer name” list here. QuickBooks starts out by displaying the printing preferences you set up in your operating system, but you can adjust them by choosing a printer and then clicking Options.
To assign and set up printers for forms in QuickBooks, choose File→Printer Setup. Then adjust the following settings:
Form Name. As you learned earlier, in QuickBooks, each form has its own print settings, so you’re free to print invoices on letterhead, timesheets in landscape orientation, and checks to a printer filled with preprinted checks. Use this drop-down list to choose the form you want to set up for printing.
Printer name. Choose a printer here to designate it as the standard for the form you selected above. Whenever you print that type of form, QuickBooks will automatically select this printer, but you can always choose a different printer—for instance, when you switch between printing paper documents and creating Adobe PDF files that you can email.
Options. If you want to adjust the properties for the printer you chose, click this button. In the dialog box that appears, depending on the type of printer, you can change things like the document’s orientation, page order, pages per sheet, print quality, paper tray, color, and so on.
Note
The rest of the settings in this list appear for most of the forms in the Form Name drop-down list, but not all of them. For example, you don’t see the “Printer type” setting for reports (to learn about print settings for reports, see Printing and Saving Reports).
Printer type. When you choose a printer name, QuickBooks fills in this box with its best guess of the type (it usually guesses right). If it guesses wrong, simply choose the correct type in this drop-down list. If the printer feeds individual pages through, such as letterhead or blank paper, choose “Page-oriented (Single sheets).” If it feeds continuous sheets of paper with perforations on the edges, such as the green-striped paper so popular in the past, choose “Continuous (Perforated Edge).”
Print on. QuickBooks gives you three options here:
— Intuit Preprinted forms. If you purchase preprinted forms, which typically include your company’s information, field labels, and lines that separate fields, choose this option. When you print your documents, QuickBooks includes only the forms’ data.
— Blank paper. This option tells QuickBooks to print everything in your document: company info, logo, labels, and data. This is the easiest way to print because you don’t have to worry about aligning the paper and the form. If you set up a template with your company logo and attractive fonts (Adding a Logo), you can produce a professional-looking form on blank paper.
— Letterhead. When you print to letterhead that already includes your company’s address and other information, you don’t need to print that info on your documents. Choose this option to tell QuickBooks to skip printing your company information.
Tip
The Letterhead option tells QuickBooks to start printing the form 2 inches from the top of the paper. If your letterhead has your logo and company information somewhere other than the top of the page, don’t use this option. Instead, create a custom template for your form (Customizing Forms) to leave room for the logo. Then, when you print, select the “Blank paper” option.
Do not print lines around each field. Turning on this checkbox is a matter of personal preference. Lines around each field make it clear which information belongs to which label, but you might consider those lines unnecessary. If your template separates fields to your satisfaction, turn off this checkbox to print only the labels and data, not borders around each field. (Because preprinted forms include borders, QuickBooks automatically turns on this checkbox if you choose the “Intuit Preprinted forms” option.)
If you’ve ever gotten lost in an office-supply store, you understand why printing includes so many options. You can print on different types of paper using different types of printers, and making the two line up properly can be a delicate process. And besides invoices and other forms, you might also print ancillary documents like mailing labels and packing slips.
To save some trees and your sanity, make sure the paper in your printer is aligned properly before you print, especially if you use fancy letterhead or preprinted forms. (When you use preprinted forms or continuous-feed paper with perforations for page breaks, the alignment of the paper is crucial: If it’s not lined up properly, your data won’t appear next to the correct labels or an invoice might print over a page break.) It’s a good idea to print a sample to check the alignment of your forms and paper every time you print, but it’s particularly important if you’re printing a big batch of forms. If the sample’s alignment is off, here’s how to save time, paper, and your mental health:
Choose File→Printer Setup.
The “Printer setup” dialog box opens.
Note
You can also align forms just before you print a batch: Choose File→Print Forms, and then choose the type of form you want to align, such as Invoices. In the “Select [forms] to Print” dialog box, select the ones you want to print, and then click OK to open the “Print [forms]” dialog box, such as Print Invoices if you’re printing invoices. In that dialog box, click Align.
From the Form Name drop-down list, choose the type of form you want to align, and then click Align.
If you have more than one template to choose from, QuickBooks opens the Align Printer dialog box. Choose the template you want to use to align your paper, and then click OK.
If you have only one template, the program goes straight to a different dialog box; exactly which one depends on the type of paper that’s selected in the “Printer setup” dialog box’s “Printer type” list:
— If the Continuous (Perforated Edge) option is selected, you’ll perform both steps 3 and 4.
— If the Page-oriented (Single sheets) option is selected, the Fine Alignment dialog box appears and you can skip to step 4.
If the Printer type is Continuous (Perforated Edge), the “Use ‘Coarse’ for Big Vertical Adjustments” dialog box opens. Position the paper so the print head is just below a page break, click Coarse, and then click OK to print a sample form.
After you print a sample form, don’t adjust the paper in your printer (QuickBooks warns you several times not to). The form that prints includes text indicating a pointer line. When the Coarse Alignment dialog box appears on your screen, in the Pointer Line Position box, type the number of the line preprinted in the paper’s margin where the pointer line text printed. QuickBooks uses that number to align the form and the paper. Click OK to print another sample. When the alignment is correct, click Close. You can then perform a fine alignment, if necessary, by clicking Fine Align.
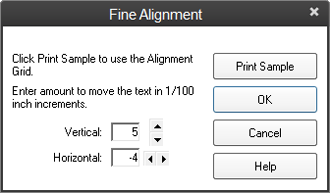
In the Fine Alignment dialog box’s Vertical and Horizontal boxes (Figure 12-2), type numbers to represent the hundredths of an inch to move the form to line it up with the paper.
After you tweak the alignment, click Print Sample to check the printed form’s appearance. When the form is aligned, click OK—and keep your mitts off the paper in the printer.
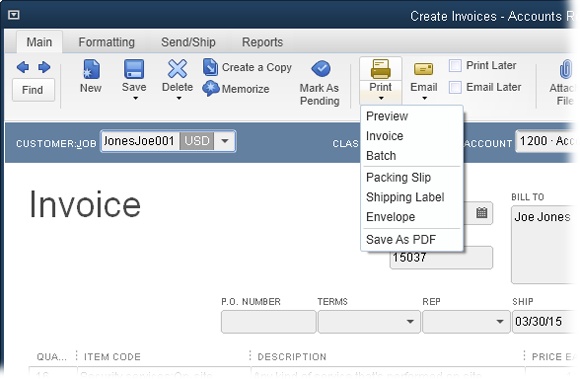
At the top of each QuickBooks form’s window are the same basic printing options; Figure 12-3 shows the Create Invoices window as an example. Here’s a guide to your choices for printing documents:
Preview a form before printing. On the form window’s Main tab, click Print, and then choose Preview from the drop-down menu.
Print one form. If you want to print the current form, on the form window’s Main tab, click Print, and then choose the type of form from the drop-down menu (in Figure 12-3, that’s Invoice).
Printing in batches. If you turn on the Print Later checkbox at the top of the form window, QuickBooks adds the current form to a queue that you can print as a batch. To print the batch of forms, at the top of the form window, click Print, and then choose Batch from the drop-down menu.
Print special forms. If you want to print a packing slip, shipping label, or envelope to go with the form you’re printing, at the top of the form window, click Print, and then choose Packing Slip, Shipping Label, or Envelope from the drop-down menu. If you choose Envelope, you have to specify the size and whether you want to include the return address (you don’t if your envelopes already have your return address on them). You can even print a delivery barcode for addresses in the United States.
When you display a form in its corresponding window, you can print it right away. To preview the form before you print it, on the window’s Main tab, click Print→Preview. The Print Preview window opens and shows you what the form will look like when you print it. Click Close to close the Print Preview window and return to the form’s window.
To print the current form, click Print, and then choose the form type (Invoice, in this example). QuickBooks displays the Print One Invoice dialog box, where you can choose the printer and paper. (You can also preview the form by clicking Preview in this dialog box.)
If the Print Later checkbox is turned on when you save a form, QuickBooks adds that form to a print queue. After you’ve checked that your printer contains the correct paper and that the paper is aligned properly, you can print all the forms in the queue in just a few steps:
Choose File→Print Forms, and then choose the type of form you want to print. (Or, on the Main tab of the form’s window—like Create Invoices, for example—click Print→Batch.)
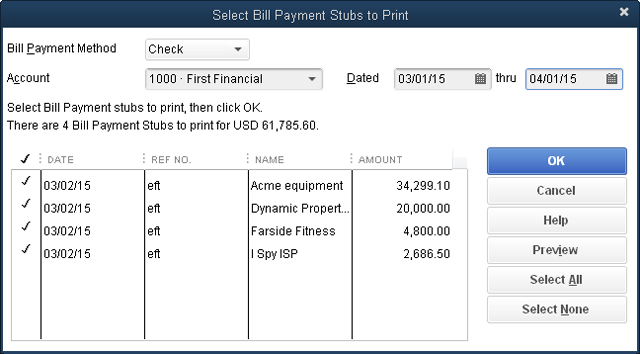
Either way, QuickBooks opens the “Select [forms] to Print” dialog box with all your unprinted forms selected, as shown in Figure 12-4. You can turn checkmarks on or off one at a time or by dragging down the checkmark column. You can also select or deselect all the forms by clicking Select All or Select None.
If you want to print labels for the selected forms, click Print Labels.
The next section dishes out the details on printing labels. After you print the labels, you’re back in the “Select [forms] to Print” dialog box, so you can print the forms that go with them.
Click OK to print the selected forms. In the “Print [forms]” dialog box that appears, click Print.
Because problems can occur during printing (paper jams, low toner, or smears), QuickBooks opens the “Print [forms] - Confirmation” dialog box after it prints the forms.
If the forms printed correctly, click OK to close the confirmation dialog box.
If a problem occurred, in the “Print [forms] - Confirmation” dialog box, click the Reprint cell for each form that didn’t print correctly. If the whole batch is a loss, click Select All. Either way, click OK to reprint the forms you selected.
QuickBooks can print mailing labels to go with some of the forms you print, such as invoices. The trick is that you have to print the labels before you print the forms because, after you print the forms, they disappear from the “Select [forms] to Print” dialog box. Here’s how you print labels for your forms:
Choose File→Print Forms, and then choose the type of form for which you want labels.
QuickBooks opens the “Select [forms] to Print” dialog box (Figure 12-4) with all your unprinted forms selected.
In the “Select [forms] to Print” dialog box, click Print Labels.
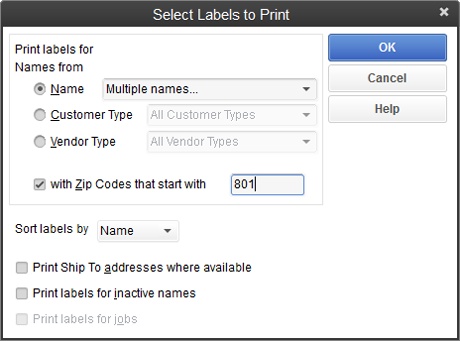
QuickBooks opens the “Select Labels to Print” dialog box and automatically chooses the Name option, which prints labels for the names associated with each form that’s waiting to print.
Tip
If you’ve created forms for a specific customer type or vendor type, in the “Select Labels to Print” dialog box, choose the Customer Type or Vendor Type option and then, in the option’s drop-down list, select the type you want to print labels for. These options are better suited for printing labels not associated with your queued forms—for example, when you want to send a letter to your retail customers informing them of product rebates. Or you might use them if you process forms for retail and wholesale customers at different times of the month.
Alternatively, if you want to print labels for a mailing without an associated form (like an open-house announcement) choose File→Print Forms→Labels.
To filter the printed labels by location, turn on the “with Zip Codes that start with” checkbox, and then type the beginning of the Zip code you want.
For example, if you’re offering a seminar for people in the Denver area, you’d type 801 in the box, as shown in Figure 12-5.
In the “Sort labels by” box, choose Name or Zip Code.
If you use bulk mail, choose Zip Code so you can bundle your mail by Zip code as your bulk-mail permit requires.
To print shipping labels rather than labels that use billing addresses, turn on the “Print Ship To addresses where available” checkbox.
The “Print labels for inactive names” checkbox can come in handy from time to time—for instance, if you need to send a letter to past and present customers to tell them about a product recall.
When you want to send communications to different addresses for each job, even if the jobs are for the same customer, turn on the “Print labels for jobs” checkbox.
Make sure you’ve selected the labels you want, and then click OK.
QuickBooks opens the Print Labels dialog box.
If you’ve already chosen the printer and settings for labels in Printer Setup, click Print and you’re done.
If you want to print to different labels, in the Label Format drop-down list, choose the type of label you’re using. (You can find the vendor and label number—like Avery #5262—on the box of labels.) The drop-down list includes popular Avery formats and several other options.
After you print your labels, QuickBooks closes the Print Labels dialog box, and the “Select [forms] to Print” dialog box reappears so you can click OK to proceed to printing your queued forms as explained on Printing Forms.
When you ship products to a customer, it’s common to include a packing slip that describes what should be in the shipment. In QuickBooks, you have to print each packing slip individually from the Create Invoices window. (The packing-slip template that Intuit provides is basically an invoice without prices.)
Here are the steps for printing the packing slip for an invoice:
If the Create Invoices window is already open, click the left arrow (Previous) in the window’s Main tab until you find the invoice you’re interested in, or click the Find button, fill in fields that identify the invoice, and then click Find.
To find an invoice when the Create Invoices window isn’t open, on the Home Page, click Customers to open the Customer Center. Next, click the Transactions tab on the window’s left, and then choose Invoices in the tab’s list of transaction types. Finally, in the table on the right, double-click the invoice you want, and QuickBooks opens it in the Create Invoices window.
In the Create Invoices window, click Print→Packing Slip.
QuickBooks sets the window’s Template box to the packing slip template and opens the Print Packing Slip dialog box, where you can set print options, if necessary.
Once the settings look good, click Print.
QuickBooks closes the Print Packing Slip dialog box and prints the packing slip.
Back in the Create Invoices window, click Save & Close.
QuickBooks automatically changes the Template box from the packing slip template back to the invoice template.
Tip
If you want QuickBooks to always use a particular packing slip template, change the packing slip template preference as described on Sales & Customers.
If you’ve grown tired of paper cuts, then sending invoices and other forms electronically is much more satisfying. But to make your electronic sending as efficient as possible, be sure that all your customer records include email addresses. Otherwise, you’ll waste time typing email addresses one after another, and the chance of a typo increases with each address you type.
If you use a popular email program, such as Outlook, QuickBooks automatically uses that program to send forms. When you email a form as described in this section, QuickBooks opens new messages in your email program, which you can edit as you would any email. When you send the emails, they show up in your Sent Items folder or Sent box. You can also tell QuickBooks to use a web-based email service like Gmail. This section explains all your emailing options.
QuickBooks gives you a couple of ways to email forms: Similar to printing, you can email the current form or add it to a queue to send in batches:
Send one form. To email the current form, at the top of the form window, click the Email button, and then choose the form’s name, such as Invoice, as shown in Figure 12-6. If the form has files attached in QuickBooks and you want to attach those files to the email, choose “[form] and Attached Files” instead, such as “Invoice and Attached Files.”
Figure 12-6. When you click the Email button, you can choose the form’s name (Invoice, in this example) to email the form that’s open in the window, or choose Batch to email all the forms in your to-be-emailed queue. Choose “[form] and Attached Files” to email the form and any files attached to it in QuickBooks.
Sending in batches. When you turn on the Email Later checkbox at the top of a form window, QuickBooks adds the current form to the queue of forms that you’ll email all at once. You can send them by clicking the window’s Email button and then choosing Batch.
![When you click the Email button, you can choose the form’s name (Invoice, in this example) to email the form that’s open in the window, or choose Batch to email all the forms in your to-be-emailed queue. Choose “[form] and Attached Files” to email the form and any files attached to it in QuickBooks.](http://imgdetail.ebookreading.net/business/82/9781491948682/9781491948682__quickbooks-2015-the__9781491948682__httpatomoreillycomsourceoreillyimages2152122.png.jpg)
Here’s how to email a form when you’re looking at it in its window (these steps use the Create Invoices window as an example, but they work equally well for other sales forms):
In the Create Invoices window (or other form window), click the Email button and then choose Invoice (or the corresponding form name).
What happens when you choose Email→Invoice depends on the email program you use. If you use one of several popular email programs, the program opens and creates a new message with the fields from QuickBooks filled in and a PDF file of the form attached to it.
If you use web-based email (see Send Forms to learn how to set it up), the “Send [form]” dialog box opens with the email fields filled in.
Note
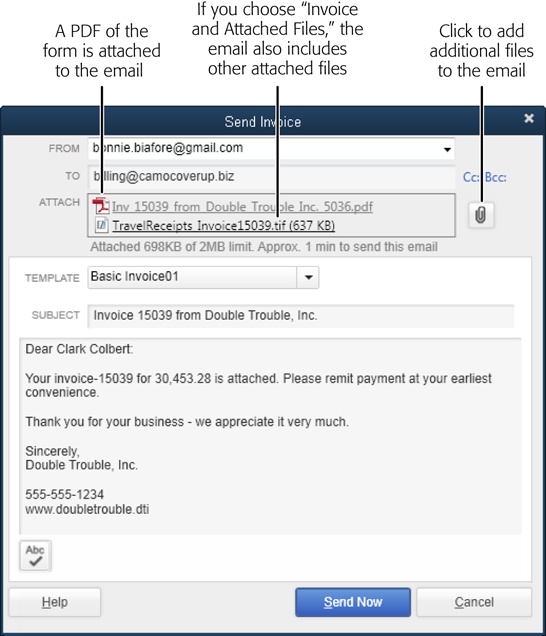
Say you attached files to a form in QuickBooks, as explained in the box on Keeping Related Info Near at Hand (like photos to show that the work you’re invoicing for is complete, or travel receipts for the reimbursable expenses on an invoice), and you want to attach those files to the email. To email a form and its attached files, on the form window’s Main tab, click Email→“[form name] and Attached Files” (“Invoice and Attached Files,” for example). The email message that QuickBooks creates includes a PDF file of the form and any files attached to the transaction in QuickBooks. If you want to attach additional files from your computer to the email, click the paper-clip icon to the right of the Attach box (labeled in Figure 12-7).
Modify the message in any way you want.
You can change the email addresses, subject, and email text that QuickBooks automatically adds.
If you use web-based email, click the “Send [form]” dialog box’s Send Now button. If you use a desktop email program, click its Send button.
When you turn on the Email Later checkbox on the Main tabs of the windows for forms you create, QuickBooks adds them to an email queue. You can then send all the forms you’ve queued up in just a couple of steps:
Choose File→Send Forms or, on the Main tab of the window where you create the forms—such as the Create Invoices window—click Email→Batch.
QuickBooks opens the Send Forms dialog box, which lists and selects all your unsent forms.
Figure 12-7. You send a QuickBooks-generated message just as you would an email you created in your email program. In Outlook, for example, simply click Send. When you email an invoice, QuickBooks attaches it to the email message as an Adobe PDF file. If you choose Email→“Invoice and Attached Files,” the invoice and any files attached to it in QuickBooks show up as attachments in the email message.
If you want to skip some of the forms, click their checkmarks to turn them off.
When you select a form in the table on the dialog box’s left, a preview of the message appears to the right of the table. If you want to change the message, simply edit it.
Note
To the left of the Send Now button, the Send Forms window displays QuickBooks’ estimate of how long it will take to email the forms you’ve selected. You won’t be able to do any other work in the program until the emails have been sent. So if you’re on a tight deadline and don’t have time to wait, click Close and then come back later to send the emails.
You’re email program sends the emails you selected.
If you enter the same transactions over and over, having QuickBooks memorize them for reuse saves time. The program can then fill in most, if not all, of the fields for you. Once it memorizes a transaction, all you have to do is choose the memorized transaction you want to reuse and make sure that the values in the new transaction are correct before you save it. This section shows you how to memorize transactions and put them to work.
Here are some examples of how you can use memorized transactions to be more productive:
Memorizing bills. You can take some of the sting out of paying bills by memorizing the ones that use the same info each time: bills with the same items or amounts, or bills that are due the same day each month, for example. If a utility bill is always due the same day, you can memorize the bill so QuickBooks fills in the vendor and account and records it on a regular schedule. When you use a memorized transaction like this, all you do is fill in the amount and save the new transaction.
On the other hand, your office rent bill probably has all the same info each month—date, vendor, account, and amount—so you can memorize the bill and even set it up to record itself automatically. Memorized bills also come in handy if you reorder the same products with the same prices from a vendor. (See Creating Memorized Groups of Transactions to learn how to save even more time.)
Note
Although you can memorize bills, you can’t memorize a bill payment. The same goes for deposits and invoice payments, because you have to choose the bills or invoices that the payments apply to. However, if you create reminders (Reminders) for transactions such as this, then QuickBooks reminds you when the bills or invoices are due to be paid.
Memorizing charges and electronic funds transfers (EFTs). If you’ve set up automatic vendor payments, like a monthly health insurance premium charged to your credit card or your telephone bill withdrawn automatically from your checking account, you can memorize those transactions in QuickBooks.
Memorizing estimates. If you’ve worked on jobs in the past and have a good idea of what they require, you can reuse that hard-won knowledge by memorizing an estimate with the labor hours you spend and the quantities of products and materials you need. The box on Building Boilerplate Estimates explains how to memorize an estimate to use on similar jobs in the future.
Tip
If you reuse transactions only occasionally, you might not want to fill up the Memorized Transaction List with those transactions. Instead, simply duplicate a transaction whenever you need it. For example, display the bill you want to copy in the Enter Bills window, right-click in the window, and choose Duplicate Bill from the shortcut menu. (Alternatively, click “Create a Copy” at the top of the window.) Then simply make any changes you want, like the date and amount, and then click Save & Close.
QuickBooks can also remind you to enter a transaction—such as a recurring client invoice for retainers—or even add the transaction without any help from you. For example, if your company’s Internet service costs $259 each month and you pay it with an automatic credit card payment, you can tell QuickBooks to memorize that charge and automatically enter it each month.
The Memorized Transactions List is an anomaly on the Lists menu because you don’t create memorized transactions the way you do entries on other lists. Instead, you tell QuickBooks to memorize existing transactions. Here’s how:
Open the window for the type of transaction you want to memorize (for example, the Create Invoices window for an invoice, Enter Bills for a bill, or Write Checks for a check).
You can memorize many kinds of transactions, including checks, credit card charges, bills, invoices, journal entries, estimates, and so on.
Fill in any fields that remain the same each time you use that transaction. If a value changes, leave its field blank or set to zero.
For example, for a bill, add the items you’re buying and their prices. If the quantities change from bill to bill, leave the Quantity fields blank or set to zero. Or, for a check, enter the payee and the account to post the expense to. If the amount is the same each time, fill in the amount; if the amount changes, leave the amount field blank. (If an amount field has a value in it, click the field, and then press Backspace to delete the value.) Later, when you use the memorized transaction, QuickBooks fills in all the fields except the ones you left blank, which you fill in with the correct values.
If you want QuickBooks to add the new transactions to your print or email queue, turn on the Print Later or Email Later checkbox.
That way, when you save a new transaction that’s based on the memorized transaction, the program adds the transaction to the print or email queue.
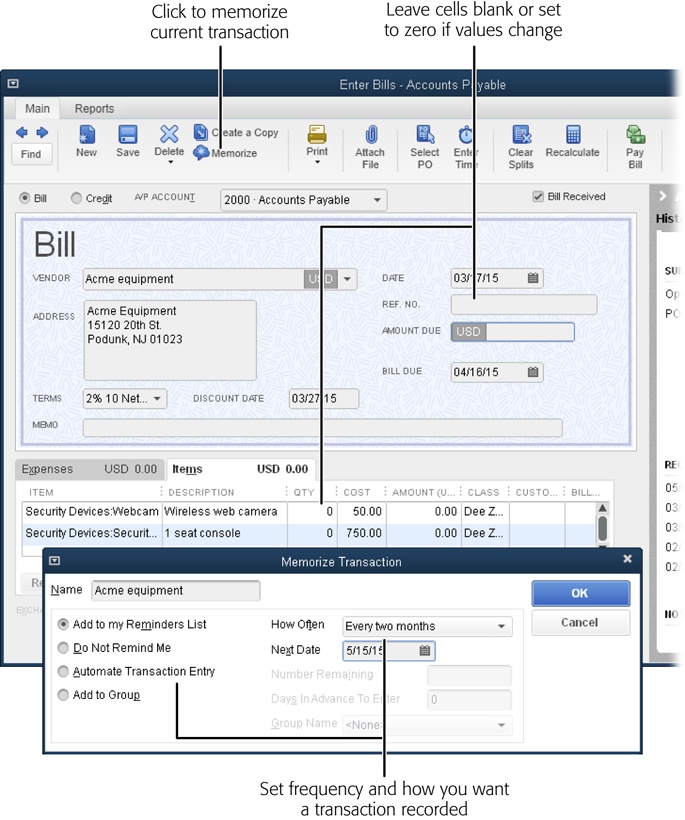
When the transaction is set up the way you want, press Ctrl+M to open the Memorize Transaction dialog box shown in Figure 12-8, foreground.
You can also open this dialog box by right-clicking in a transaction window, such as the Create Invoices window, and then choosing “Memorize [form]” (Memorize Invoice, Memorize Check, or whatever). Or you can click Memorize at the top of the window.
Note
If you’ve already memorized a transaction with the same name, the Replace Memorized Transaction message box appears instead. To replace the existing memorized transaction, click Replace. To add a new memorized transaction, click Add; when you do, QuickBooks opens the Memorize Transaction dialog box so you can specify a new name and options for the memorized transaction. If you change your mind about memorizing the transaction, click Cancel.
Figure 12-8. If the quantities change from transaction to transaction, you can fill in the items on a bill and their cost but leave the quantities blank or set to zero. Later, when you use the memorized transaction, QuickBooks fills in all the fields except the ones you left blank or set to zero, which you fill in with the correct values.
In the Memorize Transaction dialog box’s Name field, type a name that you’ll recognize when you see it in the Memorized Transaction List.
QuickBooks automatically fills in the Name box with the transaction’s Payee name or the name in a transaction, but it’s a good idea to enter something more meaningful. You can use names like Monthly Telephone Bill or Health Insurance Premium for bills you pay, a customer name combined with a sales form’s name, or the type of retainer, such as Full-time Programming Contract.
Tell QuickBooks whether you want it to remind you to enter transactions.
Choosing the “Add to my Reminders List” option is great for recurring transactions: QuickBooks adds the memorized transaction to the Reminders List (Reminders) and prompts you when it’s time to enter the next occurrence (though you can choose to skip the transaction). If you select this option, specify how often you want to be reminded and pick the next reminder date. For example, if you pay your phone bill on the 10th of each month, in the How Often box, choose Monthly, and in the Next Date box, pick the 10th of the next month.
If you don’t use the transaction on a regular schedule (like one for snowplowing), choose the Do Not Remind Me option, and QuickBooks won’t add the memorized transaction to the Reminders List. When you want to use the transaction again, press Ctrl+T to open the Memorized Transaction List window, select the transaction, and then click Enter Transaction.
For transactions that are identical from occurrence to occurrence, such as your bill for rent, choose the Automate Transaction Entry option. Then use the Days In Advance To Enter field to tell QuickBooks how many days before the due date to enter the transaction. (Providing a few days of lead time for bills helps you avoid late payments and insufficient-funds charges from your bank.) When that date arrives, QuickBooks records the transaction. When you choose Automate Transaction Entry, the Number Remaining box becomes active so you can type how many payments remain, which is ideal for loan payments that—thankfully—don’t go on forever.
Tip
You can also set up groups of memorized transactions and enter them all at once; you’ll learn how starting on Recording a Transaction Automatically.
To memorize the transaction, click OK.
QuickBooks adds the bill to the Memorized Transaction List, closes the Memorize Transaction dialog box, and returns you to the form window.
If you want to save the transaction you created, click Save & Close.
If you created an invoice or other form simply to set up a memorized transaction, click Clear in the form window, and then click the window’s Close button (the X in its upper right) to close it without saving the form.
The next section explains how to use memorized transactions.
How you generate a new transaction from one in the Memorized Transaction List depends on whether you’ve opted for a reminder, no reminder, or total automation. This section describes all three methods.
If you create a memorized transaction and tell QuickBooks to remind you (by choosing the “Add to my Reminders List” option) when the scheduled date arrives, the program adds the bill to the Reminders List (Reminders). (If the Reminders List displays only the Memorized Transactions Due heading, click it to display the transactions that are scheduled to be recorded.)
Here are the steps for turning a reminder into a transaction:
In the Reminders window, below the Memorized Transactions Due heading, double-click a memorized transaction.
The Memorized Transaction List window opens with the transaction selected in the list.
At the bottom of the Memorized Transaction List window, click Enter Transaction.
QuickBooks opens it in its corresponding transaction window (like Enter Bills for a memorized bill). The transaction that QuickBooks creates contains only the memorized information.
Make any changes you want, fill in any empty fields, and then click Save & Close.
The transaction window closes, and the memorized transaction no longer appears in the Reminders window.
Tip
For reminders that are hard to miss, tell QuickBooks to display the Reminders List each time you open the current company file. That way, when you open that company file, the program opens a Start Up box that asks if you want to enter memorized transactions; click Now to add them. (It also opens the Reminders List.) To set this up, choose Edit→Preferences→Reminders and, on the My Preferences tab, turn on the “Show Reminders List when opening a Company file” checkbox.
When you memorize a transaction that you use only occasionally or that occurs on an irregular schedule, choosing Do Not Remind Me stores the transaction in the Memorized Transaction List in case you need it. If you memorize a transaction like this, you need a way to create a new transaction based on it. (You’ll also use this technique if you set up a memorized transaction on a schedule but want to create one right away.) Here’s how to use a memorized transaction at any time:
Choose Lists→Memorized Transaction List or press Ctrl+T.
The Memorized Transaction List window opens.
Select the transaction you want, and then click the Enter Transaction button.
The corresponding transaction window opens, such as Create Invoices, Write Checks, or Enter Credit Card Charges.
Make any changes you want, and then click Save & Close.
That’s all there is to it!
If you want to change a memorized transaction’s recurrence schedule or reminder settings, press Ctrl+T to open the Memorized Transaction List window, select the transaction you want to edit, and then press Ctrl+E (or, at the bottom of the window, click Memorized Transaction→Edit Memorized Transaction). The Schedule Memorized Transaction dialog box appears with settings for reminders and the recurrence schedule (Using a Memorized Transaction).
If you want to edit the info within a memorized transaction, such as the items and services sold, you have to edit the existing transaction and then rememorize it. Here’s how:
Press Ctrl+T to open the Memorized Transaction List window. Select the transaction, and then click the Enter Transaction button.
QuickBooks opens the corresponding transaction window and creates a new transaction based on the memorized one.
Make the changes you want, and then press Ctrl+M to rememorize it with the changes you’ve made.
The Replace Memorized Transaction message box appears.
Click Replace.
The edited transaction takes the place of the previous one in the Memorized Transaction List. (If you want to save both the old and new versions, click Add instead.)
The first day of the month is the nemesis of bill payers everywhere because so many bills are due then. QuickBooks can’t ease the pain of watching your money go out the door, but it can ease the burden of entering all those bills in your company file. Memorized bills are a start, but why enter individual memorized bills when you can enter several at once?
Fortunately, QuickBooks lets you set up memorized transaction groups that act like their individual memorized counterparts—the program can remind you about all the bills due on a specific day or even enter all the recurring transactions automatically. (Memorized groups work equally well for recurring invoices.)
You might wonder how to add a memorized transaction to a group when you open the Memorize Transaction dialog box (Creating a Memorized Transaction) for the very first time; the “Add to Group” option and the Group Name box are visible but grayed out. To add a memorized transaction to a group, you have to first create a memorized group. Here’s how you do that:
Press Ctrl+T to open the Memorized Transaction List. At the bottom of the window, click Memorized Transaction→New Group.
QuickBooks opens the New Memorized Transaction Group dialog box. It’s identical to the Memorize Transaction dialog box except that it doesn’t include the “Add to Group” option or Group Name box.
Name the group something meaningful like Monthly Bills, and fill in the other fields as you would for a memorized transaction (Using a Memorized Transaction).
Tell QuickBooks how and when you want to be reminded about the bills in this group (if at all).
Click OK to save the group.
Now that the group exists, you can add individual transactions to it.
To add an existing memorized transaction to the group, in the Memorized Transaction List window, select the transaction you want to add, and then press Ctrl+E to edit it.
The Schedule Memorized Transaction dialog box opens.
Select the “Add to Group” option and then, in the Group Name box, choose the group you just created. When you’re done, click OK.
When you add a memorized transaction to a group, QuickBooks tucks the transaction underneath the group in the Memorized Transaction List, as shown in Figure 12-9.
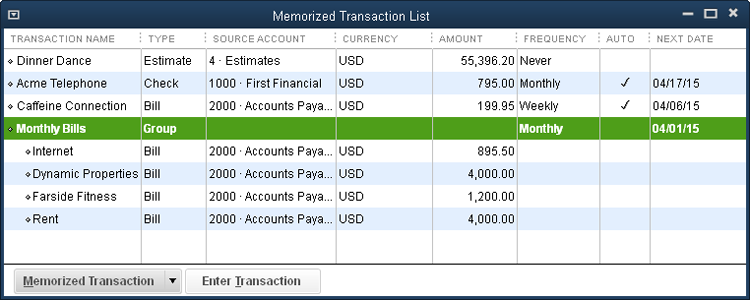
Figure 12-9. Memorized transactions take on the schedule and reminder settings of the memorized group you put them in. So if you edit a memorized transaction that belongs to a group, the How Often, Next Date, Number Remaining, and Days In Advance To Enter settings are grayed out.
Tip
Create separate memorized groups for bills with consistent amounts and for ones whose amounts vary. That way, you can set up the unvarying memorized group with the Automate Transaction Entry option so QuickBooks simply adds all the bills in that group to your list of bills to be paid without any intervention from you. Then you can set the second memorized group to use the “Add to my Reminders List” option so you can go through each bill and fill in the amount before you record it.
When you want to answer a customer’s question about what she owes, it’s easier if you have the invoice in front of you. The Create Invoices window shows only one invoice at a time, but there are several ways to find a specific invoice out of the hundreds you’ve sent. Whether you want to find pesky overdue invoices, purchase orders, or paychecks, the Customer, Vendor, and Employee Centers (and the Inventory Center if you use QuickBooks Premier or Enterprise) make it easy to find transactions for a particular customer, vendor, employee, or item. And the Item List window has a few tools for finding specific items.
QuickBooks also offers two additional ways to search. The Search feature scours every inch of QuickBooks and your company file. The Find feature (which you can access most easily by pressing Ctrl+F), on the other hand, is best suited for more precise searches—to find a particular invoice number, transactions related to a specific customer, invoices overdue more than a certain number of days, and so on. This section explains how to use all these features.
The Customer Center is a quick way to answer basic questions about your customers, like “What invoices are unpaid?” and “Does the customer have any credits available?” Likewise, you can track down bills, bill payments, and other vendor-related transactions in the Vendor Center. The Employee Center performs similar tasks for transactions like paychecks and non-payroll transactions. And if you use QuickBooks Premier or Enterprise, you can use the Inventory Center to find out what’s going on with your inventory. (See Receivables Aging and The Insights Tab, respectively, to learn how to use Income Tracker and the new Insights feature to track down transactions.)
Here are ways you can use QuickBooks’ centers to find transactions, using the Customer Center as an example (to open it, on the Home Page, click the Customers icon, or choose Customers→Customer Center):
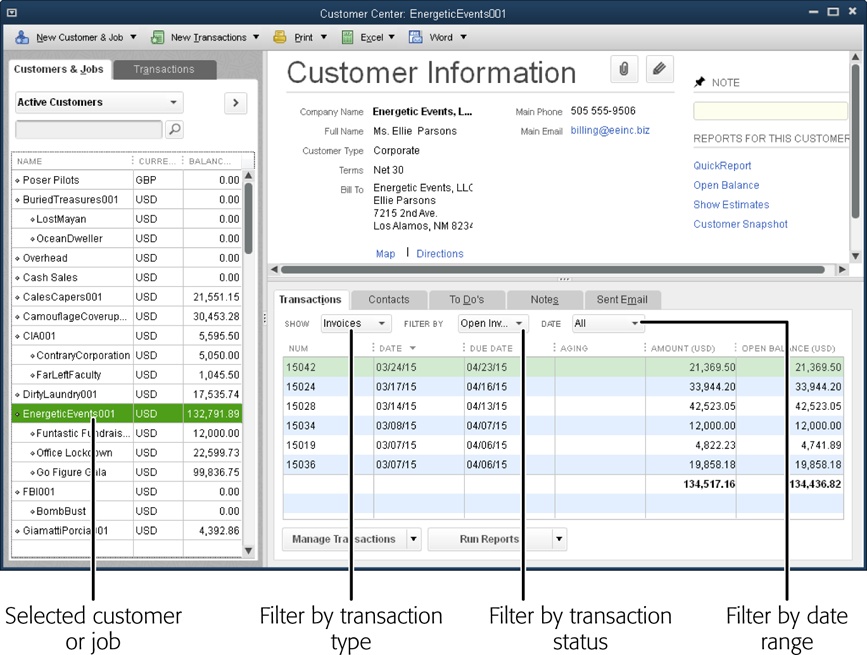
Display transactions for any customer or job. On the Transactions tab on the left side of the center, click the type of transaction you want to search for. When you do, the right side of the center lists all the transactions of that type. You can use the Filter By menu above the list to see only open transactions or ones within a certain date range.
Filter the list of customers. To narrow the Customer:Job List to those that fit the criteria you want, on the Customers & Jobs tab, click the first unlabeled box (it’s usually set to Active Customers). In the drop-down list, choose one of the entries, like Customers with Open Balances, Customers with Overdue Invoices, or Customers with Almost Due Invoices.
Find a customer. If you have trouble finding a customer on the Customers & Jobs tab, in the tab’s second unlabeled box, type part of the customer’s name and then click the “Find in common fields” button, which has a magnifying glass on it.
Review a customer’s account. In the upper-right part of the Customer Center are several links you can click to see various things about a customer’s account:
— QuickReport shows all transactions for the customer within the date range you specify.
— Open Balance generates a report of all the Accounts Receivable transactions that contributed to the customer’s current balance, like invoices and payments.
— Show Estimates generates a report of any estimates you’ve created for that customer or job.
— Customer Snapshot opens the Company Snapshot window to the Customer tab, where you can see statistics like the average days the customer takes to pay, total sales this year, and total sales for the same period last year.
Display the transactions for a customer. When you select a customer on the Customers & Jobs tab, the transactions for that customer appear in the Transactions tab in the lower-right part of the Customer Center. To see a specific type of transaction, in the Show drop-down list above the transaction table, choose the transaction type like Invoices or Refunds, as shown in Figure 12-10. QuickBooks initially displays all the transactions of that type, but you can filter them using these techniques:
— Filter transactions by status. In the Transactions tab’s Filter By drop-down menu, choose a category like Open Invoices or Overdue Invoices. The choices in this menu vary depending on the transaction type. For example, if you search for refunds, the menu includes All Refunds, Cash/Check Refunds, and Credit Card Refunds options.
— Filter transaction by date range. In the Transactions tab’s Date drop-down menu, choose a period. Your choices here are the same as the ones you can choose for reports (Choosing Date Ranges).
— Open a transaction. Double-click a transaction in the Transactions tab’s table to open the corresponding window to that transaction.
The Item List window has its own abbreviated search feature: You type what you’re looking for (such as an item name or keyword) and the field you want to search, and then QuickBooks filters the list for matching results. Here’s how to search for an item:
Open the Item List window by choosing Lists→Item List or, on the Home Page, clicking Items & Services.
In the “Look for” box, type the text or value you want to find.
If you type more than one word, QuickBooks looks for items that contain the whole phrase you typed. For example, enter fiber optic to find all your fiber-optic electronic devices.
In the “in” drop-down list, choose the field you want to search.
QuickBooks automatically selects “All fields” here. To narrow your search, choose Item Name/Number, Description (Sales), Purchase Description, Man. Part Number, or another field. You can also choose “Custom fields” to search fields you’ve created (Specifying Additional Customer Information).
Click Search.
The Item List window displays only the items that match your search criteria.
To narrow your search, delete your original search terms, type a new word or phrase in the “Look for” box, turn on the “Search within results” checkbox, and then click Search.
If you don’t see the “Search within results” checkbox, maximize the Item List window or drag one of its corners to enlarge it. Turning on this checkbox tells QuickBooks to search for the new search term only in the items currently displayed in the list.
To reset the window’s list to display all your items, click Reset (you may need to enlarge the window to see this button).
The QuickBooks Search feature can look through your company file or the program’s help files, although it automatically searches only your company file. If you want to find something in your company file, simply type in a few key words or values, and it combs through your entire company file for them. For example, type webcam and QuickBooks looks for that value in your transactions, Customer:Job List, Vendor List, other name records, items, descriptions, notes, and memos. But if you’re trying to find information about a QuickBooks feature, type the feature’s name in the Search box, choose Help in the box’s drop-down list, and Search tracks down information about it in QuickBooks’ Help files.
Tip
The Search feature is quick and easy if you want to search by date range or fairly simple filters, such as a specific amount. But if you have really specific search criteria, like invoices that are more than 30 days overdue and more than $10,000, the Find feature (explained on Using the Find Feature) is a better tool.
Here’s how to use Search:
Type the value you want to look for in the Search box, which is at the top of the left icon bar or the right end of the top icon bar (see Menus and the Icon Bar for info on the icon bars).
As you type in the Search box, the program displays a drop-down list with suggested and recent search terms. For example, if you type “ener” because you’re looking for your customer Energetic Events, the drop-down list may display “energetic” and the Customer Name value “energeticevents001.” If the term or value you’re looking for appears in the drop-down list, click the entry you want to select it.
Click the Search button (which looks like a magnifying glass) or press Enter.
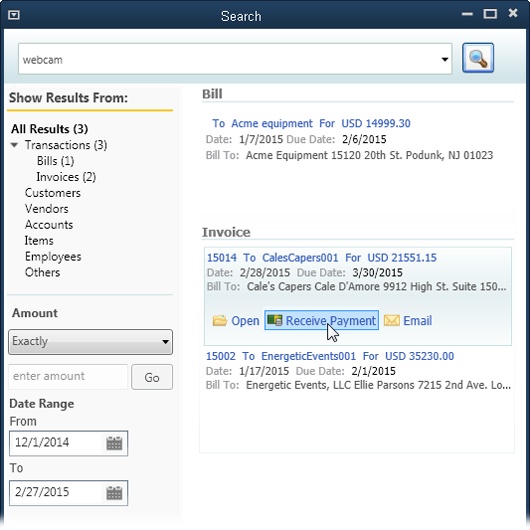
The Search window (shown in Figure 12-11) opens. (If you’ve hidden the icon bar, you can open this window by choosing Edit→Search or pressing F3.)
Figure 12-11. Below the Search box at the top of this window, you see a summary of the results, such as where QuickBooks found the results. If you get too many results, you can filter the list by clicking the type of result you want in the Show Results From section, such as Transactions. The results list on the right then displays only that type of result.
To filter the results, below the “Show Results From” heading, click the type of result you want.
To see all transactions that matched your criteria, click Transactions. To search for a specific type, click the type, such as Invoices or Bills. You can also choose a date range to specify a period to search. If you’re looking for an amount, choose an option to look for values equal to, less than, or greater than the amount.
Put your cursor over a search result.
Icons appear below the search result that represent the actions that you can perform, like Open or Receive Payment for an invoice (see Figure 12-11), or Edit for an item in the Item List. Click the icon for the action you want.
QuickBooks’ Find feature is ideal for finding transactions that match several criteria. For example, it lets you search for all invoices within a certain date range that include a product you’ve upgraded, or all the open invoices for work performed by one partner (if you use classes to track that kind of thing). In fact, the Find feature can mine every transaction field except Description (to search descriptions, use the Search feature instead [Switching among Open Windows]).
The Find window has a Simple tab for straightforward searches and an Advanced tab where you can build searches as detailed as you want. QuickBooks remembers which one you used for your last search and displays that tab the next time you open the window.
Here’s how to use the simple version of the Find feature:
Choose Edit→Find or press Ctrl+F.
If you have a form window (like Create Invoices) open, click the Find button at the window’s top left to open a smaller version of the Find window’s Simple tab. Click Advanced in this simplified dialog box to open the full-blown Find window. If you don’t have any form windows open, the full Find window opens automatically.
In the Find window, click the Simple tab if it’s not already selected.
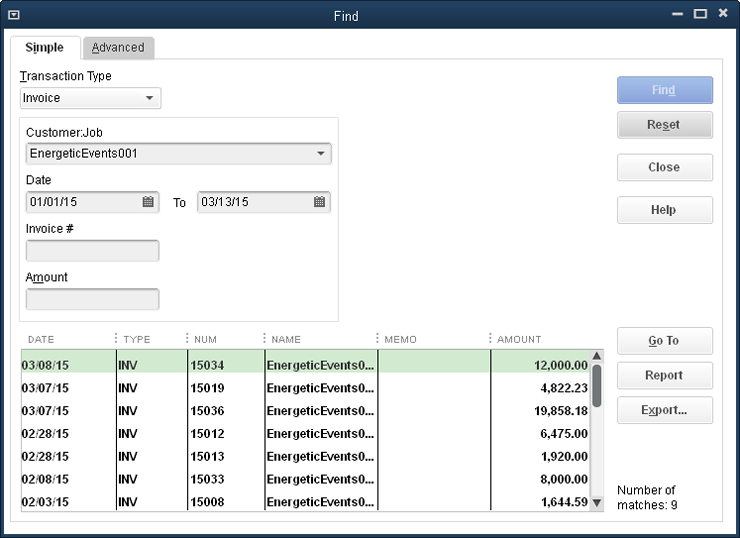
The Transaction Type box at the top of the tab is set to Invoice, and all the other fields are blank.
In the Transaction Type drop-down list, choose a type like Purchase Order or Bill.
The search fields are almost identical no matter which transaction type you choose, with a few exceptions, as explained in Figure 12-12. From, To, and Amount fields appear for every type.
Fill in the values you want to search for, and then click the Find button.
You can fill in as many or as few fields as you want. When you click Find, any matching transactions appear in the table at the bottom of the window. Double-click a transaction to open it in its corresponding window, like Create Invoices for an invoice.
To clear all the fields and start a new search, click Reset.
When you’re done, click Close.
The Find window’s Advanced tab lets you search any transaction field. You can even build up a set of filters to locate exactly the transaction you want. Here’s how:
Choose Edit→Find (or press Ctrl+F), and then click the Advanced tab. (If a simplified Find dialog box opens, click its Advanced button.)
The Advanced tab starts with an almost-clean slate every time you open the Find window—though the right-hand Filter list always starts with Posting Status set to Either.
Figure 12-12. In the Find window, the label above the first field after Transaction Type changes to reflect the type you choose. For example, if you select Bill for the transaction type, the next field’s label changes to Vendor. The second-to-last field also varies depending on the transaction type; for example, it’s Invoice # for an invoice, Ref. No. for a bill, and P.O. No. for a purchase order.
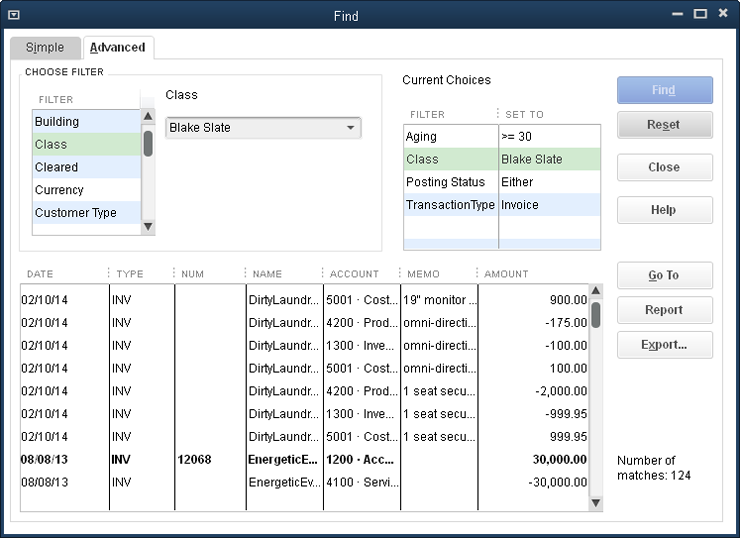
In the Find window’s left-hand Filter list (Figure 12-13), choose the first field you want to search.
Fields appear in alphabetical order. If you’ve turned on multiple currencies, you’ll see Currency and Foreign Amount options listed, too.
To the right of the left-hand Filter list, select settings to specify how you want to search the selected field.
These settings change depending on the field you select. For example, if you choose TransactionType in the left-hand Filter list, you see only a single drop-down list of QuickBooks transaction types. Choosing Date in the left-hand Filter list displays a drop-down list of time periods, along with From and To boxes to specify dates. And selecting Aging in the left-hand Filters list gives you options to help find late invoices (=, <=, and >=); for instance, you can find invoices that are 30 or more days late by choosing the >= option and typing 30 in the box.
To add another filter to your search, repeat steps 2 and 3.
You can add as many filters as you want. The window’s Current Choices table lists the fields you’re searching and what you’re searching for in each one.
Click Find.
The table at the bottom of the window lists all the matching transactions (or line items within a transaction). The next section explains what you can do with these results.
Figure 12-13. The filter settings you can choose change depending on the field you select in the left-hand Filter list. For example, if you choose Terms, you can select the terms you want to look for from the drop-down list. Choosing Amount gives you options to find values equal to (=), less than or equal to (<=), or greater than or equal to (>=) the value you fill in. If you select Name, you can specify an individual name, a category of names, or multiple names.
If you get too many or too few results, repeat steps 2 and 3 to add or change filters, and then click Find again.
To edit a filter, select the field in the left-hand Filter list and then change its settings. To remove a filter from the Current Choices list, select it in the list and then press Backspace or Delete. To clear all the filters, click the Reset button.
When you’re done, click Close.
After you find what you’re looking for, you can inspect your results more closely using the following buttons in the Find window:
Go To. Select one of the results, and then click this button to see the transaction in its corresponding window (like Create Invoices for an invoice) or account register.
Report. This button opens the Find Report window, which includes all the transactions in your search results.
Export. To export your results, click this button. (See Exporting QuickBooks Data for more on exporting.)