Chapter 5. Property and Debt
As you learned when you set up your Quicken accounts in Chapter 2, you use asset accounts to track the value of your property (the things you own) and liability accounts to track your debt (the money you owe). Quicken has many advantages when you’re managing these accounts. For one, if you set up a loan in Quicken to pay off a liability, the program reminds you when it’s time to make a payment. In addition, if you track both your liabilities and assets, Quicken can calculate your net worth (the value of your assets minus the balance of your liabilities), which is a telling indicator of your financial health.
Although borrowing can get awfully complicated with adjustable-rate mortgages, interest-only loans, refinancing, and so on, Quicken can handle just about anything you throw at it. Most people have a hard time understanding the underlying accounting. Once you know how to follow the money, you can easily set Quicken up to track it. This chapter explains both.
Understanding Property & Debt in Quicken
Assets, liabilities, and loans form the foundation for tracking what you own and owe, and Quicken groups them in the Property & Debt Center. To make the most of Quicken’s property and debt features, you need to understand the following concepts.
Assets are things that you own that have value, like your house, car, appliances, and the baseball signed by Mickey Mantle. If you want Quicken to help you figure out how much you’re really worth, track the value of your assets in Quicken. (By the way, your physical assets don’t count, unless, of course, you earn your living as a supermodel.)
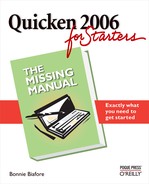
Quicken uses asset accounts to track the value of what you own. These accounts (along with liability accounts) have registers just as checking accounts do. As you can see in Figure 5-1, you can record transactions to reflect changes in the value of your assets, for instance due to depreciation, improvements you make, increases in the cash value of whole life insurance, or market changes.
There’s no need to create asset accounts for every last item you own. Quicken has specialized asset accounts for houses and cars since those are the most valuable things most people own. However, if you have other items of value that you’d like Quicken to include in your net worth (like jewelry, artwork, a stamp collection, and so on), create asset accounts for them as well.
Liabilities. Liabilities represent money you owe, whether for an asset, like a house or car, or something less tangible but no less important, like your college education.
In Quicken, you create liability accounts for the money you borrow. For example, if you borrow money from Capital One to buy your car, from Bank One to purchase your home, and from Fifth Third Bank to pay for your child’s college education, you’ll have a liability account for each debt, whether or not it’s secured by an asset that you own.
Loans. When you borrow money, the loan is your legal commitment to pay the money back according to the terms of the loan contract. If you’ve purchased a house, you already know the mountains of paperwork (and writer’s cramp) involved. Part of the paperwork is the loan document, which describes the amount being borrowed—the principal—the interest rate, the length of the loan, the number of payments, and how much principal and interest you fork over with each payment.
Most loans amortize your payoff, which means that the total for each payment is the same, but is made up of a different amount of principal and interest. Early in the loan’s life, your payments are mostly interest and very little principal—which is great for tax deductions. By the end, you’re almost entirely paying off principal. Constantly changing allocations sound like a tracking night-mare, but Quicken automatically handles amortized payments without breaking a sweat. It calculates your loan amortization schedule, assigns the principal and interest in each payment to the appropriate categories or accounts, and even handles escrow payments.
Equity and net worth. The equity you hold in an asset is the value of that asset minus the balance that you owe on it. For example, if your house is worth $200,000 and the balance on your mortgage is $125,000, you have $75,000 in equity in your home.
Net worth is the big picture of equity—the value of all your assets minus the balance of all the money you owe. Net worth is a key measure of your financial health. For example, you might own houses, cars, boats, and other toys that are worth $4,000,000. But if you borrowed $3,950,000 to buy them, you’re still a financial pauper with a net worth of only $50,000. On the other hand, a couple who have a house, car, and retirement fund with a combined value of $850,000, and a mortgage balance of only $25,000 are well on their way to millionaire status with a net worth of $825,000.
By linking loans in Quicken the asset accounts of the items they help purchase, you can see how much equity you have in each asset as well as your overall net worth.
Setting Up Asset and Liability Accounts
You need asset and liability accounts in Quicken to track what you own and owe. The program helps you create all the accounts you need. If you buy an asset with borrowed money, like a house mortgage or a car loan, you can create the asset account in Quicken and the program asks if you want to set up a liability account and loan.
Types of Accounts
Quicken includes three types of accounts for your assets and one for liabilities. Here are the types and what you use them for:
A House account can represent any type of real estate (house, condo, or water-front property in the Bahamas), whether you have a mortgage or own it free and clear. When you create a house account, you specify the original purchase price and the current value. As time passes, you can also adjust the balance for the account to reflect the house’s increase in market value or improvements you make, like the commercial-quality kitchen and the eight-person hot tub.
A Vehicle account works much like a house account. When you create a vehicle account, you specify the make, model, year, original purchase price, and an estimate of the current value. Quicken asks you if you want to set up a loan for the vehicle. As time passes, you can adjust the balance for the account (although for vehicles, adjustments are usually a decrease in value).
An Asset account is the one to use for miscellaneous possessions—from the tchotchkes that clutter your house to your signed Ansel Adams photographs. Quicken doesn’t ask you about associated loans when you create a generic asset account, but if you borrowed money to purchase the asset, you can always link that loan to the Asset account.
Liability. A liability account represents money you borrow, whether you take out a mortgage on a house, a bank loan on a car, or a personal loan from Aunt Marge to buy a cello.
Creating an Asset Account
If you borrow money to buy an asset, you can create the asset account in Quicken and, in the process, set up the loan and corresponding liability account. Occasionally, you want to create an asset account without a loan, for instance, to include the value of your wine cellar in your net worth (assuming you didn’t borrow money to buy the bottles).
There are three basic ways to create an asset account:
Using the Property and Debt Center, as described in this section.
Relaunching the Quicken Guided Setup that you used when you first started using Quicken, and repeating the procedure for adding accounts (Section 2.3.1).
Working directly in the Account List window: Press Ctrl+A to open the Account List window and then, in the Account List menu bar, choose Add Account. Because the Account List window includes every type of account you can create in Quicken, you must answer more questions than you do when you create an asset account from the Property & Debt Center.
Note
You can approach the process the other way round by creating a loan and having Quicken create the liability and asset accounts that go with it. The only downside to this approach is that the program doesn’t give you the option to specify the type of asset account that you want to create. It creates a regular asset account.
Here are the steps for creating an asset account, using a vehicle account as an example:
In the Account bar, click Property & Debt.
Quicken displays the Property & Debt Center, which includes an Add Account button.
In the Property & Debt Center, in the Property & Debt Accounts area, click Add Account.
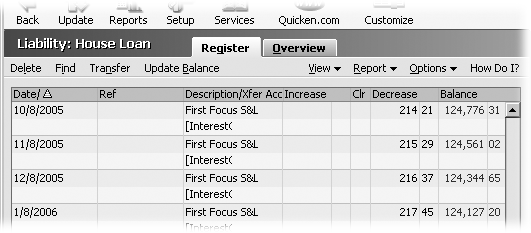
The program opens the Quicken Account Setup dialog box, which shows the four types of property and debt accounts, illustrated in Figure 5-2.
In the Quicken Account Setup dialog box, choose the type of account you want.
If you’re creating an account for a house or a vehicle, your choice is pretty simple. Choose either the House or Vehicle option. For all other valuable belongings, choose the Asset option. Click Next to begin telling the program about your asset.
In the “Tell us about this (house, vehicle, asset) account” screen, in the “Name this account” text box, type a descriptive name for the account. Click Next to continue.
Quicken fills in the “Name this account” text box with a generic name (something like House for a house account, Car for a vehicle account, and Asset for an asset account. You’ll want to change the name so it uniquely identifies the asset, for instance, Aspen Vacation House, 02 Forerunner, or Wine Cellar.
For Vehicle asset accounts, the “Tell us about this vehicle account” screen includes additional text boxes for filling in the make, model, and year of the vehicle. But if you name the vehicle asset account well, you don’t need that additional detail.
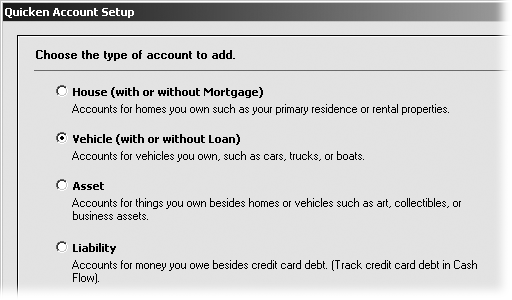
On the “Enter starting point information” screen, enter the date that you acquired the asset, its purchase price, and your estimate of its current value. Click Next to continue.
Figure 5-3 shows the screen for the starting point information for a vehicle account. The date in the “When did you acquire this vehicle?” text box sets the date for the opening balance transaction in the account. The purchase price is how much you paid for the vehicle. And the “Estimate its current value” box is for your best estimate of the vehicle’s value.
For plain Asset accounts, you don’t have to provide a purchase price. All you do is choose a starting date for tracking the asset’s value and specify your estimate of the value on that date.
Figure 5-3. To create a house or vehicle account, you specify the date on which you purchased the asset, how much you paid for it, and how much it’s worth now.Tip
See the box on Section 5.2.2 for advice on estimating vehicle and other asset values.
If you plan to transfer money in and out of the account, click the Tax button to assign tax form line items for these transfers.
The Tax Schedule Information dialog box opens with drop-down menus of the tax form and tax line to use for money that flows in or out of the account. Quicken almost always has the tax line items set up correctly, so you can click Done to create the Asset account.
Tip
To change tax information later, open the Account Details dialog box as described on Section 2.4. At the bottom of the dialog box, click Tax Schedule Info and choose the tax line items for Transfers In and Transfers Out.
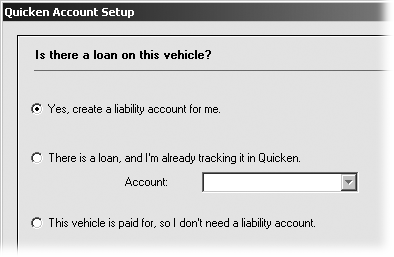
In the “Is there a loan on this vehicle?” screen (titled “Is there a mortgage on this property?” for house accounts), choose the option that matches your loan situation.
You may think there are only two choices: yes or no. But in Quicken, you have three choices, shown in Figure 5-4. The most common situation is that you have a loan or mortgage, but haven’t created the liability account in Quicken. In this case, choose “Yes, create a liability account for me” option.
For a loan or mortgage that already exists in your data file, choose the “There is a loan and I’m already tracking it in Quicken” option and, in the Account drop-down menu, choose the liability account.
If you bought the asset with cash or have already paid off the loan on the asset, choose the “This vehicle is paid for, so I don’t need a liability account” option. For a house account, this option is “This property is paid for, so I don’t need a liability account.”
Click Done.
If you don’t owe any money on the house or vehicle, or you already have a loan set up in Quicken, you really are done. Quicken creates the asset account and, if the loan exists, links the asset and the loan.
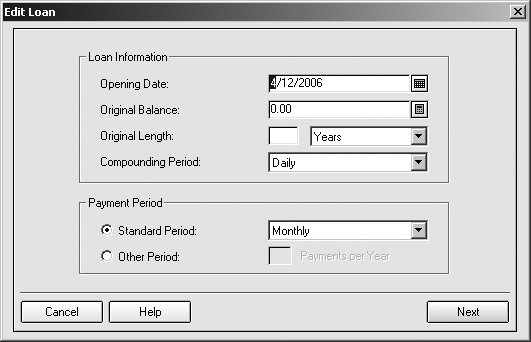
If you told Quicken to create a liability account, clicking Done creates the asset account, creates a liability account, closes the Quicken Account Setup dialog box, and opens the Edit Loan dialog box, so you can set up the loan or mortgage, as Figure 5-5 illustrates.
You’re done! You’ll learn how to fill in the Edit Loan dialog box in the next section.
Creating a Liability Account
Lenders who don’t require you to pay back what you borrow are rarer than lips on a chicken, so you’re not likely to create a liability account without a loan that describes how you’re going to pay the liability back. You can most easily set up both a liability account and the loan it represents by creating a loan in Quicken and telling the program to create a new liability account, as described next. (You can also create a liability account first, create a loan, and then link the loan to the liability account, but it’s a little more work.)
Tip
If you take out a home equity loan on your house, you can create either a liability account or credit card account for the loan. If you create a liability account, link it to the corresponding House account to track the equity. If you use a credit card account, add transactions to withdraw money from your line of credit—or deposit money when you pay some of the line of credit back.
Setting Up a Loan
Quicken makes it so easy to track a loan and make loan payments that it’s well worth the time spent in setup. Before you begin, gather your loan documents as close as the cards in a killer poker hand, because the program wants to know every detail of your loan, as you’ll soon see.
Creating a Loan
As with so many tasks in Quicken, you can create a loan in more than one way. The method you choose determines which dialog boxes you’ll see, but Quicken gathers the same information about your loan one way or another. Here are the two primary ways to create a loan:
The Loan Setup wizard. This wizard can handle loans for borrowing money, loans for lending money, loans that don’t pay for things you buy, and the various characteristics of each loan. You can launch the Loan Setup wizard by pressing Ctrl+H to open the View Loans window, and, in the window’s menu bar, choosing New.
The one thing the Loan Setup wizard doesn’t do is give you the opportunity to specify the type of asset you create to go along with the loan. If you want to set up a loan for a house or car, create a house or vehicle asset account and, when Quicken opens the Edit Loan dialog box, you can use that account to set up your loan.
Creating an asset account. If you create a house or vehicle account in Quicken, the program can tack on creating a liability account (and loan), as described on Section 5.2.3. Because the program already knows that you’re borrowing money, it creates the liability account and opens the Edit Loan dialog box to dive into the loan details.
Quicken needs quite a bit of information about your loan to correctly calculate the amortization schedule (the allocation of each payment to principal and interest). It takes a lot of steps to create a loan, but each step is easy and the process takes surprisingly few minutes. The list that follows explains how you use the Loan Setup wizard to create a loan.
Press Ctrl+H to open the View Loans window, and then, in its menu bar, choose New.
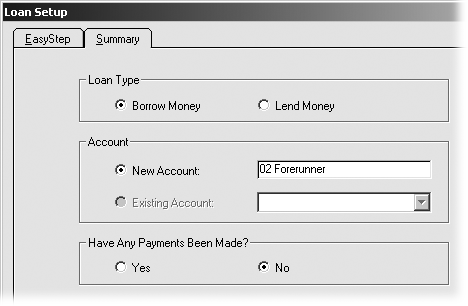
The Loan Setup wizard launches and displays the Easy Step tab. The screen tells you that you’ll need about 10 minutes to set up a loan, which is a lot less time than it takes to get a loan from a financial institution. You can click Next to begin stepping through one question at a time, but it’s much less painful to click the Summary tab and answer several questions per screen, as Figure 5-6 illustrates.
In the Loan Type section, choose the Borrow Money or Lend Money options, depending on whether you’re borrowing money, or someone else is borrowing money from you.
These options determine whether the loan is a liability or an asset for you. If you choose the Borrow Money option, your loan is a liability, because you have an obligation to repay the balance.
If you choose the Lend Money option, the loan is one of your assets. The money you lend is still your money, plus you’ll receive interest from the borrower.
In the Account section, if you’re creating a new loan account, turn on New Account and give it a name.
Adding “Loan” or “Mortgage” to the account name helps differentiate your liability account from the associated asset account. For example, if your car’s asset account is named 02 Forerunner, name the liability account 02 Forerunner Loan.
In the “Have Any Payments Been Made?” section, select either Yes or No. Then click Next.
Your answer depends, of course, on whether or not you’ve made payments on the loan before setting up this Quicken account for it. You’ll have a chance to tell the wizard how much you’ve paid off before you’re done (in step 11 on Section 5.3.1).
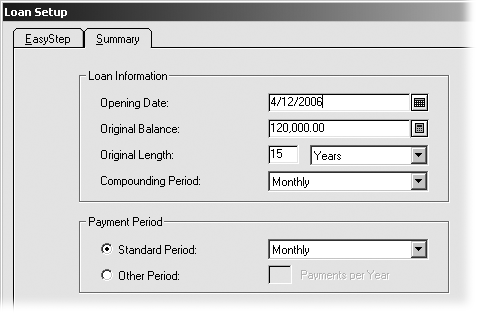
On the next screen, in the Loan Information section, in the Opening Date text box, choose the date when you opened the loan, illustrated in Figure 5-7 .
Quicken automatically fills in the current date, but the chances of that date being correct are slim to none. However, choosing the correct date is key, because the program uses the opening date to calculate accrued interest. (Asking the lender the date that interest begins to accrue is one solution, but you can read the box on Section 5.3.1 if your lender doesn’t call back.)
In the Original Balance text box, type the amount that you borrowed when you first opened the loan.
If you’re creating a loan in Quicken for a real-world loan that you’ve had for a while, be sure to type the original amount you borrowed in this text box. Later, you’ll have a chance to tell Quicken the current balance.
In the Original Length text boxes, type the number of time periods and choose the time period duration.
Most car loans are set up for 4 years, although some run for 5 years. Mortgages come in many different lengths from 3 years or more for balloon mortgages to 15, 20, and 30 years. Quicken doesn’t care if you define the length of the loan in Years, Months, or even Weeks—as long as you specify the correct number of time periods. For example, you know that a 30-year mortgage has an original length of 30 years, but you can tell Quicken that the mortgage length is 360 months as well.
In the Compounding Period text box, choose the period that the financial institution uses to calculate the compounding on the interest you pay.
Quicken automatically chooses Monthly, simply because it’s the most common compounding period. For other payment schedules, the compounding period is usually the same as the payment period; check with your lender.
In the Payment Period section, choose the Standard Period option and then choose one of the periods in the drop-down menu. Click Next to continue.
Quicken’s standard payment periods cover most periods that lenders use— from Weekly and Bi-Weekly through semi-Monthly and Monthly, up to Annually and still others in between. If you’ve borrowed money from your eccentric cousin and have an unusual payment schedule, you can choose the Other Period option and then, in the Payments per Year box, type the number of payments you make in a year.
If the loan includes a balloon payment, enter its characteristics in the Balloon section.
Balloon loans amortize the loan over a period of time—30 years for a mortgage, for example—but never actually make it that far. Instead, you must pay off the balance in full before then, often after 5 or 7 years.
Quicken selects the No Balloon Payment option automatically. If your loan includes a balloon payment, choose the Amortized Length option and fill in the boxes for the number of periods and the length of the periods. For example, for a balloon loan amortized over 7 years, in the number text box, type 7, and in the period drop-down menu, choose Years.
If you’ve already made payments on the loan, in the Current Balance section, enter the amount you currently owe on the loan and the date on which that balance applies.
If you selected No back in step 4 as to whether you had made any payments, the Current Balance section doesn’t even appear. That’s because the Current Balance is the same as the Original Balance when you first take out a loan.
You can easily find your current balance by looking at your last loan statement. Look for an entry called something like Current Balance or Current Principal Balance. That value should apply as of the date of your most recent payment.
In the Payment section, choose the Payment Amount (P+I) option and then type the amount of your payment and the next due date, as illustrated in Figure 5-8 .
Your loan documents show the payment amount including only principal and interest. For a mortgage, be sure to include only the principal and interest—not other amounts, like escrow payments or private mortgage insurance premiums.
For a new loan, in the “due on” text box, choose the date on which your first payment is due. For a loan on which you’ve already made payments, choose the date your next payment is due.
In the Interest Rate text box, type the annual interest rate on your loan document.
Loan rates are usually advertised as annual rates without compounding, which you’ll find in the interest rate section of your loan document. Other documents, like the loan disclosure document, show the annual percentage rate (APR), which represents the effective rate you pay taking into account interest compounding.
Note
If you know the loan interest rate, Quicken can calculate the payment for you. Although the calculation should be accurate if you set up your loan correctly, the payment on your loan document is the one you should go by.
Once you’ve got the interest rate entered, click Done. The Loan Setup dialog box closes, only to be replaced by the Set Up Loan Payment dialog box, in which you set up and schedule your loan payments. Because scheduled loan payments are one of the high points of Quicken convenience, go on to the next section to learn how to take advantage of this helpful feature.
Setting Up a Loan Payment
Unless you borrow money from a good friend, chances are there’s a hefty late charge awaiting you for a belated loan payment. As soon as you finish creating a loan in Quicken, the program immediately opens the Set Up Loan Payment dialog box. With just a few more steps, you can establish a scheduled transaction for the loan (see Section 5.4.1). Quicken can remind you to make your loan payment on time or process the payment automatically with a repeating online payment (see Chapter 6). Either way, you can avoid those painful late fees.
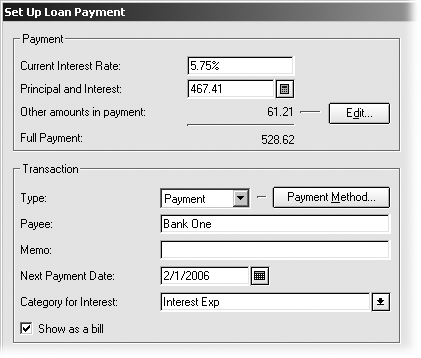
Whether you use the Set Up Loan Payment or Edit Loan Payment dialog box, Quicken fills in a few of the Payment section boxes with information from your loan.
The Current Interest Rate text box contains the interest rate you specified for the loan (step 13 on Section 5.3.1).
The Principal and Interest text box contains the value you provided in the Payment (P+I) text box (step 12 on Section 5.3.1).
The Next Payment text box contains the payment date you set in the loan (step 12 on Section 5.3.1).
Compare the values in these three text boxes with the values for your loan. If the numbers don’t jibe now, the amortization that Quicken calculates will be off as well.
Before you set up your loan payment, edit the loan to correct the discrepancies. Press Ctrl+H to open the View Loans window. In the View Loans window menu bar, click Choose Loan and select the loan for the payment. When the loan information appears in the View Loans window, click Edit Payment to open the Edit Loan Payment dialog box. (See Section 5.5.1 for instructions on using this box.)
To complete the loan payment, you must tell Quicken who to pay and which payment method to use. Also, if your payment includes more than principal and interest—property tax or homeowners’ insurance escrow, for instance—you add those items here.
Here’s how you reap the benefits of a scheduled loan payment in the shortest possible time:
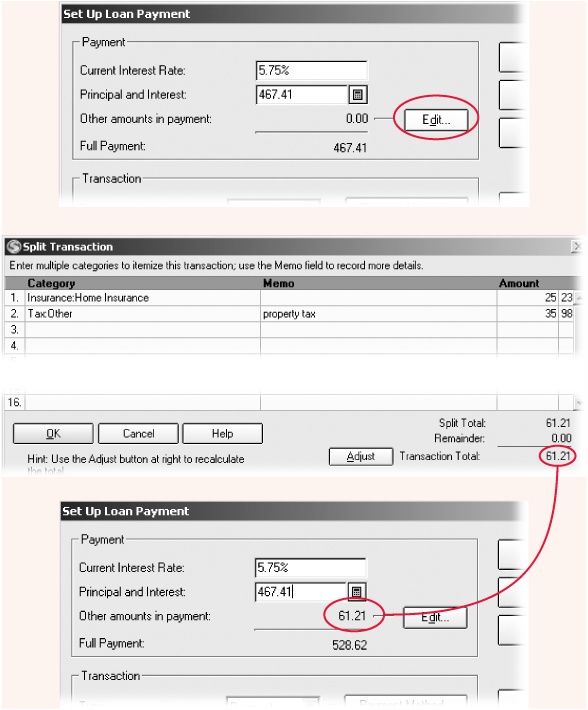
If your loan payment includes more than principal and interest, click the Edit button to the right of the “Other amounts in payment” label.
Quicken opens the Split Transaction dialog box, which you first saw in Chapter 4 (Section 4.7). Mortgage payments usually have additional amounts, like escrow payments for property taxes and homeowners’ insurance (see the box on Section 5.3.2), or premiums for private mortgage insurance. For each additional amount in the payment, choose a Category and type the amount. When you’ve added all the extra amounts, click OK to add the total to the “Other amounts in payment” line, as demonstrated in Figure 5-9.
If you want to print loan payment checks or make payments electronically, in the Transaction section, in the Type drop-down menu, choose Print Check or Online Pmt, respectively.
Quicken automatically chooses Payment, which sets your loan payment up as a scheduled transaction. With this transaction type, the program reminds you a few days before your payment is due.
If you want to check the settings for your payment, click Payment Method. In the Select Payment Method dialog box, you can specify the account to use, whether you want a reminder or an automatic payment, and how many days in advance to process the payment.
Online Pmt appears in the drop-down menu only if you have a bank account set up for online payments. Online Pmt sets the payment to transmit electronically. If you want your online bill pay service to send the payments without any action on your part, click Payment Method and, in the dialog box that opens, select the Repeating Online Payment option.
In the Payee text box, type the name of the lender.
If you’re printing your loan payment checks, click the Address button to enter the mailing address for the payee.
Figure 5-9. Top: Quicken fills in the payment amount with values from your loan. Click Edit to open the Split Transaction dialog box. Middle: In the Split Transaction dialog box, you can enter each separate addition to your loan payment. Bottom: Quicken adds the total from the Split Transaction dialog box to the loan payment.If Quicken hasn’t chosen the correct category for your loan interest, in the Category for Interest drop-down menu, choose the category you want.
Quicken automatically chooses its built-in Interest Exp category, which isn’t connected to a tax form. For mortgage interest, which is tax deductible, choose Mortgage Int:Bank instead.
Click OK.
Quicken adds your loan payment to the Scheduled Transaction List and displays a message box that asks if you want to create an asset account to go along with this loan. For houses and vehicles, you’ve probably already set up the asset account in Quicken, in which case click No to complete the payment setup. See "Linking an Asset and a Loan” (below) to learn how to connect the loan to the asset it helped you purchase.
If you need to create the corresponding asset account, click Yes. The program opens the Quicken Account Setup dialog box for an asset account. Follow the steps on Section 2.3.1 to create the account.
For loans that pay for things that aren’t assets, like school loans or debt consolidation loans, click No.
When you’re done, you can check out your payment schedule. See the box on Section 5.3.3.
Linking an Asset and a Loan
Sometimes you want assets linked to loans and sometimes you don’t. For example, if you buy a house by taking out a mortgage, linking the asset and the loan means that Quicken can tell you how much equity you have in the house. Or if you’re taking out a second mortgage on your house, you may want to link a second loan to the same asset. Whatever the reason, you can easily link an asset and a loan.
Note
Assets that you own free and clear don’t have corresponding loans. Similarly, loans that pay for intangible items don’t have corresponding assets. In either case, you don’t need to read this section.
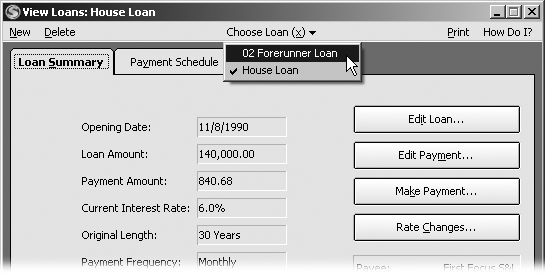
The View Loans window has three tabs. The Loan Summary tab shows the loan’s vital statistics: starting date, amount, payment, interest rate, length, payment frequency, current balance, remaining payments, and—the sign that there’s an end in sight—the final payment date. The other two tabs tend to sit lonely and unclicked most of the time, but they come in handy if you’re thinking about big loan changes, like refinancing or paying it off early.
If you choose the Payment Schedule tab, you see a full amortization schedule for your loan, like the one shown here: the principal and interest allocation for each payment and the remaining balance after each payment. You need to know how much you pay in principal and interest for tax return preparation. Unless you want the IRS asking a lot of questions, always report the values on the 1098 form from your lender, even if they differ from the ones you see in Quicken.
One reason to consult this schedule is to see whether it makes sense to pay off a loan. As you can see in the figure, amortized loan payments begin as mostly interest and very little principal, but near the end, the payment contains very little interest. At that point, you’ve already paid most of the price for borrowing the money; you may as well use the lender’s money for the life of the loan.
The Payment Graph tab shows a graph of the cumulative
principal and interest you pay over the life of the loan. This graph
can seem more disheartening than helpful, since it shows you how
long it takes to make any obvious dent in what you
owe.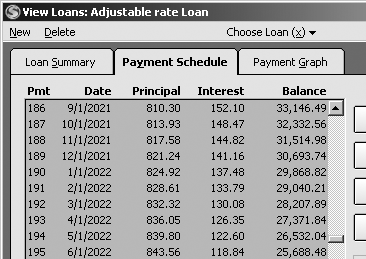
Here are the steps to linking loans to assets:
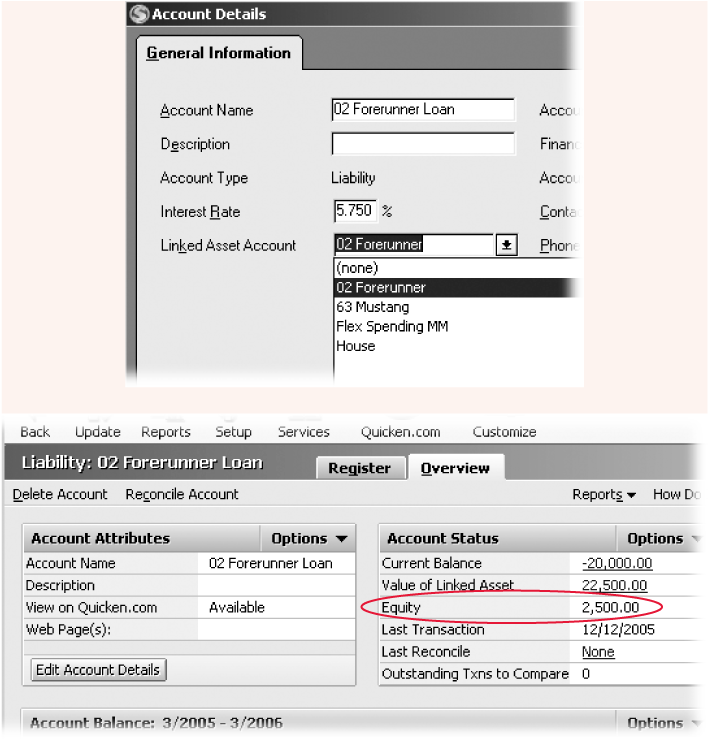
In the Account Bar, choose the liability account for the loan that you want to link to an asset. In the liability account’s register, click the Overview tab.
This tab shows basic account attributes, as well as the current status of its balance and equity, as illustrated in the bottom figure in Figure 5-10.
Below the Account Attributes section, click Edit Account Details.
The Account Details dialog box opens. Here you can add account details or edit its information, like the asset account to which it’s linked.
In the Linked Asset Account drop-down menu, choose the asset account.
Quicken lists all the asset accounts in your Quicken data file, as in Figure 5-10.
Click OK.
You’re done.
You should see the “You successfully created the asset-loan link” in the Account Details dialog box. Check the Linked Asset Account text box to make sure it shows the asset you intended. (If not, go back to step 2 and correct it.)
Making a Loan Payment
If you dutifully performed each step on Section 5.3–Section 5.3.1 when you set up your loan, you should already have a scheduled payment for your loan. With a scheduled payment in place, you can clean house, play cards, or carve voodoo dolls until Quicken reminds you it’s time to make a loan payment. Then, you pay your loan just as you would any other scheduled transaction. But every once in a while, you may decide to make an extra payment or pay your mortgage a little early. This section describes how to make loan payments, whether you’re making a regularly scheduled payment, paying on a different date than usual, or making an extra payment.
Quicken creates payment transactions that include splits to allocate the payment to the correct amounts of principal, interest, and other payments. Listed next are the program’s ground rules.
Quicken allocates interest to a category for interest expense. (For example, there’s a built-in category called Mortgage Int that’s associated with IRS Schedule A.)
Quicken allocates the principal you pay to the loan’s liability account. The transfer reduces the balance that you owe on the loan.
The program allocates other amounts to the categories that you chose when you set up the loan payment.
Note
Payments don’t have any effect on the value for the linked asset account, if one exists. The balance in an asset account indicates the current value of the asset—and making a loan payment doesn’t change that.
Making a Regular Payment
If you set up a loan payment as a scheduled transaction, it’s hard to miss the reminders that Quicken gives you. In Quicken Home for instance, your loan payment appears right there in the Bills and Scheduled Transaction list. In the Cash Flow Center, your scheduled payments show up in the Cash Flow Alerts list. And, if you view the register for the account that you use to pay your loan, you find the Bills and Scheduled Transactions list at the bottom of the window. The red text and “Overdue!” in the Status column are meant to grab your attention.
To make a payment from the Bills and Scheduled Transaction list, click Enter. The Edit Current Transaction and Enter Into Register dialog box appears. You can click Record Transaction, then write or print the check, and send it off to the lender. (In fact, you can press Ctrl+J anytime to open the Scheduled Transaction List window and enter scheduled transactions—due or not.)
If you use an online bill pay service, you can set up your loan payments in Quicken as repeating online payments. Your bill-paying service takes complete charge of your payments, sending them on schedule until you tell the service to cease and desist. (See the box on Section 6.10 for more advice.)
Paying Ahead of Time
Suppose you have a scheduled payment that you want to make early, perhaps to squeeze an extra mortgage payment into the tax year to increase your deductions. Here are the steps for making a scheduled loan payment on a different date.
Press Ctrl+J to open the Scheduled Transaction List.
You can also choose Tools → Scheduled Transaction List.
In the row for the scheduled transaction, click Enter.
The Edit Current Transaction and Enter into Register dialog box appears.
In the Date text box, choose the new date for your payment.
You can make the payment earlier or later. If you’re postponing a payment, be sure to check the grace period that your lender allows, unless you don’t mind handing over your first-born puppy.
Click Record Payment.
Quicken adds the payment to the register. Don’t forget to write or print the check and mail it to the lender.
Making an Extra Payment
If you decide to make an extra loan payment, for instance to use a holiday bonus to pay off additional principal, the View Loans window is the place to go. Here’s the drill:
Open the View Loans window by choosing Property & Debt → Loans (or by pressing Ctrl+H).
The window title includes the name of the loan that’s selected. If the loan you want to pay isn’t visible, click Choose Loan in the menu bar and, in the dropdown menu, click the loan you want. Quicken displays the basic values for the loan.
Click Make Payment.
The Loan Payment message box appears asking if you want to make a regular or extra payment.
Click Extra.
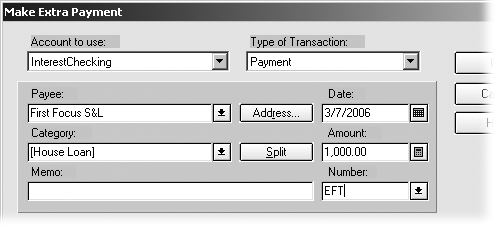
Quicken opens the Make Extra Payment dialog box. Because the payment isn’t part of the loan payment schedule, the Amount text box is blank. You must fill in or modify the boxes to fit the payment you’re making, as illus trated in Figure 5-11.
In the Date text box, choose the date that you plan to make the payment.
Quicken automatically sets the date to today.
If you’re paying towards something other than principal, choose it in the Category box.
Most of the time, extra payments pay off principal (a noble thing to do because it reduces the length of your loan and the total interest you pay). Quicken automatically sets the Category text box to the liability account for the loan, which transfers the payment amount into the account, thus reducing the outstanding balance.
Figure 5-11. For an extra payment, you have to tell Quicken how much you want to pay and when you want to pay it. In the Category text box, the program automatically chooses the liability account so that the payment pays off loan principal. Change the category if you’re making an extra payment for escrow or some other purpose.In the Amount text box, type the payment amount.
If you’re making an extra payment to reduce your principal, you can choose the payment amount. If your lender is asking for more money to make up for a shortfall in escrow, type that amount.
In the Number drop-down menu, choose how you plan to pay, just like a regular transaction in an account register.
Next Check Num, Print Check, Online Pmt, and EFT are the likely choices.
Click OK.
Quicken adds the transaction to the register of the account from which you paid.
If you’re paying off principal, the payment also acts as a transfer to reduce the balance in the loan liability account.
Editing a Loan
Loan characteristics change from time to time. For example, if you have an adjustable-rate mortgage, the interest rate changes every so often. Each year, your escrow payment increases as property taxes and homeowners’ insurance premiums go up. Or you may have made a small error when you initially set up the loan in Quicken. Regardless of the reason, the View Loans window provides the tools you need to make all these changes.
The fastest way to open the View Loans window, shown in Figure 5-12, is by pressing Ctrl+H. If keyboard shortcuts aren’t your forte, choose Property & Debt → Loans. Before you begin making changes, in the View Loans menu bar, choose Choose Loan and then, in the drop-down menu, select the loan you want to edit.
Changing Loan Details
The most common reason to change loan details is to adjust values you initially set up. For example, suppose you chose the No Balloon option when setting up a loan because you didn’t know the details of your balloon payment yet, and now you want to fill in the amortized length. Or perhaps you provided the wrong opening date and want to correct that.
In the View Loans window, click Edit Loan. When the dialog box opens, you see the same text boxes and options you ran through when you first set up the loan, as described on Section 5.3. Make the changes or corrections you want and, on the final screen, click Done to save your changes.
Changing Payment Details
The most common reason to edit a payment is to adjust the escrow for a mortgage. Mortgage lenders usually demand an escrow payment for property taxes and homeowners’ insurance to ensure that these payments are made. Their money’s on the line and they don’t want a local government seizing the property due to unpaid taxes. Property taxes and insurance premiums seem to increase constantly, so lenders usually review your escrow account once a year and adjust the escrow amount accordingly.
Note
One reason your payment might drop is when the equity in your home has increased to the point where you no longer need private mortgage insurance.
Changing your payment method is another reason to edit a payment in Quicken. If you set up the payment as a scheduled transaction, say, but want to switch to a repeating online payment, use the Edit Loan Payment dialog box.
Regardless of the reason for the change in your payment, in the View Loans window, click Edit Payment to open the Edit Loan Payment dialog box. The steps for changing the values in this dialog box should be familiar—they’re identical to adding values in the first place.
Adjusting the Interest Rate
Much as you might want to change the 8.5 percent rate on your 30-year fixedrate mortgage, you can use the Quicken Rate Changes feature only if you borrowed money with an adjustable-rate loan. When the interest rate changes on one of these loans, the payment changes along with it. (The potential for a smaller payment is one of the charms of an adjustable-rate loan.) With Quicken, you don’t have to do any fancy calculator work. You tell the program the new rate, and it automatically calculates your new payment amount.
Here’s how you change the interest rate and figure out your new payment:
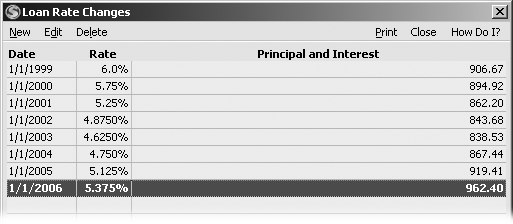
In the View Loans window, click Rate Changes.
Quicken opens the Loan Rate Changes window. As you can see in Figure 5-13, you can create, edit, or delete interest rates. When the interest rate adjusts, add a new rate with the date it becomes effective. Edit a rate if you set the rate or date incorrectly. If you’re decades into a loan, you can delete older interest rates to shorten the list.
In the Loan Rate Changes menu bar, choose New.
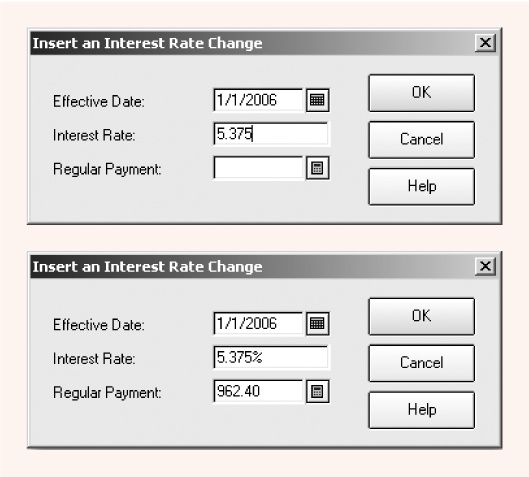
The Insert an Interest Rate Change dialog box appears with boxes for the critical values: the effective date of the change, the new interest rate, and the new payment that you’ll have to pay.
In the Effective Date box, choose the date on which the new rate becomes effective.
Adjustable-rate loans don’t change their rates any old time. Some adjust their rates in as little as a month, although loans that adjust once a year are the commonest. The lender will tell you on which day the interest rate takes effect.
In the Interest rate text box, type the new interest rate.
The Regular Payment text box is empty until you press Enter or click away from the Interest Rate text box. Quicken calculates the new payment and fills in the box, as you can see in Figure 5-14.
Click OK.
Quicken not only adds the interest rate to the Loan Rate Changes list; it also edits the loan payment to reflect the new amount beginning with the first payment after the rate’s effective date.
Refinancing a Loan
If you refinance a loan or mortgage, you use money from the new loan to pay off the balance on the old loan along with other fees. The balance on the old loan drops to zero. In Quicken, the new loan should be linked to the asset it’s paying for. If the thought of getting all these changes straight makes you sweat, you can relax. This sort of task is nothing more than following the money.
Create the new loan as you would any other. Quicken creates a transaction in the liability account for the opening balance. All you have to do is split this opening balance transaction to account for the items that the new loan covers: paying off the old loan, closing costs, and any accrued interest. Figure 5-15 shows you how.
For example, if you roll the closing costs and payoff interest into the new loan, the split transaction includes three entries, as demonstrated in Figure 5-15:
Pay off old loan balance. To pay off the balance on the old loan, choose the liability account for the old loan in the Category field. In the Amount field, type the balance on the old loan. Quicken reduces the balance on the old loan to zero.
Closing costs. To allocate some of the new loan to pay your closing costs, choose a category like House Cost Basis. (You have to create this category. The category name indicates that you can add the expenses in this category to the original purchase price to increase your cost basis and, thus, decrease the gain, when you sell.) In the Amount field, type the value of the closing fees.
Pay off interest. When you close out an old loan, you typically have to pay some interest that accrued after the last payment you made. In the Category field, choose the category you use to track deductible interest expense, like Mortgage Int: Bank.
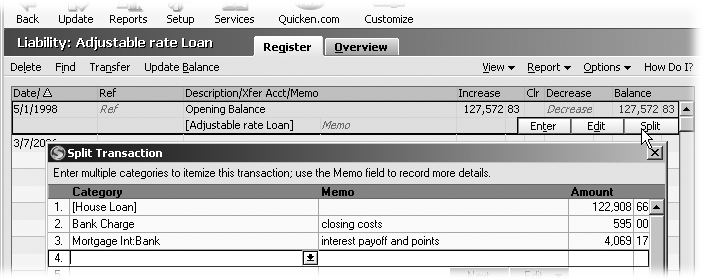
Click OK to save the splits and then click Enter to save the changes to the Opening Balance transaction.