Chapter 6. Online Banking
Before online banking, your bank balance was like the surprise ending of a film thriller. You had to wait until your bank statement arrived (by snail mail) to discover how much money you had on hand, which checks and deposits had cleared, and whether you were overdrawn. But with Quicken and almost every financial institution offering online banking, you can view those balances and transactions any time, download them into your Quicken data file, and take evasive action to avoid bank fees for bounced checks and low balances.
You can also pay bills online without having to write checks, lick stamps, or drive to the post office. For the ultimate in convenience, you can set up recurring payments so you can go on a long vacation without worrying about missing your mortgage payment.
First, you’ve got to do some setup. (There had to be a catch.) You need to sign up for your bank’s online services, and instruct Quicken how to connect to them. This chapter explains how online services work, and shows you step-by-step how to link Quicken to them, download transactions, and make online payments. You’ll also learn how to compare downloaded transactions with ones you recorded yourself (and correct any discrepancies).
Note
If you prefer paper checks and brick-and-mortar banks, simply skip this chapter. Quicken lets you manage all aspects of your personal finances without ever connecting to the Internet.
What Quicken Can Do Online
Online services boil down to three electronic tasks. Quicken can handle all three, but not all banks do. Bank policies vary widely, so contact yours directly to get all the details. If your bank doesn’t offer a certain service—online bill payment, say—you can purchase that option directly from Intuit (see the box on Section 6.1).
Online account access. Once you set up an account in Quicken for online access—checking, savings, credit card, or investment—you can download transactions that have cleared in that account. If you have two accounts at the same financial institution set up for online access (checking and savings, for example), you can electronically transfer funds between accounts.
Quicken online account access works only if your bank supports it. You can find out by checking Quicken’s list of participating financial institutions, as discussed on Section 2.3.1. If you use a financial institution that doesn’t support Quicken online account access, you may instead be able to perform online tasks through your bank’s Web site without the automatic link to Quicken. (You can learn how to do that on Section 6.3.3.)
Online bill payment. Paying bills with Quicken and your Internet connection takes only a few mouse clicks. Your days of writing checks, stuffing envelopes, digging out stamps, and dropping payments in mailboxes are over. You record a transaction in Quicken, send the instructions to your online bill payment service, and let it do the grunt work.
But perhaps the most addictive aspect of online bill payment is automatic repeating payments. You can sit back and relax without firing a single neuron over the bills that are due. Quicken takes care of sending online payments on the schedule you set.
Shopping for personal finance services. Quicken includes dozens of links to Web sites that provide personal financial services. If you desire more assistance than Quicken can provide, you can research and comparison shop for loans, insurance, financial institutions, and even financial planners. (See the box on Section 6.1 for more info.)
Connecting Quicken to the Internet
Chances are you told Quicken about your Internet connection when you installed the program. Online banking aside, Quicken does plenty every time it goes online: It can update your version of the program, show you information about financial services, convey feedback to Intuit, and connect you to support options like the Quicken Forum (see Appendix B).
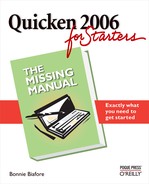
If Quicken isn’t already going online, start by choosing Edit → Preferences → Internet Connection Setup. The first screen of the Internet Connection Setup wizard has three options, which cover all possibilities for Internet access, as shown in Figure 6-1.
Use the following connection. The list in the box that accompanies this option displays all of the Internet connections you’ve set up on your computer. (If you have more than one, and don’t see them all listed here, see the box above for further advice.) Select this radio button if you use a dial-up connection: Quicken dials your ISP (or runs your ISP’s connection program) when it wants to go online.
You can also select this option to change the Internet connection Quicken uses, or if Quicken is having trouble detecting a connection.
Use my computer’s Internet connection settings to establish a connection when this application accesses the Internet. Select this option if you have an Internet connection that’s always available, like broadband, wireless, or cable. Despite its lengthy label, this option is the easiest to use. You’re telling Quicken to use the Internet connection that’s already running whenever it needs to go online.
Tip
Selecting this option is easy only if you have a running Internet connection. If Quicken tries to go online only to find no connection, the screen in Figure 6-1 appears, asking you to choose one.
I do not have a way to connect to the Internet. Please give me more information on setting up an Internet account. Unfortunately, choosing this option doesn’t offer any meaningful help. If you don’t have Internet access, you’re not ready for the Internet Connection Setup wizard. Click Cancel, find an Internet Service Provider, and subscribe to its Internet service. When you’re online, return to this wizard, and choose one of the other two options.
After you choose your connection option, click Next or Done to complete the setup of your Quicken Internet connection. Testing your connection is as simple as launching one of the helpful hints that takes you to a Web site. For example, choose Help → Ask a Quicken User to see if the program reaches the Quicken Support Forums Web site.
Tip
If Quicken can’t connect to the Internet, you first have to determine whether the problem’s with the program or your Internet connection. You can easily answer this question by checking for email or opening your Web browser. If those programs can connect, launch the Internet Connection Setup wizard again and check your settings.
Setting Up an Account for Online Services
Connecting the accounts you have at financial institutions to your Quicken accounts is a little more like matchmaking than personal finance. You must first prepare both participants for the relationship, and then introduce them. When you first create an account, as described in Chapter 2, Quicken asks you for the name of the financial institution and whether you want to set up the account for online services. If you took care of setting up your account then, you can skip to “Downloading Transactions” on Section 6.5. If not, then read on.
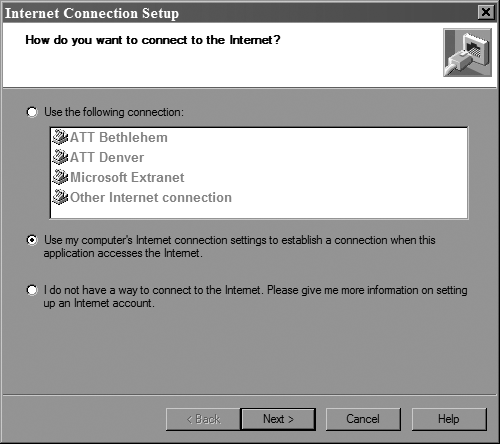
Before you embark on a mission to connect your account with online services, you must first see if your financial institution works with Quicken’s services. For accounts listed in the Quicken Cash Flow Center (including checking, savings, and credit cards), the account Overview tab is the fastest way to do this. In the Account Bar, choose the account and then click the Overview tab. Figure 6-2 shows how you can tell which online services a financial institution offers:you’ll see Available (or Not Available) listed for the services your financial institution provides.
Your financial institution takes the lead in communicating with Quicken. Financial institutions that use direct connections can do more than those that use Web Connect. As a result, you do less work to link those accounts to Quicken’s. Here are the two possibilities:
Direct connection is a secure Internet connection that links Quicken directly to your financial institution’s computers. With this type of connection and a financial institution that offers the services, you can download your bank statements and transactions directly into your data file, transfer funds between accounts, pay bills online, and email your bank. (You can learn about direct connections on Section 6.5.1.)
Web Connect uses a secure connection to your bank’s Web site to download your statement information, but, unlike a direct connection, the program doesn’t automatically load the downloaded information into Quicken. With Web Connect, you must then import the downloaded information into Quicken.
Finding a Participating Institution
Many, but not all, financial institutions support Quicken’s online services. If your current bank is behind the times, you can try another institution. Whether you’re on the prowl for a new bank or want to apply for online services with your current one, Quicken provides a list of participating financial institutions so you can see—and apply for—the services they offer. As long as you’ve registered your copy of Quicken, the program updates the list when you go online.
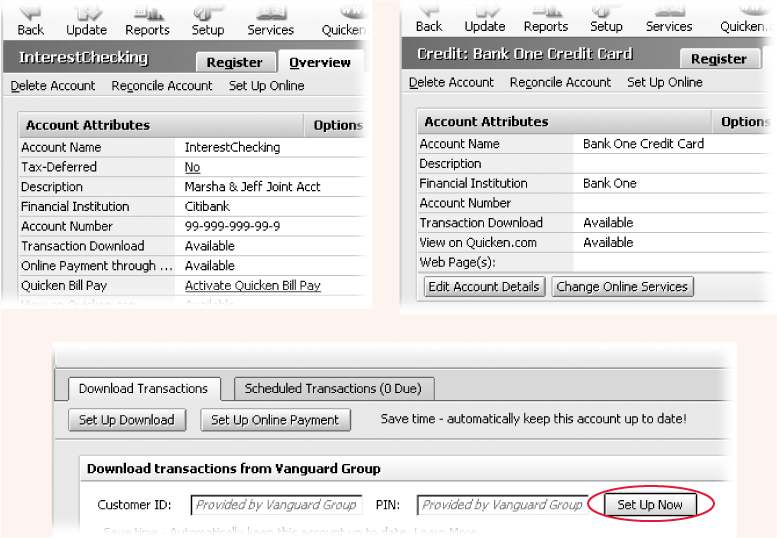
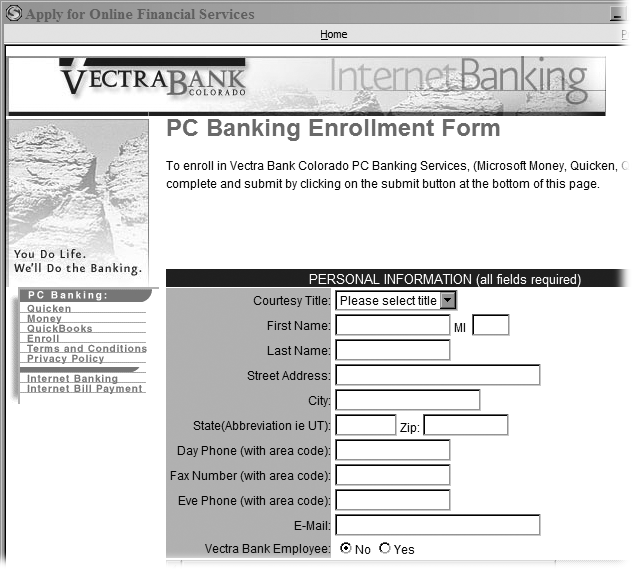
To view the list, choose Online → Participating Financial Institutions. When the Apply for Online Financial Services window appears, you can filter the list for institutions that support different types of online financial services. As shown in Figure 6-3, finding a financial institution is as easy as 1-2-3.
If you’re not shopping for a new bank, you can use the Apply for Online Financial Services window to sign up for additional services with the institution you already work with. Here are the services you may find:
Any services. By definition, this link displays financial institutions that support at least one of Quicken’s online financial services.
401(k) account access. This link filters the list to show the financial institutions that let you download the transactions for your 401(k) or 403(b) retirement accounts.
Figure 6-3. There are three steps to researching online banking services in Quicken: 1. Click one of the Online Financial Services links to filter the list to show only the financial institutions that provide that service. 2. Click the name of a financial institution to see the details of its online capabilities. 3. If you like what you see, click Apply Now to learn how to get started with their online services.Banking account access. This service lets you download transactions from your bank account into Quicken.
Bill pay. Institutions that support this service let you send them bill payment instructions from Quicken (although you usually pay for the privilege).
Brokerage account access. This service lets you download transactions from your investment account into Quicken.
Credit/charge card access. With this service, you can download your credit card transactions into Quicken.
To find a financial institution that supports all the services you want, click each link and make sure that the company’s name reappears each time. If you know which institution you want to use, it’s much easier to choose its name in the list and review the information that Quicken displays, as illustrated in Figure 6-3.
Tip
Before you go through the hassle of relocating accounts, give your current financial institution a call to see if it’s planning to offer online services. If you want only online bill payment, you can keep your account where it is and sign up for Quicken’s Bill Pay service instead (see the box below).
Applying for Online Services
The first step in a budding online relationship between Quicken and your bank accounts is applying for online banking services at your financial institution. If you’ve already started the application ball rolling, you can skip this section. If you haven’t, choose Online → Participating Financial Institutions to open the Apply for Online Financial Services window.
Peruse the Financial Institution Directory to find your bank or institution, and then click the link for its name. When the company’s details appear in the right pane, simply click the big Apply button to start the process. One of two things happens, depending on whether the financial institution has an online application:
No online application. A window opens thanking you for your interest in online services…and telling you to contact your financial institution. How helpful. In the menu bar, click Home to return to the Apply for Online Financial Services window, which includes the telephone number to call.
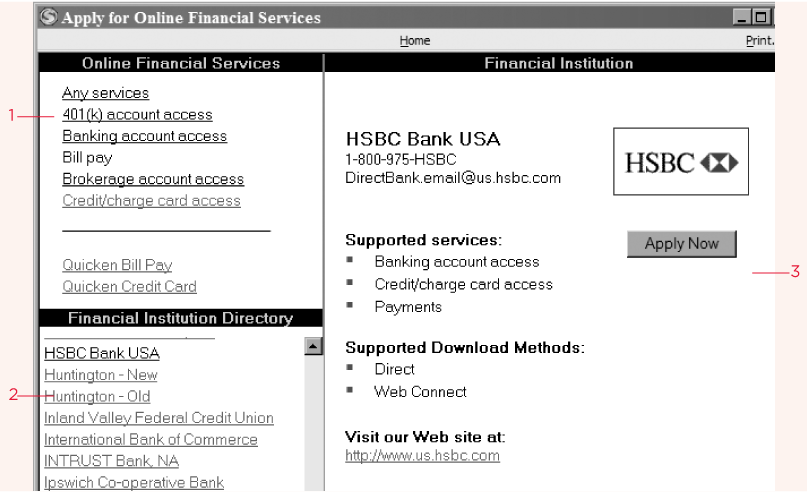
Online application. In the Apply for Online Financial Services window, Quicken displays the institution’s Web application, as you can see in Figure 6-4. Fill out the application and follow the onscreen instructions.
After you complete the application process, your financial institution will send you confirmation information, a PIN (personal identification number) or password, and so on. Check to make sure your account number and other information is correct. Now you’re ready to activate your account for online services, as described next.
Activating Online Services for Your Quicken Account
A week to ten days after you apply for online services, you should have a confirmation letter from your bank with your new customer ID and PIN. To start banking online, all you have to do is activate the corresponding account in Quicken. Here are the steps:
In the Account Bar, select the account you want to activate.
The account register opens to either the Register or Overview tab. Either way, you’ll see the Set Up Online command in the menu bar.
In the register menu bar, choose Set Up Online.
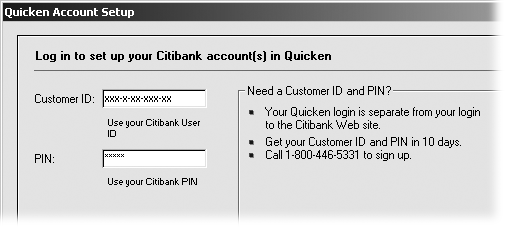
If your financial institution supports direct communication with Quicken, the program opens the Quicken Account Setup dialog box, which immediately asks for your customer ID and PIN, as illustrated in Figure 6-5.
Figure 6-4. Each financial institution has its own way of doing things. Follow the instructions on the Web site to complete its application. You must apply separately to each financial institution whose online services you want to use.For financial institutions that don’t communicate directly, Quicken has Web Connect, which helps you log into the financial institution’s Web site to download a transaction file for import to your Quicken data file. If you see a window containing your bank’s Web page, skip to “Downloading Statements with Web Connect” on Section 6.5.2.
In the Customer ID and PIN text boxes, type the customer ID and PIN you received from your financial institution. Then click Next.
Quicken goes online and downloads information it needs about your accounts from the financial institution. When Quicken and the institution have successfully made each other’s acquaintance, you’re ready to continue.
If you don’t have your customer ID and password, the dialog box tells you how to get them, and even provides the financial institution’s phone number.
If a dialog box asks you to change your PIN, fill in the boxes for your current and new PIN.
Some financial institutions make you change your PIN immediately.
If a dialog box asks for your account number and bank routing number, type them in the appropriate boxes.
For the sake of security, your confirmation letter probably doesn’t include the account and routing numbers. Choose Help → Quicken Help. In the Quicken Help window, click the Index tab and type “routing” to display the “What is my bank routing number?” topic. You can also find these numbers on your checks.
If you see a dialog box that asks you to choose the account you’re setting up, choose the account in the drop-down menu, and then click Next to continue.
You only see this box if you have more than one account set up for online services at the financial institution.
Click Next to complete the setup.
Quicken displays a dialog box proclaiming you’ve succeeded in setting up the account for online services. To download transactions, click Next once more.
To verify that your account’s activated, open the register window and click the Overview tab. Next to the service’s name, you should see the word “Activated.”
Updating All Accounts with One Step
Online financial services are about convenience, so why download transactions and send payment instructions one account at a time? In Quicken, the One Step Update automatically downloads transactions and sends payment instructions for every account you’ve set up for online services.
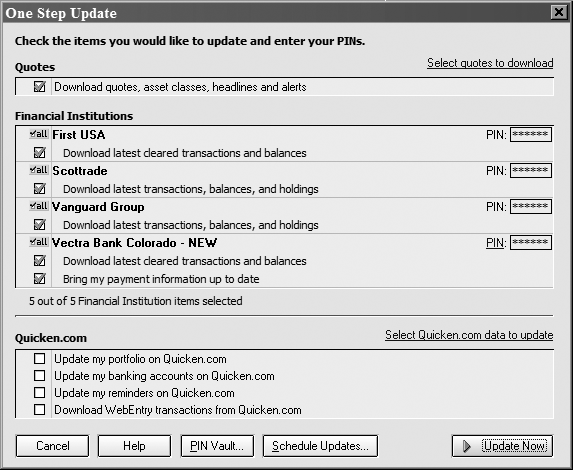
It should come as no surprise that this convenience requires some setup. The time you save is well worth the few minutes you need for the setup. To get started, choose Online → One Step Update, which opens the One Step Update dialog box, shown in Figure 6-6.
Although One Step Update can perform all of the following tasks in one session, you can tell it to perform only the tasks you want. For example, you can turn off the Quotes option if you want only your downloaded transactions.
Quotes. To download information about your investments, turn on the checkbox for “Download quotes, asset classes, headlines, and alerts.” Quicken automatically obtains price quotes, your investments’ asset classes, headlines about your investments, and alerts about things like steep price drops. To specify which quotes to download, click the “Select quotes to download” link. See Chapter 9 to learn about working with investments in Quicken.
Financial institutions. Quicken lists all the financial institutions you’ve set up for online services. The checkboxes you see for each account depend on the online services you’ve activated. Accounts that only download transactions have a checkbox for downloading. If you also set up online bill payment, that account has a second checkbox labeled “Bring my payment information up to date.”
Quicken.com. Uploading your financial information to Quicken.com lets you manage your money via the Internet, which comes in handy if you’re traveling for business or pleasure. The downside is that your sensitive financial data is stored at Quicken.com. If you think storing your personal information on a Web site is an unnecessary security risk, turn off all checkboxes in this section.
When you’re ready to update your accounts, click Update Now. A status dialog box appears, showing you which account it’s updating and how far it’s progressed. If an emergency arises, click Stop Update. You can run One Step Update later when things have calmed down.
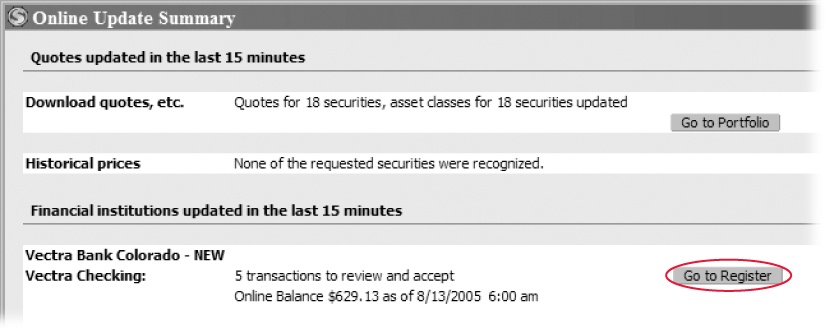
When all of your accounts are up to date, the Online Update Summary window opens. As you can see in Figure 6-7, you can quickly review an account’s current balance and whether it has any new transactions. To check the details of downloaded transactions, click Go to Register (for bank accounts) or Go to Account (for investment accounts).
Downloading Transactions
Most financial institutions offer to download transactions in one way or another. With a direct connection, you can download transactions with a single click. Using Web Connect takes a few more steps, but you still get the records from your financial institution long before the statement arrives.
With the One Step Update, you don’t need to settle for downloading transactions for just one account at a time. However, if you’re worried about your cash flow and want to quickly check whether a certain deposit cleared, you can download transactions for only one account. This section explains how to download transactions using direct connections and Web Connect.
Downloading Transactions via a Direct Connection
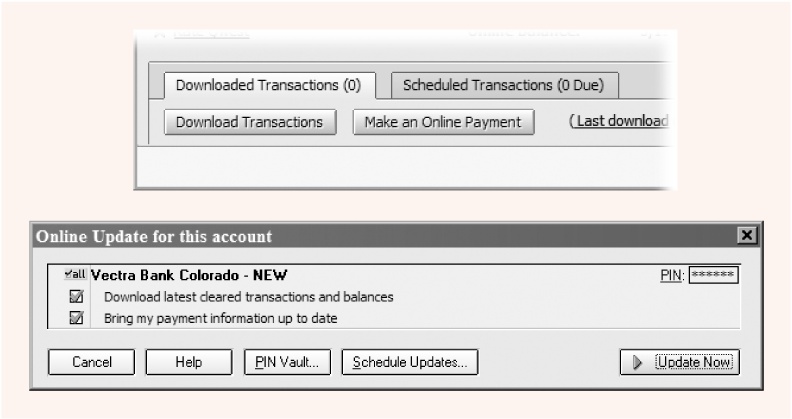
For financial institutions that support direct connections, you never have to leave Quicken to download your transactions. In the Account Bar, select the account you want to update. The register for the account appears in the top half of the window, and tabs for downloaded and scheduled transactions appear in the bottom half. On the Downloaded Transactions tab, click Download Transactions, as shown in Figure 6-8. The Online Update dialog box opens.
If you use the PIN Vault to store your PINs and passwords, Quicken automatically fills in the PIN text box (with asterisks to hide your actual PIN) and turns on the checkboxes for the online services you’ve activated. All you have to do is click Update Now. If you don’t use the PIN Vault, type your PIN or password in the PIN box.
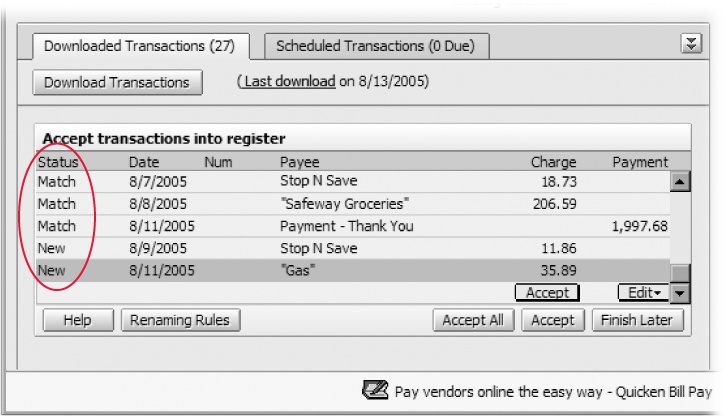
A dialog box then displays the status of the communication between Quicken and your financial institution. When the two finish talking, your downloaded transactions appear at the bottom of the register window, as shown in Figure 6-9.
Downloading Statements with Web Connect
The register window doesn’t look any different for an account that uses Web Connect. You still see a Downloaded Transactions tab, with a Download Transactions button. The big difference comes when you click that button. Quicken opens a browser window, which in turn displays the Web site for your financial institution.

Unfortunately, Quicken can’t help you find the button or link on this page that downloads transactions. A button or link labeled “Download to Quicken” is a likely candidate, but your financial institution may use a different label or a separate Download page. If you can’t find the link, call your bank’s customer support for assistance.
Once you find and click the button or link, the browser downloads a file with a .qfx extension. The qfx stands for “Quicken file transfer,” and it indicates a Web Connect transaction file. You may have the option to save or open the file, depending on your bank. To download your transactions, click Open. When the program finishes downloading the file, you can review and accept the downloaded transactions as you would for direct connect downloads, as described in the next section.
Reviewing and Incorporating Downloaded Transactions
If you record transactions in the account register prior to downloading them, you have only to match the downloaded transactions to the ones you entered and then correct any discrepancies. On the other hand, if you don’t record transactions in the register—whether due to laziness or a trusting nature—you accept downloaded transactions to create new transactions in the register. You may have to fill in the category or other fields if QuickFill hasn’t already done so.
As Figure 6-10 illustrates, the Status column tells you whether Quicken has matched a downloaded transaction to one you entered. Here’s what each status value means:
Match. Quicken’s found a transaction in the register that matches the one it downloaded.
New. The register doesn’t have a transaction that matches the one Quicken downloaded. Maybe you forgot to record it, or the one you recorded differs from the one the program downloaded.
Accepted. You’ve accepted the transaction either as a match to an existing transaction, or added a new one to the register.
If Quicken matches every transaction and you agree with the program’s judgement, your work’s almost done. In the bottom right corner of the Downloaded Transactions tab, click Accept All to accept the program’s decisions. In the account register in the Clr column, you see a lowercase “c” for every accepted transaction. The “c” indicates that your financial institution has cleared the transaction but you haven’t yet reconciled it. (See Section 7.4 for more information on reconciling.) If you’d like to examine the Match and New transactions individually, see the next section.
Tip
If you clicked Accept All in haste, you can revert to Quicken’s original status assignments by clicking Undo Accept All. With the Match and New statuses back in place, you can accept each transaction individually.
Accepting Transactions
If you forgot to record a few transactions—or you’ve decided to create transactions by downloading them—Accept All is not a good idea. You’re likely to accept bank errors (which do happen) or even fraudulent charges (which happen more often than you want to know). If you see even one downloaded transaction with a New status, review each transaction individually and find it on your paper or online statement before accepting it.
In the Downloaded transactions tab, selecting a transaction displays the Accept and Edit buttons immediately below the transaction row. If the transaction is OK, click Accept. If you wish to delete a transaction completely, click Edit, and choose Delete from the drop-down menu (see the box below for more information).
Accepting matched transactions. When you click Accept for a transaction that Quicken matched to one in your register, the program adds a lowercase “c” to the Clr field in the register to indicate that your financial institution cleared the transaction.
Accepting new transactions. If you select a downloaded transaction whose status is “New,” Quicken automatically adds a transaction to the register with the information that it knows—the date, the amount, and in many cases the payee. If QuickFill can figure out the category, it fills in that field as well.
In the register, fill in blank fields or correct any values (for instance, replace “Check” in a downloaded transaction with the actual payee name, or change an incorrect category). When the new transaction is complete, click Enter in the register, or click Accept in the Downloaded Transactions tab.
When Quicken Doesn’t Match Transactions Correctly
Sometimes Quicken makes the wrong match. For example, you have two ATM withdrawals for $100 in your register, and Quicken chooses the newer one—leaving the older one abandoned and unmatched. To correct these mismatches, select the transaction in the Downloaded Transactions tab, and then click the Edit button that appears beneath the transaction. You have two choices:
Unmatch. Choose this command if you want Quicken to find another matching transaction, for example, the earlier of your two ATM withdrawals. If the program finds a match, it changes the status to Match. If the new match is correct, click Accept. If it doesn’t find a match, the transaction’s status changes to New.
Make New. You can force Quicken to create a new transaction by choosing Make New. The program doesn’t look for matching transactions. Instead, it changes the status for the downloaded transaction to New. Click Accept to create a new transaction in your register.
Matching Transactions When Quicken Can’t
If you see a downloaded transaction that should match one in the register—but doesn’t—chances are a small mistake in the transaction you recorded is the culprit. You may have assigned the wrong check number in your Quicken register or typed a 3 instead of an 8. Or you recorded several separate deposits, but your bank consolidated them into one. Whatever the reason, you can manually match a downloaded transaction to one or more transactions in the register.
If a downloaded transaction doesn’t match, try scrolling in the account register to the transaction you entered. If your transaction amount doesn’t agree with the bank’s, adjust the register amount to match the bank’s value. When you click Enter and record the updated transaction, Quicken automatically matches it to the downloaded one.
Note
Quicken doesn’t match a transaction you recorded if you set its transaction date later than the date it cleared at the bank. For example, if you recorded a transaction with a date of March 6 and the bank cleared it on March 1, change the date in the register, to agree with the bank. Quicken then considers the two transactions a match.
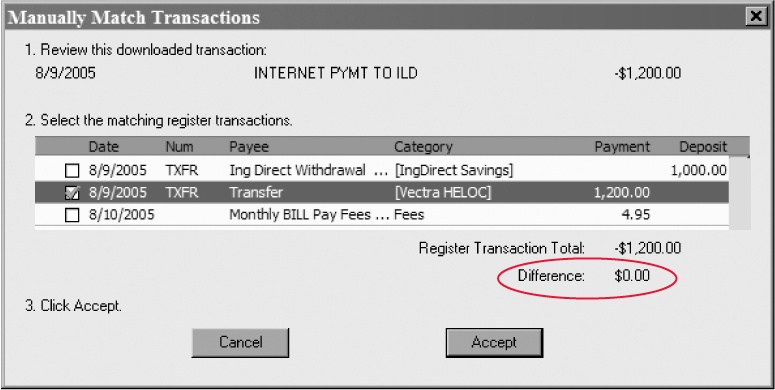
To do your own matching, in the Downloaded Transaction tab, select the transaction, click Edit, and choose Match Manually. The Manually Match Transactions dialog box, shown in Figure 6-11, appears. Turn on the checkbox for each register transaction that you want to match to the selected downloaded transaction. Quicken adds up the amounts for each transaction that you turn on. When the total for the register transactions equals the amount of the downloaded transaction, the Difference value becomes $0.00, indicating a match.
Completing the Incorporation of Downloaded Transactions
Quicken offers several options for finishing your work with downloaded transactions. Here’s what each one does and when you might use it:
Accept All. If you’ve reviewed all the downloaded transactions and found no problems, click Accept All. Quicken automatically sets the status for all the downloaded transactions to Accepted.
Finish Later. Click this button if you don’t have time to finish reviewing and accepting transactions, or if you found a problem that you want to resolve before you finish. Quicken saves the work you’ve done so far. The transactions await the next time you open the account register.
Done. When all the downloaded transactions have a status of Accepted, the Finish Later button changes to Done. Click Done to clear the accepted transactions from the Downloaded Transactions tab.
Renaming Payees
One drawback of downloading transactions is the incomprehensible payee names that financial institutions often choose. A simple transfer between your checking and savings account may show up as “INTERNET PYMT TO TXSA 472GP952.” Or a gas-station credit card charge downloads with the station’s ID number—“Conoco #00092372918027.” You want payee names that make sense, like “Savings Transfer” or “Gasoline.” Quicken understands: its renaming rules feature lets you replace downloaded payee names with something short, sweet, and meaningful.
Out of the box, Quicken comes with its “Downloaded transactions” preferences set to automatically create renaming rules if you change the payee name for a downloaded transaction. Trouble is, the program doesn’t always create useful renaming rules.
For example, the last renaming rule in Figure 6-12 is one that Quicken created automatically. If you change a downloaded payee name “LOAF N JUG #9000845453” to “Gas,” the program creates a renaming rule that looks for a payee name that is equal to “LOAF N JUG #9000845453” and changes it to “Gas.” But if you charge a gas purchase at a different Loaf ‘N Jug station, like “LOAF N JUG #1000234901,” the renaming rule doesn’t catch it. And if you replace this name with “Gas,” the program creates a second renaming rule for that gas station.
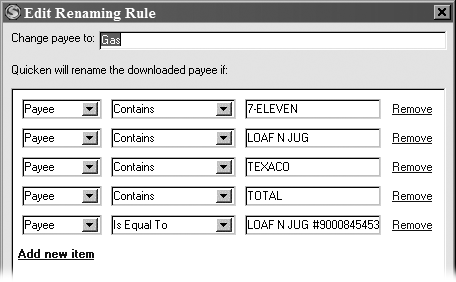
Consider creating more flexible renaming rules that catch more of your payees then Quicken’s exacting rules. As illustrated by the first four renaming rules in Figure 6-12, you can choose “Starts With” or “Contains.” With the “Starts With” test, the downloaded payee must only start with “LOAF N JUG.” The “Contains” test looks for the name anywhere in the payee name.
To work on your renaming rules, at the bottom of the Downloaded transactions tab, click Renaming Rules. (You can also choose Online → Renaming Rules.) In the Renaming Rules for Downloaded transactions dialog box, shown in Figure 6-13, you can create, edit, or delete rules.
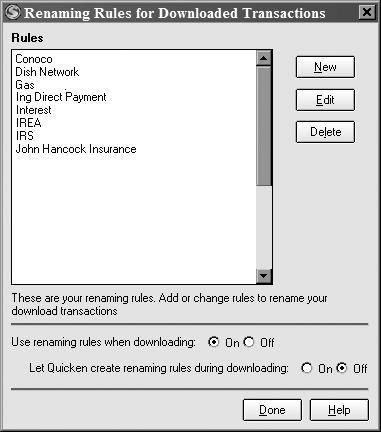
At the bottom of the Renaming Rules for Downloaded transactions dialog box, you can turn two options on or off:
Use renaming rules when downloading. If you want Quicken to use your renaming rules to replace payee names, select the On option, which almost always makes your register easier to interpret. To keep the payee names as they come from your financial institutions, select Off.
Let Quicken create renaming rules during downloading. You should initially set this option to On, so that Quicken creates renaming rules showing the payee names that you’ve edited. After the program creates a list of rules, you can quickly run through the list, editing them to make them more effective. Once you have most of the rules you think you’ll need, turn this option Off. You can reopen this dialog box any time you realize you need another renaming rule.
Setting Up Online Payees
Before your online bill payment service can send payments, you have to tell it who to pay, where to send the payments, and how the payee will know who the payment’s from. In Quicken, Online Payee records include all of this information. Here are the steps to setting up an online payee:
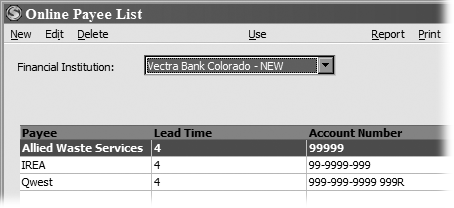
Choose Online → Online Payee List.
The Online Payee List window opens, shown in Figure 6-14.
In the window menu bar, choose New.
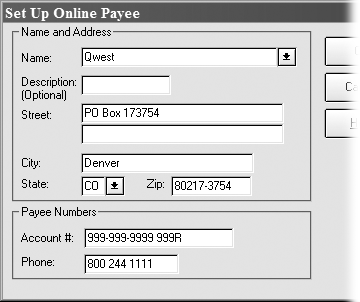
The Set Up Online Payee dialog box opens, as shown in Figure 6-15.
In the Name text box, either type the payee name as it appears on your bill or choose a payee from the drop-down menu.
The drop-down menu contains all of the entries in your Memorized Payee List.
Fill in the Street, City, State, and Zip text boxes with the address from your bill.
Use the address to which you would send a paper check.
In the “Account #” text box, type your account number for the payee.
If you don’t have an account number, you can type some kind of reference, like your last name.
In the Phone text box, type the contact telephone number for the payee.
Quicken doesn’t use this phone number for automatic dialing, so the number format doesn’t matter, but do type the full number with area code. The number’s for reference in case a problem arises with the payment.
Click OK.
The Confirm Online Payee Information dialog box appears, showing you the values that you entered. Quicken isn’t trying to be annoying. If you don’t specify the correct address and account number, your payment may not make it to the payee or may be credited to the wrong account.
In the Confirm Online Payee Information dialog box, carefully review the values, and then click Accept.
Quicken adds the payee to the list. The lead time shown for each payee is based on the number of days your financial institution sets.
Once you’ve added an online payee, you can automatically pay its bills, but Quicken won’t automatically update the payee information. Be prepared to maintain this information as necessary, as discussed in the box on Section 6.9.1.
Paying Bills Online
Whether you use the bill paying service that your financial institution offers or you subscribe to Quicken Bill Pay service, you don’t have to use special dialog boxes to make electronic payments. Online features are accessible throughout the program.
Setting Up Online Bill Payments
Quicken gives you three ways to create online bill payments. As described below, you can choose one based on how you already prefer to record payments.
Cash Flow Center. In the Account Bar, click Cash Flow Center to display the Cash Flow Center window. At the bottom of the window, the Bills and Scheduled Transactions section lists all the payments to send. By clicking Enter or Edit in the row for a scheduled transaction, you can record or edit that transaction.
Account register window. If you usually record payments in your checking account register, there’s no reason to change. In the Num field, choosing Send Online Payment turns a transaction into an online payment.
Write Checks. In the Write Checks dialog box (Section 4.3.2), turn on the Online Payment checkbox.
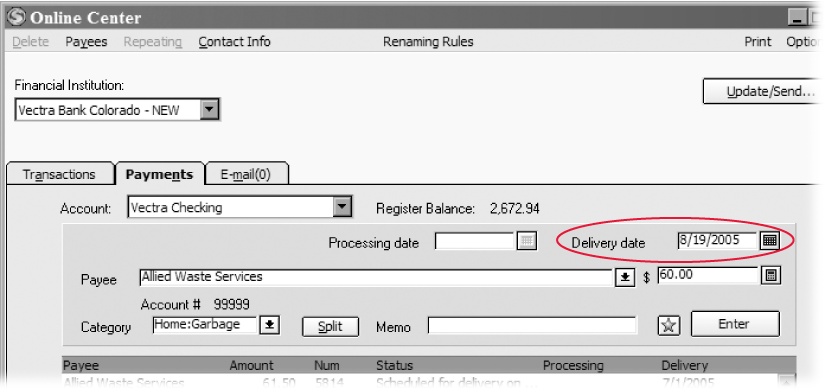
Online Center. In the Online Center window (choose Online → Online Center), click the Payments tab. At the top of the Payments tab, shown in Figure 6-16, fill in the text boxes as you would any payment transaction.
Fill in the Delivery date text box with the date that you want the payee to receive the payment. Typically, you’ll want to set the Delivery date a few days early, for instance to the date that you’d mail your paper check. If the due date’s coming up, you can also choose ASAP to tell your financial institution to process the payment as quickly as it can.
Sending Online Payments
Setting up all the online payments in the world won’t help unless you tell Quicken to send the payment instructions to your online bill payment service. If the Online Center window isn’t visible, choose Online → Online Center. Click Update/Send. The Online Update window appears, listing your payment instructions (new payments, edited payments, and even cancelled payments). Unless you use the PIN Vault, you have to type your PIN. In the Online Update window, click Update Now to transmit your instructions to your online bill payment service.
After Quicken connects to the Internet and finishes sending your payment instructions, the Online Update Summary window appears (Section 6.5). Click Done to close the window. In the account register, the Num field for your online payments now reads Sent.
Setting Up a Repeating Online Payment
If you have a payment that occurs on a regular schedule for the same amount each time, there’s no need to tediously set up and send each online payment. Repeating online payments are possibly Quicken’s most convenient feature. You tell Quicken who to pay, how much, and how often, and the program sets up a repeating online payment with your bill payment service. Because the instructions reside with the online bill payment service, you could go for months without launching Quicken, and the payments would still arrive on time.
About a month before a payment is due, the bill payment service records the pending payment using the next scheduled date. The next time you download transactions, Quicken automatically downloads these payments along with your checks, deposits, and transfers. When the delivery date comes around, your payee has its payment with no effort on your part.
Repeating online payments come in two flavors and you set each one up a bit differently. For payments that occur on a regular schedule for the same amount each time, you specify the schedule and the amount for the payment. For loan payments, you set up an online repeating payment and then link it to the loan it pays off.
Setting up repeating online payments
Creating a repeating online payment is almost exactly the same as setting up a scheduled transaction, as described on Section 4.14. You specify the payment and its schedule as usual. Once you’ve specified the details of the repeating online payment, click OK. Quicken adds the payment to the list of transactions on the Repeating Online tab.
Setting up a repeating online payment for an amortized loan
Making payments on amortized loans is the perfect application for Quicken repeating online payments. The payment amounts are the same each period; the payment schedule is regular; and the onerous late fees are a huge incentive to make sure that your payments arrive on time no matter what. Moreover, although you set up a repeating online payment to handle every payment in the loan’s schedule, Quicken automatically calculates the amount of principal and interest you pay each time.
Here are the steps for setting up your amortized loan with a repeating online payment:
Set up your lender as an online payee.
Setting up your lender as an online payee is just like setting up any other online payee. The full instructions start on Section 6.8.
Press Ctrl+J to open the Scheduled Transactions List window.
You can also choose Tools → Scheduled Transactions List.
In the window menu bar, choose Create New → Scheduled Transaction.
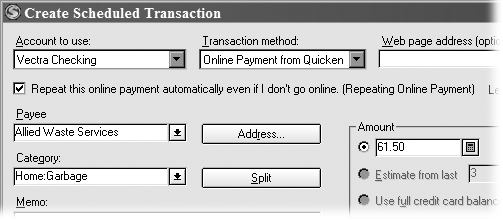
Quicken opens the Create Scheduled Transaction dialog box (Figure 6-17).
Set up the transaction as you would a regular repeating online payment.
Choose the account you use to make your payments. Choose Online Payment from Quicken for the transaction method. Choose the payee.
In the Category drop-down menu, choose the liability account for your loan.
Your accounts appear at the bottom of the Category drop-down menu and are surrounded by square brackets. For example, your liability account may look something like [Mortgage House].
Click OK to save the repeating online payment.
You can specify the amount or the schedule before you click OK, but Quicken obtains this information when you link the repeating online payment to the loan.
Press Ctrl+H to open the View Loans window.
You can also choose Property & Debt → Loans.
In the window menu bar, choose Choose Loan and, in the drop-down menu, choose the loan that you want to pay with a repeating online payment.
The View Loans window displays the overall information about the loan.
Click Edit Payment.
The Edit Loan Payment dialog box appears. For a refresher on editing loans, see Section 5.5.1.
In the Transaction section, click Payment Method.
The Select Payment Method dialog box opens, as shown in Figure 6-18.
In the Payment Type section, select the Repeating Online Payment option.
Quicken immediately displays the For Repeating Payments section. If you click the Repeating Payment box, you can choose the repeating online payment you created for your loan from the drop-down menu.
Click OK.
The Select Payment Method dialog box closes. In the Edit Loan Payment dialog box, the Type field now shows “Repeating Pmt.”
Click OK to save the new payment.
If you ever need to change any parts of this setup, see the box on Section 6.10.

The repeating online payment is ready to go. In the Online Center, remember to click Update/Send to send the new instructions to your online bill payment service.
Setting Up Online Transfers
You can set up online fund transfers in Quicken, as long as both accounts are at the same financial institution. Quicken can’t transfer funds electronically between different banks. Also, you need to set up both Quicken accounts (checking and investment, say) for the online service.
The register is the easiest place to record an online transfer. Here are the steps:
In the register for the account that holds the money you’re going to transfer, create a new transaction.
Scroll to the first blank transaction, right-click the register, and then, in the shortcut menu, choose New.
In the Num field, select Oxfr (Online Transfer).
This option appears only if you have two accounts at the same financial institution that are both set up for online services.
In the Xfer Acct drop-down menu, select the account that’ll receive the money you’re transferring.
The source account is the one whose register’s open.
In the Payment field, enter the amount that you want to transfer between the accounts.
If you type the amount in the Deposit field, the transfer brings the money in from the account you set in the Xfer Acct field.
In the register immediately below the transaction, click Enter.
Quicken completes the transaction in the register, but you’re not done yet. Don’t forget to open the Online Center (Section 6.5.1) and click Update/Send to send the transfer instructions to your financial institution.
Canceling an Online Payment
Suppose you sent an online payment for your cable TV subscription, but have decided that your library card is a more cost-effective way to find entertainment. With enough lead time, you can cancel an online payment. Unlike paper checks, which require a stop payment from your bank—at an additional cost—canceling an online payment doesn’t cost you a dime.
How much lead time you need depends on your bank, but in general you can cancel any time before the Processing date for the online payment. To find out whether an online payment arrived, or if you want to see if you have time to cancel a payment, click the transaction in the register. Below the Num field, you see a Status link, which you can click to view the payment, including its processing and delivery dates.
How you cancel a payment depends on the type of online payment. No matter which type of payment you cancel, you must click Update/Send to send the cancellation instructions to your financial institution. Here are the options:
A single online payment. To cancel a one-time payment or one instance of a repeating online payment, in the Online Center window, select the payment and then click Cancel Payment. In the confirmation dialog box, click Yes. You’ll see Cancel in the Status column.
A repeating online payment. To cancel the entire series of a repeating online payment, press Ctrl+J to open the Scheduled Transaction List window. Select the repeating online payment you want to stop, and then, in the window menu bar, choose Delete. In the confirmation dialog box, click Yes.
Note
If the repeating online payment is linked to a loan, you must first break that link. See the box on Section 6.10 for advice on editing loans.