Chapter 9. Investments and Planning
Quicken’s just as good at tracking investments as it is your checks, charges, and ATM withdrawals. You can keep tabs on investment gains and losses as well as the dividends and interest you earn, which is a huge help come tax time.
But tracking investment transactions also means you can evaluate the performance of your investments. If you hear dogs barking in your portfolio, you can get rid of them and find better places to invest your money. And by reviewing how you’ve allocated your portfolio among different types of investments, you can tell whether you’re putting too many eggs in one nest-egg basket.
This chapter explains when it makes sense to track investments in Quicken—and when it doesn’t. You’ll learn how to set up your investments, record transactions, and analyze your portfolio. Finally, you’ll learn how to use Quicken’s planning tools to make the most of your money.
Why Track Investments in Quicken?
Tracking investments in Quicken is quite easy, but it requires a small time commitment. Before you dive into the topics in this chapter, read this section to help decide whether you want—or need—to spend that time.
If you answer “Yes” to any of the following questions, tracking your investments in Quicken makes sense:
Do you need to report your investment gains and income on your tax return? One of the big advantages to tracking investments in Quicken is how easily you can gather pertinent investment data for your tax return. At tax time, you can generate Quicken reports for your taxable interest and dividends, as well as gains and losses on sales (short-term, long-term, and the ones in between). If you’ve ever sold a mutual fund that you’ve owned and reinvested distributions into for decades, you know how painful capital-gain calculations can be. If you track the fund in Quicken, the program instantly spits out the numbers you need.
On the other hand, if all of your investments are in tax-deferred accounts, like IRAs, 401(k)s, and Keoghs, there’s no need to track taxable investment income and gains—because there aren’t any. (See the box on Section 9.2 for other reasons you may not need Quicken’s help with your investments.)
Do you want to know the returns your investments achieve? For investments in individual stocks, your return depends completely on when and how much you buy, sell, or reinvest.
If you own nothing but mutual funds, you may not think you need Quicken to calculate your investment returns. After all, mutual funds calculate and report investment returns to their shareholders anyway, as the Securities and Exchange Commission requires. But calculating performance in Quicken offers some benefits over mutual fund company calculations. For example, if you buy a bunch of shares just before a fund’s value makes a big jump, your actual return would be better than the published figure.
Do you want to use Quicken to help you make investment decisions? Investments are a lot like orchids. Even though the stock market is surprisingly hardy, thriving in the financial jungle with only a bit of intervention from the Federal Reserve Board, successfully growing your personal portfolio of investments requires a fair amount of care and feeding. You have to pick investments that match your goals, diversify your investments to reduce risk, and monitor performance to see if corrective actions are in order.
Choosing the Right Type of Account
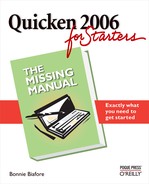
Quicken offers four types of investment-specific accounts, but you’re not limited to them. Depending on what you invest in, you may find one of the cash- or asset-oriented account types a better fit. You create an investment account just like any other in Quicken, starting from the Quicken Account Setup dialog box shown in Figure 9-1.
Quicken has six account types that work for investments. The following describes what each one does:
401(k)/403(b). Named after the sections of the tax code that created them, these are the well-known retirement plans you can sign up for at work. Choosing this account type lets Quicken handle the features of employer-sponsored accounts, including matching contributions that your employer may make, loans you can withdraw, and the tax advantages you receive.
Financial institutions vary in the detail they provide on 401(k) statements. In Quicken, the 401(k), 403(b) account type can track actual shares or dollar values only. (If you don’t care about detail, you can use the 401(k) Update wizard to enter summaries from your statements.)
IRA, SEP, Keogh. This is the account type to choose for other types of retirement accounts, including IRAs (traditional, Roth, Simplified Employee Pensions, and Education), SIMPLE plans, and Keogh plans.
Asset. If you’re tracking real estate purchased as an investment, like land, a house, or an office building, use the Asset or House account type. A House account is perfect if you also borrowed money to purchase the real estate, because Quicken makes it easy to link the asset account to the corresponding loan and liability account, as discussed in Chapter 5.
Brokerage. This account type is a catch-all for investments that don’t fit any of the other account types. A brokerage account holds one or more securities of any type that Quicken supports (stocks, bonds, mutual funds, real estate investment trusts or REITs, options, and investment cash). Although you might use a Savings account for a single certificate of deposit (CD), you could just as easily keep a ladder of several certificates of deposit from the same bank in one brokerage account.
Single Mutual Fund. The name says it all. This type of account only does one thing well: Track a single mutual fund. Choose this type only if you buy a mutual fund directly from the mutual fund company, don’t have a cash balance in the account, and hold only one fund in the account.
Savings. CDs and money market funds sometimes count as investments. If you set up a separate money market bank account or use CDs for shorter-term cash, Quicken savings accounts are ideal. Simply name the account so that you can tell at a glance it’s for a CD or whatever (see Section 2.3.1 for more account-naming advice). Many brokerage accounts include a linked money market fund for holding cash, and those money market funds can be a part of the Quicken brokerage account you create.
Tip
To move savings accounts from Quicken’s Cash Flow Center to the Investing Center, edit the account’s details to change the account location (see Section 2.4). This won’t change the type of account, only the location.
Creating an Investment Account
In Quicken, setting up an investment account isn’t all that different from setting up a banking account. You fill in text boxes, choose options, and click Next until the Quicken Account Setup screen displays the Done button. (See “Creating a Banking Account: Step by Step” on Section 2.3.1 for all the details.) Investment accounts, though, do include a few additional questions that Quicken doesn’t ask for cash flow accounts. This section describes the extra information you’ll have to provide.
To create an investment account, start by choosing Investing → Investing Accounts → Add Account (or in the Investing Center window, click Add Account). In the Quicken Account Setup dialog box, you must first provide the financial institution that holds your account—a necessity if you plan to use online services. The program makes it so easy to choose a financial institution (Section 2.3.1) that you’ll fill in this text box in seconds. You also must tell Quicken whether you want to set the account up manually or online.
The next Quicken Account Setup screen displays the different types of investment accounts you can create. After you’ve chosen the option for the type of investment account and clicked Next, read on to learn how to respond to the rest of Quicken’s interrogation.
Note
After you manually create an investment account, you provide other information, like the account number and contact information, only when you edit the account, as described on Section 2.4.
Creating a 401(k) or 403(b) Account
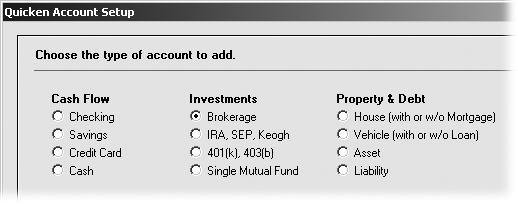
In the Quicken Account Setup dialog box, the “401(k) or 403(b)” option creates an account for your employer-sponsored retirement plan. It’s no surprise that you have to answer some questions about your employer and the features that its plan offers. For the eagle-eyed investor, you’ll notice that the dialog box title changes to “401(k)/403(b) Setup,” as you can see in the bottom figure of Figure 9-2.
Here’s the information that’s unique to 401(k) and 403(b) accounts:
Employer Name. The “Tell us about this account” screen includes the aptly named Employer Name text box, in which you type the name of the employer that provides this retirement account.
Current Employer. As long as the employer for this account still signs your paycheck, leave the Current Employer option selected. If you still have a 401(k) with a previous employer and are just getting around to creating the account in Quicken, choose the Previous Employer option.
My Account or My Spouse’s Account. This choice can be tricky if you and your spouse take an egalitarian approach to Quicken duties. Who’s “me” and who’s “my spouse” depends on how you set up your data file and how you file your taxes. Your choices here must match the main taxpayer and spouse on your tax returns—especially if you use your Quicken data to do your returns in Turbo Tax.
If you don’t know which of you is considered the spouse, click Cancel to stop the account creation. Choose Tools → Quicken Guided Setup and, in the Quicken Guided Setup window, click “About You.” On the About You screen, the spouse is the person whose name appears in the Spouse’s Name boxes. Back in the Quicken Account Setup dialog box, the My Account option is for the person whose name appears in the Your Name boxes. Choose the My Spouse’s Account option for the person whom Quicken considers the spouse, as illustrated in Figure 9-2.
Does the statement list how many shares of each security you own? Dig out the last statement that you received from the 401(k) or 403(b) administrator. If the statement tells you how many shares you own of each mutual fund (or other security) choose Yes. Otherwise, choose No.
Loans. 401(k) and 403(b) accounts let you borrow money from yourself, so the next screen in the 401(k)/403(b) Setup dialog box asks if you would like to track loans you’ve taken against the account. If you haven’t borrowed against the account, simply select the No option. (You can add a loan later, if need be, by creating a liability account and linking it to your retirement account.)
If you have borrowed against the account, select the Yes option. In the “How many?” text box, type the number of loans you’ve taken. If you indicate that you have loans, when you click Next, the program displays a few additional screens asking questions about each of these loans: a description, the current balance, and the original loan amount.
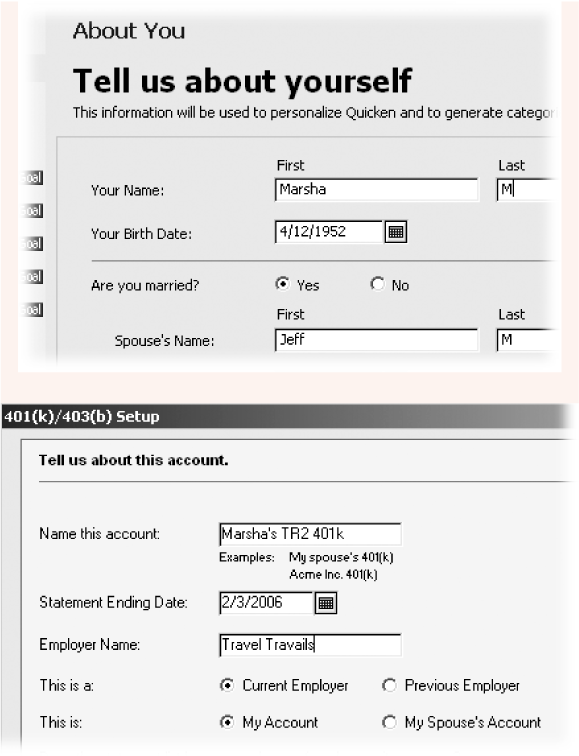
Securities. The next screen, shown in Figure 9-3, asks about the securities that you hold in the account, which you’ll see regardless of the type of investment account you create. If you can connect to the Internet, all you have to do is type the ticker symbol for each holding, and Quicken obtains the security name and other information. Alternatively, you can click Ticker Symbol Lookup to go online to find the ticker symbol. Click Add More if you own more than five.
Tip
If you’re ready for a break, you can leave this screen blank and add securities to the account after setup. Quicken pops up a message box asking if you’re sure you want to create the account without securities. Click Yes and take that break.
When you click Next, the program goes online and checks the ticker symbols you typed and collects information about your investments, like whether it’s a stock, mutual fund, or other type of security. If you tell the program that your statement shows shares, the next screen that appears asks for the shares you own and the total market value. Use the numbers on your last statement.
On the last of the Securities screens, click Next to reach the screen you’re waiting for—the Summary screen. It shows the securities you own and the Done button. When you click Done, Quicken adds the account to the ones already listed in the Investing Center and displays the account’s Summary tab in the main Quicken window.
Note
If you haven’t set up your paycheck using the Set Up Paycheck feature (see Section 4.15), you’ll have a chance to do so while creating your retirement account.
Creating a Brokerage Account
In the Quicken Account Setup dialog box, the Brokerage option creates an investment account that can handle almost anything. The questions you answer are surprisingly simple. You first provide the date of the statement on which you’re basing your answers. Here’s the other information you must provide for brokerage accounts.
Cash. In the Cash text box, type the cash balance in your account.
Money Market Fund. For brokerage accounts that come with what’s called a sweep fund (for holding cash from sales or interest), in the Money Market Fund text box, type the balance in your sweep fund.
Securities. As described in the previous section, you’ll see a screen in which you can type the tickers for the securities you own. If you want to add the securities later, leave the boxes blank and click Next.
Creating an IRA Account
In Quicken, an IRA account is simply a brokerage account with tax advantages, so the questions you answer to create one are almost identical to those for a brokerage account, as described in the previous section. Here’s the other information you must provide for an IRA account:
Who owns this IRA? Choose either the Myself or the My Spouse option depending on whom you’ve set up as the spouse (Section 9.3.1).
What type of IRA is this? As you probably already know, IRAs come in as many flavors as Starbucks lattes. Choose the type of your IRA from the list shown in Figure 9-4. If you don’t know what type of IRA you own, ask your financial institution.

Setting Up a Security
If you typed in ticker symbols when you created your investment account, you may not have to set up a new security for some time. But eventually, your investment advisor will suggest that you buy a new stock, say, or you’ll decide to switch mutual funds in your 401(k) account. This chapter explains how to add new securities to the list of ones you already own or watch.
This chapter also introduces a few other lists that you can use to categorize your investments by security type (stocks, bonds, and so on), investing goals (like growth or income), and asset class. Smart investors know there’s no such thing as a free lunch on Wall Street. In other words, the investments that offer higher returns almost always come with higher risk. Categorizing your investments in Quicken helps you evaluate whether the risks you take with your investments are paying off—making you one of those smart investors.
The Security List
When it comes to working with securities, whether setting one up, editing its characteristics, or reviewing its price history, the Security List window is the place to start. Press Ctrl+Y or choose Investing → Security List, and the window shown in Figure 9-5 appears.
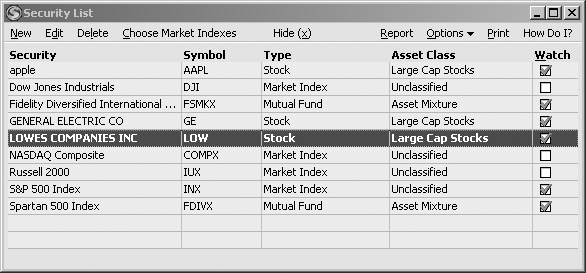
You can add a security to Quicken’s Watch list by turning on its Watch checkbox in the Security List window. Although the watch list is clearly visible in the Investing Center window, it’s not as helpful as you might expect: It shows only price quotes and the change for the day in dollars and as a percentage, which savvy investors know is only a small part of the story. Moreover, you have to look at the watch list to see if a price has dropped to your buy price or soared past your “Sell! Sell! Sell!” point.
If you really want to watch a security for events that might trigger you to buy or sell, use an Investing Alert instead. Although you start to set up alerts in Quicken, it’s actually Quicken.com that stores and sends them. You can tell Quicken to pop up an alert box on your PC screen, making important investment events hard to ignore.
To set up an alert, choose Tools → Set Up Alerts. In the
Alerts Center window, click Investing and then turn on the alerts
you want to get, like Price and Volume. Click the “Go to Quicken.com
to customize price and volume alerts” link (shown here), to specify
the levels that trigger the alerts. For instance, you can tell
Quicken.com to notify you when a stock’s price drops below $19.50.
At Quicken.com, you can even set up an alert that sends a message to
your mobile phone, for truly monumental events.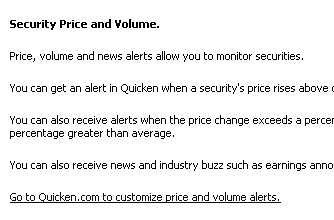
The Security Detail View
The Security Detail View window is a one-stop-shop for viewing, editing, and updating a security you’re tracking in Quicken. As you can see in Figure 9-6, the window includes sections that show security details, a summary of the shares you own (number, market value, cost basis, and so on), a price quote, a price chart, and a transaction history list. To open the Security Detail View window, choose Investing → Security Detail View.
Note
This window isn’t related to a specific account. If you own the same security in more than one account (your husband’s and your IRAs, for example), all the transactions for the security from both accounts appear in the Transaction History.
Here are some tasks you can perform from this window:
Edit the security details. To change any of the security’s details, click Edit Security Details (in the Security Details section, or in the menu bar). See “Editing a Security” on Section 9.4.4 for the items you might want to change.
Update security information. In the window menu bar, choose Update and then choose one of the commands on the drop-down menu to either download information about the security or update the values in its price history.
Check the value of your holdings. The Holdings section shows how many shares you own and their market value, cost basis, and the gain or loss by dollars and percentage. The easiest way to see all these values for all of your investments is the Portfolio View (see Section 9.11.1).
Review transactions. You can scroll through all the transactions for the security in the Transaction History section. For example, if you’re trying to find a transaction because your Quicken records don’t match your broker’s statement, scan the Shares or Amount column for numbers that match the discrepancy.
Review price and price history. The price chart shows a graph of the historical prices for the security, which by itself isn’t enough to say buy, sell, or hold. Click More Charting to go online and generate price charts that are more helpful; for instance, to show a chart that compares your mutual fund’s price performance to the index that it mirrors.

Tip
The Online Research menu button seems ripe with possibilities, but the options on the drop-down menu merely point to pages on Quicken.com, which aren’t exactly A-list investment research sites. If you prefer other Web sites, like money.msn.com, finance.yahoo.com, or www.investor.reuters.com, you’ll have to use your regular Web browser to reach them.
Adding a Security
You can add securities to your Security List when you create an investment account or as part of recording a purchase transaction (see “Purchasing a Security” on Section 9.6). If you have trouble multitasking, you might prefer to add a security to the Security List outside of other tasks. Here are the steps to adding a security:
Press Ctrl+Y or choose Tools → Security List.
The Security List window opens, as shown in Figure 9-5. If you’re a Quicken veteran, turn on hidden securities so you can easily add items you’ve owned in the past. In the Security List window menu bar, choose Options → “View hidden securities.”
In the Security List window menu bar, choose New.
The “Add Security to Quicken” dialog box appears, ready to guide you through several screens of simple questions.
In the first screen, in the Ticker Symbol text box, type the security’s ticker symbol and click Next.
The first screen asks for the ticker symbol and name, but you can type one or the other and let Quicken fill in the rest. If you type the ticker symbol, Quicken automatically goes online to retrieve the security name when you click Next. Or type the name in the Name box, and then click Look Up to open a Quicken.com Web page that finds ticker symbols, as illustrated in Figure 9-7.
To prevent typographical errors, you can select the ticker symbol on the Web page and press Ctrl+C. Back in Quicken, click the Ticker Symbol text box and press Ctrl+V to paste the ticker symbol into the text box.
Note
Quicken automatically turns on the “Include this security on my watch list” checkbox. (If you’re adding a security to your list, you usually want to know its current price.) You can remove the security from the watch list any time by turning off its checkbox in the Security List window (see Figure 9-5). Taking a security off the Watch list after you sell it is a good idea, so you don’t have to feel your heart sink as its price goes up.
After the Quicken One Step Update Status dialog box makes a brief appearance and connects to the Internet to retrieve information about the security, the final screen in the Add Security to Quicken process appears. As long as you typed the ticker symbol correctly, the program fills in all the fields for the security automatically, as demonstrated in Figure 9-8.
If you entered the wrong ticker symbol, you’ll see one of two screens:
If the ticker you typed is valid, but incorrect, the last screen of the “Add Security to Quicken” won’t show the security you wanted to add. Click Back to try again.
If you typed a ticker that doesn’t exist, the “No data found for <ticker> Company” screen appears. Quicken automatically selects the “Correct ticker symbol and try again” option, so you can retype the ticker symbol and try again. If you’re sure the symbol is correct, choose the “Add manually” option. You’ll have to tell Quicken the security type and provide the other information, but at least the program won’t spin its wheels trying to find a ticker symbol it doesn’t have in its database.
Once Quicken retrieves the information for the correct security, click Done.
The program adds the security to the Security List for watching, tracking transactions, or both.

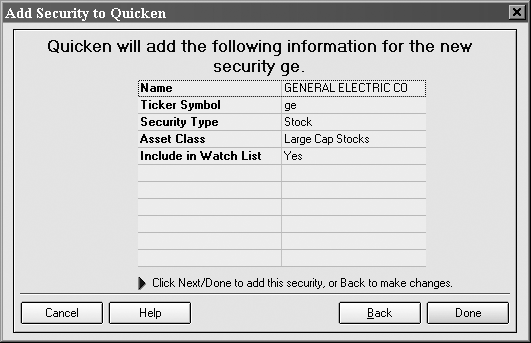
Editing a Security
There’s a lot more to securities than ticker symbol, number of shares, and price, as Figure 9-8 indicates. With a connection to the Internet, you don’t have to provide Quicken with these details. Despite the program’s best efforts, you’ll still need to edit the details of a security every now and then. For example, the load on a mutual fund may change after you purchase it, or you may want to assign an investment to a specific investing goal.
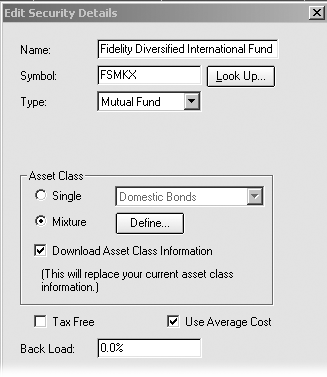
To edit these details, in the Security List window (choose Investing → Security List), select the one you want to edit. Then, in the window menu bar, click Edit. The Edit Security Details dialog box appears, as shown in Figure 9-9. You can change any of this information at your discretion.
Usually, you won’t need to edit the text boxes at the top of this dialog box, because the name, ticker symbol, and type almost never change. Here are some of the items you might want to change—and why.
Asset Class. Quicken uses the values in the Asset Class section to determine the asset allocation of your investments (see Section 9.11.3). In the Edit Security Details window, the Single option lets you choose one asset class, which is ideal for a stock, bond, REIT, and so on. If the security is a mutual fund, chances are you’ll choose the Mixture option and then click Define to specify the percentages in each asset class.
Figure 9-9. In the Edit Security Details window, you can Download Asset Class Information (as indicated in this figure) or edit other values at will.If you’re a stickler for accuracy and disagree with the asset class designation that Quicken downloads, turn off the Download Asset Class Information checkbox, and set the asset class to your interpretation. (See the box on Section 9.4.4 for more advice.)
Tax Free. If the security is exempt from taxes, like some municipal bonds, turn on this checkbox to remove its income and gains from Quicken’s reports of taxable events.
Smart investors know that asset allocation determines the lion’s share of a portfolio’s return. So what are these influential asset classes? As you can see in the figure, Quicken (with help from Value Line, an investment data and analysis provider) divvies up the investment universe into Domestic Bonds, Global Bonds, Large Cap Stocks, Small Cap Stocks, International Stocks, Cash, and a catch-all class called “other.”
Asset classes each come with a unique combination of risk and return, which is based on decades’ worth of historical performance. For example, small cap stocks tend to deliver higher average annual returns, but the risk of a stomach-wrenching nosedive in any given year is higher as well. On the other hand, domestic bonds deliver lower average annual returns but make up for that reduced return with less year-to-year volatility
Instead of trying to make a big killing by investing everything in the next Wal-Mart, financial advisors (and savvy investors) consider good asset allocation the foundation of a successful portfolio. By allocating dollars to different asset classes, your portfolio is more likely to grow steadily over the years with smaller drops during down markets.

Tip
If an investment is exempt from federal tax but not state tax (or vice versa), you can set up categories for each type of interest and dividend. For example, you can create a category called Interest-StateFree for interest that’s exempt from state tax. When you create a new category (see the next section) and scan the tax line item drop-down menu, you can choose entries like “ScheduleB:Int inc., taxed only by state” or “Schedule B:Int. inc., taxed only by Fed.”
Use Average Cost. Turn on this checkbox if you want Quicken to use the average cost of your purchases of a security to calculate the cost basis when you sell, which is the easiest way to track shares sold. A cost basis is how much you paid, plus any commissions and fees for the purchase, for tax reporting purposes. The program turns this checkbox on automatically when you add a mutual fund.
Categorizing Investments
Besides the Asset Class designation, Quicken includes two lists that you can customize to categorize your investments: security type and investing goal. Although asset classes are one way to categorize investments, you can’t change the asset classes that the program uses.
Note
If you’re anxious to start tracking your investment purchases and sales, you can skip this section for now and jump to Recording Investment Transactions on Section 9.5. You can add investment categories later.
If you want to develop your own asset class list, you can take over Quicken’s Security Type list for the job. This list comes with the usual suspects (Stock, Mutual Fund, Bond, and so on), but you can add, edit, or delete any type on the list. For example, if you invest in REITs and want to track real estate as an asset class, you can add Real Estate as a security type.
Tip
The downside to using the Security Type list for asset allocation is that you’ll have pay a visit to the Security Details View window(Section 9.4.2) to choose the type for each security you add.
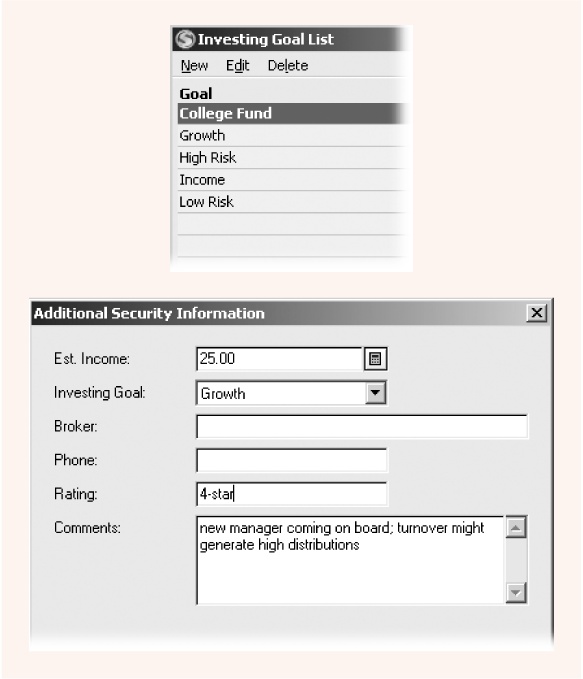
The Investing Goal list lets you categorize your investments according to the reason you’re investing the money. Although Quicken sets up the Investing Goal List with College Fund, Growth, High Risk, Income, and Low Risk, as you can see in Figure 9-10, you can change the list to match your unique sets of goals. For example, you might change the list to College Fund, Retirement, and Bahamas, if you’re investing some money for your kids’ education, some for your retirement, and some in high-risk high-return investments to buy a sweet Nassau bungalow. Then, you can generate an Investment Performance report and set the “Subtotal by” field to Investing Goal to see whether the returns for the investments for each goal are what you expect.
To set the Investing Goal as well as a few other fields, in the Edit Security Details dialog box, click Other. The Additional Security Information dialog box appears, as shown at bottom figure in Figure 9-10. These fields are completely optional, but you may fill in the Est. Income text box if you want to track how much income your portfolio generates as a whole. The Broker and Phone fields aren’t particularly useful—you probably have that information already stored with your investment account.
Tip
The Comments field can hold notes and reminders about the security. For example, if a mutual fund has a new manager, you might make a note to watch for signs of poorer performance. The problem with the Comments field is that this information is usually out of sight, so it’s up to you to remind yourself to check it.
Recording Investment Transactions
If you set up your investment accounts for online services and downloaded transactions (as described in Chapter 6), you’ll save yourself hours of data entry and head-scratching by letting your financial institution figure out how to record your transactions. If you don’t have an Internet connection, or your financial institution doesn’t work with Quicken, this section describes how to record the most common transactions.
You can record transactions directly in the account’s register or use one of Quicken’s helpful dialog boxes. The journey to entering transactions begins with the Account Bar. Click Investing Center, and then, on the Today’s Data tab, double-click the account you want to work with. The Transactions tab that appears lets you edit the account’s register, and includes a button that opens the Enter Transactions dialog box.
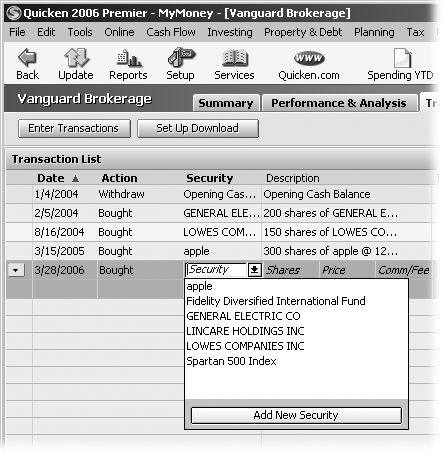
To use the register, choose a transaction type in the Action field, shown in Figure 9-11; Quicken displays the fields appropriate for that type. You can choose values from drop-down menus, tab to the next field, and type in values, just as you do for checking account transactions.
Note
After many requests from Quicken veterans who pined for the old days of recording transactions in the investment register, Intuit reintroduced this feature in Quicken 2006.
To have Quicken show you a dialog box, click Enter Transactions at the top of the register. When the box opens, it initially sports a “Buy–Shares Bought” title and displays the fields for a purchase. To record a different type of transaction, choose it in the Enter transaction drop-down menu; the title and fields in the dialog box change accordingly. The following sections show examples of the dialog boxes you’ll see for the most common transactions.
Purchasing a Security
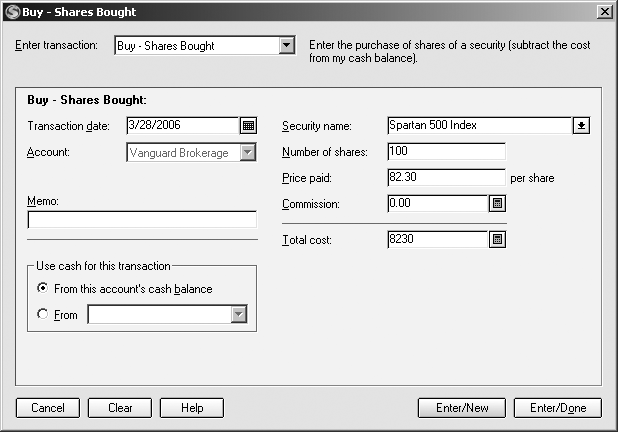
When you buy a security, whether it’s shares of stock, a bond, or a mutual fund, you use cash in one of your accounts to make the purchase. As you record the purchase, you tell Quicken what you’re buying, the number of shares, how much you paid, and the commission. The program calculates the cost of the purchase and transfers the money from the cash account you specify. This section describes the fields you fill in when you purchase a security, which are shown in Figure 9-12.
To open the “Buy–Shares Bought” dialog box, click Enter Transactions. Quicken automatically selects “Buy–Shares Bought” in the Enter transaction drop-down menu. After you record the details of a transaction, click Enter/Done if you have no more transactions to record and want to close the dialog box. If you still have transactions to record, click Enter/New to save the current transaction and start a new one.
Note
You can record transactions only for the account whose register is visible. To record transactions in another investment account, close the dialog box, switch to the investment account you want, and, in its register, click Enter Transactions.
Here are the fields you fill in when you purchase a security:
Enter transaction. Choose “Buy–Shares Bought” to record the purchase of shares of stock, mutual funds, or precious metals. (Bonds have their own Bonds Bought transaction, described in the box on Section 9.7.)
Transaction date. Quicken automatically fills in today’s date. Change the date to the day you made the purchase.
Account. Quicken automatically fills in the account whose register is visible. If you want to record transactions for a different account, close the dialog box; in the Account Bar, click the account; and then, in the account register, click Enter Transactions.
Security Name. The drop-down menu displays all of the securities that you’ve added to Quicken. If you don’t see the security that you’ve purchased, at the bottom of the drop-down menu, choose Add New Security, which immediately opens the “Add Security to Quicken” dialog box. After you add the security to your Security List, the “Add Security to Quicken” dialog box closes and you’re back in the “Buy–Shares Bought” dialog box to complete the transaction.
Number of shares. Type the number of shares you purchased.
Price paid. Type the price per share, not the total amount you paid.
Commission. Type the commission you paid to buy the security.
Total cost. Quicken calculates the total cost based on the number of shares, the price per share, and the commission. If you purchase fractional shares, the total cost that the program calculates is almost always a few cents different from what your financial institution calculates. You can bring the two into agreement by editing the value for either the commission or the price.
The easiest approach is to adjust the value in the Commission text box to make Quicken agree with your financial institution. However, with fractional shares, the discrepancy usually arises because your financial institution calculates the number of shares to a higher degree of accuracy than Quicken. Because you can’t match the number of shares, the price is the next best thing. To adjust the price, change the value in the “Total cost” field to match the financial institution’s total. When you click another field or Enter/Done, the Recalculate Investment Transaction dialog box appears. Choose the “Price (recommended)” option and click OK. Quicken recalculates the price to make the totals match.
Use cash for this transaction. If the cash for the purchase is in the cash balance for the investment account, select the “From this account’s cash balance” option. If you’re transferring cash from another account, like a savings account, choose the From option and then choose the account in the drop-down menu.
Tip
Sometimes, you want to add shares to your account without using cash. For example, if you inherited 1000 shares of stock from your grandfather, you don’t need any money to buy the shares. After you hand over the stock certificates to your broker, you record this addition using the “Add–Shares Added” transaction type.
Selling a Security
Selling a security is almost identical to buying it. In fact, the “Sell–Shares Sold” dialog box contains only two new features over the “Buy–Shares Bought” dialog box, as Figure 9-13 illustrates.
Here are the items in the “Sell–Shares Sold” dialog box that differ from the items you see when you purchase a security:
Sell all shares in this account. If you reinvest dividends, you know that you end up owning fractions of shares. But those thousandths of a share continue to compound and add up to big bucks in the end. Until that time, they simply seem inconvenient. Quicken takes some of the pain away with this checkbox. Turn it on and Quicken automatically fills in the “Number of shares” text box with the number of whole and fractional shares you own in the account.
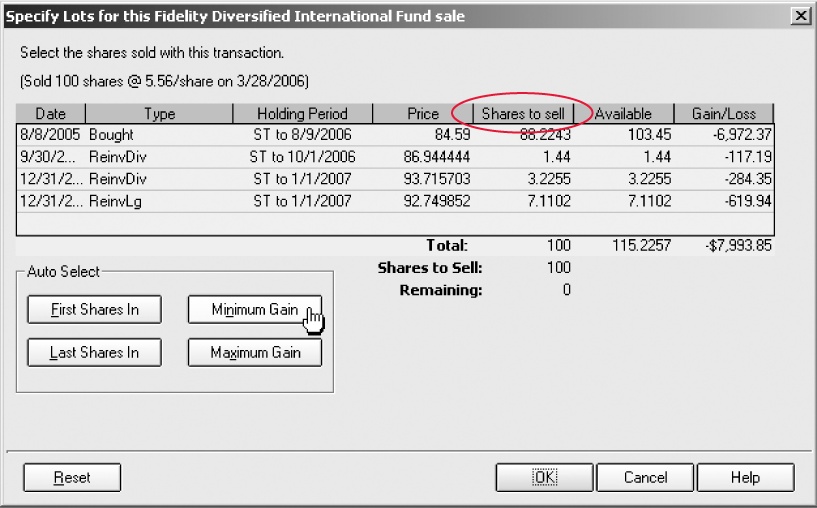
Specify Lots. By choosing specific shares to sell, you can control the capital gains you realize and, thus, the taxes you’ll pay on those gains. If you’re selling a security in a tax-deferred account, you can ignore this button and simply type the number of shares into the “Number of shares” text box. Likewise, if you’ve set up a security to use the average cost of shares for simplicity (see Section 9.4.5), this button remains grayed out. Otherwise, to sell specific lots of a security, click the Specify Lots button, and Quicken opens the Specify Lots dialog box shown in Figure 9-14.
The Specify Lots dialog box gives you ultimate control over the shares you sell. You can type numbers in the “Shares to sell” fields to specify exactly which whole and fractional shares you want to sell. However, the buttons in the Auto Select section automatically handle the most popular lot selection tasks for you. For example, if you click Minimum Gain, Quicken selects the most expensive shares you purchased to minimize your capital gains. Maximum Gain selects the least expensive shares to produce the largest capital gains.

In the “Sell–Sold Shares” dialog box, two items have different labels for a sale, but their purpose is the same:
Price received. In the “Sell–Shares Sold” dialog box, someone pays you for the security you sell. Instead of “Price paid,” as you see in the “Buy–Shares Bought” dialog box, you fill in the “Price received” text box with the share price the buyer paid you.
Record Proceeds? This label corresponds to the “Use cash for this transaction” section in the “Buy–Shares Bought” dialog box. Select the “To this account’s cash balance” option to deposit the proceeds from the sale into the cash balance of the investment account. To transfer the proceeds to another account, select To and then choose the account in the drop-down menu.
Recording and Reinvesting Income
Lots of investments pay dividends, which you can withdraw as cash to live on or reinvest to increase your nest egg. Many stocks pay cash dividends, and every once in a while you’ll get a dividend in additional shares of stock. Bonds pay interest on the money you lent to the bond issuer. And mutual funds distribute all kinds of income from the smorgasbord of securities they hold. Whether you use investment income as pocket money or reinvest it, Quicken’s dialog boxes make it easy to record these transactions.
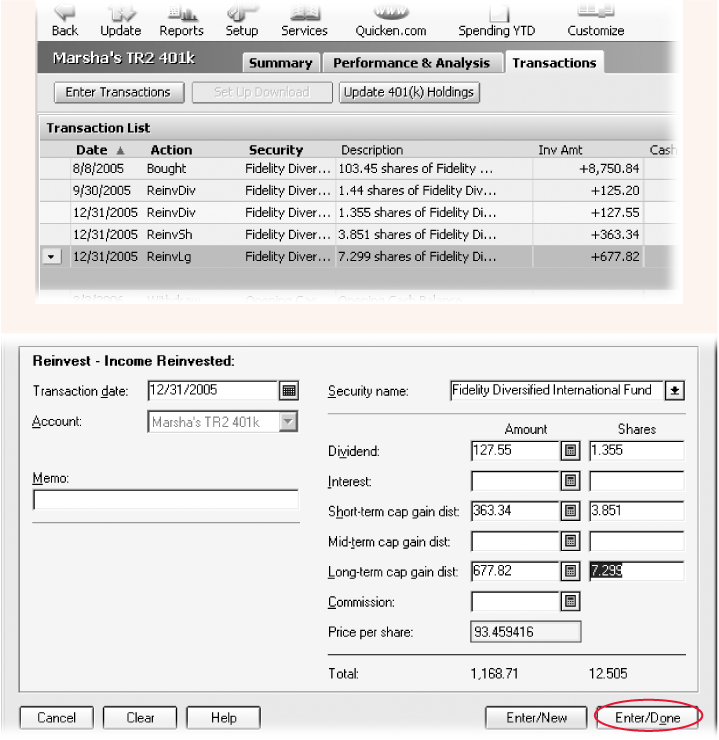
This section uses reinvesting income as an example, but recording income you keep as cash works much the same way. To open the dialog box for reinvesting income, above the investment register, click Enter Transactions. Although the title of the dialog box says “Buy–Shares Bought,” in the Enter transaction drop-down menu, choose “Reinvest–Income Reinvested,” and you’ll see the dialog box in Figure 9-15.
When you receive more than one type of income from an investment, which is almost always the case with mutual funds at the end of the year, using the “Reinvest–Income Reinvested” dialog box is much faster than adding each transaction individually. With your statement in hand, you can type the dollar amount for one type of income in the appropriate Amount field and type the corresponding number of shares in the Shares field.
Recording a Stock Split
A stock split is an interesting phenomenon. It changes both the number of shares you own and the price of those shares, so the value of your investment is exactly the same after the split as it was before. For example, a two-for-one stock split gives each investor twice the number of shares, each now at half the original price. Companies often issue a stock split to keep the per-share price within reach of everyday investors. (As an example of what happens without stock splits, consider Berkshire Hathaway, a company that has grown for years without splitting its stock. At more than $80,000 a share, few investors have the funds to buy even one share.)
Although you’d think it would be easier to tell Quicken the ratio of a stock split (like two for one), Quicken makes you enter the number of new shares and the number of old shares. To record a stock split, choose Stock Split from the Enter Transaction list. After you choose the transaction date and pick the name of the security that split, in the “New shares” text box, type the number of shares you own after the stock split. For example, if a stock splits two for one and you owned 200 shares, you now own 400 shares. In the “Old shares” text box, type the number of shares you owned before the split. The “Price after split” text box is optional—with new and old shares, Quicken can handle the math to figure out the stock price after the split.
Placeholder Entries
Quicken creates placeholder entries in your investment accounts, as shown in Figure 9-16, when you add securities to an account without providing all the information about your purchase. For example, if you include securities during account setup, Quicken knows how many shares you own, but not what you paid for them. Quicken also creates placeholder entries if you download investment transactions in which your financial institution says you own shares that don’t exist in your Quicken records. Placeholder entries are great for getting you up and running quickly, but eventually you’ll need to provide the rest of the information (to obtain accurate tax records when you sell a security, for instance).
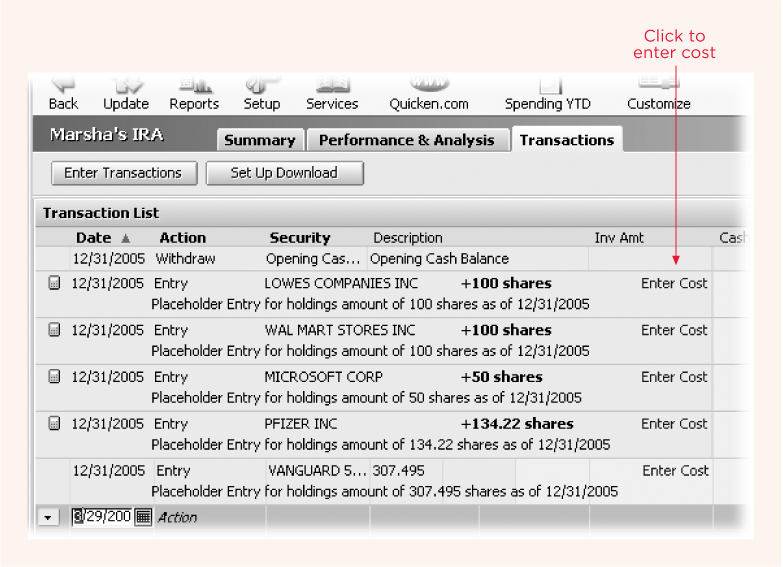
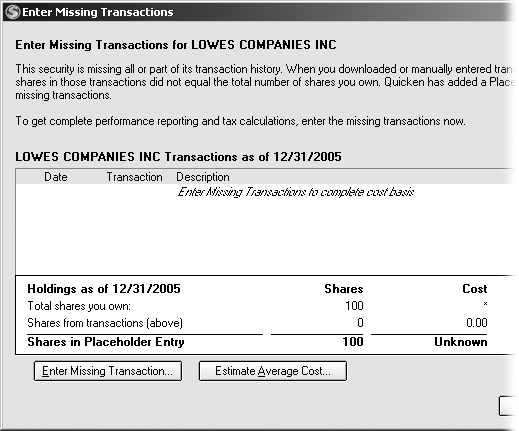
To convert a placeholder entry to an actual holding in your investment account, you must provide the purchase cost of the security. To provide the purchase cost, in the investment register, click the placeholder entry’s Enter Cost link. The Enter Missing Transactions dialog box opens, as shown in Figure 9-17, which lets you provide the missing cost in two ways: the average cost to purchase all of the shares or by adding the missing purchase transaction. The following sections describe each approach.
Enter Missing Transaction
If you need accurate records for tax reporting, in the Enter Missing Transaction dialog box, click Enter Missing Transaction. Quicken opens the “Buy–Shares Bought” dialog box with the transaction date and security name already filled in.
As described on Section 9.6, you must fill in the “Number of shares,” “Price paid,” and Commissions text boxes to complete the transaction. For a security that you bought including reinvested dividends, you’ll have to calculate the total amount you paid over time to fill in these fields.
Note
If the shares in your account are the result of years of buying additional lots and reinvesting dividends, adding one transaction for all those reinvestments still doesn’t provide accurate records for performance reporting. The only way to achieve completely accurate records for both taxes and performance reports is to add buy transactions for your original purchase and each reinvestment.
Estimate Average Cost
Click Estimate Average Cost if you don’t have the data you need to provide accurate costs for your purchase. With this approach, your tax reports won’t be accurate; nor will performance reports you generate. In the Enter Missing Transaction dialog box for average cost, all you have to provide is either the total amount that you paid for your shares or the average price per share (the total amount you paid divided by the number of shares purchased). When you click OK, Quicken fills in the Inv Amt field with the total amount you paid for the investment. However, the transaction still shows up as a Placeholder entry.
If you stumble across your missing paperwork later, you can fill in all the details of your purchase. In the investment register, double-click the placeholder entry transaction. In the Edit Adjust Share Balance dialog box that opens, click Enter History. This, in turn, opens the Enter Missing Transaction dialog box, shown in Figure 9-17. Click Enter Missing Transaction to fill in the details.
Evaluating Your Portfolio
Between investment reports and views, Quicken provides several ways to evaluate your portfolio. See “A Quick Guide to Quicken Reports” on Section 10.2 to learn about the tabular reports and graphs you can produce and how to use them. This section provides an overview of the investment views and tools that Quicken offers.
The Investing Center is home to a host of investment features and analysis tools. In the Account Bar, click Investing Center. The Today’s Data tab shows links you can double-click to open the register for any of your investment accounts. If you set up investment alerts (see the box on Section 9.4.2), like price and volume for securities, you’ll see these at the top of the tab. In addition, you can quickly review account balances, perform online updates, or review the watch list. These tasks are fine for a vague warm and fuzzy feeling, but none of these features help you make investment decisions. Read on to learn how to improve your investment performance.
The Portfolio View
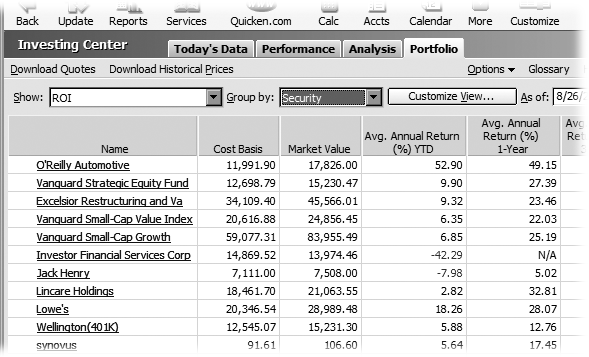
In the Investing Center, click the Portfolio tab to see all the holdings in all your investment accounts, as illustrated in Figure 9-18. Because you can customize the columns that you see in this view, you can find a lot of what you need to know to make investment decisions. For example, if you include the average annual returns for different periods of time, you can see whether investments are delivering the result you expect.
Here are some of the ways you can customize this view:
Show. In the Show drop-down menu, you can choose from dozens of views, like Asset Allocation or Tax Implications. Once you display a view, you can customize it further.
Group by. You can change how Quicken groups your investments. In the “Group by” drop-down menu, choose from Accounts, Industry, Security, Security Type, Investing Goal, Asset Class, and Sector. For example, if you group securities by account, you can view the returns for individual investments as well as the overall returns for an account. If you want to see how much money you have in each security type, choose Security Type.
Customize View. Click Customize View to open the Customize Current View dialog box. You can add, remove, and rearrange any of the columns that Quicken provides and specify the accounts to include and the securities you want to see.
As of. In the “As of” date box, choose a date to see the portfolio values as of that date. For example, if you need to know your account balance for the end of last year, choose December 31.
Tip
You can view your portfolio as of different dates to try to find out when your Quicken records began to disagree with your statements. Type a statement date and compare the share values in Quicken to the statement. If they agree, type the date for the previous statement and repeat until you find the discrepancy.
Performance and Analysis
Like most investors, you’ll develop a favorite way of measuring how your investments are doing. You can keep an eye on their average annual returns, for example, or compare their performance to a stock market index. In the Investing Center, Quicken shows these statistics on the Performance tab. Most of the time, performance depends on the makeup of a portfolio—the allocation between different types of assets, and the quality of its individual investments. In the Investing Center, the Analysis tab shows the results of Quicken’s analysis of a portfolio. You can evaluate performance and analyze your portfolio as a whole or by individual accounts:
To look at your overall portfolio, in the Account Bar, click Investing Center and then click either the Performance or Analysis tabs.
To review an individual account, in the Account Bar, click the investment account and then click the Performance & Analysis tab.
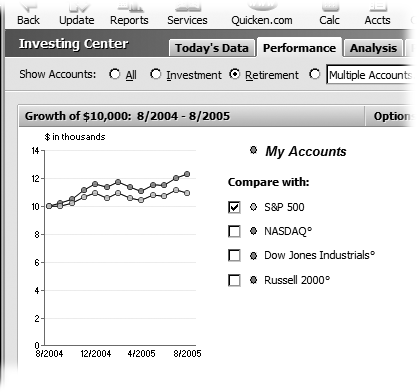
Overall portfolio
In the Investing Center, click the Performance tab to see the growth of one or more of your accounts. You can compare your performance to market indexes, as shown in Figure 9-19, to see whether your hard investing work pays off with market-beating returns. To select the accounts you want to evaluate, in the Show Accounts section, choose options like All, Investment, or Retirement.
Individual accounts
The Performance & Analysis tab for individual accounts displays three graphs: Account Value vs. Cost Basis, Asset Allocation, and Allocation by Security. In the Account Value vs. Cost Basis graph, the bars represent your account value each period. The line indicates your cost basis. If the line is below the bars, you’ve made money with your investments.
You can use the Asset Allocation graph to evaluate whether you’re distributing your money in an account appropriately. For example, in a college fund account that you’re getting ready to withdraw from, the asset allocation should be predominantly in low-risk investments like bonds or cash.
The Allocation by Security graph is a pie chart of the percentage that each investment holds in the account. If one investment makes up the lion’s share of the balance, your account is at risk, should that investment tank.
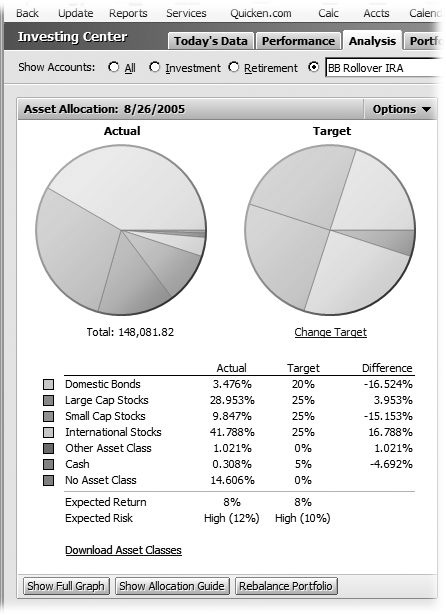
Evaluating Asset Allocation
The best way to evaluate asset allocation is by clicking Investing Center in the Account Bar and then clicking the Analysis tab. As you can see in Figure 9-20, Quicken shows your asset allocation compared to your target. The legend in the Asset Allocation section lists the percentage of your actual allocation in each class, the percentage you set in your target, and the difference between the two.
If the Difference is negative, you should consider moving money into that asset class. If the Difference is significantly positive, you should consider reducing your investment in that asset class. Of course, these are just guidelines. You must also evaluate other factors, like whether it’s a good time to sell a particular stock.
If you click Rebalance Portfolio (or choose Investing → Portfolio Rebalancer), the Portfolio Rebalancer tool opens. It tells you how many dollars you need to add or subtract from an asset class to reach your target. If you double-click a pie slice in the Actual Asset Allocation pie chart, you can see the individual investments in that asset class. If you should increase the money in that asset class, these securities are potential candidates to buy. If you should reduce the money in the class, consider selling some of the shares.
Capital Gains Estimator
If you want to estimate the effect of a sale on your taxes, choose Investing → Capital Gains Estimator. This wizard calculates the capital gains tax you’d pay if you sell a security. It can help you decide what to sell, depending on your goal (like minimizing taxes).
This tool can also help you identify securities you can sell to offset your gains with losses. If you don’t have any cash to cover a big tax bill, you can also use the Capital Gains Estimator to calculate the number of shares you have to sell to obtain the cash you want and the cash you need for taxes.
Portfolio Analyzer
Choose Investing → Portfolio Analyzer to evaluate your portfolio in several ways. The Portfolio Analyzer wizard displays results and suggestions in the following categories:
Performance. The first section shows your average annual returns from the year to date to the last five-year period. It also shows your five best and five worst performers.
Holdings. The Holdings section shows pie charts and tables of your holdings. Use this section to look for securities that make up an overly large percentage of your portfolio. If that security takes a huge hit, so does your portfolio.
Asset Allocation. This view is the same one you see on the Analysis tab for your overall portfolio, as described in “Evaluating Asset Allocation” on Section 9.11.3.
Risk Profile. Each asset class has its own combination of expected return and risk (which is measured as how much the return varies from year to year). This section shows asset classes on a bar that ranges from low risk on the left to high risk on the right. Above this bar, you’ll see your portfolio, positioned based on its risk.
Tax Implications. This section shows your capital gains and losses for the year, grouped by short-term, mid-term, and long-term.
A Quick Tour of Quicken Planning Tools
Quicken includes several tools to help you plan for the financial events in your life, all of which reside on the Planning menu. Some of these tools are wizards that step you through planning for major goals like retirement. Quicken’s financial calculators are self-contained dialog boxes that ask for a few pieces of information and then calculate a result, like the annual contribution you must make to save enough for your child’s college education.
Quicken Planning Wizards
Describing the planning wizards in detail is fodder for another book, but the wizards make most of the steps and answers you must provide easy to figure out. This section introduces these tools and what they can help you do.
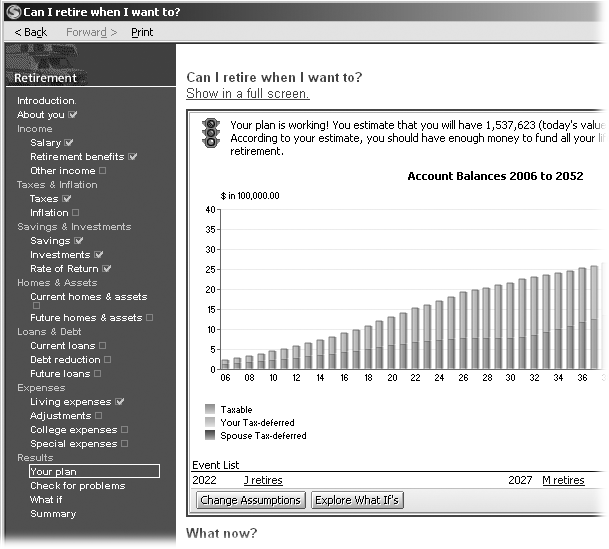
Retirement Planner. This planner helps you figure out if you’re on track to have enough money to make it through retirement. It doesn’t leave any stone unturned in the process. You provide information from your age and life expectancy, your estimates of inflation, and investment returns to the assets you own, the contributions you make to retirement accounts, and living expenses you expect you’ll need during retirement. As you can see in Figure 9-21, the plan result shows whether your plan is working. And if it isn’t, you can try what-if scenarios.
College Planner. As you might expect, the College Planner asks questions about the children going to college, how much you expect college to cost, sources of funding for college, and the savings and investments you have earmarked. In the “Can I afford college?” wizard, the last link is Internet Resources, which displays links to several valuable Web sites, including sites that help you find financial aid.
Home Purchase Planner. When you choose Planning → Home Purchase Planner, the “Can I afford that house?” wizard opens. You can provide information about your income and savings to find out the maximum monthly payment for which you qualify. This wizard can also help you find a house, although chances are you’re working with a real estate agent for that.
Debt Reduction Planner. If you’re up to your ears in debt, you’ll want to work with this planner before any of the others. You can learn which debts to pay off first to minimize the interest you pay (paying off the highest-interest-rate debts first is the most cost-effective). The Debt Reduction wizard actually has multimedia content, so you must insert your Quicken CD into your CD drive to use it.
Special Purchase Planner. For any other major purchase, use the Special Purchase Planner to figure out how to pay for it. In this planner, you provide the cost of the purchase, when you plan to purchase, how you plan to pay, and whether the price might increase between now and the purchase date.
Planning Resources
If you want more help than Quicken provides, choose Planning → Professional Planning Resources. Quicken describes the different types of financial professionals you can use and what they do. You can learn how these professionals are paid and the questions to ask before hiring one. The Professional Planning Resources window includes a “Search online for a CFP Professional (Certified Financial Planner) option,” which opens a browser to the Financial Planning Association’s Planner Search Web site.
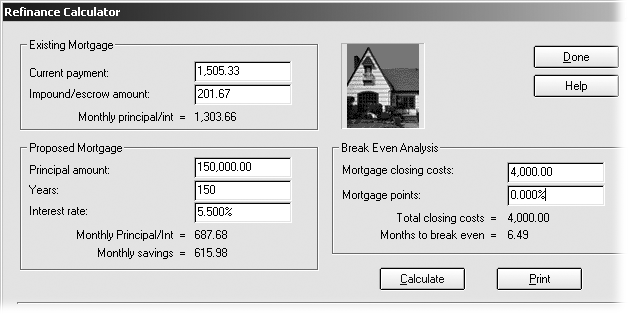
Financial Calculators
If you want to calculate a number without all the extra bells and whistles, choose Planning → Financial Calculators and then choose from Retirement Calculator, College Calculator, Refinance Calculator, Savings Calculator, and Loan Calculator. As you can see in Figure 9-22, you type in values and Quicken calculates results. For example, if you tell the Refinance calculator about your current payment and the new mortgage you’re considering, it calculates your new payment and lets you see when the savings would recoup the closing costs.
Here’s what the financial calculators do:
Retirement. This calculator needs some bare-bones information about your retirement. You can calculate the current savings you’d need to succeed, the annual contribution you must make to reach your goal, or the annual income in retirement that your current plan produces.
College. With some basic information about college education, you can calculate the annual college costs you can afford, the current savings you’d need to succeed, or how much you must contribute to save the amount you want.
Savings. If you’re using a savings account to save for a financial goal, you can calculate how much you have to contribute today to reach your goal, the regular contribution you’d have to make, or how much you’ll have based on your current balance.
Loan. This calculator can figure out the payment you’ll owe if you borrow a specific amount or the total amount you can borrow given a specific monthly payment.