Chapter 14
Preparing for Taxes
In This Chapter:
• Including tax information in accounts
• Connecting tax information with categories
• Using TurboTax
• Working with the Tax Planner
• Creating scenarios
• Minimizing taxes by maximizing deductions
• Utilizing the Itemized Deduction Estimator
• Exploring the Tax Withholding Estimator
• Understanding the Tax Center
Tax time is no fun. You have to spend hours sifting through financial records and filling out complex forms. When you’re done with the hard part, you may be rewarded with the knowledge that you can expect a refund. However, it is more likely that your reward will be the privilege of writing a check to the federal, state, or local government—or worse yet, all three.
Fortunately, Quicken can help. You can save time with its reporting features. By using the tax planning and monitoring tools that are available through Quicken’s Tax Center, the next tax season may be a little less stressful. This chapter will show you how.
 Tax Information in Accounts and Categories
As mentioned briefly in earlier chapters, Quicken accounts and categories can include information to help you at tax time. This section explains how you include tax information in accounts and categories. Although the tax line items for transfers are set up automatically when the account is created, you can change them if needed. Before you make any changes to the Quicken defaults, however, consult with your tax professional.
Including Tax Information in Accounts
You can include tax information in each account you establish in Quicken. Use the Tax Schedule dialog included with each account to enter the information.
1. Choose Tools | Account List or press CTRL-A to display the Account List window.
2. Click the Edit button that appears to the right of the account name or right-click the account name in the Account Bar and select Edit/Delete Account. (Hidden accounts appear in the More Accounts link in the Account Bar.)
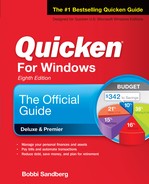
3. In either case, the Account Details dialog appears. At the bottom of the Account Details dialog, click the Tax Schedule button to display the Tax Schedule Information dialog, as shown here.

You will not see the Tax Schedule button if you have turned off the display of the Planning tab. You can turn on the Planning tab using View | Tabs To Show | Planning.
4. Use the Transfers In and Transfers Out drop-down lists to map account activity to specific lines on tax return forms and schedules. In our example, all transfers into the account are from miscellaneous income and track to Form 1040 of the individual tax return, whereas all transfers out are contributions to a personal IRA account. You may have to scroll either up or down the drop-down list within the Transfer In or Transfer Out field to find the appropriate tax line item.
There are a few tax line items set as default for various types of accounts, such as IRAs. Changing the default could cause a problem on your tax return. Be sure to check with your tax professional before changing any default item.
5. When you’re finished, click OK twice: once to close the Tax Schedule Information dialog box and again to close the Account Details dialog box. You will return to either the Account List or the main screen, depending on your location when you started the process. Repeat the process for all accounts for which you want to enter tax information.
Keep in mind that if you use the Paycheck Setup feature to account for all payroll deductions, including any retirement plan contributions, you may not have to change the settings for many of your accounts. (That’s another good reason to set up your regular paychecks in Quicken. Chapter 7 explains how to do this.) However, as with all things tax related, check with your tax professional.
Remember, when working with accounts and categories, and especially subcategories, you cannot use names that contain the characters : } / { | ^.
Connecting Tax Information with Categories
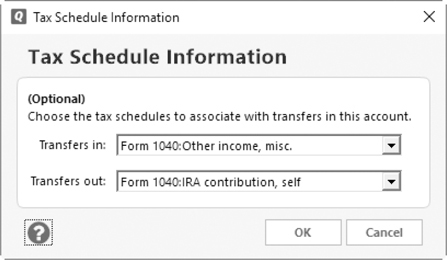
Quicken automatically sets tax information for many of the categories it creates. You can see which categories are tax related and which have tax form lines assigned to them in the Category List window, as seen in Figure 14-1. To open the Category List, click Tools | Category List or press CTRL-SHIFT-C.
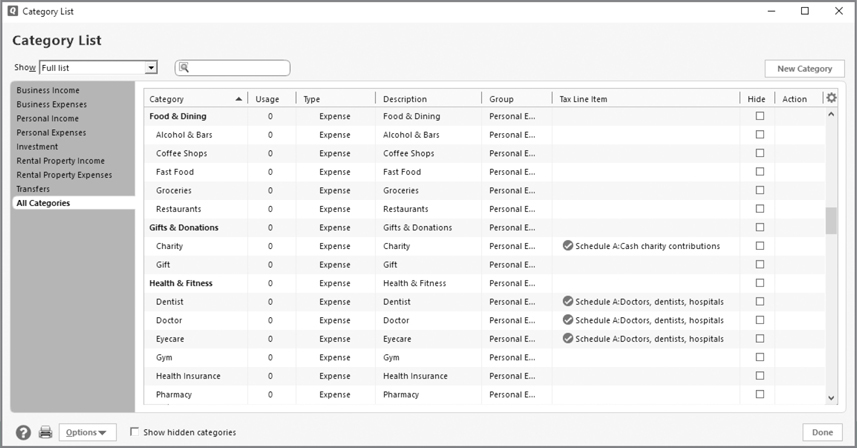
Figure 14-1 · The Category List displays where tax-related items appear on the federal tax forms.
If this information does not appear, click the Action gear icon at the far right of the Category List (under the New Category button), and ensure Tax Line Item is checked, as seen here. Concentrate on the categories without tax assignments; some of these may require tax information, depending on your situation.
Use the Set Up Category dialog to enter or modify tax information for a category.
1. Open the Category List window by choosing Tools | Category List.
2. Select the category for which you want to enter or edit tax information to highlight the category.
3. Right-click the category and choose Edit from the context menu.
4. The New Category dialog appears. Choose the Tax Reporting tab. (If the category is a transfer category, Edit does not appear on the context menu.)
5. If the category’s transactions should be included on your tax return as either income or a deductible expense, select the Tax Related Category check box.
6. Then use the Tax Line Item For This Category drop-down list to choose the form or schedule and line for the item. (You can expand this list by selecting the Extended Line Item List option.) A description of the tax line item you chose appears at the bottom of the dialog, as shown here. Keep scrolling to see all of the options.

7. Click Save to return to the Category List. The tax line item you chose now appears on the same line as your category.
8. Repeat this process for all categories that should be included on your tax return. Keep in mind that you can also enter tax information when you first create a category, as explained in Chapter 4.
Tax Reports
You can make tax time easier with several tax reports included in Quicken. Quicken creates all of these reports from the tax information settings for the accounts and categories in your Quicken data file. You can learn more about Quicken’s reporting feature in Chapter 15.
To create a specific report, select Reports | Tax from the menu bar. Choose the name of the report from the menu:
• Capital Gains summarizes gains and losses on the sales of investments, organized by the term of the investment (short or long) and the investment account.
• Tax Schedule summarizes tax-related transactions, organized by tax form or schedule and line item.
• Tax Summary summarizes tax-related transactions, organized by category and date.
Remember, you can start with a standard report, with the default settings and organization, and then customize it to meet your own requirements.
And, if you are using the Quicken Premier (or higher) edition, there are three additional options. All allow you to print reports from which you can enter information directly into the appropriate federal income tax schedules.
• Schedule A–Itemized Deductions
• Schedule B–Interest and Dividends
• Schedule D–Capital Gains and Losses
You can specify any date range for Capital Gains, Tax Schedule, and Tax Summary reports, but for Schedule A, Schedule B, and Schedule D reports, you can only select tax years 2016, 2017, or 2018.
Online Tax Tools
From both within Quicken and online, you have access to a number of tools for tax planning and preparation. Click the Planning tab, and then click the Tax Tools button on the right to open a menu, as seen next. The main Tax Tools menu shown includes the Tax Planner, Deduction Finder, Itemized Deduction Estimator, the Capital Gains Estimator, and the Tax Withholding Estimator, which are available only in Quicken Premier and higher editions. The Online Tax Tools submenu offers two tax-related features and information sources from the TurboTax.com website to help you with your taxes. All you need to take advantage of these features is your Internet connection.

EXPERIENCED USERS RECOMMEND
By taking the time to enter tax information into Quicken, you can save hours of time and maybe even some money. You see, by including tax information in Quicken accounts and categories, you make it possible for Quicken to do several things for you:
• Prepare tax reports that summarize information by tax category or schedule. Take these tax reports to your tax preparer and make it a lot easier for him or her to do your taxes. This might even save you money in tax preparation fees!
• Display tax information in the Tax Center window, which shows an up-to-date summary of your tax situation. Knowing how you stand now helps to prevent surprises at tax time.
• Save time using the Tax Planner, a Quicken feature that uses information from your Quicken data file based on tax information you enter. If you do a little work here, you can save a lot of work later. See “Working with the Tax Planner” later in this chapter.
• Distinguish between taxable and nontaxable investments, so you can create accurate reports on capital gains, interest, and dividends. That way, tax-exempt income and taxable income are separated for preparing your tax returns!
• Use TurboTax to prepare your tax return based on information imported right from your Quicken data file.
So, by spending a few minutes setting up tax information for your accounts and categories, you can save time and money at tax time and know your tax situation all year long.
Here’s a quick look at the online tax tools. The next time you’re thinking about taxes, be sure to check these out.
Tax Calculators and Common Tax Questions
Using your Internet connection, the Tax Calculators option displays the Intuit TurboTax page, with links to various online tools for making tax and other financial calculations, as shown in Figure 14-2. You will see both video links and links that offer tax guides for specific categories. There are even links to apps for smart phones and social media sites.

Figure 14-2 · The TurboTax page offers several ways to help you ensure your tax information is up to date.
Tax Forms and Publications
Using your Internet connection, choosing Tax Forms And Publications opens another TurboTax page from which you can link to both federal and state returns as well as other official IRS forms.
When you click the IRS Forms And Publications link, the Turbo Tax forms site appears. From this site, there are links to the Internal Revenue site from which you can download many federal forms and publications. The forms are Acrobat PDF files that appear in either a web browser window or an Adobe Acrobat Reader window. There is also a link to the freely distributed Adobe Acrobat Reader software to open and print these forms. You may fill out some of the forms online and print them from the website, or save them on your computer. Others must be downloaded or printed and then filled out by hand.
You will also see links to each of the states. Click any state link to go to that state’s website, from which you can download your forms. Most states offer additional information and publications on their sites as well as the tax forms. As with the federal forms that you download from the IRS page, most state forms download as Acrobat PDF files.
Adobe Reader is often included with computers you purchase “off the shelf.” In Windows 8.1 and Windows 10, press the Start button to view the Start screen and look for the Adobe Reader tile or app. In Windows 7 or earlier versions, click Start | All Programs to see if it is already on your computer.
About TurboTax
If you’re tired of paying a tax preparer to fill out your tax return for you, but you’re not quite confident enough about your tax knowledge to prepare your own return by hand, it’s time to check out TurboTax online tax-preparation software. It’s a great way to simplify tax preparation.
TurboTax works almost seamlessly with Quicken to complete your tax return. Just follow the instructions in this chapter to set up your accounts and categories with tax information. Purchase the TurboTax program either online to be downloaded or the boxed program from your local store. Then, from within TurboTax, import your Quicken data. TurboTax takes you through an easy interview process to make sure you haven’t left anything out—much like the interview you might go through with a paid tax professional. TurboTax then calculates the bottom line and makes it possible for you to file the return electronically or print it on your printer.
Using TurboTax
Intuit offers several versions of TurboTax, each of which you can access online. You can learn more about them by opening the Planning tab in Quicken and selecting Tax Tools | TurboTax | File Your Taxes With TurboTax. Using your Internet connection, the link takes you directly to the TurboTax Products and Pricing page.
You can choose from several options. With each option, you can start “for free” from this page. With so many options available, depending on your personal situation, TurboTax programs meet the tax filing requirements of nearly all of us.
All online editions featured on this page require no payment until you file the return. Of course, you can also purchase either a downloadable or a CD version of each program directly from this site.
• TurboTax Free Basic Edition is for taxpayers with basic tax preparation needs. It includes just the 1040EZ form.
• TurboTax Deluxe can perform tax calculations for taxpayers who own a home, make donations, or have childcare or medical expenses. In other words, most of us. You can also use TurboTax Deluxe for tax calculations for investments.
• TurboTax Premier offers all of the functionality of TurboTax Deluxe and includes tax calculations for taxpayers who own stocks, bonds, mutual funds, or rental properties.
• TurboTax Self-Employed offers all of the functionality of TurboTax Premier and includes tax calculations for small businesses, such as sole proprietorships or single-owner LLCs.
• TurboTax Business (click the View CD/Download Products link at the right of the page) provides tax preparation for corporations, partnerships, and multimember LLCs while maximizing business tax deductions. It does not include the means to prepare your personal taxes.
Import TurboTax File
From the Planning tab’s Tax Tools menu, select TurboTax | Import TurboTax File to import last year’s TurboTax information. Many Quicken and TurboTax users store a copy on an external device, such as an external hard drive or flash drive. This backup copy ensures the safety of the tax information. When it is time to prepare your current year’s tax return, you can import the information from either a location on your computer or an external device.
For more information about backups and Quicken, see Appendix A.
Export TurboTax Reports
Use the last two links in the TurboTax submenu to quickly create and send both the Tax Schedule and Capital Gains reports into the TurboTax program. When you choose either of the menu items, a file is created with the .txf extension (i.e., transfer files) and that file can be quickly imported into the TurboTax program.
Planning to Avoid Surprises
One of the best reasons to think about taxes before tax time is to avoid surprises on April 15. Knowing what you will owe before you owe it can help ensure that you pay just the right amount of taxes up front—through proper deductions or estimated tax payments—so you don’t get hit with a big tax bill or tax refund.
You may think of a big tax refund as a gift from Uncle Sam. Well, it isn’t. The money that Uncle Sam has been using, interest free, for months is actually your money. When you overpay your taxes, you’re giving up money that you could be using to reduce interest-bearing debt or earn interest or investment income. Making sure you don’t overpay taxes throughout the year helps you keep your money where it’ll do you the most good.
Quicken Personal Finance Software’s tax planning features, like the Tax Planner and Tax Withholding Estimator, can help you avoid nasty surprises. Other built-in tax tools, like the Deduction Finder and Itemized Deduction Estimator, can save you money and help you make smarter financial decisions. From the Planning tab’s Tax Tools menu, you will find all of these features. Each tool offers options to help you plan and monitor your tax situation.
Quicken offers built-in tax planning tools that you can use to keep track of your tax situation throughout the year. The Tax Planner helps you estimate your federal income tax bill for the 2016 and 2017 tax years. You can add up to three additional scenarios to your planner to help plan for possible changes in your life. In addition, Quicken provides several estimating tools to help you with your taxes. For example, the Tax Withholding Estimator helps you determine whether your withholding taxes are correctly calculated. Finally, the Tax Center in the Planning tab summarizes your tax situation with a number of useful snapshots. Here’s a closer look at each of these features.
Working with the Tax Planner
Quicken’s Tax Planner includes features from Intuit’s TurboTax tax preparation software to help you estimate your federal income tax bill for the 2017 and 2018 tax years. Although this can help you avoid surprises, it can also help you see how various changes to income and expenses can affect your estimated tax bill.
Opening the Quicken Tax Planner Window
To open the Tax Planner, open the Planning tab and choose Tax Center | Show Tax Planner. You can also click Tax Tools | Tax Planner. (If you don’t see Tax Tools, expand your screen.) Read the introductory information to get a clear understanding of what the Tax Planner can do for you and how it works.
If you find yourself using the Tax Planner regularly, consider adding a button for it to your Quicken Toolbar. See Appendix B for more information about customizing your Quicken Toolbar.
Viewing the Tax Planner Summary
To see what data is already entered in the Tax Planner, click the Tax Planner Summary link in the navigation bar on the left side of the Tax Planner window. A summary of income tax–related data, as well as the calculated tax implications, appears as shown in Figure 14-3.
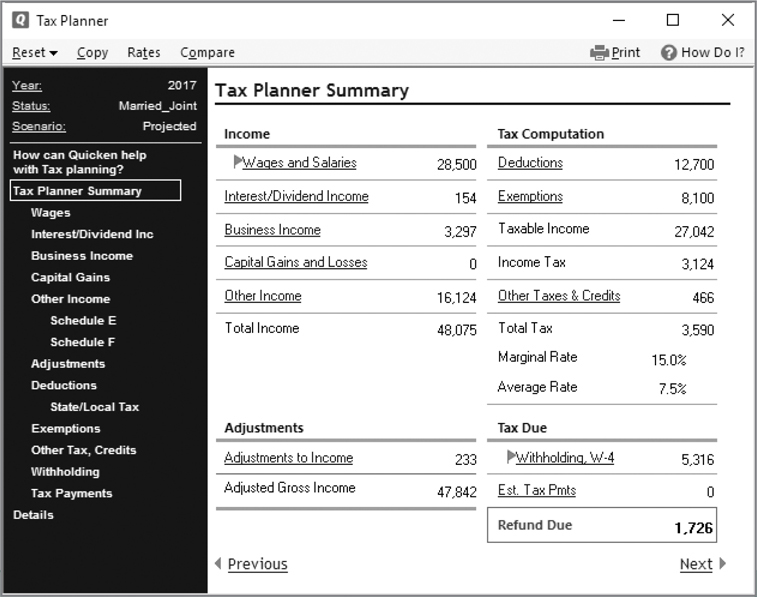
Figure 14-3 · The Tax Planner Summary screen shows the tax-related information currently entered into Quicken.
Entering Tax Planner Data
Data can be entered into the Tax Planner from three different sources:
• TurboTax data can be imported into Quicken. In the main Quicken application window, from the Planning tab, choose Tax Tools | TurboTax | Import TurboTax File. Then use the dialog that appears to locate and import your TurboTax data. You can use this information to project current-year amounts in the Tax Planner.
You can also open the TurboTax import dialog by clicking File | File Import | TurboTax File.
• User-Entered data can override any automatic entries. Use this to enter data that isn’t entered any other way or that has not yet been entered into Quicken—such as the $100.00 cash you donated to your local food bank. (As your tax professional will mention, it is always best to get a receipt for cash donations.)
• Quicken Data is automatically entered into the Tax Planner if you have properly set up your tax-related Quicken categories with appropriate tax return line items, as discussed in “Tax Information in Accounts and Categories” earlier in this chapter.
Here’s how it works. Click a link in the navigation bar on the left side of the Tax Planner window or in the Tax Planner Summary screen (refer to Figure 14-3) to view a specific type of income or expense. Then click a link within the window for a specific item. Details for the item appear in the bottom of the window. If the detail information doesn’t show, click Show Details to expand the window and show the details. If desired, change the source option and, if necessary, enter an amount.
The options you can choose from vary depending on whether TurboTax data is available or the item has transactions recorded in Quicken. For example, if TurboTax data is not available but transactions have been entered in Quicken, you can either select the User Entered option and enter a value in the Annual Total column or select the Quicken Data option and enter an adjusting value in the Adjustment column. This makes it easy to manually override any automatic entries created by the data you have entered into Quicken.
Repeat this process for any Tax Planner items you want to check or change. The Tax Planner automatically recalculates the impact of your changes.
To reset values quickly to amounts automatically entered by Quicken, choose Reset on the Tax Planner’s button bar and click Reset To Quicken Default Values.
Creating Scenarios
The Scenarios feature of the Tax Planner enables you to enter data for multiple scenarios—a “what if” capability that you can use to see tax impacts based on various changes in entry data. For example, suppose you’re planning to get married and want to see the impact of the additional income and deductions related to your new spouse. You can use a scenario to see the tax impact without changing your Projected Value scenario.
To use this feature, click the Scenario link in the upper section of the navigation bar on the left side of the Tax Planner window (refer to Figure 14-3). The Tax Planner Options screen appears. Click the Scenarios down arrow to choose a different scenario from the drop-down list.
If Quicken asks whether you want to copy the current scenario to the scenario you chose, click Yes if that new scenario hasn’t yet been created. Choose options from the Tax Year and Filing Status drop-down lists to set the scenario options. Then click the Next link at the bottom of the window to save your scenario settings. If necessary, change the values in the new scenario.
When creating or editing a scenario, you must choose the scenario first before you change the tax year or filing status.
To compare one scenario to another, click the Compare button in the Tax Planner window’s button bar. A Tax Scenario Comparisons dialog appears, showing the results of each scenario’s calculations. When you’re finished viewing the comparative information, click OK to dismiss the dialog.
Finishing Up
When you’re finished using the Tax Planner, click the X on the title bar to close the Planner. This saves the information you entered and updates the Projected Tax calculations in the Tax Center. (Learn about the Tax Center later in this chapter, in the section “Understanding the Tax Center.”)
Meeting the Estimators
You can find some of the most useful tips to aid your tax planning under the Tax Tools button in the Planning tab. From helping you find and itemize your tax deductions to helping you determine your tax refund (or payment), each tool can help you make your tax situation clearer. The more you know about taxes that you must pay, the better you will be able to manage your money to ensure there are funds to pay them.
Minimizing Taxes by Maximizing Deductions
One way to minimize taxes is to maximize your deductions. While Quicken can’t help you spend money on tax-deductible items—that’s up to you—it can help you identify expenses that may be tax deductible so you don’t forget to include them on your tax returns.
Quicken offers two features to help maximize your deductions. The Deduction Finder asks you questions about expenditures to determine if they are tax deductible. The Itemized Deduction Estimator helps make sure you don’t forget about commonly overlooked itemized deductions.
Deduction Finder
The Deduction Finder uses another TurboTax feature to help you learn which expenses are deductible. Its question-and-answer interface gathers information from you and then provides information about the deductibility of items based on your answers.
Working with the Deduction Finder Window
To open the Deduction Finder, open the Planning tab and choose Tax Tools | Deduction Finder. An Introduction dialog may appear, as shown here. Read its contents to learn more about Deduction Finder and then click OK to continue.
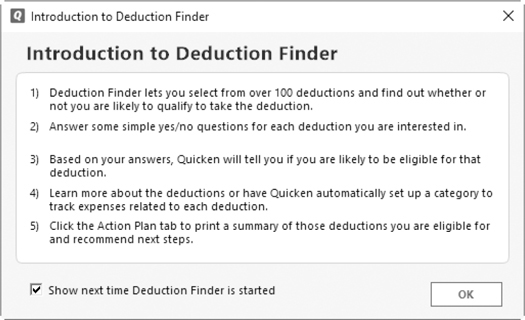
If you do not want to see the introduction the next time you open the Deduction Finder, clear the Show Next Time Deduction Finder Is Started check box.
Figure 14-4 shows the dialog displaying more information about deducting homeowner mortgage interest. This dialog appears when you select More Information in the Next Steps section at the bottom of the Deductions tab of the Deduction Finder window. Each of the deduction types offers extensive information about the deduction displayed.

Figure 14-4 · The Deduction Finder can help determine what items you can deduct on your federal tax return.
Use the buttons to work with the Deduction Finder window:
• See Introduction displays the Introduction window so you can learn more about how Deduction Finder works.
• Clear Checkmarks removes the check marks from items for which you have already answered questions.
• Print prints a summary of deduction information about all the deductions for which you have answered questions.
• How Do I? opens the Quicken Help window, where you can find additional information about using the Deduction Finder.
Finding Deductions
As you have seen, the Deductions tab of the Deduction Finder window uses clearly numbered steps to walk you through the process of selecting deduction types and deductions and then answering questions. It’s easy to use. You need only choose the type of deduction from the drop-down list. Employee is the first option. Click the downward arrow to see the options in that section. You don’t have to answer questions about all the deductions—only the deductions you think may apply to you. When you’ve finished answering questions about a deduction, the result appears near the bottom of the window. You can then move on to another deduction.
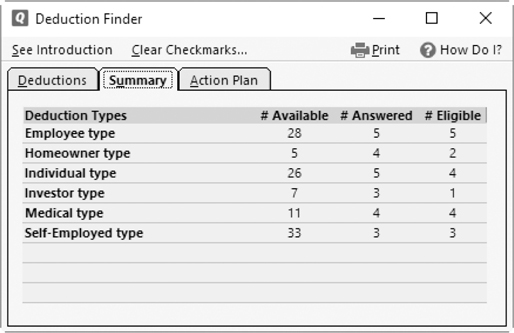
The Summary tab of the window, seen next, summarizes the number of deductions available in each category, the number for which you answered questions, and the number for which you may be eligible to take deductions based on your answers to the questions.
When you’ve finished answering questions, you can click the Action Plan tab to get more information about the deductions and the things you may need to do to claim them. Although you can read the Action Plan information on-screen, if you answered many questions, you may want to use the Print button on the button bar to print the Action Plan information for reference.
When you have completed your entries and printed your Action Plan, click the X (Close) button to close the Deduction Finder.
Utilizing the Itemized Deduction Estimator
The Itemized Deduction Estimator feature, which is available in the Quicken Premier and higher editions, helps make sure you don’t overlook any itemized deductions, specifically the deductions on Schedule A of your tax return, for which you might qualify. It does this by guiding you through a review of deduction ideas and providing the information you need to know to determine whether you may qualify. To get started, open the Planning tab and choose Tax Tools | Itemized Deduction Estimator. The How Can I Maximize My Deductions? window appears. As shown in Figure 14-5, you can select a deduction idea from the navigation bar at the left of the window and an additional dialog appears.
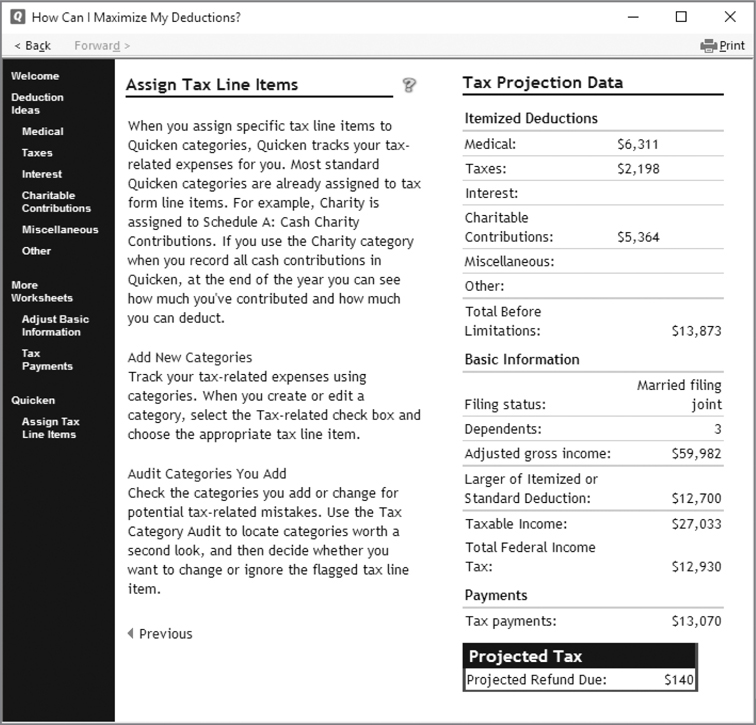
Figure 14-5 · In Quicken Premier (and higher editions) find additional Schedule A deductions using the Itemized Deduction Estimator.
Follow the instructions in the middle column of the Welcome window. You’ll be prompted to enter information related to itemized deductions, taxes paid (as seen in Figure 14-5), interest paid, charitable contributions, and other items. The instructions are clear and easy to follow. Each time you enter information that can change your taxes, the Projected Refund Due or Projected Tax Due amount in the lower-right corner of the window changes. Your goal is to get a projected refund due amount as high as possible or a projected tax due amount as low as possible.
None of the entries you make in the Itemized Deduction Estimator feature will affect your Quicken data or any other tax-planning feature within Quicken. Make changes and experiment as much as you like. When you are done, click X to close the Estimator.
Capital Gains Estimator
If you are tracking your investments in Quicken Premier or a higher edition, the Capital Gains Estimator can help you calculate the taxable consequences of selling an investment. See Chapter 11 for a detailed explanation of this tool.
Exploring the Tax Withholding Estimator
Quicken’s Tax Withholding Estimator feature, also available in Quicken Premier and higher editions, helps you determine whether your W-4 form has been correctly completed. It does this by comparing your estimated tax bill from the Tax Planner to the amount of withholding tax deducted from your paychecks.
Using the Tax Withholding Estimator Feature
To get started, in the Planning tab, choose Tax Tools | Tax Withholding Estimator. The Am I Under Or Over Withholding? window appears.
Read the information and follow the instructions in the middle column of the window. You’ll be prompted to enter information related to withholding taxes. Since the instructions are clear and easy to follow, they’re not repeated here. Each time you enter data, the Projected Refund Due or Projected Tax Due amount in the lower-right corner of the window changes. If a refund is due, you will see a message telling you that you may be withholding too much. Consider increasing the deductions you claim on your W-4 at work if the refund number is sizeable.
None of the entries you make in the Tax Withholding Estimator feature affect your Quicken data or any other tax planning feature within Quicken, so don’t be afraid to experiment.
Acting on the Results of Tax Withholding Estimator Calculations
What do you do with this information once you have it? Well, suppose your work with the Tax Withholding Estimator feature tells you that you should change your W-4 allowances from 1 to 2 to avoid overpaying federal withholding taxes. You can act on this information by completing a new W-4 form at work. This will decrease the amount of withholding tax in each paycheck. The result is that you reduce your tax overpayment and potential refund.
In some states, changing your federal withholding allowances on your W-4 changes your state withholding as well. Be careful you do not end up under withholding your state taxes if you change your federal withholding rate.
Periodically Checking Withholding Calculations
If you are entering all of your information into Quicken, including your paycheck information, consider using the Tax Withholding Estimator feature every three months or so to make sure actual amounts are in line with projections throughout the year. Whenever possible, use actual values rather than estimates in your calculations. And be sure to act on the results of the calculations by filing a new W-4 form, especially if the amount of your projected refund due or projected tax due is greater than you anticipated. Click X (Close) to close the Tax Withholding Estimator.
Understanding the Tax Center
Quicken summarizes all information about your tax situation in the Tax Center, as seen in Figure 14-6. Here’s a quick look at what you can find in the Tax Center window.
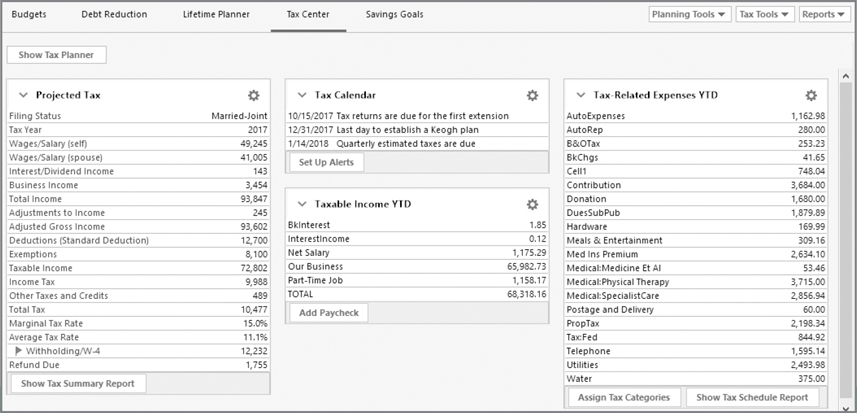
Figure 14-6 · The Tax Center displays information about your current tax situation.
Projected Tax
The Projected Tax snapshot provides a summary of your upcoming projected tax return, including the amount that you’ll have to pay or get back as a refund. If any items in the Projected Tax section need to be completed, a small flag will appear to the left of the item.
The information in this snapshot is based on the Tax Planner’s Projected scenario, discussed earlier in this chapter. If you click the small gear icon in the Projected Tax section of the Tax Center, you have the following options:
• Open the Tax Planner.
• Create a Tax Summary Report. This report can also be created by clicking the Show Tax Summary Report button at the bottom of the Projected Tax section of the Tax Center.
Watch for small red flags that appear to the left of any item in the Projected Tax snapshot. Quicken is warning you that this item may not be complete.
Tax Calendar
The Tax Calendar snapshot warns you of upcoming IRS tax deadlines. From here you can create Tax Alerts from either the Options menu or the Set Up Alerts button at the bottom of the section.
While quarterly estimated taxes are due on January 15, April 15, June 15, and September 15, if those dates fall on a holiday or a weekend, the actual payment is due the next business day.
Tax-Related Expenses YTD
The Tax-Related Expenses YTD snapshot summarizes all of your year-to-date tax-related expenses. Quicken automatically calculates this information based on the transactions you enter throughout the year. All expense categories that are marked “tax-related” and have transactions appear in this list. The small gear icon opens a menu of options available from this section, as shown next:
• Find Other Deductions opens the Deduction Finder, explained in the section “Deduction Finder” earlier in this chapter.
• How Will These Deductions Affect My Taxes? opens the Tax Planner.
• Create A Tax Schedule Report opens a report for the current tax year showing information and schedules for the Form 1040, as well as Schedules A and B. In Quicken Premier and higher editions, Schedules A and B reports for tax-related categories are included.
• Link Categories To Tax Forms opens the Category List so that you can associate categories with specific tax-line items as explained in “Including Tax Information in Accounts” earlier in this chapter.
• Go To Category List opens the Category List.
The Assign Tax Categories button at the bottom of this section opens the Category List. The Show Tax Schedule Report button opens the report described earlier.
Taxable Income YTD
The Taxable Income YTD snapshot summarizes all of your year-to-date tax-related income. Quicken calculates these totals based on the transactions you enter throughout the year. All income categories that are marked “tax-related” and have transactions appear in this snapshot. If you have chosen to enter your net paycheck and have not told Quicken that this amount is tax related, nothing will appear in this list except a link to set up your paycheck.
The link to set up your paycheck will not appear if you do not yet have a checking account created in your Quicken file.
If you have any non–paycheck-related taxable income, such as dividend income from investments, the Taxable Income YTD snapshot will not be blank.
Clicking the small gear icon of this section of the Tax Center offers the following options:
• Report My Net Worth creates a net worth report as of the current date. See Chapter 15 for more information about net worth reports.
• How Does This Income Affect My Taxes? opens the Tax Planner.
• Go To Category List opens the Category List.
The Add Paycheck button at the bottom of the section opens the Paycheck Setup dialog. The process is explained in detail in Chapter 7.
Tax Alerts
Tax alerts are only visible in the Alerts Center, which is where you go to set alerts related to your tax situation. You can access the Tax Alerts feature through the Options menu in the Tax Calendar or from the menu bar by choosing Tools | Alerts Center | Setup. In the Setup dialog, you have three options related to taxes.
If necessary, click the plus sign to the left of the Taxes item in the Alerts Center’s Setup tab to expand the tax-related alerts.
• Withholding Threshold enables you to set a value of dollars withheld from your paycheck to alert you if your payroll withholding is too much or not enough. However, this alert only works when you set up your paycheck in Quicken.
• Schedule A – Personal Deductions (Schedule-A Reminder) displays information about the types of personal deductions you can claim on Schedule A of your tax return.
• Schedule C – Business Deductions (Schedule C Reminder) is available in the Home, Business & Rental Property edition. This alert provides information about types of business deductions you may be eligible to claim.
• Important Tax Dates notifies you in advance of tax calendar events, such as estimated tax due dates and extension deadlines.
Learn more about setting alerts in Chapter 7.
You can also see tax alerts in the Alerts snapshot that you can add to your Main View on the Home tab or into another view you create on the Home tab.