Appendix B
Customizing Quicken
In This Appendix:
• Creating custom Home tab views
• Re-creating the Summary view
• Crafting an Analysis & Reports view
• Customizing the Toolbar
• Telling Quicken your preferences
• Converting your older Quicken files to a new computer
• Changing multiple transactions
• Using the Emergency Records Organizer
Once you have become familiar with Quicken, you may want to fine-tune parts of the program to meet your needs. While there are options for changing the look of Quicken throughout this book, other customization options, such as customizing the Toolbar, may be useful to you. This appendix explains many ways you can customize Quicken.
 Customizing Quicken’s Interface
Quicken offers many customization possibilities. Since the Home tab is often the opening point for many Quicken users, this part of the appendix explains how to customize both the Home tab and the Quicken Toolbar.
Creating Custom Home Tab Views
We mentioned in earlier chapters that you can customize views in the Home tab to see specifics about your Quicken data. You can create multiple Home tab views, each of which shows the “snapshots” of summarized financial information that you want to display.

If you’ve upgraded Quicken from an earlier version, you may already have custom views set up in your Quicken data file. You have access to these views on the Home tab, where you can switch from one to another, modify them, and delete them, as discussed in this section.
Displaying the Home Tab Views
To get started, click the Home tab near the top of the Quicken window, as seen in Figure B-1. Quicken displays the Main View. Before you customize this view, it displays three snapshots: See Where Your Money Goes, Stay On Top Of Monthly Bills, and Budget Your Spending. Once you’ve customized the Home tab, it displays the views you added to it. Each view can contain one or more snapshots.

Figure B-1 · Quicken’s Main View initially offers three snapshots to help you keep track of your finances.
Modifying the Current View
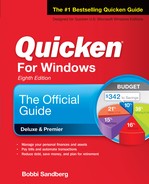
Click the Customize button shown beneath the Main View title to change the current view. The button opens the Customize View dialog, as seen next. Scroll through the Available Items list to choose what to include in your customized snapshot. Move items from the Available Items list on the left to the Chosen Items list on the right with the Add button. To rearrange the order of items in the Chosen Items list, select an item and click Move Up or Move Down. Repeat this process until the items appear in the view in the order you prefer.
Make changes as desired, and click “Save” to save them.
Removing an Item To remove an item from the view, select the Customize button and select the item you want to remove in the Chosen Items list and click Remove. This action simply moves the item back to the Available Items list.
Creating a New View
By creating multiple views, you can make several versions of the Home tab window, each with a specific set of information. You can then quickly switch from one view to another to see the information you want.
In the Home tab window, click the Add View button that appears parallel to the Main View button, but at the right side of your screen. The Customize View dialog appears.
Enter a name for the view in the View Name box. The default name will be “View 2” or the next available number. Follow the instructions in the previous section to add items to the view, and click Save. Your new view appears on your screen.
Switching from One View to Another
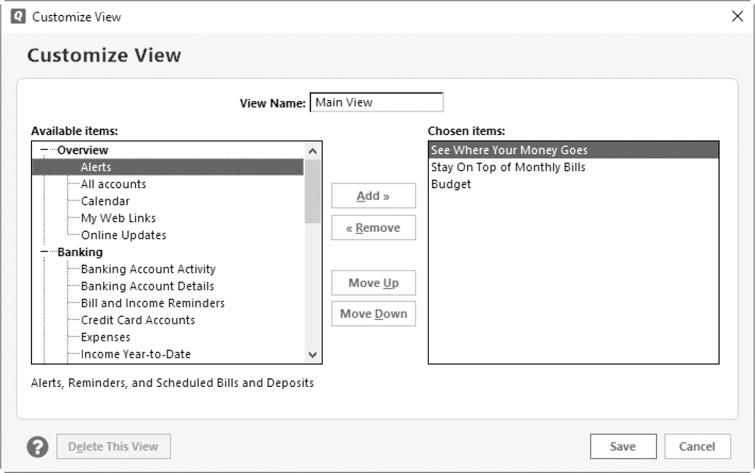
If you have created more than one view for the Quicken Home window, each view has its own menu button at the top of the Home tab window. The view currently in use is underlined as seen next. To switch from one view to another, simply click the button for your chosen view.
Deleting a View
To delete a view, select the button for the view you want to delete. Click Customize to open the Customize View dialog. Then choose the Delete This View button. Click Yes in the confirmation dialog that appears. The view is deleted. You must have at least one view in the Home tab, meaning you cannot delete the “last” view.
Re-creating the Summary View
In earlier versions of Quicken, a Summary view displayed a number of snapshots with useful information about your banking accounts. If you liked this view, as many did, you can easily create it, as described next.
1. Open the Home tab, and click Add View. The Customize View dialog appears. First, type Summary View or any name you prefer in the View Name field. If any information appears in the Chosen Items list, click the first item, hold down your SHIFT key, and click the bottom item to select the entire list. Then, select Remove to remove the highlighted items. They are still available in the Available Items list on the left as you are only removing them from the Chosen Items list in the current view,
2. Start by selecting Alerts in the Available Items list, and click Add. (You learn about setting alerts in Chapter 2.) You will note that all of the items are in this order within the six sections: Overview, Banking, Investing, Property & Debt, Planning, and Tax. However, if you have not yet added an investment account, you will not see the Investing section.
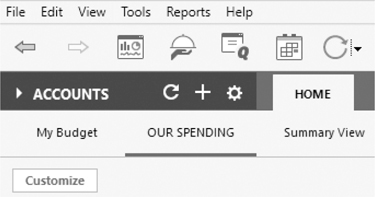
3. Add the following from the Banking section of the Available Items list: Spending And Savings Accounts, Credit Card Accounts, and Bill And Income Reminders, in that order. When you click Save, you’ll see a Summary View, similar to the one that was in previous Quicken versions, as seen in Figure B-2.
Figure B-2 · Design the Summary View to show your financial position in one location.
The layout depends on your screen width and the order in which you have placed the snapshots. To get the layout you want, change the width of your Quicken window and/or the order in which the snapshots display.
In your new Summary View, all snapshots include an Options menu that displays as a small gear icon, and buttons that you can use to work with that snapshot. For example, the Alerts snapshot at the top of the view has both buttons and Options menu commands for showing and setting up alerts. You can click links to view the account register, set up balance alerts, and set interest rates in any of the snapshots. You have seen many of these options throughout the book. Try exploring some of the others!
Here’s a brief summary of each snapshot in your new Summary View:
• Alerts The Alerts snapshot lists alerts you have set up. You can click blue links to go to the account or to other applicable alert items that you learn about in Chapter 7.
• Spending And Savings Accounts The Spending And Savings Accounts snapshot lists all of your checking, savings, and cash accounts, along with their current or ending balances. Remember, the current balance shows the net of all of the deposits and checks through today’s date. The ending balance includes any checks or deposits you have entered that will occur on future dates. Whether the Spending And Savings Accounts snapshot shows both the current balance and the ending balance or just shows the ending balance depends on whether any of the listed accounts have future-dated transactions. If you have no future-dated transactions in any of the listed accounts, only the ending balance will display in the snapshot. Review Chapter 4 to understand how account balances are displayed.
• Credit Card Accounts The Credit Card Accounts snapshot lists all of your credit card accounts along with their current balances.
• Bill And Income Reminders The Bill And Income Reminders snapshot lists all of your bills, deposits, and other scheduled transactions. It may also display a list of transactions that Quicken thinks you may want to schedule. Buttons beside each selected item enable you to enter, edit, or skip a scheduled transaction, or to schedule or ignore a suggested transaction. You may also link each item as described in Chapter 6.
Crafting an Analysis & Reports View
Another useful view is the Analysis & Reports View, which includes both graphs and reports that explain your current financial position. Most of these snapshots give you a glimpse of Quicken’s extensive and highly customizable reporting features, as discussed in Chapter 15.
• From the Home tab, click Add View to open the Customize View dialog. Type Analysis & Reports in the View Name field. Remove any items in the Chosen Items list.
• Add the following from the Available Items list: Expenses, Income vs. Expenses from the Banking section, and Budget from the Planning section, in that order. Click Save to see an Analysis & Reports View, as seen in Figure B-3.
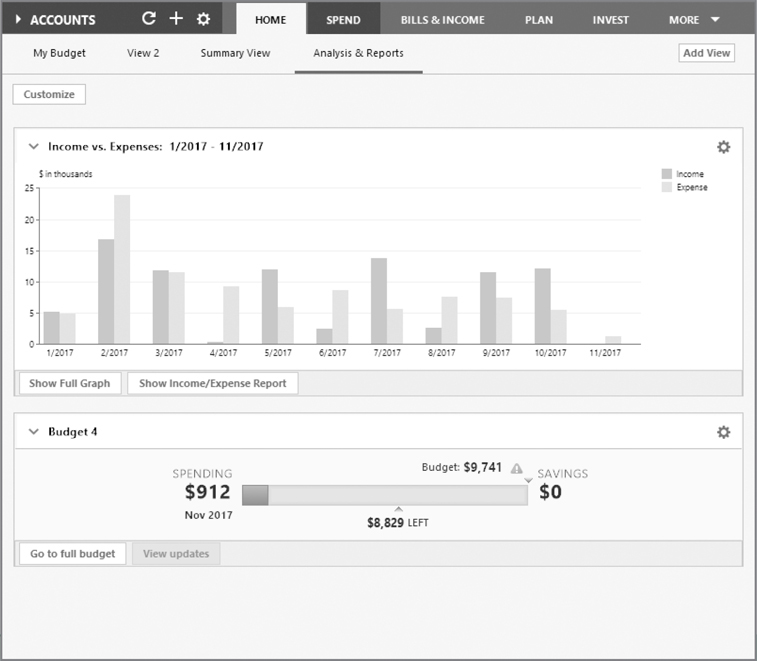
Figure B-3 · The Analysis & Reports view shows your financial position in a graphic view.
Select either the Expenses or Income vs. Expenses snapshot to open a detailed snapshot about that section of your view. In the Budget snapshot, click any of the bars to open a mini-report.
If you have not yet set up a budget, you will see Budget Your Spending with the Get Started button. Clicking the Get Started button takes you to the Budgets view on the Planning tab so you can set up your budget. Learn about setting up your Budget in Chapter 13.
Customizing the Toolbar
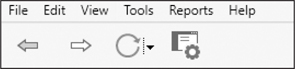
The Quicken Toolbar is an optional row of buttons along the top of the screen, just beneath the menu bar, as seen here. These buttons offer quick access to Quicken features. If you do not see the Quicken Toolbar, display it by clicking View | Show Toolbar.
By default, the Quicken Toolbar shows both a left- and right-pointing arrow, the One Step Update button, and a Preferences button. You can customize the Toolbar by adding, removing, or rearranging buttons or by changing how the buttons display. To do this, you use the Customize Toolbar dialog, as seen here. To open this dialog, open the View menu and select Customize Toolbar. To customize the Toolbar, make changes in this dialog, as discussed next, and click Done.
Quicken calls the Toolbar items “buttons,” but other Quicken users call them icons. Either way, they are simply links to other Quicken items.

Adding Buttons
To add a button, select it in the Available Toolbar Buttons list and click Add. Its name appears in the Your Toolbar Buttons list. If you want more items to choose from, click the Show All Toolbar Choices check box to display all the possibilities. The list expands to show the various items for which you can create a toolbar button.
If you have chosen to hide the display of the tabs in the View | Show Tabs menu, you may not see all the available sections in your Available Toolbar Buttons list. Unhide the tabs to ensure you can see all the available items.
You may also have more Toolbar button choices if you are using View | Classic Menus.
The Toolbar can display up to 29 buttons. If you resize your Quicken window to make it smaller, a More button, with two right-pointing arrows, appears on the Toolbar. Click this button to display a menu of buttons and select the button you want.
If you have chosen to display only buttons rather than both buttons and text, you may also see a >>> symbol showing there are more buttons available.
Adding Saved Reports to the Toolbar
To add a saved report to the Toolbar, click the Add Or Remove Saved Reports button in the Customize Toolbar dialog. Then select the In Toolbar check box beside each saved report you want to add to the Toolbar, as seen next. Click OK to save your changes.

Removing or Rearranging Buttons
To remove a button, select it in the Your Toolbar Buttons list and click Remove. Its name is removed from the Your Toolbar Buttons list, but is still available on the Available Toolbar Buttons list should you want to include it at another time.
You can rearrange the order of buttons on the Toolbar by changing their order in the Your Toolbar Buttons list. Simply select a button that you want to move, and click Move Up or Move Down to change its position in the list.
Moving More than One Button
Many Quicken users want to put several buttons on the toolbar at the same time. This is easy to do.
To choose items that are listed in the Available Toolbar Buttons list in a row (one after the other):
1. Select the first button you want to use in the Available Toolbar Buttons list.
2. Hold down the SHIFT key on your keyboard.
3. Click the last item you want to use. Release the SHIFT key. You’ll note that the items you chose are “bolded.”
4. Click the Add button (or the Remove button if you are taking them off the Quicken Toolbar). As before, the only change is made to the toolbar itself.
To move items that are not in a row, use the CTRL key rather than the SHIFT key. Select each item that you want to move while you are still holding down the CTRL key. Release the CTRL key after selecting the items.
Changing the Appearance of Buttons
At the bottom of the Customize Toolbar dialog are two options that determine how Toolbar buttons are displayed:
• Show Icons And Text displays both the Toolbar button and its label, as shown here.

• Show Icons Only displays just the Toolbar button. When you hover over a button, its label appears.
Restoring the Default Toolbar
To restore the Toolbar back to its “factory settings,” click the Reset to Default button in the Customize Toolbar dialog. Then click OK in the confirmation dialog that appears. Click Done to close the dialog and return to the main Quicken window. The Toolbar buttons return to the way they display when you first installed Quicken.
EXPERIENCED USERS RECOMMEND
Many users like the ability to create custom keyboard shortcuts for the buttons on your Toolbar. From the Customize Toolbar dialog:
1. Select the item you want to edit from the Your Toolbar Buttons list on the right of the dialog.
2. Click Edit Shortcut Or Label to open the Edit Shortcut Or Label dialog.
3. Change the label name, create a shortcut key combination, or both, and then click OK.
You can now open that item from your keyboard using the keystrokes shown in the Edit Shortcut Or Label dialog. However, if you remove the button from the Toolbar, the keystroke combination no longer works for that item. In addition, the label change does not appear in the Your Toolbar Buttons list, but it does appear on the Toolbar when you save your customized settings.
Changing a label name is effective only in the Toolbar display when you’ve chosen to show both buttons and text. It does not change the label that appears when you hover over the button with your mouse.
You can also access the Customize Toolbar dialog by right-clicking anywhere within the Toolbar.
Setting Preferences
Many Quicken users find the Preferences settings give them better control when using the program. While we discuss many of the settings throughout other chapters in this book, this section reviews all of the options you can change and tells you where you can learn more about the features they control.
Telling Quicken Your Preferences
As the name suggests, Preferences allow you to control Quicken’s appearance and operations. To access these options, either select Preferences from the Toolbar or open the Edit menu and choose Preferences. Either method opens the Preferences dialog. It lists a variety of categories as follows.
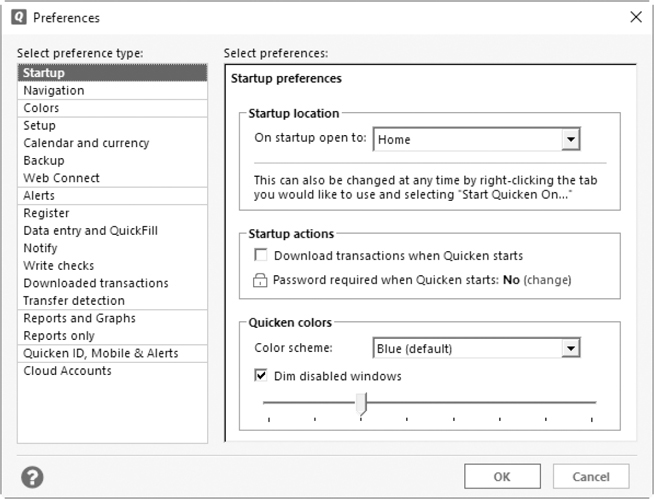
Startup
Startup preferences, shown next, enable you to specify what should appear when you start Quicken. Use the drop-down list to select Home (the default setting), one of the tabs (Home, Bills, Planning, and so on), a specific account register, an investing item, or one of the views within the tabs.
If you choose to use pop-up registers in the View window or from Register Preferences | Register Appearance dialog, you will not be able to select a specific account register to start on.
You can choose what you want Quicken to do when it starts, such as download transactions or require a password, and choose one of the predefined color schemes for the Quicken program: blue (the default), green, purple, or any of the other options. You can also choose to have non-active (disabled) windows dimmed. Use the slider to determine how much or how little “dimming” should occur.
EXPERIENCED USERS RECOMMEND
Depending on your monitor settings, sometimes changing the color scheme can make Quicken easier for you to read. Also, you can make the font easier to read by selecting View | Use Large Fonts. However, you may find that not all of your information appears in your Quicken window when you use large fonts.
However, some users report issues with using the large font option. Because the monitors on many devices today can be “scaled” to make text and other items larger or smaller, you may have to experiment a bit with your device to achieve the best result.
Navigation The Navigation preference allows you to choose how you want to get around Quicken.
• Main Navigation lets you choose to use the Classic menus (those used prior to 2010). If you choose Classic menus, you also have an option to turn off the tab display.
• Account Bar lets you select where to place the Account Bar and whether to display cents in the Account Bar balances. You can also choose to not show the Account Bar with this preference. Clearing the Show Account Bar check box minimizes the Account Bar, enabling you to see more of the Quicken screen with which you are working.
• Other Options lets you choose whether to show the Quicken Toolbar. If you have a widescreen monitor, from here you may choose to dock the side bar permanently on the right side of your monitor.
If you choose to display the Account Bar on the right side of your widescreen monitor, as well as choose to display the side bar, the side bar will then dock on the left side of your screen.
Colors
You can set how Quicken displays on your computer screen using the Colors preferences.
• Background Color lets you choose either gray or white as the background for your data. As of this writing, the difference between the gray and white is hard to discern. Also, the gray or white setting does not change the entire background—it changes just the borders of the background.
• Graph And Chart Colors offers either the default theme or a wide variety of options. Select Default and Preview to make changes. You may have to work with several options to see what will work best for your machine. Also, the Graph And Chart Colors option only changes the pie charts—it does not change bar charts. And, at this writing, there does not yet appear to be any Help available for the new Colors preference or for its Preview screen.
• Tab Color Scheme offers eight additional color schemes beyond the default blue. Take the time to review on your computer to see which is the most pleasing.
Setup
Setup options control basic Quicken operations.
• Keyboard Mappings enables you to change what certain standard Windows keyboard shortcuts do. In most Windows programs, the CTRL-Z, CTRL-X, CTRL-C, and CTRL-V shortcut keys perform commands on the Edit menu. In Quicken, these keyboard shortcuts are set to the Windows standard. See Quicken Help for more information about keyboard shortcuts.
If you are upgrading from a previous Quicken version, the preferences you set in that version may not be the same in the latest version of Quicken. To ensure the settings are what you want, choose Edit | Preferences | Setup | Keyboard Mappings to verify the settings on your machine.
• Turn On Quicken Sounds turns on Quicken sound effects. You may want to leave this check box off if you use Quicken in an environment where sounds might annoy the people around you.
• Turn On Animation, which is turned on by default, activates the Quicken animation effects that appear when you complete certain actions.
• Automatically Minimize Pop-up Windows automatically minimizes a Quicken window, such as a report window or the Category List window, to the Quicken task bar when you click outside that window. (This is the window behavior in some older versions of Quicken.) With this option turned off, you can have multiple Quicken windows open at once and can manually minimize each one. Note that not all Quicken windows open independently. For example, when the Preferences dialog is open, you cannot open other Quicken pop-up windows.
Calendar and Currency The folks at Quicken realize that not everyone manages their finances on a calendar-year basis or only in U.S. dollars. The Calendar and Currency options enable you to customize these settings for the way you use Quicken:
• Working Calendar enables you to choose between two options: Calendar Year is a 12-month year beginning with January, and Fiscal Year is a 12- month year beginning with the month you choose from the drop-down list.
• Multicurrency Support assigns a “home” currency to all of your current data, placing a currency symbol beside every amount. You can then enter amounts in other currencies by entering the appropriate currency symbol. It is not necessary to set this option unless you plan to work with multiple currencies in one of your Quicken data files.
Backup The Backup options enable you to customize the way Quicken’s Backup feature works. You can choose to have Quicken automatically do backups on your computer’s hard drive, as well as choose to be reminded to do manual backups on any drive you want. See Appendix A for a complete discussion of how and when (do it often!) to back up your data.
Web Connect The Web Connect options enable you to customize the way Quicken’s Web Connect feature works. Web Connect, as discussed in Chapter 6, is a method for downloading transaction information from your financial institution into your Quicken data file.
• Give me the option of saving to a file whenever I download Web Connect data displays a dialog after a Web Connect session that enables you to save the downloaded Web Connect information to a file.
• Keep Quicken open after Web Connect completes tells Quicken to keep running after Web Connect completes a download from the Web.
Alerts
Alerts preferences enable you to set the lead-time for calendar notes to appear in Alerts snapshots as well as the Alerts Center. Learn about alerts in Chapter 7. Chapter 7 also discusses the Billminder feature that displays your scheduled bills and deposits. You can select a lead-time period to display from the drop-down list; timing options range in time from Last Month to Next Month. The items you display in the Billminder have no effect on the lead-time you’ve set for alerts.
Warnings allow you to change all Quicken warnings back to their default. Click Reset Quicken Warnings, and a message appears that all warnings are reset. This can be helpful if you turned off a warning by checking the Don’t Show Me This Again check box and now realize you really did want to see the warning.
Investment Transactions
The Investment Transactions options let you customize the way the Investment Transaction lists look and work. Learn about the Investment Transaction lists in Chapter 9.
This option does not appear if you have turned off the Investing tab display or if you have not yet created an investing account.
• List Display determines whether transactions should appear with one or two lines in the list.
• Sort Choice determines whether transactions are sorted in ascending or descending order by date.
• Show Hidden Transactions displays hidden transactions in the list.
• Show Attach Button displays the Attach button beside the Edit and Delete buttons for the current transaction. You may want to turn off this check box if you do not use the Image Attachment feature. Chapter 5 explains how to attach images to transactions.
• Automatically Update Quotes Every 15 Minutes updates your stock portfolio with your Internet connection every 15 minutes. This feature comes with Quicken Premier and higher editions. As discussed in earlier chapters, Quicken will only update when it is the active application. If Quicken is open but you are working with another application, quotes will not update until you make Quicken the active program again.
Investing.Quicken.com Portfolio As explained in Chapter 9, http://investing
.quicken.com is an online site where you register and can then track your investment information from any location with Internet access. Your Preferences options are as follows:
• Select Accounts To View Online tells Quicken what accounts to view online at Quicken.com and how to send information. You can choose which accounts to use, or use the Select All button to select all of your accounts, or click Clear All to clear your choices and start over.
• Send My Shares/Send My Symbols Only tells Quicken what information about your holdings to track.
• Track My Watch List On Investing.Quicken.com, if cleared, stops Quicken.com from keeping track of the items you’ve included in your security Watch List.
Register
Register preferences enable you to fine-tune the way the account register works. Five groups of settings appear in addition to the Register preferences themselves. You’ll see account register windows discussed throughout this book.
Register Preferences Register options affect the way the transactions you enter appear in the account register window:
• Show Date Before Check Number is the default setting for your registers. Clear this check box to have the check number appear after the Flag or Flag and Status columns.
• Show Memo Before Category puts the Memo field before the Category field in your account register. Many Quicken users clear this option, as they prefer to enter the Category field before the Memo field.
Transaction Entry
• Automatically Enter Split Data turns the OK button in the Split Transaction window into an Enter button for entering the transaction. See Chapter 5 for a complete explanation of split transactions.
• Automatically Place Decimal Point automatically enters a decimal point two places to the left when entering dollar figures in Quicken or using Quicken’s built-in calculator. For example, if you enter 1543 in the calculator, Quicken enters 15.43.
EXPERIENCED USERS RECOMMEND
Although Quicken tries to assign a category to every transaction, you may see one or more uncategorized downloaded transactions. This happens because Quicken does not recognize the vendor. In addition to blank categories, you may see incorrect category assignments or simply categories that you want to change. Updating or adding the Memorized Payee as described next should correct both issues.
Quicken assigns categories to downloaded transactions in this order:
1. A transaction in your Memorized Payee List with a matching payee name with the category shown for that payee.
2. Your financial institution has associated a standard industrial classification (SIC) code with this transaction.
You also have the option to edit the category from the Memorized Payee List. Click Tools | Memorized Payee List, edit the memorized payee, and choose the correct category. This will then memorize the payee name to the correct category for future downloads.
Register Row Spacing This option allows you to change the height on each row on your register. You may choose from Compact; Standard, and Comfortable. Take the time to try each option before you make your decision.
To test which option works best for you, select an option. Then, click OK and open a register. Then, select Edit | Preferences | Register | Register Row Spacing and select another setting to see how that changes your view. When you have selected the option that works best for you, click OK to close Preferences
Register Appearance
• Gray Reconciled Transactions displays all reconciled transactions with gray font rather than black characters.
• Remember Register Filters After Quicken Closes remembers any register filter settings you may have made when you close Quicken so those settings are in place the next time you start the program.
• Use Pop-Up Registers opens registers in separate windows, allowing you to have several different windows with a variety of information open at the same time.
The Use Pop-Up Registers option is unavailable if you have chosen a bank, credit card, or an investing account as your Startup Location. See “Startup” earlier in this appendix.
• Fonts/Colors display dialogs with which you can select the font and font size as well as the colors for your register windows.
Data Entry and QuickFill Data Entry and QuickFill options allow you to fine-tune the way Quicken’s QuickFill feature works.
Data Entry
• Use Enter Key To Move Between Fields enables you to use either the ENTER or TAB key to move from field to field when entering data.
• Complete Fields Using Previous Entries enters transaction information using the information from previous entries.
• Recall Memorized Payees uses memorized payees to fill in QuickFill entries. This option is not available if the Complete Fields Using Previous Entries option is disabled.
• Automatically Open Drop-Down Lists In QuickFill Fields automatically displays the drop-down list when you advance to a field with a list.
• Capitalize Payees And Categories automatically makes the first letter of each word in a payee name or category uppercase.
• Show Buttons On QuickFill Fields displays drop-down list buttons on fields for which you can use QuickFill.
QuickFill and Memorized Payees
• Automatically Memorize New Payees tells Quicken to enter automatically all transactions for a new payee to the Memorized Payee List.
• Automatically Include On Calendar Payee List tells Quicken to add automatically memorized payees to the Calendar window. This option is grayed out if you have not checked the Automatically Memorize New Payees check box.
• Add Address Book QuickFill Items To Memorized Payee List tells Quicken to add entries from the Address Book to the Memorized Payee List so the address fields are filled in automatically when writing checks.
• Remove Memorized Payees Not Used In Last NN Months tells Quicken to remove memorized payees that have not been used within the number of months you specify. By default, this feature is turned on, with the number of months set at 14. By entering a value of 6 (for example), Quicken retains only the memorized payees for transactions you entered during the past six months, thus keeping the Memorized Payee List manageable. In this way, you can weed one-time transactions out of the Memorized Payee List. Changing this option does not affect already entered transactions.
Many Quicken users have reported performance issues when their Memorized Payee List grows large. If you notice entering transactions is slow, check your Memorized Payee List and use this preference to easily trim down the list.
Notify Notify options affect the way Quicken notifies you about problems when you enter transactions in the register:
• When Entering Out-Of-Date Transactions warns you when you try to record a transaction for a date more than a year from the current date.
• Before Changing Reconciled Transactions warns you when you try to modify a previously entered and reconciled transaction.
• When Entering Uncategorized Transactions warns you when you try to record a transaction without assigning a category to it.
• To Run A Reconcile Report After Reconcile asks if you want to display a Reconcile Report when you complete an account reconciliation.
• Warn If A Check Number Is Re-used warns you if you assign a check number that was already assigned in another transaction.
• When Changing The Account Of An Existing Transaction notifies you when you change the account of a transaction you have already entered.
• To Save A Transaction After Changing It asks you if you want to save the changes you made to the last transaction you changed.
Write Checks Write Checks preferences affect the way the checks you create appear when printed using the Write Checks window:
• Printed Date Style enables you to select a four-digit or two-digit date style.
• Spell Currency Units tells Quicken to spell out the currency amount in the second Amount field.
• Allow Entry Of Extra Message On Check displays an additional text box for a message in the Write Checks window. The message you enter is printed on the check in a place where it cannot be seen if the check is mailed in a window envelope.
• Print Categories On Voucher Checks prints category information, including splits and tags, on the voucher part of voucher checks. This option affects only voucher-style checks.
• Change Date Of Checks To Date When Printed automatically prints the print date, rather than the transaction date, on each check.
Downloaded Transactions Downloaded Transactions preferences control the way Quicken handles transactions downloaded into it from your financial institution. You learn more about downloading transactions into Quicken in Chapter 6.
• Automatically Add To Banking Registers saves manually reviewing and accepting each banking transaction, and possibly leaving an unaccepted transaction out of Quicken reports and graphs. Many Quicken users prefer not to use this option. If downloaded transactions occasionally seem to be disappearing, try turning off this preference, at least temporarily. That will help you determine if the missing transactions are due to incorrect downloaded transaction matching.
• Automatically Add To Investment Transaction Lists saves you time by entering your downloaded transactions to your investment account “registers” rather than having to manually review and accept each transaction.
There is an intermittent bug where automatically adding to investment transaction lists can create placeholders for all of your 401(k) securities. If you are seeing a proliferation of placeholders in your 401(k) account, try temporarily turning off this preference.
• Compare Account Portfolio After Download creates a placeholder in your investment account in cases where the downloaded transaction does not match your records. Choose Edit Settings to select the account(s) for which you want to enable this choice.
During Transaction Download
• Automatically Categorize Transactions sets the transaction’s category based on what you have used before for that payee.
• Automatically Apply Quicken’s Suggested Name To Payee uses Quicken’s “best guess” name for the downloaded transaction. Selecting this option can, depending on your financial institution, cause some unexpected or strange payee names to appear in your downloaded payees.
• Capitalize First Letter Only In Downloaded Payee Names is self-explanatory.
Your Renaming Rules The Renaming Rules options allow you control over how Quicken deals with the differences between the payee names in your records and those of the bank’s. See Chapter 6 for a complete discussion of renaming rules.
• Use My Existing Renaming Rules tells Quicken to use the rules you have created to name the downloaded payee name.
• Click the Renaming Rules button to open the Renaming Rules dialog, which you can use to create, modify, and remove renaming rules.
• Automatically Create Rules When I Rename Payees establishes a rule for the payee you have renamed.
• Let Me Review/Confirm The Automatically Created Rules tells Quicken you want to see the renaming rule that Quicken has created.
Transfer Detection This option tells Quicken to review each downloaded transaction to see if it is matched with a transaction in another account. If you select this option, when Quicken finds matched transactions, you have two options:
• Automatically Create Transfers When Detected makes the transfer from the one account to the other automatically and enters the transaction in both registers. Choosing this setting can have unexpected and undesired results. You may appear to be losing downloaded transactions because they are incorrectly identified as a transfer. If you choose to use the transfer detection feature, consider using the Confirm Possible Transfers Before Entering In Register setting instead.
• Confirm Possible Transfers Before Entering In Register directs Quicken to ask you whether the transaction is, indeed, a transfer.
Reports and Graphs
Reports And Graphs preferences include two categories of options for creating reports and graphs. Chapter 15 discusses creating reports and graphs in detail.
Reports And Graphs Preferences Reports And Graphs options enable you to set your own default options for creating reports and graphs:
• Default Date Range and Default Comparison Date Range enable you to specify a default range for regular and comparison reports. Choose an option from each drop-down list. If you choose Custom, you can always enter exact dates.
• Report Toolbar allows you to tell Quicken to show only icons or both icons and text on your reports.
• Customizing Reports And Graphs options determine how reports and graphs are customized and what happens when they are.
• Customizing Creates New Report Or Graph, which is the default setting, creates a subreport based on the report you customize.
• Customizing Modifies Current Report Or Graph changes the report you customize without creating a subreport.
• Customize Report/Graph Before Creating tells Quicken to offer to customize a report or graph when you choose one.
Reports Only This group of options applies only to reports:
• Account Display and Category Display enable you to set what you want to display for each account or category listed in the report: Description, Name, or Both.
• Visual Settings (new in Quicken) lets you set the font sizes, row color, and row height. The options for row height are Standard, Compact, and Extra Space.
• Collapse All Graphs In Reports By Default (new in Quicken) will minimize all graphs that are available with your reports. See Chapter 15 for more information about using graphs in reports.
• Use Color In Report tells Quicken to use color when displaying report titles and negative numbers.
• QuickZoom To Investment Forms tells Quicken to display the investment form for a specific investment when you double-click it in an investment report. With this check box turned off, Quicken displays the investment register transaction entry instead.
• Remind Me To Save Reports tells Quicken to ask whether you want to save a customized report when you close the report window.
• Decimal Places For Prices And Shares enables you to specify the number of decimal places to display for per-share security prices and number of shares in investment reports.
Quicken ID, Mobile, Cloud Accounts, and Alerts
After you have set up your Quicken ID, you may update your Quicken Profile for your online services.
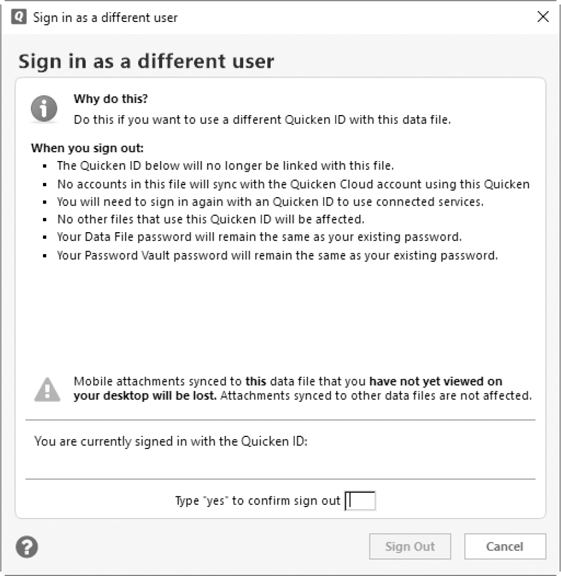
Quicken Profile shows your current Quicken ID, which you use to sign in to all Quicken services. This includes your Quicken ID, your e-mail, and your contact information. When you select Update Your Quicken Profile Information, a Quicken sign-in dialog appears in which you will need to enter your Quicken ID and password. If you select Sign In As A Different User, the following message appears. Your current Quicken ID will no longer be linked with this data file, and you will no longer be able to sync this file with the Quicken Mobile account that uses this Quicken ID. If you have made changes to your Quicken information, you must type Yes to confirm the changes and click the Sign Out button. If you simply want to cancel the change, click Cancel. Cloud Accounts are explained in Chapter 3.
If you have not yet done so, you can set up your mobile accounts with Quicken from this dialog. This process is explained in detail in Chapter 3.
EXPERIENCED USERS RECOMMEND
Another new preference for Quicken is Cloud Accounts. You can use this new preference to see cloud accounts associated with your Quicken ID (guess what, every file has a cloud account whether you opted to use mobile or not!), edit the cloud account names, or delete unneeded cloud accounts. You cannot delete the cloud account for the currently open file. If you do not want a cloud account for your main file, create a test file with one dummy account. From the test file, use the Cloud Accounts preference to delete the cloud account for your main file.
Useful Tips
While most Quicken users find the program exactly to their liking after they use some of the customization features mentioned earlier, others have questions about some specific how-tos.
Converting Your Older Quicken Files to a New Computer
After using the Quicken program for a number of years on a desktop computer, you may decide to get a new laptop and want to upgrade Quicken. Depending on the version you are running, the best way to do this follows next.
Convert from Quicken 2004 and Newer
These steps apply to converting Quicken 2004 and newer files. If you are converting from Quicken 2003 or older, see “Using Intermediate Versions of Quicken to Convert Your Old Data Files.”
1. Back up your old files before you start anything else.
2. On the “old” computer, choose File | File Operations | Validate And Repair or File | File Operations | Validate to ensure your old files are in the best shape possible. (See Appendix A for more information on Validate and Repair.)
3. Install Quicken on your new computer. The Quicken license agreement allows you to install copies of your Quicken program onto computers within your own household; however, you need to sign in with the same Quicken ID on all of the computers.
4. Copy the files from your “old” computer to your “new” computer, and you’re ready to go.
A handy way to move files from the old computer to the new computer is to back up on the old computer, copy the backup file (or files) to a thumb drive, insert the thumb drive on the new computer, and copy the backup file (or files) from the thumb drive to the new computer.
When you are installing Quicken, you may see an option asking if you are a new Quicken user. If you inadvertently choose that option, you can still access your data files. Click File | Open Quicken File, and choose the data file you want to use. Your data will be converted to use with Quicken.
Using Intermediate Versions of Quicken to Convert Your Old Data Files
You can read more information about converting from older versions of Quicken from a website. With your Internet connection, type https://www.quicken.com/support/how-and-when-use-intermediate-version-convert-older-versions-quicken into the address bar of your browser. From there you can even download the intermediate programs required to complete your conversion.
If you are unsure which version of Quicken you are using, click Help on the Quicken menu bar and select About Quicken.
Changing Multiple Transactions
As companies merge and life changes, you may have a recurring transaction that needs to be changed. While you can edit the payee, category, tag, or memo for current month and future transactions in the Bills tab, as explained in Chapter 6, you may want to change all of the previous transactions as well. It is not a difficult task to do so; however, as always when making any changes to your data, perform a backup before making those changes.
The process shown here assumes that the transactions are all from the same account.
1. Create a backup of your data file. This is the most important step!
2. Open the account in which you posted the transactions.
3. Sort by the name of the item you want to change—in this example, it is the Payee.
4. Click the first item on the list and, holding your SHIFT key down, click the last item on the list. Each of the items is highlighted. Depending on your monitor and the color preferences you have set for your register, the highlighting may be hard to distinquish.
5. Right-click one of the highlighted selections to open a context menu.
6. From the context menu choose Edit Transactions.
7. The Find And Replace dialog appears.
8. In the With field, enter the new name. Keep in mind that if you are changing something other than the payee, you will need to select the appropriate field in the Replace drop-down list.
9. Click Replace All to replace the payee name. If you do not want to create a renaming rule, click Cancel. You will find you may have to choose Cancel for as many transactions as you have selected.
10. You are returned to the Find And Replace dialog. Click Done.
11. You are returned to the register where your new payee name is now showing. (Remember, you’ve sorted in alphabetical order, so if your new name starts with a different letter, you will have to scroll down the register to see it.) After completing your transaction cleanup, remember to sort your account by date or your preferred register sort order.
You can perform this same process using any register field, including Amount, Category, Memo, and Tag, as well as Check Number, Cleared Status, and Date. However, be sure to run a backup before starting the process just to ensure your data’s safety.
You can use the All Transactions register to make changes to transactions in more than one account. The All Transactions register is accessed from the All Transactions link at the top of the Account Bar.
Quicken Emergency Records Organizer
Earlier versions of Quicken included an organizational tool in which users could maintain important information about emergency contacts, personal and legal documents, mortgage and investment information, and so on. While the Attachment utility has taken over much of the necessity of using this tool, many Quicken users still rely on this useful tool because of the variety of data it contains, as seen in Figure B-4.


Figure B-4 · The Emergency Records Organizer can be a useful tool.
If you have used the Emergency Records Organizer in earlier versions of Quicken, you can still install the Emergency Records Organizer in Quicken. To do so, first run a backup of your data file. Then, from the Quicken menu bar, click View | Classic Menus. In the Property & Debt menu, choose Emergency Records Organizer, as seen here.
Depending on your computer’s operating system, a message may appear asking if you want to allow the Quicken program to make changes to your computer. Click Yes and Quicken asks if you want to add the Emergency Records Organizer to Quicken. If you click Yes, the program is installed and you see a message telling you that the installation was successful.
Using the Emergency Records Organizer
After you have installed the Emergency Records Organizer, you must be using Classic menus to access it.
You can use Classic menus, add the Emergency Records Organizer button to your Quicken Toolbar, then switch back to Standard menus and access the Emergency Records Organizer using the Toolbar button.
1. Click View | Classic Menus.
2. Click Property & Debt. However, you will not see Property & Debt if you have not yet created a property or debt account.
3. Select the Emergency Records Organizer at the bottom of the menu. The Emergency Records Organizer window opens.
4. Click the Create/Update Records tab.
5. Click the Select An Area down arrow, and click one of the 11 areas in which to enter information.
6. Click an option under Select An Area. The records pane on the right will display text boxes to enter information pertaining to that topic.
7. Enter the relevant information in each field. Press TAB to move between fields.
8. Click Save to save the record when finished.
9. Click New Record to add another record in this topic.
Creating Reports in the Emergency Records Organizer
One of the best uses of the Emergency Records Organizer is to create reports for various professionals in case of an emergency.
• With the Emergency Records Organizer displayed, click the Report tab, click the Report Type down arrow, and choose which report you want.
• Click Sort By Family Members to include all information about each family member separately. Otherwise, it displays by topic area.
• Click Print Topics With No Data Entered to show that data has not been entered about this topic as yet.
• Click Print to print the report. The report goes directly to the printer. If you need more than one copy, you must click Print for each copy. If your default printer is the Quicken PDF printer (or other PDF printer), the report can be saved as a PDF file.
• Click Close to exit the Emergency Records Organizer.