
Once you have all the gear you need and you’re ready to start shooting, you still need to learn to set the best possible exposure for your images. I could write another book devoted just to cinematography and lighting, but in this chapter you’ll learn how to achieve the optimal exposure using the RED ONE’s onboard tools and some external gear as well. Getting a proper exposure with the RED can be challenging, but it’s something you’ll get a feel for with some practice.
First, we’ll look at some basic concepts from photography that go into making a correct exposure. Then, you’ll get some specifics on RED ONE operations and tools you can use to achieve an optimal exposure. This is one subject for which you’ll also want to carefully study RED’s own camera manual, which goes into extensive detail on camera exposure and operation. You can download the latest version of the manual at www.red.com/support.
Before getting into the menus and technical functions of the camera, let’s look at some cinematography basics. It’s useful to study still photography because the more you understand about concepts such as aperture, shutter speeds, and filters, the better your shots will look. As with everything else, the more you practice, the more your work will improve.
For every lighting situation, there’s an optimal exposure (or T-stop setting on your lens) that will give you the best possible image. An important concept to keep in mind is that the RED shoots to a RAW file format, which can be extensively manipulated after production is completed. This safety net doesn’t free you from the need to carefully expose your shots and avoid under- or overexposure. But you’d be surprised how the RED ONE lets you take shots that have slightly incorrect exposures and bring them back into proper ranges when compared to most other HD and video cameras. The latitude is more akin to working with 35mm negative, where you can “print” shots with a high degree of flexibility. Avoid the temptation to rely too heavily on the corrections RAW allows. The further exposure is from optimum, the less color correction is possible and the more likely noise will be difficult to conceal. As with standard HD formats, detail lost to extreme over- and underexposure cannot be recovered.
The American Standards Association (ASA) has created a specific exposure index measurement system used to classify film stocks’ sensitivity to lighting—the higher the ASA number, the more sensitive the film. Some common film stock speeds include 500 ASA, which is considered a fast stock, suitable for indoor and nighttime filming, and 100 ASA, which is considered a slow, fine-grain stock best used for outdoor, daylight work.
There has always been a trade-off between sensitivity, noise, and contrast. The faster stocks can be used with less light but often exhibit increased grain and reduced image contrast. If possible, most experienced cinematographers would not want to shoot film much faster than 500 ASA because of the high amount of grain and generally reduced image quality. Indeed, very few motion-picture stocks higher than 500 ASA exist.
The RED ONE also uses the ASA system to classify its sensitivity to light, though of course because it is a digital camera, the RED’s ASA is a variable control. You can set the sensitivity of the camera anywhere from 50 to 2,000 ASA, but the camera’s optimum setting is 320 ASA. As with film, when you dial in the faster ASA settings on the RED, you get increased grain (technically called image sensor noise). In my opinion, the image starts looking unacceptably noisy above 500 ASA. And unlike slow film emulsions, there doesn’t seem to be much benefit to shooting a slower ASA even when there is ample exposure to do so. My advice is to always keep the ASA set at 320 ASA. If you need more light, increase your illumination; if you need less light for your desired exposure, use neutral density (ND) filters.
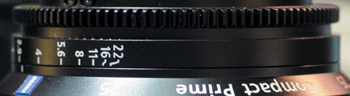
The T-stop, or aperture, setting of your lens (Figure 6.1) is the most critical control you have over your exposure. If you’re from a video background, you may be tempted to aim the camera at a given scene and simply adjust the aperture until your onboard light meters report the correct exposure. You’ll get better shot-to-shot consistency, however, if you work the other way around: Choose a specific T-stop on a per-scene basis, and then do your best to light each shot in the sequence to that stop.
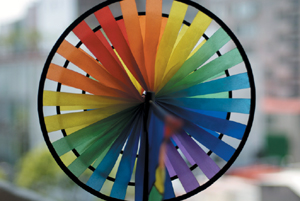
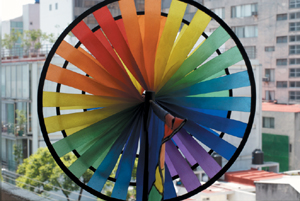
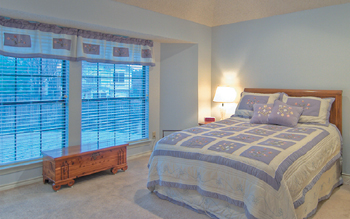
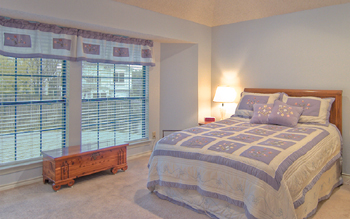
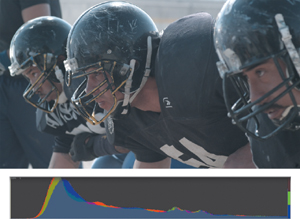
Aperture is also a way to creatively control depth of field. The more open the aperture setting, the shallower your depth of field. For example, if you are shooting a portrait at T1.8, you can expect to have a very shallow depth of field (Figure 6.2). Set up the same shot at T16, and you’ll get much deeper depth of field, with less visual separation between the foreground and background (Figure 6.3). If you take control of your aperture with lighting and ND filters, you’ll be able to use depth of field creatively to focus the viewer’s eye rather than simply having it as a random function of your cinematography.
Shutter speed is another concept that’s carried over from film cameras. In a film camera, the shutter speed is typically a mechanical blade that determines how long each frame is receiving light—as opposed to the aperture, which controls the intensity of the light and depth of field. The faster the shutter speed, the sharper motion will appear in a given frame (Figure 6.4).
But a faster shutter also means less light and thus a lower exposure. For example, at 24 frames per second, a ![]() second shutter will give a pleasing motion blur and a reasonable exposure. Move the shutter speed up to
second shutter will give a pleasing motion blur and a reasonable exposure. Move the shutter speed up to ![]() , and you’ll be losing one stop of light, but the motion will become more staccato and sharper (e.g., the Saving Private Ryan effect).
, and you’ll be losing one stop of light, but the motion will become more staccato and sharper (e.g., the Saving Private Ryan effect).
The default setting automatically adjusts the shutter speed to a standard setting across any given frame rate. This is the RELATIVE mode of the camera’s SHUTTER MODE menu. I recommend keeping the shutter in the RELATIVE mode unless you are going for a specific motion effect or unless it’s an emergency where you need more exposure by going to a slower shutter speed such as ![]() . Keep in mind that a slower shutter speed will give you more light, but the image motion will begin to smear and look more like 60i video than 24p footage.
. Keep in mind that a slower shutter speed will give you more light, but the image motion will begin to smear and look more like 60i video than 24p footage.
You can also use the shutter to synchronize the camera to an external monitor. Say, for example, you want to shoot something off a television screen or computer monitor. Those black bars moving up the screen are due to a mismatch in the refresh rate of the screen and the shutter speed of the RED. The SYNCRO setting in the SHUTTER MODE menu allows you to make very precise changes to the shutter speed. You can dial in the exact scanning rate of the monitor and achieve a distortion-free shot. Typically you make this adjustment while looking in the viewfinder and adjusting until the screen distortion disappears.
Color temperature is another subject that could fill an entire book. In a nutshell, it’s a characteristic of visible light that associates its color to a specific temperature scale measure in Kelvin, or K (Figure 6.5). Sunlight is often simplified to be around 5,600 K and is a bluer color when compared to artificial lighting. Indoor incandescent light sources like standard household tungsten such as bulbs are typically generalized as 3,200 K, which has more of an orange hue.
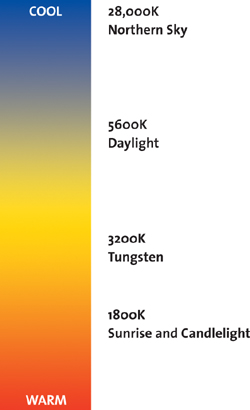
Color temperature is important for two main reasons with regard to the RED. First you have to tell the camera which color temperature to balance for. If you’re going to be outdoors primarily, you want to balance closer to 5,600 K, and when you’re indoors with mostly tungsten lights, you’ll dial down toward 3,200 K. The camera has presets for these temperatures, which you’ll find in the COLOR TEMP menu as options for DAYLIGHT and TUNGSTEN, respectively.
The second reason is that because you’re shooting RAW, color temperature is not as critical as it would be on a non-RAW camera. If you miss the ideal color temperature setting when you shoot, you can easily compensate for it during postproduction on the R3D files. What you can’t easily do is rebalance the actual lighting sources within the image.
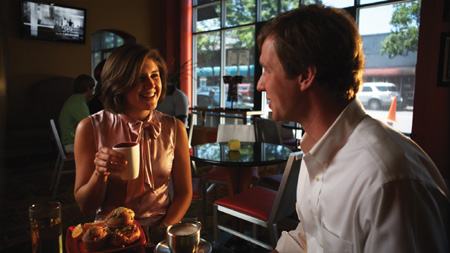
For example, if you’re shooting indoors with tungsten light during daytime and you’re also seeing daylight outside through windows, you’ll need to do some balancing work (Figure 6.6). You’ll want to gel your lighting with Color Temperature Blue (CTB) filters so they match the outside light. Or use lights that are not incandescent such as Hydrargyrum Medium-arc Iodide (HMI) units. Alternatively, you could gel the windows with Color Temperature Orange (CTO) filters to alter the outside sunlight to match the tungsten sources (Figure 6.7). Always be mindful of color temperature because your eyes automatically adjust and make lighting sources look balanced, but the camera actually captures something very different.
Now that you’ve learned some general theory about exposure, let’s get into specifics. First we’ll look at some equipment and techniques for obtaining the right exposure, and then you’ll learn about RED’s onboard camera tools.
Light meters (Figure 6.8) have been around since the early days of motion-picture cinematography. As their name implies, they measure the amount of light in a given scene to help determine the best possible exposure. Light meters take into account your camera’s current ASA, shutter speed, and frame rate in order to suggest proper exposure with great accuracy.
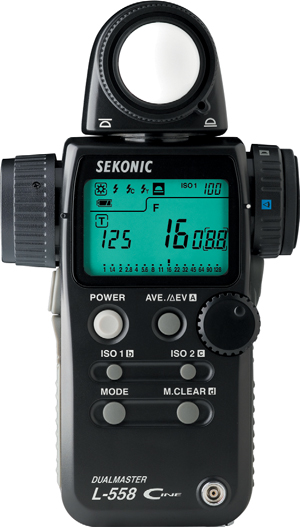
Since the RED uses industry standards, you can use just about any light meter with the camera. Light meters are much more necessary with film cameras because you have no other way of knowing whether you’ve set the right exposure until the negative is developed, and by then it’s too late to fix any mistakes. With a digital camera such as the RED, you can see the image on a monitor right away and easily tell whether a shot is not being exposed properly.
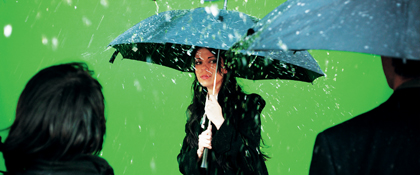
Working with a digital camera doesn’t completely do away with the usefulness of a light meter, however. It’s true that the RED has very accurate built-in light metering, but it measures only the exact frame the camera is pointed at. You can measure all the lighting around a set with a handheld light meter. This gives more thorough readings for all the potential lighting changes within a moving shot than you could get with just the onboard camera metering. You can also use a light meter to measure the output of specific lighting instruments for much finer control over the look of a scene. I recommend using a light meter, especially if you’re doing commercials or greenscreen cinematography, where lighting ratios and levels are critical.
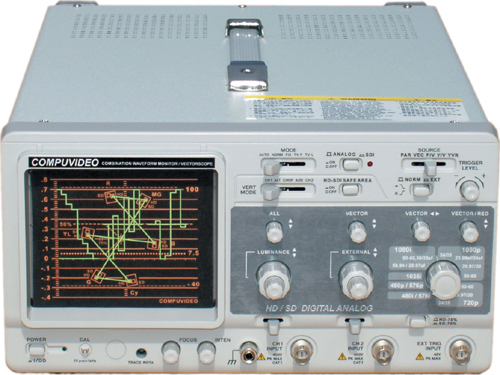
Many high-end production monitors, such as the Panasonic BT-LH1760 mentioned in Chapter 4, have a built-in waveform monitor and vectorscope. Standalone units also exist (Figure 6.9). The waveform monitor is used for measuring overall levels of brightness, or luminance, in a video signal, whereas the vectorscope is for measuring levels of chrominance (color values).
I mention waveforms and vectorscopes because using them with the RED differs from using them with a non-RAW camera. When you connect a monitor to the RED’s outputs, you are actually measuring a video signal with a specific color and gamma profile already applied. Although you can make use of these tools in determining broadcast-safe colors and maintaining a specific range of brightness in your shot, be aware that you are measuring one possible interpretation of your imagery—not the actual RAW signal. You need to use the onboard tools for a more accurate reading, which we’ll look at later in this chapter. (For more on the camera’s color and gamma settings, turn to the “Color and Gamma Space” section of Chapter 9.)
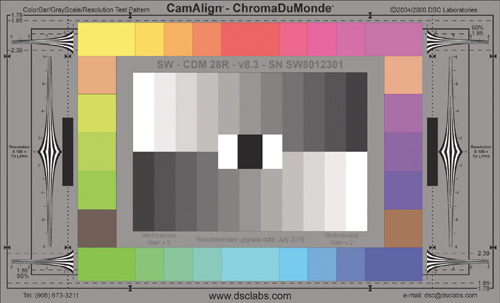
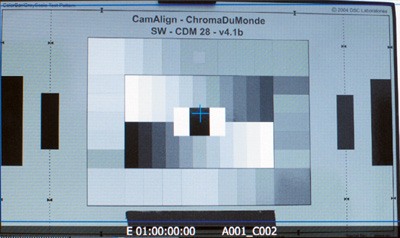
Sometimes you want to achieve very specific color values, but these can be difficult to calibrate for in postproduction. Maybe you’re shooting with a highly tinted colored gel on your lights, but you still want to get accurate skin tones. Shooting a color chart (Figure 6.10) can be helpful because you’ll have a standard reference that you can color correct to, no matter what the on-set color temperature was. I recommend carrying a ChromaDuMonde (www.dsclabs.com) or a Macbeth color chart and shooting a few seconds of it under any special lighting setups. This gives you a standard reference you can compare in every shot for which you shoot a chart. You can also use a color chart or gray card with the onboard spot meter to achieve a more accurate exposure (you’ll learn more about that in the “Spot meter” section later in this chapter).
The RED ONE is about as far from a point-and-shoot camera as you can get. There’s no single setting on the camera that will give you a proper exposure. You achieve the best exposure through a careful combination of the meters and tools the camera offers, and each lighting situation is a little different, so take the time to do the job right.
Before getting into the specifics of the onboard exposure tools, I want to mention the LOOK menu. In general, I recommend not using the LOOK settings because you can easily fool yourself into exposing for a completely different look and color setting than the camera is actually recording. Remember, you’re capturing a RAW image, which can be extensively manipulated in postproduction.
You can substantially change the look in the camera by altering settings such as SATURATION, EXPOSURE, and BRIGHTNESS within the LOOK menu. This can cause under- or overexposure or inconsistent color because you’ve pushed the LOOK settings too far past an accurate display of what you’re photographing. Keep these settings on the defaults, and you’ll get a better sense of what you’re actually capturing.
The most powerful onboard exposure tool in my opinion is False Color. In False Color mode, the normal colors of the image are replaced by a color overlay representing the different exposure levels within the frame. Blue colors represent underexposed areas, green is 18 percent ND (or exact median exposure), and yellow and red colors indicate areas approaching overexposure. Figure 6.11 shows a chart defining what each color on the scale stands for.
Tip
As with most digital cameras, the RED is more likely to clip highlights than shadows. Clipping is when a recorded luminance value goes beyond 100 percent, resulting in a pure white image with no detail. If you err on the side of slight underexposure and protect the brightest parts of the image from overexposure, you’ll have more detail to work with in postproduction.
To access the camera’s False Color mode, press the VIDEO button, and then access the VIEWFINDER menu. In the Color settings you’ll then see the FALSE COLOR setting.
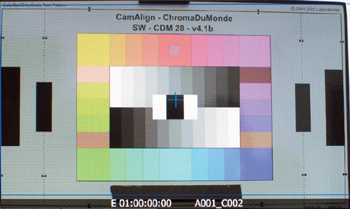
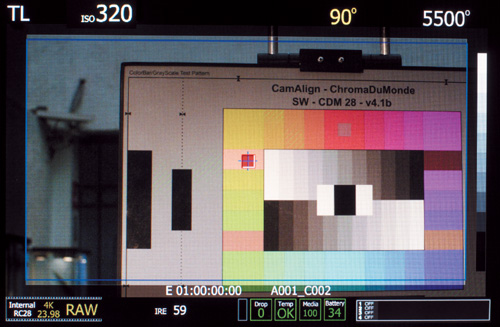
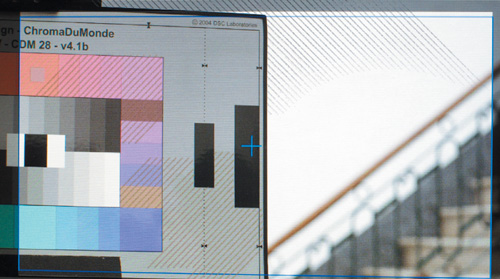
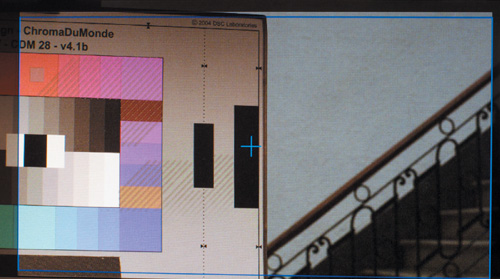
Point the camera at your subject, and adjust your aperture setting. You’ll quickly see the effects as you get warmer colors (indicating overexposure) when you open up the lens aperture and you get cooler colors (indicating underexposure) as you stop down. This is when a color chart can come in handy, because you can expose the 18 percent gray on the chart to match the 18 percent gray on the camera’s False Color scale and get a perfect exposure. Figure 6.12 shows an example of a shot framing an 18 percent gray chart, and Figure 6.13 shows the same thing without False Color.
Here are some more hints for getting the most out of False Color: Expose Caucasian flesh tones so that they fall in the pink zone. (Notice how this particular chart also features color chips for other skin tones as well. For those, use the IRE indicator as described in the “Spot Meter” section instead of using the pink False Color method.) Avoid excessive amounts of red (overexposure) or purple (underexposure) on anything you want to expose as your main subject. Be mindful of overexposure on highlights and skies. It’s best to use False Color in conjunction with the other onboard tools to ascertain the proper exposure.
Monochrome completely removes the color from the image, displaying in grayscale (Figure 6.14). This can be useful for spotting specific areas of high contrast in an image for fine-tuned lighting, because seeing everything in full color can sometimes confuse the eye. You access MONOCROME in the same VIEWFINDER menu as FALSE COLOR.
The camera’s spot meter is a carryover from still cameras, in which you can focus the camera’s exposure metering on a very small and specific portion of the frame. The spot meter is in the ANALYSIS menu on the ANALYSIS METER toggle—simply switch it to SPOT METER.
With the spot meter activated, you’ll see a small rectangle in the frame along with a numerical display that indicates the IRE level within the rectangle. You can move this rectangle around with the camera’s joystick, though you might find it easier to just pan or tilt the camera to put the item you want to measure under the rectangle. The spot meter can be useful for exposing skin tones when used in conjunction with False Color. Caucasian faces should generally fall between 50–70 IRE for proper exposure (Figure 6.15). For darker skin tones, expect to go down a few points on IRE, and for best results confirm the settings with an 18 percent gray card.
Note
IRE stands for Institute of Radio Engineers and is used to measure the amplitude of video signals. For luma (or brightness) values, 100 IRE indicates pure white, and 0 IRE indicates pure black.
Similar to still cameras, the RED also offers Histograms for exposure feedback. A Histogram is a graph of exposure values within the shot, showing where they peak. You have access to two types of Histograms: Luma, for checking overall exposure levels within a shot, and RGB, for checking exposure levels in the three primary color channels.
You access both the Luma Histogram and the RGB Histogram from the same ANALYSIS METER menu as the spot meter.
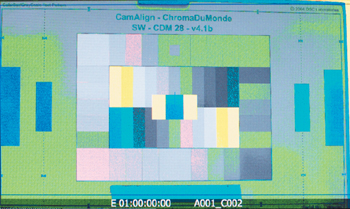
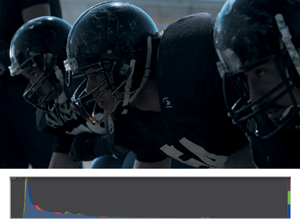
Notice how the Histogram changes rapidly as exposure is changed. As we close the aperture down, the peaks begin to appear toward the left edge of the Histogram, indicating growing underexposure within the frame (Figure 6.16).
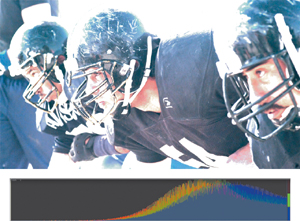
As you open the aperture up, you start to see the peaks appearing on the right side of the Histogram. Once those peaks begin to flatten, you’re getting into heavy overexposure (Figure 6.17).
The ideal Histogram is highest in the middle, indicating a good medium exposure that is protected against severe underexposure and overexposure (Figure 6.18). This gives you maximum flexibility in postproduction. A few spikes on the edges are not a big issue—you might have something within the frame like a bright light source or normal shadow areas.
If you have a DV or HD video camera background, you may be familiar with Zebras. A Zebra is a striped pattern overlaid onto any areas of the frame that read within a certain range of exposure. You’ll find the ZEBRAS setting in the VIDEO > VIEWFINDER menu.
On the RED you have two sets of Zebras that you can customize to indicate specific LOW and HI IRE levels. Zebra 1’s default settings are for highlight indication, with LOW IRE at 90 and HI IRE at 108. Zebra 2’s default setting is for 18 percent gray with LOW IRE at 44 and HI IRE at 47. You’ll see crosshatched overlays on areas of the image when one or both Zebras are activated. Zebra 1’s pattern is oriented northwest to southeast, and Zebra 2 goes northeast to southwest. (Note that when both Zebra areas overlap, Zebra 1 has priority.)
With the default Zebras activated, you can quickly determine where your highlights are and where 18 percent gray is reading at any given exposure. For example, you could drop an 18 percent gray card into a frame where your main subject is, adjust your exposure until you see Zebra 2 around the card, and then check for Zebra 1’s highlights (Figure 6.19). If the highlights are excessive, you need to bring in more light on the gray card/subject area in order to reduce the aperture and balance out the highlights (Figure 6.20).
This chapter covers only a handful of the more useful tools the camera has to help you with exposure. I recommend reading the official RED manual and practicing with your camera. If you can master the use of the False Color mode and Zebras, you’ll be well on your way to good exposure in most lighting scenarios.
The most important goal—beyond avoiding over- and underexposure—is avoiding extreme contrast. You have about 11 stops of latitude on the RED, which sounds like a lot. But remember that’s really only about 5 ½ stops above and below the set exposure. You could easily end up with a frame showing 15–20 stops of latitude between dark shadows to bright sunlit sky (Figure 6.21). To control that, you’ll need to bring in extra lighting and work with filters. Cinematography is a whole other art form and there is much you can learn. Practice the techniques covered in this chapter and you’ll be able to analyze and understand the exposure of whatever winds up in front of your lens.
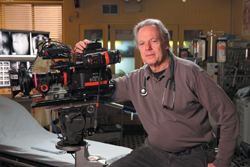
DIRECTOR OF PHOTOGRAPHY, ER
The NBC medical drama ER consistently scored in the Nielsen ratings for the top 20 television shows since it debuted in 1994. During almost the entirety of the show’s 15-year run, it was shot on 35mm film using Panavision cameras and lenses. Director of photography Arthur Albert (Happy Gilmore, The District) shot ER for eight seasons, beginning in 2001. For the final seven episodes of the series, the producers decided to completely switch to the RED ONE, making ER one of the highest-profile shows to shoot with the RED to date.
Albert had grown accustomed to working with film on the ER set but was prepared to move to the RED when the decision was made. “It came down from [executive producers] John Wells and Chris Chulack,” Albert says. “We shot a test with the Panavision Genesis about a year ago. It had a good look, but at the time the camera was too heavy for our Steadicam setup, which we shoot about 60 percent of the show with. So, the producers put in an order to buy RED cameras and planned to make the transition to digital. They envisioned ER as a test bed for their future shows. They’ve also shot a pilot called Southland with RED, which was picked up by NBC.”
The switchover from film to digital required primarily technical and workflow changes—Albert found that his creative techniques could be mostly transferred. “First we switched our lenses over from Panavision to ARRI,” notes Albert. “They were exactly the same kinds of lenses I’d have used in 35mm had we not been shooting Panavision. We ended up adding diffusion filters to knock back some of the RED’s sharpness. Film grain has a noticeable softening effect, but with RED you can see every hair on an actor’s beard and every imperfection.”
Albert also made some adjustments to the lighting of the show’s standing sets. (Though set in Chicago, the majority of ER was photographed on a soundstage in Burbank, California). “Before RED, I was rating 500 ASA–speed Kodak 35mm film at 1000 ASA, and I could get away with underexposing another stop down when I needed to,” says Albert. “The RED ONE is more like ASA 250 to my eye. You can shoot it at 500 ASA, but then you’re pushing into video noise. I’ve effectively lost two stops, or four times the amount of light. The solution was to trade out lighting instruments for bigger and more powerful units and boost overall lighting by one stop.
“We’ve had to readjust our eyes a bit and rely more on the monitor and waveform,” he continues. “It’s a tricky balance because so much of the show plays on the drama of medical displays and machines, and we wanted to make sure those read clearly without washing out. So, we underexposed the RED just a little and evened things out in color correction. I’m very happy with the general look and how the camera handles color.”
ER was well known for its fast-moving handheld and Steadicam aesthetic. This dictated a rapid pace for Albert and his crew. To keep things moving on the set, he prepared three different RED configurations that could be quickly swapped during a day’s production. “We have three RED bodies because the camera just has a ton of add-ons,” he explains. “We can quickly reconfigure from handheld to Steadicam to dolly. And because the camera is basically a computer, having a backup is always a good idea. We usually work with a single production unit shooting a single camera, rather than multiple camera coverage of the same scene.”
In terms of on-set data management, Albert chose to go with RED CompactFlash cards instead of hard drives. “Flash cards make for a lighter camera and less potential dropouts [glitches or lost frames],” he says. “It’s the same time limitation as a 1,000-foot magazine of 35mm film. The difference is if you shoot ten takes, it doesn’t cost you anything extra, except the time.”
Albert guesses the average viewer was completely unaware of the switch to RED. “Our colorist, who has been on the show for 15 years, has been instructed to make it look like ER, says Albert. “To my eyes it already looks fairly close. RED records a look that’s more saturated than film, but it’s easy to curl it back off in post.”
When asked whether he prefers film or digital, Albert professes a desire for maximum flexibility and creative choice. “You really need to know how to do both, and each has its advantages,” he notes. “Film handles extremes of bright and dark really well, while video struggles. RED is great that way, but it’s still not as sensitive as film. You can also work faster with film and have less of a struggle to maintain a specific lighting ratio. The claim of other digital cameras is that you can work at really low light levels, but then you give up detail and latitude on the high end.
“Ultimately I think film is in trouble due to the costs,” Albert adds. “The cheaper it gets to store archives and deal with post issues, the more the equation shifts to digital. It also comes down to the project. Some lend themselves to digital. If you shoot a lot of takes or improvise a lot, digital can save you money on film costs; but if you’re shooting in a jungle, you don’t want a bunch of electronic gear that goes down in heat or water. Film cameras are relatively bulletproof.
“I was involved with the original Sony Portapack videotape recorder 30 years ago, and a video tech predicted film would be dead in three years. If someone said that again today, I wouldn’t necessarily argue with them, but I’m personally hoping film sticks around. It’s like the difference between painting with oil and painting with watercolor. They each have their merits.”