
As mentioned in Chapter 8, Adobe Premiere Pro is the only one of the three editing applications covered in this book to support a truly native RED workflow. What that means is that you can drag and drop R3D files from your hard drive directly onto a sequence in Premiere Pro without having to transcode to another format first or work with proxies. This has distinct advantages both in the reduced amount of time you have to wait to start editing and in the flexibility you have with outputting a completed edit. Let’s get started with Premiere Pro.
Because you’ll be decoding R3D files on the fly as you edit, the Premier Pro workflow demands a bit more out of your system than Avid or Apple Final Cut Pro do. The more RAM, processor speed, and fast hard drives you can throw at Premiere Pro, the better performance you’ll achieve. That said, you can also change the working resolution to suit a more modest system’s power (more on that later in this chapter).
Adobe recommends Mac OS X or Windows Vista 64 for the best performance, along with a minimum of 4 GB of RAM (with a maximum of 32 GB for effects-intensive work). A fast laptop is capable of running the RED native workflow, but I recommend a high-end desktop machine for the ultimate performance. You need to have at least Adobe Premiere Pro CS4 and the latest REDCODE CS4 installer from www.red.com/support.
The Premiere Pro workflow is equivalent on Mac and Windows. In the following examples, I’m working with a Mac version of Premiere Pro, but the workflow is identical on Windows. The primary difference is the operating system’s appearance and that you use the Control key in Windows instead of the Command (aka, Apple) key.
When working natively, how you set your initial project sequence settings is not that critical. You can, for example, start with a 4K project timeline and start cutting away. Later, if you decide to work at HD resolution, all you need to do is make a new sequence in HD and drop the R3D files onto it. No matter which resolution you work in, the R3D files are automatically scaled to fit. You never need to reimport footage once you have it loaded into your project.
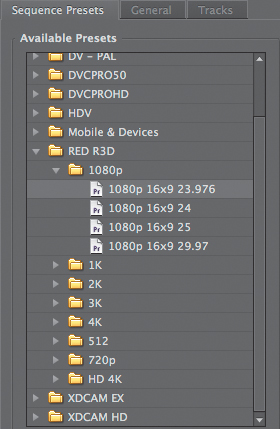
For a demonstration in the sections that follow, I’ll start a new project and work in a 1080p sequence. But everything I’m doing would be the same in a 2K, 3K, or 4K sequence. The most important part is making sure your sequence’s frame rate and aspect ratio match what you shot so you can avoid having to render shots to fit. In this case, my original footage was shot in 4K/16:9 at 23.98. To begin working with RED footage in Premiere Pro, choose File > New > New Sequence and choose a RED preset of 1080p in 16:9 and 23.98 (Figure 11.1).
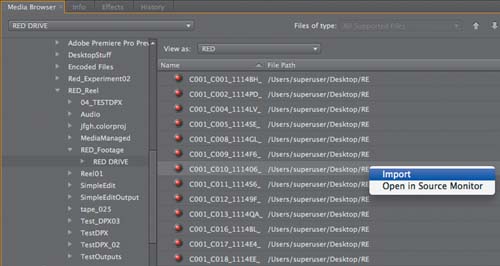
You can ingest R3D clips directly into Premiere Pro in one of two ways. In the first method, open the Media Browser and then point to your RED RDM directory (Figure 11.2). Select all of your R3D files, Control-click (right-click), and choose Import. Alternatively, you can search for R3D files on your hard drive and drag them directly into your Project window.
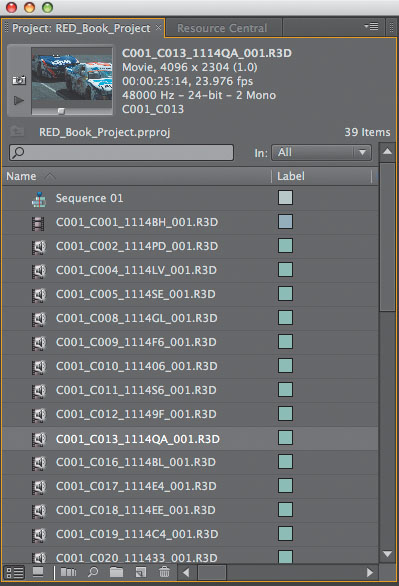
Dragging the files directly into your Project window works better if you have a lot of clips in different folders that aren’t in the same directories the camera put them in. You can control exactly what goes into the project, and when dragging it doesn’t matter as much if there is a complete RDM structure. To simplify this method, navigate to your footage folder and do a search for R3D files. Drag the search results into a bin of the Project window, and you’ll be all set (Figure 11.3).
To work with RED files in a sequence, you do exactly what you’re used to doing with other media formats in Premiere Pro. You can either double-click a clip in your Project window to load it into the Source window or drag an R3D file directly onto your Timeline.
You will, however, need to do a little bit of specific system tuning for optimal performance:
Click Play in the Source window. You will probably see things moving very slowly because the default R3D playback resolution is Full.
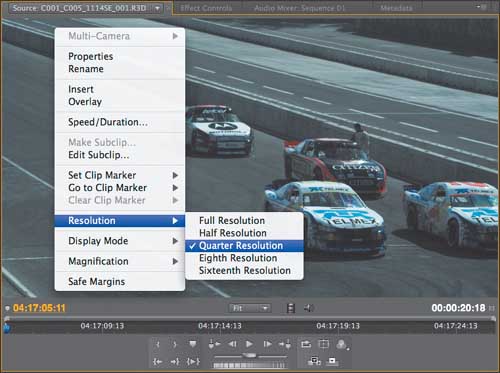
Control-click (right-click) anywhere in the Source window, and select Resolution from the pop-up menu.
You can now choose the playback resolution (Figure 11.4). I get pretty good performance with the Quarter Resolution setting on my eight-core 3 GHz machine with internal SATA drives and 4 GB of RAM, which I consider a moderate system.
Tip
When you set the resolution, it’s only for playback. The actual project and source footage resolution retains its original quality. Experiment with different playback resolutions and project resolutions to determine the best mix of performance and viewing quality on your system. Remember, even Quarter Resolution is still higher than standard definition and should be more than enough quality for editing.
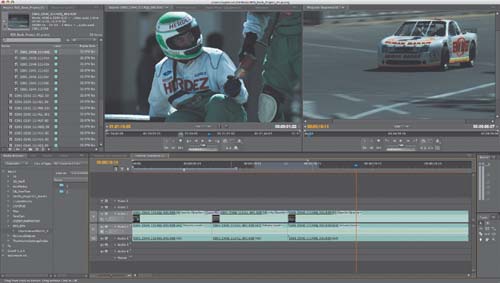
Once the working resolution is properly tuned, you can edit normally (Figure 11.5). The goal of the Premiere Pro workflow is to make editing R3D as simple as editing DV. You can also drop other footage formats and resolutions into the same sequence with RED footage, and they will be converted to match the sequence settings in real time. The playback performance of mixed edits will depend on your system specifications.
Note
The Resolution settings for the Source and Program windows are independent of each other. So if you find a setting you like in one window, be sure to match it in the other for consistency.
Regarding the visual quality of R3D shots, with Premiere Pro CS 4.1 and newer, you have direct access to most of the RED native format controls in your Project window. To make changes to a clip, select it in the Project window, Control-click (right-click), and choose Source Settings from the clip’s pop-up menu. You’ll now have access to many of the RED R3D metadata settings, such as the color temperature, exposure, ISO, color space, gamma space, and decoding quality (Figure 11.6).
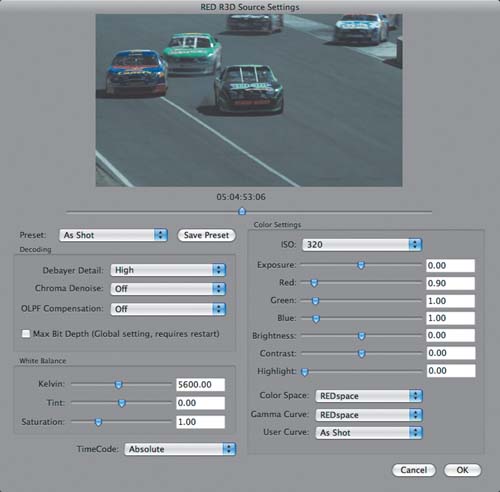
Within the Source Settings window, you can also apply a preset look. This can be a look you save using the Save Preset button, the default settings, or the original settings used on the camera when the clip was shot. Having full access to the source settings within Premiere Pro means you can do a significant level of color correction as you edit.
When you’ve completed your edit, you can export your project to a variety of different file sizes and formats. To start the process follow these steps:
Highlight the sequence you want to export.
Choose File > Export > Media. This opens the Export Settings window.
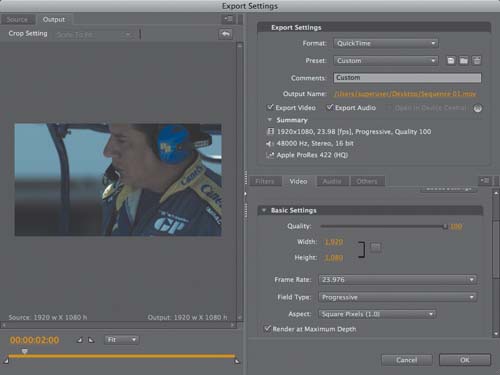
In this example, I’m exporting to an HD QuickTime file at 1920 × 1080, 23.98 (Figure 11.7). Since the edit uses the 4K R3D files as its source, you can just as easily export a DPX image sequence at 2K or 4K or a QuickTime file at standard definition, 2K, or 4K.
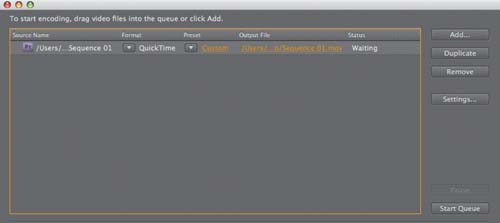
Click OK; the Adobe Media Encoder application automatically launches (Figure 11.8).
Confirm the filename and destination settings and then click the Start Queue button. Your sequence starts rendering and appears wherever you set the destination as soon as it’s complete. You may find that the encoding times vary quite a bit, depending on how large you make the export and how long the original sequence is.
Tip
Adobe Media Encoder can take a little while to load up the first time you invoke it from Premiere Pro. So, I recommend leaving it running after your first export to speed up subsequent sequence outputs.
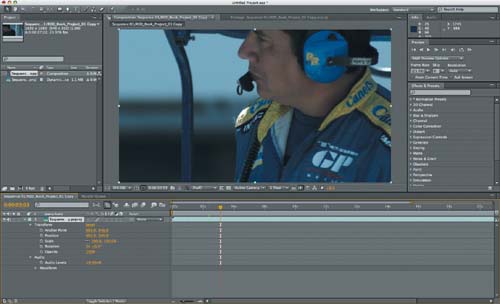
If you want to do additional effects or compositing work while in the native RED workflow, you can open your Premiere Pro project in Adobe After Effects. Start After Effects, and choose File > Adobe Dynamic Link > Import Premiere Pro Sequence. Navigate to your Premiere Pro project and choose the sequence you want to import. Place the imported sequence into a composition (Figure 11.9). It will match the sequence in Premiere Pro, including all transitions and effects.
In After Effects, you can also export to a Blu-ray high-definition disc. Follow these steps to do this:
Start with a composition open in After Effects, and then choose Composition > Add to Render Queue.
Once the Render Queue appears, click the Output Module button for the settings.
Click the Format button and choose MPEG2 Blu-ray from the Format list of options.
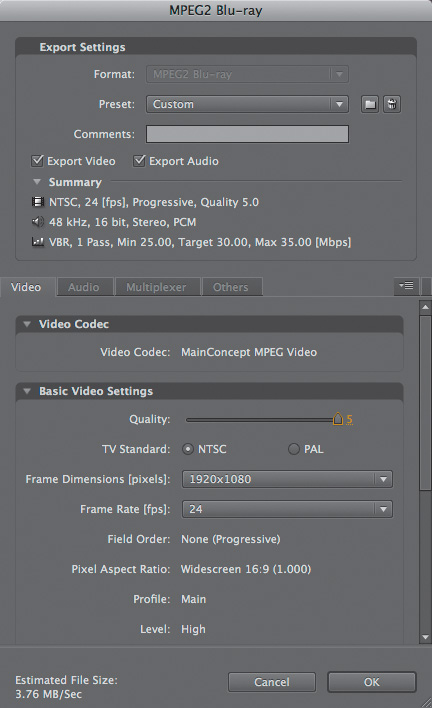
In the MPEG2 Blu-ray dialog that appears (Figure 11.10), you can choose 720p or 1080p resolution as well as pick the compression quality and frame rate settings. Click OK to finish the export.
Once you export the MPEG2, you can use the Adobe Encore application, available as part of Adobe Creative Suite Production Premium and Adobe Creative Suite Master Collection (which also includes After Effects).
You can also export to an H.264 Blu-ray format from Premiere Pro, which gives you higher image quality. To do this, follow these steps:
In Premiere Pro, Choose File > Export > Media to send your project to the Export Settings window.
Click the Format button, and choose the H.264 Blu-ray preset from the Format list of options. Then you have the option to make 720p or 1080p Blu-ray files.
Once the media has been encoded, bring it into Encore for the Blu-ray authoring.
That completes this look at the Premiere Pro native workflow. Adobe has worked closely with RED to make its software as user-friendly with the camera’s footage as possible. To learn of new changes to the Premiere Pro workflow, visit the RED support area at www.red.com/support and Adobe’s support area at www.adobe.com/products/premiere.