
Chapter 7: Building a Full-Stack E-Commerce Application with Next.js and GraphQL
If you're reading this, this means you've reached the last chapter of this book that is focused on building web applications with React. In the preceding chapters, you've already used the core features of React, such as rendering components, state management with Context, and Hooks. You've learned how to add routing to your React application, or SSR with Next.js. Also, you know how to add testing to a React application with Jest and Enzyme. Let's make this experience full stack by adding GraphQL to the list of things you've learned about so far.
In this chapter, you will not only build the frontend of an application, but also the backend. For this, GraphQL will be used, which can best be defined as a query language for APIs. Using mock data, you'll create a GraphQL server in Next.js that exposes a single endpoint for your React application. On the frontend side, this endpoint will be consumed using Apollo Client, which helps you handle sending requests to the server and state management for this data.
In this chapter, the following topics will be covered:
- Creating a GraphQL server with Next.js
- Consuming GraphQL with Apollo Client
- Handling authentication in GraphQL
Project overview
In this chapter, we will create a full stack e-commerce application in Next.js that has a GraphQL server as a backend and consumes this server in React using Apollo Client. For the frontend, an initial application is available to get you started quickly.
The build time is 3 hours.
Getting started
The project that we'll create in this chapter builds upon an initial version that you can find on GitHub: https://github.com/PacktPublishing/React-Projects-Second-Edition/tree/main/Chapter07-initial. The complete source code can also be found on GitHub: https://github.com/PacktPublishing/React-Projects-Second-Edition/tree/main/Chapter07.
The initial project consists of a boilerplate application based on Next.js to get you started quickly. This application requires the installation of several dependencies, which you can do by running the following commands:
npm install && npm run dev
This command will install all the dependencies that are needed to run the React application with Next.js, such as react, next, and styled-components. Once the installation process has finished, both the GraphQL server and the React application will be started.
Getting started with the initial React application
Since the React application is created with Next.js, it can be started with npm run dev and will be available at http://localhost:3000/. This initial application doesn't show any data as it still needs to be connected to the GraphQL server, which you'll do later in this chapter. At this point, the application will, therefore, just render a header with the title E-Commerce Store and a subheader as well, which looks something like this:
:

Figure 7.1 – The initial application
The structure of this initial React application built with Next.js is as follows:
chapter-7-initial
|- /node_modules
|- /public
|- /pages
|- /api
|- /hello.js
|- /products
|- /index.js
|- /cart
|- /index.js
|- /login
|- /index.js
|- _app.js
|- index.js
|- /utils
|- hooks.js
|- authentication.js
package.json
In the pages directory, you'll find all the routes for this application. The route / is rendered by pages/index.js, and the routes /cart, /login, and /products are rendered by the .js files in those respective directories. All routes will be wrapped within pages/_app.js. In this file, the header for all pages is constructed for example. All routes will also contain a SubHeader component, with a Button to go back to the previous page or a Button to the Cart component. The utils directory contains two files with methods that you'll be needing later in this chapter. Also, this application will have a REST endpoint available under http://localhost:3000/api/hello coming from the pages/api/hello.js file.
Building a full stack e-commerce application with React, Apollo, and GraphQL
In this section, you'll connect the React web application to the GraphQL server. A GraphQL Server on a Next.js API Route is used to create a single GraphQL endpoint that uses dynamic mock data as a source. Apollo Client is used by React to consume this endpoint and handle state management for your application.
Creating a GraphQL server with Next.js
In Chapter 3, Building a Dynamic Project Management Board, we already created a React application with Next.js, in which it was already mentioned that you can also use it to create API endpoints. By looking at the files in our directory for this chapter, you can see that the pages directory contains a directory called api with a file called hello.js. All the directories and files that you create in the pages directory become available as a route in the browser, but if you create them under the api directory in pages, they are called API routes. The hello.js file is such an API route, which is available under http://localhost:3000/api/hello. This endpoint returns a JSON blob with the following contents:
{"name":"John Doe"}
This is a REST endpoint, which we've also explored in the previous chapters of this book. In this chapter, we'll be using a GraphQL endpoint instead, as GraphQL is a popular format for APIs that are used by web and mobile applications.
GraphQL is best described as a query language for APIs and is defined as a convention for retrieving data from an API. Often, GraphQL APIs are compared to RESTful APIs, which is a well-known convention for sending HTTP requests that are dependent on multiple endpoints that will all return a separate data collection. As opposed to the well-known RESTful APIs, a GraphQL API will provide a single endpoint that lets you query and/or mutate data sources such as a database. You can query or mutate data by sending a document containing either a query or mutation operation to the GraphQL server. Whatever data is available can be found in the schema of the GraphQL server, which consists of types that define what data can be queried or mutated.
Before creating the GraphQL endpoint, we need to set up the server in Next.js. Therefore, we need to install the following dependencies that are needed to do so:
npm install graphql @graphql-tools/schema @graphql-tools/mock express-graphql
The graphql library is needed to use GraphQL in our application, while express-graphql is a tiny implementation of GraphQL Server for Node.js. Both @graphql-tools/schema and @graphql-tools/mock are open source libraries that helps you create GraphQL servers. We can also delete the pages/api/hello.js file as we won't be using this API route.
To set up the GraphQL server, we must create a new file, pages/api/graphql/index.js, that will contain the single GraphQL endpoint for our application. We need to import graphqlHTTP to create the server. The schema for the GraphQL server is written under a variable called typeDefs:
import { graphqlHTTP } from 'express-graphql';
import { makeExecutableSchema } from '@graphql-tools/schema';
import { addMocksToSchema } from '@graphql-tools/mock';
const typeDefs = /* GraphQL */ `
type Product {
id: Int!
title: String!
thumbnail: String!
price: Float
}
type Query {
product: Product
products(limit: Int): [Product]
}
`;
Below the schema, we can initiate the GraphQL server using the graphqlHTTP instance and pass the schema to it. We also configure the server to create mocks for all the values in our schema. At the bottom of the file, we return the handler that is used by Next.js to make the GraphQL server available at the route http://localhost:3000/api/graphql:
// ...
const executableSchema = addMocksToSchema({
schema: makeExecutableSchema({ typeDefs, }),
});
function runMiddleware(req, res, fn) {
return new Promise((resolve, reject) => {
fn(req, res, (result) => {
if (result instanceof Error) {
return reject(result);
}
return resolve(result);
});
});
}
async function handler(req, res) {
const result = await runMiddleware(
req,
res,
graphqlHTTP({
schema: executableSchema,
graphiql: true,
}),
);
res.json(result);
}
export default handler;
After making sure you've run the application again, the GraphQL API becomes available on http://localhost:3000/api/graphql. On this page in the browser, the GraphiQL playground will be displayed, and here is where you can use and explore the GraphQL server.
With this playground, you can send queries and mutations to the GraphQL server, which you can type on the left-hand side of this page. The queries and mutations that you're able to send can be found in DOCS for this GraphQL server, which you can find by clicking on the green button labeled DOCS. This button will open an overview with all the possible return values of the GraphQL server.
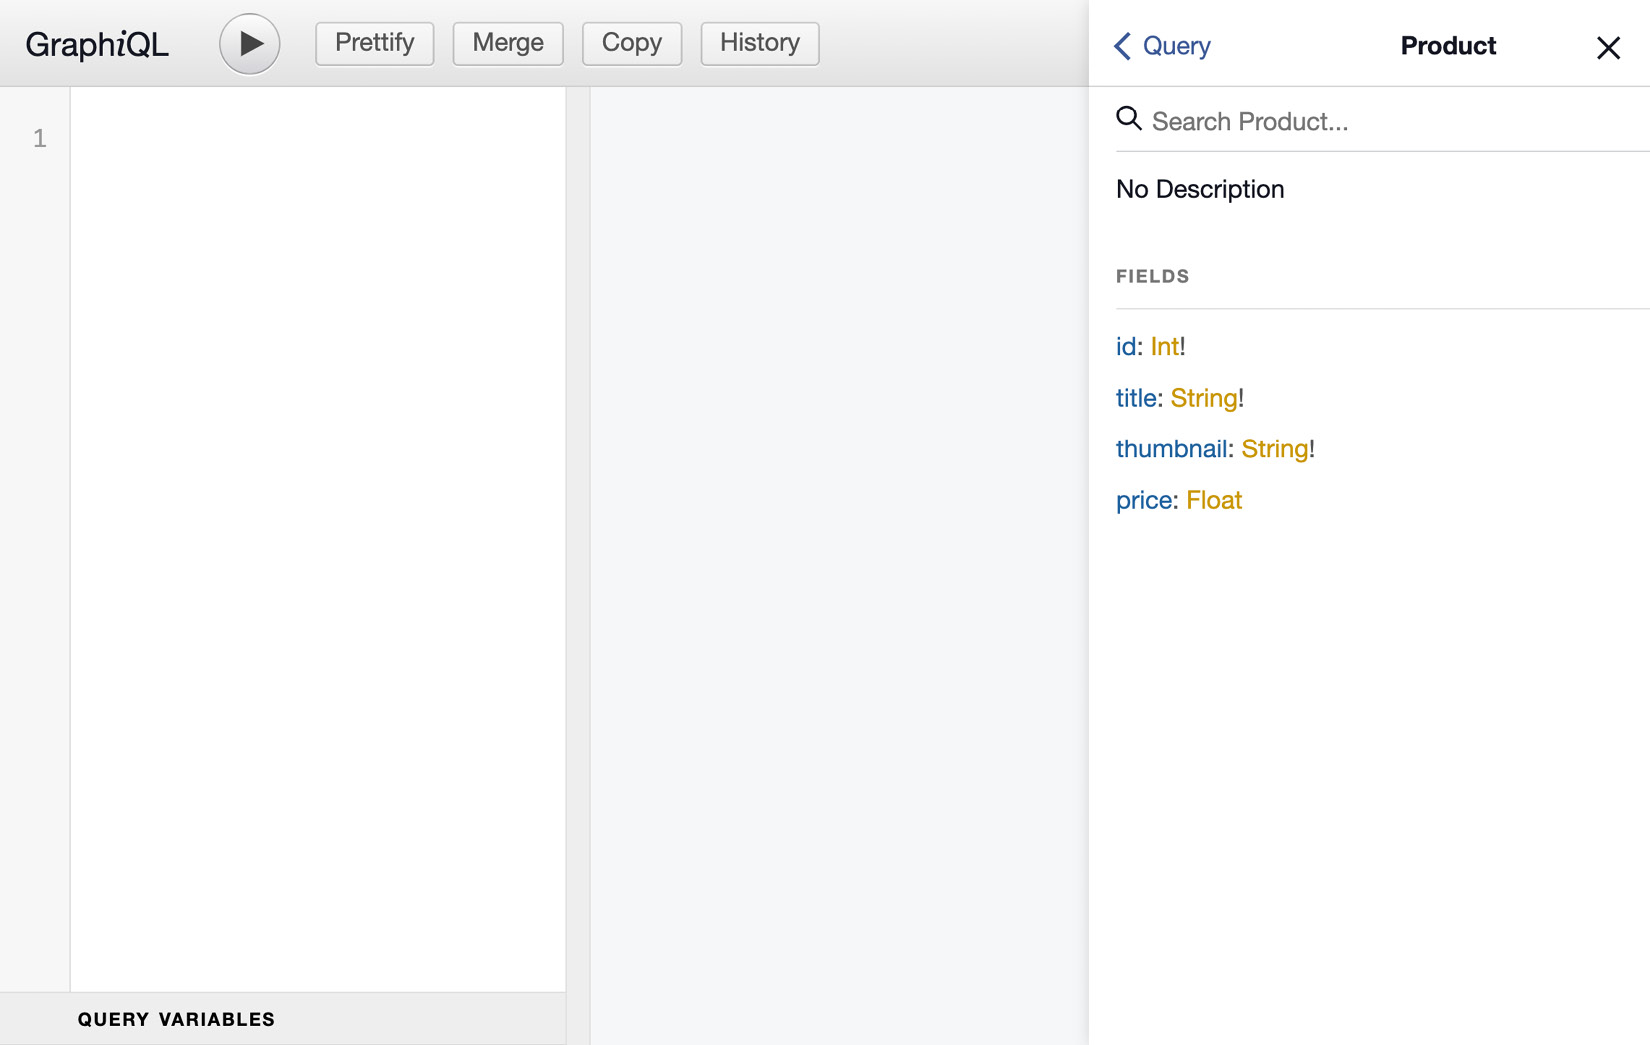
Figure 7.2 – Using the GraphiQL playground
Whenever you describe a query or mutation on the left-hand side of this page, the output that is returned by the server will be displayed on the right-hand side of the playground. The way a GraphQL query is constructed will determine the structure of the returned data since GraphQL follows the principle of ask for what you need, get exactly that. Since GraphQL queries always return predictable results, we can have a query that looks like this:
query {
products {
id
title
price
}
}
This will return an output that will follow the same structure of the query that's defined in the document that you sent to the GraphQL server. Sending this document with a query to the GraphQL server will return an array consisting of objects with product information, which has a limit of 10 products by default. The result will be returned in JSON format and will consist of different products every time you send the requests since the data is mocked by the GraphQL server. The response has the following format:
{
"data": {
"products": [
{
"id": 85,
"title": "Hello World",
"price": 35.610056991945214
},
{
"id": 24,
"title": "Hello World",
"price": 89.47561381959673
}
]
}
}
Applications using GraphQL are often fast and stable because they control the data they get, not the server. With GraphQL we can also create relations between certain fields in our data, for example, by adding a category field to our products. This is done by adding the following to the GraphQL schema in pages/api/graphql/index.js:
// ...
const typeDefs = `
type Product {
id: Int!
title: String!
thumbnail: String!
price: Float
+ category: Category
}
+ type Category {
+ id: Int!
+ title: String!
+ }
type Query {
product: Product
products(limit: Int): [Product]
}
`;
// ...
And we can also add a query for type Category by adding it to the schema:
// ...
const typeDefs = `
// ...
type Category {
id: Int!
title: String!
}
type Query {
product: Product
products(limit: Int): [Product]
+ categories: [Category]
}
`;
// ...
The products will now have a new field called category, but you can also query a list of categories on its own. As all the data for the GraphQL server is currently mocked, you don't need to connect a data source that makes the category information available. But we can specify how certain fields should be mocked, for example, by adding a thumbnail to our products. Therefore, we need to create a variable called mocks that sets the field thumbnail on the Product type to be a URL to https://picsum.photos. This is a free server for generating mock images on the fly:
// ...
+ const mocks = {
+ Product: () => ({
+ thumbnail: () => 'https://picsum.photos/400/400'
+ }),
+ };
const executableSchema = addMocksToSchema({
schema: makeExecutableSchema({ typeDefs, }),
+ mocks,
});
// ...
In addition to mocking the thumbnail field on the Product type, we also want to mock all the values of fields with the Int or Float type everywhere. Both fields are now often negative values, which is incorrect for its usage as an identifier or price. The Int type is used to define identifiers, while the Float type is used for prices. We can also mock these by adding the following:
// ...
const mocks = {
+ Int: () => Math.floor(Math.random() * 99) + 1,
+ Float: () => (Math.random() * 99.0 + 1.0).toFixed(2),
Product: () => ({
thumbnail: () => 'https://picsum.photos/400/400'
}),
};
// ...
You can check this by trying the following query that also requests a category and the thumbnail for the products:
query {
products {
id
title
price
thumbnail
category {
id
title
}
}
}
You can insert the preceding query in the GraphQL playground to get the response, which will look something like the following screenshot:

Figure 7.3 – Sending a query to the GraphQL server
As the data is mocked by the GraphQL Server, the values will change every time you send a new request with this query. But you can get the same response by sending the query in the body of an HTTP request, from either the command line or from a React application with fetch.
You can also use a library such as Apollo Client to make this more intuitive. This will be explained in the next section of this chapter, where you'll connect the GraphQL server to the React web application using Apollo and send documents to the server from your application.
Consuming GraphQL with Apollo Client
With the GraphQL server in place, let's move on to the part where you make requests to this server from a React application. For this, you'll use Apollo packages that help you add an abstraction layer between your application and the server. That way, you don't have to worry about sending documents to the GraphQL endpoint yourself by using, for example, fetch, and can send documents directly from a component.
Setting up Apollo Client
As we mentioned previously, you can use Apollo to connect to the GraphQL server; for this, Apollo Client will be used. With Apollo Client, you can set up the connection with the server, handle queries and mutations, and enable caching for data that's been retrieved from the GraphQL server, among other things. You can add Apollo Client to your application by following these steps:
- To install Apollo Client and its related packages, you need to run the following command from the client directory where the React application is initialized:
npm install @apollo/client
This will install Apollo Client as well as the other dependencies you need to use Apollo Client and GraphQL in your React application.
Note
Normally, we also need to install graphql when installing Apollo Client, but this library is already present in our application.
- These packages should be imported into the pages/_app.js file, where you want to create the Apollo Provider that wraps our application with the connection to the GraphQL server:
import { createGlobalStyle } from
'styled-components';
+ import {
+ ApolloClient,
+ InMemoryCache,
+ ApolloProvider,
+ } from "@apollo/client";
import Header from '../components/Header';
const GlobalStyle = createGlobalStyle`
// ...
- Now you can define the client constant using the ApolloClient class, and pass the location of the local GraphQL server to it:
// ...
+ const client = new ApolloClient({
+ uri: 'http://localhost:3000/api/graphql/',
+ cache: new InMemoryCache()
+ });
function MyApp({ Component, pageProps }) {
return (
// ...
- Within the return function for the MyApp component, you need to add ApolloProvider and pass the client you've just created as a prop:
// ...
function MyApp({ Component, pageProps }) {
return (
- <>
+ <ApolloProvider client={client}>
<GlobalStyle />
<Header />
<Component {...pageProps} />
+ </ApolloProvider>
- </>
);
}
export default MyApp;
After these steps, all the components that are nested within ApolloProvider can access this client and send documents with queries and/or mutations to the GraphQL server. In Next.js, all the page components are rendered under Component based on the route. The method for getting data from ApolloProvider is similar to the context API that we've used before.
Sending GraphQL queries with React
Apollo Client doesn't only export a Provider, but also methods to consume the value from this Provider. That way, you can easily get any value using the client that was added to the Provider. One of those methods is Query, which helps you to send a document containing a query to the GraphQL server without having to use a fetch function, for example.
Since a Query component should always be nested inside an ApolloProvider component, they can be placed in any component that's been rendered within App. One of those is the Products component in pages/product/index.js. This component is being rendered for the / route and should display products that are available in the e-commerce store.
To send a document from the Products component, follow these steps, which will guide you in the process of sending documents using react-apollo:
- In the Products page component, you can import the useQuery Hook from @apollo/client and define a constant for the named getProducts query. Also, you need to import gql to use the GraphQL query language inside your React file as follows:
import styled from 'styled-components';
+ import { useQuery, gql } from '@apollo/client';
import SubHeader from '../../components/SubHeader';
import ProductItem from
'../../components/ProductItem';
// ...
+ const GET_PRODUCTS = gql`
+ query getProducts {
+ products {
+ id
+ title
+ price
+ thumbnail
+ }
+ }
+ `;
function Products() {
// ...
- The imported useQuery Hook can be called from Products and handle the data fetching process based on the query that you pass to it. In the same way as the context API, useQuery can consume the data from the Provider by returning a data variable. You can iterate over the products field from this object and return a list of ProductItem components already imported into this file. Also, a loading variable is returned that will be true when the GraphQL server hasn't returned the data yet:
// ...
function Products() {
+ const { loading, data } = useQuery(GET_PRODUCTS);
return (
<>
<SubHeader title='Available products' goToCart />
+ {loading ? (
+ <span>Loading...</span>
+ ) : (
<ProductItemsWrapper>
+ {data && data.products &&
data.products.map((product) => (
+ <ProductItem key={product.id}
data={product} />
+ ))}
</ProductItemsWrapper>
+ )}
</>
);
};
export default Products;
This will send a document with the GET_PRODUCTS query to the GraphQL server when your application mounts and subsequently display the product information in the list of ProductItem components. After adding the logic to retrieve the product information from the GraphQL server, your application will look similar to the following:
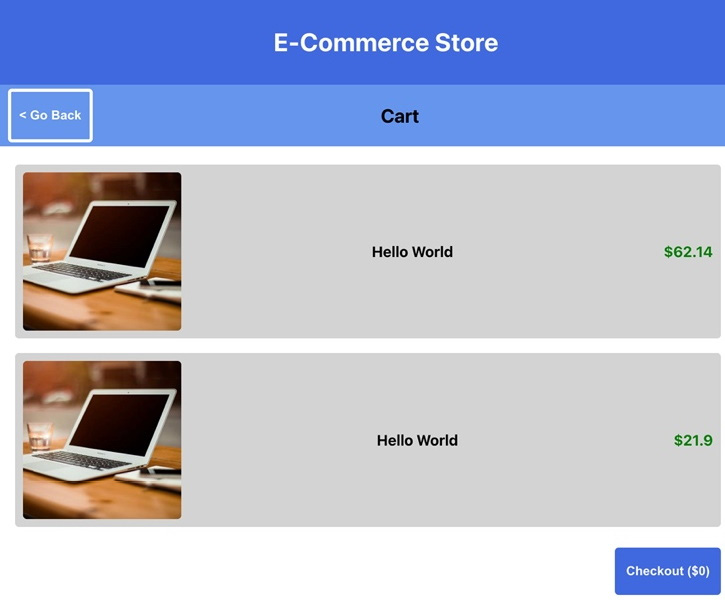
Figure 7.4 – Rendering products from GraphQL
By clicking on the button in the top-right corner of this page, you'll navigate to the /cart route, which also needs to query data from the GraphQL server. As we don't have a query to retrieve the cart yet, we need to add it to the GraphQL server in pages/api/graphql/index.js.
- We can create a mutable variable using let because there is no connected data source for the GraphQL server. This is an object that we want to update later, for example, when we add products to the cart:
import { graphqlHTTP } from 'express-graphql';
import { makeExecutableSchema }
from '@graphql-tools/schema';
import { addMocksToSchema } from '@graphql-tools/mock';
+ let cart = {
+ count: 0,
+ products: [],
+ complete: false,
+ };
const typeDefs = `
// ...
- In the schema, we need to define a type for Cart and add this type to the list of queries for our GraphQL server:
// ...
const typeDefs = `
// ...
+ type Cart {
+ count: Int
+ products: [Product]
+ complete: Boolean
+ }
type Query {
product: Product
products(limit: Int): [Product]
categories: [Category]
+ cart: Cart
}
`;
const mocks = {
// ...
- In the pages/cart/index.js file, the components to render the products in the cart are already imported. We do have to import the useQuery Hook and gql from @apollo/client and create the query constant:
import styled from 'styled-components';
+ import { useQuery, gql } from '@apollo/client';
import { usePrice } from '../../utils/hooks';
import SubHeader from '../../components/SubHeader';
import ProductItem from
'../../components/ProductItem';
import Button from '../../components/Button';
// ...
+ const GET_CART = gql`
+ query getCart {
+ cart {
+ products {
+ id
+ title
+ price
+ thumbnail
+ }
+ }
+ }
+ `;
function Cart() {
// ...
- In the Cart component, we need to get the data that we want to display using the useQuery Hook. After getting the data, we can return a list of products that are added to the cart together with the button to check out:
// ...
function Cart() {
+ const { loading, data } = useQuery(GET_CART);
return (
<>
<SubHeader title='Cart' />
+ {loading ? (
+ <span>Loading...</span>
+ ) : (
<CartWrapper>
<CartItemsWrapper>
+ {data && data.cart.products &&
data.cart.products.map((product) => (
+ <ProductItem key={product.id}
data={product} />
+ ))}
</CartItemsWrapper>
+ {data && data.cart.products.length >
0 && (
+ <Button backgroundColor='royalBlue'>
Checkout
</Button>
+ )}
</CartWrapper>
+ )}
</>
);
};
export default Cart;
- This won't show any products yet as the cart is empty; the cart will be filled with products in the next section. However, let's proceed by adding a useQuery Hook to the button that navigates to the cart in SubHeader, which is rendered on routes other than /cart itself. A new file called CartButton.js can be created in the components directory. In this file, a useQuery Hook will return data from a query that requests the total number of products in the cart. Also, we can add a value to the Button component by adding the following code to this file:
import { useQuery, gql } from '@apollo/client';
import Button from './Button';
export const GET_CART_TOTAL = gql`
query getCart {
cart {
count
}
}
`;
function CartButton({ ...props }) {
const { loading, data } = useQuery(GET_CART_TOTAL);
return (
<Button {...props}>
{loading ? 'Cart' : `Cart (${data.cart.count})`}
</Button>
);
}
export default CartButton;
- This CartButton component replaces Button, which is now being displayed with a placeholder count for the number of products in the cart, in the components/SubHeader.js file:
import styled from 'styled-components';
import { useRouter } from 'next/router';
- import Button from './Button';
+ import CartButton from './CartButton';
// ...
function SubHeader({ title, goToCart = false }) {
const router = useRouter();
return (
<SubHeaderWrapper>
// ...
{goToCart && (
- <Button onClick={() =>
router.push('/cart')}>
- Cart (0)
- </Button>
+ <CartButton onClick={() =>
router.push('/cart')} />
)}
</SubHeaderWrapper>
);
}
export default SubHeader;
With all the components that show either a product or cart information connected to the GraphQL server, you can proceed by adding mutations that add products to the cart. How to add mutations to the application and send document container mutations to the GraphQL server will be shown in the next part of this section.
Handling mutations in GraphQL
Mutating data makes using GraphQL more interesting because when data is mutated, some side effects should be executed. For example, when a user adds a product to their cart, the data for the cart should be updated throughout the component as well. This is quite easy when you're using Apollo Client since the Provider handles this in the same way as the context API.
The GraphQL server now only has queries, but no operations as yet. Adding mutations is quite like how we've added queries to the schema before, but for the mutation, we also need to add resolvers. Resolvers are where the magic happens in GraphQL and where the schema is linked to logic to get the data, possibly from a data source. The addition of mutations is done in the pages/api/graphql/index.js file:
- The first step is to add the mutation to add a product to the cart to the schema. This mutation takes productId as an argument. Also, we need to mock a list of types later:
// ...
const typeDefs =`
// ...
const typeDefs = gql`
// ...
type Cart {
total: Float
count: Int
products: [Product]
complete: Boolean
}
type Query {
product: Product
products(limit: Int): [Product]
categories: [Category]
cart: Cart
}
+ type Mutation {
+ addToCart(productId: Int!): Cart
+ }
`;
const mocks = {
// ...
- So far, all the values for our schema are mocked the GraphQLServer, but normally you would add resolvers for every type in the schema. These resolvers will contain the logic to get something from a data source. As we want to store the values for the Cart type in the cart object that is created at the top of this file, we need to add a resolver for the addToCart mutation:
// ...
+ const resolvers = {
+ Mutation: {
+ addToCart: (_, { productId }) => {
+ ...cart,
+ count: cart.count + 1,
+ products: [
+ ...cart.products,
+ {
+ productId,
+ title: 'My product',
+ thumbnail: 'https://picsum.photos/400/400',
+ price: (Math.random() * 99.0 + 1.0).
toFixed(2),
+ category: null,
+ },
+ ],
+ };
+ return cart;
+ },
+ },
+ };
const executableSchema = addMocksToSchema({
// ...
- When creating the graphqlHTTP instance, we need to pass the resolver that we created to it in order for our changes to become effective:
// ...
const executableSchema = addMocksToSchema({
schema: makeExecutableSchema({ typeDefs, }),
mocks,
+ resolvers,
});
// ...
export default handler;
You can already test this mutation by trying it out on the GraphQL playground that's available at http://localhost:3000/api/graphql. Here, you'd need to add the mutation in the upper-left box of this page. The variable that you want to include in this mutation for productId must be placed in the bottom-left box of this page, called QUERY VARIABLES. This would result in the following output:
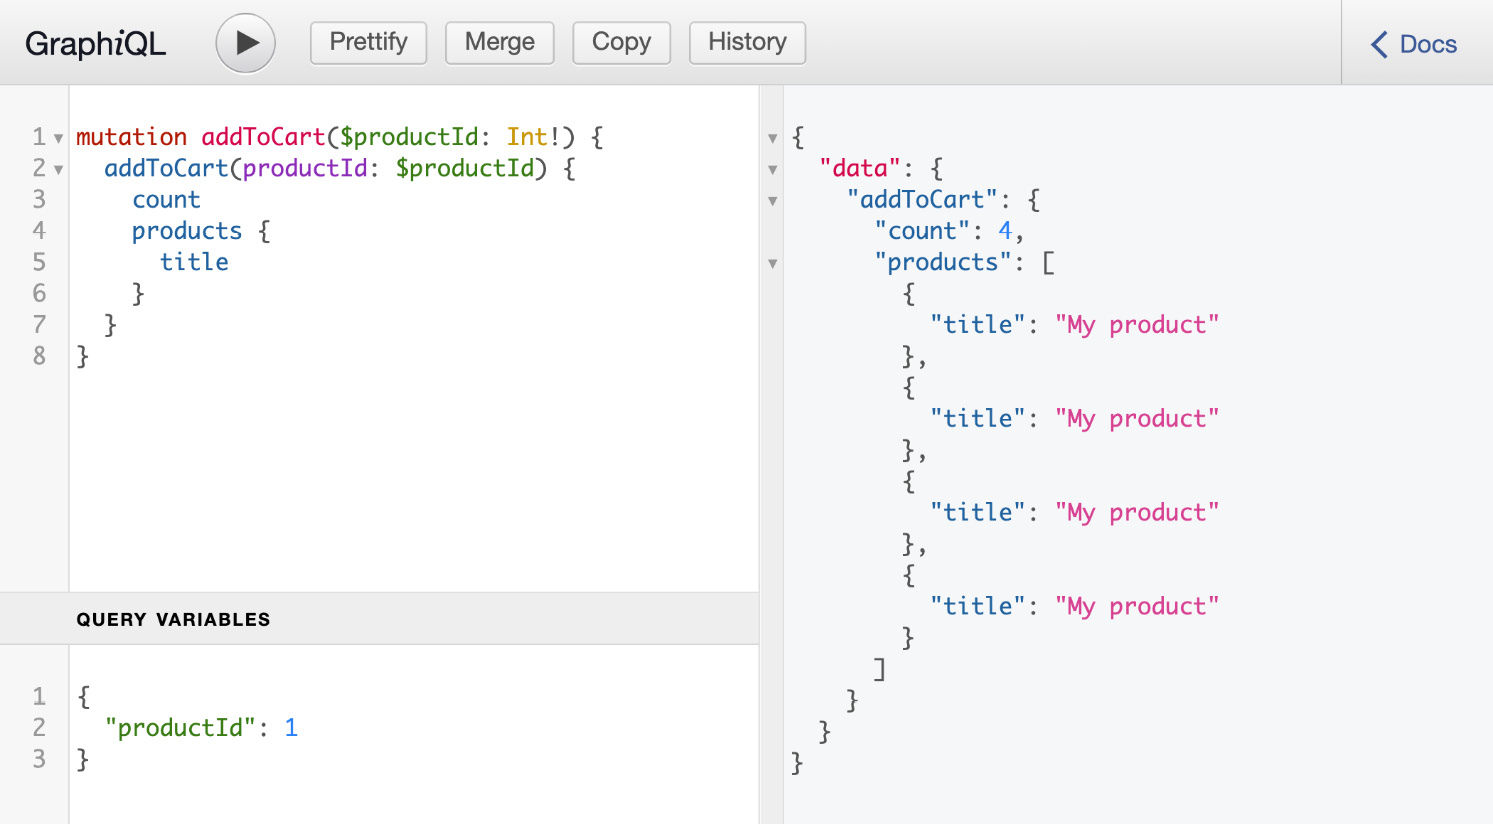
Figure 7.5 – Using mutations in the GraphiQL playground
Every time you send a document to the GraphQL server with this mutation, a new product will be added to the list. Also, the count field will be incremented by 1. But, when you want to retrieve this information using the query for the Cart type, the values will still be mocked by the GraphQL Server. To return the cart object instead, we also need to add a resolver for the query to get the cart information:
// ...
const resolvers = {
+ Query: {
+ cart: () => cart,
+ },
Mutation: {
// ...
},
};
const executableSchema = addMocksToSchema({
// ...
The response that will now be returned after using the addToCart mutation will reflect what you can retrieve with the cart query.
To be able to use this mutation from our React application, we will need to make the following changes:
- Currently, there's no button to add a product to the cart yet, so you can create a new file in the components directory and call this AddToCartButton.js. In this file, you can add the following code:
import { useMutation, gql } from '@apollo/client';
import Button from './Button';
const ADD_TO_CART = gql`
mutation addToCart($productId: Int!) {
addToCart(productId: $productId) {
count
products {
id
title
price
}
}
}
`;
function AddToCartButton({ productId }) {
const [addToCart, { data }] =
useMutation(ADD_TO_CART);
return (
<Button
onClick={() =>
!data && addToCart({ variables: { productId } })
}
>
{data ? 'Added to cart!' : 'Add to cart'}
</Button>
);
}
export default AddToCartButton;
This new AddToCartButton takes productId as a prop and has a useMutation Hook from @apollo/client, which uses the mutation we've created earlier. The output of Mutation is the actual function to call this mutation, which takes an object containing the inputs as an argument. Clicking on the Button component will execute the mutation and pass the productId to it.
- This button should be displayed next to the products in the list on the / or /products routes, where each product is displayed in a ProductItem component. This means that you will need to import AddCartButton in components/ProductItem.js and pass a productId prop to it by using the following code:
import styled from 'styled-components';
import { usePrice } from '../utils/hooks';
+ import AddToCartButton from './AddToCartButton';
// ...
function ProductItem({ data }) {
const price = usePrice(data.price);
return (
<ProductItemWrapper>
{data.thumbnail && <Thumbnail
src={data.thumbnail} width={200} />}
<Title>{data.title}</Title>
<Price>{price}</Price>
+ <AddToCartButton productId={data.id} />
</ProductItemWrapper>
);
}
export default ProductItem;
Now, when you open the React application in the browser, a button will be displayed next to the product titles. If you click this button, the mutation will be sent to the GraphQL server, and the product will be added to the cart. However, you won't see any changes to the button that displays Cart (0) in the SubHeader component.
- Executing this query after sending the mutation can be done by setting a value for the refetchQueries option of the useMutation Hook in components/AddToCartButton.js. This option takes an array of objects with information about the queries that should be requested. In this case, it's only the GET_CART_TOTAL query, which is executed by CartButton. To do this, make the following changes:
import { useMutation, gql } from '@apollo/client';
import Button from './Button';
+ import { GET_CART_TOTAL } from './CartButton';
// ...
function AddToCartButton({ productId }) {
const [addToCart, { data }] =
useMutation(ADD_TO_CART);
return (
<Button
onClick={() =>
!data && addToCart({
variables: { productId },
+ refetchQueries:
[{ query: GET_CART_TOTAL }],
})
}
>
{data ? 'Added to cart!' : 'Add to cart'}
</Button>
);
}
export default AddToCartButton;
- When you click on CartButton, we'll navigate to the /cart route, where the products that we have in the cart are displayed. On here, AddToCartButton is also rendered, as this is defined in the ProductItem component. Let's change this by going to the components/ProductItem.js file and add the following lines of code, which will render this button conditionally:
// ...
- function ProductItem({ data }) {
+ function ProductItem({ data, addToCart = false }) {
const price = usePrice(data.price);
return (
<ProductItemWrapper>
{data.thumbnail && <Thumbnail
src={data.thumbnail} width={200} />}
<Title>{data.title}</Title>
<Price>{price}</Price>
- <AddToCartButton productId={data.id} />
+ {addToCart && <AddToCartButton
productId={data.id} />}
</ProductItemWrapper>
);
}
export default ProductItem;
- From the Products page component, we need to pass the addToCart prop to render the button on this page:
// ...
return (
<>
<SubHeader title='Available products' goToCart
/>
{loading ? (
<span>Loading...</span>
) : (
<ProductItemsWrapper>
{data && data.products &&
data.products.map((product) => (
<ProductItem
key={product.id}
data={product}
+ addToCart
/>
))}
</ProductItemsWrapper>
)}
</>
);
};
export default Products;
Now, every time you send a mutation in a document to the GraphQL server from this component, the GET_CART_TOTAL query will be sent as well. If the results have changed, the CartButton and Cart components will be rendered with this new output. Therefore, the CartButton component will be updated to display Cart (1) if you click on the AddToCartButton component:
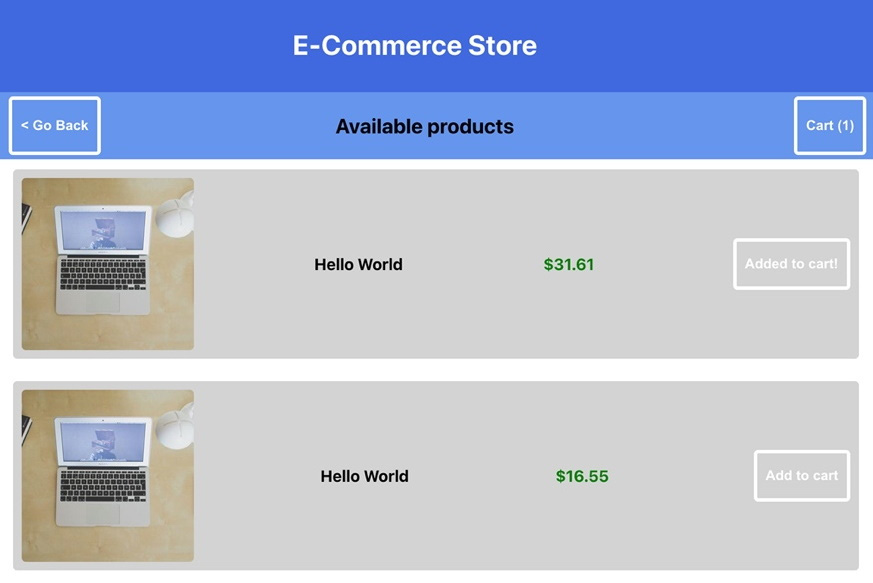
Figure 7.6 – Updating the products in the cart
In this section, we've learned how to set up Apollo Client and use it to send documents to the GraphQL server. In the next section of this chapter, we'll expand on this by handling authentication.
Handling authentication in GraphQL
Until now, we've created a GraphQL server that can be consumed by an application built with Next.js and React. Using queries and mutation, we can view a list of products and add them to a shopping cart. But we haven't added logic to check out that cart yet, which we'll do in this section.
When users have added products to the cart, you want them to be able to check out; but before that, the users should be authenticated as you want to know who's buying the product.
For authentication in frontend applications, most of the time, JSON Web Tokens (JWTs) are used, which are encrypted tokens that can easily be used to share user information with a backend. The JWT will be returned by the backend when the user is successfully authenticated and often, this token will have an expiration date. With every request that the user should be authenticated for, the token should be sent so that the backend server can determine whether the user is authenticated and allowed to take this action. Although JWTs can be used for authentication since they're encrypted, no private information should be added to them since the tokens should only be used to authenticate the user. Private information can only be sent from the server when a document with the correct JWT has been sent.
Before we can add the checkout process to the React application, we need to make it possible for customers to authenticate. This consists of multiple steps:
- We need to create a new type in the schema that defines a user and a mutation to log in a user, which we can do in pages/api/graphql/index.js:
// ...
const typeDefs = `
// ...
+ type User {
+ username: String!
+ token: String!
+ }
type Query {
product: Product
products(limit: Int): [Product]
categories: [Category]
cart: Cart
}
type Mutation {
addToCart(productId: Int!): Cart
+ loginUser(username: String!, password: String!):
User
}
`;
// ...
- With the mutation defined in the schema, it can be added to the resolvers. In the utils/authentication.js file, a method to check the username and password combination is already present. This method will return a valid token together with the username if that combination is correct. From this file, we also import a method to check whether a token is valid:
import { graphqlHTTP } from 'express-graphql';
import { makeExecutableSchema }
from '@graphql-tools/schema';
import { addMocksToSchema } from '@graphql-tools/mock';
+ import { loginUser, isTokenValid }
from '../../../utils/authentication';
// ...
const resolvers = {
Query: {
cart: () => cart,
},
Mutation: {
+ loginUser: async (_, { username, password }) =>
{
+ const user = loginUser(username, password);
+ if (user) {
+ return user;
+ }
+ },
// ...
From the GraphiQL playground, we can now check whether this mutation is working by entering the username test and the password test:

Figure 7.7 – Creating a JWT with GraphQL
- In the pages/login/index.js file, we can add the logic to use the input from a form to send a document with the loginUser mutation to the GraphQL server. The Login page component is already using useState Hooks to control the value of the input fields for username and password. The useMutation Hook can be imported from @apollo/client:
import { useState } from 'react';
+ import { useMutation, gql } from '@apollo/client';
// ...
+ const LOGIN_USER = gql`
+ mutation loginUser($username: String!, $password:
String!) {
+ loginUser(username: $username,
password: $password) {
+ username
+ token
+ }
+ }
+ `;
function Login() {
const [username, setUsername] = useState('');
const [password, setPassword] = useState('');
+ const [loginUser, { data }] =
useMutation(LOGIN_USER);
return (
// ...
- After creating the loginUser function, this can be added to the onSubmit event from the form element, and the values for username and password should be passed to this function as variables:
// ...
function Login() {
// ...
return (
<>
<SubHeader title='Login' />
<FormWrapper>
<form
+ onSubmit={(e) => {
+ e.preventDefault();
+ loginUser({ variables: { username,
password } });
+ }}
>
// ...
- Clicking the Button will send the document containing the username and password values to the GraphQL server and, if successful, it returns the JWT for this user. This token should also be stored in the session storage so that it can be used later. Also, we want to redirect the user back to the home page when logged in. To do this, we need to import a useEffect Hook from React that watches for changes in the data. When the token is present, we can use a router object obtained from a useRouter Hook that we need to import from Next.js:
- import { useState } from 'react';
+ import { useState, useEffect } from 'react';
import { useMutation, gql } from '@apollo/client';
+ import { useRouter } from 'next/router';
// ...
function Login() {
const [username, setUsername] = useState('');
const [password, setPassword] = useState('');
const [loginUser, { data }] =
useMutation(LOGIN_USER);
+ const router = useRouter();
+ useEffect(() => {
+ if (data && data.loginUser &&
data.loginUser.token) {
+ sessionStorage.setItem('token',
data.loginUser.token);
+ router.push('/');
+ }
+ }, [data]);
return (
// ...
- Every time a customer logs in via the /login route, the token is stored in the session storage in the browser. You can delete the token from the session storage by going to the Application tab in the Developer tools section of your browser; there, you'll find another tab called Session Storage. The customer's authentication details in the form of the JWT are now stored in the session storage. But for the customer to check out, this token should also be sent to the GraphQL server, along with every document for the server, to validate whether the user is authenticated or whether the token has expired. Therefore, you need to extend the setup of Apollo Client to also send the token when you make a request to the server and prefix it with Bearer, since this is how a JWT is recognized. This requires us to make multiple changes to pages/_app.js:
import { createGlobalStyle } from
'styled-components';
import {
ApolloClient,
InMemoryCache,
ApolloProvider,
+ createHttpLink,
} from '@apollo/client';
+ import { setContext } from
'@apollo/client/link/context';
import Header from '../components/Header';
// ...
+ const httpLink = createHttpLink({
+ uri: 'http://localhost:3000/api/graphql/',
+ });
+ const authLink = setContext((_, { headers }) => {
+ const token = sessionStorage.getItem('token');
+ return {
+ headers: {
+ ...headers,
+ authorization: token ? `Bearer ${token}` : '',
+ },
+ };
+ });
const client = new ApolloClient({
- uri: 'http://localhost:3000/api/graphql/',
+ link: authLink.concat(httpLink),
cache: new InMemoryCache(),
});
function MyApp({ Component, pageProps }) {
// ...
On every request to the GraphQL server, the token will now be added to the headers of the HTTP request.
- The GraphQL Server can now get the token from the HTTP request headers and store them in the context. The context is an object that you use to store data that you want to use in your resolvers, such as a JWT. This can be done in pages/api/graphql/index.js:
// ...
const executableSchema = addMocksToSchema({
schema: makeExecutableSchema({ typeDefs, }),
mocks,
resolvers,
+ context: ({ req }) => {
+ const token = req.headers.authorization || '';
+ return { token }
+ },
});
// ...
Finally, we can also create a mutation to check out the items. This mutation should empty the card and, in a production environment, redirect the customer to a payment provider. In this scenario, we'll just empty the card and display a message that the order has been created successfully. To aid the checkout process, we need to make the following changes:
- We require a new mutation in the schema of our GraphQL server in pages/api/graphql/index.js:
// ...
type Mutation {
addToCart(productId: Int!): Cart
loginUser(username: String!, password: String!):
User
+ completeCart: Cart
}
`;
const mocks = {
// ...
- With the mutation defined in the schema, it can be added to the resolvers. The mutation needs to clear the products in the cart, set the count field to 0, and the complete field to true. Also, it should check whether the user has a token stored in the context and whether this is a valid token. To check the token, we can use the previously imported isTokenValid method:
// ...
const resolvers = {
Query: {
cart: () => cart,
},
Mutation: {
// ...
+ completeCart: (_, {}, { token }) => {
+ if (token && isTokenValid(token)) {
+ cart = {
+ count: 0,
+ products: [],
+ complete: true,
+ };
+ return cart;
+ }
+ },
},
};
// ...
- In the pages/cart/index.js file, we need to import this Hook from @apollo/client and import useRouter from Next.js to redirect the user to the /login page if they are not authenticated. Also, the mutation to complete the cart can be added here:
import styled from 'styled-components';
import {
useQuery,
+ useMutation,
gql
} from '@apollo/client';
+ import { useRouter } from 'next/router';
// ...
+ const COMPLETE_CART = gql`
+ mutation completeCart {
+ completeCart {
+ complete
+ }
+ }
+ `;
function Cart() {
// ...
In the return statement of the Cart component, there is a button to check out. This button will need to call a function created by a useMutation Hook that takes this new mutation. This mutation completes the cart and clears its content. If the user isn't authenticated, it should redirect the user to the /login page:
// ...
function Cart() {
const { loading, data } = useQuery(GET_CART);
+ const [completeCard] = useMutation(COMPLETE_CART);
return (
<>
<SubHeader title='Cart' />
{loading ? (
<span>Loading...</span>
) : (
<CartWrapper>
// ...
{data &&
data.cart.products.length > 0 &&
+ sessionStorage.getItem('token') && (
<Button
backgroundColor='royalBlue'
+ onClick={() => {
+ const isAuthenticated =
sessionStorage.getItem(
'token');
+ if (isAuthenticated) {
+ completeCard();
+ }
+ }}
>
Checkout
</Button>
)}
</CartWrapper>
)}
</>
);
}
export default Cart;
This concludes the checkout process for the application and thereby this chapter, where you've used React and GraphQL to create an e-commerce application.
Summary
In this chapter, you've created a full stack React application that uses GraphQL as its backend. Using a GraphQL server and mock data, the GraphQL server was created within Next.js using API routes. This GraphQL server takes queries and mutations to provide you with data and lets you mutate that data. This GraphQL server is used by a React application that uses Apollo Client to send and receive data from the server.
That's it! You've completed the seventh chapter of this book and have already created seven web applications with React. By now, you should feel comfortable with React and its features and be ready to learn some more. In the next chapter, you'll be introduced to React Native and learn how you can use your React skills to build a mobile application by creating an animated game with React Native and Expo.
Further reading
- Next.js API routes: https://nextjs.org/docs/api-routes/introduction
- GraphQL: https://graphql.org/learn/
- Apollo Client: https://www.apollographql.com/docs/react/