
Chapter 10: Creating a Virtual Reality Application with React and Three.js
You're almost there—only one more chapter to go and then you can call yourself a React expert that has experienced React on every platform. Throughout this book, you've built nine applications with React and React Native. In this final chapter, we won't be creating a web or mobile application, but a Virtual Reality (VR) application with React and three.js. With three.js, you can create dynamic 2D, 3D, and VR experiences using JavaScript, and with the use of another library apply it within React. Although VR is still an emerging technology, the best use cases for VR are, for example, retail stores that want their customers to experience their stores or games online.
In this chapter, you'll explore the very basics of what's possible with React together with three.js and how it relates to React. The application you will build will be able to render 360-degree panorama images and use state management to render between screens. Animated 3D objects will also be displayed by combining React and three.js with other libraries.
The following topics will be covered in this chapter:
- Getting started with three.js
- Creating a panorama viewer with React and three.js
- Animating 3D objects
Project overview
In this chapter, you will build a VR application with React and three.js that uses principles from both JavaScript and React. Both 2D panorama images and 3D objects will be added to this application, and the project can be run in the browser using Create React App.
The build time is 1.5 hours.
Getting started
The application for this chapter will be built from scratch and uses assets that can be found on GitHub at https://github.com/PacktPublishing/React-Projects-Second-Edition/tree/main/Chapter10-assets. These assets should be downloaded to your computer so that you can use them later on in this chapter. The complete code for this chapter can be found on GitHub at https://github.com/PacktPublishing/React-Projects-Second-Edition/tree/main/Chapter10.
Creating a VR application with React and Three.js
You can write 2D and 3D VR applications in React by combining it with other libraries. Previously, you could write VR applications in React directly with React 360. But due to the emergence of other popular libraries, such as three.js, which is based on JavaScript, its development was discontinued. Three.js allows you to create applications with both 2D and 3D UI components without having to deal with complex setups for mobile or VR devices, which is similar to how React works.
To render both 2D and 3D in browsers, three.js uses WebGL, which is a JavaScript API that runs directly in the browser. It's supported by all recent versions of popular browsers, such as Chrome, Firefox, and Microsoft Edge.
Getting started with Three.js
Three.js is based on JavaScript and can be used together with React using a different library called @react-three/fiber, which is a React renderer for three.js that creates a link between the two.
As we already did for our previous React applications that render in the browser, we can use Create React App as the starting point for this application. To get started with building 2D and 3D applications in React with three.js, we first need to create a new project with Create React App:
npx create-react-app chapter-10
Secondly, we need to install both three.js and @react-three/fiber from npm:
npm install three @react-three/fiber
We don't need any extra dependencies or configuration as Create React App already has the right configuration out of the box. If we move into the project's root directory, which is named after our project name, we will see that it has the following structure:
chapter-10
|- /node_modules
|- package.json
|- /public
|- index.html
|- /src
|- App.css
|- App.js
|- index.css
|- index.js
Note
Not all files that were created by Create React App are mentioned above; instead, only the ones used in this chapter are listed.
Creating 3D objects with Three.js
The base for the application has now been created with Create React App, and we've also installed three.js together with @react-three/fiber. This last library lets us render three.js elements as components inside React and makes multiple Hooks available to make changes. This way, we can use three.js in the same declarative and predictive way that we're already used to from learning React. There is no additional overhead incurred by using this library instead of three.js directly, as components are rendered outside the render loop of React.
To create 3D objects in React with three.js, we need to take the following steps:
- Replace the contents of src/App.js with the following, so that it will return a Canvas component from @react-three/fiber:
import { Canvas } from '@react-three/fiber';
import './App.css';
export default function App() {
return (
<div id="Canvas-container">
<Canvas><Canvas />
</div>
)
}
This code adds a Canvas component, which is important when we want to render three.js elements in React for multiple reasons. With the Canvas component, both a scene and a camera are created, the most important building blocks for this application. The scene handles whatever is rendered by three.js, while the camera is the perspective from which we're looking at the scene. This Canvas component will render our three.js components and elements outside of the DOM and automatically handles resizing.
- The Canvas component will be resized to fit the div element it's rendered in, so you can control its size by changing the width and height of #canvas-container in CSS. This can be done by replacing the contents of src/App.css with the following:
#Canvas-container {
height: 100vh;
}
- To render something on the Canvas, we need to add a mesh element to this file, for which we don't need to import anything. The same as we can add div or any other elements in React, three.js elements will be treated as JSX elements automatically when placed inside a Canvas from @react-three/fiber:
import { Canvas } from '@react-three/fiber'
export default function App() {
return (
<div id="Canvas-container">
<Canvas>
+ <mesh>
+ <boxGeometry />
+ </mesh>
</Canvas>
</div>
)
}
Note
When we're adding a mesh element inside a Canvas component from @react-three/fiber, under the hood, it will create a THREE.Mesh object.
- This will render a small gray square using the boxGeometry element from three.js but has no additional features yet. Also, the square we have now is quite small. By adding the scale prop to the mesh element, we can increase the size of this element:
// ...
export default function App() {
return (
<div id="Canvas-container">
<Canvas>
- <mesh>
+ <mesh scale={2}>
<boxGeometry />
// ...
- To give the element some color, we first need to add a meshStandardMaterial with a color prop within our mesh element, and add another element called ambientLight. This element will add light to the component to make the color of the boxGeometry visible. On this ambientLight element, we can configure how bright the light must shine using the intensity prop:
// ...
export default function App() {
return (
<div id='canvas-container'>
<Canvas>
<mesh scale={2}>
<boxGeometry />
+ <meshStandardMaterial color='blue' />
+ <ambientLight intensity={0.5} />
</mesh>
</Canvas>
</div>
);
}
In our application, we can now see a blue square being rendered instead of a gray one. You can see the effect of the ambientLight element by changing the intensity to see the square getting lighter or darker depending on the value of the intensity.
Having a 2D square is cool, but with three.js, we can also build 3D components. For this, we need to make some changes to the component to interact with three.js directly outside of React to prevent performance issues. To make the element 3D, make the following changes:
- Let's create a separate component for the boxGeometry element, so we can separate concerns and make it reusable. We can do this in a new file called Box.js under a new directory called components in our src directory:
export default function Box() {
return (
<mesh scale={2}>
<boxGeometry />
<meshStandardMaterial color='blue' />
</mesh>
);
}
- We need to add a ref to the mesh so we can get access to it outside the scope of React, and alter it using three.js:
+ import { useRef } from 'react';
export default function Box() {
+ const mesh = useRef();
return (
<mesh
scale={2}
+ ref={mesh}
>
<boxGeometry />
<meshStandardMaterial color='blue' />
</mesh>
);
}
- Altering the mesh element with three.js can be done by changing the values of the mesh that we can now access using the ref. These alterations must be done within a useFrame Hook from @react-three/fiber, which is triggered on every frame render by three.js. When a new frame is rendered, we can slightly alter the rotation of the mesh making it rotate:
import { useRef } from 'react';
+ import { useFrame } from '@react-three/fiber';
export default function Box() {
const mesh = useRef();
+ useFrame(() => {
+ mesh.current.rotation.x =
mesh.current.rotation.y += 0.01;
+ });
return (
// ...
Note
If you don't want to rotate the Box component continuously on every frame render, you can also use a useEffect Hook to rotate the mesh just once on the initial render or on a set interval.
- In the src/App.js file, we need to replace the boxGeometry element with this new component to make it visible in the application:
import { Canvas } from '@react-three/fiber';
+ import Box from './components/Box';
export default function App() {
return (
<div id='canvas-container'>
<Canvas>
- <mesh>
- <boxGeometry />
- <meshStandardMaterial color='blue' /> */}
+ <Box />
<ambientLight intensity={0.5} />
- </mesh>
</Canvas>
</div>
);
}
- Finally, we need to add two more light elements to highlight that we're rendering a 3D element, which are the spotLight and pointLight elements:
// ...
export default function App() {
return (
<div id='canvas-container'>
<Canvas>
<Box />
<ambientLight intensity={0.5} />
+ <spotLight position={[10, 10, 10]}
angle={0.15} penumbra={1} />
+ <pointLight position={[-10, -10, -10]} />
</Canvas>
</div>
);
}
Note
The value for position is an array with three numbers. These numbers represent a Vector3 position. This is a format to describe the position of an object in 3D space where the numbers are the x, y, and z values.
By opening the application in the browser, you can now see a blue square box that is being rotated in 3D:
Figure 10.1 – Rendering a 3D element with Three.js
Something else that we can do with three.js is control the Canvas using our mouse. The Box component is now rotating on every frame render, but we could also control the rotation of the entire Canvas using three.js. The Canvas component already sets up a camera that we can control using the OrbitControls component from three.js. To do this for our application, we need to do the following:
- Disable the rotation of the Box component by adding a prop called rotate, which can be either true or false. If no value is provided, the default value will be false, meaning the Box component isn't rotating:
// ...
- export default function Box() {
+ export default function Box({ rotate = false }) {
const mesh = useRef();
useFrame(() => {
+ if (rotate) {
mesh.current.rotation.x =
mesh.current.rotation.y += 0.01;
+ }
});
return (
// ...
- From the src/App.js file, we don't need to set this prop as we don't want the Box component to rotate. Instead, we will create a new component in the src/components/Controls.js file to control the rotation of the entire Canvas and thereby the camera of the application. To do this, we need to add the following content to this file:
import { useEffect } from 'react';
import { useThree } from '@react-three/fiber';
import { OrbitControls } from
'three/examples/jsm/controls/OrbitControls';
export default function Controls() {
const { camera, gl } = useThree();
useEffect(() => {
const controls = new OrbitControls(camera,
gl.domElement);
return () => {
controls.dispose();
};
}, [camera, gl]);
return null;
};
This will create the Controls component and use the OrbitControls component from three.js as its base. From the useThree Hook, it will take the camera and gl from three.js, where the first one is the view perspective and the second one is the render for WebGL. In the useEffect Hook, the OrbitControls component will be created and also cleaned up with the dispose method when it's no longer needed.
- We need to import this new Controls component in the src/App.js file and place it inside the Canvas component:
import { Canvas } from '@react-three/fiber';
import Box from './components/Box';
+ import Controls from './components/Controls';
export default function App() {
return (
<div id='canvas-container'>
<Canvas>
+ <Controls />
<Box />
// ...
- With the previous change, we could already rotate the Box component while clicking and dragging around this component from the browser. To make this experience smoother, we can add a minimum and maximum control distance to this component in src/components/Box.js:
// ...
export default function Controls() {
// ...
useEffect(() => {
const controls = new OrbitControls(camera,
gl.domElement);
+ controls.minDistance = 2;
+ controls.maxDistance = 20;
// ...
}, [camera, gl]);
return null;
}
- Finally, we can allow the Controls component, for example, to zoom or pan. This can be done by setting the following values:
// ...
export default function Controls() {
// ...
useEffect(() => {
const controls = new OrbitControls(camera,
gl.domElement);
controls.minDistance = 2;
controls.maxDistance = 20;
+ controls.enableZoom = true;
+ controls.enablePan = true;
// ...
After adding these last two values, you can rotate, zoom, and pan the Box component in 3D from the browser with three.js and React. In the next section of this chapter, we'll be rendering 360-degree panorama images to interact with as well.
Rendering 360-degree panorama images
The application is using a default background that is displayed for the scene, but it's also possible to dynamically change the background of our scene. For this application, we want our scene background to be either 360 degrees or in 3D. Online images can be found on numerous stock photo websites that meet the requirements.
In this book's GitHub repository, you can find a selection of assets for this chapter under the chapter-10-assets directory, including two 360-degree panorama images. You need to download both the beach.jpeg and mountain.jpeg files and place them in the public directory of the application. The file structure for this chapter will therefore become the following:
chapter-10
|- /node_modules
|- package.json
|- /public
|- index.html
|- beach.jpeg
|- mountain.jpeg
|- /src
|- /components
|- Box.js
|- Controls.js
|- App.css
|- App.js
|- index.css
|- index.js
After we've added the 360-degree panorama images to the project, we can proceed by rendering them in the background of our scene on the Canvas. Using components and Hooks from both three.js and @react-three/fiber, we can create a 360-degree view in which we can also render the 3D object that we created in the previous section of this chapter.
To add a 360-degree background, we need to follow a couple of steps:
- Create a new file called Panorama.js in the components directory in the src file of the project. In this file, the setup to create a new mesh with the 360-degree image as a texture is added. First, we need to import the dependencies:
import { useLoader } from '@react-three/fiber';
import * as THREE from 'three';
import Box from './Box';
- Below the imports, we need to define the backgrounds that we want to use for this application:
// ...
const backgrounds = [
{
id: 1,
url: '/mountain.jpeg',
},
{
id: 2,
url: '/beach.jpeg',
},
];
- At the bottom of this file, the actual Panorama component must be created, which uses a Hook from @react-three/fiber and returns a mesh element from three.js with two other three.js elements:
// ...
export default function Panorama() {
const background = useLoader(THREE.TextureLoader,
backgrounds[0].url);
return (
<mesh>
<sphereBufferGeometry args={[500, 60, 40]} />
<meshBasicMaterial map={background}
side={THREE.BackSide} />
</mesh>
);
}
The useLoader Hook takes the THREE.TextureLoader and the background image to create an object that can be used by meshBasicMaterial as a texture. It will use the first entry of the backgrounds array, something we can make dynamic later on. The sphereBufferGeometry defines our 360-degree view within our scene on the Canvas.
- This new Panorama component must be imported in src/App.js so it can be rendered. Make sure to render this component within a Suspense component from React, as it's a dynamic component due to the usage of the useLoader Hook:
+ import { Suspense } from 'react';
import { Canvas } from '@react-three/fiber';
+ import Panorama from './components/Panorama';
// ...
export default function App() {
return (
<div id='Canvas-container'>
<Canvas>
<Controls />
+ <Suspense fallback={null}>
+ <Panorama />
+ </Suspense>
<Box />
// ...
You can now open the application in the browser again to see how the 360-degree panorama is rendered, also with our previously created 3D object:

Figure 10.2 – Rendering a 360-degree panorama image
Note
If you try zooming in and out of the 360-degree panorama images, you'll notice that only the Box component is changing its size. The background images are set to cover the full background and are not in 3D.
Besides rendering a 360-degree panorama image, we can also make this interactive. By adding more three.js elements and using React, we can let the user change the background image by clicking on, for example, the 3D box.
To change the backgrounds, we need to combine three.js with React and use local state management to keep track of which 360-degree panorama image should be rendered. Three.js elements rendered by @react-three/fiber can also handle onClick events to make them clickable components. Let's implement this:
- In the src/components/Panorama.js file, we need to import the useState Hook from React, and create a local state variable with it:
+ import { useState } from 'react';
import { useLoader } from '@react-three/fiber';
import * as THREE from 'three';
// ...
export default function Panorama() {
+ const [activeBackground, setActiveBackground] =
useState(1);
// ...
- Based on the value for activeBackground, we can select the 360-degree panorama image that should be rendered as the background. The id field of the backgrounds array is used to match the local state variable to the correct background:
// ...
export default function Panorama() {
const [activeBackground, setActiveBackground] =
useState(1);
- const background = useLoader(THREE.TextureLoader,
backgrounds[0].url);
+ const { url } = backgrounds.find(({ id }) =>
id === activeBackground);
+ const background = useLoader(
+ THREE.TextureLoader,
+ url
+ );
return (
// ...
- In the return statement of this Panorama component, we need to wrap the returned mesh element in a group element. This group element lets three.js return multiple interactive elements at once:
// ...
export default function Panorama() {
// ...
return (
+ <group>
<mesh>
<sphereBufferGeometry args={[500, 60, 40]} />
<meshBasicMaterial map={background}
side={THREE.BackSide} />
</mesh>
+ </group>
);
}
- In this group element, we can add another clickable group element with the onClick event that will update the value for activeBackground when clicked on: // ...And add the group element with the onClick event, which will update the value for activeBackground when clicked on:
// ...
export default function Panorama() {
// ...
return (
<group>
// ...
+ <group
+ onClick={(e) => {
+ e.stopPropagation();
+ setActiveBackground(activeBackground ===
1 ? 2 : 1);
+ }}
+ >
+ <Box />
+ </group>
</group>
);
}
- To prevent the Box component from being rendered multiple times, we need to remove it from the src/App.js file:
import { Suspense } from 'react';
import { Canvas } from '@react-three/fiber';
- import Box from './components/Box';
// ...
export default function App() {
return (
<div id='Canvas-container'>
<Canvas>
<Controls />
- <Box />
// ...
</div>
);
}
From our application, you can now change the 360-degree panorama image that is being rendered by clicking on the 3D square. We can improve the user experience more by making the mesh element interactive, for example, when the user hovers over the Box.
- In the src/components/Box.js file, we can add a local state variable to check whether the component is hovered, which is triggered from the mesh element:
- import { useRef } from 'react';
+ import { useRef, useState } from 'react';
import { useFrame } from '@react-three/fiber';
export default function Box({ rotate = false }) {
const mesh = useRef();
+ const [hovered, setHovered] = useState(false);
// ...
return (
<mesh
scale={2}
ref={mesh}
+ onPointerOver={(e) => setHovered(true)}
+ onPointerOut={(e) => setHovered(false)}
>
<boxGeometry />
<meshStandardMaterial color='blue' />
</mesh>
);
}
- When the local state variable hovered is true, we want the color prop on the meshStandardMaterial element to change to a different color:
// ...
return (
// ...
<boxGeometry />
- <meshStandardMaterial color='blue' />
+ <meshStandardMaterial color={hovered ?
'purple' : 'blue'} />
</mesh>
);
}
If you now open the application on http://localhost:3000, you can see the Box component changes from blue to purple when hovered over. Clicking on it will render a different 360-degree panorama image, which is the beach:

Figure 10.3 – Hovering over and clicking on 3D elements
Besides rendering 360-degree backgrounds and creating interactive 3D components, we can also import external 3D objects in React with three.js and animate them. This will be shown in the next section, by adding react-spring to our application.
Animating 3D objects
So far, all the components you've added in this chapter that were created with three.js didn't have animations. With three.js, you can also import external 3D objects and animate components with react-spring. This library works similar to the Animated API that we used for React Native earlier in this book.
Importing 3D objects
Before getting into animating 3D objects in React, let's import an external 3D object with three.js first. Three.js can import multiple file formats for 3D objects, including .obj, .gltf, and .glb. These file formats are the most common ones for creating 3D objects that can be used in other programs. For this chapter, we'll be using a .glb file with a 3D version of the Ingenuity Mars Helicopter from NASA. This file can be found in the repository for this book in the chapter-10-assets directory, and you can place it in the public directory next to the 360-degree panorama images that you downloaded in the previous section.
Both .gltf and .glb files can be loaded into three.js with GLTFLoader, which can load GLTF objects. GLTF is one of the most popular formats for 3D objects, also called the JPEG of 3D. The 3D model from NASA that you've placed in the public directory can be imported into a component, in a new file called Helicopter.js in the components directory:
import { useLoader } from '@react-three/fiber';
import { GLTFLoader } from
'three/examples/jsm/loaders/GLTFLoader';
export default function Helicopter() {
const gltf = useLoader(GLTFLoader, './ Ingenuity_v3.glb'
);
return (
<group position={[2, 2, 1]}>
<primitive object={gltf.scene} />
</group>
);
}
This component again uses the useLoader Hook from @react-three/fiber, and also imports the GLTFLoader that it needs to render the 3D GLTF object. A primitive element with the GLTF object is returned within a group element that has a custom position.
In src/App.js, we can return this new Helicopter component from within a Suspense component, as the useLoader Hook makes this a dynamic component:
import { Suspense } from 'react';
import { Canvas } from '@react-three/fiber';
+ import Helicopter from './components/Helicopter';
// ...
export default function App() {
return (
<div id='Canvas-container'>
<Canvas>
// ...
<Suspense fallback={null}>
<Panorama />
+ <Helicopter />
</Suspense>
</Canvas>
</div>
);
}
This will add the Ingenuity Mars Helicopter from NASA to our application, rendered in a position close to our 3D box. You can see what this looks like in the following screenshot:
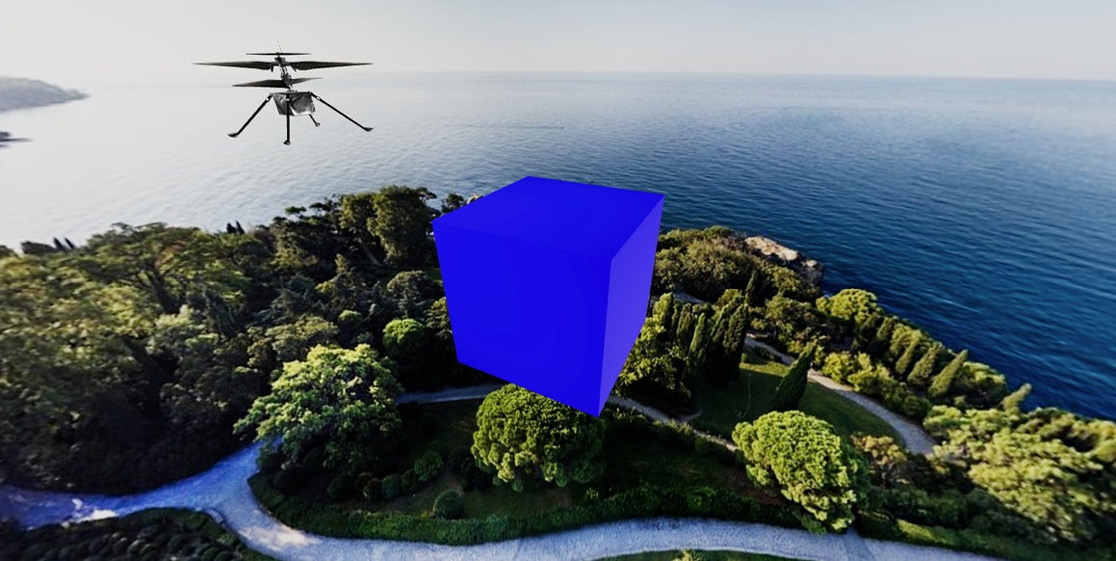
Figure 10.4 – Rendering an external 3D object with three.js
In the next part of this section, we'll animate this 3D object using a popular React library called react-spring.
Animating 3D objects with React
In a previous chapter of this book, we animated components in React Native with the Animated API. For web-based React applications, we can use another library for this, which is react-spring. Using this library, we can add animations to, for example, rotate, move, or fade components in and out of a frame. As has been the case in other examples of using React, this library provides Hooks to add these interactions.
There is a special library from react-spring that works well with @react-three/fiber, which we can install from npm:
npm install @react-spring/three
After the installation is complete, we can import the useSpring Hook and the animated element from this library in our Helicopter component in src/components/Helicopter.js:
import { useLoader } from '@react-three/fiber';
import { GLTFLoader } from
'three/examples/jsm/loaders/GLTFLoader';
+ import { useSpring, animated } from
'@react-spring/three';
export default function Helicopter() {
// ...
We can pass the configuration for our animation to the useSpring Hook, so it will create the props we can pass to the element that we want to animate:
// ...
export default function Helicopter() {
const gltf =
useLoader(GLTFLoader, './Ingenuity_v3.glb');
+ const props = useSpring({
+ loop: true,
+ to: [
+ { position: [2, 2, 3] },
+ { position: [2, 2, 6] },
+ { position: [2, 2, 9] },
+ { position: [2, 4, 9] },
+ { position: [2, 6, 9] },
+ ],
+ from: { position: [2, 2, 1] },
+ });
return (
// ...
The object with our animation configuration describes that we want to change the position prop of our 3D object. The starting position is described and the different positions it should also move to. This animation will also be looped.
The animated element from react-spring can then be used to extend the group element from three.js that is wrapping our 3D object. This group element will become an animated element that also takes the props that were created by the useSpring Hook:
// ...
return (
- <group position={[2, 2, 1]}>
+ <animated.group {...props}>
<primitive object={gltf.scene} />
+ </animated.group>
- </group>
);
}
Now, when you open the application, the helicopter will be moving around in different positions on the 360-degree panorama image.
Summary
In this final chapter, you've combined all of the knowledge you have gathered from this book to create a VR application with React. We were able to do this by combining it with three.js, which is a JavaScript library for creating 3D applications. The project we created in this chapter serves a different and more niche use case than the other React projects in this book. It has basic animations, as well as a 3D helicopter object that flies away into the distance.
With this final chapter, you've completed all 10 chapters of this book and have created 10 projects with React and React Native. Now, you have a solid understanding of everything that you can do with React and how to use it across different platforms. While React and React Native are already mature libraries, new features are added continuously. Even as you finish reading this book, there will probably be new features you can check out. My main advice would be to never stop learning and keep a close eye on the documentation whenever a new feature is announced.
Further reading
- Three.js: https://threejs.org/
- @react-three/fiber: https://docs.pmnd.rs/react-three-fiber/getting-started/introduction
- NASA 3D images: https://mars.nasa.gov/3d/images/
