
Chapter 13. React routing
This chapter covers
- Implementing a router from scratch
- Working with React Router
- Routing with Backbone
In the past, in many single-page applications, the URL rarely, if ever, changed as you progressed through the app. There was no reason to go to the server, thanks to browser rendering! Only the content on part of the page changed. This approach had some unfortunate consequences:
- Refreshing your browser took you back to the original form of the page you were reading.
- Clicking the Back button in your browser might take you to a completely different site, because the browser’s history function only recorded a single URL for the site you were on. There were no URL changes reflecting your navigation between content.
- You couldn’t share a precise page on the site with your friends.
- Search engines couldn’t index the site because there were no distinct URLs to index.
Fortunately, today we have browser URL routing. URL routing lets you configure an application to accept request URLs that don’t map to physical files. Instead, you can define URLs that are semantically meaningful to users, that can help with search-engine optimization (SEO), and that can reflect your application’s state. For example, a URL for a page that displays product information might be
https://www.manning.com/books/react-quickly
This is neatly mapped behind the scenes to a single page that displays the product with ID react-quickly. As you browse various products, the URL can change, and both the browser and search engines will be able to interact with the product pages as you’d expect. If you want to avoid complete page reloads, you can use a hash (#) in your URLs, as these well-known sites do:
https://mail.google.com/mail/u/0/#inbox
https://en.todoist.com/app?v=816#agenda%2Foverdue%2C%20today
https://calendar.google.com/calendar/render?tab=mc#main_7
URL routing is a requirement for a user-friendly, well-designed web app. Without specific URLs, users can’t save or share links without losing the state of the application, be it a single-page application (SPA) or a traditional web app with server rendering.
In this chapter, you’ll build a simple React website and learn about a couple of different options for implementing routing within it. I’ll introduce the React Router library later in the chapter; first, let’s build some simple routing from scratch.
Note
The source code for the examples in this chapter is at www.manning.com/books/react-quickly and https://github.com/azat-co/react-quickly/tree/master/ch13 (in the ch13 folder of the GitHub repository https://github.com/azat-co/react-quickly). You can also find some demos at http://reactquickly.co/demos.
13.1. Implementing a router from scratch
Although there are existing libraries that implement routing for React, let’s start by implementing a simple router to see how easy it is. This project will also help you understand how other routers work under the hood.
The end goal of this project is to have three pages that change along with the URL when you navigate around. You’ll use hash URLs (#) to keep things simple; non-hash URLs require a special server configuration. These are the pages you’ll create:
- Home—/ (empty URL path)
- Accounts—/#accounts
- Profile—/#profile
Figure 13.1 shows the navigation from the home page to the Profile page.
Figure 13.1. Navigating from the home page to the Profile page and changing the URL by clicking a link

To implement this project, which will demonstrate and use a URL router, you’ll create a router component (router.jsx), a mapping, and an HTML page. The router component will take information from the URL and update the web page accordingly. The implementation of the project breaks down into these steps:
- Write the mapping between the URL entered and the resource to be shown (React elements or components). Mapping is app-specific, and a different mapping will be needed for each new project.
- Write the router library from scratch. It will access the requested URL and check the URL against the mapping (step 1). The router library will be a single Router component in router.jsx. This Router can be reused without modifications in various projects.
- Write the example app, which will use the Router component from step 2 and the mapping from step 1.
You’ll use JSX to create React elements for the markup. Obviously, Router doesn’t have to be a React component; it can be a regular function or a class. But using a React component reinforces concepts you’ve learned about in this book, such as event lifecycles and taking advantage of React’s rendering and handling of the DOM. In addition, your implementation will be closer to the React Router implementation, which will help you understand React Router better when we discuss it later.
13.1.1. Setting up the project
The structure of the project (which you can call a simple or naive router) is as follows:
/naive-router
  /css
    bootstrap.css
    main.css
  /js
    bundle.js
 /jsx
   app.jsx
   router.jsx
 /node_modules
 index.html
 package.json
 webpack.config.js
You’ll begin by installing dependencies. I put them in package.json; you can copy the dependencies as well as the babel config and scripts, and run npm install (ch13/naive-router/package.json).
Listing 13.1. Setting up the dev environment


This isn’t all. Webpack needs its own configuration file, webpack.config.js (as explained in chapter 9). The key is to configure the source (entry) and the desired destination (output). You also need to provide the loader.
Listing 13.2. webpack.config.js

13.1.2. Creating the route mapping in app.jsx
First, you’ll create a mapping with a mapping object, where the keys are URL fragments and the values are the content of the individual pages. A mapping takes a value and ties/connects it to another value. In this case, the key (URL fragment) will map to JSX. You could create a separate file for each page, but for now let’s keep them all in app.jsx.
Listing 13.3. Route mapping (app.jsx)

Next, you’ll implement Router in router.jsx.
13.1.3. Creating the Router component in router.jsx
In a nutshell, Router needs to take information from the URL (#profile) and map it to JSX using the mapping property provided to it. You can access the URL from the window.location.hash of the browser API:
const React = require('react')
module.exports = class Router extends React.Component {
  constructor(props) {

    super(props)
    this.state = {hash: window.location.hash}
    this.updateHash = this.updateHash.bind(this)
  }
  render() {
    ...
  }
}
Next, you need to listen for any URL changes with hashchange. If you don’t implement listening to new URLs, then your router will work only once: when the entire page reloads and the Router element is created. The best places to attach and remove listeners for hashchange are the componentDidMount() and componentWillUnmount() lifecycle event listeners:
updateHash(event) {
  this.setState({hash: window.location.hash})
}
componentDidMount() {
  window.addEventListener('hashchange', this.updateHash, false)
}
componentWillUnmount() {
  window.removeEventListener('hashchange', this.updateHash, false)
}
Chapter 5 discusses lifecycle events, but here’s a refresher. componentDidMount() is fired when an element is mounted and appears in the real DOM node (you can say that an element has a real DOM node). For this reason, this is the safest place to attach events that integrate with other DOM objects, and also to make AJAX/XHR calls (not used here).
On the other hand, componentWillUnmount() is the best place to remove event listeners; your element will be unmounted, and you need to remove whatever you created outside of this element (such as an event listener on window). Leaving a lot of event listeners hanging around without the elements that created and used them is a bad practice: it leads to performance issues such as memory leaks.
In render(), you use if/else to see whether there’s a match with the current URL value (this.state.hash) and the keys/attributes/properties in the mapping property. If so, you access mapping again to get the content of the individual page (JSX). If not, you fall back to * for all other URLs, including the empty value (home page). Here’s the complete code (ch13/naive-router/jsx/router.jsx).
Listing 13.4. Implementing a URL router

Finally, in index.html, you include the CSS file and bundle.js that Webpack will produce when you run npm run build (which in turn runs ./node_modules/.bin/webpack -w):
<!DOCTYPE html>
<html>

  <head>
    <link href="css/bootstrap.css" type="text/css" rel="stylesheet"/>
    <link href="css/main.css" type="text/css" rel="stylesheet"/>
  </head>

  <body>
    <div id="content" class="container"></div>
    <script src="js/bundle.js"></script>
  </body>

</html>
Run the bundler to get bundle.js, and open the web page in a browser. Clicking the links changes the URL as well as the content of the page, as shown earlier in figure 13.1.
As you can see, building your own router with React is straightforward; you can use lifecycle methods to listen for changes in the hash and render the appropriate content. But although this is a viable option, things become more complex if you need nested routes, use route parsing (extracting URL parameters), or use “nice” URLs without #. You could use a router from Backbone or another front-end, MVC-like framework, but there’s a solution designed for React specifically (hint: it uses JSX).
13.2. React Router
React is amazing at building UIs. If I haven’t convinced you yet, go back and reread the previous chapters! It can also be used to implement simple URL routing from scratch, as you’ve seen with router.jsx.
But for more-sophisticated SPAs, you’ll need more features. For instance, passing a URL parameter is a common feature to signify an individual item rather than a list of items: for example, /posts/57b0ed12fa81dea5362e5e98, where 57b0ed12-fa81dea5362e5e98 is a unique post ID. You could extract this URL parameter using a regular expression; but sooner or later, if your application grows in complexity, you may find yourself reinventing existing implementations for front-end URL routing.
Semantic or nice URLS (https://en.wikipedia.org/wiki/Semantic_URL) are aimed at improving the usability and accessibility of a website or web app by decoupling the internal implementation from the UI. A non-semantic approach might use query strings and/or script filenames. On the other hand, the semantic way embraces using the path only in a manner that helps users interpret the structure and manipulate the URLs. Here are some examples:
Major frameworks such as Ember, Backbone, and Angular have routing built in to them. When it comes to routing and React, React Router (react-router; https://github.com/reactjs/react-router) is a ready-to-go, off-the-shelf solution. Section 13.4 covers a Backbone implementation and illustrates how nicely React plays with this MVC-like framework that many people use for SPAs. Right now, let’s focus on React Router.
React Router isn’t part of the official React core library. It came from the community, but it’s mature and popular enough that a third of React projects use it.[1] It’s a default option for most React engineers I’ve talked to.
React.js Conf 2015, “React Router Increases Your Productivity,” https://youtube.com/watch?v=XZfvW1a8Xac.
The syntax of React Router uses JSX, which is another plus because it allows you to create more-readable hierarchical definitions than you can with a mapping object (as you saw in the previous project). Like the naive Router implementation, React Router has a Router React component (React Router inspired my implementation!). Here are the steps you’ll follow:
- Create a mapping in which URLs will translate into React components (which turn into markup on a web page). In React Router, this is achieved by passing the path and component properties as well as nesting Route. The mapping is done in JSX by declaring and nesting Route components. You must implement this part for each new project.
- Use the React Router’s Router and Route components, which perform the magic of changing views according to changes in URLs. Obviously, you won’t implement this part, but you’ll need to install the library.
- Render Router on a web page by mounting it with ReactDOM.render() like a regular React element. Needless to say, this part must be implemented for each new project.
You’ll use JSX to create a Route for each page, and nest them either in another Route or in Router. The Router object goes in the ReactDOM.render() function, like any other React element:
ReactDOM.render((
  <Router ...>
    <Route ...>
      <Route ../>
      ...
    </Route>
    <Route .../>
  </Router>
), document.getElementById('content'))
Each Route has at least two properties: path, which is the URL pattern to match to trigger this route; and component, which fetches and renders the necessary component. You can have more properties for a Route, such as event handlers and data. They’ll be accessible in props.route in that Route component. This is how you pass data to route components.
To illustrate, let’s consider an example of an SPA with routing to a few pages: About, Posts (like a blog), an individual Post, Contact Us, and Login. They have different paths and render from different components:
- About—/about
- Posts—/posts
- Post—/post
- Contact—/contact
The About, Posts, Post, and Contact Us pages will use the same layout (Content component) and render inside it. Here’s the initial React Router code (not the complete, final version):
<Router>
  <Route path="/" component={Content} >
    <Route path="/about" component={About} />
      <Route path="/about/company" .../>
      <Route path="/about/author" .../>
    <Route path="/posts" component={Posts} />
    <Route path="/posts/:id" component={Post}/>
    <Route path="/contact" component={Contact} />
  </Route>
</Router>
Interestingly, you can nest routes to reuse layouts from parents, and their URLs can be independent of nesting. For instance, it’s possible to have a nested About component with the /about URL, even though the “parent” layout route Content uses /app. About will still have the Content layout (implemented by this.props.children in Content):
<Router>
  <Route path="/app" component={Content} >
    <Route path="/about" component={About} />
    ...
In other words, About doesn’t need the nested URL /app/about unless you want it to be this way. This gives you more flexibility in terms of paths and layouts.
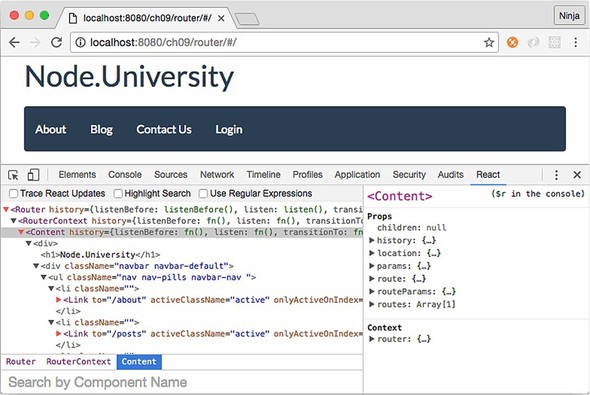
To navigate, you’ll implement a menu as shown in figure 13.2. The menu and the header will be rendered from Content and reused on the About, Posts, Post, and Contact Us pages. In the figure, several things are happening: the About page is rendered, the menu button is active, the URL reflects that you’re on the About page by showing you /#/about, and the text Node.University reflects what’s in the About component (you’ll see it later).
Figure 13.2. Navigating to /about renders the About text in the Content component, changes the URL, and makes the button active.

13.2.1. React Router’s JSX style
As I mentioned earlier, you’ll use JSX to create the Router element and Route elements nested within it (and each other). Each element (Router or Route) has at least two properties, path and component, that tell the router the URL path and the React component class to create and render. It’s possible to have additional custom properties/attributes to pass data; you’ll use that approach to pass a posts array.
Let’s put your knowledge to work by importing the React Router objects and using them in ReactDOM.render() to define the routing behavior (ch13/router/jsx/app.jsx). In addition to About, Posts, Post, and Contact Us, you’ll create a Login page.
Listing 13.5. Defining Router
const ReactRouter = require('react-router')
let { Router,
  Route,
  Link
} = ReactRouter

ReactDOM.render((
  <Router history={hashHistory}>
    <Route path="/" component={Content} >
      <Route path="/about" component={About} />
      <Route path="/posts" component={Posts} posts={posts}/>
      <Route path="/posts/:id" component={Post}  posts={posts}/>
      <Route path="/contact" component={Contact} />
    </Route>
    <Route path="/login" component={Login}/>
  </Router>
), document.getElementById('content'))
This last route, Login (/login, shown in figure 13.3), lives outside of the Content route and doesn’t have the menu (which is in Content). Anything that doesn’t need the common interface provided in Content can be left out of the Content route. This behavior is determined by the hierarchy of the nested routes.
Figure 13.3. The Login page (/#/login) doesn’t use the common layout (Content) that includes a menu. There’s only a Login element.

The Post component renders blog post information based on the post slug (part of the URL—think ID), which it gets from the URL (for example, /posts/http2) via the props.params.id variable. By using a special syntax with a colon in the path, you tell the router to parse that value and populate it into props.params.
Router is passed to the ReactDOM.render() method. Notice that you pass history to Router. Starting with version 2 of React Router, you must supply a history implementation. You have two choices: bundling with the React Router history or using a standalone history implementation.
13.2.2. Hash history
The hash history, as you can probably guess, relies on the hash symbol #, which is how you navigate on the page without reloading it; for example, router/#/posts/http2. Most SPAs use hashes because they need to reflect changes in context within the app without causing a complete refresh (request to the server). You did this when you implemented a router from scratch.
Note
The proper term for a hash is fragment identifier (https://en.wikipedia.org/wiki/Fragment_identifier).
In this example, you’ll also uses hashes, which come standalone from the history library (http://npmjs.org/history). You’ll import the library, initialize it, and pass it to React Router.
You need to set queryKey to false when you initialize history, because you want to disable the pesky query string (for example, ?_k=vl8reh) that’s there by default to support older browsers and transfer states when navigating:
const ReactRouter = require('react-router')
const History = require('history')
let hashHistory = ReactRouter.useRouterHistory(History.createHashHistory)({
  queryKey: false
})
<Router history={hashHistory}/>
To use a bundled hash history, import it from React Router like this:
const { hashHistory } = require('react-router')
<Router history={hashHistory} />
You can use a different history implementation with React Router if you prefer. Old browsers love hash history, but that means you’ll see the # hashtag. If you need URLs without hash signs, you can do that, too. You just need to switch to the browser history and implement some server modifications, which are simple if you use Node as your HTTP server back end. To keep this project simple, you’ll use hash history, but we’ll go over the browser history briefly.
13.2.3. Browser history
An alternative to hash history is the browser HTML5 pushState history. For example, a browser history URL might be router/posts/http2 rather than router/#/posts/http2. Browser history URLs are also called real URLs.
Browser history uses regular, unfragmented URLs, so each request triggers a server request. That’s why this approach requires some server-side configuration that I won’t cover here. Typically, SPAs should use fragmented/hash URLs, especially if you need to support older browsers, because browser history requires a more complex implementation.
You can use browser history in a way similar to hash history. You import the module, plug it in, and finally configure the server to serve the same file (not the file from your SPA’s routing).
Browser implementations come from a standalone custom package (like history) or from the implementation in React Router (ReactRouter.browserHistory). After you import the browser history library, apply it to Router:
const { browserHistory } = require('react-router')
<Router history={browserHistory} />
Next, you need to modify the server to respond with the same file no matter what the URL is. This example is just one possible implementation; it uses Node.js and Express:
const express = require('express')
const path = require('path')
const port = process.env.PORT || 8080
const app = express()


app.use(express.static(__dirname + '/public'))

app.get('*', function (request, response){
  response.sendFile(path.resolve(__dirname, 'public', 'index.html'))
})

app.listen(port)
console.log("server started on port " + port)
The reason for the required server-side behavior of the HTTP server is that once you switch to real URLs without the hash sign, they’ll start hitting the HTTP server. The server needs to serve the same SPA JavaScript code to every request. For example, requests to /posts/57b0ed12fa81dea5362e5e98 and /about should resolve in index.html, not posts/57b0ed12fa81dea5362e5e98.html or about.html (which will probably result in 404: Not Found).
Because hash history is the preferred way to implement URL routing when support for older browsers is needed, and to keep this example simple without having to implement the back-end server, we’ll use hash history in this chapter.
13.2.4. React Router development setup with Webpack
When you’re working with React Router, there are libraries you need to use and import as well as the JSX compilation to run. Let’s look at the development setup for React Router using Webpack, which will perform these tasks.
The following listing shows devDependencies from package.json (ch13/router/package.json). Most of this should be familiar to you already. New packages include history and react-router. As always, make sure you’re using the exact versions shown; otherwise, you can’t be sure the code will run.
Listing 13.6. Dependencies to use Webpack v1, React Router v2.6, React v15.2, and JSX
{
  ...
  "devDependencies": {
    "babel-core": "6.11.4",
    "babel-loader": "6.2.4",
    "babel-preset-react": "6.5.0",
    "history": "2.1.2",
    "react": "15.2.1",
    "react-dom": "15.2.1",
    "react-router": "2.6.0",
    "webpack": "1.12.9"
  }
}
In addition to devDependencies, package.json must have a babel configuration. I also recommend adding npm scripts:
{
  ...
  "scripts": {
    "test": "echo "Error: no test specified" && exit 1",
    "build": "./node_modules/.bin/webpack -w",
    "i": "rm -rf ./node_modules && npm cache clean && npm install"
  },
  "babel": {
    "presets": [
      "react"
    ]
  },
  ...
}
Note that because the JSX will be converted to React.createClass(), you’ll need to import and define React in files that use JSX even when they don’t use React. To illustrate, in listing 13.7, it looks as though the About component (which is stateless—that is, a function) doesn’t use React. But when this code is transpiled, it will use React in the form of React.createElement() calls. In chapters 1 and 2, React was defined as a global window.React; but with a modular, nonglobal approach, it isn’t. Hence, you need to define React explicitly (ch13/router/jsx/about.jsx).
Listing 13.7. Defining React explicitly
const React = require('react')
module.exports = function About() {
  return <div>
    <a href="http://Node.University" target="_blank">Node.University</a>
     is home to top-notch Node education which brings joy to JavaScript
      engineers.
  </div>
}
engineers.
</div>
}
The rest of the files and the project as whole will use this structure:

The index.html file is bare-bones because it includes only the bundled file.
Listing 13.8. index.html
<!DOCTYPE html>
<html>

  <head>
    <link href="css/bootstrap.css" type="text/css" rel="stylesheet"/>
    <link href="css/main.css" type="text/css" rel="stylesheet"/>
  </head>

  <body>
    <div id="content" class="container"></div>
    <script src="js/bundle.js"></script>
  </body>

</html>
webpack.config.js needs to have at least an entry-point app.jsx, babel-loader, and source maps (ch13/router/webpack.config.js).
Listing 13.9. Configuring Webpack

Next, let’s implement the Content layout component.
13.2.5. Creating a layout component
The Content component, which is defined as a parent Route, will serve as a layout for the About, Posts, Post, and Contact components. Figure 13.4 shows how it’s implemented.
Figure 13.4. The Content component as the Home page (no children)
First, you’ll import React and Link from React Router. The latter is a special component to render navigation links. Link is a special wrapper for <a>; it has some magic attributes that the normal anchor tag doesn’t, such as activeClassName="active", which adds the active class when this route is active.
The Content component’s structure looks something like this, with the omission of a few pieces (the complete code is shown later):
const React = require('react')
const {Link} = require('react-router')

class Content extends React.Component {
  render() {
    return (
      <div>
        ...
      </div>
    )
  }
}
...
module.exports = Content
In render(), you use the amazing Twitter Bootstrap UI library (http://getbootstrap.com) to declare the menu with the proper classes. The menu can be created using ready-made CSS classes, such as these:
<div className="navbar navbar-default">
  <ul className="nav nav-pills navbar-nav ">
    <li ...>
      <Link to="/about" activeClassName="active">
        About
      </Link>
    </li>
    <li ...>
      <Link to="/posts" activeClassName="active">
        Blog
      </Link>
    </li>
    ...
  </ul>
</div>
You’ll access the isActive() method, which returns true or false. This way, an active menu link will be visually different from other links:
<li className={(this.context.router.isActive('/about'))? 'active': ''}>
  <Link to="/about" activeClassName="active">
    About
  </Link>
</li>
Notice the activeClassName attribute of Link. When you set this attribute to a value, Link will apply the class to an active element (the selected link). But you need to set the style on <li>, not just on Link. That’s why you also access router.isActive().
After you’re finished with the Content class definition (full implementation shown shortly), you define a static field/attribute contextTypes that enables the use of this.context.router. If you’re using ES2017+/ES8+,[2] you may have support for static fields, but that’s not the case in ES2015/ES6 or ES2016/ES7. They don’t have this feature. The ES2017/ES8 standard isn’t final yet, but as of this writing it doesn’t have this feature either. Be sure to check the current list of finished proposals/features,[3] or consider using ES Next (collection of stage 0 proposals).
Learn more about ES2016/ES7 and ES2017/ES8 features at https://node.university/blog/498412/es7-es8 and https://node.university/p/es7-es8.
For the current list of stage 0–3 and finished proposals, see the TC39 documents on GitHub: https://github.com/tc39/proposals/blob/master/README.md and https://github.com/tc39/proposals/blob/master/finished-proposals.md.
This static attribute will be used by React Router such that if it’s required, React Router populates this.context (from which you can access router.isActive() and other methods):
Content.contextTypes = {
  router: React.PropTypes.object.isRequired
}
Having contextType and router set to required gives you access to this.context.router.isActive('/about'), which in turn will tell you when this particular route is active.
Phew! Here’s the full implementation of the Content layout.
Listing 13.10. Complete Content component


The children statement enables you to reuse the menu on every subroute (route nested in the / route), such as /posts, /post, /about, and /contact:
{this.props.children}
Let’s look at another way to access a router in an individual route, other than using contextTypes.
13.3. React Router features
To learn more about React Router’s features and patterns, let’s look at another way to access a router from child components and how to navigate programmatically within those components. And, of course, the chapter wouldn’t be complete if I didn’t cover how to parse URL parameters and pass data.
13.3.1. Accessing router with the withRouter higher-order component
Using router allows you to navigate programmatically and access the current route, among other things. It’s good to include access to router in your components.
You’ve seen how to access router from this.context.router by setting the static class attribute contextTypes:
Content.contextTypes = {
  router: React.PropTypes.object.isRequired
}
In a way, you’re using the validation mechanism to define the API; that is, the component must have the router. The Content component used this approach.
But context depends on React’s context, which is an experimental approach; its use is discouraged by the React team. Fortunately, there’s another way (some might argue it’s simpler and better; see http://mng.bz/Xhb9): withRouter.
withRouter is a higher-order component (HOC; more about these in chapter 8) that takes a component as an argument, injects router, and returns another HOC. For example, you can inject router into Contact like this:
const {withRouter} = require('react-router')
...
<Router ...>
  ...
  <Route path="/contact" component={withRouter(Contact)} />
</Router>
When you look at the Contact component implementation (a function), the router object is accessible from the properties (argument object to the function):
const React = require('react')
module.exports = function Contact(props) {
  // props.router - GOOD!
  return <div>
    ...
  </div>
}
The advantage of withRouter is that it works with regular, stateful React classes as well as with stateless functions.
Note
Even though there’s no direct (visible) use of React, you must require React because this code will be converted to code with React.createElement() statements that depend on the React object. For more information, see chapter 3.
13.3.2. Navigating programmatically
A popular use of router is to navigate programmatically: changing the URL (location) from within your code based on logic, not user actions. To demonstrate, suppose you have an app in which the user types a message on a contact form and then submits the form. Based on the server response, the app navigates to an Error page, a Thank-you page, or an About page.
Once you have router, you can navigate programmatically if you need to by calling router.push(URL), where URL must be a defined route path. For instance, you can navigate to About from Contact after 1 second.
Listing 13.11. Calling router.push() to navigate

Navigating programmatically is an important feature because it lets you change the state of the application. Let’s see how you access URL parameters such as a post ID.
13.3.3. URL parameters and other route data
As you’ve seen, having contextTypes and router will give you the this.context.router object. It’s an instance of <Router/> defined in app.jsx, and it can be used to navigate, get the active path, and so on. On the other hand, there’s other interesting information in this.props, and you don’t need a static attribute to access it:
- history (deprecated in v2.x; you can use context.router)
- location
- params
- route
- routeParams
- routes
The this.props.location and this.props.params objects contain data about the current route, such as path name, URL parameters (names defined with a colon [:]), and so on.
Let’s use params.id in post.jsx for the Post component in Array.find() to find the post corresponding to a URL path such as router/#/posts/http2 (ch13/router/jsx/post.jsx).
Listing 13.12. Rendering post data

When you navigate to the Posts page (see figure 13.5), there’s a list of posts. As a reminder, the route definition is as follows:
<Route path="/posts" component={Posts} posts={posts}/>
Figure 13.5. The Posts page renders the Posts component in the Content (menu) component because it’s defined as a child route of Content in app.jsx.

Clicking a post navigates to #/posts/ID. That page reuses the layout of the Content component.
Now, let’s move on and work with data.
13.3.4. Passing properties in React Router
You often need to pass data to nested routes, and it’s easy to do. In the example, Posts needs to get data about posts. In listing 13.13, Posts accesses a property passed to you in <Route/> in app.jsx: posts, from the posts.js file. It’s possible to pass any data to a route as an attribute; for example, <Route path="/posts" component={Posts} posts={posts}/>. You can then access the data in props.route; for example, props.route.posts is a list of posts.
Listing 13.13. Posts implementation with data from props.route

Of course, the value of this data can be a function. That way, you can pass event handlers to stateless components and implement them only in the main component, such as app.jsx.
You’re finished with all the major parts and ready to launch this project! You can do so by running an npm script (npm run build) or using ./node_modules/.bin/webpack -w directly. Wait for the build to finish, and you’ll see something like this:
> [email protected] build /Users/azat/Documents/Code/react-quickly/ch13/router
> webpack -w

Hash: 07dc6eca0c3210dec8aa
Version: webpack 1.12.9
Time: 2596ms
        Asset     Size  Chunks             Chunk Names
    bundle.js   976 kB       0  [emitted]  main
bundle.js.map  1.14 MB       0  [emitted]  main
    + 264 hidden modules
In a new window, open your favorite static server (I use node-static, but you can create your own using Express), and navigate to the location in your browser. Try going to / and /#/about; the exact URL will depend on whether you’re running your static server from the same folder or a parent folder.
Note
The full source code for this example isn’t included here, for space reasons. If you want to play with it or use it as boilerplate, or if you found the preceding snippets confusing when taken out of context, you can find the complete code at www.manning.com/books/react-quickly or https://github.com/azat-co/react-quickly/tree/master/ch13/router.
13.4. Routing with Backbone
When you need routing for a single-page application, it’s straightforward to use React with other routing or MVC-like libraries. For example, Backbone is one of the most popular front-end frameworks that has front-end URL routing built in. Let’s look at how you can easily use the Backbone router to render React components by doing the following:
- Defining a router class with the routes object as a mapping from URL fragments to functions
- Rendering React elements in the methods/functions of the Backbone Router class
- Instantiating and starting the Backbone the Router object
This is the project structure:
/backbone-router
  /css
    bootstrap.css
    main.css
  /js
    bundle.js
    bundle.map.js
  /jsx
    about.jsx
    app.jsx
    contact.jsx
    content.jsx
    login.jsx
    post.jsx
    posts.jsx
  /node_modules
    ...
  index.html
  package.json
  posts.js
  webpack.config.js
package.json includes Backbone v1.3.3 in addition to the usual suspects, such as Webpack v2.4.1, React v15.5.4, and Babel v6.11:
{
  "name": "backbone-router",
  "version": "1.0.0",
  "description": "",
  "main": "index.js",
  "scripts": {
    "test": "echo "Error: no test specified" && exit 1",
    "build": "./node_modules/.bin/webpack -w",
    "i": "rm -rf ./node_modules && npm cache clean && npm install"
  },
  "author": "Azat Mardan",
  "license": "MIT",
  "babel": {
    "presets": [
      "react"
    ]
  },
  "devDependencies": {
    "babel-core": "6.11.4",
    "babel-loader": "6.4.1",
    "babel-preset-react": "6.5.0",
    "backbone": "1.3.3",
    "jquery": "3.1.0",
    "react": "15.5.4",
    "react-dom": "15.5.4",
    "webpack": "2.4.1"
  }
}
The main logic’s source is in app.jsx, where you perform all three of the aforementioned tasks:
const Backbone = require ('backbone')
// Include other libraries
const Router = Backbone.Router.extend({
  routes: {
    ''    : 'index',
    'about' : 'about',
    'posts' : 'posts',
    'posts/:id' : 'post',
    'contact' : 'contact',
    'login': 'login'
  },
  ...
})
Once the routes object is defined, you can define the methods. The values in routes must be used as method names:
// Include libraries
const Router = Backbone.Router.extend({
  routes: {
    ''    : 'index',
    'about' : 'about',
    'posts' : 'posts',
    'posts/:id' : 'post',
    'contact' : 'contact',
    'login': 'login'
  },
  index: function() {
    ...
  },
  about: function() {
    ...
  }
  ...
})
Each URL fragment maps to a function. For example, #/about will trigger about. Thus, you can define these functions and render your React components in them. The data will be passed as a property (router or posts):

The content variable is a DOM node (which you declare before the router):
let content = document.getElementById('content')
Compared to the React Router example, nested components such as Post get their data not in props.params or props.route.posts, but in props.id and props.posts. In my opinion, that means less magic—which is always good. On the other hand, you don’t get to use declarative JSX syntax and must use a more imperative style.
The complete code for this project is available at www.manning.com/books/react-quickly and https://github.com/azat-co/react-quickly/tree/master/ch13/backbone-router. This example will give you a head start if you have a Backbone system or are planning to use Backbone. And even if you’re not planning to use Backbone, it’s shown you yet again that React is amazing at working with other libraries.
13.5. Quiz
You must provide a history implementation for React Router v2.x (the one covered in this chapter) because by default it doesn’t use one. True or false?
What history implementation is better supported by older browsers: hash history or browser HTML5 pushState history?
What do you need to implement to have access to the router object in a route component when using React Router v2.x ?
How would you access URL parameters in a route component (stateless or stateful) when using React Router v2.x?
React Router requires the use of Babel and Webpack. True or false?
13.6. Summary
- You can implement routing with React in a naive way by listening to hashchange.
- React Router provides the JSX syntax for defining a routing hierarchy: <Router><Route/></Router>.
- Nested routes don’t have to have nested URLs relative to their parent routes; path and nestedness are independent.
- You can use hash history without tokens by setting queryKey to false.
- You must include React (require('react')) when using JSX even if there’s no visible use of React, because JSX converts to React.createElement(), which needs React.
13.7. Quiz answers
True. Version 1.x of React Router loaded a history implementation by default; but in version 2.x, you must provide a library, either from a standalone package or one bundled with the router library.
Hash history is better supported by older browsers.
The static class attribute contextTypes, with router as a required object.
From props.params or props.routeParams.
False. You can use it plain and/or with other build tools such as Gulp and Browserify.