

Step 1 I begin this drawing with a carefully detailed outline drawn with a sharp HB mechanical pencil. When drawing the head, I use short strokes to create the softer edges of the feathers. I refer to several photos to confirm that the feather patterns are accurate, and I indicate the black markings of the bird with some quick shading. Right now I am more concerned with capturing the basic features of the bird—details will come later.

Step 2 With a sharp 2H pencil, I darken the lines around the feathers to define them, and I add some dark markings using short strokes. At this stage I am still very concerned about the accuracy of the feather patterns, as markings on the wings and tail are very important in identifying a bird. As I draw, I make sure that all of my strokes follow the direction of the feathers—even at this early stage, texture is being created by my strokes. I shade under the wings, but I don’t want the shadows to be too dark at this point. I darken the eye, remembering to leave the wet-looking highlight white. I remind myself that the eye is like a sphere and use tiny strokes that follow the form of the sphere. I switch to an HB so I can outline the rigid beak. I put some tone in the beak but leave it lighter on the upper part to show the light hitting it.
Step 3 I begin working on the shading that will contribute to the sense of the bird’s form but remember to maintain the softness of the feathered body. At this stage, I work back and forth between an HB and a 2B pencil. I begin developing values, concentrating on the bird’s body and head, which are both egg shapes. Using short, uneven pencil strokes, I start putting some tone on the back, the belly, and the back of the head. I also apply some darker tone to the crown of the head to indicate the blue color. I darken the beak, but I’m careful to keep some highlights to emphasize its smooth texture. At the base of the beak, I draw little lines to indicate short feathers. On the wings, I use long strokes to shade, making sure to keep the white markings evident. I use a broad-point 6B pencil to shade the branch with circular strokes. I lighten the shading as it recedes into space.

Step 4 It’s important to balance the values of the form with the values of the color while keeping the textural elements intact. The form values are the values created by the light hitting the blue jay, whereas the color values are the ones representing the different colors of the actual bird. The texture emerges from the way these values are applied. In pencil, white is expressed as light shading, blue is the midtone, and black is the darkest shading. If I run into a conflict between the form and color values, I give priority to the form values. Now I deepen the black markings with short strokes of a sharp HB, leaving the white markings free of any tone. Where the feathers overlap and at the base of the tail and under the wings, I apply a deeper shade to indicate a shadow using the side of a 2B pencil. I add more shading to the head with short lines, and at the back of the crown I use longer lines for the sharply protruding feathers. Then I deepen the tone on the back and the belly. I leave a few little lines that extend beyond the edge of the bird, producing the feathered texture.

Step 5 I now begin to focus on creating smoother and more natural tonal transitions. I further develop the eye, deepening the black tone and sharpening the highlight. I darken the blue jay’s beak, being careful to leave a slightly lighter tone just at the edge. I add some longer, deeper lines to the back of the crown to give depth to the parted feathers. I also add a few short, light strokes in the white area of the head. I keep these lines very light, so as to not lose the value of the white. I switch to a dull 4B to darken the feet with circular strokes, and I add a small shadow under them. The texture of the feet is very different from the texture of the feathers, so try to create more of a scaly feel. I now give more attention to defining the tones of the branch. I deepen the shading with heavier, irregular, circular strokes, using a broad 6B. I make the branch under the bird very dark to indicate the cast shadow. Then I put some light shading in the pine needles using a few long strokes and an HB.

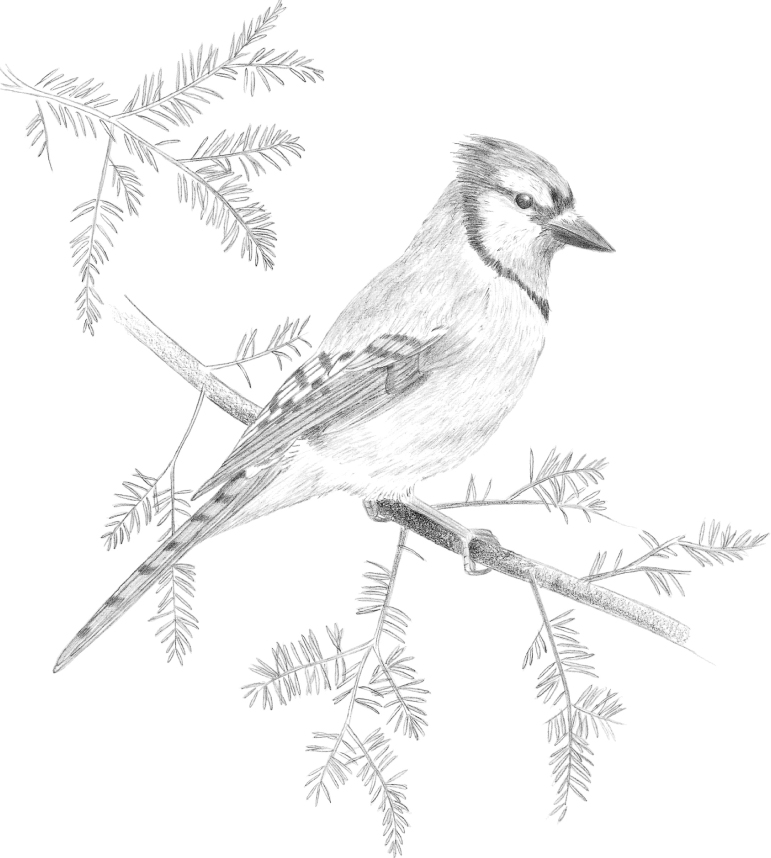
Step 6 I deepen the wings even further with a 2B pencil to create more contrast. Then I darken the grays of the shadowed belly tones. I add a few more detailed textures to the feet with a 2B, using heavy pressure. I also add a few long, sharp lines to indicate the smooth edges where the feathers overlap, and I add some short, sharp lines for the small feathers at the upper base of the beak. I shade with a 4B to give form to the small branches, and I use a blunt 4B to add tone to some of the needles, giving them more depth and a prickly texture. I use a kneaded eraser to lift out just a touch of graphite, emphasizing the reflected light at the bottom of the main branch. Leaving some small feathers sticking out softens the blue jay but at the same time doesn’t look unkempt. I clean up the drawing with my kneaded eraser and lift out any white markings I need to add to the feathers. I am very careful not to overwork the drawing. At this final stage, I look at my art in a mirror to see if there are any areas that I am not satisfied with, and I adjust my drawing accordingly.