
Music recording is foremost about the music. Recording technique and technology are the means to the end, not the end in themselves; they are employed only to serve. Although great music and great musicianship cannot be defined, you have to know when it is there. If they are not part and parcel of a recording, there is little you can do with the microphone selection, placement, and mixdown that will bring about an aesthetically successful recording.
Assuming the music and musicians can “cut it,” there are general guidelines that can serve as starting points to help smooth the recording session. There are no rules. The guidelines are just that. It is not possible to predict that by selecting a specific mic for a given instrument and placing it in a particular position that it will produce a certain sound. There are as many approaches to microphone selection and placement on various instruments as there are recordists. The reasons are understandable. Every situation has different variables: the studio acoustics; what the instrument is made of; how it is played; the combination of voicings and their interaction; the quality of the equipment; personal knowledge and taste; and, of course, the music itself; to name a few.
The focus of this chapter is studio-based music recording, as opposed to music recording in live venues, such as concert halls and theaters. There are four basic ways to record musical instruments: close miking, distant miking, accent miking, and ambient miking. Depending on the music, size of the ensemble, room acoustics, mixer, and software program, one or more of these techniques may be employed in a given session.
Close miking places a microphone relatively close to each sound source or group of sound sources in an ensemble—generally at a distance of about an inch to a foot. Close miking is the technique of choice in studio recording for most popular music genres for a number of reasons: greater control can be achieved in recording the nuances of each musical element; the sound from each instrument, and leakage from other instruments, is better contained; in popular music the difference in loudness between electric and acoustic instruments can be very difficult to balance with distant miking; and much of pop music is played loudly, and in even relatively live acoustics close miking helps prevent the music from being awash in reverberation. Reverberation, spatial positioning, and blend are added in the postproduction mixdown.
Generally, directional mics are used in close miking for better sound control of each instrument and to reduce leakage of one instrument into another instrument’s microphone. Most of the discussion of close-miking techniques that follows assumes the use of directional microphones. If acoustics and recording logistics permit, however, there are three good reasons why omnidirectional mics should not be overlooked: the better omni capacitors have an extraordinarily wide, flat response, particularly in the lower frequencies, and little or no off-axis coloration; omni mics are not as subject to proximity effect, sibilance, plosives, and breathing sounds as are directional mics; and, because of the inverse square law (see Chapter 13), it is possible to close-mike with an omni and still reduce leakage if the instrument’s sound-pressure level is high enough.
Distant miking places a microphone(s) from about three feet to several feet from the sound source. It picks up a fuller range and balance of an instrument, or a group of instruments, and captures more of the studio acoustics for a more open and blended sound.
Distant miking is employed when all sounds or voicings, or groups of sounds or voicings, are recorded at the same time and it is important to preserve the ensemble sound, or a sonic sense of it. Orchestral and choral music and certain types of jazz are examples of genres that use distant miking. The technique is also used along with close miking to enhance a recording by adding natural acoustics.
As previously noted, the purpose of distant miking, especially when mixed with sound from close mics, is to add airier, more ambient sound to the overall recording. The microphone arrays used are often stereo arrays. They are mainly coincident, near-coincident, and spaced.
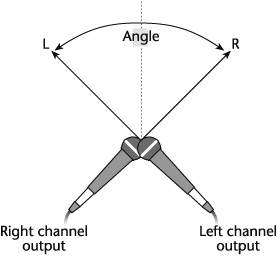
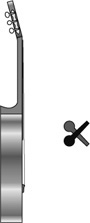
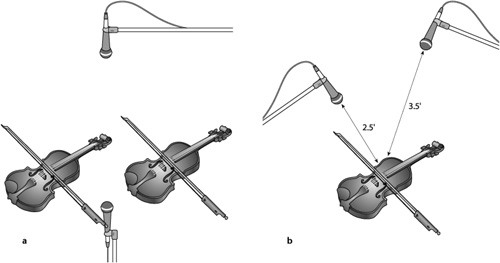
Coincident miking, also called X-Y miking, employs two matched, directional microphones mounted on a vertical axis—with one mic diaphragm directly over the other—and angled apart to aim approximately toward the left and right sides of the sound source. The degree of angle, the mics’ pickup pattern, and the distance from the sound source depend on the width of the stereo image you want to record (see 19-1).
A stereo pair must be matched to ensure a uniform sound, and the mics should be capacitors. Miking at a distance from the sound source, particularly with classical music, requires high-output, high-sensitivity microphones; capacitors are the only type of mic that meets this requirement. Moreover, the microphone preamps should be high gain, low noise.
The stereo mic provides the same coincident pickup as the stereo pair but with two directional microphone capsules housed in a single casing. The upper element can rotate up to 180 or 360 degrees, depending on the model, relative to the lower element. Some stereo mics enable control of each capsule’s polar pattern (see 4-30 and 4-31).
Coincident microphone arrays produce level (intensity) differences between channels and minimize differences in arrival time. This has the advantage of being mono compatible because the two mics occupy almost the same space, meaning their signals are in phase at all frequencies.
Middle-side (MS) miking is another coincident technique (see 4-33 and 4-34). You will recall that an M-S microphone is housed in a single casing combining a cardioid mic—the middle—with a side-facing bidirectional mic. The middle mic faces the sound source and, depending on the mic-to-source distance, picks up more direct than indirect sound; the null of the bidirectional mic faces the sound source, so it picks up mostly indirect sound from the left and right of the sound source. By increasing the level of the mid, the stereo image narrows; by increasing the level of the side, the stereo image widens.
It is also possible to employ the MS technique with two multipattern microphones or with a cardioid and a bidirectional mic. With multipattern mics, set one pickup pattern to cardioid and the other to bidirectional. Position one above the other, almost touching, with the cardioid mic facing the sound source and the bidirectional mic pointed at a 90-degree angle away from the sound source (see 19-32).
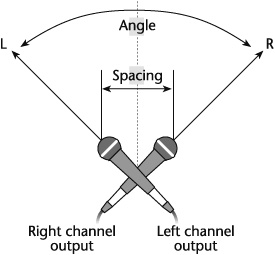
Near-coincident miking angles two directional microphones, spaced horizontally a few inches apart (see 19-2). It is also referred to as X-Y miking. The few inches’ difference between the near-coincident and the coincident arrays adds a sense of warmth, depth, and air to sound compared with the coincident array. The mics are close enough to retain intensity differences between channels at low frequencies yet far enough apart to have sufficient time delay between channels for localization at high frequencies. The stereo spread can be increased or decreased with the angle or space between the mics. The time delay between channels creates a problem, however: the greater the delay, the less the chance of stereo-to-mono compatibility.
Spaced miking employs two matched microphones at least three to several feet apart, perpendicular to the sound source and symmetrical to each other along a centerline (see 19-3). They reproduce a lusher, more spacious sound than any of the near-coincident arrays—but at a cost. Stereo imaging is more diffused and therefore less detailed. And because so much of the sound reaching the mics derives its directional information from time differences (in addition to intensity differences), stereo-to-mono compatibility is unreliable.
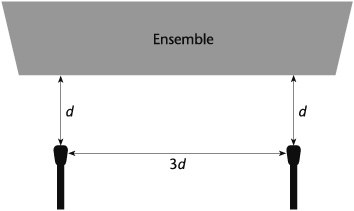
19-3 Spaced miking technique. This technique positions the mics at a distance (d) of 3 feet or more. It allows the full range and balance of an instrument or ensemble and captures the room sound as well. If the spaced mics are relatively close to the source, to prevent phase anomalies remember the three-to-one rule: the mics should be placed at least three times as far apart as the distance between the sound source and microphone (see 9-3).
If studio acoustics and the music permit, spaced omnidirectional mics are preferred to directional mics because they have less off-axis coloration and flatter overall response, especially in the low frequencies. Capacitors are almost always used. Spacing is determined by the desired width of the stereo image. With omni mics, of course, spacing must be wide enough to reproduce a stereo image. If it is too wide, however, separation may be exaggerated; if spacing is too narrow, the stereo image may lack breadth.
Spaced cardioid mics are arrayed similarly to spaced omni mics, but their directionality produces a different sonic outcome. Used with an ensemble, spaced cardioids tend to emphasize the voicings that are most on-axis. They also show the effects of coloration, particularly from any studio ambience. Placement is critical to producing acceptable results with any spaced miking but is even more so with cardioids than with omnis. Spaced cardioids do provide a better chance for mono compatibility, however, because each mic is picking up less common information, reducing the chance of phase cancellations.
Spaced nondirectional boundary microphones used for off-miking, particularly in relatively dry studios, are another possibility. Their pickup is similar to that of omni mics, although around the boundary surface the polar pattern is hemispheric.
There are several variations of the three basic stereo microphone arrays. Figures 19-4 to 19-7 display four of the more commonly employed (see also 19-8).
19-4 Blumlein miking technique. This technique uses two coincident bidirectional mics positioned at a 90-degree angle. It is designed to reproduce accurate representation of the original stereo sound stage, a sense of the ambience surrounding the primary sound source, and the room’s reverberance.
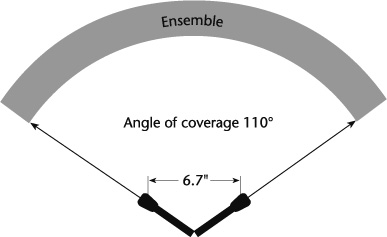
19-5 ORTF microphone array. The ORTF array (named for the Office de Radiodiffusion-Television Française, the French broadcasting system) mounts two cardioid microphones on a single stand spaced just under 7 inches apart at a 110-degree angle, 55 degrees to the left and the right of center. This technique is designed to produce a clean, clear, often bright sound with a sense of openness while still maintaining mono compatibility.
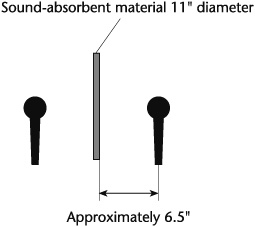
19-6 Jecklin disk. Also known as the optimal stereo signal (OSS), this technique separates two omnidirectional mics with a sound-absorbing disk or baffle. It is designed to produce a big, spacious sound with good low-frequency response. Localization is adequate but not precise.
From Ron Streicher and F. Alton Everest, The New Stereo Soundbook, 2nd ed. (Audio Engineering Associates, 1998). © 1998 Audio Engineering Associates, Pasadena, CA.
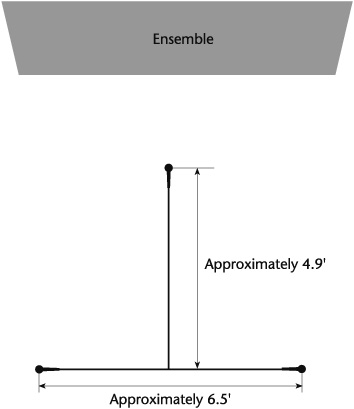
19-7 Decca Tree. This technique mounts three spaced omni mics at the ends of a T-shaped frame. It is designed to reproduce good stereo imaging with an open, spacious sound. It is favored in recording film scores because it produces a pleasing and stable stereo image that holds up throughout the application of Dolby and other surround-sound matrix systems.
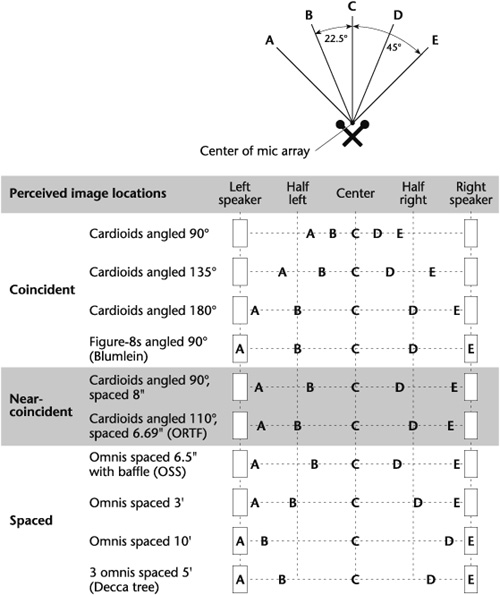
19-8 Stereo localization. The upper portion shows the locations of sound sources A through E. The bottom portion indicates the positions in which listeners perceive them to be. The Blumlein technique, the ORTF method, the Jecklin disk (OSS), and the Decca Tree are illustrated in Figures 19-4 to 19-7.
From Bruce and Jenny Bartlett, On Location Recording Techniques (Boston: Focal Press, 1999).
When a stereo microphone array—coincident, near-coincident, or spaced—is used for the primary pickup, the configuration affects the image location of the sound source. 19-8 illustrates examples of those effects.
Accent miking, also known as off-miking, is used to pick up instruments in an ensemble when they solo. It is, in effect, a relatively close-miking technique but is used when distant microphones are picking up the ensemble’s overall sound and a solo passage needs to stand out. A mic placed too close to the soloist will sound unnaturally present because there is little or no acoustic blend with the ensemble sound; a mic placed too far from the soloist will pick up so much of the ensemble’s sound that it competes with or overpowers the solo (see 19-9).
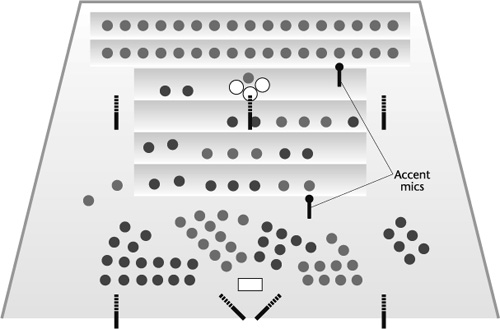
Ambience miking, used along with distant miking, attempts to reproduce the aural experience that audiences receive in a live venue by recording in an acoustically suitable studio or concert hall. Microphones are positioned far enough from the ensemble, where the later reflections are more prominent than the direct sound (see 19-10). In the mixdown, the ambient pickup is blended with the pickup from the closer mics, making the natural reverb part of the recording, and not adding it artificially in the mixdown, which may be necessary with distant miking and is definitely necessary with close miking.

19-10 Ambient miking. Spaced omnidirectional microphones situated toward the rear of the room. The success of this technique is dependent on a studio or hall with appropriate acoustics. In rooms of some size, to minimize echoes that could result from mixing the direct signal with the signal from the acoustically delayed ambient mics, the distance between the ensemble and the ambient mics should not exceed 35 feet. The distance between the spaced mics should be limited to 15 to 20 feet to minimize comb filtering.
Before getting into specific applications of miking various musical instruments, it will be helpful to keep in mind six principles:[1]
The closer a microphone is to a sound source, the drier, more detailed, more intimate, and, if proximity effect is a factor, bassier the sound. The farther a mic is from a sound source, the more diffused, open, less intimate, and ambient the sound.
Regardless of a directional microphone’s pickup pattern: the higher the frequency, the more directional the sound wave and therefore the mic pickup; the lower the frequency, the more omnidirectional the sound wave and the mic pickup.
Although close miking may employ a number of microphones, more is not always better. Each additional mic adds a little more noise to the system, even in digital recording, and means another input to keep track of and control, to say nothing of possible phasing problems.
With most moving-coil mics, the farther from the sound source they are placed, the more reduced the high-frequency response.
Generally, large-diaphragm microphones are more suitable in reproducing low-frequency instruments; small-diaphragm mics are more suitable in reproducing high-frequency instruments.
Do not confuse perspective with loudness. Loudness aside, in considering mic-to-source distance, it is hearing more or less of the ambience that helps create perspective.
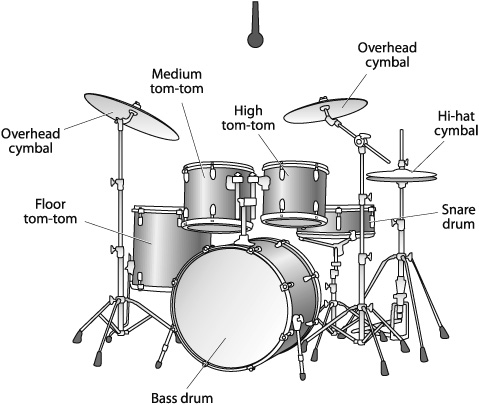
Perhaps no other instrument provides as many possibilities for microphone combinations, and therefore presents as much of a challenge, as the drums. Several different components make up a drum set—at least a bass drum, a floor (low-pitched) tom-tom, medium- and high-pitched tom-toms, a snare drum, a hi-hat cymbal, and two overhead cymbals.
Drums consist of at least one membrane (drumhead) stretched over a cylinder and, usually, a second membrane that resonates with the struck head. Drums produce loud sound levels and steep transients. They are not considered pitched instruments, although drumheads can be tuned to a musical pitch; and the pitch relationships of the floor, medium, and high tom-toms must be maintained. Also, various sonic effects can be achieved by tuning the top and bottom heads to different tensions relative to each other.
It is important that tension be uniform across the head to produce a single pitch. When several pitches are produced simultaneously, the sonic result is dissonance.
Drums radiate sound perpendicularly to the heads, particularly the top head. High-frequency transients are most pronounced on-axis, perpendicular to the point where the stick hits the drumhead. This is the sound responsible for most of the drum’s “kick.” Harmonics and overtones are produced from the tension rings, the shell, and the bottom head.
The bass drum is the lowest pitched. Its fundamental frequencies range from 30 to 147 Hz, with harmonics extending from 1 to, in some drums, as high as 5 kHz. Hence its energy is in the very low end, which provides the transient energy bursts that help establish the primary rhythm pattern. Its higher-end frequencies provide the sharpness of the attack.
It is commonly called the kick drum because it is struck with a beater controlled by the drummer’s foot. The drum stands on its side with the rear “top,” or beater, head facing the drummer. The front “bottom” head is usually removed or has a hole cut into it because of the low-frequency resonances and very steep transients that the drum can generate and for ease of mic placement. Most of the drum’s low frequencies are emitted omnidirectionally, though vibrations from the shell and the heads resonate throughout the instrument.
Tom-toms come in a variety of sizes and pitches and usually have two heads. They produce the steep transients and the radiating characteristics common to most drums. Lower-pitched toms generate more omnidirectional waves; higher-pitched toms generate more directional waves. They are tuned to have more sustain than the kick and snare drums. Although tom-toms are often used for fills to accent a piece, they are part of the rhythmic structure.
The snare can be characterized as a tom-tom tuned to a higher pitch, with little or no sustain, and steep transients. Its sound cuts through that of the other drums and usually establishes the tempo. Fundamental frequencies range from 100 to 200 Hz, with attack energy in the 4 to 6 kHz range and harmonics extending from 1 to 15 kHz. What produces the drum’s crisp signature sound and cutting power, and gives it its name, is the chainlike snares stretched across the bottom head of the instrument.
Cymbals are usually round, metal plates shaped like a flattened bell. They may be struck with a hard wooden drumstick, a soft mallet, or brushes. The type of striker used is largely responsible for the sound produced. Unlike drums, cymbals have a long decay. The harder the striker, the more high frequencies of the transients are produced. A cymbal tends to radiate sound perpendicularly to its surface, with a ringing resonance near its edge.
A cymbal’s pitch is determined by, among other things, size and thickness. Cymbals are also designed to produce different textures; the ring of the ride cymbal and the splash of the crash cymbal are two common examples. Generally, their fundamentals range from 300 to 587 Hz. Harmonics extend from 1 to 15 kHz.
The hi-hat cymbal is actually two cymbals with the open ends of the bells facing each other. A foot pedal, controlled by the drummer, raises and lowers the top cymbal to strike the bottom cymbal, or the top cymbal is struck with a drumstick, or both. Varying the pressure and the distance between the two cymbals generates different timbres. Striking the cymbal when it is opened changes the sound from tight to more sustained and shimmery. For these reasons the high-frequency transients perpendicular to the contact point and the shimmer from the edges are important. The hi-hat is integral to the drum sound not only for its different timbres but as a timekeeper.
As the name implies, the overhead cymbals are positioned above the drum kit, usually to the left center and the right center of the drummer. The most commonly used overhead cymbal is the ride cymbal. It produces a shimmery or sizzly sound, depending on how it is struck. Usually, its function it to provide a steady rhythmic pattern, known as a ride pattern, rather than accents. The crash cymbal may also be used, mainly for accents. It produces a sharp, splashy sound.
A good drum sound begins with the musicianship of the drummer and the quality and the tuning of the drum set. No miking technique will save the drum sound of an incompetent drummer or a low-quality kit.
Before drums are miked, they must be tuned. Tuning the drum set is important to the sound of individual drums and also to their overall sound because it brings out the fundamental resonances and enhances the overtones. Many studios have an in-house drum set always tuned and ready to go, not only to ensure the desired drum sound but also to avoid having this necessary and time-consuming procedure cut into recording time.
Although the drummer usually does the tuning, it helps to know what is involved and what to look and listen for. Before tuning begins, check for heads that should be changed. Look for holes or cuts (other than the hole that may have been cut into the front head of the bass drum); dents or indentations; a coated head that has lost a significant amount of its top layer; an overstretched head; or a head with too wide a difference in sound between its middle and sides.
There are many ways to tune a drum set: in fifths and octaves; in thirds; by tapping on the sides of the drum, finding its fundamental pitch, and then tuning the head to it; and by pitching the bass drum low enough to leave room in the upper bass and the midrange for the tom-toms and the snare. If the bass drum is pitched too high, it pushes too close to the toms, which in turn get pushed too close to the snare, making the drum sound smaller. A common interval between tom-toms is fourths. Some drummers use a fifth between the lowest tom and the bass drum. Moreover, by not separating the individual drum sounds, little room is left for such instruments as the bass and the guitar.
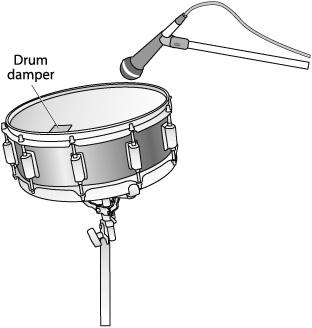
One problem with even the best drum sets is resonance, such as ringing and buzzing. Damping the drums helps reduce these sounds—and undesirable overtones as well. Placing a pillow, blanket, foam rubber cushion, or the like inside the bass drum helps dampen offending sounds (see 19-17). To dampen a tom-tom and a snare drum, specially made gel-type stick-ons are available that are removable and do not leave residue (see 19-21). Remember to place any damper out of the way of the drumstick. Before dealing with the snare drum, first check for problems with the snares off. Make sure the damping does not muffle the drum sound.
To reduce cymbal ringing, apply masking tape from the underside of the bell to the rim in narrow radial strips or use specially made cymbal silencers. If the cymbals sound dead, they may need cleaning. Copper or metal cleaner usually does the job.
Where the drum set is placed in a studio also affects its sound. Isolated in a drum booth (to reduce leakage into other instruments’ microphones), the overall sound takes on the acoustic properties of the booth: if the booth is live, the drums will sound live; if the booth is absorptive, the drums will sound tight or dull. On a hard floor, the drums sound live and bright; on a carpet they sound tighter and drier. In a corner they sound boomier because the dominant lower frequencies are more concentrated. Often drums are put on a riser that can resonate to reduce low-end leakage.
Although the drum kit consists of several different-sounding instruments, it must be miked so that they sound good individually yet blend as a unit. That said, drums are miked in many ways. The approach to take depends on the desired sound control and the type of music being recorded.
Explaining how to deal with sound control is relatively easy: the more components to regulate, the more mics you use (although this can have its drawbacks—possible phasing, for one). Achieving a particular drum sound for a certain type of music involves many variables and is more difficult to explain.
Generally, in rock-and-roll and contemporary pop music, producers like a tight drum sound for added punch and attack. Because this usually requires complete control of the drum sound, they tend to use several microphones for the drums. In jazz many styles are loose and open, so producers are more likely to use fewer drum mics to achieve an airier sound. Figures 19-11 to 19-15 illustrate a few basic approaches to miking a drum kit.
19-11 One cardioid capacitor microphone overhead. The mic hears essentially what the drummer hears. The cardioid pattern is usually wide enough to pick up the blend of drum sounds. If it is not, the wide-angle sub-cardioid should do. The capacitor mic is best suited to reproduce the spectrum of frequencies the drums emit. The problems using one overhead mic are: (1) it may not pick up an adequate bass drum sound; (2) to get a decent blend, it may have to be positioned far enough overhead so that the closer drums and the cymbals will not be too loud; (3) if the mic is positioned too close to the overhead cymbals, their sound and possibly the snare drum’s sound will be disproportionately louder than the rest of the kit; (4) the balance and the blend of the drum kit is entirely dependent on the recording, so there is little that can be done in the mixdown; and (5) the drums can be recorded only in mono.
Using two spaced overhead mics provides a stereo pickup and a better blend, but the recording still lacks an adequate bass drum and other low-end drum sounds.
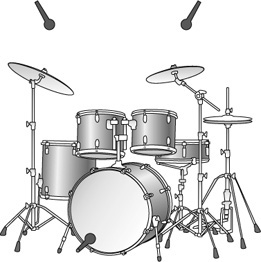
19-12 Three microphones. This setup uses two cardioid capacitor microphones overhead and one directional or nondirectional moving-coil mic in the bass drum. Using two over head mics helps with the blend and the balance and provides a stereo image. The coincident, near-coincident, and spaced arrangements will yield different acoustic results (see “Distant Miking” earlier in this chapter). The mic in the bass drum allows separate control of its sound. The directional mic concentrates its impact; the nondirectional mic opens the sound somewhat without picking up much if any of the other drum sounds due to the inverse square law—sound levels increase (or decrease) in inverse proportion to the square of the distance, in this case, from the mic to the drum head. This arrangement produces an open, airy drum sound. Using high-quality microphones is essential.

19-13 Four microphones. Three mics are placed as suggested in Figure 19-12. The fourth is usually placed on the snare drum but sometimes between the snare and hi-hat to obtain a better hi-hat pickup. It can be a moving-coil or capacitor mic, depending on the desired sound, and it is almost always a directional mic (see “Snare Drum” and “Hi-Hat Cymbal” later in this section). The overhead mics, however, may pick up enough of the snare sound so that the sound from the fourth mic may be used only for fill in the mix.
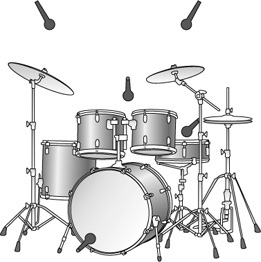
19-14 Five microphones. Four mics are placed as suggested in Figure 19-13. The fifth is positioned between the medium and high tom-toms for added control of these drums.
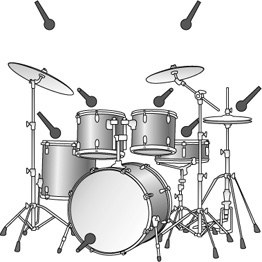
19-15 Miking each drum. For the drum kit in this illustration, eight microphones are required. The advantages of this technique are that it provides the recordist with optimal control of each drum and cymbal sound in the recording and in the mixdown. The disadvantages are that there may be phasing, leakage, or too dense a sound, or some combination of these factors.
The bass drum is the foundation of the drum set because, as noted earlier, it provides the primary rhythm pattern with transient punctuations. In much of popular music, it also works with the bass guitar to provide the bottom sound that supports the other musical elements. Because the bass drum also produces high levels of sound pressure and steep transients, large-diaphragm moving-coil microphones usually work best, although there are a few large-diaphragm capacitor mics that also work well, particularly by adding some midrange coloration. As noted in Chapter 4, there are dual-diaphragm mics designed especially for the bass drum. One model uses a moving-coil element for the low frequencies and a capacitor element to better reproduce the higher frequencies (see 4-7a and 4-7b).
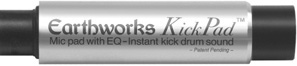
A device called the KickPad can be used with a directional microphone to provide, as the manufacturer states, an “instant, repeatable kick drum sound.” It is a passive device, requiring no phantom power, and it plugs directly into the mic line (see 19-16).
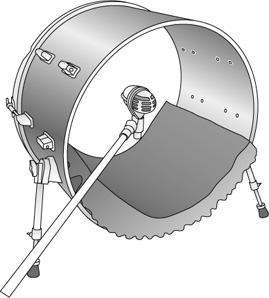
The common technique for mic placement is to use the hole often cut in the front drumhead or to remove the head entirely and place the mic inside. This gives the sound of the bass drum more punch. Pointing the mic perpendicular to the beater head produces a fuller sound (see 19-17). If the mic is too close to the head, it will pick up more click and attack than fullness and maybe the action of the beater head as well. Pointing it to the side of the drum picks up more of the drum’s overtones, creating a rounder sound with more definition but less attack (see 19-18). Placing the mic outside the open head deepens the drum sound but decreases clarity and attack and could pick up leakage from other instruments.

19-17 A directional microphone pointed at the drumhead produces a fuller sound. Foam rubber padding is placed in the drum to reduce vibrations.
Getting the desired sound from the bass drum is essential not only to the surrounding drum set but also to the overall recording and mix. It provides the music’s downbeat.
Drum mics are usually directional to increase sound separation and reduce leakage from the rest of the drum set, though an omnidirectional mic can be effective in a bass drum. Placing the mic in close proximity to a loud sound source usually prevents leakage from the other drums (remember the inverse square law). To separate the bass drum even more, use a low-pass filter, shelving, or a parametric equalizer to cut off or reduce frequencies above its upper range. Be careful, though—the perceived punch of the bass drum goes into the midrange frequencies. In fact, boosting in the 2,500 to 5,000 Hz range adds a brighter attack to the bass drum sound. The dull, thuddy, cardboard sound the bass drum tends to produce can be alleviated by attenuating between 300 Hz and 600 Hz.
A word about equalizing during recording: First, equalization (EQ) should not be used as a substitute for good microphone technique or to correct poor mic technique. Second, if you must equalize, make sure you know exactly what you are doing. Even if mistakes in equalizing during recording can be undone in the mixdown, it may not be possible to undo the additional noise and the possible distortion created in passing a signal through an electronic device.
Tom-toms come in a variety of sizes and pitches. Typical drum sets have three toms: the low-pitched, fuller-sounding floor tom; the middle-pitched medium tom; and the higher-pitched, sharper-sounding high tom.
Although toms produce loud transients (all drums do), they are not as strong as those the bass drum produces; you can therefore mike them with moving-coil, capacitor, or the more rugged ribbon mics. Placement, as always, depends on the sound you want. Generally, the mic is placed from 1 to 10 inches above the tom and is aimed at the center, or slightly off-center, of the skin. It is usually mounted just over the edge of the rim to avoid interfering with the drummer’s sticks (see 19-19 and 19-20).

The mic-to-source distance depends on the low-frequency content desired from the drum sound itself. If it has little low-frequency content, try placing a directional mic with proximity effect close to the drum skin to boost the lower frequencies. Placing a mic inside a single-headed tom gives the best isolation, but it could also produce a closed, dull sound and may require an EQ boost in the range of 5,000 Hz to bring the attack back to life. With two-headed toms, placing a second mic underneath the drum can add dimension and depth to the instrument’s overall sound. If the top and bottom mics are recorded on the same channel, switch the polarity of the bottom mic; otherwise they will be out of phase—the top mic is picking up the drum sound as the head moves in, and the bottom mic is picking up the drum sound as the head moves out. For the sake of flexibility, many producers prefer to record the top and bottom mics on separate channels. Whatever technique you use, remember that the sonic relationships of the toms must be maintained; using the same make and model of microphone on each tom helps.
Of all the components in a drum set, the snare usually presents the biggest problem in miking. Most producers prefer a crisp snare drum sound. Miking the snare too closely tends to produce a lifeless sound, whereas miking it too far away tends to pick up annoying overtones, ringing, and leakage from the other drums.
Another problem is that the snare drum sometimes sounds dull and thuddy. In this instance the problem is most likely the drum itself. Try rolling off from 50 Hz or pulling out some of the frequencies between 300 and 700 Hz, or both. Two ways to add crispness to the sound are to use a mic with a high-frequency boost or to equalize it at the console. Boosting in the 4,000 to 6,000 Hz range adds crispness and attack. Some boost between 7,000 Hz and 10,000 Hz can add airiness to the highs. If these EQ adjustments still do not enhance the sound, the better alternatives are to retune the drum set and, if that doesn’t work, to replace the drumhead(s).
Another potential problem with the snare sound is that the levels may be difficult to control because the drum is forcefully played. Some compression can help. Ratios of 2:1 or 3:1 with a high threshold should bring the levels under control without crushing the snare sound.
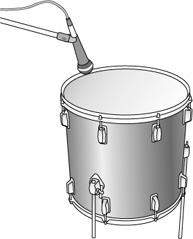
Moving-coil or capacitor mics work well on the snare drum; the moving-coil mic tends to give it a harder edge, and the capacitor mic tends to make it sound richer or crisper. To find the optimal mic position, begin at a point 6 to 10 inches from the drumhead and aim the mic so that its pickup pattern is split between the center and top edge of the drum (see 19-21). This picks up the sounds of the snares and the stick hitting the head. To get the snares’ buzz and the slight delay of their snap, use two mics: one over the drum and one under it. Remember to take the same precautions as when double-miking a two-headed tom (see 19-22).

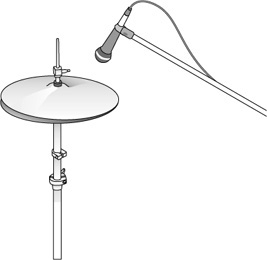
The hi-hat cymbal produces two sounds: a clap and a shimmer. Depending on how important these accents are to the music, the hi-hat can either share the snare drum’s mic or have a mic of its own. If it shares, place the mic between the hi-hat and the snare and adjust the sound balance through mic placement (see 19-23).

If the hi-hat has a separate mic, the two most common positions for it are 4 to 6 inches above the center stem, with the mic pointing straight down (see 19-24), and off the edge (see 19-25). Sound is brightest over the edge of the cymbal.
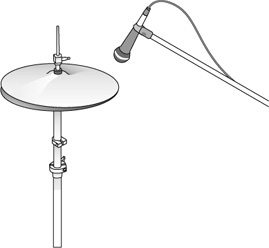
Miking too closely off the center produces ringing, and miking off the edge may pick up the rush of air produced each time the two cymbals clap together (see 19-26). Equalize by rolling off the bass to reduce low-frequency leakage—but only if the hi-hat is miked separately. If the mic is shared with the snare drum, rolling off the bass adversely affects the low-end sound of the snare.
In miking either the ride or the crash cymbal, the definition of the characteristic sounds must be preserved. To this end capacitors usually work best; for stereo pickup the coincident (see 19-1), near-coincident (see 19-2), or spaced pair (see 19-3) can be used. When using the spaced pair, remember to observe the three-to-one rule to avoid phasing problems.
Because the overhead microphones usually blend the sounds of the entire drum set, they must be at least a few feet above the cymbals. If they are too close to the cymbals, the drum blend will be poor and the mics will pick up annoying overtones that sound like ringing or gonging, depending on the narrowness of the mic’s pickup pattern. If blending the drum sound is being left until the mixdown and it is important to isolate the cymbals, roll off the low frequencies reaching the cymbal microphones from the other drums.
Sometimes, regardless of the miking technique, the sound of the overhead cymbals is disproportionately loud and washes over the drum track. There are two ways to reduce the problem: have the drummer hit the cymbals with less force and, if the cymbals are thick, use thinner cymbals, which are not so loud.
Drums produce loud sound levels. If leakage from one drum’s microphone to other drums’ mics or from the drums to the mics of other instruments being recorded is unwelcome, there are techniques to employ that can considerably reduce the problem.
Close-mic each drum. The greater the mic-to-source distance, the greater the chance of leakage as well as ambience and background noise.
Use highly directional mics, super- and hypercardioid pickups, instead of cardioids, for example.
Record the drums separately and then overdub the other voicings. (Overdubbing is a technique used in much of popular music recording. One or a few instruments are recorded first, usually the rhythm instruments, and the other voicings are added separately or in groups to the previously recorded tracks.)
If the electric instruments are being recorded, they can be recorded with the drums by “going direct”; plugging them directly into the mixer instead of miking their amplifiers.
Use a noise gate on each drum track. The potential problems here, however, are that it requires time to set up; it adds electronic processing in the signal path; and the gating must be precise or some of the drum sound can be lost, or the gating action can be heard, or both.
Enclose the drum area with portable gobos to help isolate the sound or, if one is available, use the isolation booth that some facilities have for drums.
If it does not adversely affect the drum sound or the overall music blend, have the drummer play more softly.
Before reducing the leakage, consider whether it, in fact, adds something to the drum and/or ensemble sound, such as openness, liveness, or cohesion.
Acoustic string instruments derive their sound from stretched strings, held taught in a frame, that are set into vibratory motion by being bowed, plucked, or struck. As strings do not produce much loudness, the frame, which also vibrates with the strings, serves to amplify and radiate sound. Three variables help determine the pitch of a vibrating string: length, tension, and mass (or thickness).
Plucked string instruments include the guitar, the banjo, and the mandolin. Because the six-string guitar is clearly the most popular of the plucked string instruments, it is considered here.
The guitar’s six strings are stretched across a hollow body with a flat top and a sound hole that resonates the fundamental frequencies and the harmonics of the vibrating strings. Fundamental frequencies range from 82 to 988 Hz, with harmonics extending from 1 to 13 kHz.
The guitar has a fingerboard with raised metal frets that divide the effective length of the strings into exact intervals as the strings are pressed down onto the frets. Where the guitar string is plucked affects sound quality because of the relationship of the distance from the point of contact to the ends of the strings. For example, a string plucked close to the bridge contains more high-frequency energy due to the relatively short distance between the point of contact and the bridge. A string plucked farther from the bridge produces a warmer sound due to the presence of longer wavelengths and therefore lower frequencies.
Overall most high frequencies are near the bridge. The joint between the neck and the body produces more lower frequencies. Most lower frequencies are resonated by the back of the guitar and are generated from the sound hole.
What the strings are made of and what is used to pluck them also affect a guitar’s sound quality. For example, metal strings tend to sound brighter than nylon, and a string plucked with a pick will be brighter than one plucked with a finger.
Most of a guitar’s sound radiates from the front of the instrument, so centering a microphone off the middle of the sound hole should, theoretically, provide a balanced sound. But the mic has to be at least a foot or more from the instrument to pick up the blend of radiated sound. If a mic is too close to the hole, sound is bassy or boomy. Also, because the sound hole resonates at a low frequency, the mic could pick up those vibrations. If it is moved closer to the bridge, detail is lost. If it is moved closer to the neck, presence is reduced; if it is moved too far away, intimacy is affected and, if other instruments are playing, there could be leakage.
If it is necessary to mic close to the sound hole, roll off some of the bass for a more natural sound, but be careful not to adversely affect the sound of the instrument. If a guitar lacks bottom, mike closer to the sound hole but slightly off-axis to avoid picking up low-end vibrations. If it lacks highs, aim a mic at the neck; to increase midrange, mike closer and (facing the guitar) to the left of the bridge (see 19-27).
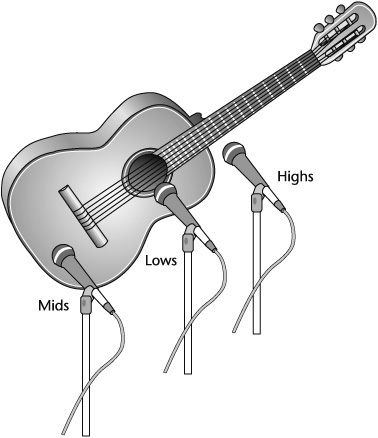
One way to achieve a natural, balanced sound is to position the mic 2 to 3 feet from the sound hole. To set a more high- or low-frequency accent, angle the mic either down toward the high strings or up toward the low strings. To brighten the natural sound, place the mic above the bridge and even with the front of the guitar because most high-frequency energy is radiated from a narrow lobe at right angles to the top plate (see 19-28). Miking off the twelfth fret, across the strings, produces a sound rich in harmonics.
19-28 Miking an acoustic guitar. A microphone placed about 6 inches above the bridge and even with the front of the guitar brightens the instrument’s natural sound.
Another way to achieve natural sound is to place a mic 8 to 12 inches above the guitar, 1 to 2 feet away, aimed between the sound hole and the bridge. A good-quality capacitor mic reduces excess bottom and warms the sound.
A microphone about 4 to 8 inches from the front of the bridge creates a warm, mellow sound, but the sound lacks detail; this lack is beneficial if pickup and string noises are a problem.
Clipping a mini-mic outside the sound hole facing in toward the center yields a natural, balanced, slightly bright sound. Clipping a mini-mic inside the sound hole gives good isolation and added resonance but also reproduces a more closed, bassier sound and less string noise.
Sometimes two microphones are used on an acoustic guitar to add body or dimension to the sound. Common placements include close-to-far, sound hole/neck, and stereo. In the close-to-far technique, the close mic picks up the essential guitar sound, and the far mic is used to pick up ambience (see 19-29). Placing one mic off the sound hole and another off the neck captures a more detailed low- and high-frequency sound blend (see 19-30). Stereo miking adds size to the guitar sound; be careful, however, not to space the mics too far apart or it will create a hole in the middle of the sound (see 19-31). Stereo imaging can also be achieved using middle-side miking, either with an M-S mic or two mics, one cardioid and one bidirectional (see 19-32).
19-32 Middle-side miking using two multidirectional mics—one set for cardioid pickup and the other set for bidirectional pickup.
The stereo miking technique requires matching microphones. For the close-to-far and sound hole/neck approaches, either matching mics can be used for a uniform sound or two different mics can be employed to capture different tonal nuances.
For a classical guitar, which requires favorable room acoustics for interaction with the instrument’s sound, the mic should be placed at least 3 feet from the sound hole. Make sure mic-to-source distance is not too great, or the subtleties of the instrument will be diminished by too much reverberation. Another approach is to use a primary mic or stereo pair closer in for the main guitar sound and a secondary mic, or stereo pair, higher and farther off-instrument for the ambience.
Plucking creates quick attacks. Using a dynamic microphone, which has slower transient response than a capacitor mic, can slow the attacks and diminish detail, particularly in the guitar’s bass frequencies. But if a capacitor mic brings out too much crispness, a good moving-coil mic can reduce it.
A natural part of the sound of most plucked string instruments is the screechy, rubbing noises called fret sounds caused by the musician’s fingering. Fret noises usually bring to the fore the issue of whether they should be part of the recording. Personal taste is the determining factor. If you do not care for fret sounds, mike farther from the instrument or use a super-or hypercardioid mic placed at a slight angle to the neck of the instrument. This puts the mic’s dead side facing the frets. Make sure the mic’s angle is not too severe, or the sound from the instrument will be off-mic. There are also strings specially designed to reduce fret sounds and sprays to reduce friction.
The well-known bowed string instruments are the violin, the viola, the cello, and the bass.
Bowed string instruments are similar to plucked string instruments in that their strings are stretched across a fingerboard and a hollow body, which resonates the vibrating strings. But bowed instruments have only four strings and no metal frets on the fingerboard; intervals are determined by the placement of the musician’s fingers on the fingerboard. Another difference is that the strings are vibrated by a bow drawn across them, thereby generating a smoother attack than that of a plucked string. The bridge in a bowed instrument is connected to a top plate through a sound post to the back plate. It is important to overall sound, as are the F-holes in the top plate that allow the air inside the body to resonate. The dynamic range of bowed string instruments is not as wide as that of most other orchestral instruments, nor is their projection as strong (see 19-33).
The four violin strings are tuned to perfect fifths and have a fundamental frequency range of 196 to 3,136 Hz, with harmonics that extend from 4 to 13 kHz. The violin radiates lower frequencies in a roughly spherical pattern. As frequencies get higher, the violin radiates them about evenly in the front and the back, as both the top plate and the back plate are designed to resonate with the strings. The highest frequencies are radiated upward from the top plate.
The viola is essentially a larger, lower-pitched version of the violin. The strings are tuned a fifth lower than the violin’s; their fundamental frequency range is 131 to 1,175 Hz, with harmonics that extend from 2 to 8.5 kHz. The radiating pattern is similar to that of the violin but is less directional due to its lower frequency range.
The cello’s strings are tuned a full octave below the viola’s, with a fundamental frequency range of 65 to 698 Hz and harmonics that extend from 1 to 6.5 kHz. The cello’s radiating pattern is more omnidirectional than directional, but it is affected by the playing position. The cello rests on a rubber- or plastic-tipped spike that is set on the floor. Hence vibrations are transmitted to the floor, which reflects and absorbs the sound waves to some degree, depending on the sound absorption coefficient of the flooring material.
The bass strings are tuned in fourths rather than fifths and have a fundamental range from 41 to 294 Hz, with harmonics extending from 1 to 5 kHz. The bass radiates sound omnidirectionally; and because it is positioned like the cello, the sound is affected by the flooring material.
Because the dynamic range of bowed string instruments is not wide, sound must be reinforced by using several instruments, multiple miking, or both, depending on the size of the sound required. Overdubbing is another method used to reinforce string sound. The need for reinforcement is aggravated by the dearth of competent string players in many communities, to say nothing of the cost of hiring them.
Individually, miking a violin or viola a few feet above the instrument, aiming the mic at the front face, produces an open, natural sound, assuming fairly live acoustics, which are essential to recording a good string sound (see 19-34a). Miking a few inches from the side or above the strings of a violin produces a country fiddle sound; the closer a microphone is to the strings, the coarser or scratchier the sound. But take care not to interfere with the musician’s bowing when close-miking over bowed instruments (see 19-34b).
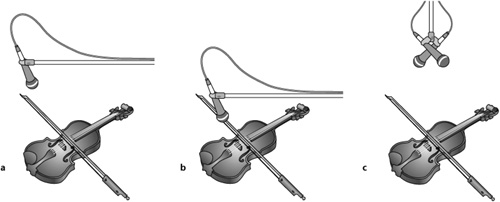
19-34 Miking a violin or viola. (a) Placing the microphone several feet above the instrument, aimed at the front face, tends to produce an open, natural sound. (b) To produce a country fiddle sound, place the mic closer to the bridge but not close enough to interfere with the bowing. (c) With stereo miking, a coincident or near-coincident pair produces a fuller, more open sound compared with using a single microphone. The angle between the mics and their distance from the instrument should be such that the highs, mids, and lows blend and the stereo imaging is not so wide that it creates a larger-than-life sound (and mental picture)—unless that is the intention.
Although sound radiation is uniform up to 500 Hz, depending on the microphone a single mic may not hear sufficient low end and therefore not reproduce a robust sound. Miking “over and under” ensures that the highs, which are concentrated above 500 Hz and radiate perpendicularly to the sounding board, are picked up from above the instrument and the lows are picked up from both above and below. This technique also tends to make one instrument sound like a few and a few sound like several (see 19-35). Assuming that the acoustics are drier than what is usually required to record a good string sound, overdubbing will accomplish this, usually with greater effectiveness.
19-35 Enlarging the sound of a violin or viola. (a) Place one microphone several feet above the instrument(s) and one below the instrument(s). This tends to make one instrument sound like a few and a few sound like several. (b) Another approach to layering parts from a single player is to set up mics at different angles and distances from the instrument.
Generally, for either the cello or the acoustic bass, miking off the bridge 2 to 3 feet produces a brighter sound and miking off the F-hole produces a fuller sound. The right contact mic placed behind the bridge produces a tight, robust sound (see 19-36). The wrong contact mic can yield a closed, dull sound.
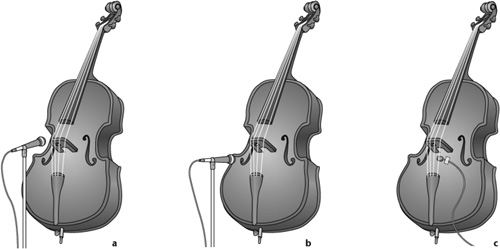
19-36 Three ways to mike a cello or bass. (a) Off the bridge produces a brighter sound. (b) Off the F-hole produces a fuller sound. (c) A contact mic behind the strings, near or at the bridge, taped to the body of the instrument produces a more resonant sound, which could also be dull and devoid of harmonics.
With a plucked bass, used in jazz, some producers like to clip a mic to the bridge or F-hole for a more robust sound. A danger with this technique is getting a thin, midrange-heavy sound instead. Close-miking a plucked bass picks up the attack. If close miking also produces too boomy a sound, compress the bass slightly or roll off some of the low end, but beware of altering the characteristic low-frequency sound of the instrument.
Capacitor and ribbon mics work particularly well with bowed string instruments. Capacitor mics enrich the string sound and enhance detail. Ribbon mics produce a resonant, warm quality, although there may be some loss of high-end detail. For plucked strings, capacitors are preferred because of their excellent transient response.
Mini clip-on and contact mics are other alternatives for miking bowed string instruments.
Assuming the musician does not mind having a mic attached to the instrument (and many do), a clip-on or contact mic attached between the bridge and the tailpiece tends to produce a bright, resonant sound. Be careful, however, that the sound is not too harsh or closed.
The best-known example of a struck string instrument is the piano.
The piano’s strings are stretched across a bridge attached to a sounding board that resonates in sympathy with the vibrating strings after they are struck. Hammers controlled by the keys on the keyboard strike the strings. The strings continue to vibrate until the key is released and a damper stops the vibration of the string. The piano’s fundamental frequency and dynamic ranges are quite wide (see 19-33).
Radiation is generally perpendicular to the sounding board, primarily upward in a grand piano. The lower-frequency strings are more omnidirectional; the higher-frequency strings are located closer to an axis perpendicular to the sounding board. The lid is also a factor in a piano’s sound radiation, but directionality depends on the angle at which the lid is open.
Because of the percussive nature of the key striking the string, timbre is affected by how hard the string is struck. Higher harmonics are more present in strings that are struck hard. Strings struck more gently produce a warmer sound.
The piano offers almost unlimited possibilities for sound shaping. More than with many other instruments, the character of the piano sound is dependent on the quality of the piano itself. Smaller grand pianos may have dull, wooden low-end response. Old or abused pianos may ring, thump, or sound dull. Steinways, generally, are built to produce a lyrical sound. Yamahas produce a crisp sound with more attack. The Bösendorfer aims for additional sonority by adding semitones in the bass range. Mic technique and signal processing cannot change a piano’s voicing from dull to bright, from thin to rich, or from sharp to smooth, but they can alter a piano’s existing sound. That said, unless the piano is nicely voiced and well tuned, the most savvy recordist with the best equipment has little chance of producing acceptable sound.
Another factor in piano miking is the music. Classical music and jazz generally require a more open sound, so mic placement and pickup should capture the full sonic radiation of the instrument. Popular music, such as rock and country, usually requires a tighter sound, so mic placement and pickup are generally closer.
Regardless of the music, aim the open lid toward the middle of the room, not toward the wall. If you aim the open lid toward the wall, in addition to picking up the piano sound, the mic(s) will also pick up the reflections bouncing back from the wall.
Check the pedals for squeaks, and oil them if necessary. If oil is not handy, place a pillow under the pedals, with the player’s approval of course.
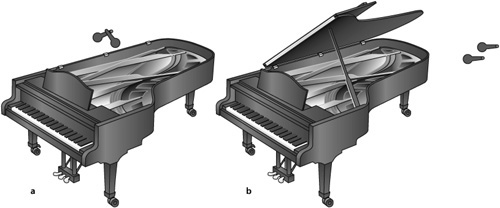
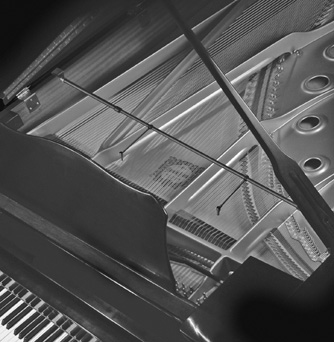
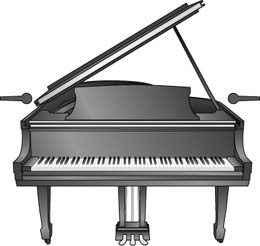
There are many miking techniques for the grand piano. Figures 19-37 to 19-41 display a few of the more common approaches.[2] 19-42 illustrates basic microphone positioning for the upright piano.
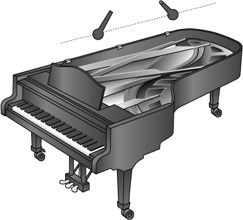
19-37 Middle-side-miking a grand piano. An M-S microphone about 12 to 18 inches above the middle strings, 8 inches horizontally from the hammers, produces a natural, balanced sound and a relatively spacious low-end to high-end stereo image (assuming appropriate acoustics). Best results are achieved with the piano lid off. Otherwise the lid should be at full stick. At full stick there will be a more concentrated sound with less ambience pickup.
19-38 Near-coincident microphone array. (a) This illustration employs an X-Y pair of directional mics about 12 to 18 inches above the middle strings using the ORTF technique (see 19-5). It spaces the array just under 7 inches apart at a 110-degree angle, 55 degrees to the left and the right of center. Stereo imaging is wide and, in good acoustics, spacious, with the mids spread somewhat wider across the aural frame than the low and high ends. Best results are achieved with the lid off. (b) When the piano lid remains attached, it should be at full stick. (At short stick the sound can be too closed and muddy.) Because the pickup usually will be more concentrated and less spacious, use a near-coincident or spaced pair of distant mics to pick up more of the blended radiations and ambience to add openness, regardless of whether close miking is used over the sound board.
19-39 PianoMic system. This approach uses two omnidirectional microphones mounted to a telescoping bar that spans over the strings and is supported at the ends by the piano case. The telescoping bar allows the mics to be positioned in a variety of recommended ways: one-third of the way in from each side of the piano, 3 inches in front of the hammers, and 3 inches above the strings; closer together for a fuller midrange sound; farther apart for wider low-to-mid-to-high-frequency stereo image; and closer to the hammers for a more percussive sound. The telescoping bar can also be turned to position the mics at various distances farther from the hammers and strings for more open-sounding pickups. The system can be used with the piano lid up or down. With the lid up, the sound is airier; with the lid down, it is more condensed. In addition to producing an open, rich, spacious sound, omni mics are not subject to proximity effect in close-miking situations.
PianoMic is a trademark of Earthworks.
19-40 Side-positioned microphones. Two omnidirectional mics are placed at each side of the piano, pointed directly at each other. Begin at about 4 feet and experiment with the height that yields the preferred sound. One mic is over the high C note and the other is over the low A note. The recorded sound is close to what the pianist hears.
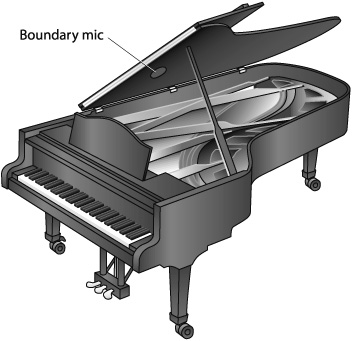
19-41 Using boundary microphones. A number of techniques are possible using boundary microphones. Two of the more commonly used are (1) mounting one boundary mic on the piano lid to pick up a blended monaural sound (shown here), or (2) mounting two directional boundary mics on the piano lid, one toward the low strings and the other toward the high strings for a balanced, open stereo pickup.
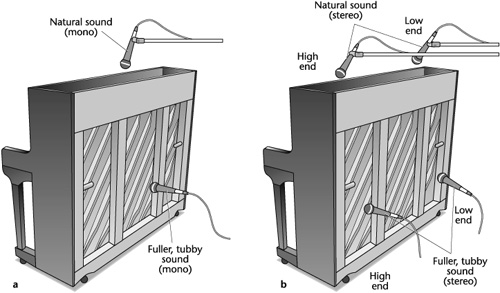
19-42 Miking an upright piano. (a) For mono, position a microphone over an open top for a natural sound or behind the sounding board for a fuller, tubby sound. (b) For stereo, position two mics, one for low-end pickup and the other for high-end pickup, over an open top or behind the sounding board, or use a stereo boundary mic. Mics can also be placed inside the piano to pick up the hammer sounds. When spacing the mics, remember the three-to-one rule.
When miking the grand piano, keep in mind its dynamic range; it can be so wide that you have to be some distance from the piano to get its full sound—close distances yield only partial sound. In studio recording there is the additional problem of leakage in the piano mics from other instruments, perhaps necessitating closer mic-to-source distances. Because there is more piano sound across the bridge/rail axis than horizontally along the keyboard, miking along the piano instead of across it reproduces a more spacious, full-bodied sound (see 19-43); a clear low-end/high-end stereo image is sacrificed, however, because the sound is more blended.
19-43 Miking across the bridge/rail axis. This produces a spacious, full-bodied sound but at the expense of low-end/high-end stereo imaging.
Any microphone mounted on a floor stand should be equipped with a shock mount. A large instrument with significant low-end response such as the piano can vibrate the floor, and those vibrations can carry to the floor stand.
Just as the vibrating string is the acoustical foundation of string instruments, a vibrating column of air is the foundation of woodwind (and brass) instruments. All wind instruments have in common a tube or cone through which air is blown, generating a standing wave of vibrating air within. In woodwinds the vibrations are produced in the clarinet and the saxophone using one reed, in the oboe and the bassoon using a double reed, and in the flute and the piccolo by blowing across the air hole.
The sounds of woodwinds are determined by the length of the tube, by whether the tube is open at one end (clarinet) or at both ends (flute), and by the opening and closing of the holes in the tube. A tube open at one end has odd-number harmonics: third, fifth, seventh, and so on. A tube open at both ends, and flared or conical tubes (oboe and bassoon), has the normal harmonics: second, third, fourth, fifth, et cetera. The vibrating reed and the sound holes generate their own overtones. In general, higher frequencies radiate from the bell, and lower frequencies radiate from the holes.
The flute is a tube that is held horizontally. The musician blows air across a sound hole and controls pitch and timbre by varying the blowing force. Opening and closing the holes in the side of the instrument also determine pitch. Sound radiates from the sound hole, the side holes, and the end of the flute. Fundamental frequencies range from 261 to 2,349 Hz, and harmonics extend from 3 to 8 kHz. Its dynamic range is limited.
The clarinet is a single-reed tube played almost vertically, with the bell pointed toward the floor. Its fundamental frequency range is 165 to 1,568 Hz, with harmonics extending from 2 to 10 kHz. Sound is generated from the mouthpiece and the reed, the side holes, and the bell. Reflections from the floor also may affect the clarinet’s sound.
The fundamental frequencies of the oboe and the bassoon are 261 to 1,568 Hz and 62 to 587 Hz, with harmonics extending from 2 to 12 kHz and 1 to 7 kHz, respectively. Despite their relatively narrow frequency response and limited dynamic range, both instruments are comparatively rich in harmonics and overtones. The oboe’s sound emanates from the mouthpiece and the reed, sound holes, and bell. Like the clarinet, it is played aimed at the floor and may also be affected by sound that is absorbed by and/or reflected from the floor. The bassoon curves upward at its bottom, pointing toward the ceiling. If the ceiling is high enough, the bassoon’s overall sound is usually not affected.
The family of saxophones includes the soprano, alto, tenor, and baritone. Saxophones have a conical shape with a bell that curves upward (except for the soprano sax, which may be straight). The saxophone’s sound radiates mostly from the bell, but the sound holes also generate significant detail. Fundamental frequency ranges are roughly as follows: soprano—200 to 1,100 Hz; alto—138 to 820 Hz; tenor—100 to 600 Hz; and baritone—80 to 400 Hz. Depending on the instrument, harmonics can extend into the 8,000 Hz range.
Woodwinds such as the flute, clarinet, and oboe are among the weaker-sounding instruments and have a limited dynamic range. Alto, tenor, and baritone saxophones are stronger sounding. But the higher-pitched woodwinds—flute, clarinet, and soprano saxophone—can cut through the sound of more powerful instruments if miking and blending are not properly managed (or if the sound designer intends it).
Because most woodwinds are not powerful instruments, the tendency is to close-mike them, but, due to their sound radiation, this results in an uneven pickup. They should be miked far enough away so that the pickup sounds blended and natural. Also, keep in mind that with woodwinds most of the sound radiates from the holes, not from the bell.
The flute and the piccolo (a smaller, higher-pitched version of the flute) radiate sound in shifting patterns sideways and from the instruments’ end holes. Therefore, miking too close tends to miss certain frequencies and emphasize others. Moreover, dry, less reverberant sound can distort some tonalities. Attaching a mini-mic, usually omnidirectional, produces a tight sound with reduced breath noise and ambience.
Selecting a microphone that can reproduce the high frequencies of these very high-pitched instruments is, of course, critical. Otherwise the sound can be brittle, hard, or distorted, and the instruments’ higher harmonics may not even reproduce. Capacitors are almost always the mics of choice.
For the flute, mic-to-source distance depends on the music. For classical it should be about 3 to 8 feet; for pop, about 6 to 24 inches. For a natural sound, microphone positioning should start slightly above the player, a few inches from the area between the mouthpiece and the first set of finger holes. To add the breathy quality of the blowing sound, mike more toward the mouthpiece—how close depends on how much breath sound you want. Using a mic with a windscreen or pop filter should help. If breath noise is a problem regardless of the mic or where it is placed and you want to eliminate it, try placing the mic behind the player’s head, aiming it at the finger holes (see 19-44). This technique also reduces high-frequency content. A windscreen or pop filter reduces unwanted breath noise, too. In miking a flute or any woodwind, be careful not to pick up the sound of the key action.
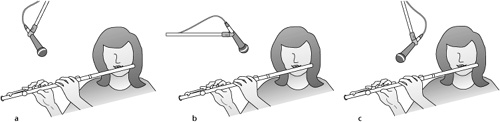
19-44 Miking a flute or piccolo. (a) Placing a microphone over the finger holes near the end of the instrument picks up most of the sounds these instruments emit and does not pick up the breathy sounds that miking the mouthpiece produces. (b) Some producers feel that these sounds are part of the instruments’ overall aural character, however, and mike the mouthpiece to produce a thinner-textured sound. (c) If unwanted breath sounds persist, place the mic behind the musician’s head, aimed at the finger holes.
Microphone positioning for the clarinet and the oboe must take into account the narrowing of high frequencies radiating in the vertical plane in front of the player, as well as floor reflections from the bell’s being aimed downward. Miking too close tends to emphasize these disparities. If close miking is unavoidable, position the mic slightly to the side of the bell rather than straight at it. This should smooth most of the sonic anomalies. Miking a few inches from the bell tends to reduce leakage and makes the sound brighter. Another possibility is to mike toward the bottom third of the instrument and far enough away to blend the pickup from the finger holes and the bell (see 19-45).
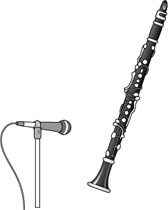
19-45 Miking a clarinet or an oboe. Place a microphone over the finger holes toward the bottom third because most of the sounds come from this part of the instrument. In miking the keys of any instrument, avoid close mic-to-source distances; otherwise the sound of the moving keys may be heard.
Classical music solos require an airy sound. Assuming good acoustics, mic about 4 to 12 feet away. Using a stereo pair can give the sound added spaciousness.
Saxophones distribute sound between the finger holes and the bell fairly well, but the proportion of sound radiating from the holes and the bell changes constantly as the keys open and close. The best sound can be obtained with a mic placed at about the middle of the instrument, pointed toward the horn. Point the mic toward the bell for a fatter sound. Some producers or players want the sound of the keypads and the keys; others don’t. The more the mic is pointed at the bell, the less key noise is apparent. Sometimes a clip-on instrument mic is used in live situations. This is an easy setup to adjust. Simply clip the mic onto the outside edge of the bell and adjust it. Some players prefer a dynamic mic close to the bell and a condenser mic farther away, pointed toward the keys, which achieves the best of both sounds.
Generally, miking saxophones off the bell produces a bright sound that, depending on the instrument, can be thin and hard. Miking too close to the bell further accentuates the high frequencies, making the sound piercing or screechy. Miking off the finger holes adds fullness, presence, and warmth. Aiming a mic at the holes from above the bell produces a natural, more blended sound (see 19-46). Mounting a mini-mic on the bell yields a sound that is bright and punchy.

Brass instruments—trumpet, trombone, baritone, tuba, and French horn—generally are conical and have a cup-shaped mouthpiece that acts as a vibrating “reed” when the musician blows into it. They are the loudest acoustic musical instruments with the widest dynamic range (see 19-33).
The fundamental frequency range of the trumpet is 165 to 988 Hz, with harmonics extending from 1 to 7.5 kHz. In addition to the sound control by lip pressure and tension at the mouthpiece, a series of three valves is used to vary the tube length and therefore the pitches. Most of the sound radiates from the bell, with higher frequencies located on an axis closer to the center of the bell.
The trombone is the orchestra’s most powerful instrument. Its distinctive feature is a slide that is moved in and out to vary the length of the tube and change pitches. (Some trombone models use valves instead of a slide.) The fundamental frequency range is 87 to 493 Hz, with harmonics and a radiation pattern similar to those of the trumpet.
The baritone has roughly the same range as the trombone, although its harmonics do not go as high—from about 980 to 4,000 Hz. Its low-frequency power is greater than that of the trombone because of the amount and the size of tubing and the wider circumference of the bell. It uses valves to vary its effective length and emits sound upward. Higher-frequency harmonics are present at the axis of the bell, although to a live audience they are not a recognizable component of the baritone’s sound because they are generated upward. Most of a baritone’s distinctive bass sound is radiated omnidirectionally.
The tuba is a larger version of the baritone and is the lowest-pitched of the brass instruments. Its fundamental frequency range is about 40 to 330 Hz, with harmonics that extend from about 500 to 3,500 Hz.
The French horn is a curved, conical tube with a wide bell and valves that is played with the bell pointed to the side of or behind the musician, often with the musician’s hand inside the bell for muting. The instrument’s sound is therefore not closely related to what the live audience hears. Its fundamental range is relatively narrow—87 to 880 Hz, with harmonics extending from 1 to 6 kHz—but the French horn’s sound can cut through the sound of louder instruments with wider frequency response.
Because of their loudness, dynamic range, and rich harmonics, brass instruments are best recorded in a relatively live room. Reverberation can be used in the mixdown, of course, but regardless of how good the reverb unit is, it can rarely match the sound of brass instruments playing in a fine acoustic environment.
Brass instruments require care in microphone placement and careful attention in adjusting levels. They emit the most directional sound; high-frequency harmonics radiate directly out of the bell. But the most distinctive frequencies of the trumpet and the trombone are around 1,200 Hz and 700 Hz, respectively, which are radiated from the sides of the bell. Below 500 Hz radiation tends to become omnidirectional, so close-miking brass instruments with a directional microphone does not quite produce their full frequency response. A directional mic close to and in front of the bell produces a bright, biting quality. Miking at an angle to the bell or on-axis to the side of the bell produces a mellower, more natural, hornlike sound (see 19-47).
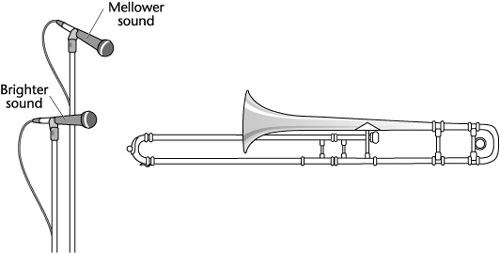
19-47 Miking off the bell. Mike trumpets, trombones, baritones, and tubas at an angle to the bell for a natural, mellower sound, being careful to avoid close mic-to-source distances so that airflow and spit sounds are not heard. Miking in front of the bell produces a brighter sound.
About 1 to 5 feet is a starting point for capturing a good working mic-to-source distance. Closer placement gives a tighter sound, although miking too close to a brass horn could pick up spit and valve sounds. More distant placement makes the sound fuller and more emphatic.
For the French horn, a mic-to-source distance of at least 3 to 5 feet is recommended. It is not the most powerful brass instrument, but, as noted previously, it can cut through and overwhelm louder instruments, and its levels fluctuate considerably. For a natural sound, aim the mic toward the bell. If leakage is a problem, move the instrument away from the ensemble (see 19-48).

19-48 Miking a French horn. (a) To control leakage place the musician away from the ensemble and the microphone near a soft baffle pointing at the bell. (b) If this arrangement creates a blending problem due to the horn’s lack of presence, placing a hard baffle a few feet from the bell should carry the sound to the mic in sufficient proportions.
In miking brass sections, trumpets and trombones should be blended as a chorus. One mic for each pair of instruments produces a natural, balanced sound and provides flexibility in the mixdown. If you try to pick up more than two trumpets or trombones with a single mic, it has to be far enough from the instruments to blend them, and the acoustics have to support the technique. Of course, leakage will occur. Mike baritones and tubas individually from above (see 19-49).
The type of mic you use also helps shape the sound of brass. The moving coil can add transparency and smooth transient response; the ribbon can add a fuller, warmer tonality; and the capacitor can add sizzle and produce accurate transient response. Be careful when using a capacitor with brass instruments, however. Their on-axis sound off the bell has peaky, high harmonics that can overload the mic.
Electric instruments—bass, guitar, and keyboards—generate their sounds through an electric pickup that can be sent to an amplifier or directly to the mixer. Three techniques are generally used to record an electric instrument: plugging the instrument into an amplifier and placing a mic in front of the amp’s loudspeaker; direct insertion (D.I.), or plugging the instrument directly into the mic input of the mixer through a direct box; or both miking the amp and using D.I.
Electric instruments are usually high impedance, whereas professional-quality audio equipment is low impedance. Not surprisingly, high- and low-impedance equipment are incompatible and produce sonic horrors if connected. The direct box matches impedances, making the output of the instrument compatible with the console’s input (see 19-50).

19-50 Direct box. This unit converts unbalanced signals from guitar amps, stereo keyboards, CD and tape players, and computer sound cards. There are two sections; each includes an XLR connector, 1/4-inch parallel wired in/out jacks, ground lift switch to help eliminate hum and buzz, and a 20 dB pad switch for connection to inputs with overly loud signal levels.
Although this chapter deals with the miking techniques, it is important to know the difference between miking an amp and going direct. Deciding which method to use is a matter of taste, practicality, and convenience (see 19-51 and 19-52).
Table . 19-51 Advantages and disadvantages of miking an amplifier loudspeaker.
Advantages | Disadvantages |
|---|---|
Adds interaction of room acoustics to sound | Could leak into other mics |
Captures more midbass for added punch | Could be noisy due to electrical problems with amp |
Creates potential for different sound textures | Level of amp can make it difficult for musicians to hear less powerful instruments |
Gives musician greater control over an instrument’s sound output | Distortion |
Allows other instrumentalists more chance to hear what the electric instruments are playing so that the acoustic players can better interact with the electric instruments | The amplifier is another “instrument,” with its own range of sonic characteristics |
The amplifier is another “instrument,” with its own range of sonic characteristics |
Table . 19-52 Advantages and disadvantages of direct insertion.
Advantages | Disadvantages |
|---|---|
Has a cleaner sound | Has a drier sound—no room ambience |
Captures more high and low frequencies | May use a transformer, which adds another electronic device to the sound chain |
Allows more sound control at the mixer | Too present |
Eliminates leakage | |
Does not require an amp |
A single amplifier loudspeaker emits directional sound waves whose sonic characteristics change depending on the angle of the microphone and its distance from the amp. A mic on-axis at the center of the speaker tends to produce more bite compared with the mellower sound of a mic positioned off-axis to the center or at the edge of the speaker. An amp cabinet with bass and treble speakers produces a more complex output and usually requires a greater mic-to-source distance to capture a blended sound.
Placement of the cabinet also affects sound. On a carpet, brightness is reduced. On a hard surface, depending on the amp, sharpness or brightness is increased. On a riser off the floor, low end is reduced.
When miking an amp loudspeaker, the moving-coil mic is most often used because it can handle loud levels without overloading. With the bass guitar, the directional moving coil is less susceptible to vibration and conductance (especially with a shock mount) caused when the instrument’s long, powerful wavelengths are amplified. Due to its powerful low end, the bass is usually recorded directly to obtain a cleaner sound. The fundamental frequency range of the electric bass is 41 to 300 Hz, with harmonics extending from 1 to 7 kHz.
The Leslie amplifier loudspeaker, most often used with an electric organ, is almost an instrument in itself (see 19-53). It is not a loudspeaker in the normal sense but is designed especially to modify sound. It contains a high-frequency loudspeaker (the tweeter) in the upper portion and a low-frequency loudspeaker (the woofer) in the lower portion. The two loudspeaker systems rotate, creating a vibrato effect. (Vibrato is short and repeating fluctuation in the pitch of a sound, not to be confused with tremolo, which is a rapid fluctuation in the amplitude of a sound.)
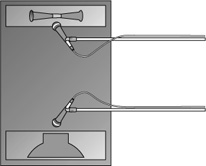
19-53 Miking a Leslie amplifier loudspeaker. One way is with two directional mics: one to pick up the highs and the other to pick up the lows. The greater the mic-to-source distance, the less the chance of picking up the rotor sounds and the increased vibrato and the better the sound blend. To record stereo use either a top and bottom pair of mixed mics left and right, or just single mics panned toward the left and the right. If the sound of the rotating horn is desired, place a boundary mic inside the cabinet.
In the absence of an actual Leslie amplifier loudspeaker, Leslie simulators are available. Depending on the design, they can be used by directly connecting the output of an electric organ into the simulator or by connecting the simulator to a patch panel and connecting the organ through it. With Leslie simulators, as with electronic simulators in general, how close they come to producing the actual sound of the instrument varies.
Recording electric bass presents a particular challenge. If there is too much bass, the mix will sound muddy. This could mask the fundamentals of other instruments and result in a thickening and a weighing down of the overall sound. Among the ways to improve clarity are to have the bassist increase treble and reduce bass on the guitar or to equalize in the control room by attenuating around 250 Hz and boosting around 1,500 Hz.
Compression is commonly used in recording the electric bass. It helps reduce noise, smooth variations in attack and loudness, and tighten the sound. Be careful in setting the compressor’s release time. If it is too fast in relation to the decay rate of the bass, the sound will be organlike. A slower release time maintains the natural sound of the instrument; too slow a release time muddies the sound.
When recording an electric guitar, a directional moving-coil mic adds body to the sound. But if it is necessary to reproduce a subtler, warmer, more detailed sound, try a capacitor or one of the more rugged ribbon mics. The fundamental frequency range of the electric guitar is 82 to 1,319 Hz. When amplified the harmonics extend from 1 to 3.5 kHz; when going direct the harmonics range from 1 to 13 kHz.
As for placement, the main challenge is understanding the dispersion pattern of the amplifier’s loudspeakers (see 19-54). Miking close to the amp and head-on produces a strong central lobe that has considerable high-frequency content within the bandwidth of the instrument itself. Off-axis miking reduces high-frequency content, and backing the mic farther from the amp produces a more blended, balanced sound. Also, the decrease in highs gives the impression of a heavier, bassier sound. Hanging a small mic over the amp emphasizes a guitar’s midrange and reduces leakage. If leakage is not a problem, and even if it is, close miking with an omni works well.
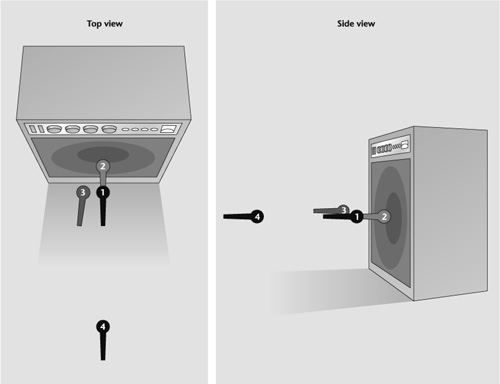
19-54 Miking an amplifier loudspeaker. (1) Four inches from the amp at the center of the speaker cone produces a natural, balanced sound. (2) One inch from the center of the speaker cone produces a bassy sound but minimizes feedback and leakage. (3) Off-center to the speaker cone produces either a dull or a mellow sound, depending on the acoustics and the microphone, but reduces amplifier noise. (4) Three feet from the center of the speaker cone produces a thinner sound with reduced bass but picks up more ambience and leakage.
An omnidirectional microphone has no proximity effect—its response is uniform. It will therefore pick up various aspects of the loudspeaker dispersion pattern, and the inverse square law takes care of the leakage problem because you are essentially force-feeding the mic from an amp that is producing a high sound-pressure level at a short mic-to-source distance. Use an omni capacitor or ribbon mic with a fast response.
Producers also record both amp loudspeaker and D.I. feeds simultaneously. This technique combines the drier, unreverberant but crisp sound of direct insertion with the acoustic coloring of the amplified sound. The amp and D.I. signals should be recorded on separate tracks. This provides more flexibility in the mixdown when the two sounds are combined or if you decide to not use one of the tracks.
It should be noted that direct recording of guitars does not necessarily guarantee a leakage-free track. If a guitar pickup is near or facing a loud instrument, it will “hear” the vibrations. By turning the musician away from the direct sound waves or by putting a baffle between the instruments, leakage is reduced.
With the electric guitar, special-effect boxes are often used to add to the sonic possibilities (see 19-55). Here too the various signals should be recorded on separate tracks, if possible, to allow flexibility in the mixdown.

19-55 Techniques used to record direct and amplified signals simultaneously. (a) The signals are recorded on separate tracks. Special-effect boxes can be used for (b) the usual technique or (c) an alternative technique. (d) A technique employing reamplification. The techniques illustrated in this figure can also be achieved with modeling plug-ins (see 19-56). The sonic results will be different, however, which may not necessarily be unwanted.
(d) Adapted from Mike Levine, “Direct Results,” Electronic Musician, December 2006, p. 31.
An amp often produces an annoying hum. Using a mic with a humbuck circuit can help reduce hum but not always enough. It also helps to turn up the loudness control on the guitar and turn down the volume on the amp and to use guitar cables with extra shielding. Another solution is to move the musician around the studio until a spot is found where the hum is reduced or disappears. If possible, convince the musician to use a smaller, lower-powered amp than is used in live concerts. There may be a problem here, however, because the change in amp produces a change in sound.
An alternative to using amplifiers for an electric guitar or bass is modeling technology that simulates the sounds of various makes and models of speaker cabinets or electric guitars and basses. Instead of plugging the instrument into an amp, it is plugged into the modeling device (see 19-56).
19-56 Guitar modeler. This device is designed to capture the tone and the feel of guitars heard through a variety of speaker cabinets and microphones and in various studio acoustics. It includes 36 memory locations, stereo balanced and unbalanced outputs, and a chromatic tuner. This device is a desktop model; pocket-sized models are also available.
The array of modeling devices available continues to grow, providing ever-increasing sources for sonic emulation of amplified guitar sounds—so much so that the days of speaker cabinets may be numbered.
A variety of software programs make it possible to manipulate and record the sound of traditional acoustic and electric instruments in the virtual domain. Figures 19-57 and 19-58 display windows from two such programs.
19-57 Virtual rhythm guitar. This program plays acoustic and electric guitar. It includes guitar parts tracked by professional guitarists and riffs for many different styles of music. It plays in any key, plays automatically in time with a song’s tempo, and can adapt parts to MIDI.
19-58 Virtual drums. This program creates, controls, and produces drum performances, using a range of different types of drum kits and styles. It provides real-time control of the virtual drummer’s intensity, complexity, timing, and dynamics. The preset drum patterns and performances are editable.
The idea of using virtual instruments in place of the real thing has raised differences of opinion in the music and production worlds. There are those who feel that virtual instruments, regardless of their sound quality, are artificial and that artificiality does not do justice to the music or its sonic authenticity; that virtual instruments cannot take advantage of the differences in sound created by the types of materials that go into the manufacture of conventional instruments; and that there is an almost clinical, too perfect, tonality to their sound and an absence, or at least a reduction, of the human factor in how they are “played.” This affects the ability to infuse individual subtle colorations and dynamics into a performance.
Those who have no problem using virtual-instrument programs cite their almost unlimited reservoir of new and different types of sound—that they should not be considered competition for, or replacements of, traditional instruments but simply additions to the choices of how to play music. After all, many of the instruments taken for granted in today’s orchestra did not begin appearing until the mid-1700s. Electric instruments did not become a major part of the music scene until the 1950s. Although the first synthesizer was invented in 1876, it was not until the 1960s that it became commercially viable. Development of the synthesizer helped bring about MIDI (Musical Instrument Digital Interface) in the early 1980s. Then there are hyperinstruments—large-scale musical systems that enable the control of complex musical events by a performer. Virtual instruments, or hyperinstruments, are simply another advance that diversifies the musical soundscape.
At its most basic level, the human voice acts like a wind instrument. The lungs expel air through the vocal cords, which vibrate and act like a double reed. The voice is then radiated through the larynx and the mouth and out into the air. Sound is modified by the movement of the tongue, jaw, and lips and the rate of exhalation. Pitch is determined primarily by the vocal cords and the larynx, but mouth, lip, and tongue movements change timbre. The wide-ranging and complex harmonics and overtones of the human voice are a product of the mouth, nasal cavity, and chest cavity.
Although the speaking voice has a comparatively limited frequency range, the singing voice does not, and it can place a severe test on any microphone (see 19-59). The singing voice is capable of subtle and almost unlimited variations in pitch, timbre, and dynamic range. There are also plosives and sibilance—annoying popping and hissing sounds—to deal with.

19-59 Fundamental frequency ranges for speech and singing in the human voice. Harmonics in the male singing voice extend from 1 to 12 kHz and in the female singing voice from 2 to 12 kHz.
In choosing a vocal mic, the most important consideration is the singer’s timbre—how edged, velvety, sharp, mellow, or resonant the voice sounds. The microphone should enhance a voice’s attractive qualities and minimize the unattractive. Usually, assuming there are no serious problems with tone quality, most producers prefer to use capacitor mics for vocals. They are far more sensitive to subtle changes in sound-pressure waves than are dynamic mics, they can better handle the complicated pattern of harmonics and overtones in the human voice, and overall sound quality is the most natural.
Controlling the dynamic range—the quietest to loudest levels a sound source produces—is another tricky problem. Well-disciplined singers can usually control wide fluctuations in the dynamic range themselves. But many cannot—their voices barely move the peak meter during soft passages and put it in the red during loud ones. In miking these vocalists, a producer has three alternatives: ride the level, adjust the singer’s mic position, or use compression. There is a fourth alternative: record the vocal on two tracks. Noise gating may also be an alternative, but it is more often than not time-consuming and requires precise settings to be effective so that its action is not heard.
Riding the level works, but it requires an engineer’s full attention, and this may be difficult if other voicings are being recorded at the same time. Also, less gifted singers may handle dynamic range differently each time they sing, which means that riding the level is more a matter of coping than of aiding.
The preferred methods are to use mic technique to adjust for irregularities in a vocalist’s dynamic range, use compression, or use both. In pop music, vocals are often compressed 10 to 13 dB. But to do so requires that a recordist know how to compensate after compression.
One placement method is to situate the vocalist at an average distance from the mic relative to the loudest and softest passages sung; the distance depends on the song, the power of the singer’s voice, and the acoustics. From this average distance, you can direct the vocalist how closely to move toward the mic during quiet passages and how far for the loud ones. The success of this method depends on the singer’s mic technique—the ability to manage the song and the movements at the same time.
If these approaches don’t work, try recording the vocal on two tracks with one track down 10 dB. If there is overload or a problem with the noise floor, the undistorted or less noisy sections of each recording can be intercut during editing.
The closer to a microphone a performer stands, the greater the chance of picking up unwanted breathing sounds and plosives from p’s, b’s, k’s, and t’s and sibilance from s’s. If the singer’s vocal projection or the type of music permits, increasing the mic-to-source distance significantly reduces these noises. Windscreens also help, but some tend to reduce the higher frequencies, although clearly some high-frequency loss is preferable to sibilance, plosives, or breathiness. If a windscreen is used, the stocking (fabric) windscreen works best (see 4-57d). It is not as dense as most other windscreens, and therefore it does not inhibit most of the high frequencies from getting through to the mic.
Other ways to reduce popping and sibilance are to have the singer work slightly across mic but within the pickup pattern or to position the mic somewhat above the singer’s mouth (see 19-60). If this increases nasality, position the mic at an angle from slightly below the singer’s mouth. If leakage is no problem, using an omnidirectional mic permits a closer working distance because it is less susceptible to popping, sibilance, and breathing sounds. The sound may be less intimate, however, because an omni mic picks up more indirect sound waves than does a directional mic; but the closeness of the singer should overcome the larger amount of indirect sound picked up.
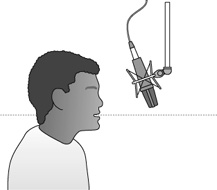
19-60 Eliminating unwanted vocal sounds. Positioning the microphone slightly above the performer’s mouth is a typical miking technique used to cut down on unwanted popping, sibilance, and breathing sounds.
Although capacitors are almost always the microphone of choice for vocals, they do tend to emphasize sibilance because of the mid- to treble-range response of many models. In such cases, and when other techniques fail to eliminate sibilance, a first-rate moving-coil mic with a built-in pop filter, or a ribbon mic, usually takes care of the problem.
Studios in which high-energy popular music is recorded usually have dry acoustics so that the sound does not become awash in reverberation. This can be disconcerting to a singer who is used to hearing a natural acoustic environment as part of the overall vocal sound. To compensate, recordists feed a comfortable amount of reverb through the fold-back system so that the singer hears the vocal in a more familiar acoustic setting. If there is too much reverb coming through the headphones, however, it can wash out detail and throw off intonation and phrasing. If the reverb is too loud, a singer may tend to lay back in the performance; if it is too soft, a singer may overproject. For these reasons, some recordists try to avoid putting any reverb in the foldback so long as it does not inhibit performance.
Be aware that when a music stand (or any hard surface) is near the singer’s microphone, sound waves reflect off the stand and into the mic. This can cause phase cancellations, adversely coloring tone quality. Remembering that a sound’s angle of incidence is equal to its angle of reflectance, position the music stand so that reflections from it do not reach the mic (see 19-61), or cover the stand with material to absorb the reflections.
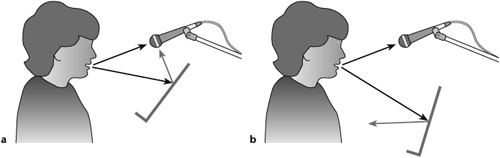
Generally, the style of the music sets the guidelines for mic-to-source distance. In popular music vocalists usually work close to the mic, from a few inches to a few feet, to create a tight, intimate sound. Classical and jazz vocalists work from a couple feet to several feet from the mic to add room ambience, thereby opening the sound and making it airy.
When close-miking be careful of proximity effect. Rolling off the unwanted bass frequencies may be one solution, but it almost certainly will change the delicate balance of vocal harmonics unless it is carefully and knowledgeably effected. Note that unless a mic is specifically designed for it, positioning the mic just about touching the lips, as some vocalists are seen doing on television and which unfortunately is imitated in the recording studio, rarely produces ideal sound. Indeed, if the mic is not up to it, such a technique rarely produces usable sound. If the distortion does not get you, the oppressive lack of air will.
To record as clean a vocal sound as possible, many studios use an isolation booth to prevent leakage from instruments or acoustics from reaching the vocal mic. In the absence of such a booth—or because it may color sound or a vocalist may find it difficult to work in a claustrophobic environment—there are other ways to isolate a microphone (see 19-62).
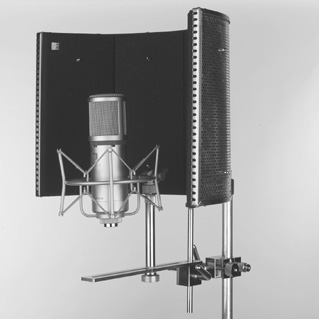
19-62 Portable sound filter for recording with reduced room ambience. The filter’s main function is to help obtain a dry vocal (or instrumental) recording. It has six main layers, which both absorb and diffuse the sound waves hitting them, so progressively less of the original source’s acoustic energy passes through each layer. The filter also helps prevent reflected sound from reaching the back and the sides of the mic.
Once the lead vocal is recorded, the accompanying backup harmony vocals are overdubbed. This may involve a singer overdubbing the harmonies one or more times, or it may involve a few vocalists singing at the same time. With the latter technique, if each has a microphone, mic-to-source distances are easier to balance, but it also means more mics to control and requires extra tracks. Another technique groups the vocalists around a bidirectional or an omnidirectional microphone. This reduces the number of mics and tracks but requires greater care in balancing and blending harmonies. Backup vocalists must be positioned to prevent any one voice or harmony from being too strong or too weak. It also reduces flexibility in signal processing and positioning in the mixdown.
Vocal software programs can process an original vocal track and harmonize it, creating a backup vocal track or tracks. The harmonies can be programmed to follow a specified scale. Other features may include voice panning, interval and level controls, glide, pitch, timing, and vibrato. One program has a “throat length” parameter that can change the character of a harmony from loose to tight and vice versa.
Choirs are usually recorded all at once, so it is vital to have microphones situated to pick up each section—soprano, alto, tenor, and bass—for a balanced, blended pickup; you also need ambient mics for acoustic fill (see 19-63). Capacitors are almost always employed because of their suitability in reproducing the sound of the singing voice. Depending on the size of the choir, near-coincident or spaced miking is usually used.
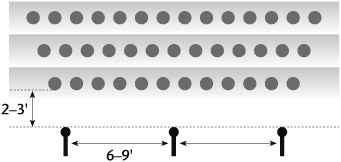
19-63 Miking a choir. Large choir using spaced miking. With spaced miking, remember to observe the three-to-one rule. Ambient mics may or may not be needed, depending on the acoustics and the amount of reverb desired in the final mix.
If one or more soloists remain in place while singing, accent mics are positioned to pick up their sound—unless the main arrays can do the job and still maintain balances.
The discussion so far in this chapter has centered mainly on the individual instrument. There are studio situations, however, in which ensembles record as a group but are divided into smaller sections to control leakage. This requires isolating them as much as possible to avoid sonic confusion yet blending them so that they sound cohesive. Figures 19-64 to 19-68 illustrate a few ways to mike studio ensembles.
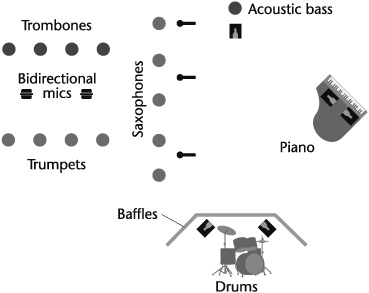
9-64 Miking a jazz band when all voicings are recorded at the same time. Notice that trumpets and trombones are miked with bidirectional microphones and that the piano, acoustic bass, and drums are miked with boundary mics. Bidirectional mics are particularly useful in reducing leakage. For example, by facing the mic straight down in front of each saxophone, each mic’s nulls are directed toward sound coming from the sides and the rear. This is especially effective when woodwinds or other weak instruments are in front of brass or other strong instruments. A high ceiling is necessary for this technique to work.
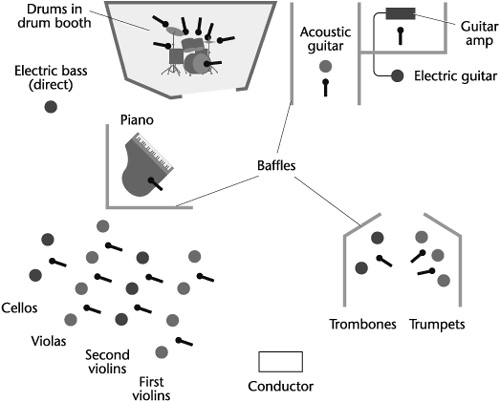
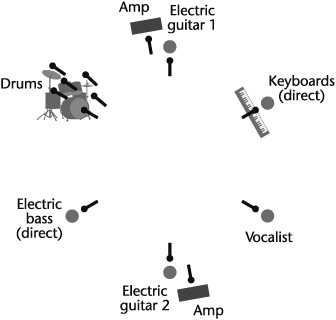
19-66 A circular studio setup. This approach positions the musicians facing one another, with all microphones pointing outward so that their nulls are pointing inward. The arrangement makes it easier for band members to communicate and minimizes the likelihood of leakage.
From Rusty Cutchin, “Bring ’Em Back Alive,” Electronic Musician, January 2007, p. 36.

19-67 Two more ways to arrange musical groups for studio recording. (a) Musicians are isolated from one another to prevent sound from one instrument from leaking into the mic of another instrument, yet they are still able to maintain visual contact. It is possible in this arrangement that the acoustic guitar sound will leak into the piano mics and vice versa. Leakage can usually be reduced, however, by supercardioid mics’ on both instruments rejecting sound from the sides and the rear, the piano lid’s blocking of sound coming from the front guitar baffle, and the guitarist’s body blocking the piano sound coming from the back of the studio. (b) Another example of arranging a musical group in a studio to control leakage.
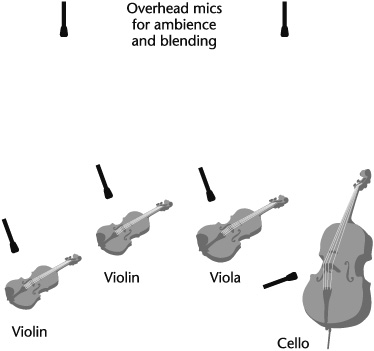
19-68 Miking a string quartet. In this example all microphones are capacitors with a cardioid pickup. The main microphones are positioned to pick up each instrument’s sound. Three are placed just above the two violins and viola and the fourth is placed off the bridge of the cello. The overhead mics are positioned to pick up ambience and used for overall blending in the mix.
As clear and noise-free as digital sound can be, there are valid complaints about digital recordings: that the high end is strident, thin, and shrieky, or that there is too much unwanted noise from amplifiers, pedals, keys, bows, tongues, teeth, lips, and so on. Many of these problems can be traced to two causes: the microphones and the miking techniques that were used.
Many microphones that were used in analog recording were selected for their rising high-end response; these mics helped deal with problems associated with analog reproduction, the most serious being the potential loss of high-frequency information during disc mastering and copying. There is little such loss in digital recording, copying, or mastering. (Uneven quality in the manufacture of CDs is, alas, another story altogether.) Therefore using such mics for digital recording only makes the high frequencies more biting and shrill. To avoid this problem, use mics with smooth high-end response. Recordists have returned to tube-type equipment in the signal chain—microphones, amplifiers, and equalizers—and plug-ins that simulate the warmth of tube-type sound to offset the edge in digital reproduction.
Capacitor mics have preamplifiers, which generate noise. In analog recording, this noise is usually masked. In the digital format, if preamp noise is loud enough, it will be audible. Digital, high-definition, and other high-quality capacitors are therefore preferred because of their superior sound quality and very low-level self-generated preamp noise.
Modern ribbon microphones are popular in digital recording. Their response is inherently nontailored, smooth, warm, and detailed without being strident. Mics used in digital recording should be linear—that is, output should vary in direct proportion to input. The mic should not introduce unwanted sonic information because, in digital sound, chances are it will be audible.
Furthermore, mics used in digital recording should be not only of the highest quality but also carefully handled and kept in clean, temperature- and humidity-controlled environments. The dust, moisture, and rough handling that may not have perceptibly affected mic response in an analog recording may very well sully a digital one.
In analog recording, close miking was employed virtually pro forma because vinyl records usually smoothed its rough spots by burying some of the harshness in background surface noise. In digital recording, no such masking occurs. For example, when close-miking an acoustic guitar in analog recording, there was little concern about noise that might be generated by the guitarist’s shirt rubbing against the instrument; in digital recording, on the other hand, the rubbing sound may be audible if the guitar is not carefully close-miked. In addition, in analog recording, noise from a musician’s amplifier may have gotten lost in tape hiss; that is not the case in digital recording, regardless of the mic used.
Even if mic-to-source distance is acceptable in digital recording, microphone placement may not be. For example, the upper harmonics of a violin radiate straight up in two directions. If a mic is placed directly in one of these paths, the digital sound could be too crisp and shrieky, even though the mic is at an optimal distance from the violin. By placing the mic more in the path of the lower-frequency radiations, the digital sound should flatten.
High frequencies of brass instruments are radiated straight ahead in a relatively narrow beam. Placing a mic directly in front of the bell may produce a harsh digital recording. Placing it at more of an angle to the bell to pick up a better blend of the lower frequencies should smooth the sound.
There are a few ways to handle a music recording for surround sound.[3] One is to use the miking techniques already discussed in this chapter and apply the surround-sound imaging during the mix through panning. Another is to mike for surround sound in the recording session. Using a combination of the first two approaches may be considered a third technique. (Mixing music for surround sound is covered in Chapter 22.)
Generally, there are differences in how popular and classical/jazz music are handled in surround recording. Because pop music is usually looking for impact and presence, the common approach is to close-mic the voicings with directional microphones and do the surround panning and the delay in the mixdown. In classical music and much of acoustic jazz, the idea is to record the sound as naturally as possible using surround miking arrays.
It is worth noting that in the music industry, recordings miked for surround sound are also miked for stereo. The main reasons are economic. Stereo releases are still where record companies make most of their sales. It is also less expensive to set up and record both the stereo and the surround microphone arrays in one session than in two. To simplify coverage this section deals only with surround techniques. (See “Distant-Miking Stereo Arrays” earlier in this chapter for coverage of stereo microphone methods; also see “Downmixing to Stereo” in Chapter 22.)
In miking for surround sound during recording, there are two basic means of handling selection and placement. One is to use direct and ambient miking; the other is to take the direct approach.
With direct/ambient surround-sound miking, either one of two stereo arrays—near-coincident or spaced—will do as a basis for the left-right frontal pickups; then add a center mic for the center channel. Because of the center mic, the angle or space between the stereo mics should be wider than usual. The surround microphones are typically used for ambience and are pointed away from the sound source to the rear or rear-side of the studio or hall. The surround mics can be used for principal voicings, however, depending on the type of music being recorded and the size and the acoustics of the room.
In addition to the surround-sound microphones, accent mics may be used on selected instruments to help fill in the overall pickup. Balancing is done in the mixdown.
19-69 illustrates a basic surround-sound miking technique. Figures 19-70 to 19-78 display other variations of surround-sound microphone arrays to provide a sense of the ongoing experimentation with surround miking techniques. None of these examples is intended to suggest that any one approach is preferred to or better than another, nor are they necessarily the most common approaches; there are other workable techniques. Any surround-sound microphone array should be evaluated in relation to the music being recorded, the room acoustics, the amount of spaciousness desired, and how the various instruments are to be localized.
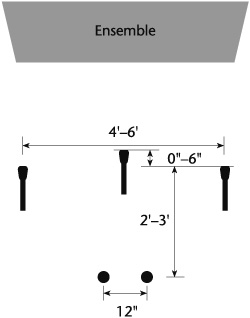
19-69 A basic approach to direct/ambient surround-sound miking. The mics can be either cardioid or wide-angle cardioid, depending on the breadth of the ensemble. The left, center, and right mics face forward. The left and right surround mics may face toward the ceiling (assuming suitable ceiling height and proper acoustics) or may be angled slightly toward the rear.
From Jason Corey and Geoff Martin, “Surround Sound Miking Techniques,” Broadcast Engineering, March 2004, p. 42. © 2004 Mondo Code.
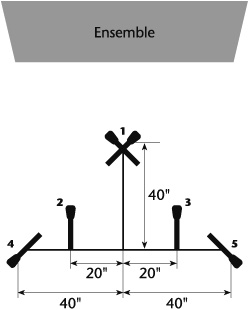
19-70 Decca Tree surround-sound techniques. Mic 1 is a supercardioid X-Y stereo array, mics 2 and 3 are a near-coincident supercardioid stereo pair, and mics 4 and 5 are a spaced sub-cardioid stereo pair. For a quasi-traditional Decca Tree, use mics 1, 2, and 3 (the traditional Decca Tree uses three omnis—see Figure 19-7); for an ambient Decca Tree, use mics 1, 4, and 5.
From Ron Streicher and F. Alton Everest, The New Stereo Soundbook, 3rd ed. (Pasadena, Calif.: Audio Engineering Associates, 2006), p. 13.18.

19-71 Delos VR (virtual reality) surround microphone technique. This method uses a coincident stereo mic in the center flanked by omnidirectional mics left and right. The distance between the left and center mics and the center and right mics depends on the size of the ensemble and the room acoustics. The surround mics face the rear of the room and are either omnis or cardioids. The distance between the front and surround mics depends on the length of the room.
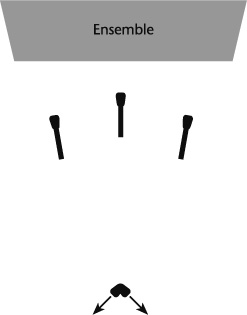
19-72 DMP (Digital Music Products) surround microphone technique. The front mics are cardioids arranged in a quasi–Decca Tree. The surround mics aimed toward the rear of the room can be a coincident stereo array (shown here), another quasi–Decca Tree, or a pair of cardioids spaced to match the distance between the outer pair of frontal mics.
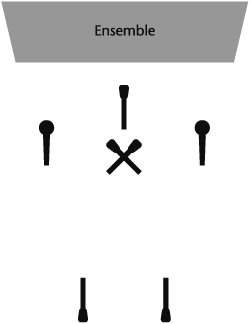
19-73 NHK (Japanese Broadcasting Corporation) surround microphone technique. A cardioid mic is centered between and slightly in front of a near-coincident stereo array in a quasi–Decca Tree configuration. Cardioids are also used for the surround mics. Widely spaced omni mics are flanked to the left and right of the center and near-coincident mics.
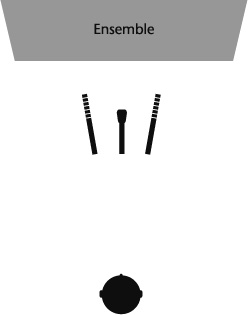
19-74 Five-channel surround microphone technique using a binaural head. The center mic is a cardioid, the left and right mics are supercardioids, and the surround pickup is through a binaural microphone head.

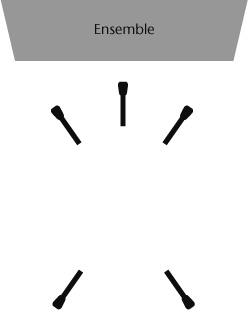
19-76 Multichannel microphone array (MMA). Also known as the Williams Five Cardioid Mic Array, this setup arranges one cardioid mic to the front and the others to the sides and the rear.
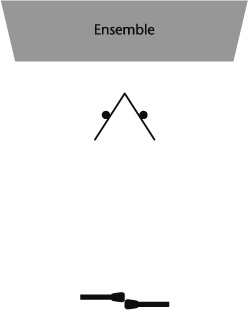
19-77 Woszcyk surround microphone technique. Two hard baffles are arranged in a wedge shape. A mini omni mic is flush-mounted on each baffle. The surround mics are a coincident pair of cardioids in opposite polarity, aiming left and right and angled 180 degrees apart.
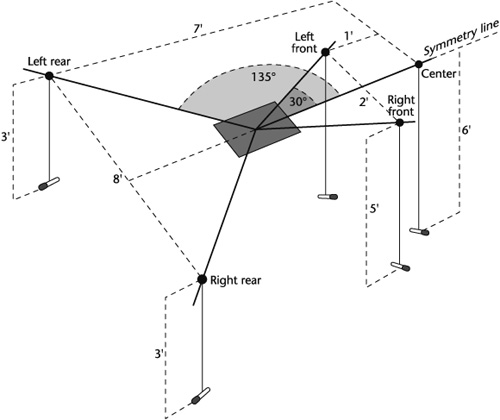
19-78 Adjustable surround-sound microphone array for small ensembles. This approach uses five capacitor omnidirectional mics positioned horizontally 30 degrees toward the floor. When recording a jazz trio, for example, the array is positioned 6 feet from the ensemble and 12 feet from the floor. For a string quartet, the array is 18 feet from the ensemble and 13 feet high.
From K. K. Profitt, “The Resolution Project,” Mix, October 2005, p. 74. © 2005 Mix Magazine.
For example, large ensembles, such as orchestras, bands, and choruses, usually call for more widely spaced arrays than do small jazz and country-music groups. Also, because of the rooms in which they are usually recorded, the larger ensembles ordinarily take omnidirectional mics, whereas with smaller groups directional mics may work better. These generalities assume good acoustics. Omnidirectional surround mics may not work in very live venues, and directional surround mics may pick up too concentrated a sound in drier rooms.
Direct/ambient surround-sound recording may use more than the three front and the two surround mics; whatever configuration is needed, do what it takes to get the optimal sound pickup. However many mics are employed, pay careful attention to how their signals are delegated (see 19-79); otherwise the sonic results could be a mishmash.
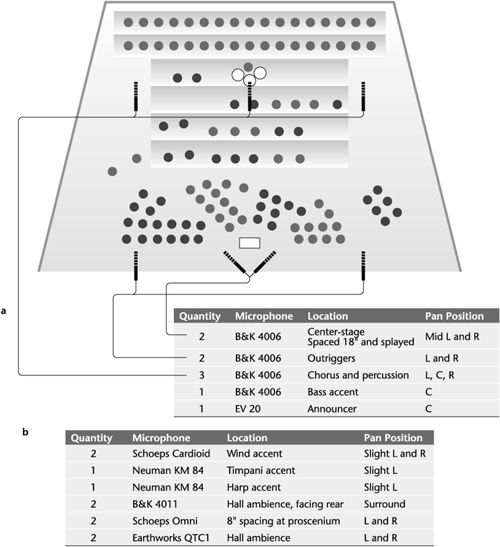
The direct surround-sound miking approach uses microphone arrays especially designed for surround-sound pickup. The array may be used to record individual instruments or groups of instruments or to pick up the sound of an entire ensemble (see 19-80 and 19-81). Direct miking tends to center the listener more “inside” the music by placing the voicings side-to-side across the front and from the front speakers to the surrounds. Or the spatial imaging may be in a horseshoe shape, with the listener centered at or somewhat inside its base. Among the direct surround-sound microphone arrays available are the SoundField 5.1 microphone system, the Atmos 5.1 system, and the Holophone (see Chapter 4).


19-81 Miking a jazz combo with the KFM 360 surround microphone system. Two modified Schoeps KFM omnidirectional mics are mounted on opposite sides of a 7-inch sphere. Two bidirectional mics are mounted on either side of the sphere next to the omni mics, facing front and rear. In recording, the omni and bidirectional mics are summed to produce a frontal cardioid pickup and differenced to produce a rear cardioid pickup. The front and rear separation is controlled by adjusting the relative levels of the front and rear signals.
Music recording is foremost about the music; technology is not the end; it is the means to the end.
Close miking places a mic relatively close to each sound source or group of sound sources in an ensemble.
Because close miking involves miking most of the instruments in an ensemble, it means that the three-to-one rule, or an appropriate variation of it, should be observed to avoid phasing problems.
Distant miking places a microphone(s) from about three feet to several feet from the sound source. It picks up a fuller range and balance of an instrument, or a group of instruments, and captures more of the studio acoustics for a more open and blended sound.
Generally, the three distant stereo arrays are coincident, near-coincident, and spaced miking.
Coincident miking, also called X-Y miking, employs two matched directional microphones mounted on a vertical axis—with one mic diaphragm directly over the other—and angled apart to aim approximately toward the left and right sides of the sound source.
Near-coincident miking angles two directional microphones, spaced horizontally a few inches apart.
Spaced miking employs two matched microphones—uni- or omnidirectional—several feet apart, perpendicular to the sound source and symmetrical to each other along a centerline.
There are a number of stereo microphone arrays, including the Blumlein technique, the ORTF method, the OSS or Jecklin disk, and the Decca Tree.
Accent miking, also known as off-miking, is used to pick up instruments in an ensemble when they solo.
Ambience miking, used along with distant miking, attempts to reproduce the aural experience that audiences receive in a live venue by recording in an acoustically suitable studio or concert hall.
The closer a mic is to a sound source, the drier, more detailed, and, more intimate, and, if proximity effect is a factor, bassier the sound. The farther a mic is from a sound source, the more diffused, open, less intimate, and ambient the sound.
Regardless of a directional microphone’s pickup pattern: the higher the frequency, the more directional the sound wave and therefore the mic pickup; the lower the frequency, the more omnidirectional the sound wave and the mic pickup.
Although close miking may employ a number of microphones, more is not always better. Each additional mic adds a little more noise to the system, even in digital recording, and means another input to keep track of and control, to say nothing of possible phasing problems.
With most moving-coil mics, the farther from the sound source they are placed, the more reduced the high frequency response.
Generally, large-diaphragm microphones are more suitable in reproducing low-frequency instruments; small-diaphragm mics are more suitable in reproducing high-frequency instruments.
Do not confuse perspective with loudness. Loudness aside, in considering mic-to-source distance, it is hearing more or less of the ambience that helps create perspective.
In recording drums, tuning the drum set is critical if the individual elements are to sound good together.
Although the drum set consists of several different-sounding instruments, it must be miked so that they sound good individually and blend as a unit.
Because most of an acoustic guitar’s sound radiates from the front of the instrument, centering a microphone off the middle of the sound hole should, theoretically, provide a balanced sound. But if a mic is too close to the hole, sound is bassy or boomy. If it is moved closer to the bridge, detail is lost. If it is moved closer to the neck, presence is reduced. If it is moved farther away, intimacy is affected.
Because the dynamic range of bowed string instruments is not wide, sound must be reinforced by using several instruments, multiple miking, or both, depending on the size of the sound required.
The piano offers almost unlimited possibilities for sound shaping. More than with many other instruments, the character of the piano sound is dependent on the quality of the piano itself.
Because most woodwinds are not powerful instruments, the tendency is to close-mike them. Due to their sound radiation, however, this results in an uneven pickup. They should be miked far enough away so that the pickup sounds blended and natural.
The loudness and the dynamic range of brass instruments require care in microphone placement and careful attention in adjusting levels at the console.
Some electric instruments, such as the bass and the guitar, can be recorded by miking their amplifier loudspeaker; by direct insertion (D.I.), or plugging the instrument into the console; or by a combination of both.
An alternative to using amplifiers for an electric guitar or bass is modeling technology that simulates the sounds of various makes and models of speaker cabinets.
A variety of software programs make it possible to manipulate and record the sound of traditional acoustic and electric instruments in the virtual domain.
Recording a vocalist is a test for any microphone because the mic must be able to handle the nuances of the singer’s timbre and dynamics as well as any popping, sibilance, and breathing sounds. Mic selection and placement depend on voice quality, style of music, and microphone presence.
Recording music digitally requires the highest-quality microphones because unwanted noise and other quiet sounds that are masked in analog recording may be audible in the digital format.
Because digital recording often reproduces sounds not audible in analog, the mics used for digital recording must be of very high quality, generate very low self-noise, be carefully handled, and be kept in clean, temperature- and humidity-controlled environments.
Generally, there are two approaches to handling a music recording for surround sound: direct/ambient surround-sound miking, using conventional techniques during recording and applying the surround-sound imaging during the mix; and the direct surround-sound approach, miking for surround sound during recording and feeding the signals directly to the surround-sound channels.
Among the arrangements used for direct/ambient surround-sound miking are the Decca Tree surround, Delos VR (virtual reality), DMP (Digital Music Products), NHK (Japanese Broadcasting Corporation), five-channel surround using a binaural head, double middle-side (M-S), multichannel microphone array (MMA), and Woszcyk surround microphone techniques.
[1] As noted earlier there are almost as many approaches to miking instruments as there are recordists. The following sections on miking instruments are intended to show some of the basic techniques. Decisions about microphone preferences and positioning are personal. Therefore drawings rather than pictures are used to avoid showing a specific mic placed in a particular way on an instrument, thereby implicitly suggesting a preference or recommendation. As for the myriad other approaches to microphone selection and placement, magazines such as Mix, Electronic Musician, Sound on Sound, and Recording; the Internet; and a number of books cited in the Bibliography abound with examples.
[2] Some of the techniques displayed are suggestions from the Shure, Earthworks, and DPA miking guides.
[3] This discussion assumes the 5.1 surround-sound format.