
8
Using SVGs for Resolution Independence
Entire books have, are being, and will be, written about SVG (an abbreviation for Scalable Vector Graphics). SVG is an important technology for responsive web design as it provides pin-sharp and future-proof graphical assets for all screen resolutions.
Images on the web, with formats such as JPEG, GIF, or PNG, have their visual data saved as set pixels. If you save a graphic in any of those formats with a set width and height and zoom the image to twice its original size or more, their limitations can be easily exposed.
Here's a screen grab of just that; a PNG image I've zoomed into in the browser:

Figure 8.1: The shortcomings of raster images are easy to see on today's high-definition screens
Can you see how the image looks obviously pixelated? Here is the exact same image saved as a vector image, in SVG format, and zoomed to a similar level:

Figure 8.2: An SVG looks sharp, regardless of the display size
Hopefully, the difference is obvious.
Beyond the smallest graphical assets, where at all possible, using SVG rather than JPEG, GIF, or PNG will produce resolution-independent graphics that require far smaller file sizes compared to bitmap images.
While we will touch upon many aspects of SVG in this chapter, the focus will be on how to integrate them into your workflow, while also providing an overview of what is possible with SVG.
In this chapter, we will cover:
- SVG, a brief history, and an anatomy of a basic SVG document
- Creating SVGs with popular image editing packages and services
- Inserting SVGs into a page with
imgandobjecttags - Inserting SVGs as background images
- Inserting SVGs directly (inline) into HTML
- Reusing SVG symbols
- Referencing external SVG symbols
- What capabilities are possible with each insertion method
- Animating SVGs with SMIL
- Styling SVGs with an external style sheet
- Styling SVGs with internal styles
- Amending and animating SVGs with CSS
- Media queries and SVGs
- Optimizing SVGs
- Using SVGs to define filters for CSS
- Manipulating SVGs with JavaScript and JavaScript libraries
- Implementation tips
- Further resources
SVG is a dense subject. Which portions of this chapter are most relevant to your needs will depend on what you actually need from SVG. Hopefully, I can offer a few shortcuts right up front.
If you simply want to replace static graphical assets on a website with SVG versions, for sharper images and/or smaller file sizes, then look at the shorter sections on using SVG as background images and within img tags.
If you're curious about what applications and services can help you generate and manage SVG assets, skip to the Creating SVGs with popular image editing packages and services section for some useful links and pointers.
If you want to understand SVG more fully, or animate and manipulate SVG, you better get yourself comfy and get a double size of your favorite beverage as this may take a while.
To begin our journey of understanding, step back with me into 2001.
A brief history of SVG
The first release of SVG was in 2001. That was not a typo. SVG has been "a thing" since 2001. While it gained traction along the way, it's only since the advent of high-resolution devices that SVGs have received widespread interest and adoption. Here is the introduction to SVGs from the 1.1 specification (http://www.w3.org/TR/SVG11/intro.html):
SVG is a language for describing two-dimensional graphics in XML [XML10]. SVG allows for three types of graphic objects: vector graphic shapes (for example, paths consisting of straight lines and curves), images, and text.
As the name implies, Scalable Vector Graphics allow two-dimensional images to be described in code as vector points. This makes them a great candidate for icons, line drawings, and charts.
As vectors describe relative points, they can scale to any size, without loss of fidelity. Furthermore, in terms of data, as SVG are described as vector points, it tends to make them tiny, compared to a comparably sized JPEG, GIF, or PNG file.
Browser support for SVG is now also very good. Android 2.3 and above, and Internet Explorer 9 and above support them: http://caniuse.com/#search=svg.
An image that is also a readable web document
Ordinarily, if you view the code of an image file in a text editor, the resultant text is completely unintelligible.
Where SVG graphics differ is that they are actually described in a markup style language. SVG is written in Extensible Markup Language (XML), a close relative of HTML. Although you may not realize it, XML is everywhere on the internet. Do you use an RSS reader? That's XML right there. XML is the language that wraps up the content of an RSS feed and makes it consumable to a variety of tools and services.
So, not only can machines read and understand SVG graphics, but we can too.
Let me give you an example. Take a look at this star graphic:

Figure 8.3: A basic SVG
This is an SVG graphic, called Star.svg, inside example_08-01. You can either open this example in the browser where it will appear as the star, or you can open it in a text editor, and you can see the code that generates it. Consider this:
<?xml version="1.0" encoding="UTF-8" standalone="no"?>
<svg
  width="198px"
  height="188px"
  viewBox="0 0 198 188"
  version="1.1"
  xmlns="http://www.w3.org/2000/svg"
  xmlns:xlink="http://www.w3.org/1999/xlink"
  xmlns:sketch="http://www.bohemiancoding.com/sketch/ns"
>
  <!-- Generator: Sketch 3.2.2 (9983) - http://www.bohemiancoding.com/sketch -->
  <title>Star 1</title>
  <desc>Created with Sketch.</desc>
  <defs></defs>
  <g
    id="Page-1"
    stroke="none"
    stroke-width="1"
    fill="none"
    fill-rule="evenodd"
    sketch:type="MSPage"
  >
    <polygon
      id="Star-1"
      stroke="#979797"
      stroke-width="3"
      fill="#F8E81C"
      sketch:type="MSShapeGroup"
      points="99 154 40.2214748 184.901699 51.4471742 119.45085 3.89434837 73.0983006 69.6107374 63.5491503 99 4 128.389263 63.5491503 194.105652 73.0983006 146.552826 119.45085 157.778525 184.901699 "
    ></polygon>
  </g>
</svg>
That is the entirety of the code needed to generate that star as an SVG graphic.
Now, ordinarily, if you've never looked at the code of an SVG graphic before, you may be wondering why you would ever want to. If all you want is vector graphics displayed on the web, you certainly don't need to. Just find a graphics application that will save your vector artwork as an SVG and you're done.
We will list a few of those packages in the coming pages. However, although it's certainly common and possible to only work with SVG graphics from within a graphics editing application, understanding exactly how an SVG fits together and how you can tweak it to your exact will can become very useful if you need to start manipulating and animating an SVG.
So, let's take a closer look at that SVG markup and get an appreciation of what exactly is going on in there. I'd like to draw your attention to a few key things.
The root SVG element
The root SVG element here has attributes for width, height, and viewBox:
<svg width="198px" height="188px" viewBox="0 0 198 188"
Each of these plays an important role in how an SVG is displayed.
Hopefully, at this point, you understand the term "viewport." It's been used in most chapters of this book to describe the area of a device through which content is viewed. For example, a mobile device might have a 320px by 480px viewport. A desktop computer might have a 1,920px by 1,080px viewport.
The width and height attributes of the SVG effectively create a viewport. Through this defined viewport, we can peek in to see the shapes defined inside the SVG. Just like a web page, the contents of the SVG may be bigger than the viewport, but that doesn't mean the rest isn't there; it's merely hidden from our current view.
The viewBox, on the other hand, defines the coordinate system in which all the shapes of the SVG are governed. You can think of the viewBox values 0 0 198 188 as describing the top left and bottom right area of a rectangle. The first two values, known technically as min-x and min-y, describe the top left corner, while the second two, known technically as width and height, describe the bottom right corner. Having the viewBox attribute allows you to do things like zoom an image in or out. For example, if you halve the width and height in the viewBox attribute like this:
<svg width="198px" height="188px" viewBox="0 0 99 94"
The shape will "zoom" to fill the size of the SVG width and height.
To really understand viewBox and the SVG coordinate system and the opportunities it presents, I recommend this post by Sara Soueidan: http://sarasoueidan.com/blog/svg-coordinate-systems/ and this post by Jakob Jenkov: http://tutorials.jenkov.com/svg/svg-viewport-view-box.html.
namespace
This SVG has an additional namespace defined for the Sketch graphics program that generated it (xmlns is short for XML namespace):
xmlns:sketch="http://www.bohemiancoding.com/sketch/ns"
These namespace references tend to only be used by the program that generated the SVG, so they are often not needed when the SVG is bound for the web. Optimization processes for reducing the size of SVGs will often strip them out.
The title and desc tags
There are title and desc tags that make an SVG document highly accessible:
<title>Star 1</title>
    <desc>Created with Sketch.</desc>
These tags can be used to describe the contents of the graphics when they cannot be seen. However, when SVG graphics are used for background graphics, these tags can be stripped to further reduce the file size.
The defs tag
There is an empty defs tag in our example code:
<defs></defs>
Despite being empty in our example, this is an important element. It is used to store definitions of all manner of reusable content such as gradients, symbols, paths, and more.
The g element
The g element is used to group other elements together. For example, if you were drawing an SVG of a car, you might group the shapes that make up an entire wheel inside a g tag:
<g id="Page-1" stroke="none" stroke-width="1" fill="none" fill-rule="evenodd" sketch:type="MSPage">
In our g tag, we can see the earlier namespace of Sketch being reused here. It will help that graphics application open this graphic again, but it serves no further purpose should this image be bound elsewhere.
SVG shapes
The innermost node in this example is a polygon:
<polygon id="Star-1" stroke="#979797" stroke-width="3" fill="#F8E81C" sketch:type="MSShapeGroup" points="99 154 40.2214748 184.901699 51.4471742 119.45085 3.89434837 73.0983006 69.6107374 63.5491503 99 4 128.389263 63.5491503 194.105652 73.0983006 146.552826 119.45085 157.778525 184.901699 "></polygon>
SVGs have a number of readymade shapes available (path, rect, circle, ellipse, line, polyline, and polygon).
SVG paths
SVG paths differ from the other shapes of SVG as they are composed of any number of connected points (giving you the freedom to create any shape you like).
So, that's the guts of an SVG file, and hopefully now you have a high-level understanding of what's going on. While some will relish the opportunity to handwrite or edit SVG files in code, a great many more would rather generate SVGs with a graphics package. Let's consider some of the more popular choices.
Creating SVGs with popular image editing packages and services
While SVGs can be opened, edited, and written in a text editor, there are plenty of applications offering a graphical user interface (GUI) that make authoring complex SVG graphics easier if you come from a graphics editing background. Perhaps the most obvious choice is Adobe's Illustrator (PC/Mac). However, it is expensive for casual users, so my own preference is either Bohemian Coding's Sketch (Mac only: http://bohemiancoding.com/sketch/), which still isn't cheap at $99, or Figma, which is cross-platform and uses a subscription-based model that is currently free for the starter plan. Check out Figma at https://www.figma.com/.
If you use Windows/Linux and/or are looking for cheap options, consider the free and open source Inkscape (https://inkscape.org/en/). It's by no means the prettiest tool to work with, but it is very capable (if you want any proof, view the Inkscape gallery: https://inkscape.org/en/community/gallery/).
Finally, there are a few online editors. Google has svg-edit (https://svg-edit.github.io/svgedit/editor/svg-editor.html). There is also DRAW SVG (http://www.drawsvg.org/) and Method Draw, an arguably better-looking fork of svg-edit (http://editor.method.ac/).
Saving time with SVG icon services
The aforementioned applications all give you the capability to create SVG graphics from scratch. However, if it's icons you're after, you can probably save a lot of time (and for me, get better results) by downloading SVG versions of icons from an online icon service.
My personal favorite is https://icomoon.io, although http://fontastic.me is also great. To quickly illustrate the benefits of an online icon service, loading the https://icomoon.io application gives you a searchable library of icons (some free, some paid):
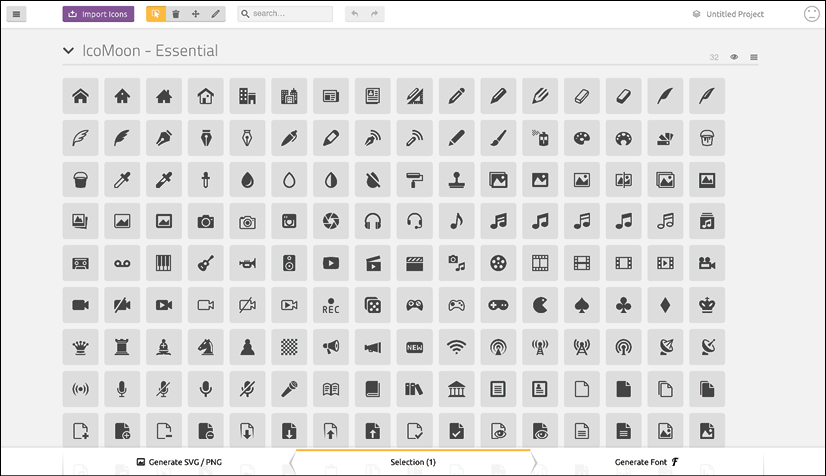
Figure 8.4: Online services can make it simple to get started incorporating SVGs
You select the ones you want and then click download. The resultant file contains the icons as SVGs, PNGs, and also SVG symbols for placement in the defs element (remember that the defs element is a container element for referenced elements).
To see for yourself, open example_08-02. You can see the resultant downloaded files after I'd chosen five icons from https://icomoon.io.
Inserting SVGs into your web pages
There are a number of things that you can do (browser-dependent) with SVG images that you can't do with normal image formats (JPEG, GIF, and PNG). The range of what's possible is largely dependent upon the way that the SVG is inserted into the page.
So, before we get to what we can actually do with SVGs, we'll consider the various ways we can actually get them on the page in the first place.
Using an img tag
The most straightforward way to use an SVG graphic is exactly how you would insert any image into an HTML document. We just use a good ol' img tag:
<img src="mySconeVector.svg" alt="Amazing line art of a scone" />
This makes the SVG behave more or less like any other image. There isn't much else to say about that.
With an object tag
The object tag is the container recommended by the W3C for holding non-HTML content in a web page (the specification for object is here: http://www.w3.org/TR/html5/embedded-content-0.html#the-object-element). We can make use of it to insert an SVG into our page like this:
<object data="img/svgfile.svg" type="image/svg+xml">
<span class="fallback-info">Your browser doesn't support SVG</span>
</object>
Either a data or type attribute is required, although I would always recommend adding both. The data attribute is where you link out to the SVG asset in the same manner you would link to any other asset. The type attribute describes the MIME type relevant for the content. In this instance, image/svg+xml is the MIME (internet media type) type to indicate that the data is SVG. You can also add a width and height attribute too if you want to constrain the size of the SVG with this container.
An SVG inserted into the page via an object tag is also accessible with JavaScript, so that's one reason to insert them this way. However, an additional bonus of using the object tag is that it provides a simple mechanism for when a browser doesn't understand the data type.
For example, if that prior object element was viewed in Internet Explorer 8 (which has no support for SVG), it would simply see the message "Your browser doesn't support SVG." You can use this space to provide a fallback image in an img tag. However, be warned that from my cursory testing, the browser will always download the fallback image, regardless of whether it actually needs it. Therefore, if you want your site to load in the shortest possible time (you do, trust me), this might not actually be the best choice.
An alternative approach to providing a fallback would be to add a background-image via the CSS. For example, in our previous example, our fallback span has a class of .fallback-info. We could make use of this in CSS to link to a suitable background-image. That way, the background image will only be downloaded if required.
Inserting an SVG as a background image
SVGs can be used as a background image in CSS, much the same way as any other image format (PNG, JPG, or GIF). There's nothing special about the way you reference them:
.item {
  background-image: url('image.svg');
}
If you find yourself in the unlikely situation of needing to support browsers that don't support SVG (Android 2 and Internet Explorer 8, for example) you can use CSS feature queries, which we looked at in Chapter 6, CSS Selectors, Typography, Color Modes, and More:
.item {
  background-image: url('image.png');
}
@supports (fill: black) {
  .item {
    background-image: url('image.svg');
  }
}
The @supports rule works here because fill is an SVG property, so if the browser understands that, it will take the lower rule over the first.
If your needs for SVG are primarily static background images, perhaps for icons and the like, I highly recommend implementing SVGs as background images. That's because there are a number of tools that will automatically create image sprites or style sheet assets (which means including the SVGs as data URIs), fallback PNG assets, and requisite style sheets from any individual SVGs you create. Using SVGs this way is very well supported; the images themselves cache well (so performance-wise, they work very well), and it's simple to implement.
A brief aside on data URIs
After reading the previous section, you might wonder what on earth is a data uniform resource identifier (URI). In relation to CSS, it's a means of including what would ordinarily be an external asset, such as an image, within the CSS file itself. Therefore, where we might do this to link to an external image file:
.external {
  background-image: url('Star.svg');
}
We could simply include the image inside our style sheet with a data URI, like this:
.data-uri {
  background-image: url(data:image/svg+xml,%3C%3Fxml%20version%3D%221.0%22%20encoding%3D%22UTF-8%22%20standalone%3D%22no%22%3F%3E%0A%3Csvg%20width%3D%22198px%22%20height%3D%22188px%22%20viewBox%3D%220%200%20198%20188%22%20version%3D%221.1%22%20xmlns%3D%22http%3A%2F%2Fwww.w3.org%2F2000%2Fsvg%22%20xmlns%3Axlink%3D%22http%3A%2F%2Fwww.w3.org%2F1999%2Fxlink%22%20xmlns%3Asketch%3D%22http%3A%2F%2Fwww.bohemiancoding.com%2Fsketch%2Fns%22%3E%0A%20%20%20%20%3C%21--%20Generator%3A%20Sketch%203.2.2%20%289983%29%20-%20http%3A%2F%2Fwww.bohemiancoding.com%2Fsketch%20--%3E%0A%20%20%20%20%3Ctitle%3EStar%201%3C%2Ftitle%3E%0A%20%20%20%20%3Cdesc%3ECreated%20with%20Sketch.%3C%2Fdesc%3E%0A%20%20%20%20%3Cdefs%3E%3C%2Fdefs%3E%0A%20%20%20%20%3Cg%20id%3D%22Page-1%22%20stroke%3D%22none%22%20stroke-width%3D%221%22%20fill%3D%22none%22%20fill-rule%3D%22evenodd%22%20sketch%3Atype%3D%22MSPage%22%3E%0A%20%20%20%20%20%20%20%20%3Cpolygon%20id%3D%22Star-1%22%20stroke%3D%22%23979797%22%20stroke-width%3D%223%22%20fill%3D%22%23F8E81C%22%20sketch%3Atype%3D%22MSShapeGroup%22%20points%3D%2299%20154%2040.2214748%20184.901699%2051.4471742%20119.45085%203.89434837%2073.0983006%2069.6107374%2063.5491503%2099%204%20128.389263%2063.5491503%20194.105652%2073.0983006%20146.552826%20119.45085%20157.778525%20184.901699%20%22%3E%3C%2Fpolygon%3E%0A%20%20%20%20%3C%2Fg%3E%0A%3C%2Fsvg%3E);
}
It's not pretty, but it provides us with a way to negate a separate request over the network. There are different encoding methods for data URIs and plenty of tools available to create data URIs from your assets.
If you're encoding SVGs in this manner, I would suggest avoiding the Base64 method as it doesn't compress as well as text for SVG content.
Generating image sprites
My personal recommendation, tool-wise, for generating image sprites or data URI assets, is iconizr (http://iconizr.com). It gives you complete control over how you would like your resultant SVG and fallback PNG assets. You can have the SVGs and fallback PNG files output as data URIs or image sprites, and it even includes the requisite JavaScript snippet for loading the correct asset if you opt for data URIs. This is highly recommended.
Also, if you are wondering whether to choose data URIs or image sprites for your projects, I did further research on the pros and cons of data URIs or image sprites that you may be interested in, should you be facing the same choice: http://benfrain.com/image-sprites-data-uris-icon-fonts-v-svgs/.
While I'm a big fan of SVGs as background images, if you want to animate them dynamically, or inject values into them via JavaScript, then it will be best to opt for inserting SVG data "inline" into the HTML.
Inserting an SVG inline
As SVG is merely an XML document, you can insert it directly into the HTML. For example:
<div>
    <h3>Inserted 'inline':</h3>
    <span class="inlineSVG">
        <svg id="svgInline" width="198" height="188" viewBox="0 0 198 188" xmlns="http://www.w3.org/2000/svg" xmlns:xlink="http://www.w3.org/1999/xlink">
        <title>Star 1</title>
            <g class="star_Wrapper" fill="none" fill-rule="evenodd">
                <path id="star_Path" stroke="#979797" stroke-width="3" fill="#F8E81C" d="M99 154l-58.78 30.902 11.227-65.45L3.894 73.097l65.717-9.55L99 4l29.39 59.55 65.716 9.548-47.553 46.353 11.226 65.452z" />
            </g>
        </svg>
    </span>
</div>
There is no special wrapping element needed; you literally just insert the SVG markup inside the HTML markup. It's also worth noting that if you remove any width and height attributes on the svg element, the SVG will scale fluidly to fit the containing element.
Inserting SVG as markup into your documents is probably the most versatile option in terms of accessing the broadest range of SVG features.
Let's consider some of those features that inserting SVGs inline allows next.
Reusing graphical objects from symbols
Earlier in this chapter, I mentioned that I had picked and downloaded some icons from IcoMoon (http://icomoon.io). They were icons depicting touch gestures: swipe, pinch, drag, and more. Suppose, in a website you are building, you need to make use of them multiple times. Remember I mentioned that there was a version of those icons as SVG symbol definitions? That's what we will make use of now.
In example_08-09, we insert the various symbol definitions inside the defs element of an SVG in the page. You'll notice that, on the svg element, an inline style is used, display:none, and the height and width attributes have both been set to 0 (those styles could be set in CSS if you prefer). This is so that this SVG takes up no space. We are only using this SVG to house symbols of the graphical objects we want to use elsewhere. So, our markup starts like this:
<body>
    <svg display="none" width="0" height="0" version="1.1" xmlns="http://www.w3.org/2000/svg" xmlns:xlink="http://www.w3.org/1999/xlink">
    <defs>
    <symbol id="icon-drag-left-right" viewBox="0 0 1344 1024">
        <title>drag-left-right</title>
        <path class="path1" d="M256 192v-160l-224 224 224 224v-160h256v-128z"></path>
Notice the symbol element inside the defs element? This is the element to use when we want to define a shape for later reuse.
You can create symbols for use inside the defs tag by taking an existing SVG, changing the svg tag to symbol, removing the namespace attribute, and then nesting it inside the defs tag.
After the SVG has defined all necessary symbols for our work, we have all our "normal" HTML markup. Then, when we want to make use of one of those symbols, we can do this:
<svg class="icon-drag-left-right">
  <use xlink:href="#icon-drag-left-right"></use>
</svg>
That will display the drag left and right icon:

Figure 8.5: With SVGs inserted inline, it's possible to reuse graphics
The magic here is the use element. As you might have guessed from the name, it's used to make use of existing graphical objects that have already been defined elsewhere. The mechanism for choosing what to reference is the xlink attribute, which, in this case, is referencing the symbol ID of the "drag left and right" icon (#icon-drag-left-right) we have inline at the beginning of the markup.
When you reuse a symbol, unless you explicitly set a size (either with attributes on the element itself or with CSS), use will be set to a width and height of 100%. So, to resize our icon, we could do this:
.icon-drag-left-right {
  width: 2.5rem;
  height: 2.5rem;
}
The use element can be used to reuse all sorts of SVG content: gradients, shapes, symbols, and more.
Inline SVGs allow different colors in different contexts
With inline SVGs, you can also do useful things like change colors based on context, and that's great when you need multiple versions of the same icon in different colors:
.icon-drag-left-right {
  fill: #f90;
}
.different-context .icon-drag-left-right {
  fill: #ddd;
}
Making dual-tone icons that inherit the color of their parent
With inline SVGs, you can also have some fun and create two-tone effects from a single color icon (as long as the SVG is made up of more than one path) with the use of currentColor, the oldest CSS variable. To do this, inside the SVG symbol, set the fill of the path you want to be one color as currentColor. Then, use the color value in your CSS to color the element. For the paths in the SVG symbol without the fill, set them as currentColor; they will receive the fill value. To exemplify this:
.icon-drag-left-right {
  width: 2.5rem;
  height: 2.5rem;
  fill: #f90;
  color: #ccc; /* this gets applied to the path that has it's fill attribute set to currentColor in the symbol */
}
Here's that same symbol reused three times, each with different colors and sizes:

Figure 8.6: Making dual-color SVGs by inheriting colors
Remember, you can dig around the code in example_08-09. It's also worth noting that the color doesn't have to be set on that element itself—it can be on any parent element; currentColor will inherit a value from up the DOM tree to the nearest parent with a color value set.
Recoloring SVGs with CSS custom properties
Nowadays, I find the most effective way to recolor the same SVG or symbol is by using CSS custom properties. Let me show you an example. This example can be found at example_08-11.
I have made a pentagon shape using two paths. Each path has a fill and a stroke value. Here is the SVG:
<svg class="shape" width="268" height="254" xmlns="http://www.w3.org/2000/svg">
  <g fill="none" fill-rule="evenodd" stroke-width="10">
    <path d="M134 6.18L6.73 98.647l48.613 149.615h157.314L261.27 98.647 134 6.18z" stroke="var(--stroke1)" fill="var(--fill1)"/>
    <path d="M134 36.18l-98.738 71.738 37.714 116.074h122.048l37.714-116.074L134 36.18z" stroke="var(--stroke2)" fill="var(--fill2)"/>
  </g>
</svg>
Notice how for each path element, both the stroke and fill values have been set to a CSS custom property. With those values in place, I can then set any colors I want for that SVG with CSS, JavaScript, or a combination of the two!
In our example, I have set default colors and hover colors, like this:
.shape {
  display: block;
  --stroke1: #ddd;
  --fill1: #444;
  --stroke2: #f90;
  --fill2: #663d00;
}
.shape:hover {
  --stroke1: #333;
  --fill1: #444;
  --stroke2: #fff;
  --fill2: #ffc266;
}
Sadly, grayscale images fail us a little here, but this is the default coloring. I made the example document background dark just to make it clearer:

Figure 8.7: CSS custom properties make recoloring SVGs simple
Then, to prove how easy it is to amend further still, if you open the example, you will see a button that uses a tiny bit of JavaScript to toggle a class on the page, adding or removing the .amended class. This allows us to have two further sets of colors for this shape:
.amended .shape {
  --stroke1: #080b2b;
  --fill1: #141a67;
  --fill2: #192183;
  --stroke2: #2d3ad7;
}
.amended .shape:hover {
  --stroke1: #092b08;
  --fill1: #125610;
  --fill2: #2dd728;
  --stroke2: #1b8118;
}
This results in four blue colors ordinarily and four green colors when hovered over:
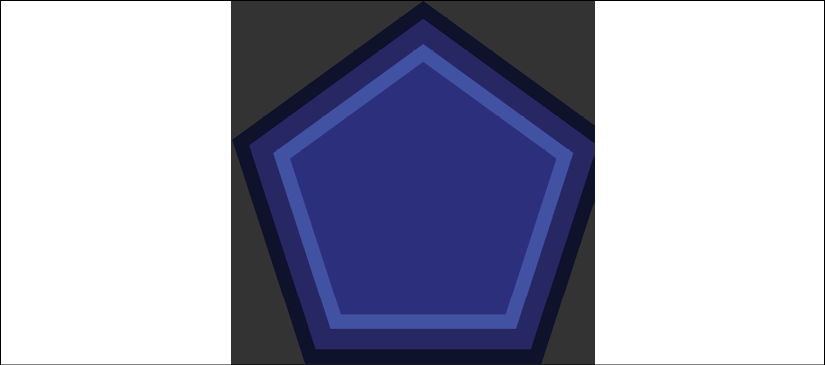
Figure 8.8: CSS custom properties create near limitless possibilities
As you can see, there are a lot of positives to placing SVGs inside the markup. The only downside is that it's necessary to include the same SVG data on every page where you want to use the icons. Sadly, this is bad for performance, as the assets (the SVG data) aren't going to be cached easily. However, there is another option (if you are happy to add a script to support Internet Explorer).
Reusing graphical objects from external sources
Rather than paste in an enormous set of SVG symbols in each page, while still using the use element, it's possible to link out to external SVG files and grab the portion of the document you want to use. Take a look at example_08-10 and the same three icons as we had in example_08-09, which are put on the page in this manner:
<svg class="icon-drag-left-right">
  <use xlink:href="defs.svg#icon-drag-left-right"></use>
</svg>
Be aware that some of these examples might require to run them on a server. Two simple solutions. Either use something like BrowserSync to create a simple local server or paste the code into a service like Codepen.io
The important part to understand is href. We are linking to an external SVG file (the defs.svg part) and then specifying the ID of the symbol within that file we want to use (the #icon-drag-left-right part). The benefits of this approach are that the asset is cached by the browser (just like any other external image would/could be) and it saves littering our markup with an SVG full of symbol definitions. The downside is that, unlike when defs are placed inline, any dynamic changes made to defs.svg (for example, if a path was being manipulated by JavaScript) won't be updated in the use tags.
Sadly, Internet Explorer does not allow referencing symbols from external assets. However, there's a polyfill script for IE 9-11, called SVG For Everybody, that allows us to use this technique regardless. Head over to https://github.com/jonathantneal/svg4everybody for more information.
When using that piece of JavaScript, you can happily reference external assets and the polyfill will insert the SVG data directly into the body of the document for Internet Explorer.
What you can do with each SVG insertion method (inline, object, background-image, and img)
As mentioned previously, SVGs differ from other graphical assets. They can behave differently, depending upon the way they are inserted into a page. As we have seen, there are four main ways in which to place SVG onto the page:
- Inside an
imgtag - Inside an
objecttag - As a background-image
- Inline
And depending upon the insertion method, certain capabilities will or will not be available to you. To understand what should be possible with each insertion method, it might be simpler to consider this table:

Figure 8.9: Depending upon the insertion method, differing capabilities are possible
Now, there are caveats to consider, marked within numbers:
- When using an SVG inside an object, you can use an external style sheet to style the SVG, but you have to link to that style sheet from within the SVG.
- You can use SVGs in an external asset (which is cacheable), but it doesn't work by default in Internet Explorer.
- A media query inside the styles section of an "inlined" SVG works on the size of the document it lives in (not the size of the SVG itself).
Be aware that browser implementations of SVG also vary. Therefore, just because those things should be possible (as indicated previously) doesn't mean they will be in every browser, or that they will behave consistently!
Browser schisms
The results in the preceding table are based upon the test page in example_08-03.
The behavior of the test page is comparable in the latest versions of Firefox, Chrome, and Safari. However, Internet Explorer sometimes does things a little differently.
For example, in all the SVG-capable versions of Internet Explorer (at this point, that's 9, 10, and 11), as we have already seen, it is not possible to reference external SVG sources. Furthermore, Internet Explorer applies the styles from the external style sheet onto the SVGs, regardless of how they have been inserted (all the other browsers only apply styles from external style sheets if the SVGs have been inserted via an object or inline).
Internet Explorer also doesn't allow any animation of SVG via CSS; animation of SVG in Internet Explorer has to be done via JavaScript. I'll say that one again for the folks at the back in the cheap seats: you cannot animate SVGs in Internet Explorer by any means other than JavaScript.
Obviously, Internet Explorer is a diminishing concern, but it's worth knowing about these issues if you need to support it.
Extra SVG capabilities and oddities
Let's put aside the foibles of browsers for a moment and consider what some of these features in the table actually allow, and why you may or may not want to make use of them.
SVGs will always render as sharp as the viewing device will allow and regardless of the manner of insertion. For most practical situations, resolution independence is usually reason enough to use SVG. It's then just a question of choosing whichever insertion method suits your workflow and the task at hand.
However, there are other capabilities and oddities that are worth knowing about, such as SMIL animation, different ways to link to external style sheets, marking internal styles with Character Data delimiters, amending an SVG with JavaScript, and making use of media queries within an SVG. Let's cover those next.
SMIL animation
SMIL animations (http://www.w3.org/TR/smil-animation/) are a way to define animations for an SVG within the SVG document itself. SMIL (pronounced "smile," in case you were wondering) stands for Synchronized Multimedia Integration Language and was developed as a method of defining animations inside an XML document (remember, SVG is XML-based).
Here's an example of how to define a SMIL-based animation:
<g class="star_Wrapper" fill="none" fill-rule="evenodd">
  <animate
    xlink:href="#star_Path"
    attributeName="fill"
    attributeType="XML"
    begin="0s"
    dur="2s"
    fill="freeze"
    from="#F8E81C"
    to="#14805e"
  />
  <path
    id="star_Path"
    stroke="#979797"
    stroke-width="3"
    fill="#F8E81C"
    d="M99 154l-58.78 30.902 11.227-65.45L3.894 73.097l65.717-9.55L99 4l29.39 59.55 65.716 9.548-47.553 46.353 11.226 65.452z"
  />
</g>
I've grabbed a section of the earlier SVG we looked at. The g is a grouping element in SVG, and this one includes both a star shape (the path element with id="star_Path") and the SMIL animation within the animate element. That simple animation tweens the fill color of the star from yellow to green in 2 seconds.
"Tweening"
In case you didn't already know (I didn't), "tweening" as a term is simply a shortening of "inbetweening" as it merely indicates all the in-between stages from one animation point to another.
What's more, it does that whether the SVG is put on the page in an img, object, background-image, or inline (no, honestly, open up example_08-03 in any recent browser other than Internet Explorer to see).
Wow! Great, right? Well, kind of. Despite being a standard for some time, SMIL remains on shaky ground. In the last edition of this book, released in August 2015, it looked like the Chrome browser was going to deprecate SMIL in Chrome.
It's also important to know that SMIL has no support in Internet Explorer. None. Nada. Zip. Zilch. I could go on with other words that amount to very little, but I trust you understand there's no support for SMIL in Internet Explorer.
However, since Microsoft now has the Edge browser, which in turn is based on Chromium (the same code Chrome runs on), SMIL is now in the most modern Microsoft browser. Plus, like a phoenix from the flames, Chrome provided a "stay of execution" of their intention to deprecate SMIL: https://groups.google.com/a/chromium.org/d/msg/blink-dev/5o0yiO440LM/YGEJBsjUAwAJ.
So, while theoretically, SMIL is good to use for some use cases, I tend to quarantine it mentally in a "use as a last resort" technique.
However, if you still have a need to use SMIL, Sara Soueidan wrote an excellent, in-depth article about SMIL animations here: http://css-tricks.com/guide-svg-animations-smil/.
Thankfully, there are plenty of other ways we can animate SVGs, which we will come to shortly. So, if you have to support Internet Explorer, hang on in there.
Styling an SVG with an external style sheet
It's possible to style an SVG with CSS. This can be CSS enclosed in the SVG itself, or in the CSS style sheets you would write all your "normal" CSS in.
Now, if you refer back to our features table from earlier in this chapter, you can see that styling SVG with external CSS isn't possible when the SVG is included via an img tag or as a background-image (apart from Internet Explorer). It's only possible when SVGs are inserted via an object tag or inline.
There are two syntaxes for linking to an external style sheet from an SVG. The most straightforward way is like this (you would typically add this in the defs section):
<link href="styles.css" type="text/css" rel="stylesheet"/>
It's akin to the way we used to link to style sheets prior to HTML5 (for example, note the type attribute is no longer necessary in HTML5). However, despite this working in many browsers, it isn't the way the specifications define how external style sheets should be linked in SVG (http://www.w3.org/TR/SVG/styling.html#ReferencingExternalStyleSheets). Here is the correct/official way, actually defined for XML back in 1999 (http://www.w3.org/1999/06/REC-xml-stylesheet-19990629/):
<?xml-stylesheet href="styles.css" type="text/css"?>
You need to add this above the opening SVG element in your file. For example:
<?xml-stylesheet href="styles.css" type="text/css"?>
<svg
  width="198"
  height="188"
  viewBox="0 0 198 188"
  xmlns="http://www.w3.org/2000/svg"
  xmlns:xlink="http://www.w3.org/1999/xlink"
></svg>
Interestingly, the latter syntax is the only one that works in Internet Explorer. So, when you need to link out to a style sheet from your SVG, I'd recommend using this second syntax for wider support. You don't have to use an external style sheet; you can use inline styles directly in the SVG itself if you would rather.
Styling an SVG with internal styles
You can place styles for an SVG within the SVG itself. They should be placed within the defs element. As SVG is XML-based, it's safest to include the Character Data marker (CDATA). The Character Data marker simply tells the browser that the information within the Character Data delimited section could possibly be interpreted as XML markup but should not be. The syntax is like this:
<defs>
  <style type="text/css">
    <![CDATA[
        #star_Path {
            stroke: red;
        }
    ]]>
  </style>
</defs>
SVG properties and values within CSS
Notice the stroke property in the prior code block? This isn't a CSS property; it's an SVG property. There are quite a few specific SVG properties you can use in styles (regardless of whether they are declared inline or via an external style sheet). For example, with an SVG, as you have seen in an earlier example, you don't specify a background-color; instead, you specify a fill. You don't specify a border; you specify a stroke-width.
For the full list of SVG-specific properties, take a look at the specification here: http://www.w3.org/TR/SVG/styling.html.
With either inline or external CSS, it's possible to do all the "normal" CSS things you would expect; change an element's appearance, animate and transform elements, and so on.
Animating an SVG with CSS
Let's consider a quick example of adding a CSS animation inside an SVG (remember, these styles could just as easily be in an external style sheet too). Let's take the star example we have looked at throughout this chapter and make it spin. You can look at the finished example in example_08-07:
<div class="wrapper">
  <svg
    width="198"
    height="188"
    viewBox="0 0 220 200"
    xmlns="http://www.w3.org/2000/svg"
    xmlns:xlink="http://www.w3.org/1999/xlink"
  >
    <title>Star 1</title>
    <defs>
      <style type="text/css">
        <![CDATA[
        @keyframes spin {
            0% {
                transform: rotate(0deg);
            }
            100% {
                transform: rotate(360deg);
            }
        }
        .star_Wrapper {
            animation: spin 2s 1s;
            transform-origin: 50% 50%;
        }
        .wrapper {
            padding: 2rem;
            margin: 2rem;
        }
        ]]>
      </style>
      <g id="shape">
        <path fill="#14805e" d="M50 50h50v50H50z" />
        <circle fill="#ebebeb" cx="50" cy="50" r="50" />
      </g>
    </defs>
    <g class="star_Wrapper" fill="none" fill-rule="evenodd">
      <path
        id="star_Path"
        stroke="#333"
        stroke-width="3"
        fill="#F8E81C"
        d="M99 154l-58.78 30.902 11.227-65.45L3.894 73.097l65.717-9.55L99 4l29.39 59.55 65.716 9.548-47.553 46.353 11.226 65.453z"
      />
    </g>
  </svg>
</div>
If you load that example in the browser, after a 1 second delay, the star will spin a full circle over the course of 2 seconds.
Notice how a transform-origin of 50% 50% has been set on the SVG? This is because, unlike CSS, the default transform-origin of an SVG is not 50% 50% (center in both axis); it's actually 0 0 (top left). Without that property set, the star would rotate around the top left point.
You can get quite far animating SVGs with CSS animations alone (well, assuming you don't need to worry about Internet Explorer). However, when you want to add interactivity, support Internet Explorer, or synchronize several events, it's generally best to lean on JavaScript. And the good news is that there are great libraries that make animating SVGs really easy. Let's look at an example of that now.
Animating SVG with JavaScript
With an SVG inserted into the page via an object tag or inline, it's possible to manipulate the SVG directly or indirectly with JavaScript. By indirectly, I mean it's possible with JavaScript to change a class on or above the SVG that would cause a CSS animation to start. For example:
svg {
  /* no animation */
}
.added-with-js svg {
  /* animation */
}
However, it's also possible to animate an SVG via JavaScript directly.
If you're animating just one or two things independently, it's probable things would be lighter, code wise, by writing the JavaScript by hand. However, if you need to animate lots of elements or synchronize the animation of elements as if on a timeline, JavaScript libraries can really help. Ultimately, you will need to judge whether the weight of including the library in your page can be justified for the goal you are trying to achieve.
My recommendation for animating SVGs via JavaScript is the GreenSock Animation Platform (http://greensock.com), Velocity.js (http://julian.com/research/velocity/), or Snap.svg (http://snapsvg.io/). For the next example, we'll cover a very simple example using GreenSock.
A simple example of animating an SVG with GreenSock
Suppose we want to make an interface dial that animates when we click a button from zero to whatever value we input. We want not only the stroke of the dial to animate in both length and color, but also the number from zero to the value we input. You can view the completed implementation in example_08-08.
So, if we entered a value of 75 and clicked Animate!!, the dial would fill around to look like this:
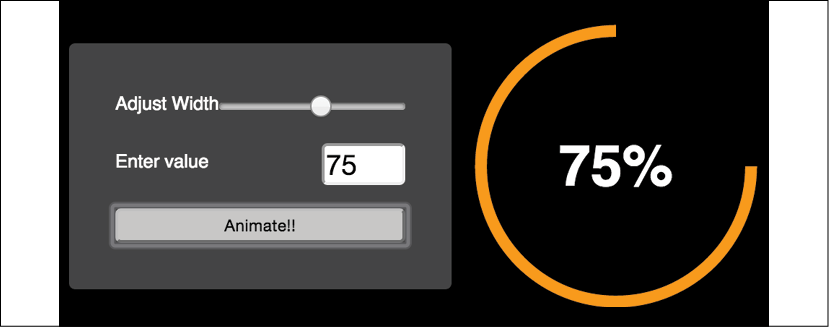
Figure 8.10: Animation libraries make animating SVGs simpler
Instead of listing out the entire JavaScript file (which is heavily commented, so it should make some sense to read in isolation), for brevity's sake, we'll just consider the key points.
The basic idea is that we have made a circle as an SVG <path> (rather than a <circle> element). As it's a path, it means we can animate the path as if it were being drawn using the stroke-dashoffset technique. There's more info on this technique in the boxed out section that follows, but briefly, we use JavaScript to measure the length of the path and then use the stroke-dasharray attribute to specify the length of the rendered part of the line and the length of the gap.
Then, we use stroke-dashoffset to change where that dasharray starts. This means you can effectively start the stroke "off" the path and animate it in. This gives the illusion that the path is being drawn.
If the value to animate dasharray was a static, known value, this effect would be relatively simple to achieve with a CSS animation and a little trial and error (more on CSS animations in the next chapter). However, besides a dynamic value, at the same time as we are "drawing" the line, we want to fade in the stroke color from one value to another and visually count up to the input value in the text node. This is an animation equivalent of patting our heads, rubbing our tummy, and counting backward from 10,000. GreenSock makes those things easy (the animation part; it won't rub your tummy or pat your head, although it can count back from 10,000, should you need it to).
Here are the lines of JavaScript needed to make GreenSock do all three:
// Animate the drawing of the line and color change
TweenLite.to(circlePath, 1.5, {
  'stroke-dashoffset': '-' + amount,
  stroke: strokeEndColour,
});
// Set a counter to zero and animate to the input value
var counter = {var: 0};
TweenLite.to(counter, 1.5, {
  var: inputValue,
  onUpdate: function() {
    text.textContent = Math.ceil(counter.var) + '%';
  },
  ease: Circ.easeOut,
});
In essence, with the TweenLite.to() function, you pass in the thing you want to animate, the time over which the animation should occur, and then the values you want to change (and what you want them to change to).
The GreenSock site has excellent documentation and support forums, so if you find yourself needing to synchronize a number of animations at once, be sure to clear a day from your diary and familiarize yourself with GreenSock.
In case you haven't come across the SVG "line drawing" technique before, it was popularized by Polygon magazine when Vox Media animated a couple of line drawings of the Xbox One and PlayStation 4 games consoles. You can read the original post here: http://product.voxmedia.com/2013/11/25/5426880/polygon-feature-design-svg-animations-for-fun-and-profit.
There's also an excellent and more thorough explanation of the technique by Jake Archibald here: http://jakearchibald.com/2013/animated-line-drawing-svg/.
Optimizing SVGs
As conscientious developers, we want to ensure that assets are as small as possible. The easiest way to do this with SVGs is to make use of automation tools that can optimize various particulars of SVG documents. Besides obvious economies such as removing elements (for example, stripping the title and description elements), it's also possible to perform a raft of micro-optimizations that, when added up, make for far leaner SVG assets. Presently, for this task, I would recommend SVGO (https://github.com/svg/svgo).
If you have never used SVGO before, I would recommend starting with SVGOMG (https://jakearchibald.github.io/svgomg/). It's a browser-based version of SVGO that enables you to toggle the various optimization plugins and get instant feedback on the file savings. Remember our example star SVG markup from the beginning of this chapter? By default, that simple SVG is 489 bytes in size. By passing that through SVGO, it's possible to get the size down to just 218 bytes, and that's leaving the viewBox in. That's a saving of 55.42%. If you're using a raft of SVG images, these savings can really add up. Here's what the optimized SVG markup looks like:
<svg
  width="198"
  height="188"
  viewBox="0 0 198 188"
  xmlns="http://www.w3.org/2000/svg"
>
  <path
    stroke="#979797"
    stroke-width="3"
    fill="#F8E81C"
    d="M99 154l-58.78 30.902 11.227-65.45L3.894 73.097l65.717-9.55L99 4l29.39 59.55 65.716 9.548-47.553 46.353 11.226 65.454z"
  />
</svg>
Before you spend too long with SVGO, be aware that, such is the popularity of SVGO, plenty of other SVG tools also make use of it. For example, the aforementioned iconizr (http://iconizr.com) tool runs your SVG files through SVGO by default anyway, before creating your assets, so ensure you aren't unnecessarily double optimizing.
Using SVGs as filters
In Chapter 7, Stunning Aesthetics with CSS3, we looked at the CSS filter effects. CSS filters aren't supported in older browsers like Internet Explorer 10 or 11. That can be frustrating if you have a project that requires filters and you want/need to support those browsers.
Luckily, with help from SVG, we can create filters that work in Internet Explorer 10 and 11 too, but as ever, it's perhaps not as straightforward as you might imagine. For example, in example_08-05, we have a page with the following markup inside the body:
<img class="HRH" src="[email protected]" />
It's an image of the Queen of England. Ordinarily, it looks like this:
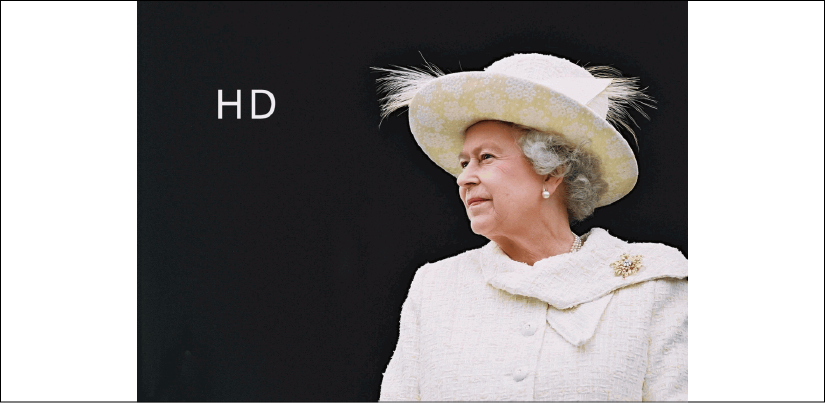
Figure 8.11: An image with no SVG filter applied
Now, also in that example folder, is an SVG with a filter defined in the defs elements. The SVG markup looks like this:
<svg xmlns="http://www.w3.org/2000/svg" version="1.1">
  <defs>
    <filter id="myfilter" x="0" y="0">
      <feColorMatrix
        in="SourceGraphic"
        type="hueRotate"
        values="90"
        result="A"
      />
      <feGaussianBlur in="A" stdDeviation="6" />
    </filter>
  </defs>
</svg>
Within the filter, we are first defining a hue rotation of 90 (using feColorMatrix, and then passing that effect, via the result attribute, to the next filter (feGaussianBlur) with a blur value of 6. Be aware that I've been deliberately heavy handed here. This doesn't produce a nice aesthetic, but it should leave you in no doubt that the effect has worked!
Now, rather than add that SVG markup to the HTML, we can leave it where it is and reference it using the same CSS filter syntax we saw in the previous chapter.
.HRH {
  filter: url('filter.svg#myfilter');
}
In most evergreen browsers (Chrome, Safari, and Firefox), this is the effect:
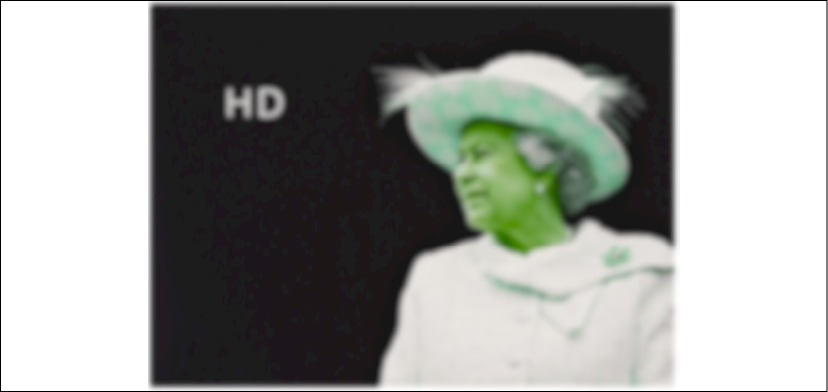
Figure 8.12: An image with an SVG filter applied
Sadly, this method doesn't work in IE 10 or 11. However, there is another way to achieve our goal, and that's using SVG's own image tag to include the image within the SVG. Inside example_08-06, we have the following markup:
<svg
  height="747px"
  width="1024px"
  viewBox="0 0 1024 747"
  xmlns="http://www.w3.org/2000/svg"
  version="1.1"
>
  <defs>
    <filter id="myfilter" x="0" y="0">
      <feColorMatrix
        in="SourceGraphic"
        type="hueRotate"
        values="90"
        result="A"
      />
      <feGaussianBlur in="A" stdDeviation="6" />
    </filter>
  </defs>
  <image
    x="0"
    y="0"
    height="747px"
    width="1024px"
    xmlns:xlink="http://www.w3.org/1999/xlink"
    xlink:href="[email protected]"
    filter="url(#myfilter)"
  ></image>
</svg>
The SVG markup here is very similar to the external filter.svg filter we used in the previous example but the height, width, and viewBox attributes have been added. In addition, the image we want to apply the filter to is the only content in the SVG outside of the defs element. To link to the filter, we are using the filter attribute and passing the ID of the filter we want to use (in this case, from within the defs element).
Although this approach is a little more involved, it means you can get the many and varied filter effects that SVG affords, even in versions 10 and 11 of Internet Explorer.
A note on media queries inside SVGs
All browsers that understand SVG should respect the CSS media queries defined inside. However, when it comes to media queries inside SVGs, there are a few things to remember.
For example, suppose you insert a media query inside an SVG, like this:
<style type="text/css"><![CDATA[
    #star_Path {
        stroke: red;
    }
    @media (min-width: 800px) {
        #star_Path {
            stroke: violet;
        }
    }
]]></style>
And that SVG is displayed on the page at a width of 200px, while the viewport is 1,200px wide.
We might expect the stroke of the star to be violet when the screen is 800px and above. After all, that's what we have our media query set to. However, when the SVG is placed on the page via an img tag, as a background image, or inside an object tag, it has no knowledge of the outer HTML document. Hence, in this situation, min-width means the minimum width of the SVG itself. So, unless the SVG itself displayed on the page at a width of 800px or more, the stroke wouldn't be violet.
Conversely, when you insert an SVG inline, it merges (in a manner of speaking), with the outer HTML document. The min-width media query here is looking to the viewport (as is the HTML) to decide when the media query matches.
To solve this particular problem and make the same media query behave consistently, we could amend our media query to this:
@media (min-device-width: 800px) {
  #star_Path {
    stroke: violet;
  }
}
That way, regardless of the SVG size or how it is embedded, it is looking to the device width (effectively the viewport).
SVG implementation tips
We're almost at the end of this chapter now and there is still so much we could talk about regarding SVG. Therefore, at this point, I'll just list a few unrelated considerations. They aren't necessarily worthy of protracted explanations, but I'll list them here in note form in case they save you from hours of searching Stack Overflow:
- If you have no need to animate your SVGs, opt for an image sprite of your assets or a data URI style sheet. It's far easier to provide fallback assets and they almost always perform better from a performance perspective.
- Automate as many steps in the asset creation process as possible; this reduces human error and produces predictable results faster.
- To insert static SVGs in a project, pick a single delivery mechanism and stick to it (image sprite, data URI, or inline). It can become a burden to produce some assets one way and some another and maintain the various implementations.
- There is no easy "one size fits all" choice with SVG animation. For occasional and simple animations, use CSS. For complex interactive or timeline style animations that will also work in Internet Explorer, lean on a proven library such as GreenSock, Velocity.js, or Snap.svg.
Summary
This has been a dense chapter. We have covered a lot of the essential information needed to start making sense of, and implementing, SVGs in a responsive project. We have considered the different graphics applications and online solutions available to create SVG assets, then the various insertion methods possible and the capabilities each allows, along with the various browser peculiarities to be aware of.
We've also considered how to link to external style sheets and reuse SVG symbols from within the same page and when referenced externally. We even looked at how we can make filters with SVG that can be referenced and used in CSS for wider support than CSS filters.
Finally, we considered how to make use of JavaScript libraries to aid animating SVGs, as well as how to optimize SVGs with the aid of the SVGO tool.
In the next chapter, we'll be looking at CSS transitions, transforms, and animations. It's also worth reading that chapter in relation to SVG, as many of the syntaxes and techniques can be used and applied in SVG documents too.
Further resources
As I mentioned at the start of this chapter, I have neither the space, nor the knowledge, to impart all there is to know about SVG. Therefore, I'd like to make you aware of the following excellent resources, which provide additional depth and range on the subject:
- SVG Essentials, 2nd Edition by J. David Eisenberg and Amelia Bellamy-Royds: http://shop.oreilly.com/product/0636920032335.do
- A Guide to SVG Animations (SMIL) by Sara Soueidan: http://css-tricks.com/guide-svg-animations-smil/
- Media Queries inside SVGs Test by Jeremie Patonnier: http://jeremie.patonnier.net/experiences/svg/media-queries/test.html
- An SVG Primer for Today's Browsers: http://www.w3.org/Graphics/SVG/IG/resources/svgprimer.html
- Understanding SVG Coordinate Systems and Transformations (Part 1) by Sara Soueidan: http://sarasoueidan.com/blog/svg-coordinate-systems/
- Hands On: SVG Filter Effects: https://testdrive-archive.azurewebsites.net/Graphics/hands-on-css3/hands-on_svg-filter-effects.htm
- The full set of SVG tutorials by Jakob Jenkov: http://tutorials.jenkov.com/svg/index.html