
Chapter 3. Deploying a Restlet application
In chapter 2 you learned how to develop a Restlet application, the basic unit of reuse in the Restlet Framework. Your goal now is to deploy those applications to local machines in your organization and to make sure that they can be properly used and tested.
In this chapter you’ll learn the purpose of a Restlet component and how it’s structured in four layers. You’ll then see how to set up a Restlet component in a Java SE environment, adding server and client connectors, exploring virtual hosting and internal routing, and configuring logging and default status messages.
As an alternative to using the Restlet API with Java code, we introduce two ways to use XML for more declarative configuration of Restlet components—one built in the Restlet Framework and another relying on the Spring Framework. Then we explain how to deploy the same Restlet application to a pre-existing Java EE server. Finally we mention a third deployment approach based on OSGi.
This chapter isn’t the last one covering deployment; chapter 8 shows how Restlet applications can be easily deployed in cloud computing infrastructures such as Google App Engine, Amazon EC2, or Microsoft Azure.
3.1. The purpose of Restlet components
When we introduced REST in chapter 1, we mentioned the role of REST components as coarse-grained distributed architecture elements that communicate between themselves using connectors and network protocols such as HTTP. We also indicated how the Restlet Framework directly embodies those elements in its API. Like chapter 2, where we illustrate how REST resources map to instances of Restlet Resource class (specifically its subclasses, ClientResource and ServerResource), this chapter introduces the Restlet Component, Connector, Client, and Server classes.
Figure 3.1 expands figure C.5 from appendix C (introducing the REST architecture style in detail) to illustrate how a Restlet component interacts with other REST components using client and server connectors. Note that the other components need not be developed using Restlet; the interoperability is solely based on the communication protocols implemented by the connectors and on the data exchanged (the resource representations).
Figure 3.1. Restlet components are containers of Restlet applications and connect them to other distributed REST components.
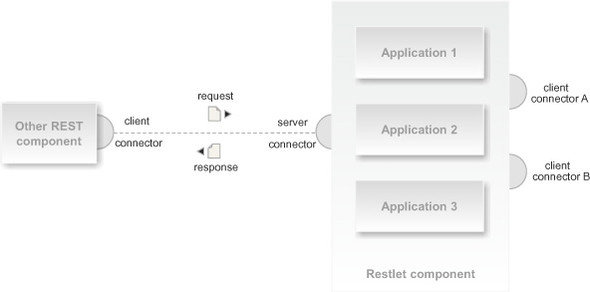
Figure 3.1 tells us another important thing about the purpose of a Restlet component: it’s a container of Restlet applications. The containment plus the connectivity offered to applications makes the Restlet components the perfect vehicles to deploy and run applications on local or remote infrastructures.
As you’ll see in the next sections—where the purpose of applications is to ensure portability of user routing logic and contained resources—the purpose of components is to deploy those applications and adapt them to specific target environments, such as Java SE and Java EE. This ensures, for example, that your applications aren’t tied to a specific IP address or domain name, thanks to the virtual hosting capabilities of components.
Also Restlet components provide, through the Realm class, the ability to abstract contained applications from security aspects specific to a given deployment environment, such as how and where user credentials (logins, passwords, certificates, and so on) are stored (LDAP directory, relational database, local file, and so forth) and which application roles are granted to authenticated users. More details on the security aspects are explained in chapter 5.
In the next section we get more concrete and explain how Restlet components are organized in layers.
3.2. The structure of Restlet components
As in section 2.2, where we discuss the structure of Restlet applications, the structure of Restlet components is organized in concentric layers, which are progressively more specific in their function as you move toward the center. Restlet components are like applications in being able to handle both inbound and outbound calls, as illustrated in figure 3.2 with large arrows.
Figure 3.2. Restlet components are structured into four concentric layers, processing inbound and outbound calls in logical steps.
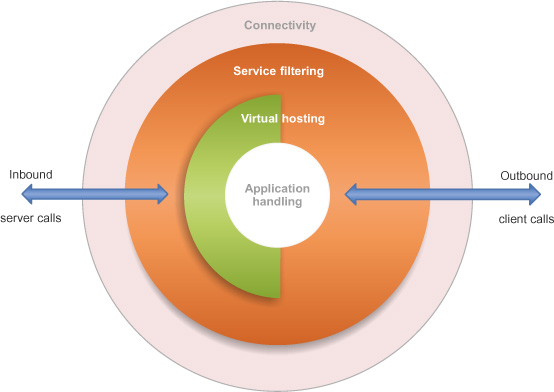
An inbound call is first received by the connectivity layer, which handles transport aspects of network protocols, such as HTTP persistent connections or FTP connection establishment. Then the call goes through the service filtering layer, similar to the one found inside each Restlet application. By default, this layer provides global access logging, similar to the HTTP access logs produced by traditional servers like Apache HTTP or Microsoft IIS. Next the call enters into the virtual hosting layer, which is only relevant on the server side.
This is a common mechanism found in HTTP servers helping to serve several domain names and websites from a single IP address and port number. It’s useful when the number of available IP addresses is limited on a single machine and you still want to use the default ports of protocols. For example, HTTP uses 80 as its default port, so you can omit :80 in HTTP URIs.
Once the call has been dispatched to one of the declared virtual hosts, it can enter into the application handling layer. This layer is the Restlet application handling described in chapter 2.
On the other side, a client call is typically issued by a contained application in the application handling layer. It goes directly to the service filtering layer because virtual hosting doesn’t apply to outbound calls. It then enters the connectivity layer, where it’s picked up by the matching client connector, based on either an explicit call protocol or a protocol implied by its context (for example, the target URI of the call). Client connectors are reused across all outbound calls of all applications and must be scalable and stateless to ensure isolation between applications.
To illustrate the call flow, figure 3.3 expands on the Restlet component portion of figure 3.1 and provides more detail. Two virtual hosts are declared, and the three application instances are attached to them using relative URI paths (for example, /app3). Note that the same application instance can be attached to several virtual hosts. (It’s also possible to instantiate a Restlet application class several times, attaching each instance to its own virtual host, typically for data-isolation purposes.)
Figure 3.3. A closer look at the content of a Restlet component

Also note that an internal router is shown with a forbidden link from the server connector. This is a private router to your component that can only be accessed for internal calls; such calls don’t go through the local network loopback. The internal router is closely related to the Restlet Internal Access Protocol (RIAP) pseudoprotocol that we take advantage of in section 7.5.2 when talking about modularizing large Restlet systems.
At this point you should have enough background information to understand the purpose and structure of Restlet components. Let’s write a first Restlet component using the Restlet edition for Java SE and the example mail server application from the end of chapter 2.
3.3. Standalone deployment with Java SE
In this section we explain how to use Restlet components to deploy standalone applications on a regular Java SE virtual machine, which is the simplest way to get started with Restlet deployment, but still a powerful one. For this purpose we use the Restlet edition for Java SE, which is best suited for development phases, when you need instant turnaround between coding and testing; for embedded scenarios, when the lightest footprint is required; and in situations where you have complete access to the server machine and want the maximum flexibility regarding which connectors to use.
The main requirement for the version of the Restlet Framework covered by this book (2.1) is Java SE 5.0 and above.
You’ll see how to set up an org.restlet.Component object via Java code, how to add client and server connectors, how to set up virtual hosts, and how to configure the common services, such as the default log and status services.
3.3.1. Creating a Component subclass
Starting with the Restlet mail server application and resources defined in section 2.5.5, we’ll create a Restlet component. The first step will be to extend org.restlet.Component. In listing 3.1 you add an HTTP server connector to the component’s list of servers and attach your application to the default virtual host. Note that Restlet components are typically configured in their constructor, whereas applications are configured in an overridden createInboundRoot() method, and resources in an overridden doInit() method.
Listing 3.1. Creating the MailServerComponent to deploy the application

As you can see, starting the component is as easy as invoking its start() method, which in turn arranges for the HTTP server connector added in the constructor to listen on port 8111, ready to answer to inbound calls. In the next subsection, we study in detail how to configure a Restlet component, its connectors, virtual hosts, services, and other features—but before that you need to ensure that the component is actually working.
Listing 3.2 shows a simple mail client that sets up a base service client resource and obtains child client proxies for each remote resource from that service that it needs to interact with. You create client proxies for child resources using the getChild(String relativeUri, Class<T>) method, as demonstrated in listing 2.13. For space reasons, we’ve omitted the class declaration.
Listing 3.2. Simple mail client interacting with component resources
System.out.println("
1) Set up the service client resource
");
Client client = new Client(new Context(), Protocol.HTTP);
ClientResource service = new ClientResource("http://localhost:8111");
service.setNext(client);

System.out.println("
2) Display the root resource
");
RootResource mailRoot = service.getChild("/", RootResource.class);
System.out.println(mailRoot.represent());

System.out.println("
3) Display the initial list of accounts
");
AccountsResource mailAccounts = service.getChild("/accounts/",
        AccountsResource.class);
String list = mailAccounts.represent();
System.out.println(list == null ? "<empty>
" : list);

System.out.println("4) Adds new accounts
");
mailAccounts.add("Homer Simpson");
mailAccounts.add("Marjorie Simpson");
mailAccounts.add("Bart Simpson");
System.out.println("Three accounts added !");

System.out.println("
5) Display the updated list of accounts
");
System.out.println(mailAccounts.represent());

System.out.println("6) Display the second account
");
AccountResource mailAccount = service.getChild(
                  "/accounts/1", AccountResource.class);
System.out.println(mailAccount.represent());

System.out.println(
    "
7) Update the individual account and display it again
");
mailAccount.store("Homer Jay Simpson");
System.out.println(mailAccount.represent());

System.out.println(
    "
8) Delete the first account and display the list again
");
mailAccount = service.getChild("/accounts/0", AccountResource.class);
mailAccount.remove();
System.out.println(mailAccounts.represent());
Note how each call to a remote resource looks as though that resource were locally present. You might also wonder what happens when an error occurs or when you need access to underlying HTTP details (for example, for preemptive authentication). To give you that access, dynamic client proxies created by ClientResource also implement the org.restlet.resource.ClientProxy interface. This interface declares a single getClientResource() method that points to the wrapped ClientResource instance and provides the richness of all the Restlet API to inspect and modify the request and response objects.
After making sure that the server-side component is started, you can launch the MailClient class and observe the console output, which looks like this:
1) Set up the service client resource

org.restlet.engine.http.connector.HttpClientHelper start
INFO: Starting the default HTTP client

2) Display the root resource

Welcome to the RESTful Mail Server application !

3) Display the initial list of accounts

<empty>

4) Adds new accounts

Three accounts added !

5) Display the updated list of accounts

Homer Simpson
Marjorie Simpson
Bart Simpson

6) Display the second account

Marjorie Simpson

7) Update the individual account and display it again

Marge Simpson

8) Delete the first account and display the list again

Marge Simpson
Bart Simpson
After this basic test run of the Component class, embedding the example mail system started in chapter 2, let’s continue with the description of connectors and how they can be managed by a Restlet component.
3.3.2. Adding server and client connectors
When your Restlet application needs to communicate with other applications—either locally or remotely, acting as a server or as a client—it needs to use a specific medium, like a TCP/IP socket, and exchange data following a specific protocol, such as HTTP, FTP, or SMTP.
In REST, connectors are in charge of those communication needs. The Restlet API, as usual, exactly follows this terminology by having an abstract org.restlet.Connector class and two concrete subclasses—org.restlet.Client and org.restlet.Server—each of which can be used with a variety of protocols thanks to the uniform interface supported by all Restlet subclasses.
The class diagram in figure 3.4 illustrates the relationships between those three classes along with their main properties. (To be concise, we don’t mention all the constructors of the Server class.) Refer to the Javadocs for authoritative information about the Restlet API. Table 3.1 presents each property of the classes.
Figure 3.4. Class diagram of the Connector superclass and the Client and Server child classes

Table 3.1. Properties of the Connector, Client, and Server classes
|
Name |
Description |
|---|---|
| protocols | List of the protocols expected to be supported at the same time by the same connector instance. On the server side, it’s generally one protocol like HTTP or HTTPS but not both. On the client side, it can be both HTTP and HTTPS at the same time. |
| available | Indicates whether the connector was able to look up an implementation helper matching the specified protocol(s). |
| connectTimeout | The delay in milliseconds that a client connector will wait while attempting to establish a network connection with a remote host. |
| address | The optional listening IP address in textual format. It’s generally specified at construction time, and changes aren’t taken into account until the connector is restarted. |
| ephemeralPort | Actual ephemeral port used by a server connector when the listening port is set to 0. This allows you to listen on any available port without knowing it in advance, typically for unit-testing purposes when you don’t know the available fixed ports. |
| next | Reference to the Restlet that will handle inbound calls received by a server connector. When a ServerResource subclass is specified, an implicit Finder is used as a resource factory. |
| port | The listening socket port number. It’s generally specified at construction time, and changes aren’t taken into account until the server connector is restarted. |
The Restlet Engine comes with built-in connectors, but additional ones are also available via the set of Restlet Extensions. You can also develop your own connectors and plug them dynamically in the Restlet Engine. If you want to do so, contact the Restlet community for guidance and additional documentation.
Let’s review the available connectors and their main characteristics, starting with the default ones provided in the Restlet core (distributed as a single org.restlet.jar file in version 2.1). All these built-in connectors listed in table 3.2 are usable in both development and light deployment scenarios.
Table 3.2. Characteristics of built-in connectors
|
Protocols |
Description |
|---|---|
| HTTP/HTTPS client and server | Complete client and server connectors supporting all HTTP features, including
|
| FILE client | Local client connector to manipulate (list, read, write, and delete) files using the file URI scheme. For example, you can send a PUT request to the file:///C/www/index.html resource with a request entity that holds the new content of the (existing or new) file identified by the URI. Note that for best portability across OS, you should try using the CLAP client or the WAR client under the Java EE environment. |
| ZIP/JAR client | Local client connectors to read resources inside local ZIP or JAR files using the zip or jar URI scheme. For example, you can send a GET request to the jar:file:///C/foo/foo.jar!/org/foo/Bar.class URI. |
| CLAP client | JVM connector to get the representations of resources accessible via class loaders and the clap URI scheme. Class Loader Access Protocol (CLAP) supports these URI authorities:
|
| RIAP client and server | JVM connector to manipulate (with any method) the representation of resources accessible via the local Restlet Framework and
the riap URI scheme. RIAP supports these URI authorities:
|
Those connectors are key elements of the framework, but in the end you’ll rarely directly invoke them. Instead, you’ll use higher-level classes such as ClientResource and ServerResource as discussed previously, or the Directory class to serve static files as you’ll see in section 8.1. We make concrete use of the RIAP pseudoprotocol in section 8.5 when discussing modularization of large applications.
Let’s now introduce the extension connectors that are provided in extension JAR files, such as org.restlet.ext.jetty.jar. Additional library dependencies are provided in the Restlet distribution for Java SE and described in a readme.txt file of the lib top directory. Table 3.3 lists the connectors available.
Table 3.3. Characteristics of extension connectors
|
Extension |
Protocols |
Description |
|---|---|---|
| HTTP Client | HTTP/HTTPS client | Complete and production-ready connector based on the latest versionof the popular Apache HTTP Client library. All HTTP features
are supported, including:
|
| JavaMail | POP/POPS,SMTP/SMTPS/SMTP StartTLS client | Complete and production-ready client connector to post and retrieve emails from a remote mail server based on the JavaMail API and reference implementation. It also supports common authentication mechanisms. The originality of this connector is that it maps the HTTP semantics of the GET and POST methods to the JavaMail API, using XML documents to represent emails and mail boxes. There’s no need to learn JavaMail to use it. Dynamic XML emails can easily be created using a template engine such as FreeMarker or Velocity. |
| JDBC | JDBC client | Complete and production-ready client connector to post SQL statements to a JDBC data source, typically a relational database based on the JDBC API. It supports regular authentication and connection pooling via the Apache Commons Pool library. The originality of this connector is that it maps the HTTP semantics of the POST method to the JDBC API, using XML documents to represent SQL statements and result sets. There’s no need to learn JDBC to use it. Dynamic XML statements can easily be created using a template engine such as FreeMarker or Velocity. |
| Jetty | AJP/HTTP/HTTPSserver | Complete and production-ready connector based on the popular Jetty HTTP server. Most HTTP features are supported:
|
| Besides the usual HTTP and HTTPS protocols, this connector supports the AJP protocol, which is sometimes used to tunnel HTTP calls between a front-end Apache HTTP daemon and a back end HTTP server as an alternative to reverse HTTP proxies. | ||
| Lucene | SOLR client | Client connector to an embedded Apache Solr indexing and retrieval engine. |
| Net | HTTP/HTTPS and FTP clients | Complete and production-ready connector based on the java.net.HttpURLConnection class from the JDK. Main HTTP features are
supported, including:
|
| The main interest of this connector is that it requires no additional dependency and is the only HTTP client supported in the Google App Engine edition. | ||
| Simple | HTTP/ HTTPS server | Alternative server connector ready for production based on the lightweight Simple HTTP framework, with features including:
|
| SIP | SIP client and server | Standalone client and server connectors built on top of the internal HTTP/ NIO connector, enabling the construction of convergent web and VoIP applications. SIP is the base protocol of VoIP, inspired by HTTP. Note that the extension doesn’t provide a SIP state machine but only a Java API that maps most SIP methods, statuses, and headers as well as SipClientResource and SipServerResource classes to process SIP calls. |
In addition to the main features described in table 3.3, you can obtain more information in the Javadocs, including a list of parameters that can be adjusted for each connector. The following listing shows how to configure such a parameter by adjusting the MailServerComponent class from listing 3.1.
Note that some experimental connectors based on Grizzly and Netty NIO frameworks were introduced in version 2.0, then removed in 2.1 in favor of new internal HTTP connectors that take full advantage of asynchronous NIO processing.
Listing 3.3. Adding HTTP tracing to the internal server connector
...
// Adds an HTTP server connector
Server server = getServers().add(Protocol.HTTP, 8111);
server.getContext().getParameters().set("tracing", "true");
...
To be taken into account, the "tracing" parameter must be set before the connector is started. When enabled it asks the default HTTP server to trace in the Java console the exact content of all the requests and responses exchanged with clients. This can be handy when troubleshooting.
The next subsection explores virtual hosting.
3.3.3. Setting up virtual hosting
In chapter 2, we discuss the Restlet routing system and in particular the Router class. The role of a router is to dispatch inbound calls to the best of the attached routes based on some criteria, typically the target URI of the request, or more precisely the relative part of the URI that hasn’t been routed.
For example, inside the MailServerApplication class updated in listing 3.13, we attached resources to the root router using relative URI paths, assuming that the base of the URI had already been consumed by the default host in MailServerComponent in listing 3.1. In this section we examine how the base of the URI—for example, http://localhost:8111—is effectively matched by a Restlet component and the exact behavior of a virtual host.
Virtual hosting in Restlet allows you to bind the same IP address to several internet domain names and still retain the ability to serve each domain name with a separate Restlet application. You can also listen at the same time to several IP addresses, handled by the same application if necessary—for example, for network load-balancing or fail-over purposes.
To get started, look at table 3.4, which lists the properties of org.restlet.routing.VirtualHost, which extends the Router class.
Table 3.4. Properties of the VirtualHost classes
|
Property |
Description |
|---|---|
| hostDomain | Pattern string that is matched against the domain name of the host URI reference of the incoming call, extracted from the Request.hostRef.hostDomain property. |
| hostPort | Pattern string that is matched against the port number of the host URI reference of the incoming call, extracted from the Request.hostRef.hostPort property. If not present in the URI, the pattern is matched against the default port number of the scheme, such as 80 for HTTP or 443 for HTTPS. |
| hostScheme | Pattern string that is matched against the scheme name of the host URI reference of the incoming call, extracted from the Request.hostRef.scheme property. |
| resourceDomain | Pattern string that is matched against the domain name of the target resource URI reference of the incoming call, extracted from the Request.resourceRef.hostDomain property. |
| resourcePort | Pattern string that is matched against the port number of the target resource URI reference of the incoming call, extracted from the Request.resourceRef.hostPort property. If not present in the URI, the pattern is matched against the default port number of the scheme, such as 80 for HTTP or 443 for HTTPS. |
| resourceScheme | Pattern string that is matched against the scheme name of the target resource URI reference of the incoming call, extracted from the Request.resourceRef.scheme property. |
| serverAddress | Pattern string that is matched against the server IP address that received the incoming call, extracted from the Response.serverInfo.address property. |
| serverPort | Pattern string that is matched against the server IP port number that received the incoming call, extracted from the Response.serverInfo.port property. If not specified, the pattern is matched against the default port number of the protocol used to receive the call, defined by Request.protocol.defaultPort. |
Each property is a string containing a pattern to be matched. The expression language used for the pattern is defined by the java.util.regex.Pattern class. For example, all the properties have the same default value .*, which matches any sequence of characters. The value a* would only match a sequence of zero or more a characters. Regular expressions can be powerful but complex, so we recommend reading the Javadocs of the Pattern class and related documentation for help.
The last piece that’s missing is the selection of the best virtual host for an inbound call by attempting to match the previously mentioned properties. This is the role of the engine logic inside each Restlet component, which uses a special router adding a route for each virtual host declared via the Component.hosts property as well as the Component.defaultHost property. In case no virtual host matches, a 404 (Not Found) status is returned.
Note that the Component’s default host is initialized to match any request, so be careful when going into production and precisely check which Restlet applications are attached to it. You can set it to null or make sure that its patterns are more restrictive, like a regular virtual host bound to a specific domain name or IP address. Finally, remember that a VirtualHost instance is still a kind of Router instance, so you can attach applications to it, or any kind of Restlet instance if necessary, using several attachment subpaths for different applications attached to the same host.
Applying what you’ve learned, let’s plan an (imaginary) production deployment of the RESTful mail system that makes MailServerComponent and the contained MailServerApplication available on the Web at the following URIs: www.rmep.com, www.rmep.net, and www.rmep.org. Let’s also imagine that the dedicated server machine has two network cards for network fail-over reasons, each linked to a different internet provider. (Another reason for having multiple IP addresses could be for network load-balancing or to map different domain names to separate IP addresses.) Figure 3.5 summarizes the virtual host configuration you want to obtain.
Figure 3.5. Virtual host listening on two IP addresses and serving several domain names

You want to update your component to match the desired configuration. Because there’s only one virtual host, you’ll reconfigure the default virtual host, which by default matches all requests. The following listing sets more precise patterns to match the host domain name of the request and the HTTP server IP address and port number.
Listing 3.4. Configuring the virtual hosting

If you restart the component and attempt to GET the http://localhost:8111/accounts/URI in your browser, the following error message is displayed: “No virtual host could handle the request.” It might appear that you can’t test this configuration unless all the domain names are bought and the network is configured with the matching IP addresses. Now it’s time to demonstrate how to use the Restlet Framework for testing purposes by creating test requests and responses and locally invoking any Restlets (components, applications) without going through the connector and network layers.
Listing 3.5 presents a simple JUnit test case that builds a request/response as it would be received by the server connector. It directly invokes a local instance of the MailServerComponent class. To make sure this test fails if the domain name doesn’t match, try running it again after changing the request domain name to rmep1.org.
Listing 3.5. Unit test for virtual host

We’re now nearly done with our exploration of standalone deployment of Restlet applications; we need to cover the available services in Component and declarative XML configuration.
3.3.4. Configuring common services
In section 2.3.4, we explain how to configure common services for Application. For the Component class, the same service mechanism applies; services extend the Service class and can be added to the Component.services property for registration. Two default services are available, listed in table 3.5, enabled and preregistered for you.
Table 3.5. Restlet applications can use several built-in component services.
|
Name |
Description |
|---|---|
| LogService | Global access log for all server connectors and applications contained in the component. By default, it produces log entries in a format similar to IIS and Apache HTTP servers. |
| StatusService | Handles error statuses. If an exception is thrown within your application or Restlet code, it’s intercepted by this service in order to customize the response status code and entity to ensure a consistent look-and-feel. |
The status service is complementary to the one defined in each application but can be configured to overwrite the status pages to make sure that they have a consistent look-and-feel across all applications contained.
Let’s look more closely at the log service and configure it to maintain a rotating access log file. The following listing updates the MailServerComponent to load logging properties via the classpath.
Listing 3.6. Configuring access logging

In this example it’s interesting to note how you use the Restlet client connector for the CLAP pseudoprotocol to easily retrieve the log.properties file from the classpath so it can be stored in the same directory as the MailServerComponent.java source file. Have a look at the self-documented configuration file to understand how you set up log handlers for the console, the rotating access log file, and the rotating debug file. You can easily adjust the logging level in this configuration to capture more or fewer log events in the console or in the log files.
Alternatively, you can indicate the location of the login properties with a JVM parameter:
-Djava.util.logging.config.file="/foo/bar/log.properties"
You can use advanced logging frameworks via the org.restlet.ext.slf4j extension. Switch Restlet logging from built-in Java logging to SLF4J by setting the org.restlet.engine.loggerFacadeClass system property to the value org.restlet.ext.slf4j.Slf4jLoggerFacade—or achieve the same effect programmatically with this code:
Engine.getInstance().setLoggerFacade(new Slf4jLoggerFacade());
SLF4J documentation describes how to configure the façade to use the desired framework (LogBack, log4j, and others). Note that currently the line numbers in log messages aren’t for the calling code but are from the logger façade class itself. Apart from this drawback, the Restlet bridge from java.util.logging to SLF4J is more efficient than the one provided by SLF4J because no additional log record objects are created; the façade invokes the SLF4J APIs directly.
In this section you saw that the Restlet API encompasses all aspects of REST and lets you build coarse-grained components and connectors using simple Java code. We described the available connectors and virtual hosts and saw how to configure them within Restlet components. You’ll now see a completely different way to configure Restlet components—using XML.
3.4. Declarative configuration in XML
Imagine that your system administrator has no Java skills but still needs to adjust the virtual hosts, port numbers, and IP addresses for your deployed applications. In such cases, you can use XML to configure your standalone Restlet components.
In this section we explain how to configure a component using a declarative XML approach with results equivalent to those obtained using plain Java code. You’ll see an example using the simple XML format supported by the Component class and then learn about a more complete and powerful approach based on the Spring Framework.
3.4.1. XML configuration with Component
The first way to use XML is built into the Component class itself, allowing you to use a simple XML document to configure your connectors, virtual hosts, and other properties that we used in the MailServerComponent class. The following listing replaces the MailServerComponent class with a single XML document.
Listing 3.7. Declarative XML configuration with the Component class

This configuration is similar to the equivalent Java code but can be more easily changed, without recompilation or Java knowledge. To run this component, you invoke the Component.main() static method, passing as a parameter a URI that refers to the XML configuration. Any available protocol or pseudoprotocol can be used, such as CLAP for the classpath, FILE for a local file, and even HTTP. In this case, we stored the configuration in a component-simple.xml file stored in the source package, resulting in this URI: clap://system/org/restlet/example/book/restlet/ch03/sec3/ server/component-simple.xml.
3.4.2. XML configuration with Spring Framework
Spring is a layered application framework and lightweight container with foundations in the book Expert One-on-One J2EE Design and Development by Rod Johnson (Peer Information, 2002). (The Spring project itself started in 2003.) The lightweight container and an aspect-oriented programming (AOP) system are the main building blocks of Spring. Spring also comes with a common abstraction layer for transaction management, integration with various persistence solutions (plain JDBC, Hibernate, JPA), and Java enterprise technologies (JMS, JMX). Spring even provides its own Model View Controller (MVC) Web framework called Spring MVC. The Spring framework isn’t an “all-or-nothing” solution: you can choose the modules according to need, the lightweight container being the glue for the application and the Spring classes.
Another popular way to declaratively configure a Restlet component is with the Spring Framework, using its special XML syntax for dependency injection even though it’s also possible to use annotations. This approach encourages loose coupling between entities and improves application maintainability.
To simplify using Restlet with the Spring Framework, a special extension is provided in the org.restlet.ext.spring module. It contains classes to facilitate configuration; for example, you can use SpringComponent instead of its parent Component class.
The following listing demonstrates configuring a component equivalent to the MailServerComponent using Spring XML.
Listing 3.8. Declarative XML configuration with the Spring Framework
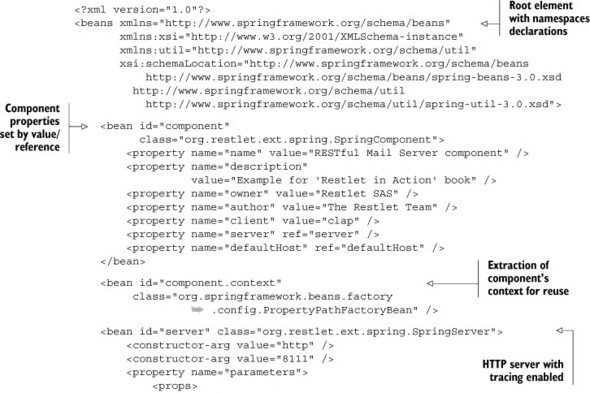

Each instance managed by Spring is defined using a bean XML element that can specify both the class of the instance (the class attribute) and its properties (the properties XML element). The property XML element can contain either a value or a reference to another bean managed by Spring. The given configuration declares the equivalent of the existing MailServerComponent.
With the Spring Framework, you can go further and configure other parts of the Restlet API, such as an application and its contained resources. The following listing contains the continuation of listing 3.8.
Listing 3.9. Declarative XML configuration with the Spring Framework (continued)
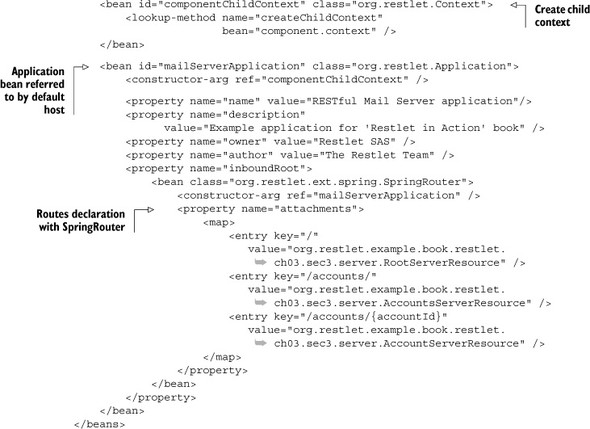
This part of the configuration is a bit verbose because there’s a lot of information to provide on the application. First you set the child context and general application information. Then you define a SpringRouter instance and its attachments property to indicate how to access your resources. This router is injected within the application using its inboundRoot property. This corresponds to what you specify in the create-InboundRoot method without Spring.
Note that you have to manually create a child context because the component’s context can’t be directly passed to isolate all contained applications, for security reasons. With the Java API, this child context is automatically created by the attachment methods, but with Spring it has to be done explicitly at instantiation time.
As a result, you can configure both your component and your application in XML with Spring, leaving only the server resources to code. This can be useful in situations where you want to provide different sets of resources for an application based on some deployment aspects, or different sets of applications for a component.
This is an overview of the features offered by the Spring extension for Restlet. Refer to the Javadocs and the online user guide for details. Let’s now make sure the Spring XML configuration works by running the small bootstrap code in the following listing.
Listing 3.10. Running the declarative XML configuration with the Spring Framework
public class MailServerSpring {

    public static void main(String[] args) throws Exception {
        // Load the Spring container
        ClassPathResource resource = new ClassPathResource(
                "org/restlet/example/book/restlet/ch03/sec3/server/component-spring.xml");
        BeanFactory factory = new XmlBeanFactory(resource);

        // Start the Restlet component
        Component component = factory.getBean("component", Component.class);
        component.start();
    }

}
The BeanFactory entity representing the Spring container can be loaded using several strategies. Listing 3.10 loads from the classpath based on the ClassPathResource class. The latter looks for the file in the classpath interpreting the path relative to the classpath root. Because you use an XML file for metadata, the XmlBeanFactory class is used. Now that the container is loaded, you can access configured beans by identifier using the getBean method. The example gets the Restlet component instance and starts it with its start method.
In this section you saw how to configure Restlet components with XML instead of Java code, first using the built-in XML configuration capabilities of the Component class and then using the more advanced XML configuration based on the Spring Framework. More approaches have been successfully explored by Restlet community members, such as the use of other dependency injection frameworks like Google Guice and dynamic languages such as Groovy and Scala.
Spring XML configurations can be verbose due to XML itself. To address this issue, Spring lets you use dedicated XML schemas for particular use cases. The most well-known are the ones for AOP and transactions. With them, there’s no need to know about the underlying beans; the schema hides this complexity. The Restlet extension for Spring doesn’t provide such a schema yet, but work is in progress (see issue #508 on GitHub for more details). Once available, the resulting XML configuration will look like the following listing.
Listing 3.11. Configuration using Spring namespace for Restlet
<beans xmlns="http://www.springframework.org/schema/beans"
       xmlns:xsi="http://www.w3.org/2001/XMLSchema-instance"
       xmlns:restlet="http://www.restlet.org/schema/spring-restlet"
       xsi:schemaLocation="http://www.springframework.org/schema/beans
            http://www.springframework.org/schema/beans/spring-beans.xsd
              http://www.restlet.org/schema/spring-restlet
            http://www.restlet.org/schema/restlet/spring-restlet.xsd">

   <restlet:application id="application">
        <restlet:attachments>
            <restlet:attachment route="/companies/{id}"
                                 resource="companyResource"/>
        </restlet:attachments>
    </restlet:application>
</beans>
Next we introduce another common way to deploy Restlet applications: reusing existing investments in Java EE application servers.
3.5. Deployment in an existing Java EE server
As you saw in section 3.3, the Restlet Framework can be used as a standalone framework on top of Java SE providing a lightweight web development platform. But it’s often necessary to deploy to Java EE application servers in production environments or to integrate with existing Servlet applications to add RESTful support without starting again from scratch.
In this section we present the Java EE edition of the Restlet Framework, especially its Servlet extension, and we discuss the integration modes supported. We illustrate those integration options by deploying our example RESTful email system into Apache Tomcat, the most widely used Servlet engine.
3.5.1. The Servlet extension
The Java EE edition of the Restlet Framework contains the exact same API and engine as the Java SE edition but comes with a different set of extensions. For example, the standalone HTTP/HTTPS server connectors such as Jetty and Simple aren’t provided but the new Servlet extension is.
This extension, available as an org.restlet.ext.servlet.jar file, provides a bridge between the Servlet API and the Restlet API. This bridge was possible because the Restlet API is designed at a higher abstraction level and has a much broader feature scope.
Note
Moving forward in this section, you’ll need to download the distribution for Java EE, including the addition Servlet extension, in order to run the examples.
Now let’s look at the main bridging scenarios supported by the extension.
3.5.2. Servlet engine as a connector for a Restlet component
The first scenario makes the most use of the Restlet Framework. You keep using a Restlet component as a container of Restlet applications. The underlying Servlet engine is only used as a server connector to support HTTP and HTTPS protocols, as illustrated in figure 3.6.
Figure 3.6. Using the Servlet engine as an HTTP server connector for a Restlet component

This scenario can ensure broad portability of a Restlet project from a standalone Java SE deployment to a Java EE deployment but requires extra care in the way the Servlet engine is configured. Indeed, although the Restlet API gives you full control over its routing system, the Servlet API has adopted a more declarative way, typically based on a /WEB-INF/web.xml file.
As a result, the initial URI-based routing of incoming calls will be routed first through the Servlet engine before reaching the Restlet component. Because the Restlet component is designed to fully handle routing, including virtual hosting, it starts the routing again from the beginning of the URI. Therefore you must ensure that its routing configuration is consistent with the Servlet’s.
Let’s put that advice in practice by deploying the MailServerComponent inside Apache Tomcat 6.0, a popular Servlet engine. First, you trim the class down a little in the following listing because you don’t need to declare the HTTP server connector anymore and you can rely on Tomcat to write the access log.
Listing 3.12. Trimmed down MailServerComponent for Servlet deployment
public class MailServerComponent extends Component {

    public MailServerComponent() throws Exception {
        // Set basic properties
        setName("RESTful Mail Server component");
        setDescription("Example for 'Restlet in Action' book");
        setOwner("Restlet SAS");
        setAuthor("The Restlet Team");

        // Attach the application to the default virtual host
        getDefaultHost().attachDefault(new MailServerApplication());
    }

}
As you can see, you don’t need to declare the CLAP client connector because you no longer load the log properties file. But it’s common in the Servlet world to store configuration files inside the WAR structure, typically in the /WEB-INF/ directory. Those files are easily accessible from the Restlet world thanks to a WAR client connector that’s automatically added to your component. As an exception, you don’t have to manually declare it. To use it, use a ClientResource or the Context.client-Dispatcher property and issue GET requests on URI references like war:///WEB-INF/ myConfig.xml.
Let’s now configure the Servlet engine to route HTTP calls to your component. For this, you need to edit the usual /WEB-INF/web.xml file, using the ServerServlet adapter class from the Servlet extension, as illustrated in the following listing.
Listing 3.13. Configuring the Servlet’s web.xml file

The next step is to copy two JARs from the Restlet distribution for Java EE into the /WEB-INF/lib/ directory:
- org.restlet.jar
- org.restlet.ext.servlet.jar
Finally you need to package the Servlet project as a WAR and deploy it with no base URI path. (Ordinarily the WAR name is used as the base URI path, but this wouldn’t match the URI routing declared inside the MailServerComponent where / maps to the RootServer-Resource.) You can then launch Tomcat and test your Restlet component by entering the following URI in your browser: http://localhost:8080/. The following message should be displayed: “Welcome to the RESTful Mail Server application!” Note that the default port number of Tomcat is 8080—a change from the 8111 value you’ve used until now.
3.5.3. Servlet engine as a container of Restlet applications
This second scenario is useful when you have existing Servlet applications deployed and want to deploy Restlet applications as well under separate URI paths. In this case the idea is to consider the Servlet engine as the component containing the applications and providing the server HTTP connector.
Figure 3.7 illustrates a Java EE deployment with two Servlet applications and one Restlet application coexisting. Each application is supposed to be deployed as a separate WAR file, contrary to the previous scenario.
Figure 3.7. Using the Servlet engine as a container of Restlet applications
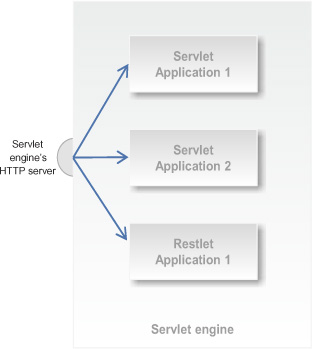
Let’s now configure the Servlet engine to route HTTP calls to the example MailServerApplication. For this you need to edit the usual /WEB-INF/ web.xml file, using the ServerServlet adapter class from the Servlet extension as illustrated in the following listing.
Listing 3.14. Configuring the Servlet’s web.xml file
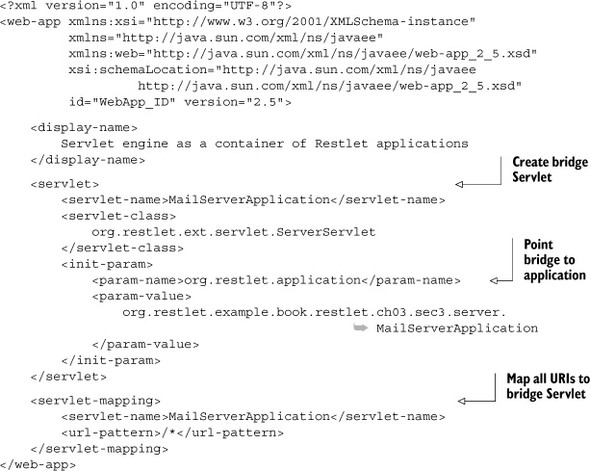
Using the same JAR files as in the previous scenario, you can now deploy your WAR into Tomcat. This time, you can attach our Servlet WAR to any base URI—for example, to /rest/ in order to keep other root paths for other web applications, potentially including other bridged Restlet applications. After restarting Tomcat, you can access the http://localhost:8080/rest/URI in your browser to see the welcome message.
This example illustrates how portable Restlet applications are. The exact same code was used in both standalone Java SE and Java EE deployments. Note that in this scenario, it’s possible to declare several Restlet applications at the same time. You need to give them different servlet-name values and adjust the servlet-mapping element accordingly.
In the next section, we look at another way to deploy Restlet applications within a Servlet engine—more precisely, inside an Oracle RDBMS!
3.5.4. The Oracle XML DB extension
The org.restlet.ext.xdb extension provides a Restlet server connector usable within an Oracle 11g database. It allows you to expose RESTful web APIs using the Oracle JVM, an embedded JVM compatible with Java 1.5 running inside the database. This approach has the benefits of saving memory space and being fast due to local access to the SQL resources. In addition, Oracle XML DB provides a Servlet 2.2 engine that can work together with the Restlet Framework to process HTTP calls.
In order to deploy your Restlet application inside the Oracle JVM, you need to enable the HTTP service in Oracle and then use the org.restlet.ext.xdb.XdbServerServlet class instead of the usual ServerServlet. This special subclass is necessary due to the limited capabilities of Oracle’s embedded Servlet engine (no session, no cookies, only one Servlet context supported, and no request dispatcher).
Those constraints are fine from a Restlet point of view, which makes it a good fit if you’re already using an Oracle database to store the state of your Restlet resources. You can even benefit from native optimization when writing XML documents.
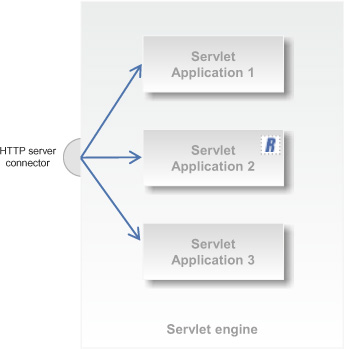
3.5.5. Restlet Framework as a library inside Servlet applications
The last scenario is sometimes preferred by Restlet users because it allows a fine-grained integration between existing Servlet applications and the Restlet Framework. It considers the Restlet Framework as a regular library or toolkit from which selected features, such as the ClientResource class or the Representation subclasses, can be used without bringing in the entire Restlet framework. Figure 3.8 illustrates this scenario with three Servlet applications deployed, one of them using Restlet as a library rather than as part of a comprehensive framework.
Figure 3.8. Using the Restlet Framework as a library inside Servlet applications
Another intermediary case is when you still want to use Restlet for server-side resources, but after some Servlet-based handling. For this purpose, the Servlet extension provides an org.restlet.ext.servlet.ServletAdapter class that has a service(HttpServlet-Request, HttpServletResponse) method that’s able to adapt a Servlet call into a Restlet call and to pass it to an attached Restlet defined by the next property. For example, the RestletFrameworkServlet class in the org.restlet.ext.spring extension makes use of the adapter class to provide another integration mode between Spring and Restlet.
We next introduce an alternative way to deploy Restlet applications, based on the highly modular and dynamic OSGi environments.
3.5.6. Dynamic deployment in OSGi environments
OSGi is a popular execution environment on top of the JVM that allows dynamic assembly of applications. Its main features are the ability to isolate applications running in the same JVM, even allowing deployment of several versions of the same application or library at the same time. It also provides hot deployment, hot update, and a loosely coupled service framework. The most famous OSGi example is the Eclipse IDE itself, but in recent years use has expanded to the server side as well.
The Restlet Framework provides out-of-the-box support for OSGi with a dedicated edition that ensures that each of its modules, including the Restlet core and extension JARs, are properly defined OSGi bundles. As a result, Restlet applications can be part of larger OSGi systems. Restlet can be embedded within OSGi bundles based on activators, entities that are triggered when bundles start and stop. In a Restlet context this enables you to start a Restlet server on bundle startup and stop it on bundle shutdown. The following listing describes how to implement this approach.
Listing 3.15. An OSGi activator to manage an embedded Restlet server
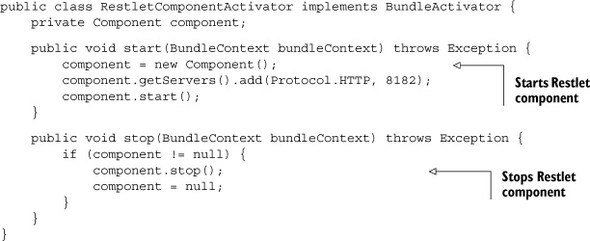
The activator then needs to be specified in the MANIFEST.MF file of the bundle that embeds it, as described in the following snippet:
Manifest-Version: 1.0
Bundle-ManifestVersion: 2
Bundle-Name: Embedded Restlet Server
Bundle-SymbolicName: org.restlet.osgi.server
Bundle-Version: 1.0.0.qualifier
Bundle-Activator: org.restlet.osgi.server.ServerActivator
Import-Package: org.osgi.framework;version="1.3.0"
Require-Bundle: org.restlet;bundle-version="2.1.0"
Because OSGi implements strict class loading, you must import the necessary packages and bundles corresponding to the classes you used in your activator (the OSGi package as well as the Restlet core bundle, in this case).
At this point, you have an embedded Restlet server in an OSGi container but no virtual hosts or applications are associated with it. You could configure everything within a single bundle, but you would lose modularity by not taking advantage of OSGi’s dynamic capabilities. The idea here is to detect virtual hosts and automatically configure against the previous server. This is the classic OSGi approach, following the white-board pattern.
This pattern is based on the OSGi service registry. Some providers register service implementations against a particular interface, and consumers listen for matching services. When such services are added or removed, consumers are notified and can adapt their processing.
This pattern allows simple decoupling of producers from consumers and uses the dynamic capabilities of OSGi.
For information see http://www.osgi.org/wiki/uploads/Links/whiteboard.pdf. (Peter Kriens and BJ Hargrave, 2001–2004, OSGi Alliance.)
Some bundles provide virtual hosts using the OSGi service registry. Each virtual host that needs to be added within the component is registered as an OSGi service. Activators of provided bundles are responsible for this registration and unregistration, as shown in the following listing.
Listing 3.16. An OSGi activator to manage registration of a virtual host

Now you need to update the server bundle to listen to service updates—in particular, services of type VirtualHost. If a service is registered, the bundle detects it and adds it to the component. On unregistration, the bundle removes it from the component. This feature is based on listening mechanisms provided by OSGi.
The code contained in the following listing must be added at the end of the start method of the server activator.
Listing 3.17. Handling registrations and unregistrations of virtual host services
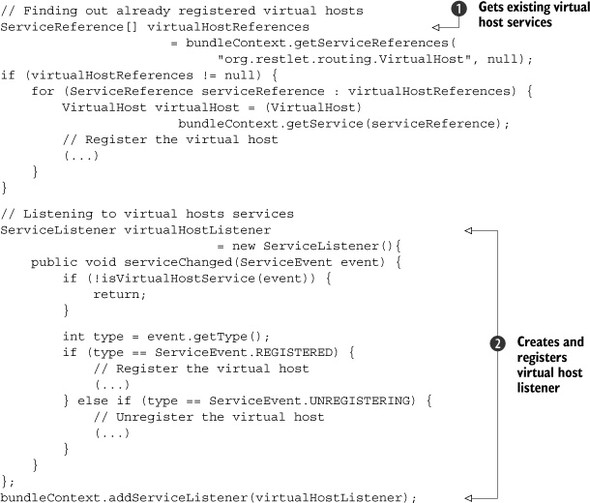
You need to find out whether some virtual host services are already present in the OSGi container ![]() . By default, bundles can randomly start, and the server bundle can start up after some bundles providing virtual host services.
For those that will be added or removed after, a listener is implemented and registered
. By default, bundles can randomly start, and the server bundle can start up after some bundles providing virtual host services.
For those that will be added or removed after, a listener is implemented and registered ![]() . Its serviceChanged method is called on such events. After detecting the service type, the method handles the registration or the unregistration
of the virtual host against the Restlet component.
. Its serviceChanged method is called on such events. After detecting the service type, the method handles the registration or the unregistration
of the virtual host against the Restlet component.
Don’t forget to remove the OSGi service listener on bundle shutdown in the stop method of the server activator, as described in the following snippet:
bundleContext.removeServiceListener(virtualHostListener);
Another promising way to use OSGi with Restlet is the Eclipse Virgo project (the contribution of SpringSource dm Server to the Eclipse Foundation, available at www.eclipse.org/virgo/), which provides a completely OSGified web application server alternative to the usual Java EE application servers.
You can also directly use Eclipse Gemini project (the contribution of SpringSource “Spring Dynamic Modules,” available at www.eclipse.org/gemini/) to let Spring manage your Restlet applications in an OSGi environment.
To learn more about deploying Restlet applications in OSGi, we recommend reading Spring Dynamic Modules in Action (Manning, 2011)—especially chapter 8, “Developing OSGi web components with Spring DM and web frameworks.” It even comes with a comprehensive deployment example for the Restlet Framework 2.0!
3.6. Summary
In this chapter you learned how to deploy Restlet applications on premises, a term used to describe machines that you physically control. You saw that the purpose of a Restlet component is to provide a RESTful web container for developers to host their Restlet applications and connect them with other REST components with client and server connectors. You saw that Restlet components are structured with four layers:
- The outermost connectivity layer provides shared client and server connectors between all contained applications.
- The service filtering layer provides services common to all contained applications such as access logging or global status handling.
- The virtual hosting layer, available only on the server side, provides component-level pre-routing on host, port, and scheme; this allows, for example, several applications, each with its own domain name, to share the same IP address.
- The central application handling layer handles inbound calls with Restlet applications and can issue outbound calls.
We also introduced the connectors provided in the Restlet Core and in Restlet Extensions, supporting a broad set of protocols and pseudoprotocols, including CLAP, FILE, FTP, HTTP/HTTPS, JAR/ZIP, JDBC, POP, RIAP, SOLR, and SMTP. We described the main characteristics of those connectors, helping you to make the best decision regarding which one to select in specific scenarios. You also learned how to use the virtual hosting and service filtering layers to, for example, map several IP addresses to a single domain name and to configure a web access log.
We described two alternative deployment mechanisms useful for administrators who can’t recompile Java code to configure things specific to deployment environments, such as port number and domain name. In those cases, declarative XML configuration files can be used, using the Spring Framework if necessary.
We also showed you some benefits of Restlet application portability by covering how Restlet edition for Java EE can let you easily deploy to Servlet engines such as Apache Tomcat, Oracle XML DB, and even OSGi environments. We described the main deployment scenarios with various levels of usage of Restlet.
You’ve now completed the “Getting started” part of this book. So far, we briefly introduced REST (additional details are available in appendix C) and then dove into Restlet coding, beginning the development of Restlet applications and resources and deploying them on premises with Restlet components.
You’ll now start the second part of your journey, exploring in more depth important aspects of Restlet development, such as resource representations, security, documentation and more, giving you enough knowledge to roll out into production.