
Hour 16
Using the Animation Editor
What You’ll Learn in This Hour:
 What the Animation Editor is
- How to create poses
- How to use Animation Editor tools
- How to work with animation events
- How to save and export animations
This hour introduces you to the Animation Editor, a must-have for adding detail to your game. Animation is perhaps one of the strongest tools for communicating action to your players. Without animation, the player can’t clearly grasp what’s happening; without good animation, the player is left confused or just underwhelmed.
Whereas bad animation can hinder the player’s experience, great animation can make a game more immersive and memorable (Figure 16.1). It can clearly communicate action in a way that’s less invasive than a UI pop-up. With the Animation Editor, you have a powerful built-in tool to create and upload custom animations to make your games unforgettable.
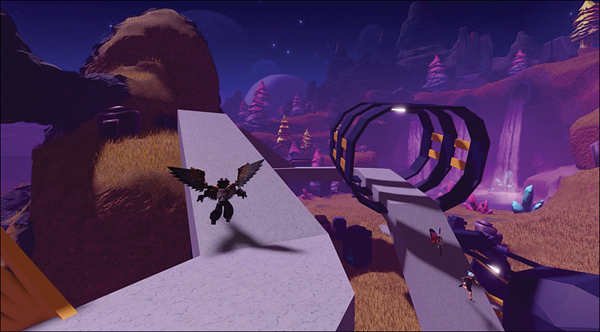
FIGURE 16.1
Animations abound in Build It, Play It: Island of Move by Roblox Resources.
Introduction to the Animation Editor
The Animation Editor is a tool that allows developers to create animations for characters, nonplayer characters (NPCs), and anything else they may want to animate in their games. Like most 3D animation software, the Animation Editor uses keyframes—timeline markers that indicate the beginning and ending of a pose—to construct movement. The developer creates the keyframes so they consist of core poses. Then the editor smoothly transitions from pose to pose, making for seamless animation.
Understanding Model Requirements
The Animation Editor can support a variety of models, as long as they are connected together as a rig with Motor6D’s and contain a PrimaryPart. If you aren’t familiar with rigging custom models together, you can insert a default R15 model because that is what we’ve used for this chapter’s exercise.
To begin, open a separate baseplate, just to be extra safe and have your animations in a separate spot. Then follow these steps:
In the Plugins tab, click Build Rig (Figure 16.2).
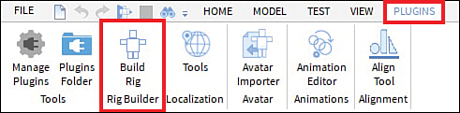
FIGURE 16.2
The Rig Builder on the Plugins tab.Select Block Rig for this example (Figure 16.3).
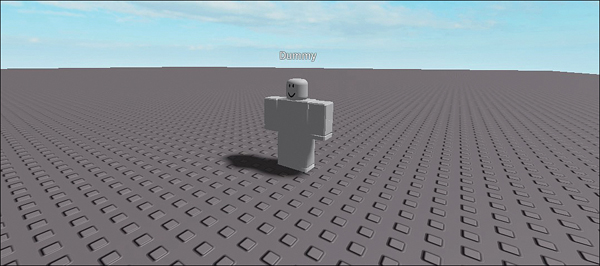
FIGURE 16.3
Inserted Block Rig R15 dummy.
With the test rig in your workspace, you’re ready to open the Animation Editor.
Opening the Animation Editor
Open the Animation Editor, which is also located under the Plugins tab (Figure 16.4).

FIGURE 16.4
Path to find the Animation Editor.Click your rig in the Animation Editor window (Figure 16.5) to select it. If prompted, name your animation and click Create.
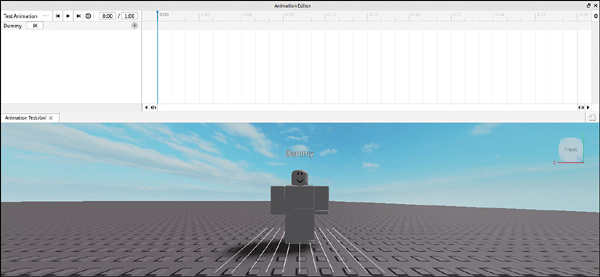
FIGURE 16.5
The Animation Editor.
Creating Poses
To animate your rig, you need to first define poses by moving specific parts, like the head or right leg, into the positions appropriate to the gesture you want to create. For example, if you want your rig to kick its right leg up, you need two poses: the leg starting on the ground, and the leg raised 90 degrees (Figure 16.6).

FIGURE 16.6
To tell the Animation Editor where each pose should begin and end, you create keyframes.
As mentioned earlier, a keyframe is a timeline marker that designates the beginning and end of a pose. To create a new pose using keyframes, use the following steps:
Move the scrubber bar (the blue line in Figure 16.7) to the time where you want to set the pose.

FIGURE 16.7
The scrubber bar in the Animation Editor.Click the part on your rig that you want to move.
Move and rotate the part to your desired orientation. When you do so, a track is created, and a new keyframe is created along the timeline, indicated by a diamond (Figure 16.8).

FIGURE 16.8
Creating a new keyframe.Continue moving or rotating parts until you get the desired pose. Whenever you adjust a specific part, a keyframe is defined for that part at the selected time.
When you’re ready to preview the animation, click the Play button in the Animation Editor (Figure 16.9). You can also play or pause animations by pressing the Spacebar.

FIGURE 16.9
Click the Play button to watch your animation.
Once your basic poses are set, you may want to fine-tune individual keyframes to give your animation more polish. Here is a quick list of common keyframe manipulations:
- Adding Keyframes: Move the scrubber bar to a new position, click the ellipsis (…) button for a track, and select Add Keyframe.
- Deleting Keyframes: Select a keyframe and press the Delete key, or right-click and select Delete Keyframe from the context menu.
- Cloning Keyframes: Press Ctrl + C (Cmd + C for Mac) while highlighting your desired keyframes, and then press Ctrl + V (Cmd + V for Mac) after moving your scrubber bar to your desired pasting position.
- Moving Keyframes: Drag your keyframes to the desired spot on the timeline.
Saving and Exporting Animations
To save an animation, use the following steps:
Click the ellipsis (…) at the top right of the Animation Editor.
Select Save As or Save depending on whether you want to create a new animation object or update a preexisting one. This will save your new animation in a model named AnimSaves (Figure 16.14) in the dummy you animated.
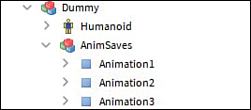
FIGURE 16.14
Where to find your saved KeyframeSequences.
To export animations for proper in-game use, use the following steps:
Click the ellipsis (…) at the top right of the Animation Editor.
Click Export.
Give your animation file a name, description, and a group owner.
Click Submit.
To copy your animation ID for use, click the Copy button right next to the animation ID. To find your animation ID later, do the following:
Click the ellipsis (…) at the top right of the Animation Editor. Then select Import, From Roblox.
Select the animation and then copy the ID number at the bottom (Figure 16.15).

FIGURE 16.15
Copying the animation ID.
Easing
Hour 15 introduced easing direction and styles. These tools determine how your keyframes move from one pose to another. They are essential because they can easily help you create intricate, life-like animations in less time.
By default, a part moves from one keyframe to the next in the steady motion of linear easing. However, you may want to customize your easing to make the animation more dynamic. To change easing for one or more keyframes, select the keyframes you want to modify, right-click, and select your options from the Easing Styles and Easing Directions menus. You can then edit the style and directions to change how the keyframe interpolates from one pose to another.
Working with Inverse Kinematics
Inverse Kinematics (IK) is a widely useful tool for quickly being able to position joints. A good example of IK is keeping the legs in place to calculate the position of multiple joints by just moving a single joint. For instance, to create a crouch (Figure 16.16), you could move just the lower torso downward and keep the feet in place.

FIGURE 16.16
An example of Body Part IK on the LowerTorso.
If you animate only the LowerTorso, the calculations for the legs are automatically handled.
Enabling IK
To start animating using IK, click the IK button in the Animation Editor (Figure 16.17) to bring up the Manage IK window on the left of the screen. At the bottom of the window, click Enable IK.

FIGURE 16.17
The IK button.
Roblox IK can be categorized into two separate modes: Full Body and Body Part (Figure 16.18).
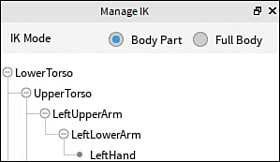
FIGURE 16.18
The two IK settings: Body Part and Full Body.
In Body Part IK mode, when you move a body part, only that part experiences any movement. For example, moving the right arm only affects parts that make up the right arm (Figure 16.19).

FIGURE 16.19
Body Part IK enabled.
In Full Body IK mode, when you move a body part, all parts of the rig will be considered. For example, moving the right arm calculates effects in the rest of the body (Figure 16.20). If you don’t want certain parts to be calculated, you can pin them to keep them stationary (see the next section).
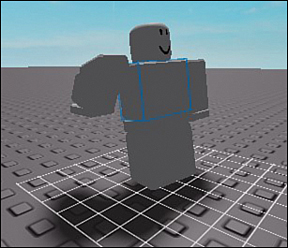
FIGURE 16.20
Full Part IK enabled.
Pinning Parts
With Full Body IK, you may want to pin parts so they don’t move. Simply click the pin icon next to the name of the part you want to pin (Figure 16.21). In Figure 16.22, the feet of the rig are pinned.

FIGURE 16.21
Click the pin icon next to a part.
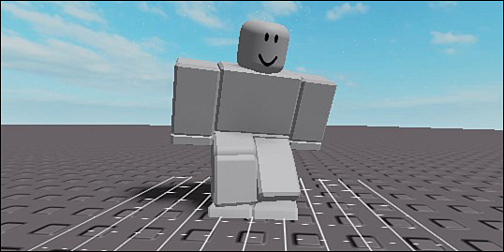
FIGURE 16.22
R15 character rig with its two feet pinned.
Animation Settings
You will probably want animations such as attacks to play just once when triggered. In other cases, animations like a run cycle need to play over and over until something stops it. Some animations are also more important than others, and you will want to prioritize their playing over other animations that might be also be triggered at the same time.
Looping
You can enable looping for animations by toggling the Looping button (Figure 16.23). When this button is enabled, it will export the animation as a loop. Be careful, though: When it loops, it stops at the final keyframe’s row in your timeline and then goes back to the beginning without any transition. To get around this, if you’re making animations that need to loop, you can copy your first set of keyframes to the end of your timeline to get a seamless loop.

FIGURE 16.23
Loop enabled.
Priority
In a gameplay setting, different player states may require different animations. For example, a player’s attack animation would be different than an idle animation. In most scenarios, you’ll want the attack animation to have a higher priority than the idle animation so that the two actions won’t conflict. Animation priority can be represented visually as shown in Figure 16.24.

FIGURE 16.24
Animation priority.
To view and adjust animation priority, click the ellipsis near the top right of the Animation Editor and select Set Animation Priority (Figure 16.25).
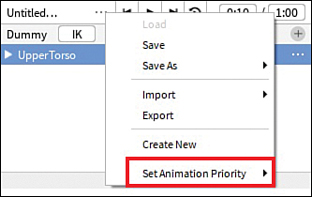
FIGURE 16.25
Setting animation priority.
In the window that opens, you can see your current animation priority and change it as needed. An important thing to remember is that the lower the priority, the more likely the animation is to be overwritten by an animation with a higher priority.
Working with Animation Events
When you’re scripting animation, it’s quite often that you’ll want to give off a signal when a certain keyframe is reached. A common example is playing footstep sounds during a walk cycle.
To achieve this, you can add event markers, which are checkpoints that send off a signal when a certain animation spot is reached. You can then use GetKeyframeMarkerReached() to hear when that keyframe is reached.
To show the animation event track, you first need to enable it. Click the Settings icon and select Show Animation Events (Figure 16.26).

FIGURE 16.26
Animation Editor’s settings.
After enabling Show Animation Events, your timeline should have a new track called Animation Events listed at the top of your previous tracks (Figure 16.27).

FIGURE 16.27
The new Animation Events track.
Adding Events
Adding animation events is a pretty simple process. Add an animation event to mark both the beginning and end of your animation. Later in this hour, you use these events in a script. Follow these steps:
Right-click the point in the timeline where you want the event, and select Add Animation Event Here.
Create two new events at the beginning and the end of the animation named AnimationStart and AnimationEnd.
Once you define the necessary fields, click Save. You see a new keyframe marker where your scrubber bar was last placed (Figure 16.28).

FIGURE 16.28
An animation event paired with keyframes.
For scripting, you can have additional parameters to pass to your GetKeyframeReachedSignal() event.
Moving and Deleting Events
If you ever want to move an event, it’s as simple as dragging the animation event to a new position on the animation track. To delete events, you can press the Delete key on your keyboard or right-click an animation event and select Delete Selected from the context menu.
Cloning Events
As you create events, they become available for use throughout the animation, and you can clone them for reuse. For instance, you can create a HandWave event marker at the point where a character’s right hand is raised, and then use the same event for waving the other hand.
To clone animation events, you first select the animation event you want to clone and press Ctrl + C (or Cmd + C on a Mac). Then move your scrubber bar to where you want to paste the animation event and press Ctrl + V (or Cmd + V on a Mac).
Implementing Events in Scripts
To implement animation events in a local script, you use a mixture of GetMarkerReachedSignal() and the animation object. For the following example, when a player presses F on the keyboard, the character stops and attacks. You need to create animation events for both the beginning and end of the animation.
Make sure your animation with events for AnimationStart and AnimationEnd has been saved and exported to Roblox.
Select StarterPlayer, StarterPlayerScripts and add a LocalScript named ZombieAttack.
Type the following code:
local UserInputService = game:GetService("UserInputService") -- Detecting
      player input
local Players = game:GetService("Players")                   -- Get local
      player
local player= Players.LocalPlayer                            -- Our player

-- Get the player's character model that needs to be animated
local characterModel = player.Character or player.CharacterAdded:Wait()
local humanoid = characterModel:WaitForChild("Humanoid")

local animation = Instance.new("Animation")       -- New animation object
animation.AnimationId = "rbxassetid://000000000"  -- Use your animation asset
      ID

local animationTrack = humanoid:LoadAnimation(animation)

-- Detects if player is pressing F and plays animation
UserInputService.InputBegan:Connect(function(input, isTyping)
      local normalWalkSpeed = humanoid.WalkSpeed
      if isTyping then return end

      if input.KeyCode == Enum.KeyCode.F then
           animationTrack:Play()
      end

      animationTrack:GetMarkerReachedSignal("AnimationStart"):
      Connect(function()
           humanoid.WalkSpeed = 0               -- Stops the player from
            moving
      end)

      animationTrack:GetMarkerReachedSignal("AnimationEnd"):Connect(function()
           humanoid.WalkSpeed = normalWalkSpeed  -- Allows movement again
      end)
end)
This code detects when the player presses F, plays the animation, and stops the player from moving until the animation ends. If you’ve followed the steps properly, now when you press F, your very own custom attack animation will play!
Replacing Default Animations
By default, Roblox player characters include common animations like running, climbing, swimming, and jumping. However, at some point, you might feel like you want to replace these defaults with your own animations. Luckily, Roblox enables you to do this pretty easily through the use of scripts. If you have a valid animation ID, you can replace the default animations with your own custom ones.
The process of replacing default animations goes as follows:
Insert a script in ServerScriptService.
Type the following script but replace the animation IDs with an ID you’ve created. Also edit animations as needed.
local Players = game:GetService("Players")local function onCharacterAdded(character) local humanoid = character:WaitForChild("Humanoid") for _, playingTracks in pairs(humanoid:GetPlayingAnimationTracks()) do playingTracks:Stop(0) end local animateScript = character:WaitForChild("Animate") animateScript.run.RunAnim.AnimationId = "rbxassetid://616163682" -- Run animateScript.walk.WalkAnim.AnimationId = "rbxassetid://616168032" -- Walk animateScript.jump.JumpAnim.AnimationId = "rbxassetid://616161997" -- Jump animateScript.idle.Animation1.AnimationId = "rbxassetid://616158929" -- Idle (Variation 1) animateScript.idle.Animation2.AnimationId = "rbxassetid://616160636" -- Idle (Variation 2) animateScript.fall.FallAnim.AnimationId = "rbxassetid://616157476" -- Fall animateScript.swim.Swim.AnimationId = "rbxassetid://616165109" -- Swim (Active) animateScript.swimidle.SwimIdle.AnimationId = "rbxassetid://616166655" -- Swim (Idle) animateScript.climb.ClimbAnim.AnimationId = "rbxassetid://616156119" -- Climb end local function onPlayerAdded(player) player.CharacterAppearanceLoaded:Connect(onCharacterAdded) end Players.PlayerAdded:Connect(onPlayerAdded)
Note that sometimes it takes an animation a bit of time to go through moderation. If you only just published the animation and it isn’t working, try again in a minute.
Summary
In this hour, you’ve learned how animations can bring your characters to life and give them personality. You’ve learned how to use Inverse Kinematics (IK) and easing styles, and you’ve been introduced to animation priority, which is very important in making sure your animations play at the right time, and how it affects animations in a game.
You’ve also learned how to add animation events to your animations and to use those events to add custom functionality linked to your animations. This is a very useful tool for syncing effects with animations. Finally, you’ve learned how to save, export, and use animations in a proper script.
Q&A
Q. Will animation events do anything if I don’t connect them?
A. No, animation events need to be connected in a script to have any functionality.
Q. What if I want to edit animations I uploaded?
A. To edit already uploaded animation, you can press the ellipsis at the top of your screen, press Import -> From Roblox, and then select the animation you want to edit. To update that animation, all you need to do is re-export it to the animation you were editing. It will automatically update all scripts that make usage of that animation.
Q. My development partner made an animation, but I can’t use it. Why?
A. When it comes to animations, only the user who originally uploaded it can use it. To use it, you’ll need a copy of the KeyframeSequence to upload yourself or they can republish the animation to a group you are both in.
Workshop
Now that you have finished, review what you’ve learned. Take a moment to answer the following questions.
Quiz
1. What plugin allows you to add R15 and R6 rigs to your game?
2. Saved rotation and position information within the Animation Editor timeline is called a ______.
3. True or False: To create an animation event, insert an AnimEvent object into the rig.
4. True or False: Toggling Looping on only loops the animation for testing purposes, not in game.
Answers
1. The Build Rig plugin allows you to add R15 and R6 rigs to your game.
2. Saved rotation and position information within the Animation Editor timeline is called a keyframe.
3. False. Animation events are created by right-clicking a keyframe and selecting “Add animation event here.”
4. False. Toggling Looping on causes the exported animation to loop in game until it is interrupted.
Exercises
The exercises use the concepts you learned up to this point. If you get stuck, don’t forget to refer to the previous pages!
In the first exercise, you replace the default animation with a custom animation and emit a particle effect.
Create a custom run animation and add animation events whenever the character’s foot touches the ground.
Upload the animation, and grab the ID for later use.
Replace the default animation with your own, either by using the method from this hour or looking at the animate script that gets pasted in your character when you play the game.
Create a particle emitter, add a
GetMarkerReachedSignal()connection, and then callParticleEmitter:Emit()when the footstep animation event is reached.Test it!
In this exercise, add a custom death animation that plays when the player’s health reaches 0. For extra detail, you can add a custom death sound.
Create the custom death animation. Using animation events is optional.
Upload the animation and grab the ID for later use.
Create a new client-sided script, get the character, and get the character’s humanoid.
Create a new animation object, add your animation ID to your new animation, and make a new animation track.
On the Humanoid.Died event, make a new function that plays your new death animation; also connect any animation events if you added them.
Test it!