
Hour 23
Monetization
What You’ll Learn in This Hour:
 How to implement one-time purchases using Game Passes
- What Developer Products are and how to use them to make consumables
- What Roblox Premium is and how to monetize it
- What the Developer Exchange program is and how to use it
So, you’ve come up with a great game idea, or maybe you have a game that’s nearly finished, and you want to earn some Robux from it? In this hour, you’ll learn how you can monetize your game to earn Robux, and in turn, use the Developer Exchange program to convert your hard-earned Robux into real money! You’ll learn how to develop one-time purchases using Game Passes, how to increase revenue with consumables, and what Roblox premium is and how to use it in monetization. Finally, this hour wraps up with a look at the Developer Exchange program.
Game Passes: One-Time Purchases
Game Passes on Roblox are for items that a player can purchase only one time in a game, such as for perks like a VIP vehicle or double XP. Items the player acquires with a game pass belong to that player permanently.
One-time purchases offer a couple of benefits that make them stand out from other forms of monetization. First, one-time purchases, especially at a low cost, can introduce the player to spending in your game. Once a player has bought one product and is invested in the game, so to speak, they are more likely to go on and buy more products. (And if they start buying consumables and engaging in repeat purchasing, that’s even better!) Second, once they are invested in the game, they are also likely to play more, which increases retention and average playtime, hopefully pushing your game closer to the front page!
It’s time to try making a one-time purchase product! Start off by creating a Game Pass on the Roblox website. Click the Create tab on the website, and then find your game by clicking the My Creations or Group Creations tab. Then click Games (Figure 23.1).

FIGURE 23.1
Click the Games tab.
On the right side of the screen, click the Settings button and choose Create Game Pass (Figure 23.2).
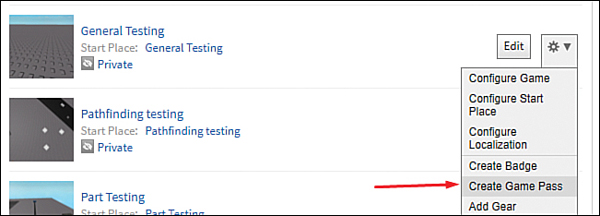
FIGURE 23.2
Click the Create Game Pass button.
You have the option to upload a picture for your Game Pass (Figure 23.3). Photos need to be a 150 × 150 circle; you can find online templates for sizing images. You’ll also need to give the Game Pass a name (such as “Double XP” or “VIP”) and a description. Once you’re done filling in the information, click the Preview button (Figure 23.3).
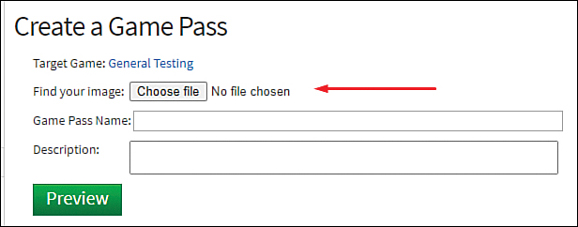
FIGURE 23.3
Upload an image.
You can then preview the Game Pass to make sure you’re happy with how it looks before clicking Verify Upload.
Once you’ve created the Game Pass, you should see it in the Game Passes tab. Click the Settings button for it and then click Configure. The Configure Game Pass dialog box (see Figure 23.4) opens, and you can choose a price. Give some thought to the purchase price for Robux and consider how much you think the item is worth in comparison to other products you are selling. It can often be helpful to compare your game to other games of a similar genre and check out their products so you know how much other developers are selling those items for. After you’ve entered the price for your Game Pass, click the Save button.

FIGURE 23.4
Setting a price for your Game Pass.
Selling Your Game Pass in Game
So, now you have a Game Pass on sale, which a player can buy from the website (on the Game Passes tab). It would be much more convenient for the player, however, if you prompted purchase of the product in your game (and you would likely sell a lot more Game Passes). Thankfully, Roblox has a way to do that! By using MarketPlaceService, you can prompt a Game Pass purchase using PromptGamePassPurchase, like so:
:PromptGamePassPurchase(player, ID)
For example, you can prompt the purchase when the player clicks on a TextButton. The following code is used to prompt a Game Pass purchase:
local MarketplaceService = game:GetService("MarketplaceService")
local ID = 12345678 – Get the ID of the Game Pass from the URL

MarketplaceService:PromptGamePassPurchase(game.Players.LocalPlayer, ID)
-- Prompt Game Pass purchase to the LocalPlayer (client)
You need to get the ID of the Game Pass to use in this function call. Click the Game Pass on the website to get the ID from the URL of the page, as shown in Figure 23.5.

FIGURE 23.5
The Game Pass ID in the URL.
Enabling Game Pass Perks
When you first set up Game Pass in-game purchasing, after a player buys the Game Pass, nothing changes in the game until you give the Game Pass a perk. Do this by using UserOwnsGamePassAsync to see whether the player owns the Game Pass. If they do, you can then give them the perk that was originally advertised using code like this:
local userID = game.Players.LocalPlayer.UserId
local ID = 1234567 -- ID of the Game Pass

if MarketplaceService:UserOwnsGamePassAsync(userID, ID) then
    -- Player owns this Game Pass
end
When the player joins the game, you can check for a Game Pass. However, you don’t want to check continuously to determine whether the player buys the Game Pass while in the game. To solve this, you can use the PromptGamePassPurchaseFinished event, which fires when the player either closes the prompt or buys the Game Pass. If the player purchases the Game Pass while in the game, you can then award the perks just like before, like so:
function FinishedGamePassPrompt(player, purchaseID, purchased)
     if purchased == true and purchaseID == ID then
         -- Player bought Game Pass with the ID checked
     end
end

-- This will call the "FinishedGamePassPrompt" function once the player either buys
      the Game Pass or closes the prompt
MarketplaceService.PromptGamePassPurchaseFinished:Connect(FinishedGamePassPrompt)

FIGURE 23.6
The Pending Sales indicator.
Developer Products: Consumables
Game Passes are a great way to monetize your game. However, repeat purchases (also known as consumables) can really increase your revenue by encouraging players to spend money multiple times in your game! This is where Developer Products are really useful. Developer Products—or “dev products” as they’re more commonly known—are used to implement consumables in the form of repeat purchases. For example, they can be used to sell limited-time powerups or extra in-game currency. You should never create a dev product that is too similar to a Game Pass. For example, if you create a dev product that gives 2x walkspeed for 15 minutes and a Game Pass that gives permanent 2x walkspeed, no one will buy the dev product!
To create a Developer Product, go to your game’s page, click the three-dot button, and then click Configure This Game (Figure 23.7).
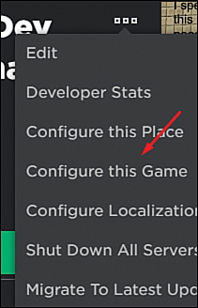
FIGURE 23.7
Click Configure this Game.
On the Configure Game page, click Create New (Figure 23.8) and fill in the price and name for your product. You’ll also be able to upload an icon for the dev product.

FIGURE 23.8
Create a new Developer Product.
Just like the Game Pass, you can provide the player with an in-game prompt to purchase a dev product. To do this, use PromptProductPurchase. To create the prompt, you need to copy the ID of the Developer Product from the website, as shown in the following code:
local productid = 1234567

local player = game.Players.LocalPlayer
MarketplaceService:PromptProductPurchase(player, productid)
Now, this is where it gets slightly tricky. But don’t worry; we’re breaking it down to make it easy to understand. Whenever a player purchases a Developer Product, the transaction needs to be handled using something called the process receipt callback. This callback will be called whenever a player purchases a Developer Product in your game:
local MarketplaceService = game:GetService("MarketplaceService")

function processReceipt(receiptInfo)
    -- Handle purchasing
end

-- The processReceipt function will be called everytime a purchase is made in the
      game
MarketplaceService.ProcessReceipt = processReceipt
Inside the processReceipt function, you need to award the player the item/perk they purchased. First, however, check that the player is still in the game. If they have left, you should return Enum.ProductPurchaseDecision.NotProcessedYet so Roblox can automatically refund the Robux to the player, or you can award the perk the next time the player joins. If you choose the latter, the processReceipt callback will be called again the next time the player joins, or, if they don’t join in the next three days, the Robux will be automatically refunded to them.
The most important part is returning Enum.ProductPurchaseDecision.PurchaseGranted, as shown in the following code. If you do not return this at the end of the processReceipt function, you won’t receive the Robux from the sale!
local MarketplaceService = game:GetService("MarketplaceService")

function processReceipt(receiptInfo)
    local player = game:GetService("Players"):GetPlayerByUserId(receiptInfo.
        PlayerId)
    if not player then
        -- The player left the game
        -- If they come back, the callback will be called again
        return Enum.ProductPurchaseDecision.NotProcessedYet
    else
        -- Award the product and if all goes well, PurchaseGranted can be called
    end

    -- This MUST be called otherwise you won't receive Rob
    -- Very important it is only called when the purchase is successful, however
    return Enum.ProductPurchaseDecision.PurchaseGranted
end

-- The processReceipt function will be called every time a purchase is made in the
      game
MarketplaceService.ProcessReceipt = processReceipt
Roblox Premium
If you’re already a keen Roblox player or developer, you’re probably aware of Roblox Premium, a subscription service that gives players extra Robux every month and enables them to trade items on the Roblox catalog. A unique way to monetize your game is to give players perks for being a Premium member, which in turn encourages them to buy Roblox Premium. You may be thinking, “Surely that just benefits Roblox?” However, Roblox recently introduced something called Premium Payouts (Figure 23.9), which enable you to earn Robux based on how many Premium players play your game and how long they play. So, by encouraging players to purchase Premium by giving perks in your game, you can increase the Premium Payouts you receive.

FIGURE 23.9
Premium Payout graph on the developer stats page.
To implement perks, you can check a player’s Premium membership status using the following code:
local player = game.Players.LocalPlayer
if player.MembershipType == Enum.MembershipType.Premium then
     -- This player owns Roblox Premium!
end
To prompt players to purchase Premium, you can use PromptPremiumPurchase:
local player = game.Players.LocalPlayer
if player.MembershipType == Enum.MembershipType.Premium then
     -- This player owns Roblox Premium!
else
     MarketplaceService:PromptPremiumPurchase(player)
end
Similarly, with Game Passes, to handle situations where a player purchases Premium while playing your game, you should use the PlayerMembershipChanged event to enable the relevant rewards:
local Players = game:GetService("Players")
-- Event will be fired when a player's membership changes
Players.PlayerMembershipChanged:Connect(function(player)
    if player.MembershipType == Enum.MembershipType.Premium then
        -- Player just bought Premium!
    end
end)
The server will be waiting for a reply from the client. If the client is laggy, it may be waiting a long time. If the client disconnects/leaves the game, the function will error. If you do use an InvokeClient, you should wrap the function in a pcall!
Developer Exchange: Earn Real Money from Your Game
Developer Exchange (DevEx) enables developers to convert Robux into real money. Since it was introduced in 2013, developers have been paid millions of dollars and have been able to form companies using the revenue generated from their games. In theory, DevEx is available to everyone, but there are some requirements you should be aware of:
- You have to be a member of Roblox Premium.
- You have to have a minimum of 100,000 Robux in your account.
- You must have a verified email address.
- You must be 13 years of age or older.
- You must be a good community member who abides by the terms of service (TOS). (Roblox will check your moderation history to see if you have been previously warned or banned. If you have a clean moderation history and are a good member of the Roblox community, you should have no problems!)
Assuming you meet all these requirements, DevEx allows you to submit a request each month for real money. The current rate at the time of writing is 100,000 Robux for $350 USD—this amount is converted into the appropriate currency for your country. You are able to receive the payment through PayPal, as a bank transfer, or, in some cases, as a check.
To cash out with DevEx, go to the Create tab and select Developer Exchange. Click the big Cash Out button on the right (Figure 23.10) and fill in all the relevant details. If it’s your first time DevExing, you should receive an invite to the Tipalti portal, which is how Roblox pays you. If not, it can take up to two weeks to receive the money; however, in most cases, payments are made much quicker than that most of the time.

FIGURE 23.10
The Cash Out button.
There is no limit to how many Robux you can cash out (Figure 23.11) at one time.

FIGURE 23.11
On the DevEx page, you can fill out how many Robux you want to cash out.
Summary
In this hour, you learned the basics of monetizing your game on Roblox. You’ve been introduced to how to make and implement Game Passes to create one-time purchases in your game and how to use Developer Products to create consumables, which can be purchased multiple times. We also covered Roblox Premium and how you can use it to increase revenue. And finally, we talked about the Developer Exchange program and how you use it to convert Robux into real cash!
Q&A
Q. What is Tipalti, which was mentioned in the DevEx section?
A. Tipalti is a payment processor that Roblox uses to pay people. You can log in to the online portal to view payment details and payment history, as well as submit tax forms and more.
Q. Should I use Game Passes or dev products to monetize my game?
A. You should use both! Having a mixture of one-time purchases and repeat purchases encourages different types of players to spend while also offering the opportunity to develop a continuous revenue stream from repeat purchases. This can also help convert players to whales (the big spenders in a game), which helps you generate more revenue.
Workshop
Now that you have finished this hour, take a few moments to review to see if you can answer the following questions.
Quiz
1. What’s the minimum amount of Robux you can cash out using DevEx?
2. ____ are the players who spend the most in your game.
3. Game Passes are an example of ____-time purchases.
4. True or False: You can only buy dev products once.
5. True or False: You get revenue from Roblox Premium purchases in your game.
6. True or False: If a player purchases a dev product in your game, you automatically get the Robux.
7. True or False: Revenue from your game takes three days to arrive in your account or group.
Answers
1. 100,000 is the minimum amount of Robux you can cash out using DevEx.
2. Whales are the players who spend the most in your game.
3. Game Passes are an example of one-time purchases.
4. False. They are used for repeat purchases.
5. False. You do get Premium Payouts for engagement time of Premium players, however.
6. False. You must return a PurchaseDecision in the ProcessReceipt function to receive funds.
7. True. Robux earnings sit in Pending Sales for three days before being released into your account or group.
Exercises
This exercise combines a number of different things you’ve learned this hour. If you get stuck, don’t forget to refer to the previous pages in this chapter. Create a Game Pass that gives the player extra walkspeed. This is a permanent perk because players own Game Passes forever!
Create a simple UI with an
ImageLabelshowing the Game Pass image; aTextLabeldescribing the perk the player will get, along with the price; and aTextButtonfor prompting the player to make a purchase.In the
TextButton, add aLocalScriptthat prompts the player to purchase the Game Pass. Don’t forget to use the correct ID from the Game Pass URL.In
ServerScriptService, create a script that uses thePromptGamePassPurchaseFinishedevent to verify whether the player bought the Game Pass. If they did, increase the walkspeed of the player (Step 5).Add a
PlayerAddedevent to the sameScript, which checks, every time a player joins, whether they own the Game Pass. If they do, increase the walkspeed of the player—this can be done by calling a function so both thePromptGamePassPurchaseFinishedandPlayerAddedevent can use it.Create a function called
increaseWalkspeed, which takes a player parameter. UsePlayer.Character.Humanoid.Walkspeed = 50to increase the walkspeed. You can set the speed to any value you’d like.
Bonus Exercise: Create a Developer Product that increases the walkspeed of the player every time they purchase it. (For the sake of simplicity, we won’t use any data stores to save this value, but ideally you would need to save purchases/perks so they can be awarded the next time the player joins.)
Create a simple UI with an
ImageLabelshowing the dev product icon for the product, aTextLabeldescribing that the dev product will award the player, and aTextButtonto prompt the purchase.In the
TextButton, insert aLocalScriptthat prompts the player to purchase the dev product. You’ll need to use the ID from the dev product you created on the website.In
ServerScriptService, create a script that uses theMarketplaceservice.ProcessReceiptevent to verify which dev product the player bought (check the ID) and to make sure they’re still in the game.If the player is still in the game and the ID matches, increase the walkspeed and return the
PurchaseGranteddecision.If the player has left the game, you should return
NotProcessedYet. If the player is still in the game but the ID matches, they have bought another dev product in your game, and you should handle that appropriately.You can reuse the same
increaseWalkspeedfunction you made in the first exercise. This time, however, you should increase the walkspeed by a certain amount each time. For example,Player.Character.Humanoid.Walkspeed = Player.Character.Humanoid.Walkspeed + 10.Extra: Using data stores, try and save a purchase history log for each player!