
Chapter 4
Building and Maintaining a Simple Database Structure
In This Chapter
![]() Using RAD to build, change, and remove a database table
Using RAD to build, change, and remove a database table
![]() Using SQL to build, change, and remove a database table
Using SQL to build, change, and remove a database table
![]() Migrating your database to another DBMS
Migrating your database to another DBMS
Computer history changes so fast that sometimes the rapid turnover of technological generations can be confusing. High-level (so-called third-generation) languages such as FORTRAN, COBOL, BASIC, Pascal, and C were the first languages used to build and change large databases. Later languages included some specifically designed for use with databases — such as dBASE, Paradox, and R:BASE. (So were these third-and-a-half-generation languages? Never mind.) The next step in this progression was the emergence of development environments such as Access, PowerBuilder, and C++ Builder, the so-called fourth-generation languages (4GLs). Now things have moved beyond the numbered generations to rapid application development (RAD) tools and integrated development environments (IDEs) such as Eclipse and Visual Studio .NET, which can be used with any of a number of languages (such as C, C++, C#, Python, Java, Visual Basic, or PHP). You use them to assemble application components into production applications.
 Because SQL is not a complete language, it doesn’t fit tidily into one of the generational categories I just mentioned. Nor is it an IDE. It makes use of commands in the manner of a third-generation language, but it is essentially nonprocedural, like a fourth-generation language. No matter how you classify SQL, you can use it in conjunction with an IDE or with older third- and fourth-generation development tools. You can write the SQL code yourself, or you can move objects around onscreen and have the development environment generate equivalent code for you. The commands that go out to the remote database are pure SQL in either case.
In this chapter, I take you through the process of using a RAD tool to build, alter, and drop a simple table, and then I discuss how to build, alter, and drop the same table using SQL.
Using a RAD Tool to Build a Simple Database
People use databases because they want to keep track of important information. Sometimes the information that they want to track is simple, and sometimes it’s not. A good database management system provides what you need in either case. Some DBMSs give you SQL. Others, such as RAD tools, give you an object-oriented graphical environment. Some DBMSs support both approaches. In the following sections, I show you how to build a simple single-table database by using a graphical database design tool. I use Microsoft Access in my examples, but the procedure is similar for other Windows-based development environments.
Deciding what to track
The first step when you create a database is to decide what you want to track. For example, imagine you’ve just won $248 million in the Powerball lottery. (It’s okay to imagine something like this. In real life, it’s about as likely as finding your car squashed by a giant meteorite.) Friends and acquaintances you haven’t heard from in years are suddenly coming out of the woodwork. Some have surefire, can’t-miss business opportunities in which they want you to invest. Others represent worthy causes that could benefit from your support. As a good steward of your new wealth, you realize that some business opportunities aren’t as good as others, and some causes aren’t as worthy as others. You decide to put all the options into a database so you can keep track of them and make fair and equitable judgments.
You decide to track the following information about your friends and relations:
![]() First name
First name
![]() Last name
Last name
![]() Address
Address
![]() City
City
![]() State or province
State or province
![]() Postal code
Postal code
![]() Phone
Phone
![]() How known (your relationship to the person)
How known (your relationship to the person)
![]() Proposal
Proposal
![]() Business or charity
Business or charity
You decide to put all the listed items into a single database table; you don’t need something elaborate.
Creating a database table
When you fire up your Access 2013 development environment, you’re greeted by the screen shown in Figure 4-1. From there, you can build a database table in several different ways. I start with Datasheet view because that approach shows you how to create a database from the ground up. Read on.
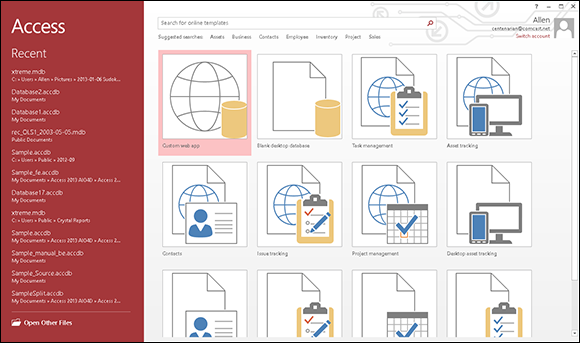
Figure 4-1: The Microsoft Access opening screen.
Building a database table in Datasheet view
By default, Access 2013 opens in Datasheet view. To build an Access database in Datasheet view, double-click the Blank Desktop Database template.
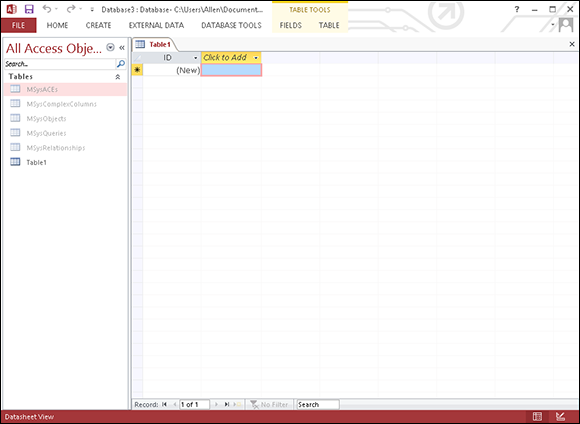
Figure 4-2: The Datasheet view in the Access development environment.
 That’s the start-from-scratch method, but you have several different ways to create an Access database table. This next one uses Design view.
Building a database table in Design view
In Datasheet view (refer to Figure 4-2), building a database table is pretty easy: You just start entering data. That approach, however, is prone to errors, because details are easy to overlook. A better way to create a table is in Design view by following these steps:
1. With Access open in Datasheet view (the default), click the Home tab on the Ribbon and then click View below the icon in the upper-left corner of the window. Choose Design View from the drop-down menu.
When you choose Design View, a dialog box pops up and asks you to enter a table name.
2. Enter POWER (for your Powerball winnings) and click OK.
The Design view (shown in Figure 4-3) appears.
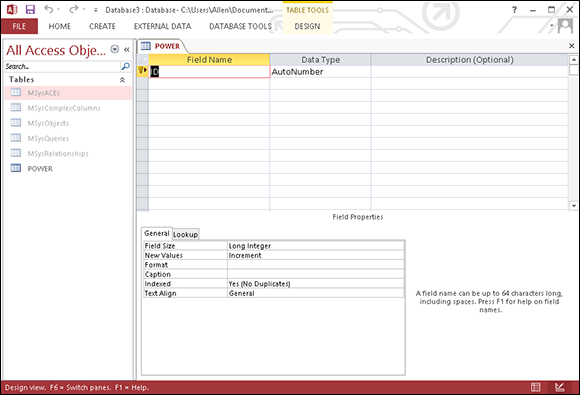
Figure 4-3: The Design view’s starting screen.
Notice that the window is divided into functional areas. Two of them are especially useful in building database tables:
• Design view options: A menu across the top of the window offers Home, Create, External Data, Database Tools, and Design options. When the Ribbon is displayed, the tools available in Design view are represented by the icons just below the menu. In Figure 4-3, the highlighting shows that the Design and Primary Key icons are selected.
• Field Properties pane: In this area for defining database fields, the cursor is blinking in the Field Name column of the first row. Access is suggesting that you specify a primary key here, name it ID, and give it the AutoNumber data type.
AutoNumber, an Access data type, isn’t a standard SQL type; it increments an integer in the field by one automatically every time you add a new record to a table. This data type guarantees that the field you use as a primary key won’t be duplicated and will thus stay unique.
3. In the Field Properties area, change the primary key's Field Name from ID to ProposalNumber.
The suggested Field Name for the primary key, ID, just isn't very informative. If you get into the habit of changing it to something more meaningful (and/or providing additional information in the Description column), it's easier to keep track of what the fields in your database are for. Here the field name is sufficiently descriptive.
Figure 4-4 shows the database table’s design at this point.

Figure 4-4: Using a descriptive field name to define the primary key.
4. In the Field Properties pane, check the assumptions that Access has made automatically about the ProposalNumber field.
Figure 4-4 shows the following assumptions:
• The Field Size has been set to Long Integer.
• New Values are obtained by incrementing.
• Indexing is called for and duplicates are not allowed.
• Text alignment is general.
As is often the case, the assumptions Access makes are fine for what you want to do. If any of the assumptions are incorrect, you can override them by entering new values.
5. Specify the rest of the fields you want this table to have.
Figure 4-5 shows Design view after you've entered the FirstName field.

Figure 4-5: The table-creation window after FirstName has been defined.
The data type for FirstName is Short Text, rather than AutoNumber, so the field properties that apply to it are different. Here Access has given FirstName the default Field Size for short text data, which is 255 characters. I don't know too many people whose first names are that long. Access is smart enough to allocate only as much memory space as is actually needed for an entry. It does not blindly allocate 255 bytes regardless of what is entered. However, other development environments might not have this capability. I like to assign reasonable values to field lengths. This keeps me out of trouble when I move from one development environment to another.
Here the default Access assumption is that FirstName is not a required field. You could enter a record in the POWER table and leave the FirstName field blank, which takes into account folks who go by only one name, such as Cher or Bono.
6. Change the Field Size for FirstName to 15.
For a rundown on why this is a good idea, see the accompanying sidebar, “Thinking ahead as you design your table.”
7. To ensure that you can retrieve a record quickly from the POWER table by LastName (which is likely), change the Indexed property for LastName to Yes (Duplicates OK), as shown in Figure 4-6.
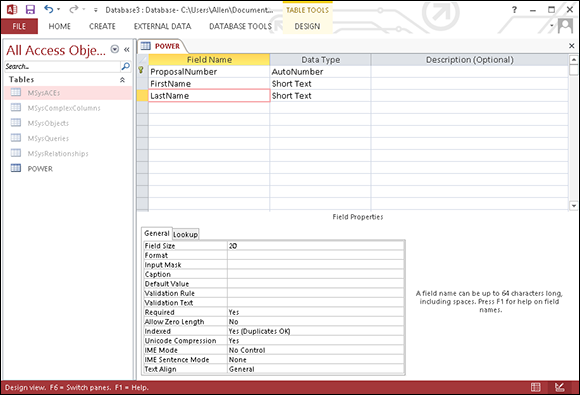
Figure 4-6: The table-creation window after LastName has been defined.
The figure shows some changes I’ve made in the Field Properties pane:
• I’ve reduced the maximum field size from 255 to 20.
• I've changed Required to Yes, Allow Zero Length to No, and Indexed to Yes (Duplicates OK). I want every proposal to include the last name of the person responsible for it. A name of zero length is not allowed, and the LastName field will be indexed.
• I allow duplicates; two or more proposers might have the same last name. This is practically certain in the case of the POWER table; I expect proposals from all three of my brothers, as well as my sons and unmarried daughter, not to mention my cousins.
• The Yes (No Duplicates) option, which I did not choose, actually would be appropriate for a field that is the primary key of a table. A table’s primary key should never contain duplicates.
8. Enter the rest of the fields, changing the default Field Size to something appropriate in all cases.
Figure 4-7 shows the result.

Figure 4-7: The table-creation window after all fields are defined.
As you can see in Figure 4-7, the field for business or charity (BusinOrCharity) is not indexed. There's no point in indexing a field that has only two possible entries; indexing doesn't narrow down the selection enough to be worth it.
 Access uses the term field rather than attribute or column. The program’s original file-processing systems weren’t relational and used the file, field, and record terminology that are common for flat-file systems.
9. Save your table by clicking on the diskette icon in the upper left corner of the window.
Keeping one eye on the future is wise as you develop your database. It’s a good idea (for example) to save frequently as you develop; just click that diskette icon now and then. Doing so could save you a lot of tedious rework in the event of a power outage or other untoward event. Also, though it won’t destroy the planet if you give the same name to a database and to one of the tables that the database contains, it might be mildly confusing for later administrators and users. As a rule, it’s handier (and kinder) to just come up with two different names.
After you save your table, you may find that you need to tweak your original design, as I describe in the next section, “Altering the table structure.”
Altering the table structure
Often newly created database tables need some tweaking. If you’re working for someone else, your client may come to you after you create the database and tell you that she wants to keep track of another data item — perhaps several more. That means you have to go back to the drawing board.
If you're building a database for your own use, deficiencies in its structure inevitably become apparent after you create the structure (it's probably a clause in Murphy's Law). For example, say you start getting proposals from other countries and need to add a Country column. Or you have an older database that didn't include e-mail addresses — time to bring it up to date. In this section, I show you how to use Access to modify a table. Other RAD tools have comparable capabilities and work in a similar fashion.
If a time comes when you need to update your database tables, take a moment to assess all the fields they're using. For example, you may as well add a second Address field for people with complex addresses and a Country field for proposals from other countries.
Although it is fairly easy to update database tables, you should avoid doing so whenever possible. Any applications that depend on the old database structure are likely to break and will have to be fixed. If you have a lot of applications, this task could be a major undertaking. Try to anticipate expansions that might be needed in the future and make provisions for them. Carrying along a little extra overhead in the database is usually preferable to updating a slew of applications written several years ago. The knowledge of how they work is probably long gone, and they may be essentially unfixable.
To insert new rows and accommodate changes, open the table and follow these steps:
1. In the table-creation window, right-click in the small colored square to the left of the City field to select that row and choose Insert Rows from the menu that pops up.
A blank row appears above the cursor position and pushes down all the existing rows, as shown in Figure 4-8.
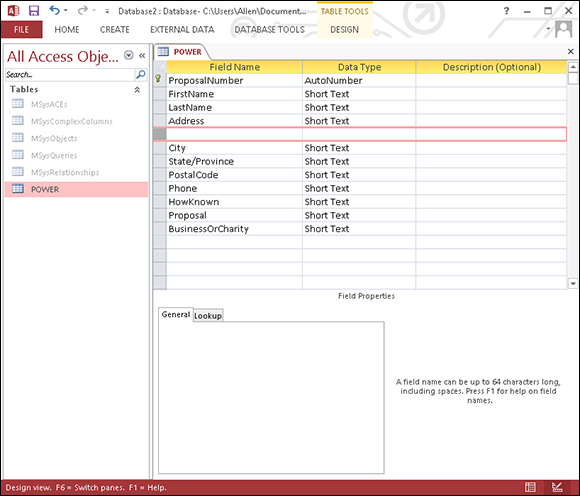
Figure 4-8: The table-creation window after opening up space for a second address line.
2. Enter the fields you want to add to your table.
I added an Address2 field above the City field and a Country field above the Phone field.
3. After you finish your modifications, save the table before closing it.
The result should look similar to Figure 4-9.
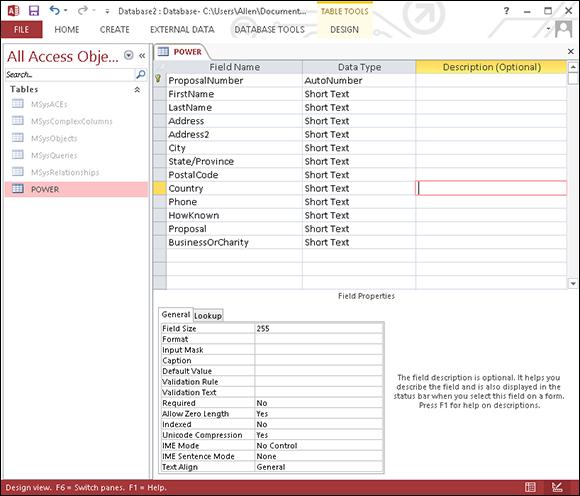
Figure 4-9: Your revised table definition should look similar to this.
Creating an index
In any database, you need a quick way to access records of interest. (This is never truer than when you win the lottery — the number of investment and charitable proposals you receive could easily grow into the thousands.) Say, for example, that you want to look at all the proposals from people claiming to be your brother. Assuming none of your brothers have changed their last names for theatrical or professional reasons, you can isolate these offers by basing your retrieval on the contents of the LastName field, as shown in the following SQL adhoc query:
SELECT * FROM POWER
WHERE LastName = 'Marx' ;
That strategy may not work for the proposals made by half brothers and brothers-in-law, so you need to look at a different field, as shown in the following example:
SELECT * FROM POWER
WHERE HowKnown = 'brother-in-law'
OR
HowKnown = 'half brother' ;
SQL scans the table a row at a time, looking for entries that satisfy the WHERE clause condition. If the POWER table is large (tens of thousands of records), you may end up waiting a while. You can speed things up by applying indexes to the POWER table. (An index is a table of pointers. Each row in the index points to a corresponding row in the data table.)
You can define an index for all the different ways you may want to access your data. If you add, change, or delete rows in the data table, you don’t have to re-sort the table — you need only to update the indexes. You can update an index much faster than you can sort a table. After you establish an index with the desired ordering, you can use that index to access rows in the data table almost instantaneously.
Because the ProposalNumber field is unique as well as short, using that field is the quickest way to access an individual record. Those qualities make it an ideal candidate for a primary key. And because primary keys are usually the fastest way to access data, the primary key of any and every table should always be indexed; Access indexes primary keys automatically. To use this field, however, you must know the ProposalNumber of the record you want. You may want to create additional indexes based on other fields, such as LastName, PostalCode, or HowKnown. For a table that you index on LastName, after a search finds the first row containing a LastName of Marx, the search has found them all. The index keys for all the Marx rows are stored one right after another. You can retrieve Chico, Groucho, Harpo, Zeppo, and Karl almost as fast as you could get the data on Chico alone.
Indexes add overhead to your system, which slows down operations. You must balance this slowdown against the speed you gain by accessing records through an index.
Here are some tips for picking good indexing fields:
![]() Indexing the fields you frequently use to access records is always a good idea. You can speedily access records without too much latency.
Indexing the fields you frequently use to access records is always a good idea. You can speedily access records without too much latency.
![]() Don’t bother creating indexes for fields that you never use as retrieval keys. Creating needless indexes is a waste of time and memory space, and you gain nothing.
Don’t bother creating indexes for fields that you never use as retrieval keys. Creating needless indexes is a waste of time and memory space, and you gain nothing.
![]() Don't create indexes for fields that don't differentiate one record from a lot of others. For example, the
Don't create indexes for fields that don't differentiate one record from a lot of others. For example, the BusinessOrCharity field merely divides the table records into two categories; it doesn't make a good index.
The effectiveness of an index varies from one implementation to another. If you migrate a database from one platform to another, the indexes that gave the best performance on the first system may not perform the best on the new platform. In fact, the performance may be worse than if you hadn’t indexed the database at all. Try various indexing schemes to see which one gives you the best overall performance, and optimize your indexes so that neither retrieval speed nor update speed suffer from the migration.
To create indexes for the POWER table, just select Yes for Indexed in the Field Properties pane of the table creation window.
Access does two handy tricks automatically: It creates an index for PostalCode (because that field is often used for retrievals) and it indexes the primary key. (Ah, progress. Gotta love it.)
PostalCode isn't a primary key and isn't necessarily unique; the opposite is true for ProposalNumber. You already created an index for LastName. Do the same for HowKnown because both are likely to be used for retrievals.
After you create all your indexes, don’t forget to save the new table structure before closing it.
If you use a RAD tool other than Microsoft Access, the info in this section doesn’t apply to you. However, the overall process is fairly similar.
Deleting a table
In the course of creating a table (such as the POWER table I describe in this chapter) with the exact structure you want, you may have to create a few intermediate versions along the way. Having these variant tables on your system may confuse people later, so delete them now while they’re still fresh in your mind. To do so, right-click the table you want to delete from the All Tables list on the left side of the window. A menu pops up, and one of the options it offers is Delete. When you click Delete, as shown in Figure 4-10, the table is removed from the database.
 Be really sure of what you’re doing. When you click Delete, that table, and all the work you put into it, will be gone.

Figure 4-10: Select Delete to delete a table.
If Access deletes a table, it deletes all subsidiary tables as well, including any indexes the table may have.
Building POWER with SQL’s DDL
All the database-definition functions you can perform with a RAD tool (such as Access) are also possible if you’re using SQL to build your table. Of course, using SQL isn’t as glamorous — instead of clicking menu choices with the mouse, you enter commands from the keyboard. People who prefer to manipulate visual objects find the RAD tools easy to understand and use. People who are happier stringing words together into logical statements find SQL commands easier to use.
Becoming proficient at using both methods is worthwhile because some things are more easily represented by using the object-oriented (mouse) technique and others are more easily handled by typing in SQL commands.
In the following sections, I use SQL to create the same table as before, and then I do the same alteration and deletion operations I did with the RAD tool in the first part of this chapter.
Using SQL with Microsoft Access
Access is designed as a rapid application development (RAD) tool that does not require programming. You can write and execute SQL statements in Access, but you have to use a back-door method to do it. To open a basic editor where you can enter SQL code, follow these steps:
1. Open your database and click the CREATE tab to display the ribbon across the top of the window.
2. Click Query Design in the Queries section.
The Show Table dialog box appears.
3. Select the POWER table. Click the Add button and then click the Close button to close the dialog box.
Doing so produces the display shown in Figure 4-11.
A picture of the POWER table and its attributes appears in the upper part of the work area and a Query By Example (QBE) grid appears below it. Access expects you to enter a query now by using the QBE grid. (You could do that, sure, but it wouldn’t tell you anything about how to use SQL in the Access environment.)

Figure 4-11: The Query screen with POWER table selected.
4. Click the Home tab and then the View icon in the left corner of the Ribbon.
A menu drops down, displaying the different views available to you in query mode, as shown in Figure 4-12.

Figure 4-12: The database views available in Query mode.
One of those views is SQL View.
5. Click SQL View to display the SQL View Object tab.
As Figure 4-13 shows, the SQL View Object tab has made the (very rational) assumption that you want to retrieve some information from the POWER table, so it has written the first part for you. It doesn’t know exactly what you want to retrieve, so it displays only the part it feels confident about.
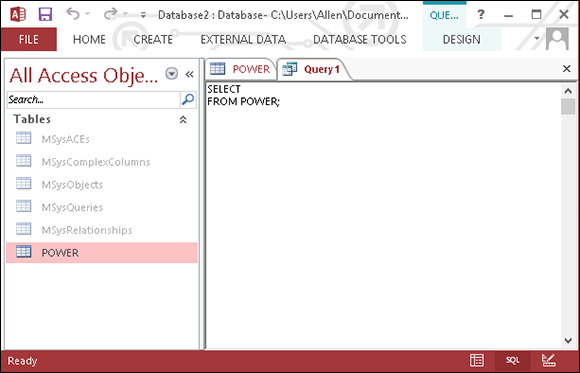
Figure 4-13: The Object tab in SQL view.
Here’s what it’s written so far:
SELECT
FROM POWER ;
6. Fill in an asterisk (*) in the blank area in the first line and add a WHERE clause after the FROM line.
If you had already entered some data into the POWER table, you could make a retrieval with something like:
SELECT *
FROM POWER
WHERE LastName = 'Marx' ;
Be sure the semicolon (;) is the last thing in the SQL statement. You need to move it down from just after POWER to the end of the next line down.
7. When you’re finished, click the floppy-diskette Save icon.
Access asks you for a name for the query you have just created.
8. Enter a name and then click OK.
Your statement is saved and can be executed as a query later.
Creating a table
Whether you’re working with Access or a full-featured enterprise-level DBMS — such as Microsoft SQL Server, Oracle 11g, or IBM DB2 — to create a database table with SQL, you must enter the same information that you’d enter if you created the table with a RAD tool. The difference is that the RAD tool helps you by providing a visual interface — in the form of a table-creation dialog box (or some similar data-entry skeleton) — and by preventing you from entering invalid field names, types, or sizes.
SQL doesn't give you as much help. You must know what you're doing at the onset; figuring things out along the way can lead to less-than-desirable database results. You must enter the entire CREATE TABLE statement before SQL even looks at it, let alone gives you any indication of whether you made errors in the statement.
In ISO/IEC standard SQL, the statement that creates a proposal-tracking table (identical to the one created earlier in the chapter) uses the following syntax:
CREATE TABLE POWERSQL (
ProposalNumber INTEGER PRIMARY KEY,
FirstName CHAR (15),
LastName CHAR (20),
Address CHAR (30),
City CHAR (25),
StateProvince CHAR (2),
PostalCode CHAR (10),
Country CHAR (30),
Phone CHAR (14),
HowKnown CHAR (30),
Proposal CHAR (50),
BusinessOrCharity CHAR (1) );
The information in the SQL statement is essentially the same information you enter using Access’s graphical user interface. The nice thing about SQL is that the language is universal. The same standard syntax works regardless of what standard-compliant DBMS product you use.
In Access 2013, creating database objects such as tables is a little more complicated. You can't just type a CREATE statement (such as the one just given) into the SQL View Object tab. That's because the SQL View Object tab is available only as a query tool; you have to take a few extra actions to inform Access that you're about to enter a data-definition query rather than a normal query that requests information from the database. A further complication: Because table creation is an action that could possibly compromise database security, it's disallowed by default. You must tell Access that this is a trusted database before it will accept a data-definition query.
1. Clickthe Create tab on the Ribbon to display the icons for creation functionality.
2. Click Query Design in the Queries section.
This displays the Show Table dialog box, which at this point contains several system tables along with POWER.
3. Select POWER and click the Add button.
As you’ve seen in the previous example, a picture of the POWER table and its attributes appears in the upper half of the work area.
4. Click the Close button on the Show Table dialog box.
5. Click the Home tab and then the View icon at the left end of the Ribbon and then choose SQL View from the drop-down menu that appears.
As in the previous example, Access has "helped" you by putting SELECT FROM POWER in the SQL editor. This time you don't want the help.
6. Delete SELECT FROM POWER and (in its place) enter the data-definition query given earlier, as follows:
CREATE TABLE POWERSQL (
ProposalNumber INTEGER PRIMARY KEY,
FirstName CHAR (15),
LastName CHAR (20),
Address CHAR (30),
City CHAR (25),
StateProvince CHAR (2),
PostalCode CHAR (10),
Country CHAR (30),
Phone CHAR (14),
HowKnown CHAR (30),
Proposal CHAR (50),
BusinOrCharity CHAR (1) );
At this point, your screen should look something like Figure 4-14.

Figure 4-14: Data-definition query to create a table.
7. After clicking the Design tab of the Ribbon, click the red exclamation point Run icon.
Doing so runs the query, which creates the POWERSQL table (as shown in Figure 4-15).

Figure 4-15: Behold the POWERSQL table.
You should see POWERSQL listed under All Access Objects in the column at the left edge of the window. In which case, you’re golden. Or you may not see the table in the All Access Objects list. In that case, read (and slog) on.
Access 2013 goes to great lengths to protect you from malicious hackers and from your own inadvertent mistakes. Because running a data-definition query is potentially dangerous to the database, Access has a default that prevents the query from running. If this has happened to you, POWERSQL won’t appear in the column at the left of the window, because the query won’t have been executed. Instead, the Message Bar may appear below the Ribbon, with this terse message:
Security Warning: Certain content in the database has been disabled.
If you see this message, move on to the next steps.
8. Click the File tab and, from the menu of the left edge, choose Options.
The Access Options dialog box appears.
9. Select Trust Center from the Access Options dialog box.
10. Click the Trust Center Settings button when it appears.
11. Select Message Bar from the menu on the left and then specify Show the Message Bar by clicking its option button if it isn’t already selected.
12. Click your way back to the place where you can execute the data-definition query that creates the POWERSQL table.
13. Execute the query.
Becoming proficient in SQL has long-term payoffs because it will be around for a long time. The effort you put into becoming an expert in a particular development tool is likely to yield a lower return on investment. No matter how wonderful the latest RAD tool may be, it will be superseded by newer technology within three to five years. If you can recover your investment in the tool in that time, great! Use it. If not, you may be wise to stick with the tried and true. Train your people in SQL, and your training investment will pay dividends over a much longer period.
Creating an index
Indexes are an important part of any relational database. They serve as pointers into the tables that contain the data of interest. By using an index, you can go directly to a particular record without having to scan the table sequentially, one record at a time, to find that record. For really large tables, indexes are a necessity; without indexes, you may need to wait years rather than seconds for a result. (Well, okay, maybe you wouldn’t actually wait years. Some retrievals, however, may actually take that long if you let them keep running. Unless you have nothing better to do with your computer’s time, you’d probably do best to abort the retrieval and do without the result. Life goes on.)
Amazingly, the SQL standard doesn't provide a means to create an index. The DBMS vendors provide their own implementations of the function. Because these implementations aren't standardized, they may differ from one another. Most vendors provide the index-creation function by adding a CREATE INDEX command to SQL.
Even though two vendors may use the same words for the command (CREATE INDEX), the way the command operates may not be the same. You're likely to find quite a few implementation-dependent clauses. Carefully study your DBMS documentation to determine how to use that particular DBMS to create indexes.
Altering the table structure
To change the structure of an existing table, you can use SQL's ALTER TABLE command. Interactive SQL at your client station is not as convenient as a RAD tool. The RAD tool displays your table's structure, which you can then modify. Using SQL, you must know in advance the table's structure and how you want to modify it. At the screen prompt, you must enter the appropriate command to perform the alteration. If, however, you want to embed the table-alteration instructions in an application program, then using SQL is usually the easiest way to do so.
To add a second address field to the POWERSQL table, use the following DDL command:
ALTER TABLE POWERSQL
ADD COLUMN Address2 CHAR (30);
You don't need to be an SQL guru to decipher this code. Even professed computer illiterates can probably figure this one out. The command alters a table named POWERSQL by adding a column to the table. The column is named Address2, is of the CHAR data type, and is 30 characters long. This example demonstrates how easily you can change the structure of database tables by using SQL DDL commands.
Standard SQL provides this statement for adding a column to a table and allows you to drop an existing column in a similar manner, as in the following code:
ALTER TABLE POWERSQL
DROP COLUMN Address2;
Deleting a table
Deleting database tables that you no longer need is easy. Just use the DROP TABLE command, as follows:
DROP TABLE POWERSQL;
What could be simpler? If you DROP a table, you erase all its data and its metadata. No vestige of the table remains. This works great most of the time. The only time it doesn't is if another table in the database references the one you are trying to delete. This is called a referential integrity constraint. In such a case, SQL will spit out an error message rather than delete the table.
Deleting an index
If you delete a table by issuing a DROP TABLE command, you also delete any indexes associated with that table. Sometimes, however, you may want to keep a table but remove an index from it. The SQL standard doesn't define a DROP INDEX command, but most implementations include that command anyway. Such a command comes in handy if your system slows to a crawl and you discover that your tables aren't optimally indexed. Correcting an index problem can dramatically improve performance — which will delight users who've become accustomed to response times reminiscent of pouring molasses on a cold day in Vermont.
Portability Considerations
Any SQL implementation you’re likely to use may have extensions that give it capabilities that the SQL standard doesn’t cover. Some of these features may appear in the next release of the SQL standard. Others are unique to a particular implementation and are probably destined to stay that way.
Often extensions make it easier to create an application that meets your needs, and you’ll find yourself tempted to use them. Using the extensions may be your best course, but be aware of the tradeoffs: If you ever want to migrate your application to another SQL implementation, you may have to rewrite those sections in which you used extensions that your new environment doesn’t support.
The more you know about existing implementations and development trends, the better the decisions you’ll make. Think about the probability of such a migration in the future — and also about whether the extension you’re considering is unique to your implementation or fairly widespread. Foregoing use of an extension may be better in the long run, even if its use might save you some time now. On the other hand, you may find no reason not to use the extension. Your call.