![]()
SQL Server 2012 has made great strides towards simplifying the deployment process for Integration Services projects. Projects within Visual Studio can now target two different deployment models – the Package Deployment Model, which is similar to what was used in previous versions of the product, and the Project Deployment Model, which was designed for the new SSIS Catalog.
This chapter will focus on patterns associated with the new Project Deployment Model and server based deployment. While the Project Model and SSIS Catalog are the recommended way to do deployment, organizations upgrading from previous versions may already have package execution frameworks that rely on file system based deployment.
The new Project Model is the default target when creating SSIS projects in SQL Server 2012. With this model, packages and other project items such as Shared Connection Managers are bundled into a single file with an .ispac extension during the project’s Build phase. This file can then be deployed to the SSIS Catalog using the Deployment Wizard, or executed directly using dtexec.exe.
If your project is targeting the Package Deployment Model, you can convert to the Project Deployment Model within Visual Studio. Right click on the project name in the Solution Explorer window, and select Convert to Project Deployment Model (as shown in Figure 19-1). Converting to the Project Deployment Model brings up the Project Conversion Wizard. The wizard helps you convert to the new model by updating Execute Package Tasks to use Project References, and changing Configurations to Parameters.
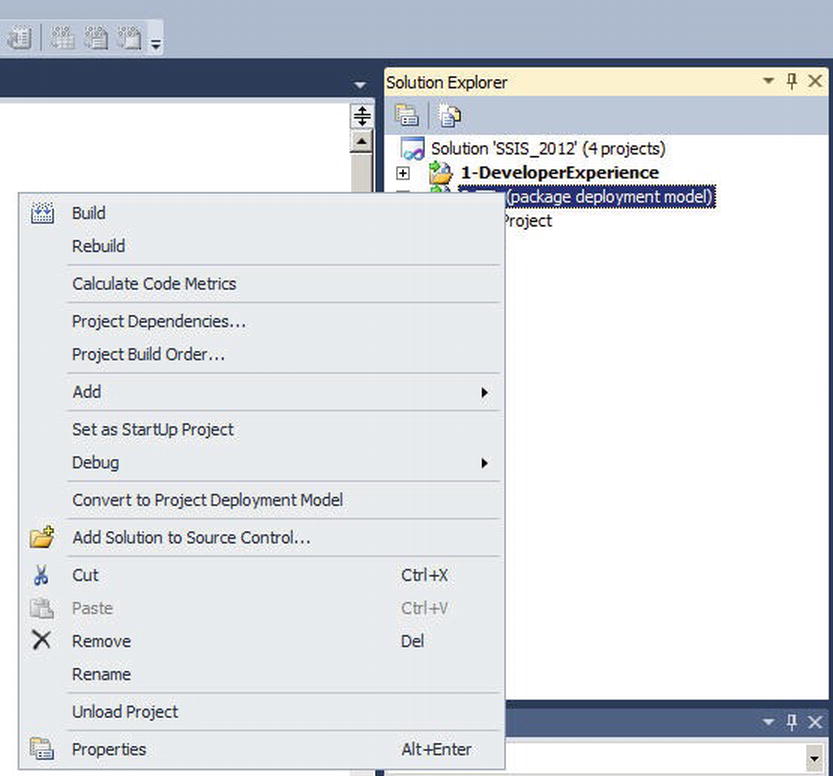
Figure 19-1. SSDT provides an option to convert to the Project Deployment Model
Integration Services projects in the Project Deployment Model can make use of new features such as Parameters, Shared Connection Managers, and Project References. Project References allow the Execute Package Task to locate child packages without the use of connection managers, and greatly simply the deployment process.
The SSIS Catalog is a new feature in SQL Server 2012, and is the recommended deployment target for Integration Services projects. Deployment to the catalog is typically done using the SSIS Deployment Wizard, which can be launched from within SSDT, SSMS, double clicking an SSIS project file (.ispac) from windows explorer, or by running ISDeploymentWizard.exe.
To launch the Deployment Wizard from SSDT, right click on the project in the Solution Explorer and select the Deploy option. The wizard will automatically load your project file, putting you on the Select Destination page (as show in Figure 19-2).
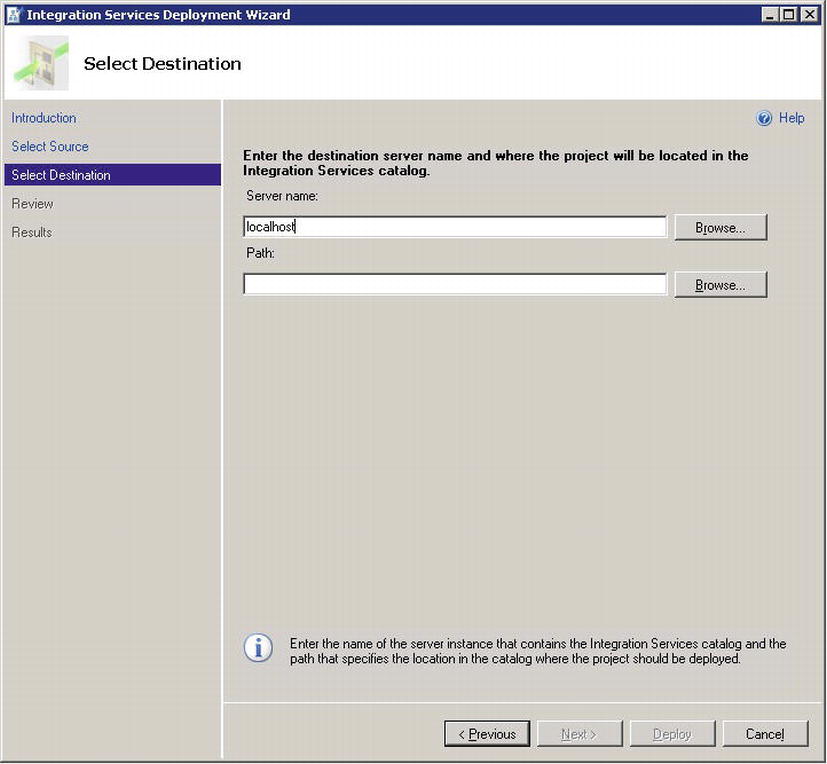
Figure 19-2. The Integration Services Deployment Wizard can be launched from SSDT
![]() Note The Deployment Wizard is typically used to deploy files to the SSIS Catalog, but it can also be used to move projects between servers. To do this, choose the Integration Services catalog option on the Select Source page.
Note The Deployment Wizard is typically used to deploy files to the SSIS Catalog, but it can also be used to move projects between servers. To do this, choose the Integration Services catalog option on the Select Source page.
The Deployment Wizard allows you to select the server and folder you wish to deploy the project to. On the final page, the project file is sent to the server and stored in the SSIS Catalog. Note that, during deployment, the wizard indicates that it is changing the project’s protection level (Figure 19-3). During this phase, sensitive data within the project is decrypted, and the project is converted to the Server Storage protection level. The server relies on database encryption to protect packages and parameter values – these tables are automatically encrypted in the SSIS Catalog.
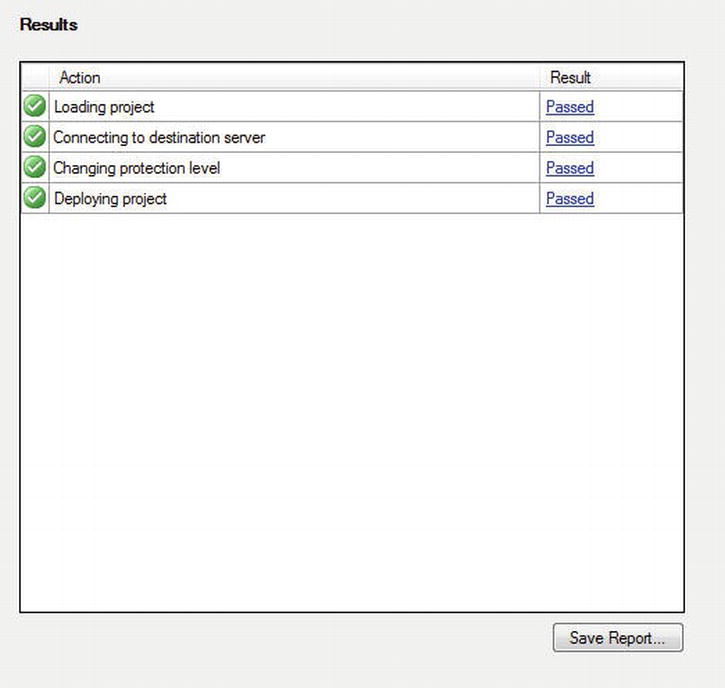
Figure 19-3. The Deployment Wizard status page
![]() Note More information about package protection levels and secure deployments can be found in Books Online at http://msdn.microsoft.com/en-us/library/bb522558(v=SQL.110).aspx
Note More information about package protection levels and secure deployments can be found in Books Online at http://msdn.microsoft.com/en-us/library/bb522558(v=SQL.110).aspx
This section describes the different deployment methods supported by the SSIS Catalog. The method you choose will depend on your environment, and what the people doing the deployment – whether they are developers, ETL operators, or DBAs – are most comfortable with. The deployment methods described here include:
- Deployment from the command line
- Deployment using custom code
- Deployment using PowerShell
- Deployment using SQL
Deployment from the Command Line
The Deployment Wizard (ISDeploymentWizard.exe) provides a command line interface, which allows you to deploy to the SSIS Catalog without a UI. This is very useful for deploying from scripts, or as part of a batch process. Table 19-1 shows the list of supported parameters. Listing 19-1 provides an example command line that deploys a project (C:SSISProject.ispac) to a folder named MyFolder on a local SSIS Catalog.
Table 19-1. Integration Services Deployment Wizard command line parameters
Listing 19-1. Deploying a project from the command line
ISDeploymentWizard.exe /Silent /SourcePath:"C:ETLProject.ispac"
/DestinationServer:"localhost" /DestinationPath:"/SSISDB/MyFolder/Project"
![]() Note When the Deployment Wizard is run in interactive (UI) mode, the Review page displays the equivalent parameters to do a command line based deployment. This can be a handy shortcut – simply copy the command line arguments into a batch file to perform automatic deployments in the future.
Note When the Deployment Wizard is run in interactive (UI) mode, the Review page displays the equivalent parameters to do a command line based deployment. This can be a handy shortcut – simply copy the command line arguments into a batch file to perform automatic deployments in the future.
The SSIS Catalog has a managed .NET API called the Management Object Model (or MOM). This API allows you to programmatically perform that same management tasks that would normally be done through SQL Server Management Studio (SSMS), including Folder creation, and deployment of projects.
Listing 19-2 provides a sample C# application that makes use of the MOM to create a new Folder in an SSIS Catalog, and deploys a project to it. The core functionality can be found in the Microsoft.SqlServer.Management.IntegrationServices assembly, which is installed with SSMS and found in the Global Assembly Cache (GAC).
Listing 19-2. Deploying a project using the MOM
class Program
{
    const string ProjectFileLocation = @"C:ETLProject.ispac";

    static void Main(string[] args)
    {
     // Connect to the default instance on localhost
     var server = new Server("localhost");
     var store = new IntegrationServices(server);

    // Check that we have a catalog
     if (store.Catalogs.Count == 0)
     {
     Console.WriteLine("SSIS catalog not found on localhost.");
     }

     // Get the SSISDB catalog - note that there should only
     // be one, but the API may support multiple catalogs
     // in the future
     var catalog = store.Catalogs["SSISDB"];

     // Create a new folder
     var folder = new CatalogFolder(catalog,
         "MyFolder",
         "Folder that holds projects");
          folder.Create();

         // Make sure the project file exists
     if (!File.Exists(ProjectFileLocation))
     {
         Console.WriteLine("Project file not found at: {0}",
     ProjectFileLocation);
     }

     // Load the project using the SSIS API
     var project = Project.OpenProject(ProjectFileLocation);

         // Deploy the project to the folder we just created
     folder.DeployProject(project);
    }
}
The SSIS Management Object Model (MOM) is accessible via PowerShell, which makes it possible to fully automate your deployment (and other management tasks) using PowerShell scripts. Listing 19-3 shows the PowerShell version of the simple deployment application from Listing 19-2.
Listing 19-3. Deploying a project using PowerShell
# Variables
$ProjectFilePath = "C:ETLProject.ispac"
$ProjectName = "Project"
$FolderName = "MyFolder"

# Load the IntegrationServices Assembly
$loadStatus = [Reflection.Assembly]::Load("Microsoft.SqlServer.Management.IntegrationServices, Version = 11.0.0.0, Culture = neutral, PublicKeyToken = 89845dcd8080cc91")

# Store the IntegrationServices Assembly namespace to avoid typing it every time
$ISNamespace = "Microsoft.SqlServer.Management.IntegrationServices"

Write-Host "Connecting to server ... "

# Create a connection to the server
$sqlConnectionString = "Data Source = localhost;Initial Catalog = master;Integrated Security = SSPI;"
$sqlConnection = New-Object System.Data.SqlClient.SqlConnection $sqlConnectionString

# Create the Integration Services object
$integrationServices = New-Object $ISNamespace".IntegrationServices" $sqlConnection
$catalog = $integrationServices.Catalogs["SSISDB"]

Write-Host "Creating Folder" $FolderName " ... "

# Create a new folder
$folder = New-Object $ISNamespace".CatalogFolder" ($catalog, $FolderName, "This is a folder description")
$folder.Create()

Write-Host "Deploying" $ProjectName "project ... "

# Read the project file, and deploy it to the folder
[byte[]] $projectFile = [System.IO.File]::ReadAllBytes($ProjectFilePath)
$project = $folder.DeployProject($ProjectName, $projectFile)

Write-Host "All done."
If you prefer to do all of your database management and deployments using T-SQL, the SSIS Catalog exposes a full management interface through a set of Views and Stored Procedures. Listing 19-4 provides a sample that loads a project file in binary format, deploys it to a folder using the [catalog].[deploy_project] stored procedure, and then queries the status of the deployment from the [catalog].[operations] view.
Listing 19-4. Deploying a project using the SQL API
use SSISDB

DECLARE @ProjectBinary as varbinary(max)
DECLARE @OperationID as bigint

-- load the project file
SET @ProjectBinary =
(
  SELECT *
  FROM OPENROWSET
  (
    BULK 'C:ETLProject.ispac',
    SINGLE_BLOB
  ) as BinaryData
)

-- deploy the project
EXEC [catalog].[deploy_project]
 'MyFolder', -- folder
 'Project', -- project name
 @ProjectBinary, -- binary data
 @OperationID out -- operation id

--
-- Get the status of the last deployment
--

DECLARE @LastDeployment_id bigint;
SET @LastDeployment_id =
(

  SELECT MAX(operation_id)
  FROM [catalog].[operations]
  WHERE operation_type = 101	-- deploy
)
SELECT [object_name], start_time, end_time, [status], [value] =
  case
      when [status] = 1 then N'Created'
      when [status] = 2 then N'Running'
      when [status] = 3 then N'Canceled'
      when [status] = 4 then N'Failed'
      when [status] = 5 then N'Pending'
      when [status] = 6 then N'Unexpected Termination'
      when [status] = 7 then N'Succeeded'
      when [status] = 8 then N'Stopping'
      when [status] = 9 then N'Completed'
  end
FROM [catalog].[operations]
WHERE [operation_id] = @LastDeployment_id
SSIS projects created in SQL Server 2012 will default to the Project Deployment Model, but some users may want to continue using the Package Deployment Model from SQL Server 2005 and 2008. You can convert from the Project Deployment Model to the Package Deployment Model in Visual Studio by right clicking on the project name in Solution Explorer, and selecting Convert to Package Deployment Model (as shown in Figure 19-4). Projects that were originally created in previous versions of SQL Server will automatically start off in the Package Deployment Model when you open them in SSDT.
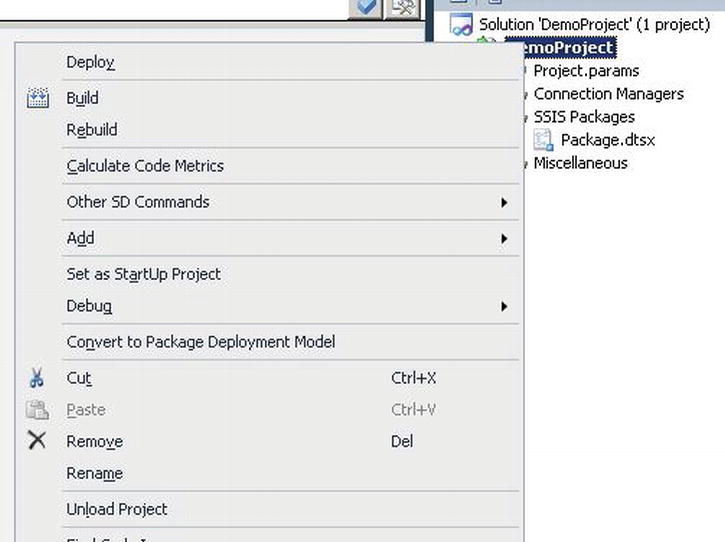
Figure 19-4. Converting to the Package Deployment Model
![]() Note When using the Package Deployment Model, you will not be able to use some of the new functionality introduced in SQL Server 2012, such as Parameters and Project References. If any of your packages are using these features, SSDT will not let you convert to the Package Deployment Model.
Note When using the Package Deployment Model, you will not be able to use some of the new functionality introduced in SQL Server 2012, such as Parameters and Project References. If any of your packages are using these features, SSDT will not let you convert to the Package Deployment Model.
Table 19-2 lists the deployment locations you would use with the Package Deployment Model, and briefly describes the advantages of each approach.
Table 19-2. Deployment locations when using the Package Deployment Model
| Location | Notes |
|---|---|
| File System | • Mirrors the structure you have when developing in SSDT |
| • Doesn’t require database permissions | |
| • Deployment is a simple file copy | |
| SQL Server (MSDB) | • Backup and maintenance part of regular SQL functionality |
| • Finer control over package access and security | |
| • Deploys through DTSInstall.exe (legacy deployment wizard), the SSIS object model, or dtutil.exe | |
| Package Store (SSIS Service) | • Provides a façade over the File System and MSDB storage locations, allowing you to change the physical location of a package, yet keep the same logical path |
| • Manages multiple storage locations from a single place | |
| • Deploys through SSMS, the SSIS object model, or dtutil.exe | |
| • Requires special DCOM permission configuration for access |
![]() Note You cannot use the Package Store interface to manage packages deployed to the SSIS Catalog. The service is only able to interact with packages stored in MSDB (the 2005, and 2008 deployment model), and is there to continue supporting users who have not migrated to the new Project Deployment Model. It may be depreciated in the future.
Note You cannot use the Package Store interface to manage packages deployed to the SSIS Catalog. The service is only able to interact with packages stored in MSDB (the 2005, and 2008 deployment model), and is there to continue supporting users who have not migrated to the new Project Deployment Model. It may be depreciated in the future.
Summary
The deployment process for SSIS packages has been greatly simplified in SQL Server 2012. Although the deployment model used in SQL Server 2005 and 2008 (now called the Package Deployment Model) is still fully supported, moving to the new Project Deployment Model is highly recommended for new data integration projects. SSIS provides a number of ways to deploy to the SSIS Catalog, providing the flexibility you need to fit the deployment process into your environment.