![]()
Securables, Permissions, and Auditing
In the previous chapter, I discussed principals, which are security accounts that can access SQL Server. In this chapter, I’ll discuss and demonstrate securables and permissions. Securables are resources that SQL Server controls access to through permissions. Securables in SQL Server fall into three nested hierarchical scopes. The top level of the hierarchy is the server scope, which contains logins, databases, and endpoints. The database scope, which is contained within the server scope, controls securables such as database users, roles, certificates, and schemas. The third and innermost scope is the schema scope, which controls securables such as the schema itself as well as objects within the schema, such as tables, views, functions, and procedures.
Permissions enable a principal to perform actions on securables. Across all securable scopes, the primary commands used to control a principal’s access to a securable are GRANT, DENY, and REVOKE. These commands are applied in similar ways, depending on the scope of the securable that you are targeting. GRANT is used to enable access to securables. DENY explicitly restricts access, trumping other permissions that would normally allow a principal access to a securable. REVOKE removes a specific permission on a securable altogether, whether it was a GRANT or DENY permission.
Once permissions are granted, you may still have additional business and compliance auditing requirements that mandate the tracking of changes or knowing which logins are accessing which tables. To address this need, SQL Server introduced the SQL Server Audit object, which can be used to collect information on SQL instance- and database-scoped actions that you are interested in monitoring. This audit information can be sent to a file, the Windows Application event log, or the Windows Security event log.
In this chapter, I’ll discuss how permissions are granted to a principal at all three securable scopes. In addition to permissions, this chapter also presents the following related securable and permissions recipes:
- How to manage schemas using CREATE, ALTER, and DROP SCHEMA
- How to report allocated permissions for a specific principal by using the fn_my_permissions function
- How to determine a connection’s permissions to a securable using the system function HAS_PERMS_BY_NAME, as well as using EXECUTE AS to define your connection’s security context to a different login or user to see their permissions, too
- How to query all granted, denied, and revoked permissions using sys.database_permissions and sys.server_permissions
- How to change a securable’s ownership using ALTER AUTHORIZATION
- How to provide Windows external-resource permissions to a SQL login using CREATE CREDENTIAL and ALTER LOGIN
- How to audit SQL instance- and database-level actions using the SQL Server Audit functionality
This chapter starts with a general discussion of SQL Server permissions.
Permissions Overview
Permissions apply to SQL Server objects within the three securable scopes (server, database, and schema). SQL Server uses a set of common permission names that are applied to different securables (and at different scopes) and imply different levels of authorization against a securable. Table 30-1 shows those permissions that are used for multiple securables (however, this isn’t an exhaustive list).
Table 30-1. Major Permissions
|
Permission |
Description |
|---|---|
|
ALTER |
Enables the grantee the use of ALTER, CREATE, or DROP commands for the securable. For example, using ALTER TABLE requires ALTER permissions on that specific table. |
|
AUTHENTICATE |
Enables the grantee to be trusted across database or SQL Server scopes |
|
CONNECT |
Enables a grantee to have permission to connect to SQL Server resources (such as an endpoint or the SQL Server instance) |
|
CONTROL |
Enables the grantee to have all available permissions on the specific securable, as well as any nested or implied permissions within (so if you CONTROL a schema, for example, you also control any tables, views, or other database objects within that schema) |
|
CREATE |
Enables the grantee to create a securable (which can be at the server, database, or schema scope) |
|
IMPERSONATE |
Enables the grantee to impersonate another principal (login or user). For example, using the EXECUTE AS command for a login requires IMPERSONATE permissions. In this chapter, I’ll cover how to use EXECUTE AS to set your security context outside of a module. |
|
TAKE OWNERSHIP |
Enables the grantee to take ownership of a granted securable |
|
VIEW |
Enables the grantee to see system metadata regarding a specific securable |
To report available permissions in SQL Server, as well as view that specific permission’s place in the permission hierarchy, use the sys.fn_builtin_permissions system table-valued function. The syntax is as follows:
    sys.fn_builtin_permissions
(  [  DEFAULT | NULL ] | empty_string |
APPLICATION ROLE | ASSEMBLY | ASYMMETRIC KEY |
CERTIFICATE | CONTRACT | DATABASE |
ENDPOINT | FULLTEXT CATALOG| LOGIN |
MESSAGE TYPE | OBJECT | REMOTE SERVICE BINDING |
ROLE | ROUTE | SCHEMA | SERVER | SERVICE |
SYMMETRIC KEY | TYPE  | USER | XML SCHEMA COLLECTION )
Table 30-2 describes the arguments of this command.
Table 30-2. fn_builtin_permissions Arguments
|
Argument |
Description |
|---|---|
|
DEFAULT | NULL | empty_string |
Designating any of these first three arguments results in all permissions being listed in the result set. |
|
APPLICATION ROLE | ASSEMBLY | ASYMMETRIC KEY | CERTIFICATE | CONTRACT | DATABASE | ENDPOINT | FULLTEXT CATALOG| LOGIN | MESSAGE TYPE | OBJECT | REMOTE SERVICE BINDING |ROLE | ROUTE | SCHEMA | SERVER | SERVICE | SYMMETRIC KEY | TYPE | USER | XML SCHEMA COLLECTION |
Specify any one of these securable types in order to return permissions for that type. |
In addition to the permission name, you can determine the nested hierarchy of permissions by looking at the columns in the result set for covering_permission_name (a permission within the same class that is the superset of the more granular permission), parent_class_desc (the parent class of the permission—if any), and parent_covering_permission_name (the parent covering permission—if any), all of which you’ll see demonstrated in the next recipe.
30-1. Reporting SQL Server Assignable Permissions
Problem
You want to list the available permissions within SQL Server.
Solution
To view the available permissions within SQL Server and explain their place within the permissions hierarchy, you should use the system function sys.fn_builtin_permissions. In this first example, we’ll return all permissions, regardless of securable scope:
USE master;
GO

SELECT class_desc, permission_name, covering_permission_name, parent_class_desc, parent_covering_permission_name
    FROM sys.fn_builtin_permissions(DEFAULT)
    ORDER BY class_desc, permission_name;
GO
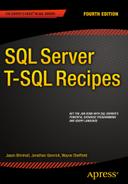
This returns the following (abridged) result set:
The next example shows only the permissions for the schema securable scope:
USE master;
GO

SELECT permission_name, covering_permission_name, parent_class_desc
    FROM sys.fn_builtin_permissions('schema')
    ORDER BY permission_name;
GO
This returns the following result set:
|
permission_name |
covering_permission_name |
parent_class_desc |
|---|---|---|
|
ALTER |
CONTROL |
DATABASE |
|
CONTROL |
DATABASE | |
|
CREATE SEQUENCE |
ALTER |
DATABASE |
|
DELETE |
CONTROL |
DATABASE |
|
EXECUTE |
CONTROL |
DATABASE |
|
INSERT |
CONTROL |
DATABASE |
|
REFERENCES |
CONTROL |
DATABASE |
|
SELECT |
CONTROL |
DATABASE |
|
TAKE OWNERSHIP |
CONTROL |
DATABASE |
|
UPDATE |
CONTROL |
DATABASE |
|
VIEW CHANGE TRACKING |
CONTROL |
DATABASE |
|
VIEW DEFINITION |
CONTROL |
DATABASE |
The sys.fn_builtin_permissions system-catalog function allows you to view available permissions in SQL Server.
The first example in this recipe, sys.fn_builtin_permissions, was used to display all permissions by using the DEFAULT option. The first line of code referenced the column names to be returned from the function:
SELECT class_desc, permission_name, covering_permission_name, parent_class_desc, parent_covering_permission_name
The second line referenced the function in the FROM clause, using the DEFAULT option to display all permissions:
FROM sys.fn_builtin_permissions(DEFAULT)
The last line of code allowed us to order by the permission’s class and name:
ORDER BY class_desc, permission_name;
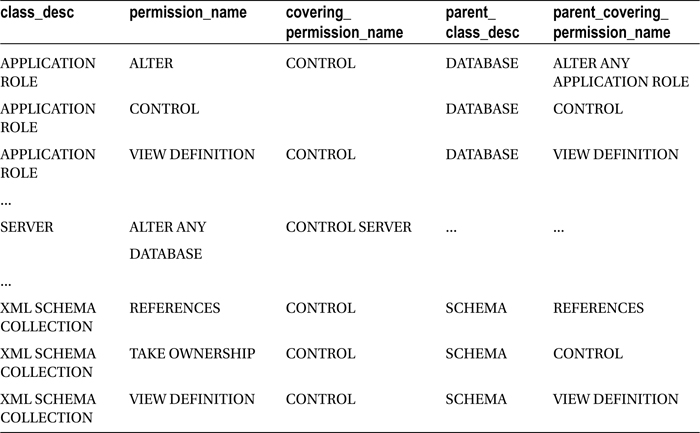
The results displayed the securable class description, permission name, and covering permission name (the covering permission name is the name of a permission class that is higher in the nested permission hierarchy). For example, for the APPLICATION ROLE class, you saw that the CONTROL permission was a child of the DATABASE class and ALTER ANY APPLICATION permission, but it was not subject to any covering permission in the APPLICATION ROLE class (because CONTROL enables all available permissions on the specific securable to the grantee, as well as any nested or implied permissions within).
For the OBJECT class, you can see that the ALTER permission is a child of the SCHEMA parent class and ALTER permission. Within the OBJECT class, the ALTER permission is also a child of the covering CONTROL permission (as seen in the covering_permission_name column).

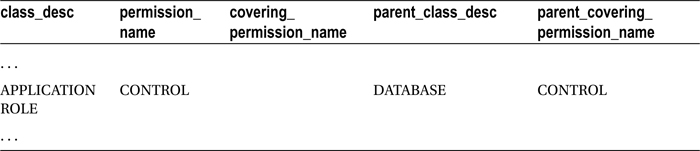
For the SERVER class and ALTER ANY DATABASE permission, the covering permission for the SERVER class is CONTROL SERVER. Notice that the SERVER class does not have a parent class or permission.
The second example in this recipe returned permissions for just the schema-securable class. The first line of code included just three of the columns this time:
SELECT permission_name, covering_permission_name, parent_class_desc
The second line included the word schema in order to show permissions for the schema-securable class:
FROM sys.fn_builtin_permissions('schema')
The results were then ordered by the permission name:
ORDER BY permission_name;
Permissions that control database objects contained within a schema (such as views, tables, and so on) were returned. For example, you saw that the DELETE permission is found within the schema scope and is covered by the CONTROL permission. Its parent class is the DATABASE securable.
|
permission_name |
covering_permission_name |
parent_class_desc |
|---|---|---|
|
. . . | ||
|
DELETE |
CONTROL |
DATABASE |
|
. . . |
Server-Scoped Securables and Permissions
Server-scoped securables are objects that are unique within a SQL Server instance, including endpoints, logins, and databases. Permissions on server-scoped securables can be granted only to server-level principals (SQL Server logins or Windows logins) and not to database-level principals such as users or database roles.
Since they are at the top of the permissions hierarchy, server permissions allow a grantee to perform activities such as creating databases, logins, or linked servers. Server permissions also give the grantee the ability to shut down the SQL Server instance (using SHUTDOWN) or use SQL Profiler (using the ALTER TRACE permission). When allocating permissions on a securable to a principal, the person doing the allocating is the grantor, and the principal receiving the permission is the grantee.
The abridged syntax for granting server permissions is as follows:
GRANT Permission [ ,...n ] TO grantee_principal [ ,...n ] [ WITH GRANT OPTION ] [ AS grantor_principal ]
Table 30-3 describes the arguments of this command.
Table 30-3. GRANT Arguments
|
Argument |
Description |
|---|---|
|
Permission [ ,...n ] |
You can grant one or more server permissions in a single GRANT statement. |
|
TO grantee_principal [ ,...n ] |
This is the grantee, also known as the principal (SQL Server login or logins), whom you are granting permissions to. |
|
WITH GRANT OPTION |
When designating this option, the grantee will then have permission to grant the permission(s) to other grantees. |
|
AS grantor_principal |
This optional clause specifies from where the grantor derives the right to grant the permission to the grantee. |
To explicitly deny permissions on a securable to a server-level principal, use the DENY command.
The syntax is as follows:
DENY  permission  [ ,...n ]
TO grantee_principal [ ,...n ]
[  CASCADE ]
[  AS grantor_principal ] .
Table 30-4 describes the arguments of this command.
Table 30-4. DENY Arguments
|
Argument |
Description |
|---|---|
|
Permission [ ,...n ] |
This specifies one or more server-scoped permissions to deny. |
|
grantee_principal [ ,...n ] |
This defines one or more logins (Windows or SQL) that you can deny permissions to. |
|
CASCADE |
When this option is designated, if the grantee principal granted any of these permissions to others, those grantees will also have their permissions denied. |
|
AS grantor_principal |
This optional clause specifies from where the grantor derives his right to deny the permission to the grantee. |
To revoke permissions on a securable to a principal, use the REVOKE command. Revoking a permission means you’ll neither be granting nor denying that permission; REVOKE removes the specified permission(s) that had previously been either granted or denied.
The syntax is as follows:
REVOKE [ GRANT OPTION FOR ] permission  [ ,...n ]
FROM < grantee_principal > [ ,...n ]
[ CASCADE ]
[ AS grantor_principal ] .
Table 30-5 describes the arguments of this command.
Table 30-5. REVOKE Arguments
|
Argument |
Description |
|---|---|
|
GRANT OPTION FOR |
When specified, the right for the grantee to grant the permission to other grantees is revoked. |
|
Permission [ ,...n ] |
This specifies one or more server-scoped permissions to revoke. |
|
grantee_principal [ ,...n ] |
This defines one or more logins (Windows or SQL) to revoke permissions from. |
|
CASCADE |
When this option is designated, if the grantee principal granted any of these permissions to others, those grantees will also have their permissions revoked. |
|
AS grantor_principal |
This optional clause specifies from where the grantor derives the right to revoke the permission to the grantee. |
The next set of recipes demonstrates some administrative tasks related to server-scoped securables.
30-2. Managing Server Permissions
Problem
You have a login in SQL Server to which you need to grant server-scoped permissions.
Solution
In the first example of this recipe, the SQL login Gargouilleis granted the ability to view session data from Extended Event sessions in order to monitor SQL Server activity. This permission is granted to a custom server role, as shown in Chapter 29. Keep in mind that permissions at the server scope can be granted only when the current database is the master, so we will start the batch by switching database context:
USE master;
GO
/*
-- Create recipe login if it doesn't exist
*/
IF NOT EXISTS (SELECT name FROM sys.server_principals
    WHERE name = 'Gargouille')
BEGIN
CREATE LOGIN [Gargouille]
    WITH PASSWORD=N'test!#l'
    , DEFAULT_DATABASE=[AdventureWorks2014]
    , CHECK_EXPIRATION=OFF, CHECK_POLICY=OFF;
END

--check for the server role
IF NOT EXISTS (SELECT name FROM sys.server_principals
    WHERE name = 'hdserverstate'
        AND type_desc = 'SERVER_ROLE')
BEGIN
    CREATE SERVER ROLE hdserverstate AUTHORIZATION securityadmin;
    GRANT VIEW SERVER STATE TO hdserverstate;
END

--check for the user
IF NOT EXISTS (SELECT mem.name AS MemberName
    FROM sys.server_role_members rm
        INNER JOIN sys.server_principals sp
            ON rm.role_principal_id = sp.principal_id
        LEFT OUTER JOIN sys.server_principals mem
            ON rm.member_principal_id = mem.principal_id
    WHERE sp.name = 'hdserverstate'
        AND sp.type_desc = 'SERVER_ROLE'
        AND mem.name = 'Gargouille')

BEGIN
    ALTER SERVER ROLE [hdserverstate] ADD MEMBER [Gargouille];
END
In this second example, the Windows login [PETITMOTJeanLouis] (you will need to substitute this login for a login that exists on your system) is granted the permissions necessary to create and view databases on the SQL Server instance:
USE master; .
GO
GRANT CREATE ANY DATABASE, VIEW ANY DATABASE TO [PETITMOTJeanLouis];
GO
In this next example, The Windows login [PETITMOTJeanLouis] is denied the right to execute the SHUTDOWN command:
USE master;
GO
DENY SHUTDOWN TO [PETITMOTJeanLouis];
GO
In the last example, the permission to use or view Extended Event session data is revoked from the hdserverstate custom server role, including any other grantees he may have given this permission to:
USE master;
GO
REVOKE VIEW SERVER STATE FROM hdserverstate
CASCADE;
GO.
How It Works
Permissions on server-scoped securables are granted using GRANT, denied with DENY, and removed with REVOKE. Using these commands, one or more permissions can be assigned in the same command, as well as allocated to one or more logins (Windows or SQL).
This recipe dealt with assigning permissions at the server scope, although you’ll see in future recipes that the syntax for assigning database and schema permissions is very similar.
30-3. Querying Server-Level Permissions
Problem
You need to identify server-scoped permissions associated with a SQL login.
Solution
You can use the sys.server_permissions catalog view to identify permissions at the SQL instance level. In this recipe, we will query all permissions associated with a login named TestUser2. To start, we’ll create the new login:
USE master;
GO
CREATE LOGIN TestUser2
WITH PASSWORD = 'abcdelllllll!';
GO
Next, we’ll grant a server-scoped permission and deny a server-scoped permission:
USE master;
GO
DENY SHUTDOWN TO TestUser2;
GRANT CREATE ANY DATABASE TO TestUser2;
GO
Querying sys.server_permissions and sys.server_principals returns all server-scoped permissions for the new login created earlier:
USE master;
GO
SELECT p.class_desc, p.permission_name, p.state_desc
    FROM sys.server_permissions p
    INNER JOIN sys.server_principals s
        ON p.grantee_principal_id = s.principal_id
    WHERE s.name = 'TestUser2';
GO
This query returns the following:
|
class_desc |
permission_name |
state_desc |
|---|---|---|
|
SERVER |
CONNECT SQL |
GRANT |
|
SERVER |
CREATE ANY DATABASE |
GRANT |
|
SERVER |
SHUTDOWN |
DENY |
Even though we explicitly executed only one GRANT and one DENY, just by virtue of creating the login, we have implicitly granted the new login CONNECT permissions to the SERVER scope.
How It Works
In this recipe, we queried sys.server_permissions and sys.server_principals in order to return the server-scoped permissions associated with the new login created. In the SELECT clause, we returned the class of the permission, the permission name, and the associated state of the permission:
SELECT p.class_desc, p.permission_name, p.state_desc
In the FROM clause, we joined the two catalog views by the grantee’s principal ID. The grantee is the target recipient of granted or denied permissions:
FROM sys.server_permissions p
    INNER JOIN sys.server_principals s
        ON p.grantee_principal_id = s.principal_id
In the WHERE clause, we designated the name of the login for which we wanted to examine permissions:
WHERE s.name = 'TestUser2';
Database-Scoped Securables and Permissions
Database-level securables are unique to a specific database and include several SQL Server objects, such as roles, assemblies, cryptography objects (keys and certificates), Service Broker objects, full-text catalogs, database users, schemas, and more.
You can grant permissions on these securables to database principals (database users, roles). The abridged syntax for granting database permissions is as follows:
GRANT permission [ ,...n ]
TO database_principal [ ,...n ]
[ WITH GRANT OPTION ] [ AS database_principal ]
Table 30-6 describes the arguments of this command.
Table 30-6. GRANT Arguments
|
Argument |
Description |
|---|---|
|
permission [ ,...n ] |
This specifies one or more database permissions to be granted to the principal(s). |
|
database_principal [ ,...n ] |
This defines the grantees to whom the permissions should be granted. |
|
WITH GRANT OPTION |
When designating this option, the grantee has permission to grant the permission(s) to other grantees. |
|
AS database_principal |
This optional clause specifies from where the grantor derives the right to grant the permission to the grantee. For example, if your current database user context does not have permission to GRANT a specific permission, but you have an IMPERSONATE permission on a database user that does, you can designate that user in the AS clause. |
To deny database-scoped permissions to a grantee, the DENY command is used. The abridged syntax is as follows:
DENY permission [ ,...n ]
TO database_principal [ ,...n ] [ CASCADE ]
[ AS database_principal ]
Table 30-7 describes the arguments of this command.
Table 30-7. DENY Arguments
|
Argument |
Description |
|---|---|
|
permission [ ,...n ] |
This specifies one or more database-scoped permissions to deny. |
|
< database_principal > [ ,...n ] |
This defines one or more database principals to deny permissions for. |
|
CASCADE |
When this option is designated, if the grantee principal granted any of these permissions to others, those grantees will also have their permissions denied. |
|
AS database_principal |
This optional clause specifies from where the grantor derives the right to deny the permission to the grantee. |
To revoke database-scoped permissions to the grantee, the REVOKE command is used. The abridged syntax is as follows:
REVOKE permission [ ,...n ]
FROM < database_principal > [ ,...n ]
[ CASCADE ]
[ AS database_principal]
Table 30-8 describes the arguments of this command.
Table 30-8. REVOKE Arguments
|
Argument |
Description |
|---|---|
|
database_permission [ ,...n ] |
This specifies one or more database-scoped permissions to revoke. |
|
< database_principal > [ ,...n ] |
This defines one or more database principals to revoke permissions from. |
|
CASCADE |
When this option is designated, if the grantee principal granted any of these permissions to others, those grantees will also have their permissions revoked. |
|
AS database_principal |
This optional clause specifies from where the grantor derives the right to revoke the permission to the grantee. |
30-4. Managing Database Permissions
Problem
You need to alter database-scoped permissions for a database user.
Solution
You should use GRANT, DENY, and REVOKE to alter database-scoped permissions for a database user.
To begin this recipe, I’ll set up the logins and users if they don’t already exist or haven’t already been created earlier in the chapter:
USE master;
GO
/*
-- Create DB for recipe if it doesn't exist
*/
IF NOT EXISTS (SELECT name FROM sys.databases WHERE name = 'TestDB')
BEGIN
CREATE DATABASE TestDB
END
GO
/*
Create recipe login if it doesn't exist
*/
IF NOT EXISTS (SELECT name FROM sys.server_principals WHERE name = 'Phantom')
BEGIN
CREATE LOGIN [Phantom]
    WITH PASSWORD=N'test!#23', DEFAULT_DATABASE=[TestDB], CHECK_EXPIRATION=OFF, CHECK_POLICY=OFF
END;
GO

USE TestDB;
GO
/*
-- Create db users if they don't already exist
*/
IF NOT EXISTS (SELECT name FROM sys.database_principals WHERE name = 'Gargouille')
BEGIN
CREATE USER Gargouille FROM LOGIN Gargouille
END;
GO
IF NOT EXISTS (SELECT name FROM sys.database_principals WHERE name = 'Phantom')
BEGIN
CREATE USER Phantom FROM LOGIN Phantom
END;
GO
This first example demonstrates granting database permissions to the Gargouille database user in the TestDB database:
USE TestDB;
GO
GRANT ALTER ANY ASSEMBLY, ALTER ANY CERTIFICATE TO Gargouille;
GO
This second example demonstrates denying permissions to the Phantom database user:
USE TestDB;
GO
DENY ALTER ANY DATABASE DDL TRIGGER TO Phantom;
GO
The last example demonstrates revoking database permissions to connect to the TestDB database from the Phantom user:
USE TestDB;
GO
REVOKE CONNECT FROM Phantom;
GO
How It Works
This recipe demonstrated how to grant, revoke, or deny database-scoped permissions to database principals. As you may have noticed, the syntax for granting database-scoped permissions is almost identical to server-scoped permissions. Schema-scoped permissions are also managed with the same commands, but with slight variations.
Before reviewing how to manage schema permissions, in this next recipe I’ll demonstrate how to manage schemas in general.
30-5. Querying Database Permissions
Problem
You want to list the database-scoped permissions for a database user.
Solution
You can use the sys.database_permissions catalog view to identify permissions in a database. In this recipe, we will query all permissions associated with a user named TestUser in the AdventureWorks2014 database. To start, we’ll create the new login and user:
USE master;
GO
CREATE LOGIN TestUser WITH PASSWORD = 'abcdelllllll!'
USE AdventureWorks2014;
GO
CREATE USER TestUser FROM LOGIN TestUser;
GO
Next, we’ll grant and deny various permissions:
USE AdventureWorks2014;
GO
GRANT SELECT ON HumanResources.Department TO TestUser;
DENY SELECT ON Production.ProductPhoto TO TestUser;
GRANT EXEC ON HumanResources.uspUpdateEmployeeHireInfo TO TestUser;
GRANT CREATE ASSEMBLY TO TestUser;
GRANT SELECT ON SCHEMA::Person TO TestUser;
DENY IMPERSONATE ON USER::dbo TO TestUser;
DENY SELECT ON HumanResources.Employee(BirthDate) TO TestUser;
GO
We’ll now query the sys.database_principals to determine the identifier of the principal:
USE AdventureWorks2014;
GO
SELECT principal_id
FROM sys.database_principals
WHERE name = 'TestUser';
GO
This query returns the following results (if you are following along with this recipe, keep in mind that your principal identifier may be different):
principal_id
5
Now we can use the principal ID of 5 with the grantee principal ID in the sys.database_permissions table (I could have integrated the prior query into this next query, but I’ve separated them in order to give a clearer picture of what each catalog view does):
USE AdventureWorks2014;
GO
SELECT
    p.class_desc,
    p.permission_name,
    p.state_desc,
    ISNULL(o.type_desc,'') type_desc,
    CASE p.class_desc
    WHEN 'SCHEMA'
    THEN schema_name(major_id)
    WHEN 'OBJECT_OR_COLUMN'
    THEN CASE
        WHEN minor_id = 0
        THEN object_name(major_id)
        ELSE (SELECT
        object_name(object_id) + '.' + name
        FROM sys.columns
        WHERE object_id = p.major_id
        AND column_id = p.minor_id) END
    ELSE '' END AS object_name
FROM sys.database_permissions p
LEFT OUTER JOIN sys.objects o
    ON o.object_id = p.major_id
WHERE grantee_principal_id = 5;
GO
This query returns the following:

How It Works
This recipe demonstrated querying system catalog views to determine the permissions of a specific database user. We created the login and user and then granted and denied various permissions for it.
After that, we queried sys.database_principals to determine the ID of this new user.
Walking through the last and more complicated query in the recipe, the first few columns of the query displayed the class description, permission name, and state (for example, GRANT or DENY):
SELECT
p.class_desc,
p.permission_name,
p.state_desc,
The type description was actually taken from the sys.objects view, which was used to pull information regarding the object targeted for the permission. If it is NULL, we return no characters in the result set:
ISNULL(o.type_desc,'') type_desc,
The next expression was the CASE statement evaluating the class description. When the class is a schema, return the schema’s name:
CASE p.class_desc WHEN 'SCHEMA'
THEN schema_name(major_id)
When the class is an object or column, nest another CASE statement:
WHEN 'OBJECT_OR_COLUMN' THEN CASE
If the minor ID is zero, we know that this is an object and not a column, so we return the object name:
WHEN minor_id = 0
THEN object_name(major_id)
Otherwise, we are dealing with a column name, so we perform a subquery to concatenate the object name with the name of the column:
ELSE (SELECT
object_name(object_id) + '.'+
name FROM sys.columns
WHERE object_id = p.major_id AND column_id = p.minor_id) END ELSE '' END AS object_name
We queried the permissions with a LEFT OUTER JOIN on sys.objects. We didn’t use an INNER join because not all permissions are associated with objects—for example, the GRANT on the CREATE ASSEMBLY permission:
FROM sys.database_permissions p
LEFT OUTER JOIN sys.objects o
    ON o.object_id = p.major_id
Lastly, we qualified that the grantee has the ID of the user I created. The grantee is the recipient of the permissions. The sys.database_permissions also has the grantor_principal_id, which is the grantor of permissions for the specific row. I didn’t want to designate this; rather, I just wanted the rows of permissions granted to the specified user.
WHERE grantee_principal_id = 5;
Schema-Scoped Securables and Permissions
Schema-scoped securables are contained within the database securable scope and include user-defined data types, XML schema collections, and objects. The object securable also has other securable object types within it, but I’ll review this later in the chapter.
As of SQL Server 2005, users are separated from direct ownership of a database object (such as tables, views, and stored procedures). This separation is achieved by the use of schemas, which are basically containers for database objects. Instead of having a direct object owner, the object is contained within a schema, and that schema is then owned by a user.
One or more users can own a schema or use it as their default schema for creating objects. What’s more, you can apply security at the schema level. This means any objects within the schema can be managed as a unit, instead of at the individual object level.
Every database comes with a dbo schema, which is where your objects go if you don’t specify a default schema. But if you want to create your own schemas, you can use the CREATE SCHEMA command.
The abridged syntax is as follows:
CREATE SCHEMA schema_name [AUTHORIZATION owner_name ]
Table 30-9 describes the arguments of this command.
Table 30-9. CREATE SCHEMA Arguments
|
Argument |
Description |
|---|---|
|
schema_name |
This is the name of the schema and the schema owner. |
|
owner_name |
The owner is a database principal that can own one or more schemas in the database. |
To remove an existing schema, use the DROP SCHEMA command. The syntax is as follows:
DROP SCHEMA schema_name
The command takes only a single argument: the name of the schema to drop from the database. Also, you can’t drop a schema that contains objects, so the objects must be either dropped or transferred to a new schema.
![]() Note See Recipe 30-6 for a review of using ALTER SCHEMA to transfer schema ownership of an object.
Note See Recipe 30-6 for a review of using ALTER SCHEMA to transfer schema ownership of an object.
Like with server- and database-scoped permissions, permissions for schemas are managed using the GRANT, DENY, and REVOKE commands.
The abridged syntax for granting permissions on a schema is as follows:
GRANT permission [ ,...n ] ON SCHEMA :: schema_name
TO database_principal [ ,...n]
[ WITH GRANT OPTION ][ AS granting_principal ]
Table 30-10 describes the arguments of this command.
Table 30-10. GRANT Arguments
|
Argument |
Description |
|---|---|
|
Permission [ ,...n ] |
This specifies one or more schema permissions to be granted to the grantee. |
|
schema_name |
This defines the name of the schema the grantee is receiving permissions to. |
|
database_principal |
This specifies the database principal permissions recipient. |
|
WITH GRANT OPTION |
When designating this option, the grantee has permissions to grant the schema permission(s) to other grantees. |
|
AS granting_principal |
This optional clause specifies from where the grantor derives the right to grant the schema-scoped permission to the grantee. |
To deny schema-scoped permissions to a grantee, the DENY command is used. The abridged syntax is as follows:
DENY permission [ ,...n ] ON SCHEMA :: schema_name TO database_principal [ ,...n ]
[ CASCADE ]
[ AS denying_principal ]
Table 30-11 describes the arguments of this command.
Table 30-11. DENY Arguments
|
Argument |
Description |
|---|---|
|
Permission [ ,...n ] |
This specifies one or more schema-scoped permissions to deny. |
|
schema_name |
This defines the name of the schema where permissions will be denied. |
|
database_principal [ ,...n ] |
This specifies one or more database principals to deny permissions for. |
|
CASCADE |
When this option is designated, if the grantee principal granted any of these permissions to others, those grantees will also have their permissions denied. |
|
AS denying_principal |
This optional clause specifies from where the grantor derives the right to deny the permission to the grantee. |
To revoke schema-scoped permissions from the grantee, the REVOKE command is used. The abridged syntax is as follows:
REVOKE [ GRANT OPTION FOR ]
permission  [ ,...n ]
  ON SCHEMA :: schema_name
{  TO | FROM } database_principal [ ,...n ]
  [  CASCADE ] [ AS principal ]
Table 30-12 describes the arguments of this command.
Table 30-12. REVOKE Arguments
|
Argument |
Description |
|---|---|
|
Permission [ ,...n ] |
This specifies one or more schema-scoped permissions to revoke. |
|
schema_name |
This defines the name of the schema for which the permissions will be revoked. |
|
database_principal[ ,...n ] |
This specifies one or more database principals to revoke permissions for. |
|
CASCADE |
When this option is designated, if the grantee principal granted any of these permissions to others, those grantees will also have their permissions revoked. |
|
AS principal |
This optional clause specifies from where the grantor derives the right to revoke the permission to the grantee. |
30-6. Managing Schemas
Problem
A new project is starting. Many new objects are to be created for this project. Prior to creating those objects, you need to create a schema that will own the new objects. You will also need to associate a user with this new schema.
Solution
You should use the CREATE SCHEMA command to create a new schema. When associating a user to a schema, you should use the ALTER USER command.
In this recipe, we’ll create a new schema in the TestDB database called Publishers:
USE TestDB;
GO
CREATE SCHEMA Publishers AUTHORIZATION db_owner;
GO
We now have a schema called Publishers, which can be used to contain other database objects. It can be used to hold all objects related to publication functionality, for example, or be used to hold objects for database users associated to publication activities.
To start using the new schema, we use the schema.object_name two-part naming format:
USE TestDB;
GO
CREATE TABLE Publishers.ISBN (ISBN char(13) NOT NULL PRIMARY KEY, CreateDT datetime NOT NULL DEFAULT GETDATE());
GO
This next example demonstrates making the Publishers schema a database user’s default schema. For this example, we’ll create a new SQL login in the master database:
USE master
GO
CREATE LOGIN Rossignol
WITH PASSWORD=N'testl23',
DEFAULT_DATABASE=TestDB,
CHECK_EXPIRATION=OFF,
CHECK_POLICY=OFF;
GO
Next, we’ll create a new database user in the TestDB database:
USE TestDB;
GO
CREATE USER Rossignol FOR LOGIN Rossignol;
GO
Now we’ll change the default schema of the existing database user to the Publishers schema. Any objects this database user creates by default will belong to this schema (unless the database user explicitly uses a different schema in the object creation statement):
USE TestDB;
GO
ALTER USER Rossignol WITH DEFAULT_SCHEMA=Publishers;
GO
Chapter 31 reviews how to transfer the ownership of an object from one schema to another using ALTER SCHEMA. You’ll need to use this in situations where you want to drop a schema. For example, if I tried to drop the Publishers schema right now, with the Publishers.ISBN table still in it, I would get an error warning me that there are objects referencing that schema. This example demonstrates using ALTER SCHEMA. to transfer the table to the dbo schema prior to dropping the Publishers schema from the database:
USE TestDB;
GO
ALTER SCHEMA dbo TRANSFER Publishers.ISBN;
GO
DROP SCHEMA Publishers;
GO
How It Works
Schemas act as a container for database objects. Unlike when a database user owns objects directly, a database user now can own a schema (or, in other words, have permissions to use the objects within it).
In this recipe, CREATE SCHEMA was used to create a new schema called Publishers. A new table was created in the new schema called Publishers.ISBN. After that, a new login and database user were created for the TestDB database. ALTER USER was used to make that new schema the default schema for the new user.
Since a schema cannot be dropped until all objects are dropped or transferred from it, ALTER SCHEMA was used to transfer Publishers.ISBN into the dbo schema. DROP SCHEMA was used to remove the Publishers schema from the database.
30-7. Managing Schema Permissions
Problem
A new user in your environment needs to be granted certain permissions on a schema that owns several objects.
Solution
You need to use the GRANT, DENY, and REVOKE commands using the ON SCHEMA option.
In this next set of examples, I’ll show you how to manage schema permissions. Before showing you this, though, I would like to quickly point out how you can identify which schemas exist for a particular database. To view the schemas for a database, you can query the sys.schemas system catalog view. This example demonstrates listing the schemas that exist within the AdventureWorks2014 database:
USE AdventureWorks2014;
GO
SELECT s.name SchemaName, d.name SchemaOwnerName
FROM sys.schemas s
INNER JOIN sys.database_principals d
ON s.principal_id= d.principal_id
ORDER BY s.name;
GO
This returns a list of built-in database schemas (the fixed database roles dbo, guest, sys, and INFORMATION_SCHEMA) along with user-defined schemas (Person, Production, Purchasing, Sales, HumanResources).
|
SchemaName |
SchemaOwnerName |
|---|---|
|
db_accessadmin |
db_accessadmin |
|
db_backupoperator |
db_backupoperator |
|
db_datareader |
db_datareader |
|
db_datawriter |
db_datawriter |
|
db_ddladmin |
db_ddladmin |
|
db_denydatareader |
db_denydatareader |
|
db_denydatawriter |
db_denydatawriter |
|
db_owner |
db_owner |
|
db_securityadmin |
db_securityadmin |
|
dbo |
dbo |
|
guest |
guest |
|
HumanResources |
dbo |
|
INFORMATION_SCHEMA |
INFORMATION_SCHEMA |
|
Person |
dbo |
|
Production |
dbo |
|
Purchasing |
dbo |
|
Sales |
dbo |
|
sys |
sys |
Within the AdventureWorks2014 database, I’ll now demonstrate assigning permissions on schemas to database principals. In this example, the database user TestUser is granted TAKE OWNERSHIP permissions to the Person schema, which enables the grantee to take ownership of a granted securable:
USE AdventureWorks2014; .
GO
GRANT TAKE OWNERSHIP ON SCHEMA ::Person TO TestUser;
GO
In the next example, we’ll grant the database user TestUser multiple permissions in the same statement, including the ability to ALTER a schema, EXECUTE stored procedures within the Production schema, or SELECT from tables or views in the schema. Using the WITH GRANT OPTION, TestUser can also grant other database principals these permissions:
USE AdventureWorks2014;
GO
GRANT ALTER, EXECUTE, SELECT ON SCHEMA ::Production TO TestUser
WITH GRANT OPTION;
GO
In this next example, the database user TestUser is denied the ability to INSERT, UPDATE, or DELETE data from any tables within the Production schema:
USE AdventureWorks2014;
GO
DENY INSERT, UPDATE, DELETE ON SCHEMA ::Production TO TestUser;
GO
In the last example of this recipe, TestUser’s right to ALTER the Production schema or SELECT from objects within the Production schema is revoked, along with the permissions she may have granted to others (using CASCADE):
USE AdventureWorks2014;
GO
REVOKE ALTER, SELECT ON SCHEMA ::Production TO TestUser CASCADE;
GO.
How It Works
Granting, denying, or revoking permissions occurs with the same commands that are used with database- and server-scoped permissions. One difference, however, is the reference to ON SCHEMA, where a specific schema name is the target of granted, denied, or revoked permissions. Notice, also, that the name of the schema was prefixed with two colons (called a scope qualifier). A scope qualifier is used to scope permissions to a specific object type.
Objects are nested within the schema scope, and they can include tables, views, stored procedures, functions, and aggregates. Defining permissions at the schema scope (such as SELECT or EXECUTE) can allow you to define permissions for a grantee on all objects within a schema. You can also define permissions at the object level. Object permissions are nested within schema permissions, schema permissions within database-scoped permissions, and database-scoped permissions within server-level permissions.
The abridged syntax for granting object permissions is as follows:
GRANT permission ON
[ OBJECT :: ][ schema_name ]. object_name [ ( column [ ,...n ] ) ]
TO <database_principal> [ ,...n ]
[ WITH GRANT OPTION ] [ AS database_principal ]
Table 30-13 shows the arguments of this command.
Table 30-13. GRANT Arguments
|
Argument |
Description |
|---|---|
|
permission [ ,...n ] |
This specifies one or more object permissions to be granted to the grantee. |
|
[ OBJECT :: ][ schema_name ]. object_name [ ( column [ ,...n ] ) ] |
This defines the target object (and if applicable, columns) for which the permission is being granted. |
|
database_principal |
This specifies the database principal that is the permissions recipient. |
|
WITH GRANT OPTION |
When designating this option, the grantee has permission to grant the permission(s) to other grantees. |
|
AS database_principal |
This optional clause specifies from where the grantor derives the right to grant the permission to the grantee. |
To deny object permissions to a grantee, the DENY command is used. The abridged syntax is as follows:
DENY permission [ ,...n ] ON
[ OBJECT :: ][ schema_name ]. object_name [ ( column [ ,...n ] ) ] TO <database_principal> [ ,...n ] [ CASCADE ] [ AS <database_principal> ]
Table 30-14 describes the arguments of this command.
Table 30-14. DENY Arguments
|
Argument |
Description |
|---|---|
|
[ OBJECT :: ][ schema_name ]. object_name [ (column [ ,...n ] ) ] |
This specifies the target object (and if applicable, columns) for which the permission is being denied. |
|
< database_principal > [ ,...n ] |
This specifies one or more database principals for whom permissions will be denied. |
|
CASCADE |
When this option is designated, if the grantee principal granted any of these permissions to others, those grantees will also have their permissions denied. |
|
AS database_principal |
This optional clause specifies from where the grantor derives the right to deny the permission to the grantee. |
To revoke object permissions to the grantee, the REVOKE command is used. The abridged syntax is as follows:
REVOKE [ GRANT OPTION FOR ] permission [ ,...n ]
ON [ OBJECT :: ][ schema_name ]. objectjame [ ( column [ ,...n ] ) ] FROM <database_principal> [ ,...n ] [ CASCADE ] [ AS <database_principal> ]
Table 30-15 describes the arguments of this command.
Table 30-15. REVOKE Arguments
|
Argument |
Description |
|---|---|
|
GRANT OPTION FOR |
When this option is used, the right to grant the permission to other database principals is revoked. |
|
permission [ ,...n ] |
This specifies one or more object permissions to be revoked from the grantee. |
|
[ OBJECT :: ][ schema_name ]. object_name [ ( column [ ,...n ] ) ] |
This defines the target object (and if applicable, columns) for which the permission is being revoked. |
|
< database_principal > [ ,...n ] |
This specifies one or more database principals to revoke permissions from. |
|
CASCADE |
When this option is designated, if the grantee principal granted any of these permissions to others, those grantees will also have their permissions revoked. |
|
AS database_principal |
This optional clause specifies from where the grantor derives the right to revoke the permission to the grantee. |
30-8. Managing Object Permissions
Problem
After having defined permissions at the schema scope, you have determined that you need to define additional permissions for a specific set of tables.
Solution
Like server-level, database-scoped, and schema-scoped permissions, you can use GRANT, DENY, and REVOKE to define permissions on specific database objects
In this recipe, we grant the database user TestUser the permission to SELECT, INSERT, DELETE, and UPDATE data in the HumanResources.Department table:
USE AdventureWorks2014;
GO
GRANT DELETE, INSERT, SELECT, UPDATE ON HumanResources.Department TO TestUser;
GO
Here, the database role called ReportViewers is granted the ability to execute a procedure, as well as to view metadata regarding that specific object in the system catalog views:
USE AdventureWorks2014;
GO
CREATE ROLE ReportViewers
GRANT EXECUTE, VIEW DEFINITION ON dbo.uspGetManagerEmployees TO ReportViewers;
GO
In this next example, ALTER permission is denied to the database user TestUser for the HumanResources.Department table:
USE AdventureWorks2014;
GO
DENY ALTER ON HumanResources.Department TO TestUser;
GO
In this last example, INSERT, UPDATE, and DELETE permissions are revoked from TestUser on the HumanResources.Department table:
USE AdventureWorks2014;
GO
REVOKE INSERT, UPDATE, DELETE ON HumanResources.Department TO TestUser;
GO
How It Works
This recipe demonstrated granting object permissions to specific database securables. Object permissions are granted by designating the specific object name and the permissions that are applicable to that object. For example, EXECUTE permissions can be granted to a stored procedure, but not SELECT permissions.
Permissions can be superseded by other types of permissions. For example, if the database user TestUser has been granted SELECT permissions on the HumanResources.Department table but has been denied permissions on the HumanResources schema itself, TestUser will receive the following error message when attempting to SELECT from that table, because the DENY overrides any GRANT SELECT permissions.
Msg 229, Level 14, State 5, Line 2
SELECT permission denied on object 'Department', database 'AdventureWorks2014', schema
'HumanResources'.
Managing Permissions Across Securable Scopes
Now that I’ve reviewed the various securable scopes and the methods by which permissions can be granted to principals, in the next set of recipes I’ll show you how to report and manage the permissions a principal has on securables across the different scopes.
30-9. Determining Permissions to a Securable
Problem
You want to see the permissions your connection has on a securable.
Solution
With SQL Server’s nested hierarchy of securable permissions (server, database, and schema), permissions can be inherited by higher-level scopes. Figuring out what permissions your current login/database connection has to a securable can become tricky, especially when you add server or database roles to the equation.
Understanding what permissions your database connection has to a securable can be determined by using the HAS_PERMS_BY_NAME function. This system scalar function returns a 1 if the current user has been granted permissions to the securable and returns 0 if not.
The syntax for this function is as follows:
HAS_PERMS_BY_NAME ( securable , securable_class , permission [ , sub-securable ] [ , sub-securable_class ] )
Table 30-16 describes the arguments for this function.
Table 30-16. Has_perms_by_name Arguments
|
Parameter |
Description |
|---|---|
|
securable |
The name of the securable that you want to verify permissions for |
|
securable_class |
The name of the securable class you want to check. Class names (for example, DATABASE or SCHEMA) can be retrieved from the class_desc column in the sys.fn_builtin_permissions function. |
|
permission |
The name of the permission to check |
|
sub-securable |
The name of the securable subentity |
|
sub-securable_class |
The name of the securable subentity class |
This example demonstrates how to check whether the current connected user has permissions to ALTER the AdventureWorks2014 database:
EXECUTE AS LOGIN ='testuser';

USE AdventureWorks2014;
GO
SELECT HAS_PERMS_BY_NAME ('AdventureWorks2014', 'DATABASE', 'ALTER'),
GO

REVERT
This returns 0 if the connection is established using the login TestUser. This means the current connection does not have permission to ALTER the AdventureWorks2014 database.
0
This next query tests the current connection to see whether the Person.Address table can be updated or selected from by the current connection:
USE AdventureWorks2014;
GO
SELECT UpdateTable = CASE HAS_PERMS_BY_NAME ('Person.Address', 'OBJECT', 'UPDATE') WHEN 1 THEN 'Yes' ELSE 'No' END ,
SelectFromTable = CASE HAS_PERMS_BY_NAME ('Person.Address', 'OBJECT', 'SELECT') WHEN 1 THEN 'Yes' ELSE 'No' END;
GO:
This query returns the following when the connection is established by the TestUser login.
|
UpdateTable |
SelectFromTable |
|---|---|
|
No |
Yes |
How It Works
The HAS_PERMS_BY_NAME system function evaluates whether the current connection has granted permissions to access a specific securable (granted permissions either explicitly or inherently through a higher-scoped securable). In both examples in this recipe, the first parameter used was the securable name (the database name or table name). The second parameter was the securable class, for example, OBJECT or DATABASE. The third parameter used was the actual permission to be validated, for example, ALTER, UPDATE, or SELECT (depending on which permissions are applicable to the securable being checked).
30-10. Reporting Permissions by Securable Scope
Problem
You want to provide a list of all permissions for the currently connected user.
Solution
You can report on all permissions for the currently connected user by using the fn_my_permissions function.
In this recipe, I’ll demonstrate using the fn_my_permissions function to return the assigned permissions for the currently connected principal. The syntax for this function is as follows:
fn_my_permissions ( securable , 'securable_class')
Table 30-17 describes the arguments for this command.
Table 30-17. fn_my_permissions Arguments
|
Argument |
Description |
|---|---|
|
securable |
The name of the securable to verify. Use NULL if you are checking permissions for the server or database scope. |
|
securable_class |
The securable class that you are listing permissions for. |
In this first example, I demonstrate how to check the server-scoped permissions for the current connection:
USE master;
GO
SELECT permission_name
FROM sys.fn_my_permissions(NULL, N'SERVER')
ORDER BY permission_name;
GO
This returns the following results (this query example was executed under the context of sysadmin, so in this case, all available server-scoped permissions are returned).
ADMINISTER BULK OPERATIONS
ALTER ANY CONNECTION
ALTER ANY CREDENTIAL
ALTER ANY DATABASE
ALTER ANY ENDPOINT
ALTER ANY EVENT NOTIFICATION
ALTER ANY LINKED SERVER
ALTER ANY LOGIN
ALTER RESOURCES
ALTER SERVER STATE
ALTER SETTINGS
ALTER TRACE
AUTHENTICATE SERVER
CONNECT SQL
CONTROL SERVER
CREATE ANY DATABASE
CREATE DDL EVENT NOTIFICATION
CREATE ENDPOINT
CREATE TRACE EVENT NOTIFICATION
EXTERNAL ACCESS ASSEMBLY
SHUTDOWN
UNSAFE ASSEMBLY
VIEW ANY DATABASE
VIEW ANY DEFINITION
VIEW SERVER STATE
If you have IMPERSONATE permissions on the login or database user, you can also check the permissions of another principal other than your own by using the EXECUTE AS command. Chapter 18 demonstrated how to use EXECUTE AS to specify a stored procedure’s security context. You can also use EXECUTE AS in a stand-alone fashion, using it to switch the security context of the current database session. You can then switch back to your original security context by issuing the REVERT command.
The simplified syntax for EXECUTE AS is as follows:
EXECUTE AS { LOGIN | USER } = 'name' [ WITH { NO REVERT } ]
Table 30-18 describes the arguments of this command.
Table 30-18. EXECUTE AS Abridged Syntax Arguments
|
Argument |
Description |
|---|---|
|
{ LOGIN | USER } = 'name' |
Select LOGIN to impersonate a SQL or Windows login or USER to impersonate a database user. The name value is the actual login or user name. |
|
NO REVERT |
If NO REVERT is designated, you cannot use the REVERT command to switch back to your original security context. |
To demonstrate the power of EXECUTE AS, the previous query is reexecuted, this time by using the security context of the Gargouille login:
USE master;
GO
EXECUTE AS LOGIN = N'Gargouille';
GO
SELECT permission_name
FROM sys.fn_my_permissions(NULL, N'SERVER')
ORDER BY permission_name;
GO
REVERT;
GO
This returns a much smaller list of server permissions, because you are no longer executing the call under a login with sysadmin permissions.
CONNECT SQL
VIEW ANY DATABASE
VIEW SERVER STATE
This next example demonstrates returning database-scoped permissions for the Gargouille database user:
USE TestDB;
GO
EXECUTE AS USER = N'Gargouille';
GO
SELECT permission_name
FROM sys.fn_my_permissions(N'TestDB', N'DATABASE')
ORDER BY permission_name;
GO
REVERT;
GO
This query returns the following:
ALTER ANY ASSEMBLY
ALTER ANY CERTIFICATE
CONNECT
CREATE ASSEMBLY
CREATE CERTIFICATE
SELECT
In this next example, permissions are checked for the current connection on the Production.Culture table, this time showing any subentities of the table (meaning any explicit permissions on table columns):
USE AdventureWorks2014;
GO
SELECT subentity_name, permission_name
FROM sys.fn_my_permissions(N'Production.Culture', N'OBJECT')
ORDER BY permission_name, subentity_name;
GO
This returns the following results (when the subentity_name is populated, this is a column reference):
|
subentity_name |
permission_name |
|---|---|
|
ALTER | |
|
CONTROL | |
|
DELETE | |
|
EXECUTE | |
|
INSERT | |
|
RECEIVE | |
|
REFERENCES | |
|
CultureID |
REFERENCES |
|
ModifiedDate |
REFERENCES |
|
Name |
REFERENCES |
|
SELECT | |
|
CultureID |
SELECT |
|
ModifiedDate |
SELECT |
|
Name |
SELECT |
|
TAKE OWNERSHIP | |
|
UPDATE | |
|
CultureID |
UPDATE |
|
ModifiedDate |
UPDATE |
|
Name |
UPDATE |
|
VIEW CHANGE TRACKING | |
|
VIEW DEFINITION |
How It Works
This recipe demonstrated how to return permissions for the current connection using the fn_my_permissions function. The first example used a NULL in the first parameter and SERVER in the second parameter in order to return the server-scoped permissions of the current connection:
FROM sys. fn_my_permissions(NULL, N'SERVER')
We then used EXECUTE AS to execute the same query, this time under the Gargouille login’s context, which returned server-scoped permissions for his login:
EXECUTE AS LOGIN = N'Gargouille';
GO
REVERT;
GO
The next example showed database-scoped permissions by designating the database name in the first parameter and DATABASE in the second parameter:
FROM sys.fn_my_permissions(N'TestDB', N'DATABASE')
The last example checked the current connection’s permissions to a specific table:
FROM sys.fn_my_permissions(N'Production.Culture', N'OBJECT')
This returned information at the table level and column level. For example, the ALTER and CONTROL permissions applied to the table level, while those rows with a populated entity_name (for example, CultureID and ModifiedDate) refer to permissions at the table’s column level.
30-11. Changing Securable Ownership
Problem
A database user needs to be removed. The database user owns objects within the database. You need to change the owner of the objects that are owned by this user in order to remove the user from the database.
Solution
As described earlier in the chapter, objects are contained within schemas, and schemas are then owned by a database user or role. Changing a schema’s owner does not require the objects to be renamed. Aside from schemas, however, other securables on a SQL Server instance still do have direct ownership by either a server- or database-level principal.
For example, schemas have database principal owners (such as database user), and endpoints have server-level owners, such as a SQL login.
Assuming that the login performing the operation has the appropriate TAKE OWNERSHIP permission, you can use the ALTER AUTHORIZATION command to change the owner of a securable.
The abridged syntax for ALTER AUTHORIZATION is as follows:
ALTER AUTHORIZATION
ON [ <entity_type> :: ] entity_name
TO { SCHEMA OWNER | principal_name }
Table 30-19 describes the arguments for this command.
Table 30-19. ALTER AUTHORIZATION Arguments
|
Argument |
Description |
|---|---|
|
entity_type |
This designates the class of securable being given a new owner. |
|
entity_name |
This specifies the name of the securable. |
|
SCHEMA OWNER | principal_name |
This indicates the name of the new schema owner or the name of the database or server principal taking ownership of the securable. |
In this example, the owner of the HumanResources schema is changed to the database user TestUser:
USE AdventureWorks2014;
GO
ALTER AUTHORIZATION ON Schema::HumanResources TO TestUser;
GO.
In this second example, the owner of an endpoint is changed to a SQL login. Before doing so, the existing owner of the endpoint is verified using the sys.endpoints and sys.server_principals system catalog views:
/* In case an endpoint does not exist let's create one */
CREATE ENDPOINT ProductMirror
    STATE = STOPPED
    AS TCP ( LISTENER_PORT = 7022 )
    FOR DATABASE_MIRRORING (ROLE=PARTNER);
/* In 2014, only the following endpoints are available
TSQL | SERVICE_BROKER | DATABASE_MIRRORING
*/

USE AdventureWorks2014;
GO
SELECT p.name OwnerName
FROM sys.endpoints e
INNER JOIN sys.server_principals p
ON e.principal_id = p.principal_id
WHERE e.name = 'ProductMirror';
GO
This query returns the following (your results will vary).
OwnerName
PETITMOTOwner
Next, the owner is changed to a different SQL login:
USE AdventureWorks2014;
GO
ALTER AUTHORIZATION ON ENDPOINT::ProductMirror TO TestUser;
GO
By reexecuting the query against sys.server_principals and sys.endpoints, the new owner is displayed.
OwnerName
TestUser
![]() Note If the ProductMirror endpoint does not exist and you attempt to change the owner to TestUser as done in this recipe, you will receive the following error:
Note If the ProductMirror endpoint does not exist and you attempt to change the owner to TestUser as done in this recipe, you will receive the following error:
Cannot find the endpoint ‘ProductMirror’, because it does not exist or you do not have permission.
How It Works
This recipe demonstrated how to change object ownership. You may want to change ownership when a login or database user needs to be removed. If that login or database user owns securables, you can use ALTER AUTHORIZATION to change that securables owner prior to dropping the SQL login or database user.
In this recipe, ALTER AUTHORIZATION was used to change the owner of a schema to a different database user and the owner of an endpoint to a different SQL login (associated to a Windows account). In both cases, the securable name was prefixed by the :: scope qualifier, which designates the type of object you are changing ownership of.
30-12. Allowing Access to Non-SQL Server Resources
Problem
You have a SQL login that must have access to a share on the operating system.
Solution
In this chapter, I’ve discussed permissions and securables within a SQL Server instance; however, sometimes a SQL login (not associated with a Windows user or group) may need permissions outside of the SQL Server instance. A Windows principal (a Windows user or group) has implied permissions outside of the SQL Server instance, but a SQL login does not, because a SQL login and password are created inside SQL Server. To address this, you can bind a SQL login to a Windows credential, giving the SQL login the implied Windows permissions of that credential. This SQL login can then use more advanced SQL Server functionality, where outside resource access may be required. This credential can be bound to more than one SQL login (although one SQL login can be bound only to a single credential).
To create a credential, use the CREATE CREDENTIAL command.
The syntax is as follows:
CREATE CREDENTIAL credential_name WITH IDENTITY = ' identity_name '
[ , SECRET = ' secret ' ] [ FOR CRYPTOGRAPHIC_PROVIDER cryptographic_provider_name ]
Table 30-20 describes the arguments for this command.
Table 30-20. CREATE CREDENTIAL Arguments
In this example, a new credential is created that is mapped to the PETITMOTOwner Windows user account:
USE master;
GO
CREATE CREDENTIAL AccountingGroup
WITH IDENTITY = N'PETITMOTAccountUser',
SECRET = N'mypassword!';
GO
Once created, the credential can be bound to existing or new SQL logins using the CREDENTIAL keyword in CREATE LOGIN and ALTER LOGIN:
USE master;
GO
ALTER LOGIN Gargouille
WITH CREDENTIAL = AccountingGroup;
GO.
How It Works
A credential allows SQL authentication logins to be bound to Windows external permissions. In this recipe, a new credential was created called AccountingGroup. It was mapped to the Windows user PETITMOTAccountUser and given a password in the SECRET argument of the command. Once created, the credential was bound to the SQL login Gargouille by using ALTER LOGIN and WITH CREDENTIAL. Now the Gargouille login, using credentials, has outside–SQL Server permissions equivalent to those of the PETITMOTAccountUser Windows account.
Auditing Activity of Principals Against Securables
SQL Server Enterprise Edition offers the native capability to audit SQL Server instance- and database-scoped activity. This activity is captured to a target data destination using a Server Audit object, which defines whether the audit data is captured to a file, to the Windows Application event log, or to the Windows Security event log. A Server Audit object also allows you to designate whether the SQL Server instance should be shut down if it is unable to write to the target. Once a Server Audit object is created, you can bind a Server Audit Specification or Database Audit Specification object to it. A Server Audit Specification is used to define which events you want to capture at the SQL Server instance scope. A Database Audit Specification object allows you to define which events you want to capture at the database scope. Only one Server Audit Specification can be bound to a Server Audit object, whereas one or more Database Audit Specifications can be bound to a Server Audit object. A single Server Audit object can be collocated with a Server Audit Specification and one or more Database Audit Specifications.
In the next few recipes, I will demonstrate how to create a Server Audit object that writes event-captured data to a target file. I will then demonstrate how to associate SQL instance-level and database-scoped events with the audit file, and I’ll demonstrate how to read the audit data contained in the binary file.
30-13. Defining Audit Data Sources
Problem
A new requirement from the security department will require that auditing be enabled on SQL Server. Knowing that auditing will be required and that more-specific requirements are forthcoming, you want to start setting up auditing while waiting for these requirements.
Solution
The first step in configuring auditing for SQL Server Enterprise Edition is to create a Server Audit object. This is done by using the CREATE SERVER AUDIT command. The syntax for this command is as follows:
CREATE SERVER AUDIT audit_name
    TO { [ FILE (<file_options> [, ...n]) ] | APPLICATION_LOG | SECURITY_LOG }
     [  WITH ( <audit_options> [, ...n] ) ]
     [ WHERE <predicate_expression> ]
}
[  ;  ]
<file_options>::=
{
    FILEPATH = 'os_file_path'
     [, MAXSIZE = { max_size { MB | GB | TB } | UNLIMITED } ]
     [,  MAX_ROLLOVER_FILES = integer]
     [, RESERVE_DISK_SPACE = { ON | OFF } ]
}

<audit_options>::=
{
     [    QUEUE_DELAY = integer ]
     [, ON_FAILURE = CONTINUE | SHUTDOWN ]
     [,  AUDIT_GUID = uniqueidentifier ]
}
<predicate_expression>::=
{
     [NOT ] <predicate_factor>
     [ { AND | OR } [NOT ] { <predicate_factor> } ]
     [,...n ]
}

<predicate_factor>::=
    event_field_name { = | < > | ! = | > | > = | < | < = } { number | ' string ' }
Table 30-21 describes the arguments for this command.
Table 30-21. CREATE SERVER AUDIT Arguments
|
Argument |
Description |
|---|---|
|
audit_name |
This specifies the user-defined name of the Server Audit object. |
|
FILE (<file_options> [, ...n]) ] | |
This designates that the Server Audit object will write events to a file. |
|
APPLICATION_LOG |
This designates that the Server Audit object will write events to the Windows Application event log. |
|
SECURITY_LOG |
This designates that the Server Audit object will write events to the Windows Security event log. |
|
FILEPATH |
If FILE was chosen, this designates the OS file path of the audit log. |
|
MAXSIZE |
If FILE was chosen, this argument defines the maximum size in megabytes, gigabytes, or terabytes. UNLIMITED can also be designated. |
|
MAX_FILES |
When specified, rollover to first file does not occur and, instead, any new events generated will fail with an error. |
|
MAX_ROLLOVER_FILES |
If FILE was chosen, this designates the maximum number of files to be retained on the file system. When 0 is designated, no limit is enforced. |
|
RESERVE_DISK_SPACE |
This argument takes a value of either ON or OFF. When enabled, this option reserves the disk space designated in MAXSIZE. |
|
QUEUE_DELAY |
This value designates the milliseconds that can elapse before audit actions are processed. The minimum and default value is 1,000 milliseconds. |
|
ON_FAILURE |
This argument takes a value of either CONTINUE or SHUTDOWN. If SHUTDOWN is designated, the SQL instance will be shut down if the target can’t be written to. FAIL_OPERATION will cause the actions that triggered an audited event to fail while other actions are able to continue. |
|
AUDIT_GUID |
This option takes the unique identifier of a Server Audit object. If you restore a database that contains a Database Audit Specification, this object will be orphaned on the new SQL instance unless the original Server Audit object is recreated with the matching GUID. |
|
predicate_expression |
New to SQL Server 2012, this option is used to determine whether an event should be processed. This expression has a maximum size of 3,000 characters. |
|
event_field_name |
Name of the field that you want to filter as the predicate source. |
|
number |
Any numeric type; limited only by physical memory and any number too large for a 64-bit integer |
|
'string' |
ANSI or Unicode string used by the predicate compare. Implicit conversions are not permitted. Passing the wrong type will result in an error. |
In this recipe, we will create a new Server Audit object that will be configured to write to a local file directory. The maximum size we’ll designate per log will be 500MB, with a maximum number of 10 rollover files. We won’t reserve disk space, and the queue delay will be 1 second (1,000 milliseconds). If there is a failure for the audit to write, we will not shut down the SQL Server instance:
USE master;
GO
CREATE SERVER AUDIT TroisMots_Server_Audit TO FILE
( FILEPATH = 'C:Apress',
MAXSIZE = 500 MB,
MAX_ROLLOVER_FILES = 10,
RESERVE_DISK_SPACE = OFF) WITH ( QUEUE_DELAY = 1000,
ON_FAILURE = CONTINUE);
GO
To validate the configurations of the new Server Audit object, we can check the sys.server_audits catalog view:
USE master;
GO
SELECT sa.audit_id,sa.type_desc,sa.on_failure_desc
    ,sa.queue_delay,sa.is_state_enabled
        ,sfa.log_file_path
FROM sys.server_audits sa
        INNER JOIN sys.server_file_audits sfa
                ON sa.audit_guid = sfa.audit_guid
        WHERE sa.name = 'TroisMots_Server_Audit'
GO
This query returns the following:

As you can see from the is_state_enabled column of sys.server_audits, the Server Audit object is created in a disabled state. Later, I’ll demonstrate how to enable it in the “Querying Captured Audit Data” recipe, but I will leave it disabled until I define Server and Database Audit Specifications, which can be associated with it.
To see more details regarding the file configuration of the Server Audit object I just created, I can query the sys.server_file_audits catalog view.
USE master;
GO
SELECT  name,
log_file_path,
log_file_name,
max_rollover_files,
max_file_size
FROM sys.server_file_audits;
GO
This returns the following result set (reformatted for presentation purposes).
|
Column |
Result |
|---|---|
|
name |
TroisMots_Server_Audit |
|
log_file_path |
C:Apress |
|
log_file_name |
TroisMots_Server_Audit_AE04F81A-CC5C-42F7-AE23-BD2C31D7438E.sqlaudit |
|
max_rollover_files |
10 |
|
max_file_size |
500 |
In this next example, I will create a new Server Audit object that will be configured similar to the prior example. This time, I want to take advantage of the predicate_expression, which has been available since SQL Server 2012. In this example, I will demonstrate how a predicate_expression can be used to filter for events occurring in the AdventureWorks2014 database and the Sales.CreditCard table. If there is a failure for the audit to write, I will not shut down the SQL Server instance:
USE master;
GO
CREATE SERVER AUDIT TroisMots_CC_Server_Audit TO FILE
     ( FILEPATH = 'C:Apress',
    MAXSIZE = 500 MB,
    MAX_ROLLOVER_FILES = 10,
    RESERVE_DISK_SPACE = OFF) WITH ( QUEUE_DELAY = 1000,
    ON_FAILURE = CONTINUE)
WHERE database_name ='AdventureWorks2014' AND schema_name ='Sales'
  AND object_name ='CreditCard' AND database_principal_name ='dbo';
GO
I confirmed the creation of this Server Audit object with the following script:
USE master;
GO
SELECT  name,
log_file_path,
log_file_name,
max_rollover_files,
max_file_size,
predicate
FROM sys.server_file_audits sfs
WHERE sfs.name = 'TroisMots_CC_Server_Audit';
GO
This returns the following result set (reformatted for presentation purposes).
|
Column |
Result |
|---|---|
|
name |
TroisMots_CC_Server_Audit |
|
log_file_path |
C:Apress |
|
log_file_name |
TroisMots_CC_Server_Audit_6E934469-D6A1-4B83-86D7-BA5E6C13C00D.sqlaudit |
|
max_rollover_files |
10 |
|
max_file_size |
500 |
|
predicate |
([database_name]=‘AdventureWorks2014’ AND [schema_name]=‘Sales’ AND [object_name]=‘CreditCard’ AND [database_principal_name]=‘dbo’) |
How It Works
The first recipe demonstrated how to create a Server Audit object that defines the target destination of collected audit events. This is the first step in the process of setting up an audit. Walking through the code, in the first line we designated the name of the Server Audit object:
CREATE SERVER AUDIT TroisMots_Server_Audit
Since the target of the collected audit events will be forwarded to a file, we designated TO FILE:
TO FILE
Next, we designated the file path where the audit files would be written (since there are rollover files, each file is dynamically named, so we just used the path and not an actual file name):
( FILEPATH = 'C:Apress',
We then designated the maximum size of each audit file and the maximum number of rollover files:
MAXSIZE = 500 MB, MAX_ROLLOVER_FILES = 10,
We also chose not to reserve disk space (as a best practice, you should write your audit files to a dedicated volume or LUN where sufficient disk space can be ensured):
RESERVE_DISK_SPACE = OFF)
Lastly, we designated that the queue delay remain at the default level of 1,000 milliseconds (1 second) and that if there were a failure to write to the target, the SQL Server instance would continue to run (for mission-critical auditing, where events must be captured, you may then consider shutting down the SQL instance if there are issues writing to the target file). See the following:
WITH ( QUEUE_DELAY = 1000,
ON_FAILURE = CONTINUE)
In the second recipe, I demonstrated the use of the predicate_expression option:
WHERE database_name ='AdventureWorks2014' AND schema_name ='Sales'
  AND object_name ='CreditCard' AND database_principal_name ='dbo';
After creating the new Server Audit object, we used sys.server_audits to validate the primary Server Audit object settings and sys.server_file_audits to validate the file options.
In the next recipe, I’ll demonstrate how to capture SQL instance–scoped events to the Server Audit object created in this recipe.
30-14. Capturing SQL Instance–Scoped Events
Problem
You have just received more detailed requirements from the security department about what to audit in SQL Server. You now know that you need to audit events that are instance-scoped
Solution
A Server Audit Specification is used to define which SQL instance–scoped events will be captured to the Server Audit object. The command to perform this action is CREATE SERVER AUDIT SPECIFICATION, and the syntax is as follows:
CREATE SERVER AUDIT SPECIFICATION audit_specification_name
FOR SERVER AUDIT audit_name
{
{ ADD ( { audit_action_group_name } )
} [, ---n] [ WITH ( STATE = { ON | OFF } ) ] }
Table 30-22 describes the arguments for this command.
Table 30-22. CREATE SERVER AUDIT SPECIFICATION Arguments
|
Argument |
Description |
|---|---|
|
audit_specification_name |
This specifies the user-defined name of the Server Audit Specification object. |
|
audit_name |
This defines the name of the preexisting Server Audit object (target file or event log). |
|
audit_action_group_name |
This indicates the name of the SQL instance–scoped action groups. For a list of auditable action groups, you can query the sys.dm_audit_actions catalog view. |
|
STATE |
This argument takes a value of either ON or OFF. When ON, collection of records begins. |
In this recipe, we will create a new Server Audit Specification that will capture three different audit action groups. To determine which audit action groups can be used, we can query the sys.dm_audit_actions system catalog view:
USE master;
GO
SELECT name
FROM sys.dm_audit_actions
WHERE class_desc = 'SERVER'
AND configuration_level = 'Group'
ORDER BY name;
GO
This returns the following abridged results.
name
APPLICATION_ROLE_CHANGE_PASSWORD_GROUP
AUDIT_CHANGE_GROUP
BACKUP_RESTORE_GROUP
BROKER_LOGIN_GROUP
DATABASE_CHANGE_GROUP
DATABASE_MIRRORING_LOGIN_GROUP
DATABASE_OBJECT_ACCESS_GROUP
...
DBCC_GROUP
FAILED_LOGIN_GROUP
LOGIN_CHANGE_PASSWORD_GROUP
LOGOUT_GROUP
...
SERVER_OBJECT_PERMISSION_CHANGE_GROUP
SERVER_OPERATION_GROUP
SERVER_PERMISSION_CHANGE_GROUP
SERVER_PRINCIPAL_CHANGE_GROUP
SERVER_PRINCIPAL_IMPERSONATION_GROUP
SERVER_ROLE_MEMBER_CHANGE_GROUP
SERVER_STATE_CHANGE_GROUP
SUCCESSFUL_LOGIN_GROUP
TRACE_CHANGE_GROUP
In this recipe scenario, I would like to track any time a DBCC command was executed, BACKUP operation was taken, or server role membership change was performed:
USE master;
GO
CREATE SERVER AUDIT SPECIFICATION TroisMots_Server_Audit_Spec FOR SERVER AUDIT TroisMots_Server_Audit
ADD (SERVER_ROLE_MEMBER_CHANGE_GROUP),
ADD (DBCC_GROUP),
ADD (BACKUP_RESTORE_GROUP) WITH (STATE = ON);
GO
Once the Server Audit Specification is created, we can validate the settings by querying the sys.server_audit_specifications catalog view:
USE master;
GO
SELECT server_specification_id,name,is_state_enabled
FROM sys.server_audit_specifications;
GO
This query returns the following.
|
server_specification_id |
name |
is_state_enabled |
|---|---|---|
|
65536 |
TroisMots_Server_Audit_Spec |
1 |
We can also query the details of this specification by querying the sys.server_audit_specification_details catalog view (we use the server specification ID returned from the previous query to qualify the following result set):
USE master;
GO
SELECT server_specification_id,audit_action_name
FROM sys.server_audit_specification_details
WHERE server_specification_id = 65536;
GO
This query returns the following.
|
server_specification_id |
audit_action_name |
|---|---|
|
65536 |
SERVER_ROLE_MEMBER_CHANGE_GROUP |
|
65536 |
BACKUP_RESTORE_GROUP |
|
65536 |
DBCC_GROUP |
The entire auditing picture is not yet complete since we have not yet enabled the Server Audit object (TroisMots_Server_Audit). Before we turn the Server Audit object on, we will also add a Database Audit Specification object, and then we’ll look at actual audit event captures and how to query the audit log.
How It Works
In this recipe, I demonstrated how to create a Server Audit Specification that defines which SQL instance–scoped events will be captured and forwarded to a specific Server Audit object target (in this case, a file under C:Apress).
We started the recipe first by querying sys.dm_audit_actions to get a list of action groups that we could choose to audit for the SQL Server instance. The sys.dm_audit_actions catalog view actually contains a row for all audit actions—at both the SQL instance and database scopes. So, in the WHERE clause of our query, we designated that the class of audit action should be for the SERVER and that the configuration level should be for a group (I’ll demonstrate the nongroup action-level configuration level in the next recipe). See the following:
WHERE class_desc = 'SERVER' AND
configuration_level = 'Group'
Next, we used the CREATE SERVER AUDIT SPECIFICATION command to define which action groups we wanted to track. The first line of code designated the name of the new Server Audit Specification:
CREATE SERVER AUDIT SPECIFICATION TroisMots_Server_Audit_Spec
The next line of code designated the target of the event collection, which is the name of the Server Audit object:
FOR SERVER AUDIT TroisMots_Server_Audit
After that, we designated each action group we wanted to capture:
ADD (SERVER_ROLE_MEMBER_CHANGE_GROUP),
ADD (DBCC_GROUP),
ADD (BACKUP_RESTORE_GROUP)
Lastly, we designated that the state of the Server Audit Specification should be enabled upon creation:
WITH (STATE = ON)
In the next recipe, I’ll demonstrate how to create a Database Audit Specification to capture database-scoped events. Once all of the specifications are created, I’ll then demonstrate actual captures of actions and show you how to read the Server Audit log.
30-15. Capturing Database-Scoped Events
Problem
You have just learned that you need to audit some database-scoped events.
Solution
A Database Audit Specification is used to define which database-scoped events will be captured to the Server Audit object. The command to perform this action is CREATE DATABASE AUDIT SPECIFICATION, and the abridged syntax is as follows (it does not show action-specification syntax; however, I’ll demonstrate this within the recipe):
CREATE DATABASE AUDIT SPECIFICATION audit_specification_name {
[ FOR SERVER AUDIT audit_name ] [ { ADD (
{ <audit_action_specification> | audit_action_group_name } )
} [, ---n]  ] [ WITH ( STATE = { ON | OFF } ) ] }
Table 30-23 shows the arguments for this command.
Table 30-23. CREATE DATABASE AUDIT SPECIFICATION Arguments
|
Argument |
Description |
|---|---|
|
audit_specification_name |
This specifies the user-defined name of the Database Audit Specification object. |
|
audit_name |
This defines the name of the preexisting Server Audit object (target file or event log). |
|
audit_action_specification |
This indicates the name of an auditable database-scoped action. For a list of auditable database-scoped actions, you can query the sys.dm_audit_actions catalog view. |
|
audit_action_group_name |
This defines the name of the database-scoped action group. For a list of auditable action groups, you can query the sys.dm_audit_ actions catalog view. |
|
STATE |
This argument takes a value of either ON or OFF. When ON, collection of records begins. |
In this recipe, we will create a new Database Audit Specification that will capture both audit action groups and audit events. Audit action groups are related groups of actions at the database scope, and audit events are singular events. For example, we can query the sys.dm_audit_actions system catalog view to view specific audit events against the object securable scope (for example, tables, views, stored procedures, and functions) by executing the following query:
USE master;
GO
SELECT name
FROM sys.dm_audit_actions
WHERE configuration_level = 'Action'
AND class_desc = 'OBJECT'
ORDER BY name;
GO
This returns a result set of atomic events that can be audited against an object securable scope.
name
DELETE
EXECUTE
INSERT
RECEIVE
REFERENCES
SELECT
UPDATE
We can also query the sys.dm_audit_actions system catalog view to see audit action groups at the database scope:
USE master;
GO
SELECT name
FROM sys.dm_audit_actions
WHERE configuration_level = 'Group'
AND class_desc = 'DATABASE'
ORDER BY name;
GO
This returns the following abridged results.
name
APPLICATION_ROLE_CHANGE_PASSWORD_GROUP
AUDIT_CHANGE_GROUP
BACKUP_RESTORE_GROUP
DATABASE_CHANGE_GROUP
DATABASE_OBJECT_ACCESS_GROUP
DBCC_GROUP
SCHEMA_OBJECT_ACCESS_GROUP
SCHEMA_OBJECT_CHANGE_GROUP
SCHEMA_OBJECT_OWNERSHIP_CHANGE_GROUP
SCHEMA_OBJECT_PERMISSION_CHANGE_GROUP
In this recipe scenario, we would like to track any time an INSERT, UPDATE, or DELETE is performed against the Sales.CreditCard table by any database user. We would also like to track whenever impersonation is used within the AdventureWorks2014 database (for example, using the EXECUTE AS command):
USE AdventureWorks2014;
GO
CREATE DATABASE AUDIT SPECIFICATION AdventureWorks2014_DB_Spec
    FOR SERVER AUDIT TroisMots_Server_Audit
    ADD (DATABASE_PRINCIPAL_IMPERSONATION_GROUP)
    , ADD (INSERT, UPDATE, DELETE ON Sales.CreditCard BY public)
WITH (STATE = ON);
GO
We can validate the settings of our Database Audit Specification by querying the sys.database_audit_specifications system catalog view:
USE AdventureWorks2014;
GO
SELECT database_specification_id,name,is_state_enabled
FROM sys.database_audit_specifications;
GO
This query returns the following:
|
database_specification_id |
name |
is_state_enabled |
|---|---|---|
|
65536 |
AdventureWorks2014_DB_Spec |
1 |
For a detailed look at what we’re auditing for the new Database Audit Specification, we can query the sys.database_audit_specification_details system catalog view (I’ll walk through the logic in the “How It Works” section):
USE AdventureWorks2014;
GO
SELECT audit_action_name, class_desc, is_group
,ObjectNM = CASE
    WHEN major_id > 0 THEN OBJECT_NAME(major_id, DB_ID()) ELSE 'N/A' END
FROM sys.database_audit_specification_details
WHERE database_specification_id = 65536;
GO
This query returns the following:
Although the Database Audit Specification is enabled, we have still not enabled the overall Server Audit object. I’ll be demonstrating that in the next recipe, where you’ll also learn how to query the captured audit data from a binary file.
How It Works
In this recipe, we looked at how to create a Database Audit Specification that designated which database-scoped events would be captured to the Server Audit object. To perform this action, we used the CREATE DATABASE AUDIT SPECIFICATION command. We started by changing the context to the database we wanted to audit (since this is a database-scoped object):
USE AdventureWorks2014;
GO
The first line of the CREATE DATABASE AUDIT SPECIFICATION command designated the user-defined name, followed by a reference to the Server Audit object we would be forwarding the database-scoped events to:
CREATE DATABASE AUDIT SPECIFICATION AdventureWorks2014_DB_Spec FOR SERVER AUDIT TroisMots_Server_Audit
After that, we used the ADD keyword followed by an open parenthesis, defined the audit action group we wanted to monitor, and then entered a closing parenthesis and a comma (since we planned on defining more than one action to monitor):
ADD (DATABASE_PRINCIPAL_IMPERSONATION_GROUP),
Next, we designated the ADD keyword again, followed by the three actions we wanted to monitor for the Sales.CreditCard table:
ADD (INSERT, UPDATE, DELETE
ON Sales.CreditCard
The object-scoped actions required a reference to the database principal for which we wanted to audit actions. In this example, we wanted to view actions by all database principals. Since all database principals are by default a member of public, this was what we designated:
BY public)
After that, we used the WITH keyword followed by the STATE argument, which we set to enabled:
WITH (STATE = ON);
GO
We then used the sys.database_audit_specifications to view the basic information of the new Database Audit Specification. We queried the sys.database_audit_specification_details catalog view to list the events that the Database Audit Specification captured. In the first three lines of code, we looked at the audit action name, class description, and is_group field, which designates whether the audit action is an audit action group or individual event:
SELECT audit_action_name, class_desc, is_group,
We used a CASE expression to evaluate the major_id column. If the major_id is a nonzero value, this indicates that the audit action row is for a database object, and therefore we used the OBJECT_NAME function to provide that object’s name:
,ObjectNM = CASE
    WHEN major_id > 0 THEN OBJECT_NAME(major_id, DB_ID()) ELSE 'N/A' END
In the last two lines of the SELECT, we designated the catalog view name and specified the database specification ID (important if you have more than one Database Audit Specification defined for a database, which is allowed):
FROM sys.database_audit_specification_details
WHERE database_specification_id = 65536;
Now that we have defined the Server Audit object, Server Audit Specification, and Database Audit Specification, in the next recipe I’ll demonstrate enabling the Server Audit object and creating some auditable activity, and then I will show how to query the captured audit data.
30-16. Querying Captured Audit Data
Problem
After enabling auditing on your SQL Server Instance, you now need to report on the audit data that has been captured.
Solution
With the auditing solution provided through the previous recipes, we will need to use the fn_get_audit_file function.
The previous recipes have built up to the actual demonstration of SQL Server’s auditing capabilities. To begin the recipe, we will enable the Server Audit object created a few recipes ago. Recall that we had defined this Server Audit object to write to a binary file under the C:Apress folder. To enable the audit, we use the ALTER SERVER AUDIT command and configure the STATE option:
USE master;
GO
ALTER SERVER AUDIT [TroisMots_Server_Audit] WITH (STATE = ON);
GO
Now we will perform a few actions at both the SQL Server scope and within the AdventureWorks2014 database in order to demonstrate the audit collection process. I’ve added comments before each group of statements so that you can follow what actions I’m trying to demonstrate:
USE master;
GO
/*
-- Create new login (not auditing this, but using it for recipe)
*/
CREATE LOGIN TestAudit WITH PASSWORD = 'C83D7F50-9B9E';
GO
/*
-- Add to server role bulkadmin
*/
EXECUTE sp_addsrvrolemember 'TestAudit', 'bulkadmin';
GO
/*
-- Back up AdventureWorks2014 database
*/
BACKUP DATABASE AdventureWorks2014 TO DISK = 'C:ApressExample_AW.BAK';
GO
/*
-- Perform a DBCC on AdventureWorks2014
*/
DBCC CHECKDB('AdventureWorks2014'),
GO
/*
-- Perform some AdventureWorks2014 actions
*/
USE AdventureWorks2014
GO
/*
-- Create a new user and then execute under that
-- user's context
*/
CREATE USER TestAudit FROM LOGIN TestAudit
EXECUTE AS USER = 'TestAudit'
/*
-- Revert back to me (in this case a login with sysadmin perms)
*/
REVERT;
GO
/*
-- Perform an INSERT, UPDATE, and DELETE -- from Sales.CreditCard
*/
INSERT Into Sales.CreditCard (CardType, CardNumber,ExpMonth,ExpYear,ModifiedDate)
    VALUES('Vista', '8675309153332145',11,2003,GetDate());

UPDATE Sales.CreditCard SET CardType = 'Colonial'
    WHERE CardNumber = '8675309153332145';
DELETE Sales.CreditCard
    WHERE CardNumber = '8675309153332145';
GO
Now that we have performed several events that are covered by the Server Audit Specification and Database Audit Specification created earlier, we can use the fn_get_audit_file table-valued function to view the contents of our Server Audit binary file. The syntax for this function is as follows:
fn_get_audit_file ( file_pattern,
    { default | initial_file_name | NULL },
    { default | audit_record_offset | NULL } )
Table 30-24 describes the arguments for this command.
Table 30-24. fn_get_audit_file Arguments
|
Argument |
Description |
|---|---|
|
file_pattern |
Designates the location of the audit file or files to be read. You can use a drive letter or network share for the path and use the single asterisk (*) wildcard to designate multiple files. |
|
{default | initial_file_name | NULL } |
Designates the name and path for a specific file you would like to begin reading from. Default and NULL are synonymous and indicate no selection for the initial file name. |
|
{default | audit_record_offset | NULL } |
Designates the buffer offset from the initial file (when initial file is selected). Default and NULL are synonymous and indicate no selection for the audit. |
In this first call to the fn_get_audit_file function, we’ll look for any changes to server role memberships. Notice that we are using the sys.dm_audit_actions catalog view in order to translate the action ID into the actual action event name (you can use this view to find which event names you need to filter by):
USE master;
GO
SELECT af.event_time, af.succeeded,
af.target_server_principal_name, object_name
FROM fn_get_audit_file('C:ApressTroisMots_Server_Audit_*', default, default) af
INNER JOIN sys.dm_audit_actions aa
    ON af.action_id = aa.action_id
WHERE aa.name = 'ADD MEMBER'
    AND aa.class_desc = 'SERVER ROLE';
GO
This returns the event time, success flag, server principal name, and server role name.

In this next example, I’ll take a look at deletion events against the Sales.CreditCard table:
USE master;
GO
SELECT af.event_time,
af.database_principal_name
FROM fn_get_audit_file('C:ApressTroisMots_Server_Audit_*', default, default) af
INNER JOIN sys.dm_audit_actions aa
    ON af.action_id = aa.action_id
WHERE aa.name = 'DELETE'
    AND aa.class_desc = 'OBJECT'
    AND af.schema_name = 'Sales'
    AND af.object_name = 'CreditCard';
GO
This query returns the following result set.
|
event_time |
database_principal_name |
|---|---|
|
2015-01-03 05:11:36.854 |
dbo |
The fn_get_audit_file function also exposes the SQL statement when applicable to the instantiating event. The following query demonstrates capturing the actual BACKUP DATABASE text used for the audited event:
USE master;
GO
SELECT event_time, statement
FROM fn_get_audit_file('C:ApressTroisMots_Server_Audit_*', default, default) af
INNER JOIN sys.dm_audit_actions aa
    ON af.action_id = aa.action_id
WHERE aa.name = 'BACKUP'
    AND aa.class_desc = 'DATABASE';
GO
This returns the event time and associated BACKUP statement text:
|
event_time |
statement |
|---|---|
|
2015-01-03 05:11:36.8630420 |
BACKUP DATABASE AdventureWorks2014 TO DISK =‘C:ApressExample_AW.BAK’ |
The last query of this recipe demonstrates querying for each distinct event and the associated database principal that performed it, along with the target server principal name (when applicable) or target object name:
USE master;
GO
SELECT DISTINCT
aa.name,
database_principal_name,
target_server_principal_name,
object_name
FROM fn_get_audit_file('C:ApressTroisMots_Server_Audit_*', default, default) af
INNER JOIN sys.dm_audit_actions aa
    ON af.action_id = aa.action_id;
GO
This returns the various events we performed earlier that were defined in the Server and Database Audit Specifications. It also includes audit events by default—for example, AUDIT SESSION CHANGED.
How It Works
We started this recipe by enabling the overall Server Audit object using the ALTER SERVER AUDIT command. After that, we performed several SQL instance– and database-scoped activities, focusing on events that we had defined for capture in the Server and Database Audit Specifications bound to the TroisMots_Server_Audit audit. After that, we looked at how to use the fn_get_audit_file function to retrieve the event data from the binary file created under the C:Apress directory.
![]() Note We could have also defined the Server Audit object to write events to the Windows Application or Windows Security event log instead, in which case we would not have used fn_get_audit_file to retrieve the data, because this function applies only to the binary file format.
Note We could have also defined the Server Audit object to write events to the Windows Application or Windows Security event log instead, in which case we would not have used fn_get_audit_file to retrieve the data, because this function applies only to the binary file format.
Each query to fn_get_audit_file we also joined to the sys.dm_audit_actions object in order to designate the audit action name and, depending on the action, the class description. Here’s an example:
...
FROM fn_get_audit_file('C:ApressTroisMots_Server_Audit_*', default, default) af
INNER JOIN sys.dm_audit_actions aa
    ON af.action_id = aa.action_id
WHERE aa.name = 'ADD MEMBER'
    AND aa.class_desc = 'SERVER ROLE';
...
In the next and final recipe of this chapter, I’ll demonstrate how to manage, modify, and remove audit objects.
30-17. Managing, Modifying, and Removing Audit Objects
Problem
Your corporate auditing requirements for SQL Server have changed. Now you need to modify the existing audit objects.
Solution
To modify existing audit objects, you should use the ALTER SERVER AUDIT SPECIFICATION, ALTER SERVER AUDIT, or ALTER DATABASE AUDIT SPECIFICATION commands.
This recipe will demonstrate how to add and remove actions from existing Server and Database Audit Specifications, disable Server and Database Audit Specifications, modify the Server Audit object, and remove audit objects from the SQL instance and associated databases.
To modify an existing Server Audit Specification, we use the ALTER SERVER AUDIT SPECIFICATION command. In this first query demonstration, we’ll remove one audit action type from the Server Audit Specification we created in an earlier recipe and also add a new audit action.
Before we can modify the specification, however, we must first disable it:
USE master;
GO
ALTER SERVER AUDIT SPECIFICATION [TroisMots_Server_Audit_Spec] WITH (STATE = OFF);
GO
Next, we will drop one of the audit actions:
USE master;
GO
ALTER SERVER AUDIT SPECIFICATION [TroisMots_Server_Audit_Spec]
DROP (BACKUP_RESTORE_GROUP);
GO
Now I’ll demonstrate adding a new audit action group to an existing Server Audit Specification:
USE master;
GO
ALTER SERVER AUDIT SPECIFICATION [TroisMots_Server_Audit_Spec]
ADD (LOGIN_CHANGE_PASSWORD_GROUP);
GO
To have these changes take effect and resume auditing, we must reenable the Server Audit Specification:
USE master;
GO
ALTER SERVER AUDIT SPECIFICATION [TroisMots_Server_Audit_Spec]
WITH (STATE = ON);
GO
To modify the audit actions of a Database Audit Specification, we must use the ALTER DATABASE AUDIT SPECIFICATION command. Similar to Server Audit Specifications, a Database Audit Specification must have a disabled state prior to making any changes to it:
USE AdventureWorks2014;
GO
ALTER DATABASE AUDIT SPECIFICATION [AdventureWorks2014_DB_Spec]
WITH (STATE = OFF);
GO
This next query demonstrates removing an existing audit event from the Database Audit Specification we created earlier:
USE AdventureWorks2014;
GO
ALTER DATABASE AUDIT SPECIFICATION [AdventureWorks2014_DB_Spec]
DROP (INSERT ON [HumanResources].[Department] BY public);
GO
Next, we’ll look at how to add a new audit event to the existing Database Audit Specification:
USE AdventureWorks2014;
GO
ALTER DATABASE AUDIT SPECIFICATION [AdventureWorks2014_DB_Spec]
ADD (DATABASE_ROLE_MEMBER_CHANGE_GROUP);
GO
To have these changes go into effect, we need to reenable the Database Audit Specification:
USE AdventureWorks2014;
GO
ALTER DATABASE AUDIT SPECIFICATION [AdventureWorks2014_DB_Spec]
WITH (STATE = ON);
GO
To modify the Server Audit object, we use the ALTER SERVER AUDIT command. Similar to the Server and Database Audit Specification objects, the Server Audit object needs to be disabled before changes can be made to it. In this next example, I demonstrate disabling the Server Audit, making a change to the logging target so that it writes to the Windows Application event log instead, and then reenabling it. See the following:
USE master;
GO
ALTER SERVER AUDIT [TroisMots_Server_Audit] WITH (STATE = OFF);
ALTER SERVER AUDIT [TroisMots_Server_Audit] TO APPLICATION_LOG;
ALTER SERVER AUDIT [TroisMots_Server_Audit] WITH (STATE = ON);
Once the target is changed, audit events are forwarded to the Windows Application event log. For example, if I execute a DBCC CHECKDB command again, I would see this reflected in the Windows Application event log with an event ID of 33205. The following is an example of a Windows Application event log entry:
Audit event: eventjtime: 2015-01-03 05:11:36.8630420
sequence_number:1
action_id:DBCC
succeeded:true
permission_bitmask:0
is_column_permission:false
session_id:57
server_principal_id:263
database_principal_id:1
target_server_principal_id:0
target_database_principal_id:0
object_id:0
class_type:DB
session_server_principal_name:PETITMOTAdministrator
server_principal_name:PETITMOTAdministrator
Server_principal_sid:0105000000000005150000006bbl3b36a981eb9a2b3859a8f4010000
database_principal_name:dbo
target_server_principal_name:
target_server_principal_sid:
target_database_principal_name:
server_instance_name:PETITMOTJeanLouis
database_name:AdventureWorks2014
schema_name:
object_name:

statement:DBCC CHECKDB('AdventureWorks2014') additional_information:
To remove a Database Audit Specification, we need to disable it and then use the DROP DATABASE AUDIT SPECIFICATION, as demonstrated here:
USE AdventureWorks2014;
GO
ALTER DATABASE AUDIT SPECIFICATION [AdventureWorks2014_DB_Spec] WITH (STATE = OFF);
DROP DATABASE AUDIT SPECIFICATION [AdventureWorks2014_DB_Spec];
GO
To remove a Server Audit Specification, we need to disable it and then use the DROP SERVER AUDIT SPECIFICATION command:
USE master;
GO
ALTER SERVER AUDIT SPECIFICATION [TroisMots_Server_Audit_Spec] WITH (STATE = OFF);
DROP SERVER AUDIT SPECIFICATION [TroisMots_Server_Audit_Spec];
GO
Finally, to drop a Server Audit object, we need to first disable it and then use the DROP SERVER AUDIT command, as demonstrated here:
USE master;
GO
ALTER SERVER AUDIT [TroisMots_Server_Audit] WITH (STATE = OFF);
DROP SERVER AUDIT [TroisMots_Server_Audit];
GO
Any binary log files created from the auditing will still remain after removing the Server Audit object.
How It Works
This recipe demonstrated several commands used to manage audit objects. For each of these existing audit objects, we were required to disable the state prior to making changes. We used ALTER SERVER AUDIT SPECIFICATION to add and remove audit events from the Server Audit Specification and DROP SERVER AUDIT SPECIFICATION to remove the definition from the SQL Server instance.
We used ALTER DATABASE AUDIT SPECIFICATION to add and remove audit events from the Database Audit Specification and DROP DATABASE AUDIT SPECIFICATION to remove the definition from the user database. We used ALTER SERVER AUDIT to modify an existing Server Audit object, changing the target logging method from a binary file to the Windows Application event log instead. Lastly, we used DROP SERVER AUDIT to remove the Server Audit object from the SQL Server instance.