SecureCRT supports public-key authentication using DSA or RSA keys. It can generate keys with a built-in wizard (in SECSH format, compatible with Tectia [6.1.2]), or you can import existing keys. It also distinguishes between two different types of SSH identities: global and session-specific. Finally, SecureCRT includes an SSH agent and supports OpenSSH-style agent forwarding.

SecureCRT’s Key Generation Wizard creates key pairs for public-key authentication. The utility is run in the Tools menu by selecting Create Public Key. Equivalently, from the Global Options window, under SSH2 or SSH1,[183] click Create Identity File.
Operation is straightforward. All you need to supply are the passphrase, the number of bits in the key, and some random data by moving your mouse around the screen. The RSA Key Generation Wizard then creates a key pair and stores it in two files. As with the Unix SSH implementations, the private key filename is anything you choose (say, mykey), and its corresponding public-key filename is the same with .pub added (e.g., mykey.pub).
Once your key pair is generated, you need to copy the public key to the SSH server machine, storing it in your account’s authorization file. [6.1] SecureCRT can do this automatically, or you can do it manually.
SecureCRT can upload your public keys to an SSH server with the click of a button, but there’s a catch: your remote SSH server must support the publickey subsystem, described in technical detail at:
| http://www.vandyke.com/technology/draft-ietf-secsh-publickey-subsystem.txt |
VanDyke’s own VShell server supports it, and VanDyke makes available a patched OpenSSH server with similar support at:
| http://www.vandyke.com/download/os/pks_ossh.html |
Assuming you’re running one of these servers:
Open the Session Options window, either for an existing session or to create a new session.
Under Connection/SSH2, fill in your desired hostname and remote username. Then, for your primary authentication method, choose PublicKey.
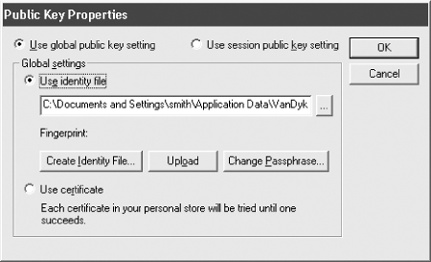
Click the Properties button to display the Public Key Properties dialog (see Figure 17-2).
Select your desired public key, or generate a new one.
Click the Upload button.
SecureCRT will upload your public key to the remote SSH server machine. You will have to authenticate.
If the server does not support the publickey subsystem, you’ll see an error message like “Unable to open the subsystem for publickey assistant.” Try installing the key manually.
To install your SecureCRT public key on a remote SSH server:
Log into the SSH server machine using SecureCRT and password authentication.
View the public-key file and copy the full text of the key to the Windows clipboard.
Install the public key (by pasting from the clipboard as necessary) on the SSH server machine in your remote account. [2.4.3]
Log out.
In the Session Options window, select Connection/SSH2, and change Authentication from Password to PublicKey.
Log in again. SecureCRT prompts you for your private-key passphrase, and you’ll be logged in.
SecureCRT supports two types of SSH identities. Your global identity is the default for all SecureCRT sessions, and is found on the Global Options window, under SSH2 or SSH1 (“Use identity file”).
You may override the default by using a session-specific identity that may differ (as the name implies) for each session you define:
Open the Session Options window.
Select Connection/SSH2.
For your primary authentication type, select PublicKey, then click the Properties button to its right, to view the Public Key Properties dialog (see Figure 17-2).
Select “Use session public key setting,” then select or generate your key of choice.
SecureCRT comes with an SSH agent for holding your SSH keys in memory, so you don’t have to type your passphrase. (We cover agents in Chapter 6.)
SecureCRT’s agent is the simplest to use of any SSH implementation we’ve seen. Simply open the Global Options window, select SSH2, and place a checkmark next to “Add keys to agent.” From that point onward, each time you enter a passphrase for a key, the decrypted key will be stored in the agent, so you won’t have to reenter the passphrase.
To enable SecureCRT’s agent forwarding, which works with OpenSSH and VanDyke’s own VShell servers only, open the Global Options window and select SSH2. Then place a checkmark next to “Enable OpenSSH agent forwarding.” [6.3.5]
You might also notice that SecureCRT offers to remember login passwords when you use password authentication. This is not the same as using an agent: your login password on the remote machine has nothing to do with keys and passphrases on the local machine.