In our running example, the user pat is authenticated by the SSH server via login password. Passwords, however, have serious drawbacks:
In order for a password to be secure, it should be long and random, but such passwords are hard to memorize.
A password sent across the network, even protected by an SSH secure channel, can be captured when it arrives on the remote host if that host has been compromised.
Most operating systems support only a single password per account. For shared accounts (e.g., a superuser account), this presents difficulties:
Password changes are inconvenient because the new password must be communicated to all people with access to the account.
Tracking usage of the account becomes difficult because the operating system doesn’t distinguish between the different users of the account.
To address these problems, SSH supports public-key authentication: instead of relying on the password scheme of the host operating system, SSH may use cryptographic keys . [3.2.2] Keys are more secure than passwords in general and address all the weaknesses mentioned earlier.
A key is a digital identity. It’s a unique string of binary data that means “This is me, honestly, I swear.” And with a little cryptographic magic, your SSH client can prove to a server that its key is genuine, and you are really you.
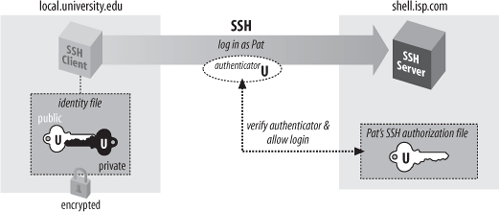
An SSH identity uses a pair of keys, one private and one public. The private key is a closely guarded secret only you have. Your SSH clients use it to prove your identity to servers. The public key is, like the name says, public. You place it freely into your accounts on SSH server machines. During authentication, the SSH client and server have a little conversation about your private and public key. If they match (according to a cryptographic test), your identity is proven, and authentication succeeds.
The following sequence demonstrates the conversation between client and server. [3.4.2.4] (It occurs behind the scenes, so you don’t need to memorize it or anything; we just thought you might be interested.)
Your client says, “Hey server, I’d like to connect by SSH to an account on your system, specifically, the account owned by user smith.”
The server says, “Well, maybe. First, I challenge you to prove your identity!” And the server sends some data, known as a challenge, to the client.
Your client says, “I accept your challenge. Here is proof of my identity. I made it myself by mathematically using your challenge and my private key.” This response to the server is called an authenticator.
The server says, “Thanks for the authenticator. I will now examine the smith account to see if you may enter.” Specifically, the server checks smith’s public keys to see if the authenticator “matches” any of them. (The “match” is another cryptographic operation.) If so, the server says, “OK, come on in!” Otherwise, the authentication fails.
Before you can use public-key authentication, some setup is required:
To use cryptographic authentication, you must first generate a key pair for yourself, consisting of a private key (your digital identity that sits on the client machine) and a public key (that sits on the server machine). To do this, use the ssh-keygen program to produce either a DSA or RSA key. The OpenSSH version of ssh-keygen requires you to specify the key type with the -t option (there is no default):
    $ ssh-keygen -t dsa
    Generating public/private dsa key pair.
    Enter file in which to save the key (/home/dbarrett/.ssh/id_dsa):  press ENTER
    Enter passphrase (empty for no passphrase): ********
    Enter same passphrase again: ********
    Your identification has been saved in /home/pat/.ssh/id_dsa.
    Your public key has been saved in /home/pat/.ssh/id_dsa.pub.
    The key fingerprint is:
    14:ba:06:98:a8:98:ad:27:b5:ce:55:85:ec:64:37:19 [email protected]
On Tectia systems, ssh-keygen produces a DSA key by default, and also accepts the -t option:
    $ ssh-keygen
    Generating 2048-bit dsa key pair
       1 ..oOo.oOo.oO
       2 o.oOo.oOo.oO
       3 o.oOo.oOo.oO
            The program displays a "ripple" pattern to indicate progress; he characters are actually overwritten on a single line
      28 o.oOo.oOo.oO
    Key generated.
    2048-bit dsa, [email protected], Wed Jan 12 2005 20:22:21 -0500
    Passphrase : **************
    Again      : **************
    Private key saved to /home/pat/.ssh2/id_dsa_2048_a
    Public key saved to /home/pat/.ssh2/id_dsa_2048_a.pub
Normally, ssh-keygen performs all necessary mathematics to generate a key, but on some operating systems you might be asked to assist it. Key generation requires some random numbers, and if your operating system doesn’t supply a random-number generator, you may be asked to type some random text or wiggle your mouse around. ssh-keygen uses the timings of your keystrokes to initialize its internal random-number generator. On a 3.2 GHz Pentium 4 system running Linux, a 1024-bit RSA key generates in less than one second; if your hardware is slower or heavily loaded, generation could take minutes. It can also take longer if the process runs out of random bits and ssh-keygen waits to collect more.
ssh-keygen then creates your local SSH directory (~/.ssh for OpenSSH or ~/.ssh2 for Tectia) if it doesn’t already exist, and stores the private and public components of the generated key in two files there. By default, their names are id_dsa and id_dsa.pub (OpenSSH) or id_dsa_2048_a and id_dsa_2048_a.pub (Tectia). SSH clients consider these to be your default identity for authentication purposes.
Warning
Never reveal your private key and passphrase to anyone. They are just as sensitive as your login password. Anyone possessing them can impersonate you!
When created, the identity file is readable only by your account, and its contents are further protected by encrypting them with the passphrase you supplied during generation. We say “passphrase” instead of “password” both to differentiate it from a login password, and to stress that spaces and punctuation are allowed and encouraged. We recommend a passphrase at least 10 -15 characters long and not a grammatical sentence.
ssh-keygen has numerous options for managing keys: changing the passphrase, choosing a different name for the key file, and so forth. [6.2]
When passwords are used for authentication, the host operating system maintains the association between the username and the password. For cryptographic keys, you must set up a similar association manually. After creating the key pair on the local host, you must install your public key in your account on the remote host. A remote account may have many public keys installed for accessing it in various ways.
Returning to our running example, you must install a public key into the pat account on shell.isp.com. This is done by editing a file in the SSH configuration directory: ~/.ssh/authorized_keys for OpenSSH or ~/.ssh2/authorization for Tectia.
Create or edit the remote file ~/.ssh/authorized_keys and append your public key—i.e., the contents of the id_dsa.pub file you generated on the local machine. A typical authorized_keys file contains a list of public-key data, one key per line. The example contains only two public keys, each on its own line of the file, but they are too long to fit on this page. The line breaks inside the long numbers are printing artifacts; if they were actually in the file, it would be incorrectly formatted and wouldn’t work:
    ssh-dss
    AAAAB3NzaC1kc3MAAACBAMCiL15WEI+0dFJZ9InMSh4PAZ3eFO7YJBFZ6ybl7ld+807z/jnXGghYVuvKbHdNlR
YWidhdFWtDW3l5v8Ce7nyYhcQU7x+j4JeUf7qmLmQxlu0v+O5rlg7L5U2RuW94yt1BGj+xk7vzLwOhKHE/+YFVz52s
FNazoYXqPnm1pRPRAAAAFQDGjroMj+ML= [email protected]
    ssh-rsa
    AAAAB3NzaC1yc2EAAAABIwAAAIEAvpB4lUbAaEbh9u6HLig7amsfywD4fqSZq2ikACIUBn3GyRPfeF93l/
weQh702ofXbDydZAKMcDvBJqRhUotQUwqV6HJxqoqPDlPGUUyo8RDIkLUIPRyqypZxmK9aCXokFiHoGCXfQ9imUP/
w/jfqb9ByDtG97tUJF6nFMP5WzhM= [email protected]
The first entry is a DSA key and the second is RSA. [8.2.1]
For Tectia you need to edit two files, one on the client machine and one on the server machine. On the client machine, create or edit the file ~/.ssh2/identification and insert a line to identify your private-key file:
IdKey id_dsa_2048_a
On the server machine, create or edit the file ~/.ssh2/authorization, which contains information about public keys, one per line. But unlike OpenSSH’s authorized_keys file, which contains copies of the public keys, the authorization file lists only the filename of the key:
Key id_dsa_2048_a.pub
Finally, copy id_dsa_2048_a.pub from your local machine to the remote Tectia server machine, placing it in ~/.ssh2.
Regardless of which SSH implementation you use, make sure your remote SSH directory and associated files are writable only by your account:[8]
    # OpenSSH
    $ chmod 755 ~/.ssh
    $ chmod 644 ~/.ssh/authorized_keys

    # Tectia
    $ chmod 755 ~/.ssh2
    $ chmod 644 ~/.ssh2/id_dsa_2048_a.pub
    $ chmod 644 ~/.ssh2/authorization
The SSH server is picky about file and directory permissions and may refuse authentication if the remote account’s SSH configuration files have insecure permissions. [5.3.2.1]
You are now ready to use your new key to access the pat account:
    $ ssh -l pat shell.isp.com
    Enter passphrase for key '/home/you/.ssh/id_dsa': ************
    Last login: Mon Aug 16 19:44:21 2004 from quincunx.nefertiti.org
    You have new mail.
    shell.isp.com>
If all goes well, you are logged into the remote account. Figure 2-2 shows the entire process.
Note the similarity to the earlier example with password authentication. [2.2] On the surface, the only difference is that you provide the passphrase to your private key, instead of providing your login password. Underneath, however, something quite different is happening. In password authentication, the password is transmitted to the remote host. With cryptographic authentication, the passphrase serves only to decrypt the private key to create an authenticator. [2.4.1]
Public-key authentication is more secure than password authentication because:
It requires two secret components—the identity file on disk, and the passphrase in your head—so both must be captured in order for an adversary to access your account. Password authentication requires only one component, the password, which might be easier to steal.
Neither the passphrase nor the key is sent to the remote host, just the authenticator discussed earlier. Therefore, no secret information is transmitted off the client machine.
Machine-generated cryptographic keys are infeasible to guess. Human-generated passwords are routinely cracked by a password-guessing technique called a dictionary attack . A dictionary attack may be mounted on the passphrase as well, but this requires stealing the private-key file first.
A host’s security can be greatly increased by disabling password authentication altogether and permitting only SSH connections by key.
Suppose you have generated a key pair, id_dsa and id_dsa.pub, and copied id_dsa.pub to a bunch of SSH server machines. All is well. Then one day, you decide to change your identity, so you run ssh-keygen a second time, overwriting id_dsa and id_dsa.pub. Guess what? Your previous public-key file is now invalid, and you must copy the new public key to all those SSH server machines again. This is a maintenance headache, so think carefully before changing (destroying!) a key pair. Some caveats:
You are not limited to one key pair. You can generate as many as you like, stored in different files, and use them for diverse purposes. [6.4]
If you just want to change your passphrase, you don’t have to generate a new key pair. ssh-keygen has command-line options for replacing the passphrase of an existing key: -p for OpenSSH [6.2.1] and -e for Tectia [6.2.2]. In this case your public key remains valid since the private key hasn’t changed, just the passphrase for decrypting it.