If you’d like to use public-key authentication to connect to remote hosts [2.4], PuTTY includes a key generator program, called PuTTYgen. It has a simple graphical user interface for creating and editing RSA and DSA keys, as shown in Figure 18-2.

To create a new key, simply click the Generate button. You’ll be asked to waggle your mouse around to supply random numbers to the generator, then to supply a passphrase. To edit an existing key, just click the Load button.
You might remember that OpenSSH and Tectia use different file formats for their keys. PuTTYgen uses the SECSH format for public keys [6.1.2], but its own unique format for private keys. The private key is stored in a file with the suffix .ppk and looks like this:
    PuTTY-User-Key-File-2: ssh-rsa
    Encryption: aes256-cbc
    Comment: Your comment here
    Public-Lines: 4
    AAAAB3NzaC1yc2EAAAABJQAAAIBltDpO1wC9qJ98peVr5y9C7N9vdOh+OrCNwbIh
    lba1oSf94rrDl1TQXKXxgIHSd1ICgh7wkdxFWbyDRXSuWdur6kreTGRaw9XgCzQt
    LyANMtKAPpDYVE1g8jb6jA1bOMtK8b+pGPmetbvdyBDmFcQ/oPwYyrZIjfbd8IdK
    FxxJvw==
    Private-Lines: 8
    3ryAyuTLEnYuLGsetfNvazRYOhxQmzBWSyMLyT2i+zt7QqArlPglY1Um3NBJlYgS
    caHDiLyH95tV2onEeBThJzYFAvgrr7UlXVjQTDLr29fe2FTS/bNm4OahTaKzTNV4
    0EojvG1yafCucaZMVwsndB4djpm4otJja+xDVLN7Wj3ibzUT+SfodSJyazMAjB0y
    Q3ndbcqcIPPg4OM3sL8c09KTVdcuLkkyKMSV5yEgTAP0RG0M+T8/ChHLFLHswwV+
    /tlb0GLZRa1w3KsnzHHFKxMsM2zOdHXnSG8TX0kecdpT2p8PT3UGw2+SMESD8umc
    GLai7g/o03lMJVSOezrooDC06p8J8OXk8h84gYeJbBIyXdELh10E3fnDSkTy5jS4
    w2SCNzXX67ggWjIFtsefsx6VJ4WwJUYtNbKY35M59xMug/GRBL07QPLu+xSh8/RB
    yM/rWtUvGwXG3ygW/TVm7A==
    Private-MAC: a0f9fa2204172fc6df9e0f6d5b918c8790d88611
But never fear: PuTTYgen can read and write public and private keys for both OpenSSH and Tectia:
To read an OpenSSH or Tectia key, simply click the Load button and select the key file. (In the file dialog, be sure to set the file type to “All Files (*.*)” so that your non-PuTTY keys show up.)
To write an OpenSSH or Tectia private key, use the Conversion menu and select “Export OpenSSH key” or “Export ssh.com key.”
To write an OpenSSH public key, copy and paste the key shown at the top of the window, under “Public key for pasting into OpenSSH authorized_keys file.” To write a Tectia public key, do nothing: PuTTY’s public keys are already in SECSH format.
To select the private key for PuTTY to use, open the PuTTY Configuration dialog and visit Connection/SSH/Auth. Under “Private key file for authentication,” browse to and select your key of choice. (Make sure the corresponding public key is properly installed on the server. [6.2])
If you’re using Plink, you can choose the key on the command line with the -i option:
C:> plink -i c:keysme.ppk [email protected]
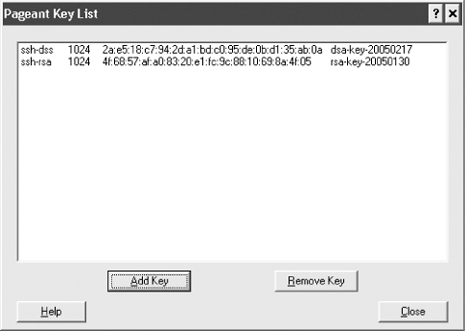
An SSH agent goes hand in hand with public-key authentication. [6.3] PuTTY has an agent, called Pageant, that caches private keys (stores them in memory) and responds to authentication-related queries from PuTTY, PSCP, and other clients in the suite. In short, Pageant is a timesaver, so you don’t have to keep retyping your passphrase.
To run Pageant, just double-click it or invoke it from the command line. (Even better, add pageant.exe to your system startup so that it’s always available when you boot or log in.) An icon will appear in the Windows System Tray on the taskbar. Right-click the icon and you can load keys into the agent, view your keys, or perform other operations, as shown in Figure 18-3. (To add a key, you’ll need to know its passphrase.) Once a key is loaded into Pageant, the various PuTTY clients will use the key transparently, and you won’t have to retype its passphrase.
You can also run Pageant on the command line. Just follow it with one or more keys you’d like to load, e.g.:
C:> pageant key1 key2 key3
and it will dutifully load them.
Speaking of agents, PuTTY also supports agent forwarding [6.3.5], but only for OpenSSH servers, not Tectia servers. Just make sure the option “Allow agent forwarding” is checked in PuTTY’s configuration window; or if you’re using Plink, add the -A option to enable agent forwarding or -a to disable it.