
Chapter 10 Data Backup and Disaster Recovery
No matter how fault tolerant your server hardware is or if you have implemented the best security measures possible, there is no guarantee that data will never be lost. Sometimes the cause is totally beyond your control—a fire caused by a gas leak, for example, or even Mother Nature (remember the Los Angeles earthquake?). Also, to err is human; even the most experienced users and system administrators make mistakes. Deleting the wrong file or mistyping information into a file (such as /etc/passwd) can cause unwarranted headaches and additional work for yourself or coworkers who need to access the data, or, in the worst case, the deletion renders the whole system unusable. Also, a disgruntled user or malevolent hacker may deliberately remove or corrupt essential data or system files; as a matter of fact, most attacks occur from within the company rather than from without. In all cases, having up-to-date backups would be a lifesaver.
Recovering from a hacker break-in can be tedious work. The problem is that once a system has been compromised, it is essentially impossible to determine everything that has occurred, especially if the system’s root account was compromised. Log files and audit trails help, but if the hacker covered his or her tracks well, there will be no telltale signs found. So the best way to quickly recover from any break-in is to use a pristine backup.
To be able to use such a backup, it is of utmost importance that you have developed and implemented a reliable data backup and disaster recovery strategy. In this chapter, you learn how to develop a backup plan and how and when to use the standard Linux backup tools, such as tar and cpio. You also find out how to create and use an SLES rescue floppy disk using YaST.
TIP
If you have a corrupted lilo boot loader, boot your system using the rescue disk and then reinstall lilo on the MRB of your hard disk using the /sbin/lilo -M command.
A Look at Backup Strategies
The purpose of performing backups is to be able to restore individual files or complete filesystems. How often to perform backups, what data should be backed up, and how to rotate backup media are issues that can be confusing.
Exactly how often you should back up which files depends on your system hardware configuration and particular needs. The criterion is, “If the system crashes, how much work are you willing to lose, and how much data can you afford to lose?” Remember that in any computing environment, the most valuable component is data, which may be in the form of databases or source code. Ideally, you would want to back up all files on all filesystems every few minutes so that you would never lose more than a few minutes’ worth of work. However, this approach is not practical, and there are other ways in which you can achieve this near real-time redundancy without doing backups.
TIP
One option to achieve (near) real-time redundancy, without installing special hardware, is to periodically mirror the data from your server to a backup server using rsync, a file-synchronization utility included with SLES. rsync is discussed later in this chapter.
To examine the problem another way, you might ask this question: “How often should I back up the files?” The more users you have on the system, the more often you should back up the filesystems. A common schedule is to perform a full backup once or twice a week and partial daily backups. In a full backup, every single file on every filesystem is backed up, regardless of its creation or modification time. A partial, or incremental, backup backs up only the files that have been created or modified since the last full backup.
Your backup strategy should be based on a rotation scheme that guarantees complete recovery in case of a disaster, within a reasonable amount of time. The following discussion is based on tape rotation because the most commonly used backup medium today is tape; however, the same principle applies to other storage media, such as rewritable DVDs.
A rotation system distributes both old and new information across several tapes to reduce the risk of being lost due to media failure. The backup and storage media type and media rotation method you choose should take the following into consideration:
![]() Backup time window—How much of a time window do you have when files on the servers are not being updated? Unless your backup software is capable of backing up open files, you need to schedule the job for the time period when no files are being accessed, or you have to make a conscious decision to skip opened files.
Backup time window—How much of a time window do you have when files on the servers are not being updated? Unless your backup software is capable of backing up open files, you need to schedule the job for the time period when no files are being accessed, or you have to make a conscious decision to skip opened files.
![]() Amount of data and backup media throughput—Both the amount of data to back up and the speed at which that data can be written to the backup media will have an impact on your choice of backup methods. For example, if you have 20GB of data to be backed up daily and your backup device is capable of storing only 1GB per hour, performing a full backup will take at least 20 hours. In such a case, doing a daily full backup is probably not a good option, and a daily incremental backup is more appropriate.
Amount of data and backup media throughput—Both the amount of data to back up and the speed at which that data can be written to the backup media will have an impact on your choice of backup methods. For example, if you have 20GB of data to be backed up daily and your backup device is capable of storing only 1GB per hour, performing a full backup will take at least 20 hours. In such a case, doing a daily full backup is probably not a good option, and a daily incremental backup is more appropriate.
![]() Media realibility and capacity—Tapes have a limited lifetime, and constant use of the same tape can shorten its life span. The typical shelf life of a magnetic tape is just a few years, or shorter depending on the environment in which it is stored. On the other hand, tapes have a much higher storage capacity (hundreds of gigabytes) than most other storage media, such as CDs (800MB) and DVDs (4–8GB). Some installations use tapes for short-term storage, and when certain data needs to be retained for an extended period of time, this data is transferred to DVDs. In some cases due to audit requirements, data is backed up directly to CDs or DVDs so they cannot be subsequently modified.
Media realibility and capacity—Tapes have a limited lifetime, and constant use of the same tape can shorten its life span. The typical shelf life of a magnetic tape is just a few years, or shorter depending on the environment in which it is stored. On the other hand, tapes have a much higher storage capacity (hundreds of gigabytes) than most other storage media, such as CDs (800MB) and DVDs (4–8GB). Some installations use tapes for short-term storage, and when certain data needs to be retained for an extended period of time, this data is transferred to DVDs. In some cases due to audit requirements, data is backed up directly to CDs or DVDs so they cannot be subsequently modified.
![]() File restoration decision—How many tapes (that is, how much time) will you need to restore information in the event of a complete system failure? (Always plan for the worst-case scenario, but hope for the best.) Also, the procedure to restore your filesystems back to a known state (for example, last night) should be as straightforward as possible; you should not have to run through 20 tapes for the task.
File restoration decision—How many tapes (that is, how much time) will you need to restore information in the event of a complete system failure? (Always plan for the worst-case scenario, but hope for the best.) Also, the procedure to restore your filesystems back to a known state (for example, last night) should be as straightforward as possible; you should not have to run through 20 tapes for the task.
![]() Storage facilities—It is general practice that backup archives should be sent to offsite storage facilities for safe-keeping. However, this may not be feasible in all cases, especially with smaller companies. In such instances, you need to consider the question “How many tapes are you physically capable of storing safely and securely onsite?” For instance, your backup tapes should be locked in a fire-resistant safe (one especially designed for tapes and magnetic storage media, and not one for documents). That way, should there be an accidental small fire, the safe can keep the tapes from melting for a few hours and at the same time secure them from theft. However, a typical office safe (22×18×18 inches) has only a small useable storage space (perhaps a couple of cubic feet) due to the thick walls. Alternatives include using bank safety deposit boxes, branch office locations, and even sending your backups home with the company’s owner on a frequent basis.
Storage facilities—It is general practice that backup archives should be sent to offsite storage facilities for safe-keeping. However, this may not be feasible in all cases, especially with smaller companies. In such instances, you need to consider the question “How many tapes are you physically capable of storing safely and securely onsite?” For instance, your backup tapes should be locked in a fire-resistant safe (one especially designed for tapes and magnetic storage media, and not one for documents). That way, should there be an accidental small fire, the safe can keep the tapes from melting for a few hours and at the same time secure them from theft. However, a typical office safe (22×18×18 inches) has only a small useable storage space (perhaps a couple of cubic feet) due to the thick walls. Alternatives include using bank safety deposit boxes, branch office locations, and even sending your backups home with the company’s owner on a frequent basis.
You can choose a number of commonly used media rotation schemes for your backup needs. Two of them, the Grandfather-Father-Son (sometimes known as GFS) and the Tower of Hanoi methods, are discussed in the next section. Because these two rotation systems are based on the traditional incremental and differential backup methodologies, the concepts behind incremental and differential backups are discussed first.
Implementing a Backup Strategy
As previously mentioned, the ideal backup strategy is to do a full backup of all the filesystems frequently. This way, should you need to restore a single file or the whole system, you need to access only the latest backup tape set and go from there. Unfortunately, daily full backups are only possible for small systems where you have enough low system usage time (a backup “window”) to create a complete backup. It also becomes expensive to continue purchasing new tapes (because none of the existing tapes can be reused during the archive-retaining time period). For most systems, a combination of full and incremental backups coupled with a tape rotation scheme, where a given set of tapes is reused, is the best option.
NOTE
Always schedule your system backup to take place during a time of little or no user activity—for two reasons. First, backup procedures take up system resources such as CPU cycles and put a high demand on hard disk access. This could degrade the system performance, and in some extreme cases, the backup process can consume considerable resources, resulting in a temporarily denial of service. Second, when users are on the system, there will always be opened files, which are not backed up (unless your backup software has an “open file agent” that handles them). Therefore, to back up as many changed files as possible, during the time that your backup job runs, you should shut down any applications, such as inventory database programs, that keep files open constantly, and you should also restrict user access to files. (Also see the “Database Backups: Cold or Hot?” section later in this chapter.)
The main drawback to incremental backups appears when you need to perform a full system restore. You need to first restore the last full backup and then apply all the incremental backups from that point onward. Therefore, you save some time during the backup process, but the restore phase takes a little longer. In the case of a partial restore, you can easily do that from the incremental backup, but you would have to scan through a number of media to locate the one where the desired data is stored.
There are two types of incremental backups: backup files changed since the last complete backup (often referred to as differential backups) or backup files changed since the last incremental backup. Assume that you have set up a backup schedule as listed in Table 10.1.
Table 10.1. Sample Differential Backup Schedule
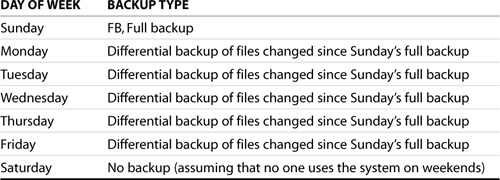
If you need to restore a file lost on Thursday, you need to access only one tape: either the differential tape created on Wednesday (if the file was changed during the current week) or the full backup tape created on Sunday (if the file was not changed during the current week). To fully restore the system, you need only two tapes: the full backup tape and the latest differential tape. Under this schedule, the backup time gets longer as the week progresses because more and more files need to be backed up. However, it makes restoring files simple. This example is a simplification of the Grandfather-Father-Son rotation method.
NOTE
The main drawback of differential backups is that, as the week progresses, you have more and more changed files to back up as you are backing up files changed since the last full backup. Therefore, it is likely that by Friday, your backup time will take twice as long as it did on Monday.
Table 10.2 shows a different backup schedule. This one does a full backup at the beginning of the month, a weekly incremental on Mondays, and a daily incremental for the rest of the week.
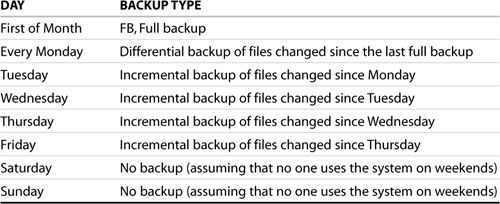
Using this schedule, restoring files is a little more complicated than it was in the previous example. For instance, to restore a file you lost, you need to do the following:
1. Use the full backup tape if the file wasn’t changed during the month.
2. Use the latest differential tape if the file was changed in the previous week but not during the current week.
3. Use the appropriate incremental tape from the current week if the file was changed this week.
The advantage of this sample schedule is that it takes less time per day for the backups because it backs up only those files changed from the previous workday. The downside is that a little more work is required to restore a file.
The preceding two examples do not take into account multiple tape sets that would be necessary to go back to data from the previous week or month. The Grandfather-Father-Son and Tower of Hanoi rotation systems described in the following sections, on the other hand, use multiple tape sets. These two rotation methods are among the most often used by backup software.
Grandfather-Father-Son Rotation Method
The Grandfather-Father-Son rotation scheme (GFS for short) uses three “generations” of tapes (hence, the name), as illustrated in Table 10.3. It uses a total of 21 tapes. Of these 21 tapes, 4 are daily tape sets labeled Monday, Tuesday, Wednesday, and Thursday. Another 4 tapes are weekly tape sets labeled Friday1, Friday2, Friday3, and Friday4; for months that have five Fridays, a fifth weekly tape set labeled Friday5 is used. Also, 12 tapes labeled January, February, and so on through December act as monthly tapes.
Table 10.3. GFS Tape Rotation Scheme

This rotation scheme recycles the daily tapes the following week (the “sons” because they have the shortest life span), the weekly backup tapes after five weeks (the “fathers”), and the monthly tapes the following year (the “grandfathers”).
NOTE
The monthly tapes are full backups, whereas the daily and weekly tapes are incrementals. As to which type of incremental backup (weekly or daily) you use, the choice is up to you. However, you should base your decision on these factors: how large a backup window you have, the amount of data to back up, and the throughput of your backup device.
CAUTION
The daily tapes get the most use; therefore, they are most prone to failure. Check these tapes regularly and often for wear-and-tear before using them.
Tower of Hanoi Rotation Method
The Tower of Hanoi rotation scheme is named after an ancient mathematical game of the same name. The rotation scheme is sometimes referred to as the ABACABA rotation method, based on the frequency with which tapes are rotated. Five or more tapes are needed in this implementation. To simplify the discussion, five tapes labeled A, B, C, D, and E are used.
NOTE
The French mathematician Edouard Lucas invented the Tower of Hanoi game, sometimes referred to as the Tower of Brahma or the End of the World Puzzle, in 1883.
The basic idea is that each of the five tapes is used at different rotation intervals. For example, tape A is used every other day; tape B, every fourth day; tape C, every eighth day; and tapes D and E, every sixteenth day. Typically, tapes A, B, and C are incremental backups, and tapes D and E are full backups. Table 10.4 shows the rotation pattern.
Table 10.4. Tower of Hanoi Tape Rotation Scheme
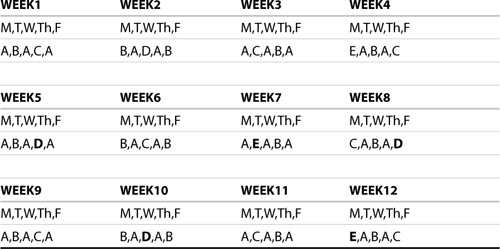
Notice that the pattern recycles itself every 31 days (one month), with the use of either tape D or E between the cycles. If you use fewer than five tapes, the cycle repeats itself every 15 days, which doesn’t “map” nicely to the requirement of monthly backups. In the case where five tapes are used (as in the example presented here), tapes D and E are alternated in their usage within the cycle, so they are used once every 16 days. This difference is shown in bold in Table 10.4.
Some Tips and Tricks
Having chosen a backup media rotation scheme does not mean you now have a viable backup strategy. You also need to decide what to back up, how often to back up, and how best to keep track and safeguard your backup tapes. The following are some points to consider:
![]() Automate your backup.Most backup software allows you to set up a schedule so that the process initiates itself periodically without manual intervention. This is important because if you need to manually start the backup procedure daily, inevitably there will be a day that you forget because you don’t have time, or something happens and prevents you from doing it. And, as Murphy’s Law will have it, that is the one day you will need a backup!
Automate your backup.Most backup software allows you to set up a schedule so that the process initiates itself periodically without manual intervention. This is important because if you need to manually start the backup procedure daily, inevitably there will be a day that you forget because you don’t have time, or something happens and prevents you from doing it. And, as Murphy’s Law will have it, that is the one day you will need a backup!
If you are using one of the Linux utilities, such as tar, for your backup, you can always automate it using one of the other Linux tools, such as at or cron. They are discussed later in this chapter.
TIP
You might want to get a backup device that holds multiple tapes (or whatever medium)—about twice as much as you require for a backup job—so that you have the option of not changing the tapes for one day.
![]() Back up every file.Do not limit backups to just documents or certain files; you will inevitably need one that was not backed up. Also, having a backup of every file, especially the system files, allows you to rebuild your entire server quickly, should there be a need. Having a pristine copy of your system utilities gives you a way to determine whether an intruder has installed any rootkits on your system. Of course, if your old backups contained already-compromised files, you wouldn’t necessarily know by comparing existing files to those on the backup. (Refer to Chapter 12, “Intrusion Detection” for more information about rootkits.)
Back up every file.Do not limit backups to just documents or certain files; you will inevitably need one that was not backed up. Also, having a backup of every file, especially the system files, allows you to rebuild your entire server quickly, should there be a need. Having a pristine copy of your system utilities gives you a way to determine whether an intruder has installed any rootkits on your system. Of course, if your old backups contained already-compromised files, you wouldn’t necessarily know by comparing existing files to those on the backup. (Refer to Chapter 12, “Intrusion Detection” for more information about rootkits.)
You can elect to back up documents and files that change frequently (such as those in /home, /etc, and perhaps /usr/local) in your daily incremental backup, and include system files in the full backup. In general, you can safely exclude /tmp, /var/tmp, and /usr/var/tmp from being backed up because they usually only contain temporary files.
If you take intrusion detection seriously, you should also backup your /var/log directory. The log files can be very useful for intrusion situations and for general troubleshooting. However, log files tend to be large, so perhaps you should compress them—using gzip, for instance—before backing them up. Alternatively, you can use a central log server (see Chapter 13, “System Security”) so the backup can exclude /var/log should backup media capacity become an issue.
WARNING
You should exclude /proc from your backups because it is not a true disk filesystem. Rather, /proc is really just a way for the kernel to provide you with information about the operating system and system memory. For instance, /proc/kcore is a pseudo-file containing the contents of your entire physical memory; backing it up is rather a waste of time and backup media storage space! (More information about /proc can be found in Chapter 7, “System Management and Monitoring.”)
You might also want to avoid backing up the /mnt filesystem, unless you need to back up the files from your CD-ROM device, floppy drive, network file shares, or other mounted devices.
![]() Make copies of your backup.Storage media will fail, especially tapes, after prolonged and repeated use. It does not hurt to have multiple copies (or “generations”) of your backups, even if they are older copies. When needed, an old copy is better than no copy at all.
Make copies of your backup.Storage media will fail, especially tapes, after prolonged and repeated use. It does not hurt to have multiple copies (or “generations”) of your backups, even if they are older copies. When needed, an old copy is better than no copy at all.
Some backup software includes a tape-to-tape copy feature that you can use to make a duplicate of your backup without having to actually perform another backup.
![]() Keep offsite copies.You never know when a fire, flood, theft, or some natural disaster will make your office inaccessible for days or weeks and your offsite copy is your only readily accessible copy. One option is to keep your current weekly backup onsite (in a fire-resistant safe, for instance) and send the previous week’s backup to a secure offsite location.
Keep offsite copies.You never know when a fire, flood, theft, or some natural disaster will make your office inaccessible for days or weeks and your offsite copy is your only readily accessible copy. One option is to keep your current weekly backup onsite (in a fire-resistant safe, for instance) and send the previous week’s backup to a secure offsite location.
TIP
There are companies that specialize in secure and climate-controlled storage for both documents and backup media. They often provide a courier service to pick up your new set of tapes and drop off an older set for reuse. Check your local yellow pages. In a pinch, a bank safety deposit box can be a good alternative.
![]() Verify your backups.You need to know whether you can ever restore from your backups. Most backup software has a verification feature; although it adds to the backup time, use it whenever possible. Also, periodically restore a few files at random and verify them yourself.
Verify your backups.You need to know whether you can ever restore from your backups. Most backup software has a verification feature; although it adds to the backup time, use it whenever possible. Also, periodically restore a few files at random and verify them yourself.
![]() Label all media.Be sure to label and date all media—tapes, DVDs, whatever—used in a backup. If you have to use multiple items, make sure they are numbered sequentially. If you send backups offsite, document them so you know which tapes are where.
Label all media.Be sure to label and date all media—tapes, DVDs, whatever—used in a backup. If you have to use multiple items, make sure they are numbered sequentially. If you send backups offsite, document them so you know which tapes are where.
![]() Keep track of where your files are located.As you can see from the Tower of Hanoi discussion, keeping track of which tape to use when can be complicated. Labeling all your media is certainly a starting point. Fortunately, many backup programs logically label the media so that they can detect whether the right one has been inserted. At the same time, the backup software keeps track of what files have been backed up on which tape using its own database. Make sure that this database is backed up as well.
Keep track of where your files are located.As you can see from the Tower of Hanoi discussion, keeping track of which tape to use when can be complicated. Labeling all your media is certainly a starting point. Fortunately, many backup programs logically label the media so that they can detect whether the right one has been inserted. At the same time, the backup software keeps track of what files have been backed up on which tape using its own database. Make sure that this database is backed up as well.
![]() Back up your system before making major changes.When you upgrade your system or make any configuration changes, you should definitely make a backup of at least the
Back up your system before making major changes.When you upgrade your system or make any configuration changes, you should definitely make a backup of at least the / (root), /usr, and /home filesystems (if they are not on the same disk partition), if not a full backup. Although such failures don’t happen often, it is possible for a critical library or package not to upgrade properly, crippling your system.
NOTE
A root filesystem generally contains everything needed to support a functional Linux system, such as the following:
![]() Minimum set of directories, such as
Minimum set of directories, such as /dev, /proc, /bin, /sbin, /etc, /lib, /tmp
![]() Basic set of utilities, such as
Basic set of utilities, such as sh, ls, cp, mv, and so on
![]() Minimum set of configuration files, such as
Minimum set of configuration files, such as rc, inittab, fstab, and so on
![]() Device files, such as
Device files, such as /dev/hd*, /dev/tty*, /dev/fd0, and so on
![]() Runtime libraries to provide basic functions used by utilities
Runtime libraries to provide basic functions used by utilities
Before we discuss the actual backup tools, there is one more topic to consider as part of your backup strategy: how best to back up a database application, such as Oracle or MySQL.
Database Backups: Cold or Hot?
When you are backing up files belonging to a database application, such as Oracle or MySQL, or applications that constantly keep certain files open, such as Lotus Notes, you need to give some extra thought than you would when backing up typical documents, such as OpenOffice files. There are two methods of performing a backup on a database: cold and hot. In a cold backup, an application is taken offline, which means there’s no user access to the data, and the data is backed up; this is the way backups are normally done. In a hot backup, on the other hand, the application remains online, and user access is retained while the backup is performed.
A cold backup is usually the optimal solution for those applications that can tolerate multiple hours of downtime to perform the backup. Some applications that used to be backed up cold have now grown so large that the backup cannot be completed during the allotted time window. If a cold backup is still desired, one way is to take a point-in-time “snapshot” of the data, and within a matter of minutes (depending on the size of the data files involved), the application is brought online. The snapshot can then be mounted back onto the application server, or mounted directly to the backup server, and backed up. Total downtime for the application in such a case is the time required to stop the application, perform the snapshot, and then restart the application.
NOTE
To take a snapshot of an application’s database, either you need an application that provides this feature, or you need to obtain additional software and/or hardware.
TIP
It is possible to create a snapshot device that is an alias for an existing Logical Volume (LV). The snapshot device, which can be accessed read-only, contains a point-in-time image of the LV; in other words, while applications continue to change the data on the LV, this logical device contains the unchanging image of the LV at the time when the snapshot was created. This makes it possible for you to do a consistent backup without shutting anything down or using any special software. This method is independent of any software because it happens in the LV Manager abstraction layer. SUSE has included a Logical Volume Manager since SUSE LINUX 6.3. For details on performing backups using LVM snapshots, see http://www.tldp.org/HOWTO/LVM-HOWTO/index.html.
If you want to perform a hot backup on an application that has constantly open files, the application must have a hot backup feature, and the backup software needs hot backup support for the specific application. Generally speaking, in hot backup mode, instead of writing to the live data, the application queues up the updates in a special file so the backup software can get a complete backup of the database. The special file is backed up next. After this is done, the application is then allowed to apply the queued-up changes to the database, thus bringing everything up to date.
Therefore, to decide whether you should perform a cold or hot backup of your database application files, you need to take the following factors into consideration:
![]() Can the application data files be backed up cold and not violate their integrity? If not, does the application have a hot backup feature?
Can the application data files be backed up cold and not violate their integrity? If not, does the application have a hot backup feature?
![]() Does your backup software support the hot backup option of that particular application?
Does your backup software support the hot backup option of that particular application?
![]() How much of a downtime window do you have to back up this application’s data files? Perhaps the window is wide enough for a cold backup, which would make life a lot easier.
How much of a downtime window do you have to back up this application’s data files? Perhaps the window is wide enough for a cold backup, which would make life a lot easier.
If you have small downtime window but have sufficient disk space, perhaps using the Logical Volume snapshot feature is an option.
Backup and Restore Tools
There are a variety of methods of performing backups with SLES. They include the general-purpose command-line tools included with every Linux distribution, such as tar, dd, dump, and cpio. Newer Linux distributions, such as SLES 9, include some text-based utilities, such as AMANDA (Advanced Maryland Automatic Network Disk Archiver) and taper. These utilities are designed to add a more user-friendly interface to the backup and restore procedures. GUI-based utilities are available as well, such as the System Backup and Restore modules in YaST. Finally, many commercial backup utilities are also available, such as BRU, CTAR, ARCserve, Legato NetWorker, and System Backup Administrator. Any one of these backup solutions can provide protection for your valuable data.
CAUTION
When you are selecting a backup utility, ensure it supports the filesystem types that you are using. For instance, Legato NetWorker 7.2 for Linux supports ext2/ext3, ReiserFS, and JFS (Journaled File System), but not XFS.
When deciding on a backup solution, you need to consider the following factors:
![]() Portability—Is backup portability (that is, the ability to back up data from your SLES server and restore it to another server running a different Linux distribution or implementation of Unix) important to you? For example, can you port the backup from SLES 9 to HP/UX? If so, you’ll probably want to choose one of the standard command-line tools such as
Portability—Is backup portability (that is, the ability to back up data from your SLES server and restore it to another server running a different Linux distribution or implementation of Unix) important to you? For example, can you port the backup from SLES 9 to HP/UX? If so, you’ll probably want to choose one of the standard command-line tools such as tar, dd, or cpio, because you can be reasonably sure that such tools will be available on any Linux/Unix system.
![]() Unattended backup—Is the ability to automate backups so that they can be performed at regular intervals without human intervention important to you? If so, you will need to choose both a tool and a backup medium that support such a backup scheme.
Unattended backup—Is the ability to automate backups so that they can be performed at regular intervals without human intervention important to you? If so, you will need to choose both a tool and a backup medium that support such a backup scheme.
![]() Ease of use—Is a user-friendly interface important to you? If so, you will likely want to choose a tool that provides either a text- or GUI-based interface. Commercial products may provide the easiest interfaces as well as added technical support.
Ease of use—Is a user-friendly interface important to you? If so, you will likely want to choose a tool that provides either a text- or GUI-based interface. Commercial products may provide the easiest interfaces as well as added technical support.
![]() Remote backups—Do you require the ability to start backups and restores from a remote machine? If so, you’ll probably want to choose one of the command-line tools or text-based utilities instead of the GUI-based utilities (unless you have a reasonably fast network connection and the ability to run remote X sessions).
Remote backups—Do you require the ability to start backups and restores from a remote machine? If so, you’ll probably want to choose one of the command-line tools or text-based utilities instead of the GUI-based utilities (unless you have a reasonably fast network connection and the ability to run remote X sessions).
![]() Network backups—Is performing backups and restores to and from networked hosts important to you? If so, you’ll probably want to use one of several of the command-line utilities (such as
Network backups—Is performing backups and restores to and from networked hosts important to you? If so, you’ll probably want to use one of several of the command-line utilities (such as tar) that support network access to backup devices, or a specialized utility such as AMANDA or one of the commercial products.
![]() Media type support—Backups can be stored on a variety of media, such as tape, an extra hard drive, ZIP drives, or rewritable DVDs. Consider cost versus reliability, storage capacity, and transfer speed and select a backup application that supports your chosen device type.
Media type support—Backups can be stored on a variety of media, such as tape, an extra hard drive, ZIP drives, or rewritable DVDs. Consider cost versus reliability, storage capacity, and transfer speed and select a backup application that supports your chosen device type.
TIP
Often, even if your selected tool doesn’t have a built-in scheduler to automate and run backups unattended, you may be able to automate such backups by using the cron facilities.
In the following sections, we discuss methods for performing backups and restores using the following tools:
![]()
tar
![]()
dump and restore
![]()
cpio
![]()
dd
![]()
rsync
![]()
AMANDA
![]() YaST’s System Backup and Restore modules
YaST’s System Backup and Restore modules
Making Tarballs
The tar (tape archive) utility is probably the most commonly used application for data backup on Linux/Unix systems. Why? Because as with vi or ls, you can be guaranteed that any Linux/Unix system will have tar. Furthermore, this tool has been ported to a wide range of hardware platforms and operating systems. Therefore, if you need your backups to be portable across different versions of SUSE, other Linux distributions, to Unix platforms (such as HP/UX or AIX), other operating systems (such as Windows), or even to mainframes, tar would be an excellent choice.
tar was designed to create a tape archive (a large file that contains, or “archives,” other files). In addition to file contents, an archive includes header information to each file inside it. This header data can be used when extracting files from the archive to restore information about the files, such as file permissions, ownerships, and modification dates. An archive file can be saved to disk (and later copied to tape or transferred to another storage medium), written directly to tape, or transmitted across the network while it is being created.
NOTE
The tar archive file is officially referred to as a tarfile. However, it is often (affectionately) called a tarball instead. Frequently, source codes for Linux/Unix-related applications are available as tarballs on the Internet.
By convention, tarfiles use .tar as their filename extension. You will also encounter .tar.gz or .tgz extensions, which identify tar archives that have been compressed using gzip.
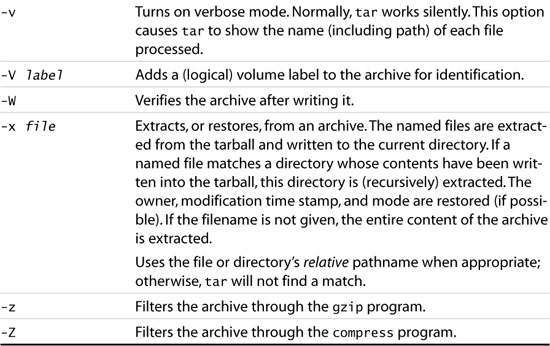
Although many command-line options are available with tar, Table 10.5 shows a list of the most commonly used option switches.
Table 10.5. Commonly Used Options for tar

CAUTION
The -r and -u options cannot be used with many tape drives due to limitations in those drives, such as the absence of the backspace or append capability.
NOTE
Some of the tar switches have mnemonic equivalence so the switch is more intuitive. For instance, instead of -x, you can use --extract or --get. Refer to the tar man pages for more details.
The general syntax for the tar command is as follows:
tar [options] filename
Following are some examples of the use of tar in backing up and restoring files:
![]() Copies all files in
Copies all files in /home and below to the archive file called home-directory-backup.tar in the current directory; the verbose mode is on:
tar -cvf ./home-directory-backup.tar /home
![]() Copies all files in
Copies all files in /usr/lib and below to a tarball on a tape drive; verbose mode is on:
tar -cvf /dev/st0 /usr/lib
![]() Reads the table of contents from tape drive
Reads the table of contents from tape drive /dev/st0:
tar -tvf /dev/st0
![]() Extracts all files from the tarball located on the tape drive:
Extracts all files from the tarball located on the tape drive:
tar -xvf /dev/st0
![]() Extracts all files from the tarball located on the tape drive and places them in
Extracts all files from the tarball located on the tape drive and places them in /home/temp:
tar -xvf /dev/st0 -C /home/temp
![]() Extracts only the file called
Extracts only the file called chapter.10 (located in the SLES directory) from the archive located on the tape drive (note that a relative path is used):
tar -xvf /dev/st0 SLES/chapter.10
![]() Duplicates the contents from the directory
Duplicates the contents from the directory /home/peter to the current working directory; file permissions and ownerships are preserved:
(cd /home/peter; tar -cpf - *) | tar -xf -
The parentheses in the command instruct the shell to execute the commands inside them first before piping the output to the second tar command.
TIP
You can use the following handy tar command in a script (and have it executed by a cron job) that backs up your entire system onto the tape drive (/dev/st0). The /tmp directory, /proc pseudo-filesystem, any mounted filesystems in /mnt, as well as Squid proxy server’s cache files, and the log file for the tar job are excluded from the backup; insert additional --exclude parameters for other directories to be excluded from backup:
tar -cvpf /dev/st0
-V "full system backup on ’date’"
-directory / -exclude=mnt -exclude=proc
-exclude=tmp -exclude=var/spool/squid
-exclude=home/root/tar.logfile . > /home/root/tar.logfile
A logical volume label with the date and time at which the tar command was executed is included in the tarball to aid with identification. (If you have many files to exclude, you can place them in a text file, one name per line, and use the -X file switch.)
tar has a built-in incremental backup option. It uses an ASCII file to keep track of files and directories that were backed up. To use this feature, do the following:
1. Create a full backup of the desired directory or directories using the -g option. For example,
tar -czpf /backup/home_full_backup.tgz
-g /backup/home_tracking_file /home
2. Create daily incremental backups using the following commands:
tar -czpf /backup/home_monday_backup.tgz
-g /backup/home_tracking_file /home
tar -czpf /backup/home_tuesday_backup.tgz
-g /backup/home_tracking_file /home
(and so on for other days)
Because you are using the same “tracking” file, tar is able to tell what files were previously backed up and when. Subsequent tarballs will contain only files that have been modified or created since the last backup (as recorded in the tracking file).
WARNING
The tar man page describes a -P (or --absolute-paths) switch, which you use to not strip the leading / from pathnames. You should not exercise this option as the default mode (to use relative paths) to protect you from accidentally overwriting critical files during a restore operation when you didn’t mean to. If you use it, instead of the files going into your current working directory, they are written to the original location!
Archiving Data with cpio
The cpio (copy in-out) program is similar to tar in that it is a general-purpose utility for copying file archives. However, it can use archive files in many different formats, including tarballs. A cpio archive can span multiple tapes or disks, and this capability is a big plus for dealing with large files and filesystems.
cpio operates in one of three modes:
![]() Copy-out mode—
Copy-out mode—cpio -o reads from stdin to obtain a list of filenames and copies those files to stdout together with pathname and status information. Output is padded to a 512-byte boundary by default or to the user-specified block size or to some device-dependent block size, where necessary (as with certain types of tapes).
TIP
A typical way to generate the list of filenames for the copy-out mode is to use either the ls or find command.
![]() Copy-in mode—
Copy-in mode—cpio -i extracts files from an archive, or the standard input (stdin), that is assumed to be the product of a previous cpio -o operation. Only files with names that match patterns are selected. Extracted files are conditionally created and copied into the current directory tree based on the specified command-line switches. The permissions of the file are those of the previous cpio -o command. Owner and group are the same as the current user unless the current user is root. If this is the case, owner and group are the same as those resulting from the previous cpio -o command. Note that if cpio -i tries to create a file that already exists and the existing file is the same age or newer, cpio displays a warning message and does not overwrite the file. (The -u option can be used to force an overwrite of the existing file.)
![]() Copy-pass mode—
Copy-pass mode—cpio -p reads from stdio a list of filenames and copies these files from one directory tree to another, essentially combining the copy-out and copy-in steps without actually using an archive.
Similar to tar, cpio uses many command-line switches. Table 10.6 shows a list of the most commonly used options.
Table 10.6. Commonly Used Options for cpio

The general syntax for the cpio command is as follows:
cpio [options] [filename]
Following are some examples of the use of cpio in backing up and restoring files:
![]() Copies the files in the current directory to a
Copies the files in the current directory to a cpio archive file called newfile:
ls | cpio -VoO newfile
![]() Prints out the table of contents from the archive file:
Prints out the table of contents from the archive file:
cpio -tvF newfile
or
cpio -itvI newfile
![]() Extracts all the files from the archive file into the current directory, overwriting any existing files:
Extracts all the files from the archive file into the current directory, overwriting any existing files:
cpio -ivuI newfile
![]() Using the copy-pass mode (
Using the copy-pass mode (-p switch), copies or links (the -l option) all the files and directories from /home/carol to the newdir directory located in the current path:
(find /home/carol -depth -print | cpio -pdlmv newdir) 2>cpio.log
The -d switch tells cpio to create directories as necessary, -m says to retain the modification times, and -v turns on the verbose mode. All log messages from cpio are redirected to the cpio.log file in the current directory. Notice that stderr redirected as stdout is a valid output path, so cpio logs messages to stderr instead. Newdir must exist; otherwise, the cpio command will fail.
The choice between using cpio or tar to perform backups is largely a matter of preference. However, because of the simpler command syntax and wide availability on other operating systems, tar seems to be the more popular choice.
Converting and Copying Data Using dd
The dd program is another oldie but goldie that does data conversion and transfers. It was originally designed for importing mainframe data to Unix systems. On the mainframe, the data is transferred to tape using the EBCDIC character encoding scheme. To use such data on most Unix machines, dd was used to read the tapes and change the coding to ASCII. However, with the availability of TCP/IP on mainframes, dd is no longer needed because FTP and other IP-based protocols can do the same job over the network (and eliminate the need for tapes).
dd can strip file headers, extract parts of binary files, and write into the middle of floppy disks; it is even used by the Linux kernel makefiles to create boot images. It can be used to copy and convert magnetic tape formats, convert between ASCII and EBCDIC, swap bytes, and force upper- and lowercase conversions.
WARNING
Because dd works with volume headers, boot records, and similar system data areas, its misuse can potentially trash your hard disks and filesystems. As a result, some people refer to dd as “Destroy Disk” or “Delete Data” because if it is misused, accidentally or otherwise, a disk partition or output file can be trashed very quickly.
One common use of dd today is to create disk images of your filesystems or to rip CD or DVD contents to an ISO image that you can later access (without having to use the CD or DVD again) by mounting the images.
Unlike most of the Linux/Unix commands that use command-line switches, dd uses a keyword=value format for its parameters. This was allegedly modeled after IBM System/360 JCL (Job Control Language), which had an elaborate DD (Dataset Definition) specification for I/O devices.
Most of the time, you need to use only two keywords: if=infile and of=outfile. Input defaults to stdin and output defaults to stdout if these two keywords are not specified. For instance, to copy one file to another, use the following:
Athena:/home/admin # dd if=/etc/passwd of=passwd.backup
4+1 records in
4+1 records out
By default, dd copies files in 512-byte records. The preceding output (4+1 records) indicates that four full 512-byte records plus one partial 512-byte record were read and then written. (In this case, /etc/passwd is 2,185 bytes in size.) You can modify the buffer size used, as in this example:
Athena:/home/admin # dd if=/etc/passwd of=passwd.backup bs=3000
0+1 records in
0+1 records out
The following are some additional sample uses of the dd command:
![]() To create a disk image of a 1.44MB floppy disk (the
To create a disk image of a 1.44MB floppy disk (the bs= specifies the standard geometry of a 1.44MB-formatted floppy disk: 18 sectors of 512 bytes, 2 heads, and 80 cylinders, for a total of 1,474,560 bytes; this results in a single 1,474,560-byte read request to /dev/fd0 and a single 1,474,560-byte write request to /tmp/floppy.image):
dd bs=2x80x18b if=/dev/fd0 of=/tmp/floppy.image
1+0 records in
1+0 records out
![]() To write the same disk image back onto a floppy disk:
To write the same disk image back onto a floppy disk:
dd bs=2x80x18b if=/tmp/floppy.image of=/dev/fd0
1+0 records in
1+0 records out
![]() To make a complete copy of a partition:
To make a complete copy of a partition:
dd if=/dev/sda1 of=/backup/boot.partition.image
![]() To make a backup copy of your Master Boot Record (MBR), which is the first block on the disk:
To make a backup copy of your Master Boot Record (MBR), which is the first block on the disk:
dd if=/dev/sda of=/backup/mbr_backup count=1
![]() To make an ISO image of a DVD disk (assuming the DVD drive is
To make an ISO image of a DVD disk (assuming the DVD drive is /dev/hdc):
dd if=/dev/hdc of=/backup/dvd.image
To mount an ISO image created using dd for access, use mount -o loop /path/image.name /mountpoint, for instance,
mount -o loop /backup/dvd.image /mnt
See man mount for additional information.
TIP
Depending on the file sizes involved, it may be advantageous to use a larger buffer size because doing so reduces the number of system calls made and performance improvement may be significant. If the input and output devices are different (say, from a file to a tape), you can use ibs= and obs= to set different buffer sizes for the reads and writes, respectively; bs= sets the same size for both reads and writes.
You can obtain a complete listing of all keywords available by using the dd --help command.
Using dump and restore
The dump program performs an incremental filesystem save operation. It can back up all specified files (normally either a whole filesystem or files within a filesystem that have changed after a certain date or since the last dump operation). The output (known as a dump image or archive) can be a magnetic tape, floppy disks, or a disk file. The output device can be either local or remote. The restore program examines the dumps to recover individual files or an entire filesystem.
NOTE
On some versions of Unix, dump is referred to as ufsdump, whereas restore may be called restore or ufsrestore. On HP/UX, fbackup performs similar functions to dump.
dump: THE GOOD, THE BAD, AND THE UGLY
A simplistic and primitive tool, dump was designed to work at the inode level, but it does come with a brilliant feature for incremental archiving. It identifies newly created or modified files after the previous backup and efficiently stores them to the dump image very quickly.
NOTE
Every Linux/Unix file has an inode. Inodes are data structures that hold descriptive information about a file, such as file type, permissions, owners, time stamps, size, and pointers to data blocks on disk. (They act like the Directory Entry Table, or DET, entries found in NetWare or the File Allocation Table, or FAT, entries found in Windows.)
For example, suppose a file titled foobar was backed up during the last archiving and removed afterward. On the next incremental archiving, dump puts the record in the archive as “Hey, there used to be a file foobar at inode xxx, but it was removed.” During a full filesystem restore process, deleted files are not resurrected. If you use, for example, tar for your regular incremental backup tasks and attempt a full restoration one day, you may run out of disk space by trying to restore a large number of files that had been previously removed. With dump, you will never face such a problem because of the way it handles incremental backups.
Incremental backups by dump are controlled by assigning a dump level to a particular backup. There are 10 dump levels, ranging from 0 through 9. When a dump of a certain level N is performed, all files that have changed since the last dump of level N–1 or lower are backed up. For instance, if a level 2 dump was done on Monday, followed by a level 4 dump on Tuesday, a subsequent level 3 dump on Wednesday would contain all files modified or added since the level 2 (Monday) backup.
The main advantage of dump is that it can simplify your backup strategy because it looks directly at the filesystem rather than from user space (like tar or cpio). For example, you don’t have to mess around with scripts that try to figure what has changed since your last backup; therefore, implementing an incremental backup solution is much easier. Another benefit is that you don’t have to worry about file permissions or ownerships being lost in the backup and restore process, not to mention the creation time or last-modified time of a file, because this information is included when dump scans the filesystem. The restore program is also simple to use whether you’re trying to fully restore a filesystem or just pulling out an important OpenOffice document file that one of your coworkers deleted.
There are a few things that might make dump a poor choice for a backup utility in your environment, however. You should keep these factors in mind before deciding to deploy dump for your setup:
![]() Ext2/ext3 filesystem types only—Because
Ext2/ext3 filesystem types only—Because dump is closely tied to the filesystem, it is designed for ext2fs and ext3fs filesystems only. Unfortunately, the default filesystem type used by SUSE is ReiserFS. So, unless you changed the filesystem type when creating your filesystem, dump will be unable to help you. Also, dump works with local filesystems only.
![]() Version dependency—
Version dependency—dump is very much a version-dependent program. Sometimes dump is not backward compatible with itself, which means that if you want to restore a dump image that was made with dump-0.4b35, you need to have a copy of the restore binary from that same version available. In an environment where you may be frequently upgrading an operating system (such as to apply security patches) or the versions of software available for it, dump probably is not an ideal solution. One way around this problem is to keep a backup copy of your backup utilities handy on a CD-ROM or a vendor/OS-neutral archive on tape (like tar or cpio).
![]() Filesystems should be inactive during backup—The filesystems should be inactive when
Filesystems should be inactive during backup—The filesystems should be inactive when dump is performing their backup; otherwise, the dump output might be inconsistent (as files may be changed during backup), and restore can get confused when doing incremental restores from dump tapes that were made on active filesystems. It is strongly recommended that a level 0 (and perhaps even a level 1) dump be made when the filesystems are inactive, while the other levels may be made with the system in multiuser mode. If you decide to perform a dump in single-user mode, you must choose between convenience or data integrity.
NOTE
A filesystem is considered inactive when it is unmounted or when the system is in single-user mode or at run level 1. (Refer to Chapter 3 for details about run levels.) Of course, if the filesystem is unmounted, you can access it for backup. Furthermore, you cannot unmount the root filesystem; otherwise, you wouldn’t have a running system! If you need to back up the root filesystem using dump, boot your system using a rescue disk and run dump from there.
![]() Difficult to exclude files and directories from being dumped—Because
Difficult to exclude files and directories from being dumped—Because dump works directly with filesystems, it is labor intensive to exclude certain files and directories on a filesystem from being backed up by dump.
TIP
You can exclude a file or directory from being dumped in three ways. First, you can use the -e switch to specify the list of inode numbers of the files or directories (determined using stat filename) to be excluded. Second, you can place the inode numbers in a file and pass it to dump using the -E switch. Third, you can manually flag the files and directories to be excluded with the d attribute using chattr.
![]() Know thy
Know thy mt commands—dump doesn’t have any built-in capability to manipulate tape storage media like commercial backup software utilities do. This means that if you’re backing up to tape, you’ll need to become familiar with the mt (magnetic tape) commands and mtx commands if you have a tape changer.
NOTE
The mt utility enables you to manipulate tape drives. With mt, you can rewind, forward, and position the tape, as well as check the drive status. It is a must-have tool if you want to use dump and restore with tape drives. If possible, it is a good idea to prepare a tape for training purposes and practice using it. Some commands of mt are drive dependent, so you should check the tape drive’s manual carefully to find out which commands are available for your drive.
Now that you know the good and the bad about dump, we’ll briefly discuss how to use dump and restore.
BACKING UP USING dump
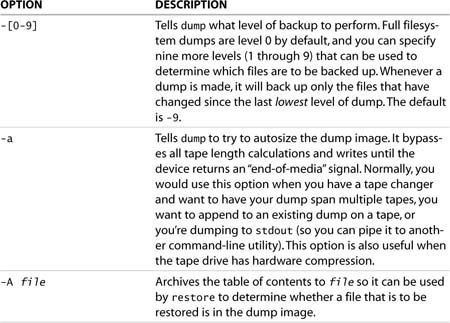
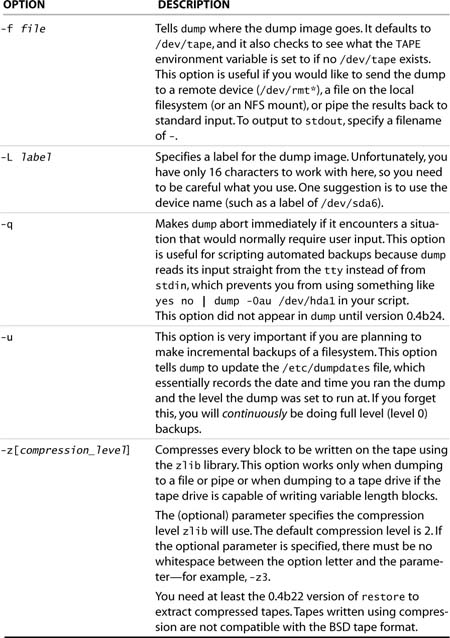
The man page for dump includes several command-line switches. Table 10.7 shows a brief summary of the important ones you should be familiar with when using dump.
Table 10.7. Noteworthy dump Command-Line Options
NOTE
dump sends all of its output through stderr, so a command such as the following is valid:
dump -0af /tmp/backup /home 2>/tmp/backup.log
This example sends the dump image to /tmp/backup and causes the stderr output from dump to go to /tmp/backup.log.
Running dump may seem complicated, but it is actually fairly straightforward. A typical command looks like this:
Athena:~ # dump -0au -L "/dev/hda1: /boot" -f /dev/st0 /boot
When dump is invoked normally, backup proceeds with some messages printed on the console, as shown in Listing 10.1. It is a good idea to leave this session in the foreground rather than to send it to the background until you are convinced everything works fine. If dump reaches the end of tape or if some error occurs, you will be requested to make some choices in the interactive session.
LISTING 10.1. Sample dump Log Messages
DUMP: Date of this level 0 dump: Sat Jan 29 17:03:55 2005
DUMP: Dumping /dev/hda1 (/boot) to /dev/st0
DUMP: Added inode 21 to exclude list (journal inode)
DUMP: Label: /dev/hda1: /boot
DUMP: mapping (Pass I) [regular files]
DUMP: mapping (Pass II) [directories]
DUMP: estimated 11000 tape blocks.
DUMP: Volume 1 started with block 1 at: Sat Jan 29 17:03:55 2005
DUMP: dumping (Pass III) [directories]
DUMP: dumping (Pass IV) [regular files]
DUMP: Closing /dev/st0
DUMP: Volume 1 completed at: Sat Jan 29 17:03:56 2005
DUMP: Volume 1 10940 tape blocks (10.68MB)
DUMP: Volume 1 took 0:00:01
DUMP: Volume 1 transfer rate: 10940 kB/s
DUMP: 10940 tape blocks (10.68MB) on 1 volume(s)
DUMP: finished in 1 seconds, throughput 10940 kBytes/sec
DUMP: Date of this level 0 dump: Sat Jan 29 17:03:55 2005
DUMP: Date this dump completed: Sat Jan 29 17:03:56 2005
DUMP: Average transfer rate: 10940 kB/s
DUMP: DUMP IS DONE
The log messages in Listing 10.1 also indicate whether any files (inodes) are skipped. In the example, the log shows inode 21 was excluded from the backup. The reason is that inode 21 turns out to be the journal for the ext3 filesystem; therefore, it doesn’t need to be backed up and can be excluded from future backups.
When the dump session finishes properly, you can dump another filesystem if enough tape capacity remains.
TIP
It is always a good idea to first check the filesystem’s integrity prior to doing a dump, especially when it is a full dump. To do this, after you have entered single-user mode, unmount the filesystems one by one and check them using e2fsck:
Athena:~ # umount /usr/home; e2fsck -afv /dev/sdd1
Check all the filesystems that are to be backed up, preferably after unmounting them. Because you cannot unmount the root filesystem, you may want to remount it as read-only to prevent its data (thus the inodes) from being modified and check it with e2fsck:
Athena:~ # mount -r -n -o remount / ; e2fsck -afv /dev/hda1
After all the checks are done, remount it again with read-write so that dump can log the backup information:
Athena:~ # mount -w -n -o remount /
A simple incremental backup strategy is shown in Table 10.8.
Table 10.8. A Simple Incremental Backup Strategy Using dump


After Day 2, dump backs up updated files only. And on Day 11, you make a complete backup again and the sequence repeats.
Some people use a more elaborate method, using the Tower of Hanoi sequence, for the dump-level scheduling. This method may employ the following sample sequences:
In this case, you start with a level 0 dump and then perform daily incremental backups based on the sequence. The pattern repeats itself after 27 days.
Note that under this scenario, each level 0 dump should be made on a new tape and stored at a safe place. For level 1 backups, use two different tapes (or as many as the number of rotations). For other dump levels, one tape per level is sufficient, and they can be reused from one rotation to another.
CAUTION
If you are considering the Tower of Hanoi sequence for your dump-level schedule, pay attention to the section “A FEW WORDS OF CAUTION ABOUT DUMP LEVELS” later in this chapter.
RECOVERING DATA USING restore
There are two main methods of restoring files from a dump archive: either interactively (when the -i switch is specified) or through a full restore. You point restore to a dump image, and the selected files are extracted into the current directory. Table 10.9 shows some of the important restore command-line switches.
Table 10.9. Noteworthy restore Command-Line Options

TIP
A piped combination of dump and restore can duplicate the contents of one filesystem onto another filesystem.
The restore utility is not too difficult to use but can be rather tricky when you’re dealing with multiple dump images on the same media. Therefore, you should be familiar with it before you really have to use it. The following are two sample restore commands:
![]() Retrieves all the files from the archive in tape media and writes them under the current directory:
Retrieves all the files from the archive in tape media and writes them under the current directory:
restore -rf /dev/st0
![]() Performs an interactive restoration from the third dump image on the tape media:
Performs an interactive restoration from the third dump image on the tape media:
restore -is 3 -f /dev/st0
TIP
When you are performing a partial restore interactively, it is recommended that you do not restore the files directly to the target directory. Instead, you should first restore the files to an empty temporary directory and then move them to their final locations. That way, you do not run the risk of accidentally overwriting any existing files.
For a full filesystem restore, you should mount a formatted disk first, move to that mount point, and then invoke the restore command.
CAUTION
You should be careful about the sequence of the archives to restore. When restoring the full filesystem from the archives with the -r switch, you must start with the level 0 archive.
A FEW WORDS OF CAUTION ABOUT DUMP LEVELS
You can save some trouble during a full filesystem restore if your dump backups were made of staggered incremental dump levels. The online man page for dump suggests the following method of staggering incremental dumps to minimize the number of tapes.
First, you start with a level 0 backup and then daily dumps of active filesystems using a modified Tower of Hanoi algorithm. The suggested sequence of daily dump levels is as follows:
3 2 5 4 7 6 9 8 9 9 ...
One thing you need to realize with the dump level logic is that an archive with some level becomes ineffective if a smaller level dump is taken after that. For instance, in the preceding sequence, the level 3 archive becomes “ineffective” when the next level 2 dump is taken because a level 2 dump includes all files backed up under level 3. Similarly, an existing level 5 archive is ineffective after the next level 4 dump. In the extreme case, a new level 0 dump makes all existing archives with level 1 through 9 ineffective.
Therefore, on a full restore, you should skip these ineffective archives. When restoring from dumps made using the sequence presented in the preceding example, you should choose the restoration sequence as follows to obtain the latest status of the filesystem:
0 2 4 6 8
If you ignore this rule and try to restore the archives following the Tower of Hanoi sequence (that is, 0, 3, 2, 5, 4, and so on), you will encounter the Incremental tape too high error on the restoration of your level 2 archive and then Incremental tape too low errors after that. After you encounter one of these errors, you cannot complete the full restore by any means, and you must restart that restoration from the first step.
NOTE
The generation of ineffective archives by no means diminishes the usefulness of the Tower of Hanoi sequence. It is still an excellent way to preserve many snapshots of the filesystem for a long period with less backup media.
Data Mirroring Using rsync
The rsync (remote synchronization) utility is a replacement for rcp (remote copy), which has many more features. rsync is intended to create copies of complete directory trees across a network to a different system but also works locally within the same machine; it uses a special algorithm (adeptly called the “rsync algorithm”) that provides a very fast method for bringing remote files into synchronization. It does this by sending just the differences in the files across the network link, without requiring that both sets of files are present at one of the ends of the link beforehand.
Features of rsync include the following:
![]() Can update whole directory trees and filesystems
Can update whole directory trees and filesystems
![]() Optionally preserves symbolic links, hard links, file ownership, permissions, devices, and creation/modification times
Optionally preserves symbolic links, hard links, file ownership, permissions, devices, and creation/modification times
![]() Does not require special privileges to install
Does not require special privileges to install
![]() Uses internal pipelining to reduce latency for multiple files
Uses internal pipelining to reduce latency for multiple files
![]() Can use
Can use rsh, ssh, or direct sockets as the transport
![]() Supports “anonymous
Supports “anonymous rsync,” which is ideal for public data mirroring (such as distributing file changes to FTP mirror sites serving open source programs)
rsync supports a large number of command-line switches, but the ones listed in Table 10.10 are used most frequently.
Table 10.10. Most Frequently Used rsync Switches

The following are some sample rsync command usages:
![]() Mirrors all home directories to a backup filesystem:
Mirrors all home directories to a backup filesystem:
rsync -acv --stats /home /backup
Notice that in the preceding command, there is no trailing slash after /home. If you specify the source path with a trailing slash (such as /home/) as in
rsync -acv --stats /home/ /backup
all data in the /home directory will be mirrored to /backup but not the directory itself.
![]() Mirrors root’s home directory (
Mirrors root’s home directory (/home/admin) to a remote system, Pollux, using ssh as the transport:
rsync -azcve ssh /home/admin/ root@pollux:/backup/home/admin
root@pollux specifies the username (root) and the host (Pollux) to log in to, and /backup/home/admin is the path for the remote directory that rsync will mirror the files with.
![]() Copies root’s home directory data back from the remote system:
Copies root’s home directory data back from the remote system:
rsync -azcve ssh root@pollux:/backup/home/admin/ /home/admin
The sample script in Listing 10.2, found at http://rsync.samba.org/examples.html, backs up a number of important filesystems to a spare disk; this extra disk has the capacity to hold all the contents of the main disk. The first part does the backup on the spare disk, and the second part backs up the critical parts to daily directories.
LISTING 10.2. A Sample Backup Shell Script Using rsync
#!/bin/sh
export PATH=/usr/local/bin:/usr/bin:/bin
LIST="rootfs usr data data2"
for d in $LIST; do
mount /backup/$d
rsync -ax --exclude fstab --delete /$d/ /backup/$d/
umount /backup/$d
done
DAY=`date "+%A"`
rsync -a --delete /usr/local/apache /data2/backups/$DAY
rsync -a --delete /data/solid /data2/backups/$DAY
For more details, consult the rsync man page, as well as the detailed documentation found at http://rsync.samba.org, home of rsync.
TIP
You can find an excellent article titled “Easy Automated Snapshot-Style Backups with Linux and Rsync” at http://www.mikerubel.org/computers/rsync_snapshots.
TIP
rsync is also available for different operating systems, including NetWare (http://forge.novell.com/modules/xfmod/project/?rsync) and Windows ( http://www.cygwin.com).
YaST’s System Backup and Restore Modules
The YaST Backup module allows you to create a backup of your data files. The backup created by the module does not comprise the entire system, but only saves information about changed packages and copies of critical storage areas (such as the MBR), configuration files (such as those found under /etc), and user files (such as /home). Furthermore, it does not provide any incremental backup features. The Backup module basically provides you with a GUI front end to tar.
To access the Backup module, from the YaST Control Center, select System, System Backup; or from a terminal session, use yast2 backup or yast backup. At the YaST System Backup screen, you can select Profile Management, Add to create different backup profiles that store different backup settings. For example, you can create a profile called MBR Backup that is used exclusively to back up the Master Boot Record and another profile called User Home Directories that will back up all user files.
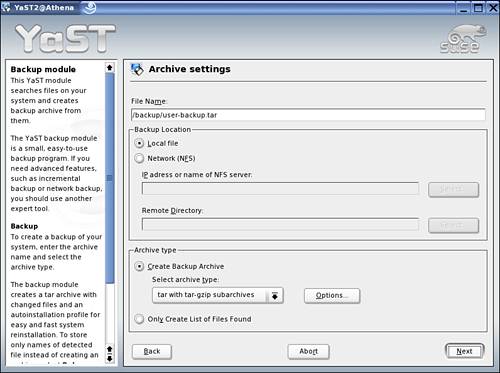
Figure 10.1 shows the Archive Settings screen where you can specify the name of your tarfile and the archive type (such as a tarball compressed using gzip). Clicking Next takes you to the File Selection dialog box. Here, select the desired option(s) and click Next. (If you want to back up your MBR, click the Expert button for additional settings.) The last screen specifies the Search Constraints. Here, you select the directories and filesystems that you want to be excluded from backup. Click Finish to save the profile settings.
Figure 10.1. The Archive Settings dialog box.
NOTE
If your screen resolution is 800×600, the File Name edit box may be partially hidden if you have the task panel displayed.
If you need to do a one-off backup, you can select the Backup Manually button and walk through the same setup screens described in the preceding paragraphs, but not save the settings in a profile.
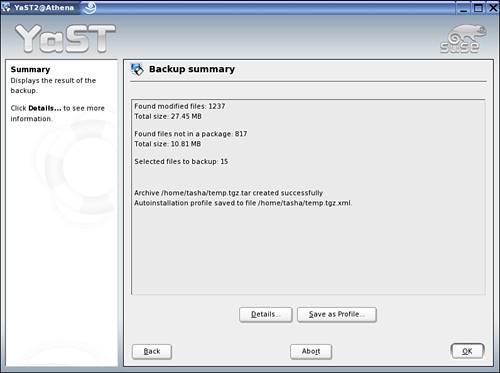
To perform a backup, simply select one of the existing profiles and then click Start Backup. YaST takes a few minutes to search through the system for files matching your selection and then creates the resulting archive (see Figure 10.2). The tarball created by YaST has the following “structure”:
Athena:/home/admin # tar -tvf backup.tar
-rw------- root/root 143 2005-01-14 06:07:42 info/files
-rw------- root/root 136 2005-01-14 06:07:42 info/packages_info.gz
-rw------- root/root 6 2005-01-14 06:07:35 info/hostname
-rw------- root/root 17 2005-01-14 06:07:35 info/date
-rw------- root/root 0 2005-01-14 06:07:35 info/comment
-rw------- root/root 127 2005-01-14 06:07:35 info/complete_backup
-rw------- root/root 18754 2005-01-14 06:07:42 info/installed_packages
-rw------- root/root 1679 2005-01-14 06:07:42 NOPACKAGE-20050114-0.tar.gz
Figure 10.2. The Backup summary screen.
Instead of the tarfile holding the backed-up files, those files are actually placed in another tarball within the archive, and additional identification information is added. As a result, the YaST System Restore module does not accept a “standard” tarball created by tar unless you have packaged the files into the same structure.
The System Restore module enables restoration of your system from a backup archive. To access the Restore module, from the YaST Control Center, select System, System Restore; the Archive Selection dialog box is then shown (see Figure 10.3). (From a terminal session, you can use yast2 restore or yast restore.) First, specify where the archives are located (removable media, local hard disks, or network file systems). A description and the contents of the individual archives are then displayed, letting you decide what to restore from the archives. There are two dialog boxes for uninstalling packages that were added since the last backup and for the reinstallation of packages that were deleted since the last backup. These two steps let you restore the exact system state at the time of the last backup.
Figure 10.3. The Archive Selection dialog box.

Because it does not support incremental or differential backups, the YaST System Backup module is of limited use. However, it is adequate for quick-and-dirty backups or for small test servers. Also, it has a built-in scheduler (which you access by selecting Profile Management, Automatic Backup), so you can run regular backups at predetermined times in the background.
CAUTION
If your screen resolution is 800×600, the Start Backup Automatically check box is hidden if the task panel is displayed. This makes all the selections on the Automatic Backup Options dialog box inaccessible (grayed out). You need to hide the task panel to access the check box.
Getting to Know AMANDA
AMANDA, the Advanced Maryland Automatic Network Disk Archiver, was originally written by James da Silva while at the University of Maryland at College Park in 1997. This backup system allows a network administrator to set up a single master backup server and back up multiple hosts to a single, large-capacity tape drive. AMANDA uses native dump and/or GNU tar facilities and can back up a large number of workstations running multiple versions of Linux/Unix. Recent versions can also use Samba to back up Microsoft Windows hosts; no support is available for Macintosh systems at the time of this writing.
NOTE
The current main website for AMANDA is http://sourceforge.net/projects/amanda, where you can find the latest version and its source code.
AMANDA provides its own network protocols on top of TCP and UDP instead of using the standard rsh, rdump, or rmt protocols. Each client agent writes to stdout, which AMANDA collects and transmits to the tape server host. This allows AMANDA to insert compression and encryption and also gather a catalog of the image for recovery. Multiple clients are typically backed up in parallel to files in one or more holding disk areas as cache buffers. A separate tape-writing process keeps the tape device streaming at maximum possible throughput. AMANDA can also run direct to tape without holding disks, but with reduced performance.
Either the client or tape server may do software compression, or hardware compression may be used. When enabled on the client side, software compression reduces network traffic. On the server side, it reduces client CPU load. Software compression may be selected on an image-by-image basis. If Kerberos is available, clients may use it for authentication and dump images may be encrypted. Instead of Kerberos, .amandahosts authentication files (similar to .rhosts) can be used instead, or AMANDA may be configured to use .rhosts (even though the r*-utilities, such as rlogin, are not themselves used). AMANDA is friendly with security tools like TCP Wrappers (ftp://info.cert.org/pub/network_tools) and firewalls.
AMANDA uses standard software for generating dump images and software compression. Consequently, if you have an AMANDA-created tape, but AMANDA is not readily available, you can readily use the normal Linux/Unix tools such as mt, dd, and gzip/uncompress to recover a dump image from the tape. When AMANDA software is available, using the catalog, it locates which tapes are needed and finds images on the tapes. There is an FTP-like restore utility for administrators to make searching online dump catalogs easier when recovering individual files.
There is no graphical interface available for AMANDA; it is totally command line based. As a matter of act, AMANDA consists of a set of command-line utilities. Consequently, you can easily set up cron jobs to run the backup automatically.
AMANDA has configuration options for controlling almost all aspects of the backup operation and provides several scheduling methods. A typical configuration does periodic full dumps with partial dumps in between. There is also support for the following:
![]() Periodic archival backup, such as taking full dumps so you can send them to offsite storage.
Periodic archival backup, such as taking full dumps so you can send them to offsite storage.
![]() Incremental-only backups where full dumps are done outside
Incremental-only backups where full dumps are done outside AMANDA, such as very active areas that must be taken offline, or no full dumps at all for areas that can easily be recovered from vendor media.
![]() Always doing full dumps, such as for databases that can change completely between each run or critical files that are easier to deal with during an emergency if they are a single-restore operation.
Always doing full dumps, such as for databases that can change completely between each run or critical files that are easier to deal with during an emergency if they are a single-restore operation.
Scheduling of full dumps is typically left up to AMANDA. They are scattered throughout the dump cycle to balance the amount of data backed up during each run. Because there is no human intervention to determine when a full dump may take place, AMANDA keeps logs of where backup images are located for each filesystem. For instance, the Friday tape will not always have a full dump of /home for Athena. Therefore, system-generated logs are essential. The scheduling of partial backup levels is also left to AMANDA. History information about previous levels is kept, and the backup level automatically increases when sufficient dump size savings are realized.
A simple but efficient tape management system is employed by AMANDA. It protects itself from overwriting tapes that still have valid dump images and from writing on tapes that are not allocated to the configuration. Images may be overwritten when a client is down for an extended period or if not enough tapes are allocated, but only after AMANDA has issued several warnings. AMANDA can also be told not to reuse specific tapes.
As you can see, many of the features in AMANDA rival those of many of the commercial backup products, and it’s free! If you need to back up multiple systems, take a look at AMANDA. It is included as part of the SLES 9 software.
TIP
You can find an excellent reference on configuring and using AMANDA in Chapter 4 of W. Curtis Preston’s book Unix Backup & Recovery (ISBN 1-56592-642-0).
Scheduling Backups
As already discussed, backups should be made on a regular basis to be of any use in case of an accident or other emergency. Most, if not all, commercial backup products have a built-in scheduler. If you have elected to use one of the Linux-supplied tools, however, they do not come with schedulers. In this case, you can use cron to execute your backup commands at preset times.
NOTE
While each performs the same task, there are many variants of cron. The version of cron included with SLES 9 is Vixie cron, which is a rather full-featured cron implementation based on AT&T System V’s cron. Each user has his or her own crontab file (placed in /var/spool/cron/tabs) and is allowed to specify environment variables (such as PATH, SHELL, HOME, and so on) within that crontab. The actual access to the cron service is controlled by the /var/spool/cron/allow and /var/spool/cron/deny files. Unlike the other cron variants, this version also offers support for the SELinux security module ( http://www.nsa.gov/selinux/papers/module-abs.cfm) and PAM. It supports fewer architectures than Dcron (Dillon’s cron), but more than Fcron.
System jobs are controlled via the contents in /etc/crontab and the files located in /etc/cron.d. For backup jobs, it is probably best to place the necessary commands in /etc/crontab. The following is a sample crontab entry that performs a backup of /home/project every day at 3:00 a.m. using tar:
#mm hh dd mm ww command
00 03 * * * (tar -czpvf /backup/project.tgz /home/project![]() > /home/peter/tar.log)
> /home/peter/tar.log)
Refer to man 5 crontab for details about the format of cron commands.
Sometimes you may need to run a (backup) command just once, but at a later time. For this purpose, you can use the at command instead of cron.
The at command requires one argument (the time) and accepts a number of options. The command syntax is as follows:
at [-q queue] [-bdlmrv] [-f file] time [date | +increment]
The output from the commands in file (as specified via -f file) is emailed to the user who submitted the job; at executes the command file using /bin/sh. The following is a sample at command that will make the backup1 script run 10 minutes from the time it was submitted:
Athena:/home/admin # at -f backup1 now+10 minutes
warning: commands will be executed using /bin/sh
job 5 at 2005-1-19 14:24
The following example will execute the backup1 script at 3 p.m., three days from today:
Athena:/home/admin # at -f backup1 3pm + 3days
warning: commands will be executed using /bin/sh
job 6 at 2005-1-22 15:00
Similar to cron, at uses allow (/etc/at.allow) and deny (/etc/at.deny) files to control which of the nonroot users may submit at commands.
NOTE
The at service (atd) is not started by default. You can check to see whether it is currently running by using the command ps aux | grep atd and looking for the atd process. If it is not running, you can manually start it with /usr/sbin/atd. Similarly, you can use ps aux | grep cron to ensure the cron service is running. If it is not, you can start it with /usr/sbin/cron.
For more information about the at commands, especially its time syntax, see its man page.
Commercial Backup Products
Other than the tools and free utilities included with SLES, a number of commercial backup products are also available. Some notable mentions follow:
![]() CTAR—The Compressing Tape Archiver is an unattended backup/preconfigured command scheduler. It is based on the nonproprietary industry standard
CTAR—The Compressing Tape Archiver is an unattended backup/preconfigured command scheduler. It is based on the nonproprietary industry standard tar format. CTAR has been around since 1989 and supports a wide range of Linux and Unix systems. Visit UniTrends Software ( http://www.unitrends.com) for more information.
![]() BRU—The Backup and Restore Utility family of products is strongly based on
BRU—The Backup and Restore Utility family of products is strongly based on tar but adds many more features, including both command-line and GUI interfaces. It runs a daemon that manages the backup schedule. BRU supports full, incremental, and differential backups, as well as catalogs, and can save the archive to a file as well as a wide range of storage devices. Like CTAR, BRU has been around for a long time (since 1985), so it has a proven track record. Visit TOLIS Group at http://www.tolisgroup.com for more information.
![]() BrightStor ARCserve Backup for Linux—ARCserve is an easy-to-use, high-performance, comprehensive data management tool for enterprise networks. Utilizing a browser-based Java GUI, ARCserve makes managing the backup of large servers and heterogeneous networks simple. Full automation of the data management process, including tape rotation, is made easy by the built-in Auto Pilot feature. A number of add-on agents and modules are available to support hot backup of databases (such as MySQL) and applications (such as Apache Web Server). Visit Computer Associates at http://www.ca.com for more information.
BrightStor ARCserve Backup for Linux—ARCserve is an easy-to-use, high-performance, comprehensive data management tool for enterprise networks. Utilizing a browser-based Java GUI, ARCserve makes managing the backup of large servers and heterogeneous networks simple. Full automation of the data management process, including tape rotation, is made easy by the built-in Auto Pilot feature. A number of add-on agents and modules are available to support hot backup of databases (such as MySQL) and applications (such as Apache Web Server). Visit Computer Associates at http://www.ca.com for more information.
![]() Legato NetWorker for Linux—NetWorker utilizes a centralized console for configuring and managing all backups and restores, thus reducing the amount of training required across your system. Wizard-driven configuration tools help simplify such tasks as filesystem and device configuration. You can readily implement flexible, automated, calendar-based scheduling, and design separate browse and retention policies at client or defined backup levels to enable more flexibility in managing your data. The user console allows your users to perform ad hoc backups and even browse and recover their own files, eliminating the need for administrator intervention. NetWorker also provides automatic event notification via pager, email, or optional SNMP module. For heavily scripted environments or users wishing to integrate with other applications, NetWorker provides extensive command-line capabilities. A number of modules are also available, such as NetWorker Module for Oracle, which enables you to perform online database backups. Visit EMC Legato at http://www.legato.com for more information.
Legato NetWorker for Linux—NetWorker utilizes a centralized console for configuring and managing all backups and restores, thus reducing the amount of training required across your system. Wizard-driven configuration tools help simplify such tasks as filesystem and device configuration. You can readily implement flexible, automated, calendar-based scheduling, and design separate browse and retention policies at client or defined backup levels to enable more flexibility in managing your data. The user console allows your users to perform ad hoc backups and even browse and recover their own files, eliminating the need for administrator intervention. NetWorker also provides automatic event notification via pager, email, or optional SNMP module. For heavily scripted environments or users wishing to integrate with other applications, NetWorker provides extensive command-line capabilities. A number of modules are also available, such as NetWorker Module for Oracle, which enables you to perform online database backups. Visit EMC Legato at http://www.legato.com for more information.
![]() System Backup Administrator—System Backup Administrator (SBA) provides a graphical interface for administration of various types of backups. The rich feature set in SBA allows you to use a single backup product for daily incremental backups, raw partition backups, and full-system backups, along with the necessary boot media. SBA also has some unique system recovery features that are not found in other similar products. For instance, when you are reinstalling a system using new hardware, the configuration is tailored to work with your new hardware configuration. In addition, you can completely recustomize your system during the system installation process by changing filesystem types, adding software RAID devices, converting to LVM partitions, and much more. Visit Storix, Inc., at http://www.storix.com for more information.
System Backup Administrator—System Backup Administrator (SBA) provides a graphical interface for administration of various types of backups. The rich feature set in SBA allows you to use a single backup product for daily incremental backups, raw partition backups, and full-system backups, along with the necessary boot media. SBA also has some unique system recovery features that are not found in other similar products. For instance, when you are reinstalling a system using new hardware, the configuration is tailored to work with your new hardware configuration. In addition, you can completely recustomize your system during the system installation process by changing filesystem types, adding software RAID devices, converting to LVM partitions, and much more. Visit Storix, Inc., at http://www.storix.com for more information.
![]() Arkeia Server and Network Backup—Arkeia offers two Linux backup solutions: Arkeia Server Backup (ASB) and Arkeia Network Backup (ANB). ASB is specifically designed for businesses and enterprise departments that rely on local backups to a single tape drive, and ANB was designed to protect heterogeneous networks with options for backing up to disks and/or tape libraries. Arkeia users can take advantage of a fully integrated wizard for easy setup of basic operations, and the GUI interface provides ready access to various functions and features, including scheduling and email notification. Plug-ins are available to perform online, hot backups of widely used database applications, such as Lotus Notes and MySQL. Visit Arkeia Corporation at http://www.arkeia.org for more information.
Arkeia Server and Network Backup—Arkeia offers two Linux backup solutions: Arkeia Server Backup (ASB) and Arkeia Network Backup (ANB). ASB is specifically designed for businesses and enterprise departments that rely on local backups to a single tape drive, and ANB was designed to protect heterogeneous networks with options for backing up to disks and/or tape libraries. Arkeia users can take advantage of a fully integrated wizard for easy setup of basic operations, and the GUI interface provides ready access to various functions and features, including scheduling and email notification. Plug-ins are available to perform online, hot backups of widely used database applications, such as Lotus Notes and MySQL. Visit Arkeia Corporation at http://www.arkeia.org for more information.
SLES Boot and Rescue Disks
In the unfortunate event that your SLES 9 system disk is corrupted and no longer bootable, you can still (likely) access the data on the filesystems if you boot with a rescue disk. If you have the SLES CDs or DVD available, you simply boot using the DVD or CD1. At the boot screen, select Rescue System and press Enter. From the language selection dialog box, highlight the desired language and press Enter. When the rescue system starts, log in as root.
What can you do if your CD-ROM drive doesn’t support bootable CDs or you don’t have the media handy? If you have the foresight, you can use YaST to create a set of boot or rescue floppy diskettes for just such an emergency.
These floppy disks are helpful if the boot configuration of your system is damaged. The rescue disk is especially necessary if the filesystem of the root partition is damaged. In this case, you might also need the module disk with various drivers to be able to access the system (for example, to access a RAID system).
To access the Create Boot or Rescue Floppies module, from the YaST Control Center, select System, Create a Boot, Rescue or Module Floppy. (From a terminal session, you can use yast2 bootfloppy or yast bootfloppy.) A dialog box similar to Figure 10.4 is displayed.
Figure 10.4. Creating boot and rescue floppies.

Using this YaST module, you can create the following types of floppy disks:
![]() Standard Boot Floppy 1, 2, or 3—Use these options to create standard boot disks so that you can boot an installed system. You also need these disks to start the rescue system.
Standard Boot Floppy 1, 2, or 3—Use these options to create standard boot disks so that you can boot an installed system. You also need these disks to start the rescue system.
![]() Rescue Floppy—This disk contains a special environment that allows you to perform maintenance tasks in your installed system, such as checking and repairing the file system and updating the boot loader.
Rescue Floppy—This disk contains a special environment that allows you to perform maintenance tasks in your installed system, such as checking and repairing the file system and updating the boot loader.
![]() Module Floppies—Module disks contain additional system drivers that may be required to support hardware access. The standard kernel supports only IDE drives. If your system has SCSI controllers, for instance, you need to load the needed drivers from a module disk to be able to access them. If you select this option and click Next, you are taken to a dialog box for creating various module disks.
Module Floppies—Module disks contain additional system drivers that may be required to support hardware access. The standard kernel supports only IDE drives. If your system has SCSI controllers, for instance, you need to load the needed drivers from a module disk to be able to access them. If you select this option and click Next, you are taken to a dialog box for creating various module disks.
![]() Custom Floppy—Use this option to write any existing floppy disk image from the hard disk to a floppy disk.
Custom Floppy—Use this option to write any existing floppy disk image from the hard disk to a floppy disk.
![]() Download Floppy Image—Use this option to specify a URL and authentication data to download a floppy disk image from the Internet.
Download Floppy Image—Use this option to specify a URL and authentication data to download a floppy disk image from the Internet.
To create one of these floppy disks, select the corresponding option on the screen and then click Next. Insert a blank floppy disk when prompted. Click Next again to create the floppy disk. After you have created the necessary disks, label them and store them in a secure location.
Summary
This chapter provided information on how to develop a backup plan and how and when to use various standard Linux backup tools, such as tar and cpio, to implement a flexible yet reliable data backup and recovery strategy.