Chapter 4 User and Group Administration
As the system administrator of a multiuser system, you are responsible for, among many other tasks, managing and controlling user access to system resources. Because SLES is a multiuser system, this chapter provides you with an understanding of how users and groups are identified, how this information is used to determine access privileges to data and applications, and how you can effectively manage user and group information. The following topics are covered in this chapter:
![]() User and group IDs
User and group IDs
![]() System users versus regular users
System users versus regular users
![]() The
The /etc/passwd, /etc/shadow, and /etc/group files
![]() Ways to create and update user and group information using YaST and command-line tools
Ways to create and update user and group information using YaST and command-line tools
![]() User account security considerations
User account security considerations
User and Group IDs
Each user and group in SLES is assigned a unique numeric value because it is much easier for the operating system to deal with numbers than text strings. The number associated with a user is called a user ID (UID) and the number assigned with a group is called a group ID (GID). By default, SUSE LINUX (all versions) assigns UIDs to regular (nonsystem) users starting at 1000, and GID assignments starting at 100.
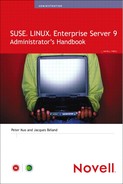
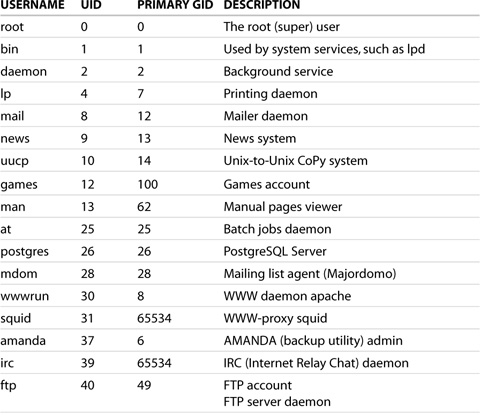
The Linux standard reserves the UID range from 0 through 99 for the system itself, and the range 100 through 499 for special system users (such as services and applications). To allow room for future expansion, SUSE LINUX thus starts regular user ID values at 1000 (and ends at 60000, by default; the maximum upper limit is 65535). Table 4.1 shows the SLES-created system users, their UIDs, and their primary GIDs.
Table 4.1. SLES Default System User Settings
NOTE
Every Linux (and Unix) system has a special, privileged user called root. The root user always has a UID of 0 (zero). There are no special or reserved group names in Linux.
WARNING
Because the operating system identifies users by their UID, different usernames with the same UID are considered to be one and the same. Consequently, you can set up additional root users by assigning a UID of 0 to these users. By the same token, if you accidentally (or someone maliciously) made a user’s UID equal to 0, you have granted that person unlimited privileges over the system. As a precaution, you should periodically audit /etc/passwd (and your LDAP/NIS databases, if you are using them for authentication) to ensure only root and designated users have a UID and GID set to 0. Bastille, mentioned in Chapter 13, “System Security,” can be used to automatically detect unauthorized duplicate root accounts.
If you need to set up multiple administrators, it is best to either assign these users to a special group (such as the root group) that has been granted the necessary rights or preferably use sudo (as discussed in Chapter 5, “User Environment Management and Security.”
When you log in to Linux, your active, or current, GID is set to the primary (or default) GID as specified in the user database (such as /etc/passwd), even though you may be a member of multiple groups. The operating system calculates a user’s access permissions to files based on the current GID. You can change your active GID to a new one by using the newgrp command, as follows:
newgrp groupname
NOTE
Although usually used to switch your UID to that of the root user, the su command may be used to switch your active UID to that of another user (su username). If you’re currently root, no password is required; otherwise, you will need to supply the password of that user.
If groupname is not given, the GID is switched back to the primary GID. After you switch to a new group successfully—you must be a member of the group, or be root, to do so—all your actions from then on will have the permissions of that new group. For example, if you create a new file or directory, the group of the new file or directory will be “groupname.”
Upon executing the newgrp command, you remain logged in, the current directory is unchanged, and a new shell is created. Some implementations of newgrp always replace the current shell with a new shell, even if the command terminates with an error (such as when an unknown group was specified). Consider the confusion that may result: Are you in a new shell and need to use the exit command to return to your original shell, or are you still in your original shell where the exit command would terminate your current session? SUSE’s implementation avoids this problem by not creating a new shell should the command fail.
To return to the previous GID and shell, use the exit command and not newgrp; otherwise, you start yet another shell. The following illustrates the effects of the newgrp command:
Athena:/home/admin # #display my UID, GID, and groups I belong to
Athena:/home/admin # id
uid=0(root) gid=0(root) groups=0(root),64(pkcs11)
Athena:/home/admin # #show my currently running processes
Athena:/home/admin # ps
PID TTY TIME CMD
7853 pts/1 00:00:00 bash
7875 pts/1 00:00:00 ps
Athena:/home/admin # #change group to wheel
Athena:/home/admin # newgrp wheel
Athena:/home/admin # #check my current settings:
Athena:/home/admin # #wheel is now my current GID
Athena:/home/admin # id
uid=0(root) gid=10(wheel) groups=0(root),10(wheel),64(pkcs11)
Athena:/home/admin # #and I have one extra bash shell running!
Athena:/home/admin # ps
PID TTY TIME CMD
7853 pts/1 00:00:00 bash
7877 pts/1 00:00:00 bash
7885 pts/1 00:00:00 ps
Athena:/home/admin # #return to previous setting
Athena:/home/admin # exit
exit
Athena:/home/admin # #and the extra bash shell is gone too
Athena:/home/admin # id
uid=0(root) gid=0(root) groups=0(root),64(pkcs11)
Athena:/home/admin # ps
PID TTY TIME CMD
7853 pts/1 00:00:00 bash
7886 pts/1 00:00:00 ps
When you return to your original shell, its previous environment (such as shell variables and working directory) is preserved; you are returned to the exact state you were in just before you started the new shell.
NOTE
The user is prompted for a password if the group has a password and the user is not listed in the /etc/group file as being a member of that group. The only way to create a password for a group is to use the passwd utility and then cut and paste the password from /etc/shadow to /etc/group. Group passwords are antiquated and not often used, but they provide a means for a user who is not listed as a member to take on the identity of that group.
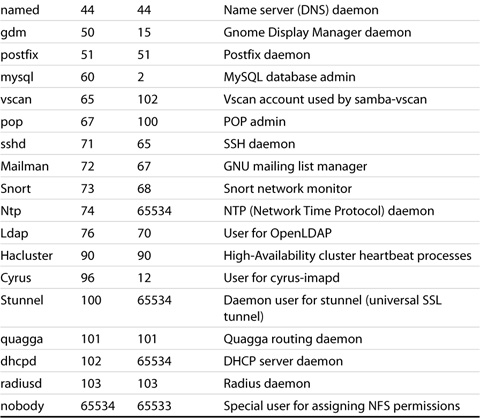
Linux reserves the GID range from 0 through 10 for system groups. Similar to UIDs, by default, user-created groups start with a GID of 1000, and the GID value can be as high as 60000. Table 4.2 shows the SLES-created system groups and their GIDs.
Table 4.2. SLES Default System Groups and Their GIDs


User and Group Data Files
Linux stores local user and group information in text files in the /etc directory. Traditionally, user information (including passwords) is stored in the /etc/passwd file, and group information is found in the /etc/group file. However, the /etc/passwd file contains information (such as the comment field, which generally contains the user’s full name and the UID of a user) that has to be readable by anyone. At the same time, you don’t want passwords world-readable because this capability gives would-be crackers a good place to start (for example, using a password-cracking tool as discussed in the “BE A CRACKER JACK” section later in this chapter). So the passwords in newer implementations of Linux (such as SLES) are kept in the shadow file (/etc/shadow), which is readable only by root, and everyone’s password is entered into the /etc/passwd file as “x.”
WARNING
You should not directly edit any of the /etc/passwd, /etc/group, and /etc/shadow files—especially /etc/shadow. Any error in these files may lead to the affected user, including root, no longer being able to log in. Instead, you should use the supplied system tools, such as YaST and the user* utilities (such as useradd) discussed later in this chapter.
NOTE
The three files discussed in this section are used only for users and groups that are local to the system. If you use LDAP or NIS authentication methods, users and groups created under these protocols are not stored in these three /etc files, but in the LDAP or NIS database instead.
Next, we examine the record structure of each of these three data files.
The /etc/passwd File
Each line in the /etc/passwd file corresponds to an entry for one person, and fields on each line are separated by a colon. The following is a sample record:
eric:x:1000:100:Eric the Webmaster, Room 215a, 555-1212, N/A, other info:/home/eric:/bin/bash
The fields, from left to right, are the login name, hashed password, user ID, primary group ID, comment field (officially referred to as the GCOS field), home directory, and default or login shell. The presence of an “x” in the password field indicates that the shadow password file is used; some implementations use an asterisk (*) instead.
WHAT IS THE GCOS FIELD?
The GCOS field has no defined syntax and is generally used for personal information about the user, such as full name, phone number, room number, and so on. Often, the finger utility uses the information stored in this field.
Delimited by commas, finger interprets the information in the GCOS field as follows: user’s full name, office location, office telephone number, home phone number. Any additional fields are considered as “other information,” and this Other field is not displayed by finger. The following is sample output from finger for user eric:
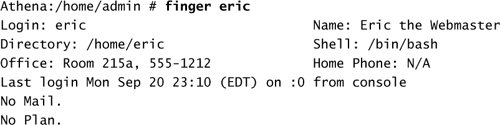
The acronym GCOS comes from GECOS, or General Electric Comprehensive Operating System, a mainframe operating system. This was later changed to General Comprehensive Operating System (GCOS) when GE’s large systems division was sold to Honeywell. The name is mostly a nostalgic residue from using the comment field in the /etc/passwd file to store identification data for submitting print jobs or batch jobs from Unix to GCOS machines.
As a security measure, some sites populate the GCOS field with the user’s full name and phone numbers but disable the finger daemon (see Chapter 8, “Network Services,” on how to enable/disable various services). Or, TCP/UPD port 79 is blocked at the perimeter firewall so the GCOS information is only available internally but not to an external query. In most cases, only the user’s real name is listed in the GCOS field.
CAUTION
For backward compatibility with older applications and Linux/Unix implementations, the login name should be eight or fewer characters even though Linux can handle longer names.
The /etc/passwd file can contain a line (usually the last line in the file) beginning with a plus (+), which means to incorporate entries from Network Information Services (NIS). There are two styles of + entries. A single + means to insert the entire contents of an NIS passwd file at that point:
+::::::
A line of the form +name means to insert the NIS entry (if any) for that username. If a + entry has a non-null field (such as the default shell), the data in that field overrides what is contained in NIS. In the following example, user ted’s UID, primary GID, GCOS data, and home directory information will come from NIS, but he will be assigned a default shell of /bin/csh regardless of the setting in NIS:
+ted::::::/bin/csh
The /etc/passwd file can also contain lines beginning with a minus (-). These entries are used to disallow user entries. There is only one style of - entry; an entry that consists of -name means to disallow any subsequent entry (if any) for name. These entries would disallow the specified users from logging in to the machine. For example,
-jacques::::::
does not allow user jacques to log in to the local system.
You can also use +@netgroup or -@netgroup to specify entries for all members of the (NIS) network group netgroup into /etc/passwd.
CAUTION
The /etc/passwd file must not contain any blank lines. Blank lines can cause unpredictable behavior in system administration software that uses the file.
For more information about the /etc/passwd file, use the man 5 passwd command.
The /etc/shadow File
Similar to the /etc/passwd file, each line in the /etc/shadow file is an entry for one person, and the fields are separated by colons. The following is a sample record:
eric:$1$w1bsw/N4$UWLu2bRET6YyBS.CAEp7R.:12794:0:90:5:30:12989:
This record has the following nine fields:
![]() Login name.
Login name.
![]() Hashed password. By default, passwords are hashed using the
Hashed password. By default, passwords are hashed using the crypt function that is based on the Data Encryption Standard (DES) algorithm. (For more information about the crypt function, use the man 3 crypt command.) The resulting DES-hashed password is always 13 characters in size. You can change the encryption method to use either MD5 (Message Digest number 5) or Blowfish; see Chapter 11, “Network Security Concepts,” for more details.
![]() Date that the password was last changed. This is given in number of days since the Epoch (January 1, 1970).
Date that the password was last changed. This is given in number of days since the Epoch (January 1, 1970).
![]() Minimum number of days that a password must be in existence before it can be changed.
Minimum number of days that a password must be in existence before it can be changed.
![]() Password’s life span. This is the maximum number of days that a password can remain unchanged. If this time elapses and the user does not change the password, the system administrator must change it for him or her.
Password’s life span. This is the maximum number of days that a password can remain unchanged. If this time elapses and the user does not change the password, the system administrator must change it for him or her.
![]() Number of days before password expiration the user will begin receiving notifications about changing the password. A value of
Number of days before password expiration the user will begin receiving notifications about changing the password. A value of -1 means no warning will be issued.
![]() Number of days after the password expires that the account is disabled and the user can no longer log in. A value of
Number of days after the password expires that the account is disabled and the user can no longer log in. A value of -1 means access is allowed even if the password has expired.
![]() Date after which the account is disabled. This is given in number of days since the Epoch. This information is useful for setting up temporary accounts.
Date after which the account is disabled. This is given in number of days since the Epoch. This information is useful for setting up temporary accounts.
![]() A reserved flag field, and is not currently used.
A reserved flag field, and is not currently used.
The previous sample record shows the following information for user eric:
![]() The password was last changed on January 11, 2005.
The password was last changed on January 11, 2005.
![]() No minimum amount of time is required before the password can be changed.
No minimum amount of time is required before the password can be changed.
![]() The password must be changed every 90 days.
The password must be changed every 90 days.
![]() The user will get a warning 5 days before the password must be changed.
The user will get a warning 5 days before the password must be changed.
![]() The account will be disabled 30 days after the password expires if no login attempt is made.
The account will be disabled 30 days after the password expires if no login attempt is made.
![]() The account will expire on July 25, 2005.
The account will expire on July 25, 2005.
You can use chage -l username to examine a user’s password-aging information. The output for eric looks like this:
Athena:/home/admin # chage -l ericMinimum: 0Maximum: 90Warning: 5Inactive: 30Last Change: Jan 11, 2005Password Expires: Apr 11, 2005Password Inactive: May 11, 2005Account Expires: Jul 25, 2005
A nonroot user will be prompted for username’s password for security reasons, even if the user is querying his or her own password-aging data.
NOTE
You can also use passwd -S username to display the password status of a user or passwd -Sa to display status for all users. The output for user eric looks similar to this:
eric PS 01/11/2005 0 90 5 30
The status follows directly after the username: PS means existing or locked password, NP means no password, and LK means the account is locked. As you can see, the output is not as descriptive as that from chage -l. Furthermore, passwd -S works only with local users; for all other types of users (such as LDAP), it returns a status of LK, regardless of the actual status. The remaining fields show the password last changed date, minimum password days, maximum password days, number of days before warning is issued, and number of days after password expiration that the account will be disabled, respectively.
The /etc/group File
The /etc/group file contains the names of valid groups and the usernames of their members. This file is owned by root and only root may modify it, but it is world-readable. When a new user is added to /etc/passwd, information on what groups that user is a member of must be added here. Group IDs (GIDs) from the /etc/passwd file are mapped to the group names kept in this file. Similar to users in the /etc/passwd file, the groups are listed one per line. For example,
audio:x:17:eric,tasha,carol
Each entry consists of four fields separated by a colon:
![]() Group name—The name of the group, used by various utility programs to identify the group.
Group name—The name of the group, used by various utility programs to identify the group.
![]() Group password—If set, this allows users who are not part of the group to join the group by using the
Group password—If set, this allows users who are not part of the group to join the group by using the newgrp command and typing the password stored here. If a lowercase “x” is in this field, shadow group passwords (stored in /etc/gshadow) are being used. However, although earlier versions of SUSE LINUX make use of /etc/gshadow, SLES 9 and later do not and any group password hashes are stored in /etc/group.
![]() Group ID (GID)—The numerical equivalent of the group name. The system and applications use it when determining access privileges.
Group ID (GID)—The numerical equivalent of the group name. The system and applications use it when determining access privileges.
![]() Member list—A comma-delimited list of users in the group.
Member list—A comma-delimited list of users in the group.
NOTE
Some Linux distributions use /etc/groups to hold passwords that let a user join a group. SUSE does not use this file.
The preceding sample entry from /etc/group shows the audio group is using shadow passwords; has a GID of 17; and that eric, tasha, and carol are group members.
CAUTION
The group members in /etc/group should be separated from each other by a single comma and no whitespaces. Otherwise, any users listed after the whitespace are not recognized as members.
Similar to etc/passwd, the /etc/group file can contain a line (usually the last line in the file) beginning with a plus (+), which means to incorporate group entries from NIS. A line with a single + means to insert the entire contents of the NIS group file at that point:
+:::
A line with +name means to insert the group entry (if any) for name from NIS at that point. If a + entry has a non-null field (such as the group membership), the data in that field overrides what is contained in NIS.
An entry of the form -name means that the group is disallowed. All subsequent entries for that group name, whether in the NIS group file or in the local /etc/group file, are ignored.
CAUTION
As is the case with /etc/passwd, the /etc/group file must not contain any blank lines. Blank lines can cause unpredictable behavior in system administration software that uses the file.
For more tinformation on /etc/group, use the man 5 group command.
User Account and Group Management Applications
There are two basic types of applications you can use when managing user accounts and groups on SUSE systems:
![]() The graphical system assistant application, YaST
The graphical system assistant application, YaST
![]() A suite of command-line tools
A suite of command-line tools
While both YaST and the command-line utilities perform essentially the same task, the command-line tools have the advantage of being scriptable and, therefore, more easily automated. On the other hand, YaST provides a wizard-like graphical interface that walks you through the necessary steps.
Table 4.3 describes some of the more common command-line tools used to create and manage users.
Table 4.3. User Management Command-Line Tools

Table 4.4 lists some of the more common command-line tools used to create and manage groups.
Table 4.4. Group Management Command-Line Tools

To learn more about the utilities in Table 4.4, refer to the man page for each (for example, man grpck).
NOTE
The applications listed in Tables 4.3 and 4.4 do not determine what resources these users and groups have control over. For this, you must use applications that deal with file permissions, some of which are discussed in Chapter 6, “Filesystem Security.”
Creating and Editing User Accounts
When you need to create or modify a single user account or a small number of accounts (say, fewer than five), it is usually more convenient to use YaST for the task because of its GUI interface. Otherwise, you may want to consider creating some shell scripts for the task using command-line tools discussed later in this section.
TIP
Many user-creation scripts are available on the Internet. A sample skeleton bash script for creating new users (using the useradd command) can be found at http://www.osix.net/modules/article/?id=577.
Use the following steps to create a new user account using YaST:
1. Launch YaST using one of the following methods:
![]() From the KDE desktop, click on the YaST icon. Enter the root password if prompted.
From the KDE desktop, click on the YaST icon. Enter the root password if prompted.
![]() From the KDE desktop, select Applications, System, YaST. Enter the root password if prompted.
From the KDE desktop, select Applications, System, YaST. Enter the root password if prompted.
![]() From a terminal window, first run
From a terminal window, first run sux to become root (if not root already) and then run yast2 (the GUI version).
![]() From a terminal window, first run
From a terminal window, first run su to become root (if not root already) and then run yast (the ncurses version).
2. From the YaST Control Center, select Security and Users, Edit and Create Users to launch the User and Group Administration module. (If the NIS, LDAP, Samba, or Kerberos authentication is configured, you will be prompted for additional passwords.)
TIP
You can run yast and yast2 with the parameter users (for example, yast users) so YaST automatically launches the User and Group Administration module instead of displaying the Control Center menu.
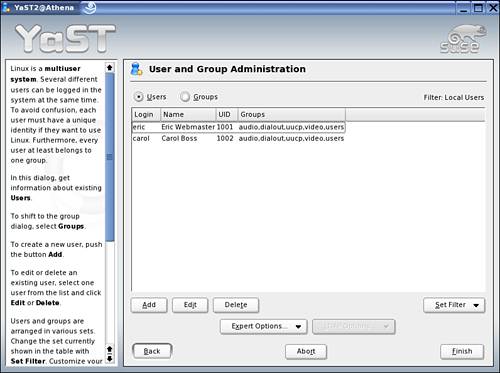
3. From the User and Group Administration screen (see Figure 4.1), select Set Filter and choose the type of user accounts (such as Local Users, System Users, or LDAP Users) you want to manage. A list of current users of the selected type is displayed. You may only see Local Users and System Users available as selections under the Set Filter drop-down list. Additional selections (such as LDAP Users) will be available only after you have configured and started the services on the server.
Figure 4.1. The User and Group Administration module screen in YaST.
TIP
You can combine multiple user types (such as Local Users and LDAP Users) to be displayed under the Custom filter by editing the selections in Set Filter, Customize Filter, Custom view.
4. Select the Add option, and a screen similar to Figure 4.2 is displayed.
Figure 4.2. Adding a new local user.
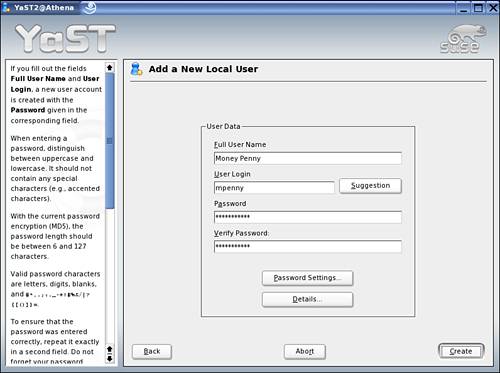
5. Fill in the user’s name, login ID, and password. Keep in mind that both login names and passwords are case sensitive. Valid passwords can be composed of any of the (7-bit) ASCII characters, including digits and upper- and lowercase letters. However, you should use only printable ASCII characters whose decimal values are between the range of 33 and 126. Spaces (dec. 32) do work if you have a pure Linux/Unix environment but may fail with connections from an X emulator or SSH client from a Windows client. Therefore, you should avoid spaces in passwords. Furthermore, depending on the encryption algorithm (such as DES, which is the default), you may be limited to use only up to eight alphanumeric characters. (See “USE A STRONG PASSWORD-HASHING ALGORITHM” later in this chapter.)
6. Click Password Settings if you want to change the settings (such as password expiration date) for the new user to something other than the defaults. In many cases, the default settings are sufficient and don’t need to be modified.
7. Click Details if you want to change settings such as UID, home directory location, default login shell, and group memberships; the Additional User Information field in this screen corresponds to the GCOS field in /etc/passwd. (Remember that if you plan to run the finger daemon, the information in this field must be in the particular form required by finger; see the earlier “WHAT IS THE GCOS FIELD?” sidebar.) The UIDs are assigned automatically, based on the previously used value, and default settings are read from /etc/default/useradd.
TIP
The shells shown in the drop-down list of the Login shell are read from the /etc/shells file. Edit this file to remove any entry that you don’t want to show up. Keep in mind that having an entry in /etc/shells does not necessarily mean the actual shell exists on the server. You should check to ensure the program exists before you include it in the list. This file is also referenced by chsh.
You may notice an entry called /bin/bash1 in /etc/shells, but it is not listed in the drop-down list. /bin/bash1 is an old reference to version 1 of bash, and /bin/bash is a general reference to the current version of bash, which is version 2. YaST filters out /bin/bash1 using the /usr/share/YaST2/modules/Users.pm Perl script.
8. Click Create when you are satisfied with the user’s settings.
9. Repeat steps 4 through 8 to create more users. Click Finish when you are done. You must click Finish for the databases to be updated. Otherwise, if you click Abort, any changes made (including new users “added”) will be discarded.
TIP
You can select Expert Options, Write Changes Now to save the changes made thus far, without exiting the module.
The procedure for updating and deleting a user is similar: Instead of Add, select Edit or Delete after highlighting the desired user.
TIP
If you change a user’s UID, YaST will normally change all file ownerships in the user’s home directory. If for some reason YaST fails to do this automatically, you can use the chown -R username /home/username command to change the ownerships.
TIP
When a user’s UID is changed using YaST, only the ownership permissions for files in the home directory are adjusted. Changes to the permissions on files that may be located elsewhere on the system are not made.
To find all files on a system owned by a particular user, you can use the find command:
find / -uid id_number -print
find is a very powerful and useful program that can perform specific functions (via the exec switch) on found files. For instance, the following command will change all files belonging to UID 1000 to UID 1002:
find / -uid 1000 -exec chown 1002 {} ;
Being familiar with it will add a great tool to your bag of tricks. See man find for more information.
When you use YaST, you can manage most aspects of the user account within the single application, except you cannot use YaST to enable or disable a user account—you must do this using command-line tools. In addition, because YaST is a menu-driven utility, it does not lend itself to batch creation or modification of user accounts easily. Therefore, we highlight the multistep user-creation process necessary when using the command-line tools.
The following steps illustrate what happens when you issue the command /usr/sbin/useradd -m carol:
![]() A new entry for carol is created in
A new entry for carol is created in /etc/passwd. The line begins with the username carol, and an “x” is placed in the password field indicating that the system is using shadow passwords. A UID at or above 1000 is created, and the primary GID is set to 100 (group users). The optional GCOS information is left blank. The home directory is created (because of the -m switch) and set as /home/carol, and the default shell is set to /bin/bash as specified by /etc/default/useradd.
NOTE
If you need to create a system user (that is, one with a UID between 0 and 499), include the -r and -u switches. For example,
useradd -m -r -u 200 -c "db admin user" -g 0 db_admin
creates a user called db_admin whose UID is 200 and primary GID is 0 (that is, the root group), sets the GCOS field, sets the default shell to /bin/bash, and creates /home/db_admin as the home directory. In some cases, you may not want to include the -m switch to create a home directory, such as when the account is used by a daemon instead of a real-life user.
![]() A new entry for carol is created in
A new entry for carol is created in /etc/shadow. The line begins with the username carol, and an exclamation point (!) is placed in the password field, which locks the account. The related password policy (such as expiration date) is set according to the values found in /etc/default/useradd.
![]() Group memberships in
Group memberships in /etc/group are updated to include carol in the appropriate groups, such as dialout, uucp, video, and audio. User carol is not added to the group users because it is her primary group.
![]() A directory for carol is created in the
A directory for carol is created in the /home directory. This directory’s ownership is set to user carol and group users. Full privileges (read, write, and execute) are granted to carol, while group and others have only read and execute privileges.
![]() The files (including subdirectories) within the
The files (including subdirectories) within the /etc/skel directory (which contain default user settings, such as .bashrc) are copied into the new /home/carol directory. If useradd is used without the -m option, the home directory is not created; thus, files from /etc/skel are not copied. You can override settings in /etc/default/useradd using additional command-line switches, such as -g and -d. Refer to man useradd for more information.
TIP
You can define additional actions to be performed when useradd and userdel are used. For example, before removing a user using userdel, execute a script—for example, find / -uid id_number -exec rm {} ;—to remove all files owned by the user. Refer to the USERADD_CMD, USERDEL_PRECMD, and USERDEL_POSTCMD directives in /etc/login.defs for more information.
At this point, a locked account called carol exists on the system. To activate it, you must next assign a password to the account using the passwd command and, optionally, set password-aging guidelines.
It is also possible to configure the account so that during the first login, the user is asked to change his or her password. To configure a user account in this manner, follow these steps:
1. Create the user account using the useradd command. At this point, the account is created but locked (with an invalid password assigned).
2. Use chage -d0 username or passwd -e username to force immediate password expiration. This step sets the value for the date the password was last changed to the Epoch. This value forces immediate password expiration no matter what password-aging policy, if any, is in place.
3. Unlock the account by setting a valid password using passwd. You can assign an initial password that will be given to the user, or you can assign a null password (the user just needs to press Enter at the password prompt):
passwd -d username
CAUTION
You can also change a user’s password by using usermod. However, when using usermod, you need to first hash the password before using it. Unlike passwd, usermod does not perform the hashing.
In either case, upon initial login, the user is prompted for a new password.
CAUTION
Although using a null password is convenient for both you and the user, there is a slight risk that a third party can log in first and access the system. To minimize this threat, you can lock the account from being accessed by using the procedure discussed in the following paragraphs and unlock it just before the user is ready to log in.
In some instances, you may need to temporarily disable some accounts and reenable them at a later time. You can both disable an account and reenable it with passwd (but not with YaST). To disable an account, do the following:
passwd -l carol
This command inserts a ! character at the beginning of carol’s password, making it unmatchable to any hashed value. Then, to enable the account with the original password, do the following:
passwd -u carol
The previously inserted ! character is removed, so carol can log in again using the assigned password.
TIP
If you have to manage LDAP user passwords, it is best to use YaST, or some LDAP-based tools (such as ldapmodify), instead of passwd. passwd can change only local passwords, even though the -D option can be used to specify binding to LDAP—it cannot authenticate to the LDAP server.
CAUTION
You should train your nonadministrator users to use passwd or the desktop password utility (Applications, System, Change Password) to change their passwords, and not to use YaST. When nonprivileged users use YaST to make changes, even to their own accounts, they receive errors indicating some values cannot be updated (for example, “The directory /home is not writable.”).
Some Linux distributions, such as Red Hat, use a so-called user private group (UPG) scheme. The UPG scheme does not add or change anything in the standard Linux/Unix way of handling groups; instead, it offers a new convention. Under UPG, whenever you create a new user, by default, a unique group with the same name as the user is created and is assigned as the user’s primary group. This group contains only this particular user, hence, the name “private group.” Usually, this group has the same name as the user login name, and its GID is the same as the user’s UID; this can be a bit confusing at times. UPG is meant to make file permission management a little easier. You can find additional discussion of the pros and cons of UPG in Chapter 6. SUSE LINUX does not make use of UPG; therefore, you do not see any groups created concurrently when you create new users.
Setting Default User Account Properties
As discussed in the preceding section, default values for the user account are stored in /etc/default/useradd. Both useradd and YaST use this file. Additional settings, such as password-aging policies, are stored in /etc/login.defs. These two files, however, govern only local users—those defined in /etc/passwd. The files have no effect when you are creating LDAP or other nonlocal users because settings for those users are stored in their respective databases.
NOTE
Refer to Chapter 8 for information about setting up and configuring services such as LDAP and NIS.
Shown in Listing 4.1 is the default /etc/default/useradd file. The default settings for a new user are as follows:
![]() The primary GID for the user is 100 (group users).
The primary GID for the user is 100 (group users).
![]() The user is made a member of the dialout, uucp, video, and audio groups.
The user is made a member of the dialout, uucp, video, and audio groups.
![]() The user’s home directory will be created under
The user’s home directory will be created under /home.
![]() The user can log in using the expired password, indefinitely.
The user can log in using the expired password, indefinitely.
![]() There is no preset account expiration date.
There is no preset account expiration date.
![]() The user’s default shell is
The user’s default shell is /etc/bash.
![]() Files and subdirectories in
Files and subdirectories in /etc/skel will be copied to the user’s home directory after it has been created.
LISTING 4.1. The Default /etc/default/useradd File
GROUP=100
HOME=/home
INACTIVE=-1
EXPIRE=
SHELL=/bin/bash
SKEL=/etc/skel
GROUPS=dialout,uucp,video,audio
You can customize this file to suit your specific requirements. For instance, if you need the new user to be a member of video, audio, helpdesk, and support groups, change the GROUPS= line to read:
GROUPS=video,audio,helpdesk,support
If some site-specific configuration files (such as a configuration file containing the name of the SQL database server) need to be placed in the user’s home directory, simply place them in /etc/skel, and they will be copied when the home directory is created.
TIP
Settings in /etc/default/useradd can be edited using YaST. From the User and Group Administration screen, select Expert Options, Defaults for New Users.
Default user account, group, and password-aging policy settings, such as the life span of a password, are found in the /etc/login.defs file. This file also contains settings used by the login process (such as the amount of time delay before being allowed another attempt after a failed login). Shown in Listing 4.2 are user account and group-related directives.
LISTING 4.2. User and Group-Related Directives in /etc/login.defs
#
# Password aging controls (used by useradd):
#
# PASS_MAX_DAYS
# - Maximum number of days a password may be used.
# PASS_MIN_DAYS
# - Minimum number of days allowed between password changes.
# PASS_WARN_AGE
# - Number of days warning given before a password expires.
#
![]()
#
# Min/max values for automatic uid selection in useradd
#
# SYSTEM_UID_MIN to SYSTEM_UID_MAX inclusive is the range for
# UIDs for dynamically allocated administrative and system
# accounts.
# UID_MIN to UID_MAX inclusive is the range of UIDs of
# dynamically allocated user accounts.
#

#
# Min/max values for automatic gid selection in groupadd
#
# SYSTEM_GID_MIN to SYSTEM_GID_MAX inclusive is the range for
# GIDs for dynamically allocated administrative and system
# groups.
# GID_MIN to GID_MAX inclusive is the range of GIDs of
# dynamically allocated groups.
#

#
# User/group names must match the following regex expression.
# The default is [A-Za-z_][A-Za-z0-9_.-]*[A-Za-z0-9_.$-]?
#
CHARACTER_CLASS [A-Za-z_][A-Za-z0-9_.-]*[A-Za-z0-9_.$-]?
#
# Umask which is used by useradd and newusers for creating
# new home directories.
#
UMASK 022
#
# If defined, this command is run when adding a user.
# It should rebuild any NIS database etc. to add the
# new created account.
#
USERADD_CMD /usr/sbin/useradd.local
#
# If defined, this command is run before removing a user.
# It should remove any at/cron/print jobs etc. owned by
# the user to be removed.
#
USERDEL_PRECMD /usr/sbin/userdel-pre.local
#
# If defined, this command is run after removing a user.
# It should rebuild any NIS database etc. to remove the
# account from it.
#
USERDEL_POSTCMD /usr/sbin/userdel-post.local
The UMASK directive in /etc/login.defs is used by useradd and YaST to set the proper file permissions on the home directory. Refer to Chapter 6 for information about file ownership and permissions. The USERDEL_PRECMD and USERDEL_POSTCMD directives point to two templates that you can customize for your particular needs. For instance, you may want to copy the user’s home directory elsewhere before you delete the user ID. The default script for the USERDEL_PRECMD directive deletes any cron jobs belonging to the user, whereas the default USERDEL_POSTCMD does nothing.
TIP
Settings in /etc/login.defs can be edited using YaST. From the YaST Control Center, select Security and Users, Security Settings. If the Current Security Setting is one of Level 1 through Level 3, click Details. If the selection is Custom Settings, click Next. You are then presented with a series of screens, each dealing with a different set of directives found in /etc/login.defs.
Where redundancy exists between /etc/login.defs and /etc/default/useradd, the settings in /etc/login.defs take precedence.
Creating and Editing Groups
The process for managing groups is similar to that for users. Rather than listing many of the same steps again, we’ve listed the salient differences here instead:
![]() From the YaST Control Center, select Security and Users, Edit and Create Groups to launch the User and Group Administration module. If you are already in the User and Group Administration module, click on the Groups radio button near the top of the screen; you can use the Users and Groups radio buttons to switch back and forth between managing users and groups.
From the YaST Control Center, select Security and Users, Edit and Create Groups to launch the User and Group Administration module. If you are already in the User and Group Administration module, click on the Groups radio button near the top of the screen; you can use the Users and Groups radio buttons to switch back and forth between managing users and groups.
![]() When launching YaST from a terminal session, you can use
When launching YaST from a terminal session, you can use yast groups or yast2 groups to skip over the YaST Control Center and go directly to the User and Group Administration module.
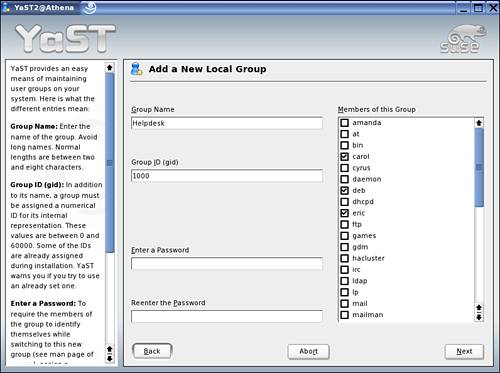
![]() Shown in Figure 4.3 is the screen for adding a new local group. You need to provide a group name and optionally select one or more users who will be members of this group.
Shown in Figure 4.3 is the screen for adding a new local group. You need to provide a group name and optionally select one or more users who will be members of this group.
Figure 4.3. Adding a new local group.
NOTE
The list of users available in the Add New Local Group screen includes all known users, which includes those from local, LDAP, NIS, and so on. However, if you are adding, for instance, a new LDAP group, only LDAP users are shown for selection.
![]() The GID is automatically assigned, using the lowest non-used GID. You can change it to a different value if you like. YaST will warn you if the newly specified value is already in use.
The GID is automatically assigned, using the lowest non-used GID. You can change it to a different value if you like. YaST will warn you if the newly specified value is already in use.
![]() Group passwords are optional. They allow users who are not members of the group to use
Group passwords are optional. They allow users who are not members of the group to use newgrp to switch their active GID to that group—if they know the group’s password.
![]() When editing an existing group, you will also see a list of users for which this group is their default. You cannot modify this list in YaST. To remove a user from this list, you need to assign a different primary GID to that user.
When editing an existing group, you will also see a list of users for which this group is their default. You cannot modify this list in YaST. To remove a user from this list, you need to assign a different primary GID to that user.
There are three commonly used command-line utilities for managing groups:
![]()
groupadd—This application creates a new group by adding a new entry to /etc/group. Common usage is simply groupadd groupname where the next available GID will be assigned. If you want to use a specific GID for the new group, include the -g id_number switch; for a system group (that is, a group whose GID is within the range of SYSTEM_GID_MIN and SYSTEM_GID_MAX as defined in /etc/login.defs), include the -r switch. You can assign a group password using the -p password switch; or you can add it later using passwd -g groupname, gpasswd groupname, or groupmod -p password groupname. It is generally preferred that you use passwd -g or gpasswd to set the password because the password will not be seen on the command line.
![]()
groupmod—This utility allows you to modify a group’s name, GID, its list of members, and its password. Keep in mind that if you change the GID, you need to manually change the group ownership of any files owned by the old GID using chgrp; changing the name has no effect on the group ownership. You can use the find command as previously discussed in “Creating and Editing User Accounts.”
![]()
groupdel—Use this utility to delete a group from /etc/group: groupdel groupname. Note that you can delete a group only when no user has this group as his or her primary group.
You will not find a /etc/gshadow file on SLES 9 and later systems because it is no longer used.
Security Considerations
The first step in securing any operating system is to secure the user and group accounts. This includes, but is not limited to, the following:
![]() Enforcing strong password selection
Enforcing strong password selection
![]() Restricting user access to only those files, directories, and shells that are absolutely necessary
Restricting user access to only those files, directories, and shells that are absolutely necessary
![]() Safeguarding system accounts (especially root)
Safeguarding system accounts (especially root)
![]() Closing any potential backdoors, such as disabling unused or dormant accounts
Closing any potential backdoors, such as disabling unused or dormant accounts
These steps are discussed in the following sections. Other precautions, such as securing a user’s working environment, handling filesystem security, preventing and detecting intruders, as well as system hardening are discussed in later chapters in this book
Using Strong Passwords
Like having good and secure locks on your house, you want users to pick passwords that are difficult to guess yet easy enough to remember so the users will not write down their passwords for the world to find. Difficult-to-guess passwords means they should not be associated with the user personally, such as the name of his or her spouse, names of children, pets, or the user’s address. Strong passwords should also not include dictionary words. Many password-cracking programs make use of word lists to brute-force crack passwords. Many of these programs are freely available over the Internet; two of the most popular password-crackers are Crack and John the Ripper. We will discuss how you can use John the Ripper to detect weak passwords on your system in Chapter 11.
One way to select a difficult-to-guess password is to use a randomly selected string of characters, such as i2#yA9%3r. This is not a word found in any dictionary, nor is it remotely connected to a user. Unfortunately, your user probably wouldn’t be able to remember such a password. The likely result is that the user will write it down on a sticky note and paste it underneath his or her keyboard!
A better way to select a strong password is to use a short phrase (commonly referred to as a passphrase) such as I missed hockey! Alternatively, you can derive a password from a long sentence such as The Adventures of Buckaroo Banzai across the Eighth Dimension! One derivation is to simply take the first letter from each word, except for the word Eighth, which is replaced by the number 8, and you get TaoBBat8D. Or you can take the second letter of each word, except again for the word Eighth, and you get hdfuach8i. As you can see, you can use many variations to come up with difficult-to-guess but rather easy-to-remember passwords.
NOTE
Given the ever-increasing computing power and the ready availability of utilities such as John the Ripper and packet sniffers (such as Ethereal), even the most difficult-to-guess passwords are fast becoming worthless. If a hacker obtains a list of your usernames and hashed passwords, he can run Crack or John the Ripper against the list until a match is found. If the user is logging in over a network, both username and password are sent in cleartext (unless the session is encrypted such as when using SSH instead of Telnet). This makes it even easier for the bad guy because all he needs is a sniffer to capture all the network traffic and look for “Login:” and “Password:” in the packets. No need for John the Ripper at all! You can take many steps discussed throughout this book to minimize the impact and even prevent these types of attacks from happening in the first place.
The standard industry recommendations on selecting strong passwords and enforcing password security are summarized in the following sections.
PROTECT YOUR PASSWORDS
The first rule of password security is that you don’t ever write down your password; memorize it instead. In particular, don’t write it down and leave it somewhere that is publicly or easily accessible by others, and don’t place it in an unencrypted file! If you can’t memorize it, you didn’t choose a good password. If you must write it down, keep it on your person at all times!
If you have access to different systems and a centralized authentication mechanism (such as NIS or LDAP) is not used, use unrelated passwords on these machines. This also applies to your access to systems controlled by different organizations: You don’t know how well they protect their systems and don’t want to help any bad guys to get into your servers using information hacked from those other systems.
Don’t give or share your password, in particular to someone claiming to be from computer support or a vendor, especially over the phone! Often, a hacker uses deception or misdirection to obtain information from an unsuspecting user—especially a new user. The hacker often pretends to be someone in authority, such as someone from IT Security or a vendor’s customer support group that needs to verify a user’s identity. Consider the following telephone conversation:
Hacker: Good morning! This is John at the corporate IT Security division. Are you Susan James?
Susan: Yes, this is she.
Hacker: We are in the process of setting up your mainframe access. To make things simple for you, we will make your mainframe’s username and password the same as your LAN’s so you don’t have to memorize multiple logins.
Susan: That’s great!
Hacker: Your LAN username is Sjames, correct?
Susan: Yes.
Hacker: All I need is your password so I can enter that into mainframe.
Susan: Sure; it is…
This method is referred to as social engineering. The hacker simply carries out a seemingly innocent conversation with the victim in a social setting and obtains the necessary information without having to spend days trying to crack a single MD5- or Blowfish-hashed password!
CAUTION
In recent years, such social engineering ploys (known as phishing) have been used on the Internet. The bad guys send out an email to a user falsely claiming to be an established, legitimate enterprise in an attempt to scam the user into surrendering private information that will be used for identity theft. The email directs the user to visit a website where he or she is asked to update personal information, such as passwords and credit card, Social Security, and bank account numbers that the legitimate organization already has. The website, however, is bogus and set up only to steal the user’s information. Visit http://www.ftc.gov/bcp/conline/pubs/alerts/phishingalrt.htm for more information.
Don’t let anyone watch you enter your password and don’t enter your password into a computer you do not trust. If the password is needed only for a limited time, change it periodically. When it comes to safeguarding your password, the golden rule is practice perseverance and vigilance.
CHOOSE HARD-TO-GUESS PASSWORDS
A strong password should be something you would not find in a dictionary (in any language or jargon). You shouldn’t use a name (including that of a spouse, parent, child, pet, and so on) or any variation of your personal or login name. Don’t use publicly accessible information about you (such as your phone number, car license plate, or employee number) or your environment (such as office address) as part of your password. Don’t use a birthday or a simple pattern (such as spelling the username backward, following the name with a digit, or preceding the name with a digit).
A good, hard-to-guess password consists of a mixture of upper- and lowercase letters as well as digits or punctuation. When choosing a new password, make sure it’s unrelated to any previous passwords (such as by adding a digit to an old password). Use long passwords (say, eight characters or more). You might use a word pair with punctuation inserted (such as greAT:@Book), a passphrase, or selected letters of each word in a long sentence, as discussed previously.
BUTTON DOWN THE HATCHES!
You should never, ever, allow an account without a password. Such an account is an open invitation begging some bad guy to compromise your system. Lock all unused accounts—for users who are away for an extended period of time or users who have left your organization but you need to retain their environments—using the passwd -l command. You will also find many of the system accounts to have an invalid password assigned (a single * or ! in the password field in /etc/shadow). These accounts exist to allow programs to be run as the UID associated with that account; they are not direct login accounts. If you ever need to create such an account, ensure you disable its login access.
TIP
In addition to locking dormant accounts by disabling the passwords, you should also remove (or rename) all .rhosts, .netrc, and .forward files in their home directories to prevent remote access as those users via FTP or any of the r- commands (such as rlogin and rexec).
You should also change these users’ shells to a dummy shell such as /dev/null, /bin/false, or /sbin/nologin. This way, even if someone is able to log in as one of these users, an immediate exit will be the result. You may not want to use nologin because it informs the user that the account is not available—a giveaway to hackers that the account does exist but is disabled.
USE PASSWORD AGING
No matter how hard a password is to guess, if it has been used for an extended period of time, someone is going to figure it out. It is not uncommon for users to brag with each other about how secure or how clever their passwords are: “I used all my three children’s middle names. How’s that for a tough password?” “You know the color that I really, really hate?” or “Hey, I used my wife’s favorite Italian dish as my password. Try to guess that!”
Given enough talk, and some luck, a bad guy may just figure out what the password is. Therefore, it is a good idea to force the users to periodically change their passwords. Password aging may be implemented on a system-wide basis or on a per-user basis. Password-aging policy in Linux is controlled through the shadow password file and is configured automatically by SLES during installation.
BE A CRACKER JACK
Use a password-cracker yourself to audit for weak passwords. SUSE LINUX implements Pluggable Authentication Module (PAM) by default to provide flexible user authentication. One of the side benefits of PAM is its ability to help enforce strong passwords (through the pam_pwcheck module, for instance). (You can find more details about PAM in Chapter 5, “User Environment Management and Security.”) There is always a possibility that another system administrator assigned a weak password without realizing it. To find out, you should periodically use a password-cracker, such as John the Ripper, to self-audit and see whether any weak passwords are reported.
CAUTION
When nonroot users change their passwords, PAM ensures a “good” password is chosen; otherwise, the password is not changed. However, for the root user, PAM gives the warning when a weak password is detected but allows it to be used.
TIP
A set of cron scripts called seccheck is included and installed by default as of SuSE 6.3. Seccheck performs daily, weekly, and monthly checks of your system’s security and compares them to the last run. The results are emailed to the root account. Weak password checks are performed weekly using John the Ripper. For more information, refer to /usr/share/doc/packages/seccheck/README.
USE A STRONG PASSWORD-HASHING ALGORITHM
The previous recommendations of using passphrases and long passwords are fine if the password-hashing algorithm you use supports long strings. By default, SLES 9 (and many other Linux distributions) uses a DES-based algorithm, which supports passwords up to eight characters in length; any string longer than eight characters is truncated to eight characters in size. Fortunately, SUSE ships with the option of encrypting passwords with the stronger MD5 hash algorithm or with Blowfish. (For more information on the MD5 hash algorithm, consult RFC 1321; see http://www.schneier.com/blowfish.html for more information about the Blowfish encryption algorithm.) Although MD5 and Blowfish passwords do not eliminate the threat of password cracking, they do make cracking your passwords much more difficult.
NOTE
SLES uses DES as the password-hashing method by default. However, you can change it to either MD5 or Blowfish during install as discussed in the “Detailed Installation Steps” section in Chapter 1, “Installing SUSE LINUX Enterprise Server.” Or you can change it any time after the server is up and running, as discussed next.
If you didn’t change the password-hashing algorithm from DES to MD5 or Blowfish during install, you can easily change it at a later time. This is easily done using YaST because it will make changes to all the related configuration files for you (such as /etc/security/pam_unix2.conf and /etc/security/pam_pwcheck.conf). You can make the change either via the User and Group Administration module or the Local Security Configuration module as follows:
![]() From the YaST Control Center, select Security and Users, Edit and Create Users to launch the User and Group Administration module. Click Expert Options, Password Encryption. From the displayed Set Password Encryption dialog box (see Figure 4.4), select the desired method and click OK. Click Finish for the change to take effect.
From the YaST Control Center, select Security and Users, Edit and Create Users to launch the User and Group Administration module. Click Expert Options, Password Encryption. From the displayed Set Password Encryption dialog box (see Figure 4.4), select the desired method and click OK. Click Finish for the change to take effect.
Figure 4.4. Changing the password-hashing method.

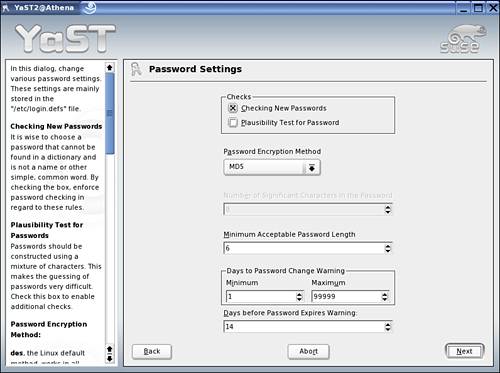
![]() From the YaST Control Center, select Security and Users, Security Settings to launch the Local Security Configuration module. If the Current Security Setting is one of Level 1 through Level 3, click Details. If the selection is Custom Settings, click Next. The first screen is Password Settings (see Figure 4.5). From the Password Encryption Method drop-down list, select the desired method. Make any other changes if desired. Click Next until the Miscellaneous Settings screen is displayed. Click Finish for the new change(s) to take effect. (From a terminal session, you can launch the Local Security Configuration module directly using
From the YaST Control Center, select Security and Users, Security Settings to launch the Local Security Configuration module. If the Current Security Setting is one of Level 1 through Level 3, click Details. If the selection is Custom Settings, click Next. The first screen is Password Settings (see Figure 4.5). From the Password Encryption Method drop-down list, select the desired method. Make any other changes if desired. Click Next until the Miscellaneous Settings screen is displayed. Click Finish for the new change(s) to take effect. (From a terminal session, you can launch the Local Security Configuration module directly using yast security or yast2 security.)
Figure 4.5. Changing the password-hashing method via the Local Security Configuration module.
WARNING
There appears to be a cosmetic bug with the User and Group Administration module when setting passwords. Regardless of your current password-hashing algorithm, when you try to use a password longer than eight characters, YaST always warns you that the password is too long and asks if it should be truncated. When you click Yes, it is truncated when using DES. However, with MD5 and Blowfish, the password is not truncated even though you are led to believe it will be after you click Yes; if you click No, you’re returned to the screen to enter the password again.
CAUTION
Changing the password-hashing method used does not change the existing password hash values to the new one. For instance, switching from the default DES to MD5 leaves existing password hashes as DES. However, new passwords will be hashed using MD5. Therefore, if you want all user passwords to be hashed using the new algorithm, change the method and then expire all passwords. This way, the next time a user logs in, that user will be prompted to change his or her password, and it will be hashed using the new method.
You can determine what hashing algorithm was used for a given password hash by examining /etc/shadow—another reason why this file is accessible by root only because you don’t want to give any hackers hints on what hashing algorithm you are using:
![]() DES-hashed passwords are always 13 characters in length, where the first two characters are the salt.
DES-hashed passwords are always 13 characters in length, where the first two characters are the salt.
![]() MD5-hashed passwords can be up to 34 characters in length, including the salt. The salt for an MD5 hash begins with the prefix $1$, and the salt itself is a string that can be up to eight characters and is followed by a dollar sign to indicate the end of the salt (for example, $1$abcdefgh$).
MD5-hashed passwords can be up to 34 characters in length, including the salt. The salt for an MD5 hash begins with the prefix $1$, and the salt itself is a string that can be up to eight characters and is followed by a dollar sign to indicate the end of the salt (for example, $1$abcdefgh$).
![]() Blowfish-hashed passwords can be up to 60 characters in length, including the salt. The salt for a Blowfish hash begins with the prefix $2a$, and the salt itself is just a two-character string followed by a dollar sign to indicate the end of the salt.
Blowfish-hashed passwords can be up to 60 characters in length, including the salt. The salt for a Blowfish hash begins with the prefix $2a$, and the salt itself is just a two-character string followed by a dollar sign to indicate the end of the salt.
Each of the DES, MD5, and Blowfish algorithms has its pros and cons, and you should give them some careful thought before picking one. For instance, the Linux (and Unix) implementation of the DES hashing method limits the password to only eight characters, but because all versions of Linux/Unix and most other Unix-like operating systems support it, it is a good choice for cross-platform compatibility. On the other hand, MD5 and Blowfish allow for much longer passwords (127 characters for MD5 and 72 characters for Blowfish), but the algorithms are computational-intensive. So if you have an underpowered server that needs to perform many user authentications per second (such as an LDAP authentication server), performance will suffer. There are also some networking protocols that do not play well with passwords longer than eight characters. For example, only the first eight characters are significant in NIS+ passwords because the underlying secure-RPC protocol uses DES.
Consider the following suggestions when choosing a password-hashing algorithm for your system:
![]() When using DES, set the minimum password length to be at least six; use an eight-character password for root.
When using DES, set the minimum password length to be at least six; use an eight-character password for root.
![]() If all interconnected systems support MD5, use MD5 as the password-hashing algorithm and set the minimum password length to be at least six.
If all interconnected systems support MD5, use MD5 as the password-hashing algorithm and set the minimum password length to be at least six.
![]() Consider using Blowfish for all system accounts that require a password. (However, this means you need to switch the password-hashing method from the current setting to Blowfish, change the password, and restore the setting. An alternative is to install the Blowfish-aware version of Perl—the version included with SLES 9 supports only DES and MD5—so you can use a simple script to first generate the hashed value using Perl and then set the password using
Consider using Blowfish for all system accounts that require a password. (However, this means you need to switch the password-hashing method from the current setting to Blowfish, change the password, and restore the setting. An alternative is to install the Blowfish-aware version of Perl—the version included with SLES 9 supports only DES and MD5—so you can use a simple script to first generate the hashed value using Perl and then set the password using usermod -p hashed_value.)
TIP
You can find the RPM for a version of Perl that supports Blowfish at http://rpmfind.net/linux/RPM/contrib/libc6/i386/perl-Crypt-Blowfish-2.09-1.i386.html and at http://rpmfind.net/linux/RPM/suse/8.2/i386/suse/i586/perl-Crypt-Blowfish-2.09-188.i586.html. The Perl crypt home page is at http://cpan.org/modules/by-module/Crypt.
In most cases, MD5 provides the best balance between performance and security.
Auditing Default Accounts
As mentioned earlier, a number of system accounts exist to allow programs to be run as the UID associated with that account; they are not direct login accounts. FTP, named (for DNS), mail, and news are some examples of such system accounts. Make sure such accounts are prevented from a terminal login by setting their shell to /bin/false or similar.
If the services for these accounts are not in use, uninstall them and remove the accounts—or at the very least, disable unused services (see Chapter 8 for more information). Periodically, you should check the contents of /etc/passwd and /etc/shadow to ensure that the removed system accounts didn’t “spontaneously resurrect” themselves or new system accounts were not added without your knowledge, and nonlogin system accounts don’t “suddenly” get assigned valid password hashes and shells.
The Root Account
The root account is the key to your entire server kingdom (and to your entire network if the server in question serves as the central authentication server). Nothing is more important than the password to the root account in the Linux/Unix world. For this reason, you will not want to make your root password known to anyone else but yourself. Well, this is often easier said than done.
As you may already have found out, many of the administrative tasks, such as resetting a user’s forgotten password, changing system configuration, and so on, require you to be root. If you’re the lone ranger who looks after the system(s) at your organization, keeping the root password safe is relatively easy: Follow the recommendations given earlier in this chapter about selecting strong passwords, change it often, never write it down, and so on. However, it is not uncommon in a company for system administration tasks to be shared by two or more people. In such cases, how do you safeguard the root password effectively? The more people who know it, the higher the likelihood it will be leaked to someone who shouldn’t know about it!
TIP
If you are the sole system administrator at your organization, it might be a good idea to record the root password in a sealed envelope and keep it in a secure location where only trusted company officers (such as the accountant or CTO) have access to it; a bank safety deposit box is a good choice. The idea here is that although you would want to keep the root password secret from others, you need to provide a way for “continuity” should you be unavailable, due to illness or any other reasons.
There are a number of ways to address the multiple administrator requirements, and we discuss two of them here:
![]() Setting up multiple root users—Instead of providing the root password to the people who need access, you can set up multiple root accounts. Suppose, for example, both Tasha and Carol require administrative access as part of their job. One way to track their root activities is to set up two separate accounts, say tasha-root for Tasha and carol-root for Carol, each with a unique (strong) password and each with a UID of 0. Whenever Tasha needs root privileges, she would log in as tasha-root or
Setting up multiple root users—Instead of providing the root password to the people who need access, you can set up multiple root accounts. Suppose, for example, both Tasha and Carol require administrative access as part of their job. One way to track their root activities is to set up two separate accounts, say tasha-root for Tasha and carol-root for Carol, each with a unique (strong) password and each with a UID of 0. Whenever Tasha needs root privileges, she would log in as tasha-root or su as tasha-root. Carol would do so as carol-root. This method has the advantage of having an audit trail in the forms of process accounting and system logging for each administrator and without having to share the root password. The disadvantage is that each duplicate UID 0 account is another potential vulnerability.
Because adding another UID 0 account is also a common hacker practice, you should review /etc/passwd frequently to check for illegal UID 0 accounts. You can also use Bastille (see Chapter 13) to automatically detect unauthorized duplicate root accounts.
CAUTION
You should not name the root-equivalent accounts with “-root” as that makes it easy for the hackers to zero in on accounts to attack.
![]() Using
Using sudo—The best way of granting multiple users root access is via the sudo (superuser do) utility. sudo allows you to grant certain users (or groups of users) the ability to run some (or all) commands as root while logging all commands and arguments used, regardless of whether the command was successful. All sudo commands are logged in the log file /var/log/messages, which can be very helpful in determining how user error may have contributed to a problem. All the sudo log entries have the word sudo in them, so you can easily get a thread of commands used by using the grep command to selectively filter the output accordingly. sudo operates on a per-command basis, and it is not a replacement for the shell.
Running as root all the time is not a very good idea. Because it grants you all-powerful, unlimited access to the server and its files, one little mistake may render the whole system useless. For example, before you execute rm -r * (or even just rm *), make very sure you are in the right directory! In general, think twice before you perform certain actions as root. Here are some tips regarding using the root account:
![]() Become root only when absolusely necessary.
Become root only when absolusely necessary.
![]() Gain root access only through
Gain root access only through su or sudo.
![]() Restrict from which terminal console(s) root can log in. (See
Restrict from which terminal console(s) root can log in. (See man securetty and refer to the “Authentication Using PAM” section in Chapter 5 for more information.)
![]() Exercise extreme care when executing potentially destructive commands (such as
Exercise extreme care when executing potentially destructive commands (such as rm) while being root.
![]() Use absolute pathnames when invoking commands. This helps to eliminate executing a Trojan Horse program that may have been installed in one of the nonsystem directories that is pointed to by the
Use absolute pathnames when invoking commands. This helps to eliminate executing a Trojan Horse program that may have been installed in one of the nonsystem directories that is pointed to by the PATH environment variable.
TIP
When setting up root’s environment, do not put user-writable directories in root’s PATH. This reduces the chance of running a Trojan Horse program placed (knowingly or not) by a user.
![]() Whenever you need to remotely administer a system as root, use SSH (discussed in the “Securing Network Services” section in Chapter 13) and
Whenever you need to remotely administer a system as root, use SSH (discussed in the “Securing Network Services” section in Chapter 13) and sudo.
User in Too Many Groups?
Linux and most other recent Unix systems support at least 32 groups per user. However, because the NFS protocol supports only 16 groups, most of them (SUSE included) have imposed a soft limit of 16 groups per user. There are very rarely circumstances that require more than 16 groups, but it is usually possible to use more if the system will not be exporting or using NFS-mounted filesystems; NFS has a hard-coded limit of 16 groups in its underlying RPC protocol. The first 16 groups are passed to the NFS server for permission checking, while the others are ignored. In other words, a user might appear to belong to a group, but if the 16-group limit is exceeded, the user might not have the access privileges of that group.
Summary
This chapter provided information on how users and groups are identified in Linux and how you can effectively manage user and group information using YaST and command-line tools. The following topics were covered in this chapter:
![]() User and group IDs
User and group IDs
![]() System users versus regular users
System users versus regular users
![]() The
The /etc/passwd, /etc/shadow, and /etc/group files
![]() Ways to create and update user and group information using YaST and command-line tools
Ways to create and update user and group information using YaST and command-line tools
![]() User account security considerations
User account security considerations
The next chapter will provide you with information and tips on how best to secure your users’ working environment. For instance, you can restrict users to be able to log in using only certain terminal consoles and apply disk quotes so the server does not run out of disk space, resulting in what is sometimes known as “self denial of service” (SDOS).