
Hour 4. Dealing with Words: Adding Text and Lists
What You’ll Learn in This Hour:
• How to create a new web page and set up properties for the whole page
• How to use the Property inspector to change text fonts and font sizes
• How Dreamweaver creates CSS styles and how to rename and apply styles
• How to align text and add unordered and ordered lists
• How to preview a web page in different browsers
The most common elements in a web page are text and images, so this hour we’ll start dealing with text. You’ll get started creating web pages with Dreamweaver by becoming familiar with adding text and setting text properties. You’ll learn how Dreamweaver formats the appearance of text, modifying fonts using Cascading Style Sheets (CSS). This hour introduces CSS, whereas Hour 6, “Formatting Web Pages Using Cascading Style Sheets,” gives more in-depth information into using CSS.
Creating a New Page
The New Document dialog box enables you to select the type of document you want to create. This dialog box is organized into several categories:
• Blank Page
• Blank Template
• Page from Template
• Page from Sample
• Other
Each category lists different types of documents and layouts that you can create. You are going to start with a completely blank HTML document. In other hours, you will experience selecting document types from other categories in the New Document dialog box. To create a new blank HTML web page, do the following:
1. Select File, New.
2. Select the Blank Page category.
3. Select HTML from the Page Type column, as shown in Figure 4.1.
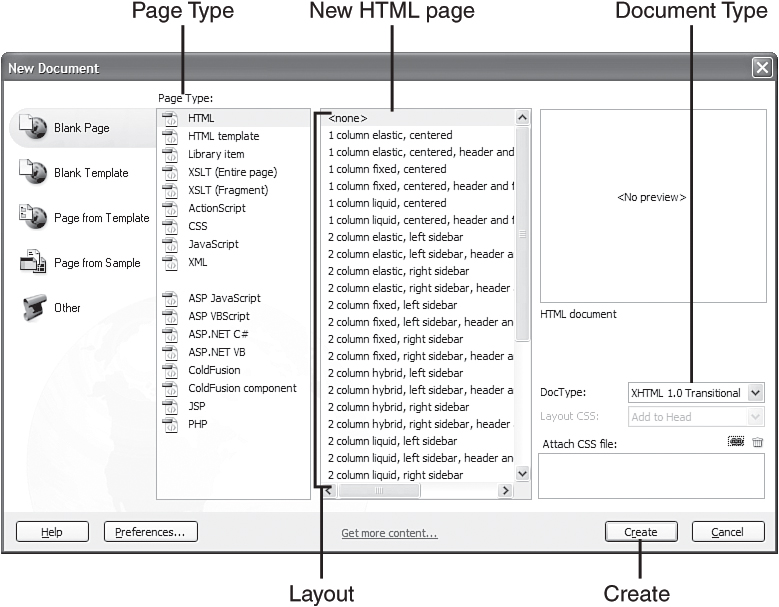
Figure 4.1. The New Document dialog box enables you to select the type of document you want to create.
4. Select <none> from the Layout column.
5. Ensure that XHTML 1.0 Transitional is selected in the DocType drop-down menu.
6. Click the Create button.
A new document is created, and you can add text, images, and other objects to it.
The keyboard shortcut to open the New Document dialog box is Ctrl+N (Command+N on the Macintosh). You can also create a new page from Dreamweaver’s Welcome page (remember the screen that is visible in the Document Window when you first open Dreamweaver?). The middle column in the Welcome Page is titled Create New, and you can select HTML from that column to quickly create a blank web page.
By the Way: What Are Document Type and XHTML?
You might have noticed the Document Type drop-down menu in the New Document dialog box. By default, Dreamweaver creates an HTML type defined using the XHTML 1.0 Transitional document type, often called doctype because it is defined using the doctype tag. XHTML (Extensible Hypertext Markup Language) is the most recent version of HTML, combining HTML with XML (Extensible Markup Language). You’ll explore document type more in Hour 7, “Looking Under the Hood: Exploring HTML.”
Saving the File
It’s a good idea to always save and name a new web page after you’ve created it. The insertion of images, movies, links, and other objects requires that you save the web page first. Remember to save the file in the directory you’ve previously defined as the site root as discussed in Hour 3, “Setting Up a Website.” To save a web page, perform the following steps:
1. Select File, Save.
2. Navigate to the correct directory, either the root of the defined site or a subdirectory within the root of the defined site.
3. Enter a filename including either the .htm or .html file extension; myfile.htm, for example.
4. Click the Save button.
The .htm and .html file extensions are interchangeable. Traditionally, the .html extension has been more popular with developers working on the Mac or UNIX platforms because those operating systems have always supported longer file extensions. The .htm file extension reflected the older Windows version three-character file extension limit. Windows no longer has a character limit for file extensions, but I use the .htm file extension simply because it’s shorter.
By the Way: Name Your Files Properly to Avoid Problems
Spaces, punctuation, and special characters in file and directory names might cause problems. You can use underscores or dashes instead of spaces in names. All files should be named using a combination of letters, numbers, and underscores. Don’t ever begin your filenames with a number because JavaScript is not able to process names that begin with numbers. You might not be using JavaScript right now, but you might in the future and it could be a lot of work to rename files.
Watch Out!: Servers Might Be Case Sensitive
Filenames are case sensitive on most web servers. Servers running the various flavors of the UNIX operating system enable you to create files named mydog.gif, Mydog.gif, and MYDOG.gif in the same directory because the capitalization differs. Microsoft operating systems, such as Windows, are not case sensitive. So, if you are developing in Windows, your links might work perfectly and then cease to work when you upload them to a case-sensitive server!
Adding Text to a Web Page
To enter text into the new web page you just created, you can simply type into the Document window. Type some text to serve as a heading at the top of the page, press the Enter key, and type a couple of sentences. This is the best way to add text to the web page if you are writing it as you create the web page. If the text exists elsewhere, however, such as in a Microsoft Word document, an email, or another type of text file, you’ll want to look at the next section on copying and pasting text into Dreamweaver.
Did you Know?: Spelling and Grammar Are Important!
I like to create text for web pages in a robust word processing application such as Microsoft Word so that I have the automatic spell check and grammar check. I can then copy and paste the text into a web page in Dreamweaver. You can, of course, use Dreamweaver’s spell checker, but there is no grammar checker in Dreamweaver.
Copying and Pasting Text from a File
Often you need to transfer text that exists as a word processing document into a web page. You can easily copy text from another application, such as Microsoft Word or even the spreadsheet application Microsoft Excel, and paste it into Dreamweaver. Dreamweaver can paste text two ways: with and without text formatting. To copy and paste text from a word processing program or another program, follow these steps:
1. Open a Word document (.doc) or another word processing document.
2. Select at least a couple of paragraphs.
3. Copy the text by selecting Edit, Copy or using the keyboard command (Ctrl+C for Windows or Command+C on the Mac).
4. Go to Dreamweaver and place the insertion point where you want to paste the text.
5. Select Edit, Paste or use the keyboard shortcut (Ctrl+V in Windows or Command+V on the Mac). The text is pasted into Dreamweaver, and it retains its formatting, including fonts, paragraphs, color, and other attributes.
I often want to reformat the text in the web page, so I usually paste into Dreamweaver without font formatting. The following is how to copy and paste text from a word processing program with only structural formatting (paragraphs, lists, tables) and no font formatting (bold, colored text, font sizes):
1. Open a Word document (.doc) or another word processing document.
2. Select at least a couple of paragraphs.
3. Copy the text by selecting Edit, Copy or using the keyboard command (Ctrl+C for Windows or Command+C on the Mac).
4. Go to Dreamweaver and place the insertion point where you want to paste the text.
5. Select Edit, Paste Special.
6. Select Text with Structure (Paragraphs, Lists, Tables, Etc.) as shown in Figure 4.2.

Figure 4.2. The Paste Special dialog box enables you to choose exactly what formatting properties get pasted along with your text into Dreamweaver.
If you have a preferred way to paste text from other applications, you can set that preference as Dreamweaver’s default. You can then simply use the Paste command or the keyboard shortcut (Ctrl+V for Windows or Command+V on the Mac), as I prefer, to paste in your preferred way. Of course, you can always bring up the Paste Special command when you need to paste in a unique way. Change the default Paste command in Dreamweaver Preferences’ (Edit, Preferences) Copy/Paste category as shown in Figure 4.3. Make sure that you also check the Clean Up Word Paragraph Spacing option so that you don’t get extra spaces between your paragraphs. This is a nice feature that saves you from cleaning up the extra spaces by hand.
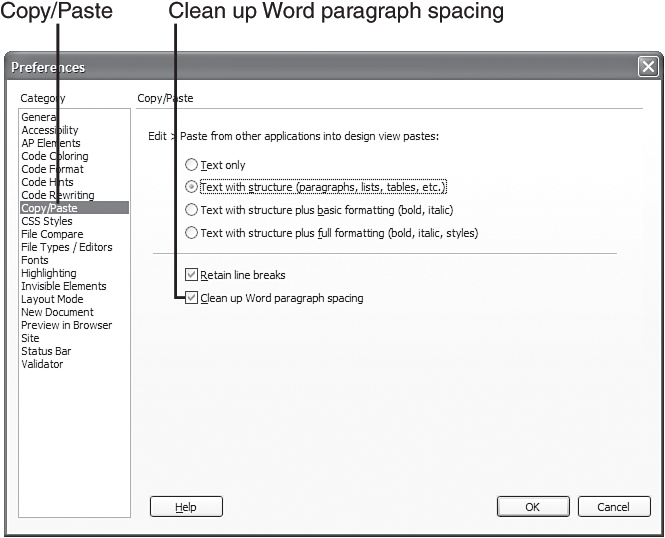
Figure 4.3. The Copy/Paste preferences enable you to change the default formatting that Dreamweaver uses when it pastes content from other applications.
Applying Text Formatting
The Property inspector is the panel directly beneath the Document window. You will use this panel extensively to set properties of objects on a web page. You can toggle the display of the Property inspector by choosing Window, Properties. One way to format text in Dreamweaver is by using the Format drop-down menu in the Property inspector. There are four basic formatting options:
• None—This option removes any formatting styles currently applied to the selection.
• Paragraph—This option applies paragraph tags (<p></p>) to the selection. This adds two carriage returns after the selection.
• Heading 1 through Heading 6—These options apply heading tags to the selection. Heading 1 is the largest heading and Heading 6 is the smallest. Applying a heading tag makes everything on the line that heading size.
• Preformatted—This option displays text in a fixed-width, or monospaced, font (on most systems, 10-point Courier). The text resembles typewriter text. You probably won’t use this format option too often.
Select the top line heading in your web page and apply Heading 1 formatting, as shown in Figure 4.4. While you are creating web pages, you will use the different heading and paragraph formats all the time. These formatting options wrap the text you’ve selected with HTML tags. The Heading 1 format, for instance, adds the <h1> tag before the selection and the closing tag </h1> after the selection.
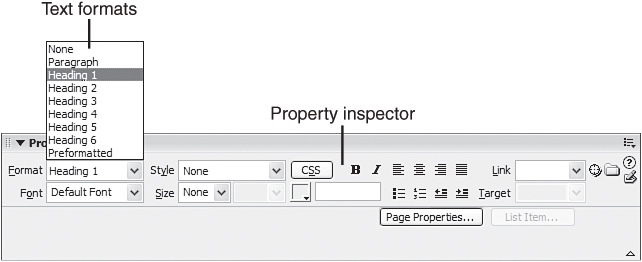
Figure 4.4. The Format drop-down menu in the Property inspector applies heading, paragraph, and preformatted formatting to text.
Understanding Paragraph and Break Tags
It’s important to understand the difference between the paragraph (<p>) and break (<br>) tags. Paragraph tags surround a block of text, placing two carriage returns after the block. You create a new paragraph by pressing the Enter or Return key. Think of paragraph tags as creating a container for the block of text. This container is a square box that contains text. In Hour 6, you’ll understand how to modify this container with CSS.
The break tag is less commonly used, and inserts a single carriage return into text. You can insert a break into a web page by using the keyboard shortcut Shift+Enter or selecting the Line Break object from the Characters drop-down menu in the Text category of the insert bar. The break tag does not create a container as the paragraph format does. This tag is best used for creating a new line within a paragraph such as when formatting an address on different lines.
Pressing Shift+Enter twice, inserting two line breaks, instead of pressing Enter to create a paragraph looks visually identical on a web page. However, because you haven’t created a paragraph container, any formatting applies to the entire container. This will become more important as you begin formatting portions of web pages in different ways.
Setting Page Properties
You can set global page properties, such as the default font and font size for all the text on the page. And you always need to add the page title to a web page. Both global page properties and page title can be added in the Page Properties dialog box. To get started, select Modify, Page Properties to open this dialog box.
The Page Properties dialog box, shown in Figure 4.5, has five property categories listed in the left column: Appearance, Links, Headings, Title/Encoding, and Tracing Image. Next you’ll learn about the property settings in the Appearance, Headings, and Title/Encoding categories; the Links category settings will be covered in Hour 5, “Adding Links: Hyperlinks, Anchors, and Mailto Links.” You simply click one of the categories to modify its property settings.
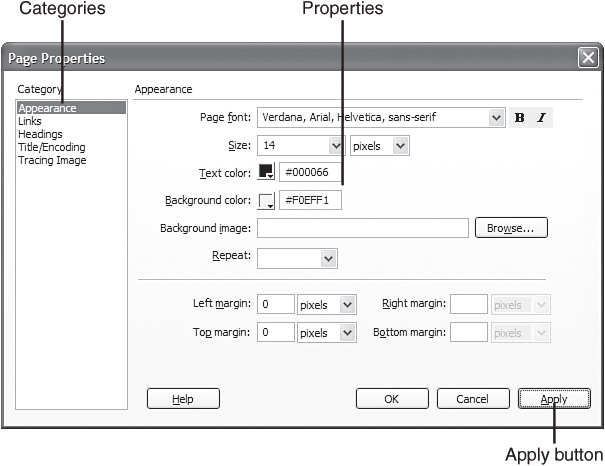
Figure 4.5. The Page Properties dialog box enables you to set properties for the entire web page.
Setting Global Page Appearance
You use the settings in the Appearance category of the Page Properties dialog box to set the text font, size, and color, along with several other settings, for the entire web page. For instance, the text on a web page is black by default. You can change the default text color on the web page by changing this setting in Page Properties.
Setting the Global Page Font and Font Size
Select the Appearance category in the Page Properties dialog box by clicking the category name on the left side of the dialog box. You can select the default page font for the entire page along with the default text size and color. These settings may be overridden by any local text setting, such as the settings you’ll apply later this hour. To set the page font properties, follow these steps:
1. In the Page Properties dialog box, select the font family you want from the Page Font drop-down menu.
2. You can also set the default text to be bold, italic, or both. I don’t suggest selecting either!
3. Select the font size in the Size drop-down menu. If you select a numeric font size, you also have to select a unit type, such as points or pixels.
4. Click the Apply button at the bottom of the Page Properties dialog box to view the font changes you’ve changed so far. You might have to adjust the position of the Page Properties dialog box so that it isn’t blocking your view. The Apply button enables you to view your changes without closing the Page Properties dialog box.
Did you Know?: Use Ems Instead of Points
Many web designers standardize on using relative measurement units such as ems or percent for font measurement. Ems are a measurement based on the height of the capital letter “M”; 1em is equal to the height of M in the default font size. Points are used for designing type for print but are often unpredictable for displaying text on a computer screen. The great thing about using a relative measurement like ems is that you are respecting your user’s font size choices. If they have set the browser font size to a higher setting, if they have problems seeing for instance, then your font measurements will be relative to those choices. If you set the font size to 1.25ems for a heading then the text will be a quarter size bigger than the default font that the user has set.
Setting the Global Text Color
In a number of areas in Dreamweaver, you can change the color of an object or text. In HTML, colors are specified by using a hexadecimal numbering system, but if you don’t know the hexadecimal translation of the color you’d like to use, you can use Dreamweaver’s color picker. You access the Dreamweaver color picker by clicking on the color picker box, shown in Figure 4.6. Dreamweaver’s color palette appears.
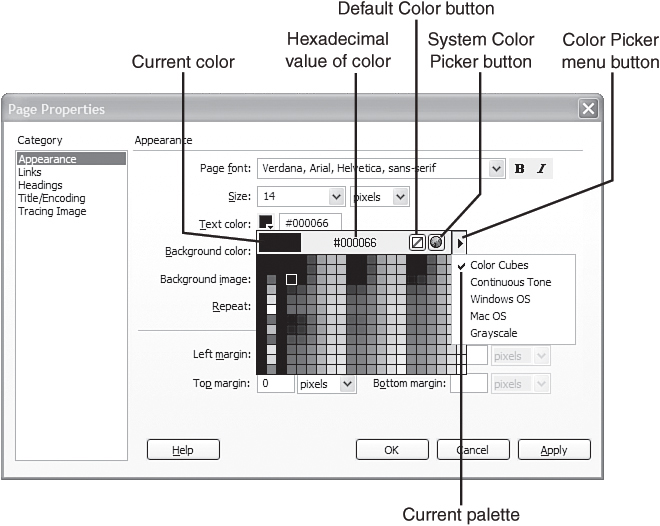
Figure 4.6. Select the color picker to open Dreamweaver’s color palette.
You can experiment with picking a color by using the color picker in a number of ways:
• Pick one of the available color swatches by clicking it with the eyedropper.
• By default, the Color Cubes palette displays. You can select one of the five other panels: Color Cubes, Continuous Tone, Windows OS, Mac OS, and Grayscale.
• Use the eyedropper to pick up any color onscreen by simply clicking the eyedropper on it. You can pick up any color on the computer screen, not just colors in Dreamweaver. Try selecting a color from one of the icons in the insert bar. You’ll need to arrange Dreamweaver so that you can see other Windows and click the eyedropper on the colors.
• Select the System Color Picker button to create a custom color as shown in Figure 4.7. This opens the system color picker, where you can either pick one of the basic colors or click anywhere in the color spectrum to mix your own color. Click the Add to Custom Colors button and then click the OK button to use the color.
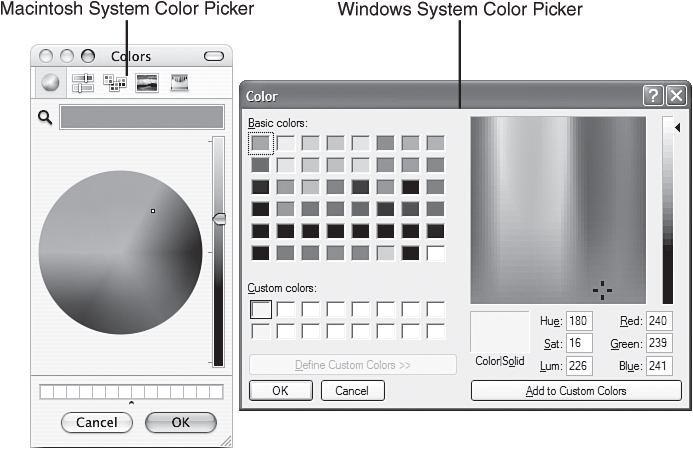
Figure 4.7. The System Color Picker enables you to mix your own custom colors on either a Windows (right) or Macintosh OS X (left) computer.
You can also type the color information directly into the color text box in the Property inspector:
• Colors are represented in HTML by three hexadecimal numbers preceded by the pound (#) sign. For instance, the hexadecimal RGB (red, green, blue) value for light blue is represented as #0099FF, where the value for R is 00, the value for G is 99, and the value for B is FF. If you know the hexadecimal value for a color, you can simply type it in.
• Most browsers display standard color names in addition to hexadecimal values. For instance, you could type in red instead of #FF0000.
To clear the current color without picking another color, click the Default Color button in the color picker.
Did you Know?: Utilities to Identify Color Values
For Windows users to easily identify the hexadecimal value of a color on the screen, download ColorCop, a freeware program available at prall.net/colorcop/. I use this utility all the time! On Mac OS 10.4 (Tiger), you can select DigitalColor Meter from the Utilities folder in Applications to identify RGB values on the screen as hexadecimal values.
Setting the Background Color and Background Image of a Web Page
You can set the background color of an entire page in the Appearance category of the Page Properties dialog box. For example, if you’d like to set the web page background color to white, you can enter the hexadecimal color code (#FFFFFF) into the Background Color text box, type white into the box, or use the color picker. Of course, you can pick any color that you want as the background color, but make sure that the combination of the background color and the text color doesn’t make your web page difficult to read. If you apply a dark background color, you should use a light text color for contrast so that the viewer can easily read the text.
Watch Out!: Eight to Ten Percent of People Are Colorblind!
You should check that your color combination is visible to the many people who are colorblind. Use the Colorblind Web Page Filter at colorfilter.wickline.org/ to check your design. The filter returns a version of your web page displayed as it would look to someone who is colorblind.
You can also set a background image for a web page. This image is tiled both vertically and horizontally on the page. For the web page background to look nice, you should find or create an image especially designed as a web page background. You can find these specially designed background images on the Web or in image galleries that you purchase. A background image should never interfere with the readability of a page.
To add a background image, select the Browse button and navigate to an image file saved on your hard drive. The image has to be saved in the GIF, JPEG, or PNG format (you’ll learn more about image formats in Hour 8, “Displaying Images”). Click the OK button. You might receive a message from Dreamweaver that a file:// path will be used until you save your document. Just click OK; Dreamweaver automatically corrects that path after you save the web page.
Setting the Page Margins
Margins set the amount of space between the contents of the web page and the edges of the browser window. You set the margins for a page in the Page Properties dialog box. The default setting for page margins varies from browser to browser, so it’s impossible to predict the amount of whitespace visible around the border of your web page design. You may want to change the margins if you notice there are gaps at the top and on the left side of your web pages.
You can change the page margins by entering values into the margin boxes, as shown in Figure 4.8. There are four page margin settings: Left Margin, Top Margin, Right Margin, and Bottom Margin. Many web designers set the Left and Top Margin settings to 0 pixels so that the design is snug to the upper-left corner of the browser window.
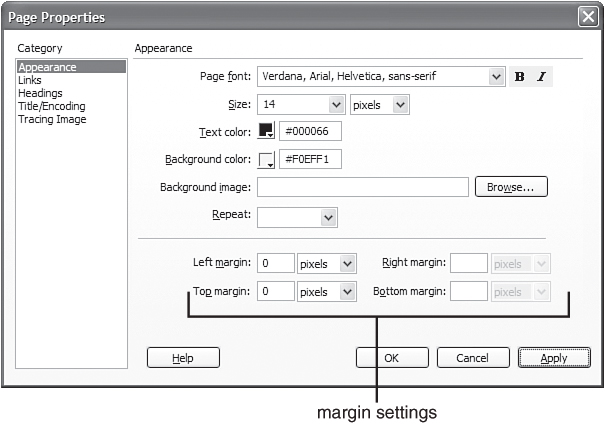
Figure 4.8. Set the page margins, the space between your web page design and the edge of the browser window, in the Page Properties Appearance category.
Setting Global Heading Properties
You create a heading by selecting one of the heading formats, Heading 1 through Heading 6, in the Format drop-down menu in Dreamweaver’s Property inspector. In the Headings category of the Page Properties dialog box, you can set global properties for these headings, as shown in Figure 4.9. You can select a Heading Font for all six heading sizes. You can also set a unique font size and color for each size.
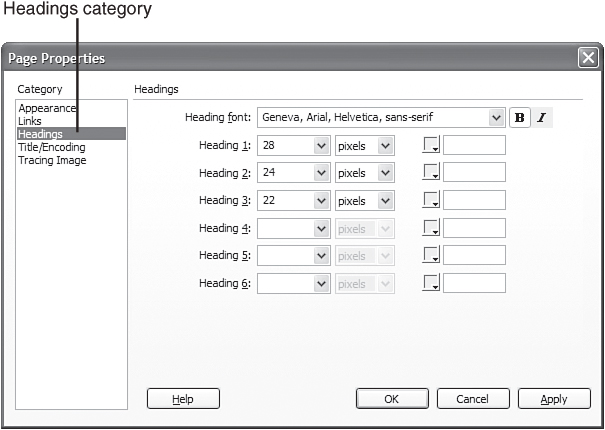
Figure 4.9. Set the font, font sizes, and color for headings in the Headings category of the Page Properties dialog box.
To set how Heading 1 will appear, follow these steps:
1. Select Modify, Page Properties if you don’t already have the Page Properties open. You should already have some text set to Heading 1 on the page.
2. Select a default font for all the headings by selecting one of the fonts beside the Heading font setting. You can also select the Bold or Italic button if you’d like.
3. Enter a large font size beside Heading 1. A good size to try is 36 pixels. You can also change the color by clicking on the color picker in the Heading 1 settings.
4. Click the Apply button (refer to Figure 4.5) to apply your changes without closing the Page Properties dialog box.
Remember that headings become smaller as the heading number increases. So, Heading 1 is logically meant to be larger than Heading 2. You can override these sizes, but it isn’t a good idea to do so.
Adding a Page Title
The Title/Encoding category of the Page Properties dialog box enables you to set the document title of your web page along with the document and encoding types. The title of your web page is important because it appears in the title bar of the browser when someone views the page. This same title is saved to a user’s browser Bookmarks or Favorites list when the address of your site is saved; therefore, you should make it meaningful and memorable.
Did you Know?: Search Engines Want Your Page Title
It’s important to give your web page a meaningful title, especially if you want people to be able to find your page by using the major search engines. Although search engines use many factors to find and rate web pages, the page title is often an important factor. You can find Keith Robinson’s excellent discussion on writing better web page titles at www.7nights.com/dkrprod/gwt_seven.php.
To add a title to a document, follow these steps:
1. Select Modify, Page Properties if you don’t already have the Page Properties dialog box open.
2. Select the Title/Encoding category.
3. Type a descriptive title in the title box at the top of the Page Properties dialog box.
4. Click the OK button to save the settings. The page title appears in the Document Title text box in the Document toolbar, as shown in Figure 4.10. You can always add the title in this text box instead of opening the Page Properties dialog box.
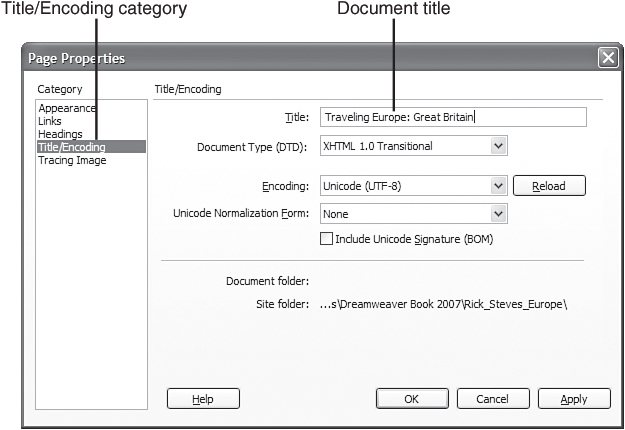
Figure 4.10. The document title appears in the Document Title text box after you enter it in the Page Properties dialog box.
The Title/Encoding category houses the Document Type setting, which you first encountered earlier this hour when you created a new HTML file. By default, Dreamweaver applies the XHTML 1.0 Transitional document type, which is a good choice because XHTML is an up-and-coming standard and the transitional version of XHTML enables old browsers to continue to view the web page. XHTML is written in XML and enables you to create web pages that are ready for the next generation of websites. Dreamweaver automatically adds a tag at the top of each web page to describe the document type for the browser. This tag tells the browser the flavor of HTML that your web page is written in and helps the browser interpret the page.
There are various alphabets in the world, and using the Encoding command is how you tell a web browser which one you are using for your web page. By default, Dreamweaver lists the Unicode (UTF-8) encoding type that has become the standard for computer code creation in all languages. Creating pages using Unicode encoding ensures that your web pages will be standards-based and viewable all over the world.
Introducing Cascading Style Sheets
You probably didn’t realize it, but you were creating CSS styles while you were modifying settings in the Page Properties dialog box. Dreamweaver automatically adds CSS to your web page and the styles created are visible in the CSS Styles panel (Window, CSS Styles) as shown in Figure 4.11. To view the styles in a web page, make sure that the All button is selected at the top of the CSS Styles panel and expand the list of styles by clicking the Expand/Collapse (+) button next to <style>.
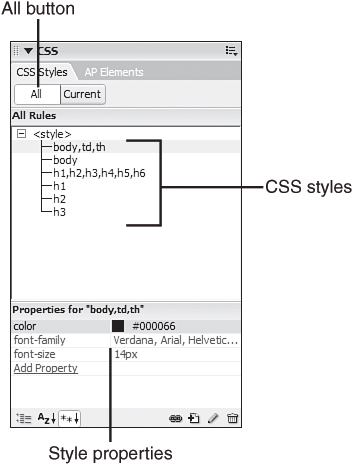
Figure 4.11. The CSS Styles panel displays a list of styles created by Dreamweaver when you set properties in the Page Properties dialog box.
The styles created by the Dreamweaver Page Properties dialog box are redefined tag styles. These styles add formatting properties and alter the default appearance of various tags. For instance, when you change the background color of the page, Dreamweaver redefines the <body> tag, which is the tag that contains everything on the web page. These styles are defined in the web page you are working in, but in Hour 6 you’ll learn how to place these styles in an external style sheet that can be shared by multiple web pages.
By the Way: Goodbye, <font> Tag
Note that older browsers—pre-1997 browsers older than Internet Explorer 4 or Netscape Navigator 4—don’t support CSS. The older method of formatting text is to use the <font> tag. This tag has been deprecated by the World Wide Web Consortium (W3C), the Web standards organization. Deprecated means that the W3C is removing it from the approved tag list and eventually it might not be supported by browsers. Dreamweaver CS3 does not insert any <font> tags into your code. If you have existing web pages in your website that use this tag, you should plan to update them by replacing the <font> tags with CSS.
Changing Text Attributes in the Property Inspector
In the first part of this hour, you learned about the global page settings that affect text. In the next section, you’ll explore setting properties of sections of text on the page using Dreamweaver’s Property inspector. The Property inspector enables you to change the font, font size, and color for sections of text.
Selecting a Text Font
To apply a specific font, select some text and then select the Text Font drop-down menu in the Property inspector, as shown in Figure 4.12.
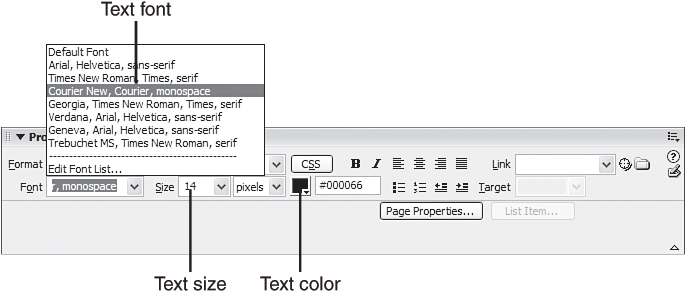
Figure 4.12. The Text Font drop-down menu has several font groups from which to choose.
The fonts in the Text Font drop-down menu are defined in groups. Specifying a group instead of an individual font increases the odds that your viewers will have at least one of the fonts in the group. The browser attempts to display text with the first font listed, but if that font isn’t available, the browser continues through the list. Dreamweaver has predefined groups to choose from, and you can create your own groups.
Remember, just because you can see the font and it looks great on your machine doesn’t mean that everyone has that font. If a font isn’t available, the browser will use the default font—usually Times New Roman—instead. The fonts in the predefined font combinations in Dreamweaver are commonly available fonts in popular operating systems.
Changing Text Size
You change text size by selecting one of the size settings in the Property inspector Text Size drop-down menu shown in Figure 4.13, or by typing a number in the text box. If you select one of the numbers at the top of the list, the Units drop-down menu becomes active so that you can select the unit type. Point and pixel are the most common unit types. You can also select one of the relative sizes (xx-small, medium, large, and so on). These text size settings enable the text to appear relative to the size settings that the user configures in his browser. This is particularly useful for users who have vision impairment, but it makes it difficult for you to strictly control how your web page appears to the user.
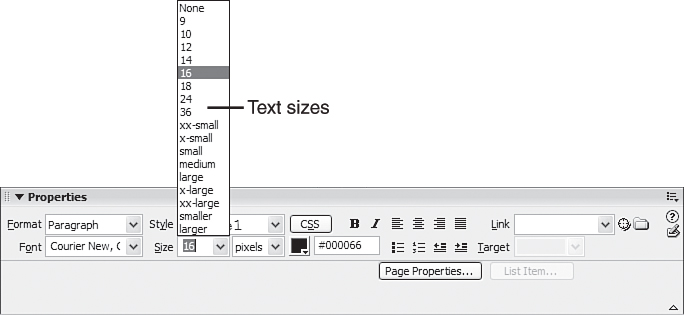
Figure 4.13. The Size drop-down menu in the Property inspector enables you to set the size of the selected text.
Selecting a Text Color
You change the text color by either selecting a color using the color picker or by entering a hexadecimal color value, such as #0000FF for blue, into the Text color text box.
By the Way: Dreamweaver Easter Egg
An Easter egg is a fun bit of functionality that the programmers secretly put into software applications. It is undocumented and unsupported. If you are using Dreamweaver for Windows, there is an Easter egg associated with text color. If you type the word Dreamweaver into the Text Color box in the Property inspector and then press Enter, Dreamweaver displays a little game. Enjoy! Sorry, this doesn’t work in the Macintosh version of Dreamweaver.
Renaming a Style That Dreamweaver Creates
When you add text formatting from Dreamweaver’s Property inspector, a CSS style is created in the code and applied to the text you selected. This style defines the appearance of the text. The name of the style that Dreamweaver created for you displays in the CSS Style drop-down menu of the Property inspector as shown in Figure 4.14. Dreamweaver gives the style a default name beginning with .style1, .style2, .style3, and so on.
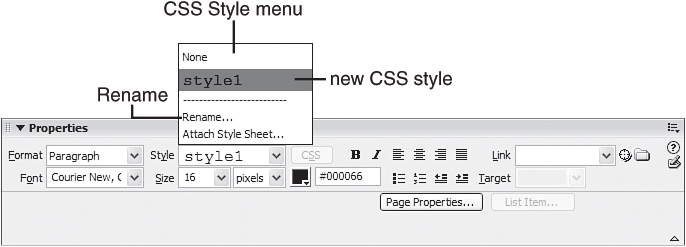
Figure 4.14. The name of the CSS Style that Dreamweaver created displays in the CSS Style drop-down menu.
The newly created CSS style is also visible in the CSS Styles panel (make sure that the All button is selected in the CSS Styles panel to see the list of styles). You need to edit the default name that Dreamweaver gives to the style; the name should be meaningful and describe the purpose of the CSS style. You need to pay attention while using the Property inspector and make sure that you aren’t accidentally adding styles. If you do add a style that is unnecessary, simply right-click on the style name in the CSS Styles panel and select Delete. To edit the default style name (style1, style2, and so on), do the following:
1. Select the Rename command from the CSS Style drop-down menu in the Property inspector.
2. Select the style you’d like to rename from the Rename style drop-down menu.
3. Give the style a more meaningful name, preferably a name that describes the function of the style in the page.
4. Click OK.
5. Dreamweaver searches the page for instances of the old style name and replaces them with the new style name. The Results panel opens underneath the Property inspector after this find-and-replace operation finishes.
6. Close the Results panel by selecting the Close Panel Group command from the Panel menu in the upper-right corner of the panel.
You should never re-create the same formatting by created additional, identical CSS styles. Instead, you should reapply an existing CSS style. Follow these steps to apply a CSS style:
1. Select the appropriate text on the web page.
2. Select a style from the CSS Style drop-down menu in the Property inspector.
3. Repeat this process until you have styled all the text that you’d like restyled.
You’ll learn how to edit the style definition in Hour 6.
By the Way: No Guarantees in Website Design
There is no way to guarantee that a web page will look the same on a viewer’s computer as it does on your computer. Browser preferences enable the user to override font settings, size settings, background colors, and hyperlink colors. Don’t depend on the page fonts and colors to be exact. If it makes you feel better, though, keep in mind that most users don’t change the browser defaults.
You might have noticed that all the styles listed in your CSS Styles panel don’t appear in the CSS Style drop-down menu in Dreamweaver’s Property inspector. For instance, the h1 style and the body, td, and th styles don’t appear. That’s because you apply these redefined tag styles by simply applying the HTML tag to text. In the case of the h1 style, you simply select Heading 1 from the Property inspector’s Format drop-down menu. The styles that Dreamweaver initially named beginning with a period, such as .style1, are class selectors, a special type of style that you apply individually to selections of text.
Aligning Text
You can align text to the left, center, or right just as you can in a word processing program. You can also justify the text so that the left and right margins are evenly set down the page. To align some text in the center of the page, follow these steps:
1. Select the text.
2. Click the Align Center icon (see Figure 4.15) in the Property inspector. These icons are very similar to icons in popular word processing programs.
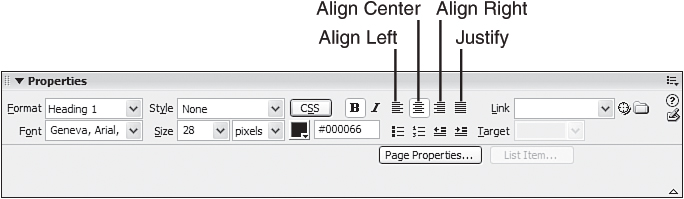
Figure 4.15. The alignment icons in the Property inspector look and act like the alignment commands in word processing software.
Alternatively, with the text selected, select Text, Align, Center. The Text menu also contains all the text formatting commands used in this hour.
Creating Lists and Indenting Text
By using Dreamweaver, you can create bulleted lists, called unordered lists in HTML, and numbered lists, called ordered lists in HTML. The Unordered List and Ordered List buttons appear in the Property inspector when you select text. Create an unordered list by following these steps:
1. Type three items for the list, pressing the Enter (or Return) key after each item so that each item is on its own line.
2. Drag the cursor over all three items to select them.
3. Click the Unordered List button in the Property inspector, as shown in Figure 4.16.
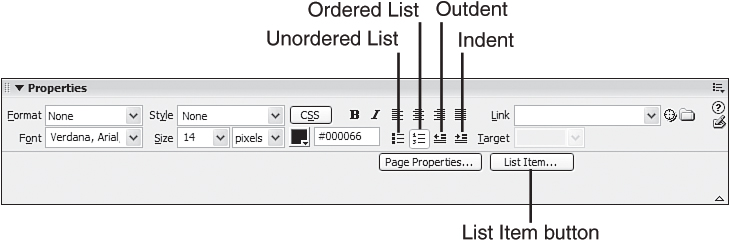
Figure 4.16. The Property inspector has buttons to create ordered and unordered lists. You can select the Indent and Outdent buttons to nest lists and to indent and outdent text.
Now a bullet precedes each line. Next, add another list that nests in the first list:
1. Place the insertion point after the last item.
2. Press the Enter key to make a new line. The new line should be preceded by a bullet.
3. Type three items, as you did in the previous list.
4. Drag the cursor over these new items and select the Indent button in the Property inspector.
Now the second list nests within the third item of the first list. You can tell because it is indented and preceded by a different style of bullet. Use the Outdent button to place the nested list back in line with the main list.
Did you Know?: Customize Your Bullets and Numbers
You can change the bullet or number style by clicking the List Item button in the Property inspector (refer to Figure 4.16) when your cursor is located within the list. Oddly, the List Item button does not appear if you select the entire list. Pick the bullet style (either bullet or square) for an unordered list or pick a number style for an ordered list. You can also start the number count at a number other than 1 by entering the initial number in the Start Count box.
To turn the nested unordered list into an ordered list, select the three items in the nested list again and click the Ordered List button in the Property inspector. To bring the nested list back in line with the main list, select the Outdent button.
With regular text, you use the Indent and Outdent buttons to modify the margins of a block of text. In HTML there is no easy way to tab or indent text, so Dreamweaver uses the <blockquote> tag to indent. This tag actually indents both the left and right sides of the text, so it might look strange if you indent multiple times.
Adding a Separator to a Page: The Horizontal Rule
A graphical item that has been around since the Stone Age of the Web (about 10 years ago!) is the horizontal rule. That little divider line is still useful. A horizontal rule is a shaded line that divides a web page into sections. Note that you can’t place anything else on the same line with a horizontal rule.
Add a horizontal rule to your web page by selecting the Horizontal Rule object from the HTML category of the Insert bar. If you’re a menu kind of person, you can do this by selecting Insert, HTML, Horizontal Rule. In Figure 4.17, the Property inspector presents the properties of a horizontal rule. You can set width and height values in either pixels or percentages of the screen. You can also set the alignment and turn shading on and off.

Figure 4.17. Horizontal rule properties appear in the Property inspector when you select the rule.
Many objects in HTML have width and height values either in absolute pixel values or as a percentage of the size of the container they are in. If a horizontal rule in the body of a web page is set to a percentage value and the user changes the size of the browser window, the horizontal rule resizes to the new window size. If the horizontal rule is set to an absolute pixel size, it does not resize, and the user sees horizontal scrollbars if the horizontal rule is wider than the screen.
Previewing in a Browser
Even though Dreamweaver is a WYSIWYG (what you see is what you get) tool, you need to see how your page really looks in particular browsers. You should save your work before you preview it in a browser. Saving your work lets Dreamweaver correctly set the paths to linked files, such as images. Dreamweaver will prompt you to save the web page before it launches the page in a browser.
Adobe says you can define up to 20 browsers for previewing. Good luck finding 20 browsers! I generally have the following browsers installed for testing: Mozilla Firefox, Microsoft Internet Explorer, Netscape, and Opera on my Windows machine and Internet Explorer, Netscape, Safari, and sometimes Opera on my Mac. You must have these programs installed on your computer before you can use them to preview your web pages. All the browsers mentioned have free versions and are available for download over the Internet.
Did you Know?: Get Your Browsers Here!
My favorite browser, which I use on a daily basis, is Mozilla Firefox. You can download it at www.firefox.com. Download Netscape Navigator at browser.netscape.com/ns8 and download Microsoft Internet Explorer at www.microsoft.com/windows/ie. The most popular Mac browser, Safari, is available at www.apple.com/safari and Opera is available at www.opera.com/download.
First, set up a browser as follows:
1. Select File, Preview in Browser, Edit Browser List command. Dreamweaver’s Preferences dialog box opens to the Preview in Browser category. Dreamweaver might have already located browser(s) and entered them here during the installation process, so the list might not be empty.
2. Click the plus button to add a browser, as shown in Figure 4.18.
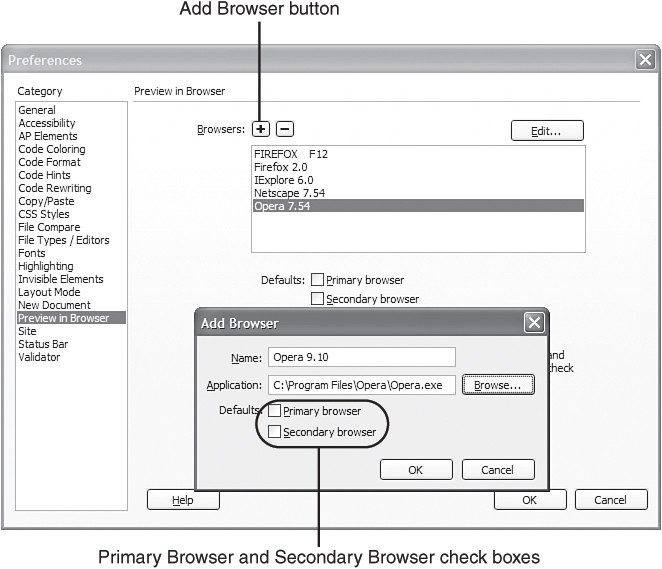
Figure 4.18. Set the browsers you will use to preview your web pages in the Preview in Browser category in the Preferences dialog box.
3. Leave the Name text box empty for now; Dreamweaver automatically picks up the name of the browser.
4. Click the Browse button next to the Application text box and navigate to the browser program. For computers running Windows, the default installation location for most browsers is in the Program Files directory. For the Mac, look in your Applications folder.
5. Click either the Primary Browser check box or the Secondary Browser check box. This determines which keyboard shortcut you use to launch the browser. The keyboard shortcut for one primary browser is F12, and the shortcut for one secondary browser is Ctrl+F12.
6. Repeat steps 2 through 5 until all browsers have been added.
7. Make sure that the Preview Using Temporary Files option is not selected. Click the OK button when you are done.
Below the browser list is a single check box option that controls whether you directly view your web page in the browser or whether you want Dreamweaver to create a temporary file to display in the browser. When the box is checked, you won’t need to save your web page prior to previewing in a browser because Dreamweaver creates a temporary file for you to display in the browser. If you uncheck this box, you have to save your web page prior to previewing it in the browser. I prefer to uncheck this box and know that I’m viewing the actual web page instead of a temporary file. Even after you’ve saved your page in Dreamweaver and previewed it in the browser, you can still undo changes that you made prior to saving the page.
Select File, Preview in Browser or select Preview in Browser on the Document toolbar to view the current web page. Select the browser you want to use from the menu. If the browser is already open, you might have to switch to the application to see your page. If the browser isn’t already open, Dreamweaver opens it and loads the requested page so that you can preview it.
Dreamweaver actually checks each page you open in Dreamweaver for potential browser errors. The Check Browser menu on the Document toolbar displays whether you have any browser check errors in the target browsers selected. By default, Dreamweaver checks your page for errors in the following browsers:
• Firefox 1.5
• Internet Explorer 6
• Internet Explorer for Macintosh 5.2
• Netscape 8
• Opera 8
• Safari 2
Modify the browsers and versions in the Target Browsers dialog box, shown in Figure 4.19, by selecting Check Browser, Settings.
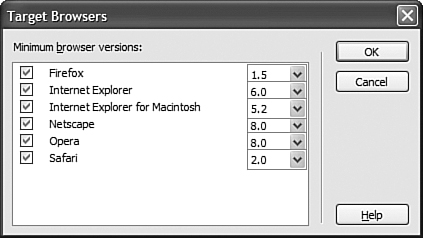
Figure 4.19. Select which browser definitions Dreamweaver uses to automatically check for errors.
Congratulations! You’ve created your first web page in Dreamweaver and learned a lot about formatting the page and text on the page. Many of the tasks described in this hour will become habitual to you with every web page you create, and you will be able to quickly move through the steps you’ve practiced in this hour.
Summary
In this hour, you learned how to enter and import text into a web page. You set text properties, including headings, fonts, lists, and alignment. You were introduced to CSS, the language of presentation on the Web. You used a horizontal rule to separate the page into sections, and previewed your work in a browser.
Q&A
Q. Where can I learn more about CSS styles? They seem important.
A. CSS styles are important, and they are part of the movement in web development toward separating content (the words and images on the web page) from the presentation (font size, colors, and positioning). This separation is important because it is becoming more and more common to deliver content to various devices, such as PDAs (personal digital assistants), and to people with disabilities, such as impaired sight.
You’ll learn much more about CSS styles in Hour 6 and I’ve listed a number of books and websites in Appendix A, “Resources,” which will help you learn about CSS.
Q. I indented a line of text by clicking the Indent button. I wanted it to act as a tab acts in my word processing program, but it seems to indent both the beginning and the end of the line. What’s going on?
A. Oddly enough, there is no way in HTML to tab as you do in your word processing program. The Indent button applies the <blockquote> tag to the text. This tag, as you noticed, actually indents both the left and the right of the text. The block quote tag was originally designed for quotes in research-type documents. The easiest way to indent text is to place your text in a table. You’ll learn about tables in Hour 12, “Displaying Data in Tables.” Another way to indent text is to use CSS-Positioning techniques that you’ll learn about in Hour 13, “Using CSS for Positioning.”
Workshop
Quiz
1. What button in the Property inspector do you select to nest a list?
2. By default, which heading size is largest on the screen: Heading 1 or Heading 6?
3. What are the usual default font, size, and color for pages viewed in the default browser configuration?
Quiz Answers
1. The Indent button nests one list within another.
2. Heading 1 is the largest size and Heading 6 is the smallest.
3. The usual defaults for pages viewed in the default browser configuration are Times New Roman, 10 point (medium), and black text.
Exercises
1. Try changing the alignment, shading, and size of a horizontal rule. Use a pixel size value and then use a percentage size value. Test each of your experiments by previewing the page in a web browser.
2. Experiment with creating lists. Create an ordered list, an unordered list, a definition list (see the Text tab of the insert bar), and some nested lists. As you do this, look at the tag selector in the status bar and see which HTML tags are used. What do you think the <li> tag is for?
3. Select one of the color boxes in the Page Properties dialog box and set up a custom color. Use the eyedropper to pick a color from anywhere onscreen. You can even pick a color from another application you have open.