
Hour 17. Using Dynamic HTML and AP Divs
What You’ll Learn in This Hour:
• What AP divs are, how they work, and how they are used
• How to add an AP div and position it on the page
• How to set the stacking order, background color, and visibility of an AP div
• How to use Dreamweaver timelines to add animation to a web page
Dynamic HTML (DHTML) provides you with the flexibility to make your web pages interactive. Dreamweaver’s AP (absolutely positioned) divs provide a way to control the placement of objects on the page. You can place items precisely where you want them, absolutely positioned on the page.
You don’t have to pick between regular divs and AP divs. You can use both in a web page, taking advantage of the strengths of each. In Hour 13, “Using CSS for Positioning,” you used div tags as containers from the web page content. You placed these divs relative to one another, stacked up like boxes in a store. AP divs are autonomous, can be moved individually, and can be placed anywhere on the page. In this hour, you’ll experiment with AP divs and be able to compare them to what you learned about div tags in Hour 13.
One of the great things about AP divs is that you can use them with Dreamweaver behaviors, which you’ll learn more about in Hour 18, “Adding Interactivity with Behaviors.” At the end of the hour, you’ll explore the Dreamweaver Timeline functionality that enables you to create simple animations in a web page using AP divs. Dreamweaver accomplishes this using JavaScript, and it can use a number of JavaScript behaviors with AP divs.
What Is DHTML?
DHTML enables you to create an interactive experience for the web page user. DHTML isn’t an official term; it’s a term used by web developers to refer to a collection of technologies used to produce a more interactive web page. The three main components of DHTML are AP divs, Cascading Style Sheets (CSS; see Hour 6, “Formatting Web Pages Using Cascading Style Sheets”), and JavaScript (see Hour 18).
DHTML is an extension of HTML that gives web page developers greater control over page layout and positioning. DHTML also allows greater interactivity without depending on interaction with a server. When people talk about DHTML, they usually mean the combination of HTML 4 (as defined by the W3C [World Wide Web Consortium] Web standards organization) and CSS. These elements work together through a scripting language, usually JavaScript.
Here’s a short list of the types of things you can accomplish using DHTML:
• Insert hidden images that appear when the user clicks a button or a hotspot.
• Create pop-up menus.
• Enable the user to drag and drop an object around the screen at will.
• Cause text to change color or size when the user rolls her mouse over it.
• Repetitively load text into an area of the screen as feedback to the user. For instance, if the user clicks the wrong answer in a quiz, you can give feedback and then replace that feedback when the user gets the answer right.
In this hour, you’ll experiment with AP divs, the containers that enable you to position items on the screen wherever you want.
Adding an AP Div
AP divs are containers that you use to position content on a web page. The term AP divs is a Dreamweaver expression, and if you speak with other web developers who aren’t using Dreamweaver, they won’t know what you mean. AP divs is short for “absolutely positioned div,” meaning a div tag that is positioned at a precise x and y position on the screen. As you learned in Hour 13, the div tag logically divides a web page into sections.
AP divs have two very interesting attributes:
• Visibility—This property enables you to hide all the content in an AP div and then trigger its appearance when the user performs an action on the screen. For instance, you can simulate a click on a menu in a software program. The AP div holding the menu image initially hides. When the user clicks a menu title on the screen, a script changes the visibility of the menu AP div from hidden to visible.
• Z-index—This property controls the stacking order of all the AP divs on the page. You can stack AP divs on top of one another (overlapping) and control which one is on top. This gives you the power to create complicated designs.
Did you Know?: Extensions to Dreamweaver
Dreamweaver contains many extensions that enable you to accomplish cool things with AP divs (you’ll learn more about extensions in Hour 24, “Customizing Dreamweaver”). There are extensions that make an AP div slide to a specified position and that make an AP div that doesn’t scroll with the page. There are also several extensions to create drop-down menus using AP divs.
You can create an AP div in Dreamweaver in two ways:
• The simplest way is to select the Draw AP Div object from the Layout category of the Insert bar and drag the crosshair cursor on your page to approximately the desired AP div size, as shown in Figure 17.1.
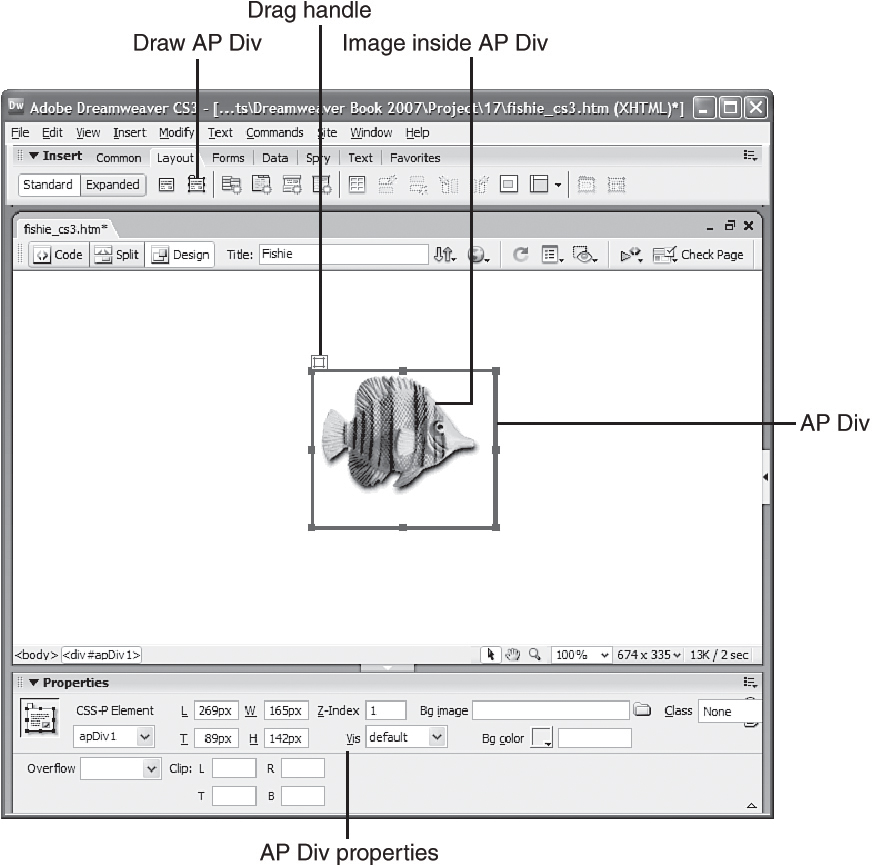
Figure 17.1. Selecting the Draw AP Div object from the Insert bar enables you to draw an AP div by dragging the crosshair cursor.
• Select Insert, Layout Objects, AP Div to insert an AP div.
The AP Elements category in the Preferences dialog box, shown in Figure 17.2, is where you can set default AP div values. You set the default visibility, width, height, background color, and background image. If you have a standard AP div size that you use often, you might want to set that size as the default in this dialog box. You can also enable nesting by checking the Nesting check box.
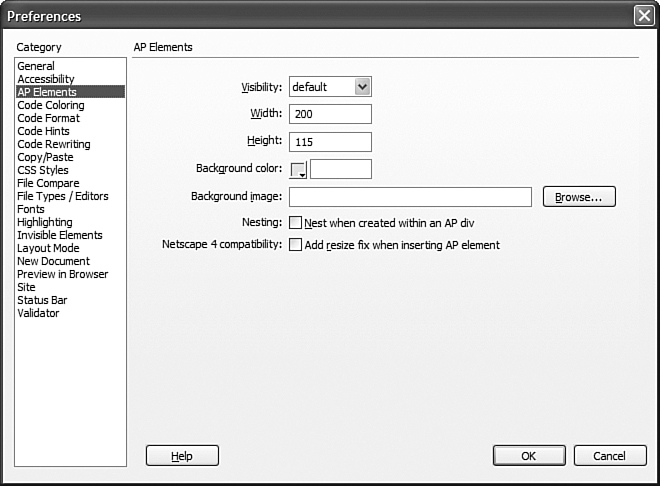
Figure 17.2. The AP Elements category in the Preferences dialog box is where you set the default values of AP div attributes.
Watch Out!: Unpredictable Placement of AP Div
You might be thinking, “Wow, AP divs are so easy to use. I should use them for the layout of my web pages!” Unfortunately, various browsers can display the position of AP divs differently, so it’s difficult to perfectly calculate where an AP div should be placed when developing a web page. Stick to using relatively placed divs for page layout and use the occasional AP div for a special purpose.
Notice resizing handles on each border of your AP div: You can drag these handles to make your AP div bigger or smaller. You can also set the width and height of the AP div in the Property inspector. The W and H properties in the Property inspector are the width and height, respectively, of the AP div. The default measurement unit is pixels.
Watch Out!: Old Netscape and AP Divs Don’t Mix
Enable the Add Resize Fix When Inserting AP Element check box to have Dreamweaver automatically insert the Netscape 4 resize fix whenever you insert an AP div into a web page. Insert the Netscape 4 resize fix on any page that includes AP divs and that users might view in Netscape 4, a very old version of the Netscape browser. You can do this automatically by turning on the preference or manually by selecting Command, Add/Remove Netscape 4 Resize Fix. This fix resolves problems that occur when a Netscape 4 user resizes a page that contains AP divs. Dreamweaver inserts JavaScript into the page that solves the problem.
Don’t insert the Netscape 4 resize fix unless it is absolutely necessary. The fix causes the page to reload and might be distracting to Netscape 4 users. In addition, it adds unnecessary code to web pages that will be delivered to mostly non–Netscape 4 users. Test your page by opening it in a small Netscape 4 window and then maximizing the window. Do your AP divs stay small? If so, you have to apply the Netscape AP div fix. You can download older Netscape versions for testing purposes at browser.netscape.com/ns8/download/archive.jsp.
It’s always a good idea to name your AP divs. When you start adding behaviors, names help you identify specific AP divs. You can specify a name in the CSS-P Element Name box in the Property inspector, as shown in Figure 17.3.
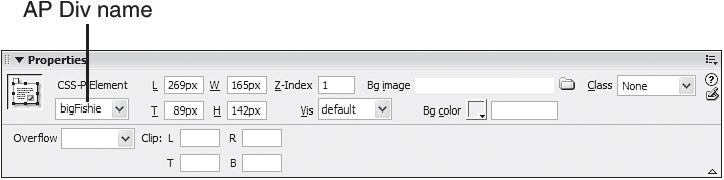
Figure 17.3. Change the AP div name in the CSS-P Element Name box of the Property inspector. It’s important to give AP divs meaningful names.
Did you Know?: No Punctuation in AP Div Names
Don’t use spaces or punctuation in AP div names. If you later apply a behavior to the AP div, sometimes JavaScript isn’t happy with spaces or punctuation in an AP div name. If you want to name your AP div with multiple words, you can use capitalization or underscores to make the name readable. For instance, CestLaVieBakery and Green_Grocer are possible AP div names.
You can also name Dreamweaver AP divs in the AP Elements panel. Double-click the name in the AP Elements panel Name column until it becomes editable and then type in a new name, as shown in Figure 17.4. Notice that when you select an AP div in the AP Elements panel, you select the AP div in the Document window also.
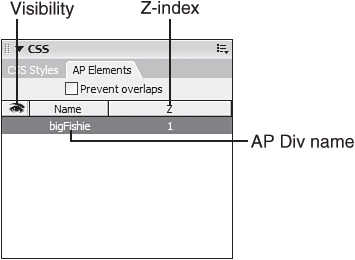
Figure 17.4. You can edit the name of an AP div in the AP Elements panel by double-clicking the name and changing it.
Setting AP Div Positioning
An AP div has a drag handle in the upper-left corner. You can reposition an AP div by picking it up and moving it with this handle. To select multiple AP divs, hold down the Shift key while clicking AP divs to add them to the selection. You can also use the arrow keys on your keyboard to move a selected AP div.
Did you Know?: Use the Drag Handle
Get in the habit of moving AP divs by picking up the drag handle. It’s very easy to accidentally move items contained in an AP div instead of moving the AP div itself. If you become accustomed to using the handle, you won’t make that mistake. If you can’t use the drag handle because the AP div is at the very top of the Document window, select the AP div in the AP Elements panel and use the arrow keys to move it. Alternatively, you can enter positioning values in the Property inspector.
Use the AP Elements panel to select one or many AP divs. The AP Elements panel enables you not only to select AP divs, but also to see and set some AP div properties. You’ll learn about the two properties that you can set—the z-index and the visibility—in a few minutes. Notice that you can enable a check box at the top of the AP Elements panel to prevent overlaps. If you cannot place your AP divs on top of one another, you probably have to disable the Prevent Overlaps check box.
You can use the drag handle to drag an AP div anywhere on the screen, or you can use the Property inspector to set the AP div’s exact positioning. The L and T properties stand for the left (the offset from the left edge of the page) and top (the offset from the top edge of the page). These positions are relative to the entire browser window. You can move an AP div either by dragging it with its selection handle, or position it exactly by entering values in the L and T boxes, as shown in Figure 17.5.
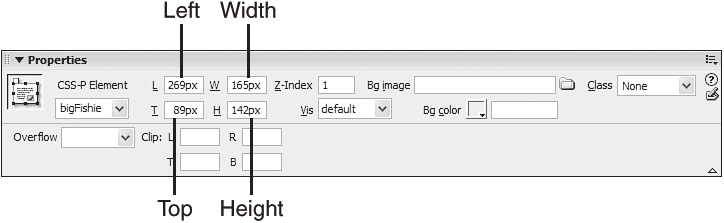
Figure 17.5. Exactly position an AP div by entering values in the L (left) and T (top) boxes of the Property inspector.
Did you Know?: Where Did the AP Div Properties Go?
If you don’t see AP div properties in the Property inspector, it’s because you don’t have an AP div selected. You might have accidentally selected the contents of the AP div instead of selecting the AP div itself.
Adding a Background Color and Background Image
An AP div can have a background color, as shown in Figure 17.6. You can use the color picker or type in a color in the standard HTML hexadecimal format, preceded by #. Make sure that you leave the Bg Color option blank if you want your AP div to be transparent. If your page background is white and you make your AP div background white, your AP div will seem as if it’s transparent until you position it over something else!
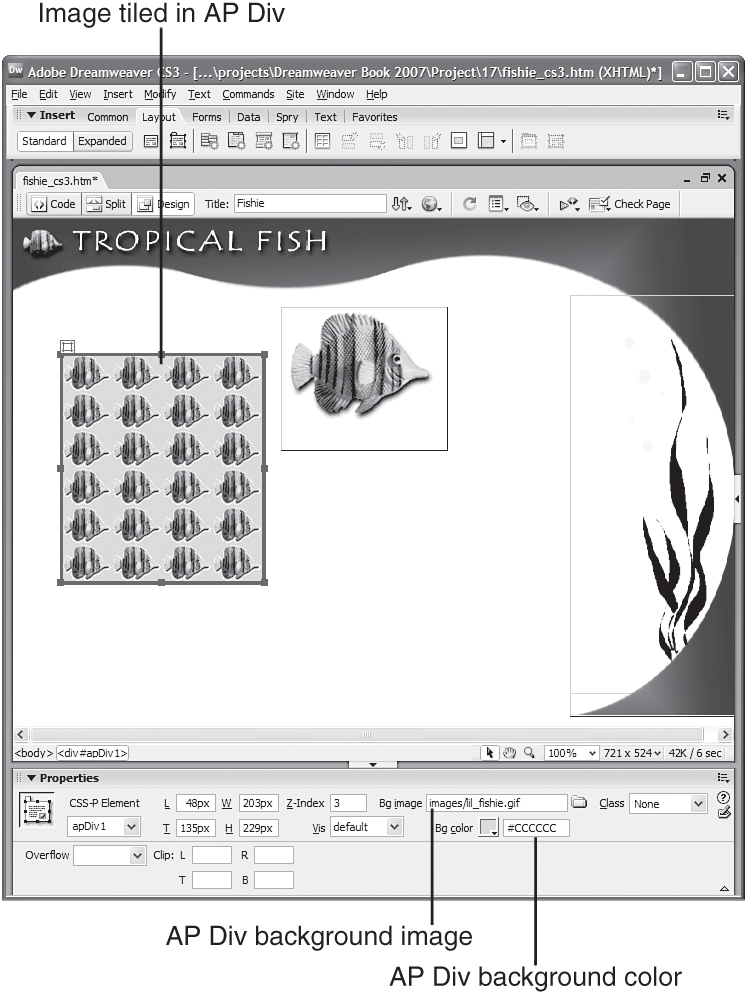
Figure 17.6. An AP div can have a background color or a tiled background image.
You can also place a background image in an AP div. The image repeats multiple times (called tiling) within the AP div if the AP div is larger than the image. Objects and text that you put within the AP div are on top of the background image. Select the Browse icon (the folder) beside the Bg Image box in the Property inspector and navigate to the background image file. Figure 17.6 also shows the Property inspector when a selected AP div contains a background image.
Exploring AP Div Stacking Order
Not only can you position AP divs in exact places on the page, you can also allow AP divs to overlap one another. So, which AP div is on top? The stacking order decides which AP div is on top of other AP divs. The z-index value, in turn, determines the stacking order. The z-index can be either a negative or a positive number.
The AP div with the highest Z-index value is the one on the top. The term z-index comes from the coordinate system that you used back in geometry class—remember x and y coordinates? Well, the z-index is the third coordinate that is necessary to describe three-dimensional space. Imagine an arrow coming out of the paper or screen toward you and another going back into the screen or paper. That is the z-index.
Dreamweaver prefers to give each AP div a unique z-index value. In HTML, you can legally have multiple AP divs that have the same z-index. Remember, though, that if you reorder the AP divs, Dreamweaver will renumber each with a unique z-index. So, why waste your time?
You can set the z-index in the Z-Index box in the Property inspector, as shown in Figure 17.7. The AP Elements panel displays the z-index to the right of each AP div’s name. This panel displays the AP divs in order according to their z-index value, with the top being the highest z-index and the bottom being the lowest. You can easily rearrange the stacking order by selecting the AP div name in the AP Elements panel and then dragging and dropping it somewhere else.
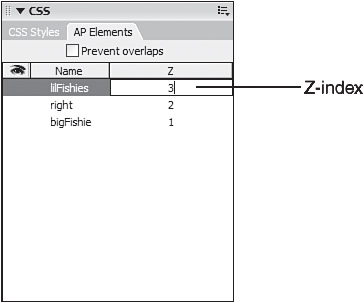
Figure 17.7. The z-index value represents the stacking order of AP divs. You can set the z-index (as either a positive or negative value) in the Property inspector.
Changing AP Div Visibility
AP divs have a visibility attribute that can be set to Visible, Hidden, Inherit, or Default. The Vis drop-down menu, as shown in Figure 17.8, is in the middle of the Property inspector when you select an AP div. The visibility settings are
• Visible—An AP div set to Visible appears on the web page at loading.
• Hidden—An AP div set to Hidden does not appear on the web page. You can later make the AP div visible by using the Show-Hide Elements behavior.
• Inherit—An AP div set to Inherit has the same visibility as its parent. You’ll learn more about nesting and parent AP divs in a few minutes. If you set the parent to Hidden, and you set the AP div nesting within that parent to Inherit, the nested element hides also.
• Default—The Default setting is the same as the Inherit setting in most browsers.
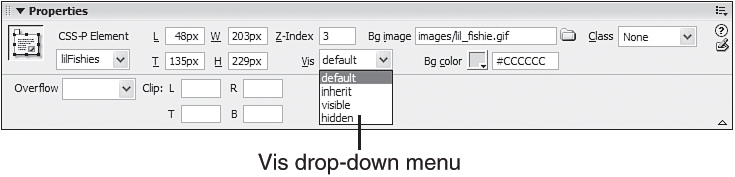
Figure 17.8. The Vis drop-down menu enables you to set the visibility attribute for an AP div.
Why you might want AP divs to be visible is obvious, but why might you want them to hide? So that you can display them later, after something has happened! You’ll learn about using the Show-Hide Elements behavior in Hour 18.
The AP Elements panel represents visibility with a picture of an eye. The eye beside an AP div is open if you set the AP div to Visible. The eye is closed if you set the AP div to Hidden. The Inherit setting does not have an eye representation. The Eye icon is a toggle that moves through the Default, Visible, and Hidden settings and then goes back to Default. You can set the visibility characteristics of all the AP divs by selecting the Eye icon in the header of the AP Elements panel.
Watch Out!: Don’t Accidentally Click the Eye Icon Column Header
Be careful when clicking the Eye icon column for your top AP div. It’s easy to accidentally click the header instead and set all the eyes in the column. You have to click in the Eye column beside the AP div for which you want to set the Visibility property.
Nesting AP Divs
You can create an AP div within another AP div; the new AP div nests within its parent AP div. If you move the parent AP div, the child AP div moves with it. The child AP div also inherits its parent’s visibility attributes.
To create a nested AP div, you place the cursor inside the parent AP div and choose Insert, AP Div. You draw a nested AP div by using the Draw AP Div object to draw inside an existing AP div while holding down the Ctrl key (the Command key on the Mac). In addition, you can place an existing AP div within another AP div by picking it up in the AP Elements panel while holding down the Ctrl key in Windows or the Command key on the Mac and then dropping it into another AP div. The nested AP div appears indented in the AP Elements panel, as shown in Figure 17.9.

Figure 17.9. An AP div nested within another AP div appears indented in the AP Elements panel.
The easiest way to un-nest an AP div if you make a mistake or change your mind is to pick it up in the AP Elements panel and drop it somewhere else in the list of AP divs, as shown in Figure 17.10.
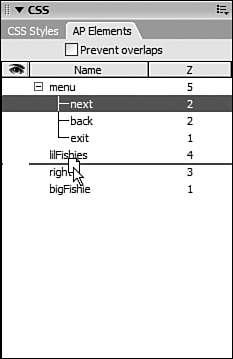
Figure 17.10. Pick up a nested AP div and move it to another position within the AP Elements panel to un-nest it.
Did you Know?: Can’t Draw? Check Prevent Overlaps
If Dreamweaver doesn’t seem to allow you to draw a nested AP div by holding down the Ctrl key, you probably have the Prevent Overlaps check box enabled at the top of the AP Elements panel.
Watch Out!: Where Did the AP Divs Go?
Did your AP div disappear from the screen when you un-nested it? When an AP div is nested, its position is relative to its parent. When you un-nest the AP div, its position is then relative to the page. The AP div’s coordinates might cause the AP div to be off the screen. To fix this problem, select the AP div in the AP Elements panel and give it L (left) and T (top) attributes that place it back on the screen.
Animating with Timelines
Dreamweaver’s capability to create time-based animation makes it unique as a Web-based authoring tool. Those familiar with Adobe’s animation programs, Director and Flash, will quickly feel comfortable with Dreamweaver’s Timelines panel. Those not familiar with animation programs will soon create animations after learning a few key concepts.
Creating an Animation
Timelines change properties over time to create an animation. To make an AP div move, you change the positioning properties—left and top—over time. To make objects appear or disappear, you change the visibility properties over time. To change the stacking order of objects, you change the z-index over time. You’ll learn more about time-based animations in this hour.
Did you Know?: Changing Images
You can also place images into timelines and change the image source over time. You cannot make images move around the screen unless they are contained in an AP div.
The animations that Dreamweaver creates play natively in the browser. You don’t need any plug-ins to play Dreamweaver timelines. Your viewer must have a browser capable of viewing Dynamic HTML (either Internet Explorer or Netscape Navigator 4.0 or better) to see your timelines. These animations work in most modern browsers.
When you create a timeline, Dreamweaver inserts JavaScript into your web page. The JavaScript defines all the timeline functionality. If you edit the HTML source, be careful not to delete or move the JavaScript that creates the timeline.
Using the Timelines Panel
Open the Timelines panel (Window, Timelines), shown in Figure 17.11; it appears beneath the Property inspector in Windows or as a floating panel on the Mac. The numbered channels run vertically up and down the timeline. Channels enable you to animate multiple objects in the same timeline. Numbered frames run horizontally from left to right along the top of the timeline. The number of frames affects the pace of the animation.

Figure 17.11. Use the Timeline panel to configure animations in your web page. A timeline comprises channels (vertical axis) and frames (horizontal axis).
The letter B labels a special channel across the top of the timeline. You can set behaviors in this channel so that behaviors execute in a certain frame. You’ll learn more about behaviors in Hour 18.
The red square with a line extending down is the playback head. It rests on the current frame and controls which frame you have currently selected. Drag the playback head to any frame in the timeline to view a specific frame.
The playback controls at the top of the Timelines panel, shown in Figure 17.12, manage the playback head. The rewind button moves the playback head to the first frame. The Back button moves the playback head back one frame. The Play button moves the playback head forward one frame. If you hold down the Back or Play button, you can move through all the frames. The current frame number displays between the Back and Play buttons.
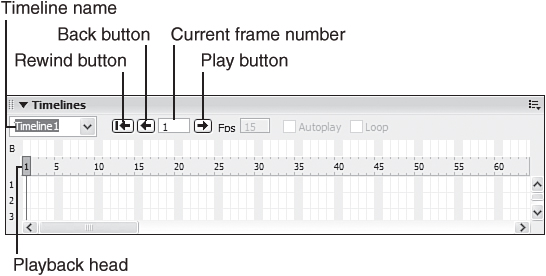
Figure 17.12. The playback controls, at the top of the Timeline panel, enable you to move both backward and forward through all the frames in the animation.
You set the frames per second (fps) in the Fps box beside the Play button. This sets the number of frames that occur per second in your timeline. The higher the fps, the faster the animation because more frames are crammed into one second. If you are moving an object around the screen, more frames will make the animation smoother. There is a certain point, however, beyond which the browser just can’t animate any faster even if you increase the fps.
The default fps setting of 15 is a good place to start. This setting means that 15 frames will take one second to play.
Recording a Simple Animation
Try creating an animation. The quickest way to make something move in a timeline is to record it. First, you will need an AP div with something in it (an image, some text, or a background color). Animated AP divs usually contain images. All the objects that you place in your timelines have to be in AP divs.
By the Way: The Timeline Panel
The Timeline panel opens beneath the Property inspector. Be careful not to accidentally drop the AP div in the Timelines panel while animating. This has a different effect than recording an animation.
To record an animation path, follow these steps:
1. First, make sure that you disabled the Prevent Overlaps check box in the AP Elements panel.
2. Select the AP div you want to animate. You have selected an AP div when you see its drag handles. You must select an AP div for the Record Path of AP Div command to become active.
3. Select the Modify, Timeline, Record Path of AP Element.
4. Make sure that the playback head in the Timelines panel is on frame one. If it is not, move it there.
5. Pick up the AP div’s move handle and drag the AP div on the path that you want. A dotted line marks your path. It’s best to start out making your animation short.
6. When you release the mouse button, the path becomes a solid line, as shown in Figure 17.13.
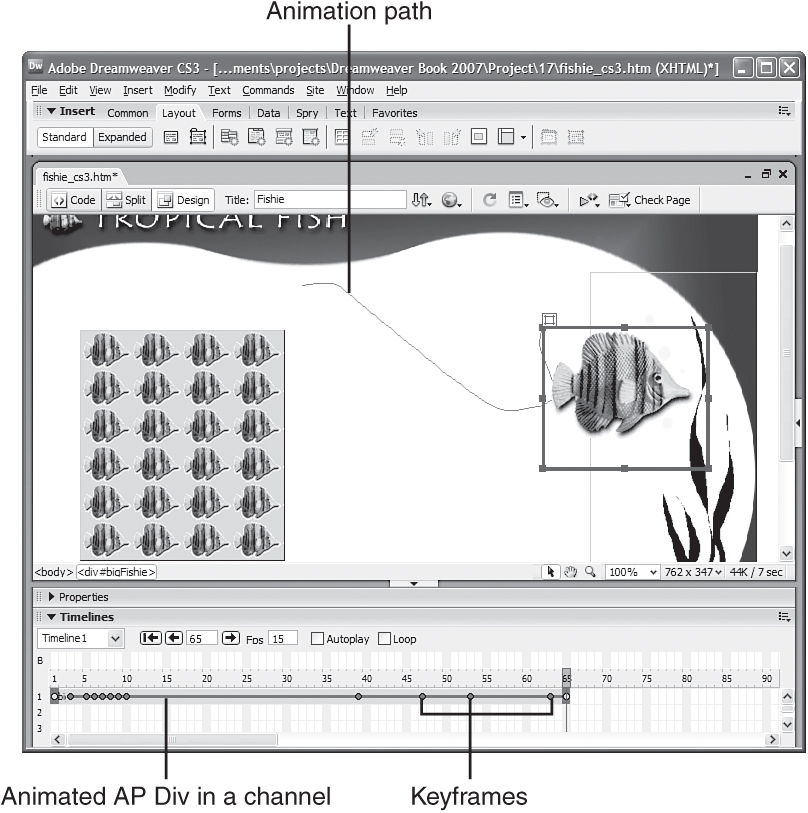
Figure 17.13. The path of the animation becomes a solid line after you stop dragging the AP div. This is what all animation paths look like.
Congratulations! You’ve created a timeline animation in Dreamweaver. The default name for your timeline is Timeline1. To change the timeline’s name, click the Timelines drop-down menu, change the name, and press Enter. You can select different timelines to display in the Timelines panel with this drop-down menu.
You see the name of your AP div in the first channel of the Timelines panel. The line through the channel marks the duration of the animation. You can drag the playback head along the frames to see the animation in the Document window.
The solid circles in the animation bar are called keyframes (refer to Figure 17.13). Keyframes are an important part of timeline animations because you can define changes only in keyframes. The code in Dreamweaver calculates all the intermediate steps between keyframes. You need a keyframe every time the animation changes direction or anything else new happens. You’ll explore adding and editing keyframes in a few minutes. Notice that your recorded animation probably has many keyframes. Dreamweaver added one every time the direction changed when you recorded the movement of the AP div.
Preview the animation in the browser. Did anything happen? Probably not. You haven’t yet set anything to trigger the animation to play. You’ll do that next.
Turning on Autoplay and Looping Your Animation
There are two check boxes in the Timelines panel, shown in Figure 17.14, which you haven’t learned about yet: Autoplay and Loop. Enable the Autoplay check box to make the timeline play when the web page loads. This setting automatically adds the Play Timeline behavior to the <body> tag, triggered by the onLoad event. After you check this setting in the Timelines panel, preview the animation in the browser. It works!
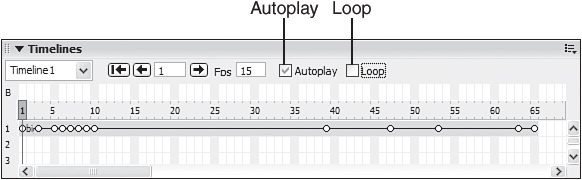
Figure 17.14. The Autoplay setting inserts a behavior into the <body> tag that makes the animation play when the web page is loaded. The Loop setting inserts a behavior in the B channel that sends the animation back to the first frame.
To make the animation play continually, select the Loop check box. Dreamweaver inserts the Go to Timeline Frame behavior in the B channel of the Timelines panel. Dreamweaver inserts the behavior in the last frame of the animation. What timeline frame do you think the Go to Timeline Frames behavior is set to go to? You’re right if you said the first frame.
Adding an AP Div to the Timeline
The Record Path of AP Element command is nice for capturing animations that have complex movement. But most of the time you want to set the length of a timeline and its keyframes manually. In addition, you can also add multiple AP divs to your animation.
Create another AP div to add to the timeline that you just created. Make sure that the Timelines panel is open. To add the AP div to the timeline, do the following:
1. Pick up an AP div, drag it into the Timelines panel, and drop it in the second channel beneath the previously animated AP div, as shown in Figure 17.15.
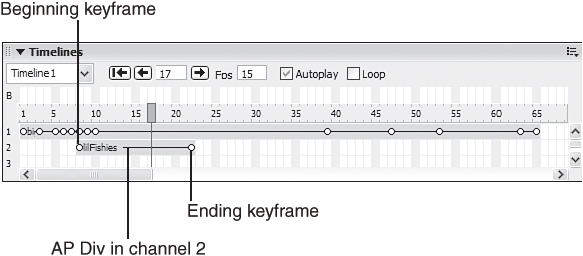
Figure 17.15. Dragging another AP div into the Timelines panel. Place the AP div in channel 2 beneath the other AP div.
If you see the name of an image in the timeline instead of the name of the AP div that contains an image, you have accidentally dragged the image into the timeline. You have to delete the image from the timeline and drag the AP div onto the Timelines panel instead.
2. You might receive a message box warning you about which AP div attributes Netscape does not support. You won’t be using any attributes that Netscape doesn’t support, so you can close this box.
3. Note that the animation bar begins and ends with a keyframe. Pick up the animation bar and move it in the same channel or to a different channel if you want.
4. To increase or decrease the length of the animation, drag the end keyframe.
5. Click the beginning keyframe. This is the position that the AP div will be in at the beginning of the animation. You can adjust the beginning position only while you have the first keyframe selected.
6. Click the ending keyframe. This is the position that the AP div will be in at the end of the animation. Only while you have the ending keyframe selected can you pick up the AP div and move it to its end position; do so now. When you release the mouse button you will see a line in the Document window showing the animation path, as in Figure 17.16.

Figure 17.16. A line represents the animation path when you have a timeline selected in the Timelines panel.
7. Preview the animation in your browser. Note that the second AP div moves in a line from one point, the beginning keyframe, to another point, the ending keyframe.
Adding a Keyframe
To create a more complex animation or make something happen at a specific frame, you have to turn that frame into a keyframe. When you hold down the Control key (Command on the Macintosh) and position your cursor over an animation bar, the cursor looks like a keyframe. Yes, you guessed it: click and you insert a keyframe at that location. You can also access the context menu, shown in Figure 17.17, by right-clicking a specific frame in the animation bar. It contains the Add Keyframe command that accomplishes the same thing.
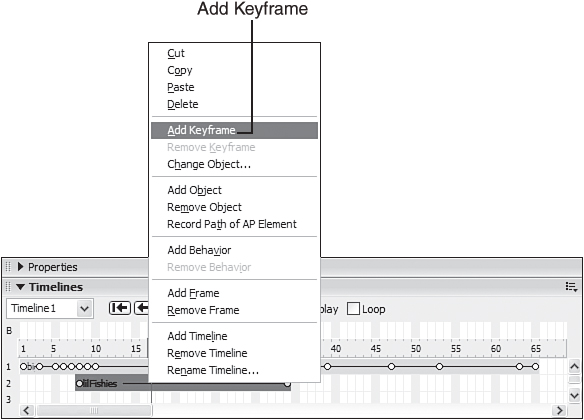
Figure 17.17. The context menu contains many useful commands for manipulating timelines, including the Add Keyframe command.
With the newly created keyframe selected, move the AP div. When you release the mouse button, the animation path has changed, as shown in Figure 17.18. You can add as many keyframes as you want. If you need to adjust the position of an AP div at a certain keyframe, select the keyframe and move the AP div. If you need to add or remove frames, right-click the frame in the animation bar to select either the Add Frame or the Remove Frame command. When you add or delete frames, you are adding or deleting them from the entire timeline, not from just a single channel.
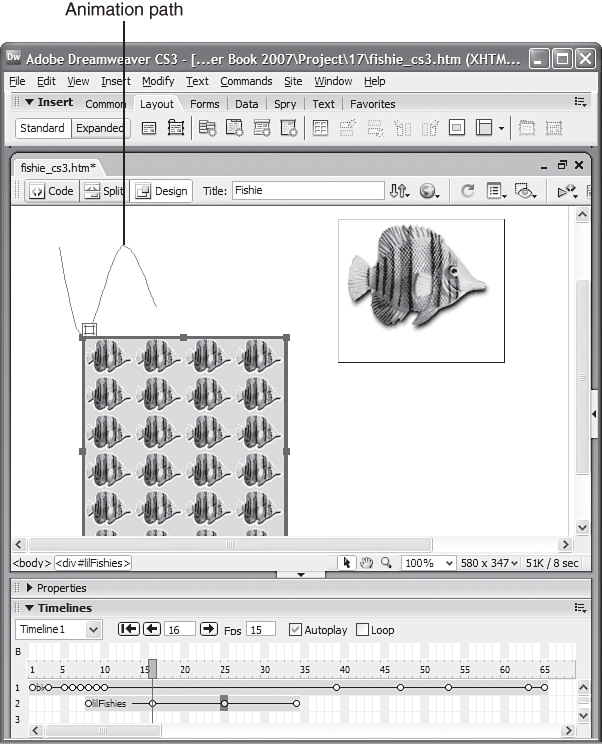
Figure 17.18. After you add a keyframe and move the AP div, the animation path changes.
Summary
In this hour, you learned how to insert an AP div into a web page. You learned how to change an AP div’s size, position, background color, and name. You explored setting the stacking order, or z-index, of AP divs and setting an AP div’s visibility. You learned how to record the movement of an AP div. You learned how to add AP divs to a timeline and how to change their properties. In addition, you added a keyframe so that you could add properties to another frame.
Q&A
Q. How do AP divs differ from the div tags I use with CSS for page layout?
A. CSS defines box elements, which is what both AP divs and div tags are. When creating a page layout, you often leave the CSS properties applied to a div with the default positioning, which is relative. Relative positioning means that a div appears according to its position in the code; the div before it in the code appears above it on the page. AP divs have the positioning property set to absolute, which means that regardless of where the div tag appears in the code, the div and its content will appear at a certain position—a particular number of pixels from the left and a particular number of pixels from the top of the web page.
Q. Why would I want to use AP divs in my web pages?
A. If you’d like to have some content overlapping or sitting on top of other content, you’ll have to use AP divs and set their z-index values higher than the underlying content’s z-index. Alternatively, if you want to hide an image or text on the screen and show it later by using the Show-Hide Elements behavior (see Hour 18), you have to use AP divs.
Q. Help! My timeline doesn’t play. What’s wrong?
A. First, check that you dragged an AP div, not an image, into the Timelines panel. Then make sure that you enabled the Autoplay check box. Is the animation bar starting at the first frame? If not, your animation might be playing empty frames before it gets to your content.
Q. I’m right-clicking the Timelines panel, but I don’t see the Insert Keyframe command in the context menu. Where is it?
A. You have to right-click an individual animation bar to get the context menu to appear. You can’t click the top of the playback head or the frame numbers. If you continue to have trouble, hold down the Ctrl key (Command key on the Macintosh) and use the keyframe cursor to add keyframes.
Workshop
Quiz
1. What does a keyframe do?
2. What is the most common cross-browser tag used to implement AP divs?
3. The AP div with the lowest z-index is the one on the top. True or false?
Quiz Answers
1. A keyframe is a frame where you can change properties.
2. The <div> tag is the most logical choice. It logically divides sections of the page, and it works in most version 4.0 and higher browsers.
3. False. The AP div with the highest z-index is the one on top.
Exercises
1. Create a web page that has multiple AP divs. Experiment with inserting images and text into the AP divs. Change the background color of one of the AP divs. Be sure to make a few of the AP divs overlap so that you can see how the z-index works.
2. Create a banner and a navigation bar for a site by placing an AP div across the top of the site for the banner. Place individual AP divs with the text Home, Previous, and Next in them. You can make these hyperlinks if you like. Now convert these AP divs into a table.
3. Create an animation in which an AP div moves around the screen. Add more keyframes. Do the keyframes change the way the animation runs? For instance, does the animation run more smoothly with more keyframes?