
Hour 21. Introduction to Scripts: Sending and Reacting to Form Data
What You’ll Learn in This Hour:
• How to use the Validate Form behavior and Spry form validation elements
• How to set up a page to submit to a CGI script
• How to create secure web pages
• How Dreamweaver edits and displays ASP, ASP.NET, JSP, PHP, and CFML code
In Hour 20, “Creating a Form and Collecting Data,” you learned how to create a form. In this hour, you’ll decide what to do with the data that the user enters into your form. You have to send the data to a script on the server for processing. The script on the server can store data in a database, send it to an email address, send results back to the browser, or process it any way you want (depending on your scripting abilities!).
By the Way: Client-Side Scripts
You can also have client-side scripts created in JavaScript process form data, but those scripts do not have access to server resources and are not able to email data or insert it into a database.
Some of the types of information you might want to receive in a form could include orders, feedback, comments, guest book entries, polls, and even uploaded files. Creating the form and inserting form elements are usually the easy parts. The difficult part is installing and configuring the scripts that process the data.
Validating a Form’s Data Using the Validate Form Behavior
Before you receive and process information from a form, make sure that the information is complete and in the right format. Dreamweaver has a Validate Form behavior that forces the user to enter data into a field, determines whether the user enters an email address, and ensures that the user enters numbers correctly.
The Validate Form behavior requires the user to enter the form data correctly before submitting the data to a script or an application on the server. You can validate the form in two ways:
• Attach the Validate Form behavior to the submit button to validate the entire form when the submit button is clicked. The onClick event triggers the behavior.
• Attach the Validate Form behavior to an individual text field to validate the data entered in that field when the user leaves it. The onChange event triggers the behavior when the user’s focus leaves the field.
You must have a form with form objects in your web page before the Validate Form behavior is active in the + drop-down menu of the Behaviors panel. To validate a form, follow these steps:
1. Create a new form that has various text fields or open the form you created in Hour 20.
2. Select the submit button.
3. Open the Behaviors panel. Click the + button and select the Validate Form behavior.
4. The Validate Form dialog box appears. A list of all the text fields appears in the dialog box.
5. Set up validation settings for every text field that requires them.
6. Check the Required check box if the user must fill in an entry in the field.
7. Choose from among the four settings in the Accept category:
Anything—Select this setting if the user has to enter data into the field but that data can be in any format. For instance, if you are asking for a phone number, you do not want to limit the user to entering only numbers because users often format phone numbers with other characters.
Number—Select this setting if the user has to enter data that is numeric.
Email Address—Select this setting if the user has to enter an email address. This setting checks for an @ symbol.
Number From—Select this setting to check for a number within a range of specific numbers. Fill in both the low and high ends of the range.
8. Notice that your settings appear in parentheses beside the name of the text field in the Fields list (shown in Figure 21.1). Repeat steps 5 through 7 to validate all the text fields.
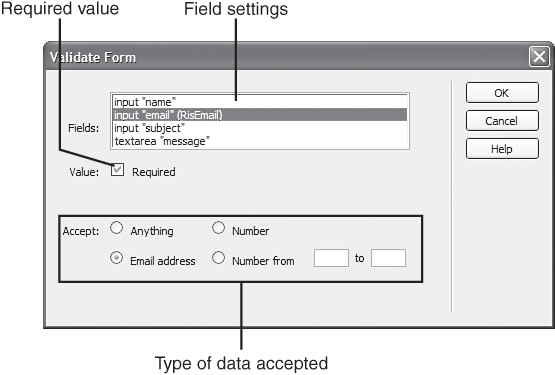
Figure 21.1. The validation settings appear in parentheses in the Named Fields list in the Validate Form dialog box.
9. When you are finished making changes in the Validate Form dialog box, click OK. Select the onClick event if the Validate Form behavior is attached to the submit button. Select the onChange event if you attached the behavior to an individual text field.
When the Validate Form behavior triggers, it checks the data in the form against the settings you entered. You should make sure that your form’s labels and instructions clearly tell users what type of data to enter in each field and indicate which fields are required. You should give the users the information to fill out the form properly so that they don’t get frustrated with error messages.
Did you Know?: Required Form Elements
A standard way to signal that a form element is required is to place an asterisk next to its label. It’s becoming more common to use a bold label to signal that a form element is required. You should tell your users somewhere on the page what indicates that a form element is required.
If the user enters incorrect data, the message box shown in Figure 21.2 appears. This message tells the user that errors have occurred, lists the text fields’ names, and explains why the Validate Form behavior rejected the data. Here is another place where a meaningful name for a Dreamweaver object is important. If you are validating a form, it is a good idea to give a text field the same name as the label beside it so that the user can easily locate and change the field’s data.

Figure 21.2. After running the validation script, a form that has errors or omissions displays this message, indicating which fields the user either omitted or filled out incorrectly.
Did you Know?: Better Form Validation
The Validate Form behavior offers rudimentary form validation. There are other validation behaviors that offer more choices—validating form objects other than just text fields, for instance—and that are available free on the Adobe Exchange. Hour 24, “Customizing Dreamweaver,” explains how you can download and install third-party extensions to Dreamweaver. One behavior I particularly like is Check Form, created by Jaro von Flocken (see www.yaromat.com/dw).
Using the Spry Framework Validation Objects
In Hour 19, “Displaying Content and XML Using the Spry Framework,” you explored the Spry framework and learned how to insert Spry elements in a web page. Spry has four special form elements that you can insert in a form to add automatic form validation: a Spry text field, select object (list or menu), check box, and text area.
Let’s walk through inserting and setting up a text field as an example. All the Spry form elements work similarly. To set up a Spry Validation text field, do the following:
1. Place the insertion point inside a form.
2. Select Insert, Spry, Spry Validation Text Field.
3. Click the tab above the text field to display the text field validation settings in the Property inspector, as shown in Figure 21.3.

Figure 21.3. You can set up Spry validation properties by selecting the object and changing settings in the Property inspector.
4. Select the type of data that the text field should be. Is it a credit card? A number? A ZIP code? A Social Security number? There are validation settings for all of these commonly collected pieces of data.
5. Select when the text field validates by choosing one of the Validate On selections. Select Blur to validate when the user clicks outside the form element. Select Submit to validate when the user clicks the submit button. Select Change to validate when the content of the form element changes.
6. Save the web page (File, Save) and copy the dependent files if prompted. Preview the page in the browser and test the validation.
Receiving Information from a Form
The standard way to process a form is to have on the server an application that parses the data and performs an action on it. Parsing data is the act of dividing and interpreting the name-value pairs that are sent to the server.
Each name-value pair contains the name of the form element entered in Dreamweaver and the value that the user entered or selected for that field. A text field has a name-value pair that contains the name of the text field and the value entered into that field. A radio button group sends a name-value pair with the name of the radio button group and the value of the button selected when the user submitted the form. A list or a drop-down menu sends the name of the object and any items the user selected.
The web browser sends the name-value pairs to a server via an HTTP request. The web server software passes the request to the application server that handles the scripting language specified in the request, as shown in Figure 21.4. For instance, if the script is in ColdFusion Markup Language (CFML), the ColdFusion application server handles the request. Depending on the script, the application server might request data from a database or send a request to an email server to send a specific email message. The server can process scripts in many ways. The application server usually returns some sort of output, normally HTML, which the web server sends back to the browser. This all takes place in milliseconds!
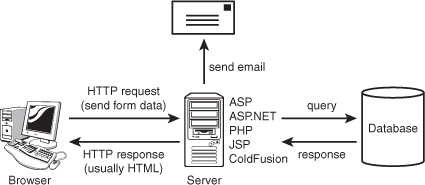
Figure 21.4. The browser sends a request to a script on the server and receives a response. The script might control sending an email message or accessing and returning data from a database.
A popular way of processing forms on a server is by using a CGI script. Developers usually write those scripts in Perl or another programming language. Later in this hour, you will learn other ways of processing forms, with Active Server Pages (ASP), ASP.NET, JavaServer Pages (JSP), PHP: Hypertext Preprocessor (PHP), and CFML—proprietary processing systems that are powerful in creating web applications.
Luckily, there are a number of places on the Web to download already written CGI scripts. Because programming CGI scripts is beyond the scope of this book, the examples in this hour use an existing script that processes form data and sends it to a specific email address.
Did you Know?: Get Free Scripts on the Web
The Web is an incredibly generous place, and you can download all sorts of free scripts to use. If you don’t know how to program CGI scripts and you are willing to process your forms generically, you’ll find a number of great scripts available from Matt’s Script Archive (www.scriptarchive.com) and FreeScripts (www.freescripts.com).
CGI stands for Common Gateway Interface, and it is the definition of the standard method of communication between a script and the web server. A CGI script resides in a specific directory on the web server. It is common for access to this directory to be limited to webmasters for security reasons. You can contact your webmaster and ask whether a script is already available on your server to do what you want to do or whether the webmaster will install one for you. You might have a directory within your own web directory that can hold CGI scripts. Often this directory’s name is cgi-bin or has cgi somewhere in its name.
You should double-check that your hosting service, if you are using one, supports CGI scripts. Sometimes you can use only the scripts that the service has available; check that a form mail script is available. Carefully review the features of the type of account you are signing up for and ask questions, if necessary.
Did you Know?: Use a Form-Hosting Site
CGI scripts might expose a server to hackers on the Web, which is why access to the scripts directory is usually limited. If you don’t have access to CGI scripts, you might want to use a form-hosting site (search for “free form hosting” on Yahoo! or any other search engine). The site www.formmail.com enables you to build and host forms without advertisements for less than a dollar per month.
These sites allow you to create forms that the form-hosting sites process for you. You simply link to the page with the form located on the hosting service’s server. The disadvantage of using these services is that they usually display advertising on your form page.
Enter the URL to the CGI script in the Action text box in the Property inspector, as shown in Figure 21.5. The URL has to be an absolute URL; it should not be relative, even if the script resides in a directory relative to your website. The documentation for the script will tell you whether the script expects the form name-value pairs to be submitted via either the GET or the POST method.
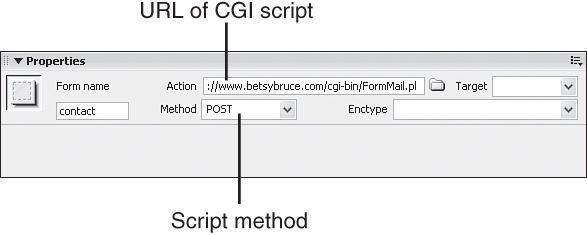
Figure 21.5. With the form selected, enter the URL to the CGI script that will process your form in the Action text box of the Property inspector.
The GET and POST methods differ in the following ways:
• The GET method appends form data to the URL, a URL that can be saved as a bookmark in the browser. Data submitted via this method is limited to 1KB, you can’t upload files, and the address field of the browser displays sensitive data after submission.
• The POST method packages and sends the data invisibly to the user; the output doesn’t appear in the URL. There is no limitation on the amount of data that forms can send. In addition, the POST method allows uploading of files with forms.
Using the FormMail Script
Download Matthew Wright’s FormMail script from www.scriptarchive.com/formmail.html to use with the rest of this hour. This script sends the contents of a form to an email address. The script can be configured a number of ways. If you are going to test the script, you need to install it first. The script comes with a readme file that describes all the functions and parameters you can set in the script. The process of setting up and calling the FormMail script is similar that of submitting a form to any CGI script.
Watch Out!: Web Server Operating Systems
Web server applications reside on various operating systems. UNIX and Windows NT are the most popular operating systems for servers. It’s important that you know which operating system your web server uses. Developers write scripts to run on certain operating systems. For instance, Matthew Wright wrote the FormMail script to run on UNIX. Other people have translated the script to other operating systems. One additional caution: UNIX filenames are case sensitive, so you must be careful that you reference links and image files with the proper case.
To use the FormMail script, you must add to your form hidden fields containing parameters that tell the script what to do. Open the FormMail script in Dreamweaver or a text editor, such as Notepad, and you’ll see instructions at the top of the file. The scripted processes are also contained in the file, so be careful what you change. You have to configure the following four variables at the top of the FormMail script before loading it onto the server:
• $mailprog—This variable needs to point to the UNIX server’s sendmail program. Leave the variable set at the default; if it doesn’t work, your webmaster can give you the path. You do not need this variable if you are running the Windows NT version of the script. If your hosting company provided the FormMail script for you, it has probably modified this variable for you. A common path to sendmail is usr/lib/sendmail; you’ll have to read your hosting service’s documentation or contact the service to determine what address you have to use.
• @referers—This variable contains the domains (usually one) allowed access to the script. This setting keeps unauthorized domains from using the script and the resources on your server. My domain is www.betsybruce.com, so that’s what I would enter into this variable. This prevents people with forms in domains other than mine from using my script to process their forms.
• @recipients—This variable defines the email addresses that can receive email from the form. This deters spammers from using the form to do their dirty deeds.
• @valid_ENV—This variable is configurable by the webmaster in order to define environment variables. You don’t need to worry about this unless your webmaster gives you information on how to change it.
Adding a Hidden Field to a Form
Hidden fields are sent along with all the other form fields. The users cannot change the contents of these fields, nor can they see the fields unless they view your HTML source. You should create hidden fields for the recipient of the emailed form data, the subject that appears in the email subject field, and the URL to which the script redirects the user after filling out the form. You can explore many other settings on your own.
Make sure that your form has the URL to the FormMail script on the server set the Action text box in the Property inspector. The FormMail script can accept either the GET method or the POST method for submitting the data. I suggest the POST method because it is more common and because you do not risk exceeding the amount of data that the GET method can handle. To add hidden fields to your form, follow these steps:
1. Place the insertion point anywhere inside your form. It does not matter where the hidden fields are located.
2. Select the Hidden Field object from the Insert bar or select Insert, Form, Hidden Field.
3. Dreamweaver displays the Hidden Field symbol in your web page, as shown in Figure 21.6. You must have Invisible Elements checked (select View, Visual Aids, Invisible Elements); also, the Invisible Elements category in the Dreamweaver Preferences dialog box must have Hidden Form Fields checked.
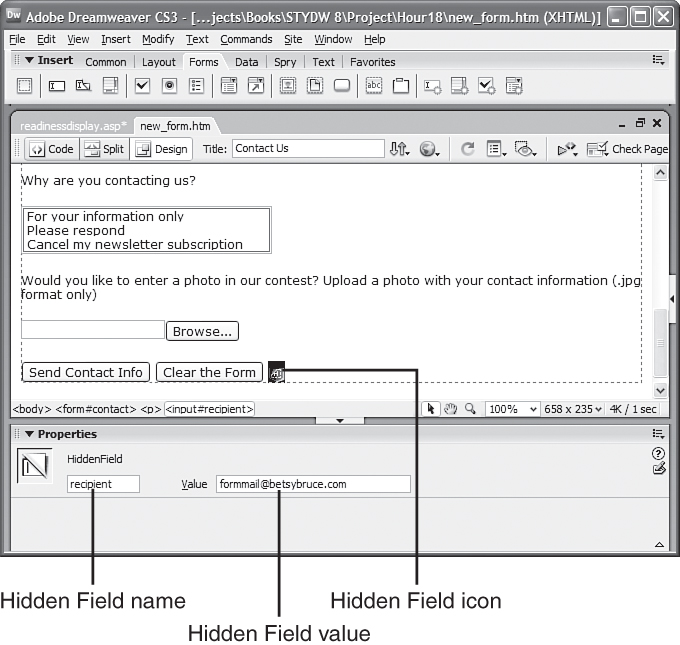
Figure 21.6. The Hidden Field symbol appears when you insert a hidden field into a form. The Property inspector shows a hidden field name-value pair.
4. Enter recipient in the text box on the left side of the Property inspector and your email address as the value, as shown in Figure 21.6. The script documentation describes these name-value pairs.
5. Optionally, add another hidden field to the form and enter the name redirect. As the value of the field, enter the URL to which the script redirects the user after submitting the form.
When you are naming your own objects in Dreamweaver, you can afford to occasionally make a typo or misspelling. Scripts and applications, however, are not forgiving of typos. Adding hidden fields requires you to enter the names exactly as they are listed in the documentation. It’s often necessary that the letter case be exact as well because many servers are case sensitive.
You can add a number of optional form fields to the FormMail script. Refer to the documentation to read about them. When the user submits the form, the script sends the name-value pairs to the email address specified in the hidden field named recipient. This is the simplest processing possible for a form. Other scripts can save data to databases, validate and process credit card information, and perform all sorts of other complex actions.
Exploring Submission Security
When your users submit form information, it travels in packets across the Internet, along with millions of other packets. Packets are electronic bundles of information that carry data to the server. People who understand how to intercept and reassemble data taken from the Web can intercept and read these packets of information. After you take steps to secure sensitive data, don’t forget to assure users that their transactions and data are indeed secure.
Again, this is a web server issue. The web server on which your site is located must have secure sockets enabled. Many ISPs offer this service. Ask your webmaster whether you have access to secure web pages.
Users access a secure URL exactly as they would a regular URL. The only difference is that the protocol portion of the URL changes from http to https. A user must have a browser that is capable of accessing secure pages. As shown in Figure 21.7, the browser displays a Lock icon in the status bar when it is in secure mode.

Figure 21.7. The browser displays a Lock icon in the status bar when serving the page via secure sockets.
You have to worry about secure submissions only when the user enters sensitive information, such as credit card numbers or other financial data. For polls, guest books, or feedback forms, you don’t have to shield the information from potential thieves. Customers will expect you to protect only their sensitive data.
You need a server certificate to add security to your form submissions. A certificate is an electronic document verifying that you are who you say you are. You might be able to use your web host’s certificate, or you might need to purchase your own. One of the major certificate vendors is VeriSign, and you can learn more about certificates at VeriSign’s website: www.verisign.com.
Uploading a File from a Form
You might have to add a file field that enables users to upload files. You can collect images, homework assignments, or any types of files that you want to have sent to you with a file field object. Users click the Browse button, shown in Figure 21.8, to select a file from the local drive. When a user clicks the Submit button, the file travels to the server.

Figure 21.8. Use a file field to enable a user to upload a file to the server. However, make sure that your server allows uploading before you create your form.
A file field has attributes similar to those of a text field, which you used in the last hour. You can set the size of the file field by putting a value in the Char Width box in the Property inspector. You can also set the Max Chars attribute and the Init Val attribute in the Property inspector. You must give the file field a unique name.
The important question you must answer before you use a file field is this: Does your server allow anonymous file uploads? You also have to select multipart/form-data from the Enctype drop-down list for the <form> tag so that the file encoding is correct. Also, you should use the POST method to submit your form; the GET method does not work with file fields.
Preparing a Page to Interact with ASP, ASP.NET, JSP, PHP, or CFML
In addition to using CGI scripts, there are other ways to process forms and create dynamic web applications. Like CGI scripting, these technologies interact with the web server to process web page information. Dreamweaver enables you to create dynamic web pages that incorporate server-side scripting. When you create a new web page, you create a dynamic page by selecting the Dynamic Page category in the New Document dialog box, as shown in Figure 21.9.

Figure 21.9. You can create ASP, ASP.NET, JSP, PHP, and CFML pages with Dreamweaver.
Dreamweaver supports these five major server-side scripting languages:
• ASP—Microsoft’s ASP combines client-side scripting with server-side processing to create dynamic web pages. The capability to process ASP comes with Microsoft’s Internet Information Server (IIS) 4+, which runs on Windows NT. (You can add the capability to process ASP to IIS 3.) Some third-party applications, such as Chili!Soft, can interpret ASP on UNIX servers.
• ASP.NET—Microsoft’s ASP.NET, released in 2002, is a server-side application platform that will eventually replace ASP. To run ASP.NET on your server, you need Microsoft IIS 5.0 or later, running on Windows 2000, Windows XP, or Windows Server 2003. You also need the .NET Framework Redistributable installed (available from http://msdn.microsoft.com/net and included automatically in Windows Server 2003).
• JSP—JSP is a Java-based way to dynamically process web pages. JSP scripts interact with a JSP-enabled server. The popular Apache web server and the free Tomcat JSP application server are available. For Microsoft IIS, Macromedia’s JRun is a popular JSP application server.
• PHP—PHP is a free, open-source server-side scripting language that sends dynamic web pages to the user after interpreting PHP code. PHP is the open-source movement’s answer to ASP.
• CFML—Macromedia’s ColdFusion server interprets CFML to create dynamic web pages. The ColdFusion server application can run on many operating systems. CFML is slightly different from the other scripting languages described here because it is a tag-based language, like HTML.
All these scripting languages accomplish the same thing: enabling a client-side web page to interact with the server by accessing data, sending an email message, or processing input in some way. They all have advantages and disadvantages, and each uses a different syntax to add code to web pages.
Did you Know?: Intrigued? Want to Learn More?
Sams Teach Yourself Macromedia Dreamweaver MX 2004 in 21 Days by John Ray picks up where this book leaves off by introducing you to dynamic websites and scripting. Also check Appendix A, “Resources,” for links to sites where you can learn more about these scripting methods.
You can embed ASP, ASP.NET, JSP, PHP, and CFML into your web pages, and Dreamweaver represents the code with special icons, as shown in Figure 21.10. When you define your site as one containing dynamic pages, your page looks slightly different from this. In a dynamic site, Dreamweaver displays a representation of the code; you can display actual data from the database by viewing the web page in Live Data view.

Figure 21.10. Special icons, in this case an ASP Script icon, appear when you’re viewing invisible elements that represent code.
You can use ASP, ASP.NET, JSP, PHP, or CFML scripts contained in an external script file to process a form. Such a script acts like the CGI script you used earlier this hour. You reference the script’s URL as the form’s action in the Property inspector. Again, the script’s directory must have the proper permission set in order for the script to execute. Figure 21.11 shows a form submitting its contents to an ASP script.

Figure 21.11. You enter the URL of an ASP script if the script will process your form when the user submits it.
When you define your site as a dynamic site, you can author dynamic web pages in Dreamweaver. Dreamweaver enables you to easily hook up your web content to databases. You can visually add ASP, ASP.NET, JSP, and CFML components. Dreamweaver generates the code for you behind the scenes and displays the dynamic elements. You can even see how your web page will look with real data from the database within Dreamweaver.
Did you Know?: Learn More with the Dreamweaver Tutorials
If you’d like to learn more about creating dynamic web pages, go through the tutorials that come with Dreamweaver.
Summary
In this hour, you learned how CGI scripts work and how form data gets to them. You learned how to use the Validate Form behavior and Spry form validation elements to validate the data that the user enters into your form. You inserted into a form hidden fields that contain a name-value pair. You set the action for a form and learned the difference between the GET and POST methods for submitting data. You learned about secure transactions. In addition, you learned how to call ASP, ASP.NET, PHP, JSP, and CFML scripts.
Q&A
Q. I know an ASP programmer who will help me with my web pages. What do I need to tell her about my web pages so that she can write a script to process them on the server?
A. She needs to know what you called the items in your form and how you want them processed. If she is sending the data to a database, she has to know what you call the items in your form so that she can parse the data into the correct place. She also needs to know whether you need any validation or processing applied to the data. For instance, you might need to have individual prices added together as one total price.
Q. Should I learn Perl, ASP, ASP.NET, PHP, JSP, or CFML?
A. It depends on what you want to do when you grow up! Do you have a knack for coding? If so, having skills in any of these technologies might be fun and look great on your résumé. Find out what technologies people at work are using. If you learn those technologies, your colleagues might be a good support system for your learning endeavor.
If you aren’t very interested in coding but want to expand your web skill set, maybe it’s a better idea to specialize in Dreamweaver—there’s a lot to learn! On the other hand, you can always learn more about databases. If you don’t really enjoy coding, it can be a real chore. Dreamweaver offers objects and server behaviors that make it much easier than before to code dynamic web pages.
Workshop
Quiz
1. What pair of items do users send when submitting a form?
2. What is a hidden text field?
3. What does it mean when a URL begins with https?
Quiz Answers
1. Users send a name-value pair when they submit a form. This is the name of the form object and the value either entered or selected by the user.
2. A hidden text field contains a name-value pair that the user cannot change. Generally, the script requires this data to process the form properly.
3. A URL beginning with https signals that the URL is secure using the Secure HTTP protocol.
Exercises
1. Add a Google search box to a web page. You’ll be adding a form that contacts the Google servers and returns results to the web page. You can find the code at www.google.com/searchcode.html; paste this code in Dreamweaver’s Code view and then change to Design view to examine and edit it.
2. Experiment with the FormMail fields that you did not explore in this hour. The script also offers validation functionality that you could use instead of using the Dreamweaver Validate Form behavior. You can find the documentation online at www.scriptarchive.com/readme/formmail.html.
3. Find a form on a Web and look at it critically. Select the View Source command to see the HTML. Does the form have any hidden fields? To what server is the form submitted? You should look for the <form> and </form> tags that contain the code for the form.