
LESSON 13. Using LinkedIn Applications
In this lesson, you learn how to enhance your LinkedIn experience with LinkedIn applications, including how to add, manage, and remove these applications.
Understanding LinkedIn Applications
LinkedIn Applications are optional extensions to LinkedIn that enhance the content and effectiveness of your profile, foster collaboration with your network, and integrate your LinkedIn data with other sites to provide further research and competitive intelligence opportunities.
The following LinkedIn applications are currently available, with more in development:
• Blog Link by SixApart
• Box.net Files by Box.net
• Company Buzz by LinkedIn
• Events by LinkedIn
• FT Press Delivers by FT Press
• Google Presentation by Google
• Huddle Workspaces by Huddle.net
• Lawyer Ratings by LexisNexis Martindale-Hubbell
• My Travel by TripIt
• Polls by LinkedIn
• Portfolio Display by Behance
• Projects and Teamspaces by Manymoon
• Reading List by Amazon
• Real Estate Pro by Rofo
• SAP Community Bio by LinkedIn
• SlideShare Presentations by SlideShare
• Tweets by LinkedIn
• WordPress by WordPress
All LinkedIn applications are free, but some require you to have an account with an application that might charge fees based on your usage. For example, Box.net Files and Huddle Workspaces offer both free and fee-based plans.
Choosing the Right Applications
LinkedIn applications offer many options for sharing and collaborating. At times, the number of choices is overwhelming. Although some applications, such as My Travel and Company Buzz, are unique in terms of the features they provide, other applications overlap in their functionality. For example, both Blog Link and WordPress enable you to share blog posts on your profile. You can share presentations using Google Presentation, SlideShare Presentations, and even Box.net Files.
Here are some tips for making the most of LinkedIn applications:
• Analyze how each application fits into your strategic plan and helps you meet your goals. Just because something sounds interesting doesn’t make it worthwhile to add.
• If more than one application performs the same function, compare their features before you pick one to use. Fortunately, LinkedIn applications are easy to add and remove.
• Focus on quality rather than quantity when choosing the documents and presentations you would like to share. A resume, portfolio, or presentation that highlights your business can enhance the effectiveness and reach of your LinkedIn profile, but don’t add so many documents that the important ones are lost in the mix.
• Consider your personal privacy with all the documents and data you share online. For example, adding your resume to your profile can aid in your job search, but you might not want to include your home address or phone number.
• Determine whether you have the legal right to post presentations or other documents you created for an employer.
Adding Applications
To add an application to your profile or home page, follow these steps:
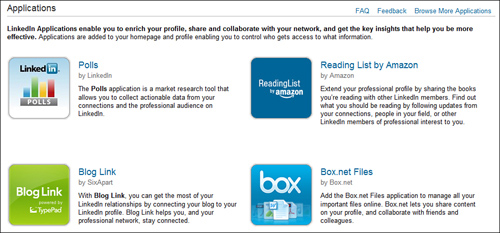
- On the global navigation bar, select Get More Applications from the More drop-down list. Alternatively, click the Add an Application link on the bottom of the Edit Profile page. The Applications page opens (see Figure 13.1).
Figure 13.1. Enhance your LinkedIn experience with one of the many available applications.
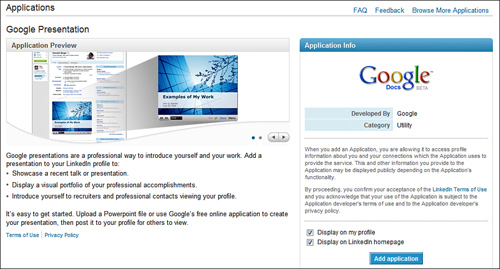
- Select the application you want to add. The page for that application opens. Figure 13.2 illustrates the Google Presentation page, as an example.
Figure 13.2. Google Presentation is one of many LinkedIn applications.
- The Application Info box appears on the right side of every application page. In this box, choose whether you want to display the application on your profile, on your LinkedIn home page, or on both.
- Click the Add Application button to add the application and enter details specific to that application.
The rest of this section explains how to set up individual applications. This lesson provides detailed instructions for only the most popular applications, not every available application.
When you add an application, a link to it appears on the More drop-down menu on the global navigation bar. If you haven’t added any applications, only the Reading List by Amazon and Events links appear by default.
Adding the Blog Link Application
The Blog Link application enables you to post summaries of your blog posts to your LinkedIn profile. You can also follow the blog posts of LinkedIn members in your network. Blog Link supports blogs on multiple platforms including TypePad, Movable Type, Vox, Wordpress.com, Wordpress.org, Blogger, LiveJournal, and more.
Note: If You Use WordPress, Consider the WordPress Application
WordPress users have two choices for displaying their blog posts on their profiles: the Blog Link application and the WordPress application. Both applications serve the same function, but they display your blog posts in a different format. If you use WordPress, try both applications to see which one you prefer. See “Adding the WordPress Application” later in this lesson for more information.
Before adding the Blog Link application, verify that the URL to your blog appears in the Websites section on your profile. Refer to Lesson 2, “Creating Your Profile,” for more information on listing your blog in this section. The application pulls your blog data from your profile and doesn’t work properly if you don’t have a listed blog.
To add the Blog Link application, follow the steps listed in “Adding Applications” earlier in this lesson, selecting the Blog Link application on the Applications page. The Blog Link application opens.
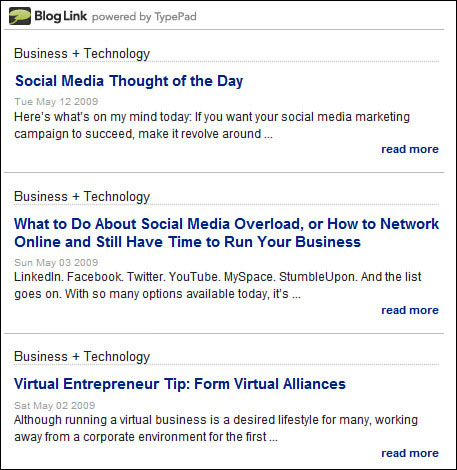
The Blog Link application searches for your blog posts and includes summaries on your LinkedIn profile (see Figure 13.3). They also appear on the By Me tab in the Blog Link application.
Figure 13.3. Automatically post your blog updates to your LinkedIn profile.
Caution: What to Do If Your Blog Posts Don’t Appear on Your Profile
If your blog posts don’t appear on your profile, verify that you selected the Display on My Profile check box on the initial application page. Also, verify that your blog is listed on the Websites section of your profile. The Blog Link application pulls its content from the blog listed in this section.
Blog Link also searches for blog posts from your connections and includes these on the From My Contacts tab. If you don’t want to view a particular blog, click the Hide This Feed link below its title. Blog posts from other LinkedIn members don’t appear on your profile.
Caution: Only Add Blogs That Relate to Your Professional Activities
Remember that your LinkedIn profile is part of your professional presence online. Include only blog content that supports your professional image. Personal blogs or blogs covering controversial topics might not be suitable to share with your LinkedIn connections.
Adding the Box.net Files Application
The Box.net Files application enables you to share content from Box.net (www.box.net), a leading online collaboration and file-sharing website. With this application, you can post files such as resumes, portfolios, and presentations to your profile, collaborate privately with your LinkedIn connections, and view and edit your files online.
To add the Box.net Files application, follow the steps listed in the “Adding Applications” section earlier in this lesson, selecting the Box.net Files application on the Applications page.
The Box.net Files application opens, requesting that you log in to your Box.net Files account or sign up for a free account.
After you log in, you can upload files, view your connections’ public files, and collaborate privately with your connections.
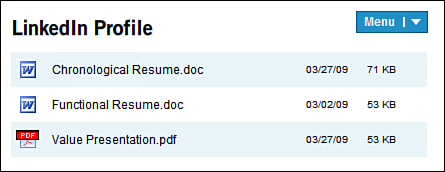
The files you selected to display publicly on your profile appear in the Applications section, shown in Figure 13.4.
Figure 13.4. Posting your resume can help you stand out from the crowd of other job seekers.
Adding a Poll
The Polls application enables you to poll LinkedIn users about relevant professional topics and participate in polls other LinkedIn members create. A LinkedIn poll is a short question with the option of providing as many as five answers. Members select their preferred answer and the Polls application tallies the results. Polls are different from other applications in that they don’t integrate with external data and they offer both free and fee-based options.
You can invite your 1st degree connections on LinkedIn to participate in your poll at no charge or purchase a paid poll that surveys a wider audience on LinkedIn. If you choose to purchase a paid poll, you can specify a target audience based on job function, seniority, gender, age, or geography. You pay a set fee of $1 per response with a minimum purchase of 50 responses. If you’re a LinkedIn premium member, you might be eligible for discounts or special offers.
To create a poll, follow these steps:
- Follow the steps listed in the “Adding Applications” section earlier in this lesson, selecting the Polls application on the Applications page. The Create a Poll page opens, shown in Figure 13.5. If you already installed the Polls application, you can select it from the More drop-down menu on the global navigation bar.
Figure 13.5. Use a LinkedIn poll to gain valuable insight and perform market research.
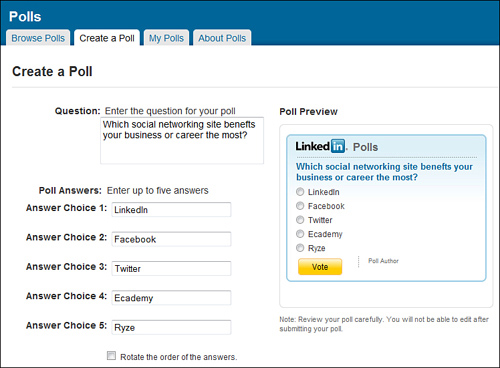
- Enter a question of no more than 75 characters.
- Enter up to five possible answers (using no more than 40 characters per answer) to your question.
- Click the Rotate the Order of the Answers check box if you want to vary the position of your answers in your poll.
- Select the audience for your poll’s distribution. Options include
• Target Audience of Professionals in the U.S: With this option, you can select a target audience and receive a guaranteed response for a fee.
• Your 1st Degree Connections: LinkedIn sends a network update informing your connections about your poll. The number of responses you receive will vary based on your number of connections and their interest in participating in your poll. LinkedIn will also provide you with a URL you can use to share your poll with others.
- Click the Post Poll button to post your poll to the Network Activity section on your connections’ home page. If you selected the fee-based poll option, LinkedIn opens additional pages for you to specify your target audience and pay for your poll before posting.
To view the results of your polls, click the My Polls tab on the Polls page. On this tab, you can select a poll to view, copy a poll for reuse, or end a poll.
When you click the title link of a poll, LinkedIn displays detailed information about your poll, shown in Figure 13.6.
Figure 13.6. Analyze the results of your poll.
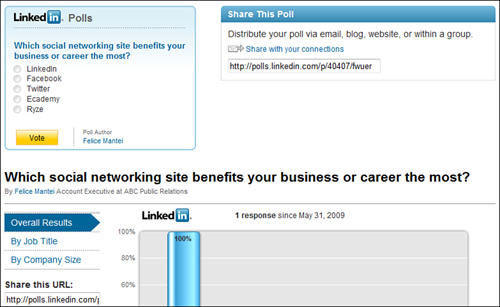
Here you can
• View the total number of responses you’ve received. Note that each LinkedIn member can vote only once, so no one can skew poll results.
• View the response percentage for each potential answer.
• View responses by job title and company size.
• Share your poll’s unique URL with others.
• Add and review comments.
To view and respond to polls other LinkedIn members submit, click the Browse Polls tab.
Adding the Reading List by Amazon Application
The Reading List by Amazon application enables you to share book recommendations and reading plans with your LinkedIn connections. LinkedIn installs the Reading List by Amazon application by default.
To add a book to your profile using the Reading List by Amazon application, follow these steps:
- On the global navigation bar, select Reading List by Amazon on the More drop-down menu. The Reading List by Amazon application opens, with the Network Updates tab selected.
- In the What Are You Reading section, enter the title of a book you would like to include on your profile.
- Click the Search Books button to display possible matches. If the book you want to display doesn’t appear, revise your search results or search according to author name.
- Click the Select button below the matching title to continue to the next page (see Figure 13.7).
Figure 13.7. Share your reading recommendations with your network.
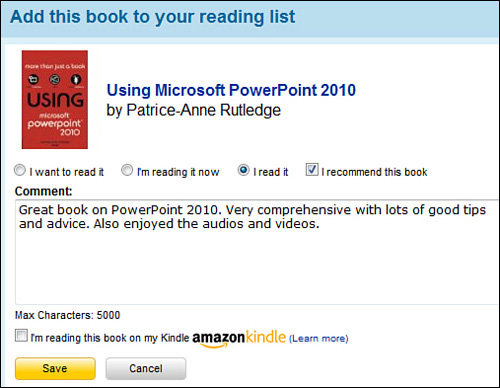
- Select one of the following reading options: I Want to Read It, I’m Reading It Now, or I Read It.
- Enter a comment of up to 5,000 characters. In your comments, explain to your connections why you’re including this book and the value it offers.
- Select the I’m Reading This Book on My Kindle check box if you’re reading the Kindle version.
- Click the Save button to update your reading list.
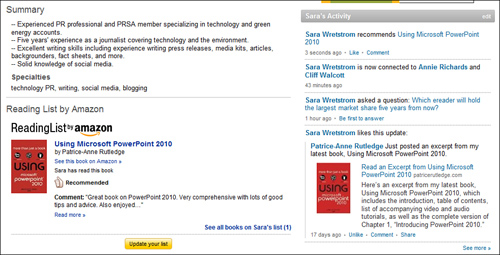
The book now appears on your profile (see Figure 13.8) and home page (if you selected these display options).
Figure 13.8. Your connections can view your reading list on your profile.
To return to this application, select Reading List by Amazon from the More drop-down menu on the global navigation bar. The Network Updates tab is selected by default.
This tab also includes information about the books your connections are reading. For each book that appears, you can click the
• Title of the book for more information about the book
• See Profile link to view the profile of the person who recommends this book
• Watch [First Name]’s List button to add yourself to this person’s watch list
• Add Book to Your Reading List link to add the book to your own reading list
• See This Book on Amazon link to open the book’s Amazon page
In addition to the Network Updates tab, the Reading List by Amazon application also includes three other tabs:
• Your Reading List: Displays a list of all books you added to your reading list. You can edit or delete an existing entry from this list.
• Industry Updates: Displays books on the reading lists of others in your industry.
• All Recent Updates: Displays reading list updates from all LinkedIn members.
If you remove the Reading List by Amazon application and want to add it again, follow the steps listed in the “Adding Applications” section earlier in this lesson.
Adding the SlideShare Presentations Application
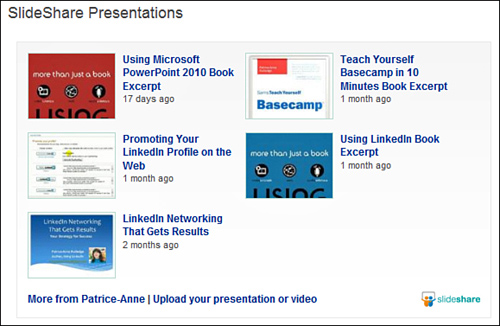
Using the SlideShare Presentations application, you can embed presentations and other documents from SlideShare (www.slideshare.net), the popular presentation-sharing site. If you don’t have an account on SlideShare, you can sign up for one from LinkedIn and start uploading files. The files you choose appear on your profile (see Figure 13.9).
Figure 13.9. Use SlideShare to incorporate slideshows into your LinkedIn profile.
Although SlideShare is best known for sharing presentations such as PowerPoint files, you can also share files of up to 100MB in numerous formats, including Microsoft Word, Microsoft Excel, and PDF. You can also embed YouTube videos in your presentations to give your LinkedIn profile some added flair.
To add the SlideShare Presentations application, follow the steps listed in the “Adding Applications” section earlier in this lesson, selecting the SlideShare Presentations application on the Applications page. The SlideShare application opens.
Enter your Username and Password if you already have a SlideShare account and click the Link Existing Profile button. Alternatively, sign up for a SlideShare account and click the Create New Profile button.
The SlideShare application includes the following five tabs.
• Home: Displays the Network Activity list, detailing the presentations your connections have uploaded. Click the name of any presentation to view it in a player, tweet it on Twitter, share with your connections, add comments, or mark it as a favorite.
• Explore: Lists the most viewed and most recently uploaded presentations.
• Your Connections: Displays the presentations your connections have uploaded.
• Your Slidespace: Offers the following display options: Your Presentations, Your Favorites, or Your Connections. This tab also includes a link to the Settings page where you can specify whether you want to display presentation thumbnails or a complete presentation in a player.
• Upload: Enables you to upload files to LinkedIn.
Adding the WordPress Application
If you have a WordPress blog, you can display your blog posts on your LinkedIn profile. This application works with both self-hosted WordPress.org blogs and hosted WordPress.com blogs.
Tip: Also Consider the Blog Link Application
If you use a solution other than WordPress to host your blog, check out the Blog Link application instead. WordPress users can choose between adding the WordPress application or adding the Blog Link application. Each application performs the same function, but each displays posts in different formats. Refer to the “Adding the Blog Link Application” section earlier in this lesson for more information.
To add the WordPress application, follow these steps:
- Follow the steps listed in the “Adding Applications” section earlier in this lesson, selecting the WordPress application on the Applications page. The WordPress application opens, shown in Figure 13.10.
Figure 13.10. Specify the URL of your WordPress blog.
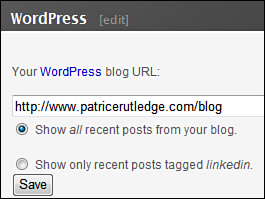
- Enter the complete URL of your blog in the text box, such as http://www.patricerutledge.com/blog.
- Indicate whether you want to show all recent blog posts or only those tagged LinkedIn.
- Click the Save button to preview your blog posts.
Your WordPress blog posts now appear on your profile and home page (if you selected these display options).
Adding and Managing LinkedIn Events
The LinkedIn Events application enables you to add events to LinkedIn’s events calendar, promote events to LinkedIn members, and find events you want to attend. LinkedIn focuses on professional events, both in-person and virtual, rather than personal events.
LinkedIn installs the Events application by default. To open the LinkedIn Events page, select Events from the More drop-down menu on the global navigation bar. This page contains four tabs:
• Events Home: Browse your connections’ events, the most popular events on LinkedIn, and event-related network updates. Click an event’s title link to view more details, add comments, and RSVP your participation at the event (such as attending, presenting, exhibiting, or interested). This isn’t an official RSVP, but rather a way to let your LinkedIn network know about your event activities. You can also see how many other LinkedIn members RSVPed, including your connections.
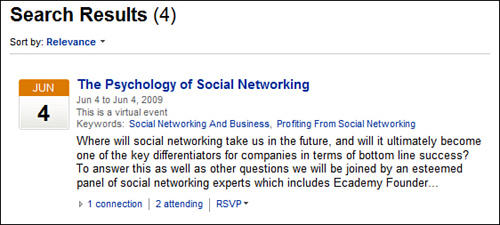
• Find Events: Search for events to attend by keyword, date, location, or event type. Figure 13.11 shows a sample Search Results summary, which also lets you know about your connections’ participation.
Figure 13.11. Use LinkedIn Events to find events to attend and share with your network.
• My Events: View a list of the events you added or those events for which you submitted an RSVP.
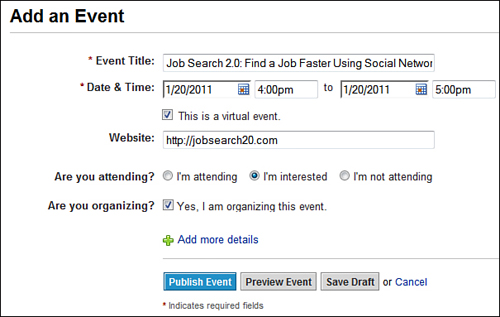
• Add an Event: Add your own events to the LinkedIn events calendar. Figure 13.12 shows a sample new event.
Figure 13.12. Add an event and publicize it on LinkedIn.
LinkedIn provides event visibility in its event directory, on member home pages, and member profiles. You can also send a message to your connections about a particular event by clicking the Share link on that event’s page. Advertising via LinkedIn DirectAds is another way to promote your event. See Web Lesson 3, “Advertising on LinkedIn,” for more information about placing DirectAds.
Removing Applications
Eventually, you might discover that an application isn’t as useful as you thought it would be and you want to remove it:
- On the global navigation bar, select Get More Applications from the More drop-down menu.
- On the Applications page, click the link for the application you want to remove.
- In the Application Info box on the right side of the page, click the Remove button.
LinkedIn removes the application from your profile and home page.
You can also update an application’s visibility settings from this page. For example, rather than removing an application, you could choose not to display it on your profile or LinkedIn home page.
Summary
In this lesson, you learned how to use LinkedIn applications to enhance your profile and collaborate with your connections.