
In this lesson, you’ll learn about the LinkedIn network and the many ways to communicate with other LinkedIn members.
Before you start communicating with others on LinkedIn, you need to understand how LinkedIn classifies its members in terms of their connections to you. This distinction is important because it determines what, if any, restrictions LinkedIn places on your ability to contact people.
Your LinkedIn network consists of three levels of connections:
• 1st degree connections. LinkedIn members you connect with directly. Either you sent them an invitation to connect and they accepted, or you accepted their invitation. Your connection list on your profile displays your 1st degree connections. When LinkedIn refers to “your connections,” this means your 1st degree connections.
• 2nd degree connections. LinkedIn members who connect directly with your 1st degree connections.
• 3rd degree connections. LinkedIn members who connect directly with your 2nd degree connections.
For example, if you connect directly with your colleague Nicole, she is your 1st degree connection. If Nicole connects directly to Ben, her former classmate, Ben is your 2nd degree connection. If Ben connects directly with Drake, one of his co-workers, Drake is your 3rd degree connection.
LinkedIn also considers fellow members of groups as part of your network. See Lesson 11, “Working with LinkedIn Groups,” for more information about LinkedIn groups.
LinkedIn offers several ways to communicate with other members. The type of communication you can send depends on how you’re connected to these members. Your choices include
• Messages. Messages are the primary form of communication on LinkedIn. You can send messages to your direct connections as well as to the people who belong to the same LinkedIn groups as you do. If you can send a message to someone, the Send Message link appears next to their name on their profile and in search results. See “Sending Messages” later in this lesson for more information. Although you’ll often see the term “message” used generically to refer to all items in your Inbox, it is a specific type of communication in itself.
• Invitations. An invitation is a request to connect with another LinkedIn member. See Lesson 3, “Adding and Managing Connections,” for more information about sending invitations.
• InMail. An InMail is a private message to or from a LinkedIn member who is not your connection. You can receive InMail free if you indicate that you are open to receiving InMail messages on the Account & Settings page. In general, sending InMail is a paid LinkedIn feature unless the recipient is a premium member who belongs to the OpenLink Network. See “Sending InMail” later in this lesson for more information.
• Introductions. An introduction provides a way to reach out to the people who are connected to your connections. By requesting an introduction through someone you already know, that person can introduce you to the person you’re trying to reach. You can contact your 1st degree connections to request introductions to members who are 2nd and 3rd degree connections. Members with free accounts can have up to five introductions open at a time. See “Requesting Introductions” later in this lesson for more information.
Before you start communicating with another LinkedIn member, you need to understand your available options for contacting that particular person. When you view member profiles or their summary information from another part of the site, the icons next to a member’s name tell you how you’re connected (see Figure 6.1).
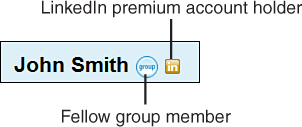
These icons identify 1st, 2nd, and 3rd degree connections; fellow group members; and LinkedIn premium account holders.
Note: Some LinkedIn Members Have No Icons
Members who display no icons next to their names are out of your network, don’t share any groups, and aren’t premium account holders.
The links that display to the right of a member’s name let you know what contact options are available. These include
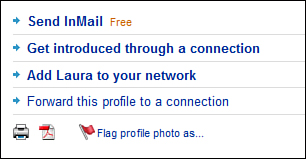
• Send Message. Send a message to a direct connection or group member.
• Send InMail. Send an InMail to someone who isn’t in your network. This option doesn’t appear for members to whom you can send a message because it wouldn’t make sense to pay to contact someone you can communicate with freely. If you click the Send InMail link and don’t have a premium account, LinkedIn prompts you to sign up for one before you can proceed.
• Send InMail (Free). Send an OpenLink message to a member of the OpenLink Network. LinkedIn members who hold premium accounts can offer you the option of sending them free InMail. See Lesson 1, “Introducing LinkedIn,” for more information about the OpenLink Network.
• Get Introduced Through a Connection. Request an introduction to this member through a 1st degree connection.
• Add [person’s first name] to Network. Send an invitation to connect. See Lesson 3, “Adding and Managing Connections,” for more information about sending connection requests.
• Forward This Profile to a Connection. Forward a member’s profile to a member you know, as a way of informal introduction.
These are the link names that appear on an actual profile. The link names in search results are sometimes abbreviated.
Caution: Not All Options Are Available for All Members
Remember that you’ll never see all of these options for any one member. For example, it wouldn’t make sense to send InMail, request an introduction, or add to your network a member who is already your connection, so these options don’t appear for your connections.
Your Inbox is the focal point for all your direct communication on LinkedIn. A summary of your five most recent Inbox items appears at the top of your home page. You can also click the Inbox link on the left navigation menu to open the Inbox page, shown in Figure 6.2.
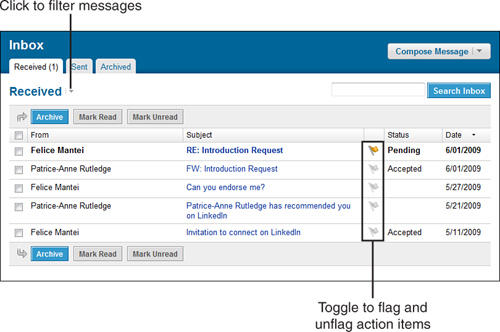
The default view of your Inbox is the Received tab, which displays all the items you’ve received. If you have a lot of Inbox items and want to filter what you see, click the down arrow next to the Received heading and choose one of the available options. For example, you can choose to display only action items, messages, InMails, introductions, invitations, jobs, recommendations, or group messages.
Tip: Search for Specific Content
In addition to filtering Inbox items, you can also search for a specific message. Enter a keyword in the text box on the right side of the page and click the Search Inbox button. LinkedIn displays all messages containing that search term. For example, you could search for a person’s name or a word or phrase in the subject line or message text.
From the Received tab, you can
• Sort your messages. Click one of the message headings (From, Subject, Status, or Date) to sort based on that heading.
• Archive a message. Select the check box to the left of the message you want to move to the Archive folder and click the Archive button. It’s a good idea to archive old or resolved messages to keep your Inbox focused on your current action items.
Caution: You Can’t Delete Messages from Your Inbox
LinkedIn doesn’t let you delete messages from your Inbox. If you want to remove messages, simply archive the messages you no longer need to view.
• Mark a message as read or unread. By default, new messages appear in bold text to signify they have not yet been read. After you read a message, the message no longer is boldfaced in your Inbox. To change this, select the check box to the left of a message and click either the Mark Read or Mark Unread button.
• Flag a message as an action item for follow-up. By default, new messages include a flag icon to the right of the subject line, flagging it as an action item. Click the flag icon, which serves as a toggle, to flag or unflag a message for action.
The Inbox also includes two other tabs. The Sent tab displays all your sent messages and the Archived tab displays all the messages you archived.
Each message also lists a status. When a new message arrives, its status displays as Pending. Based on the action you take on each message, your status changes. Status options include
• Accepted. You accepted the message, such as an invitation to connect.
• Bounced. The message bounced when sent to an email provider.
• Don’t Know/Doesn’t Know. The message, such as an invitation to connect, was rejected when the recipient clicked the I Don’t Know This User button. LinkedIn lists the status as “Don’t Know” if you clicked the button. The status is “Doesn’t Know” if you sent the request that was rejected.
• In Progress. Identifies an InMail or introduction request that is still an action item for one of the people involved.
• Replaced. Another message has replaced this message and you can no longer respond to it. For example, someone sent you a recommendation request and then resent it when you didn’t respond.
• Replied. You replied to the message.
• Sent. You sent this message. If the message was a request, the recipient hasn’t accepted it yet.
• Withdrawn. The sender has withdrawn this message, request, or invitation.
You can also send messages directly from the Inbox. Click the Compose Message button to open the Compose Your Message page and send a message to a connection. For other options, click the down arrow to the right of the Compose Message button. From the drop-down list, you can choose to
• Send a message to a connection (same result as clicking the Compose Message button)
• Send InMail or an introduction
• Send invitation
• Send recommendation
• Request recommendation
• Send job notification
Refer to other sections in this lesson and other lessons in this book for more information about each specific type of communication.
To send a message to a 1st degree connection or group member, follow these steps:
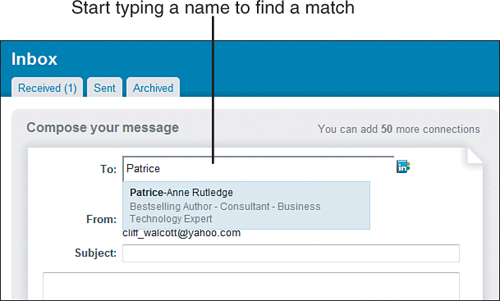
- Click the Compose Message link on the expanded left navigation menu to open the Compose Your Message page, shown in Figure 6.3.
- In the To field, start typing the name of your connection and wait for LinkedIn to find a match.
Tip: Send a Message to Multiple Connections
Alternatively, click the address book icon to open your connection list. With the address book, you can search for the person you want to reach or select multiple recipients for your message. LinkedIn allows you to send a message to up to 50 connections at one time.
- Enter a Subject for your message.
- Enter your message in the text box.
- If you’re sending a message to multiple recipients and don’t want to disclose this information, remove the check mark before the Allow Recipients to See Each Other’s Names and Email Addresses check box (selected by default).
- To email yourself a copy of your message, select the Send Me a Copy check box. Your message already appears in your Sent folder by default.
- Click the Send button. LinkedIn sends your message to the recipient and notifies you that your message was sent.
Although clicking the Compose Message link is the primary way to send messages on LinkedIn, you can also send messages by clicking the Send Message link in a profile, on your home page, or in search results.
You can open your messages from the Inbox preview on your home page or from the Inbox itself. (Access it by clicking the Inbox link on the left navigation menu.)
Click the Subject line link of any message to open it. Figure 6.4 illustrates a sample message.

The buttons that appear at the bottom of a message vary depending upon the message type and what actions you can take. For example, a basic message includes the Reply button, a recommendation request includes the Write a Recommendation button, and an invitation to connect includes the Accept button and I Don’t Know This User button.
As you learned earlier in this chapter, InMail enables you to contact LinkedIn members who aren’t in your network. In an effort to manage spam, LinkedIn requires members to pay to send InMail. InMail is most useful for members who want to contact a wide variety of people, such as recruiters or individuals using LinkedIn for business development.
LinkedIn premium accounts enable you to send a fixed number of InMail messages per month. To learn more about LinkedIn premium accounts and InMail, click the Upgrade Your Account link on the bottom navigation menu. You can also purchase individual InMails at $10 each. To do so, click the Account & Settings link on the top navigation menu and then click the Purchase link in the Account section. This is cost-efficient only if you want to contact just a few people by InMail.
Tip: When You Can Send Free InMail
If you see the word “Free” immediately following a Send InMail link, you can send InMail to this LinkedIn member at no charge. To enable members to send you free InMail, you must participate in the OpenLink Network, a premium feature.
See Lesson 1 to learn more about the OpenLink Network and premium account options.
To determine the InMail options available for a particular member, view the contact options on that person’s profile (see Figure 6.5).
Note: Where Is the Send InMail Link?
You won’t see any Send InMail link for members who indicate on the Account & Settings page that they aren’t open to receiving InMail. InMail isn’t an option for your connections, either. You can contact them directly at no cost to either party.
To send InMail to a LinkedIn member, follow these steps:
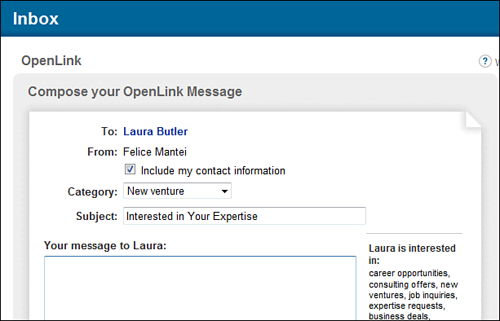
- Click the Send InMail link on the profile of the person you want to reach. If you’re sending paid InMail, the Compose Your Message page opens. If you’re sending free InMail, the Compose Your OpenLink Message page opens (see Figure 6.6). These pages contain identical information.
- If you don’t want to share your contact information with the person you want to reach, remove the check mark from the Include My Contact Information check box (selected by default). In general, it’s a good idea to share contact information.
- In the Category drop-down list, select the reason for your InMail. Options include career opportunity, consulting offer, new venture, job inquiry, expertise request, business deal, reference request, or get back in touch.
- In the Subject field, enter the subject of your InMail.
- In the text box, enter your message. To increase your chances of a positive reply, be as specific as possible.
- Click the Send button to send your InMail. If the recipient doesn’t respond to the InMail within seven days, the message expires.
For more information about InMail, see “Understanding InMail, Introductions, and LinkedIn Messages” in this lesson and see Lesson 1.
Tip: Consider Alternatives to InMail
Although InMail is an effective LinkedIn communication tool, it comes at a price. If you want to contact someone you don’t know and don’t want to pay to send InMail, you have several other options. You could join a group that this person belongs to and then send a message or invitation to connect as a fellow group member. You could also request an introduction through a mutual connection. Alternatively, you could choose to contact the individual outside LinkedIn by accessing the website links and external email information individuals provide on their profiles.
Requesting an introduction is a good way to connect with people in your network whom you don’t connect with directly. Although you can send an invitation to connect to someone you don’t know, you might want to consider requesting an introduction through a shared connection for important communications. An introduction can carry more weight than a cold contact.
For example, let’s say that you’re connected to your former manager Felice (1st degree connection) and Felice is connected to Dalton (2nd degree connection), a manager at another local company. You’re very interested in working in Dalton’s department, but you don’t know him and haven’t seen any posted job openings. Rather than sending Dalton an email and resume as a “cold contact,” you could send an introduction request through Felice.
Often you’ll know already how you’re connected to the person you want to reach, but you can also determine this by viewing the How You’re Connected To [First Name] on your target contact’s profile. If you don’t already know of a common connection, this box could list a name you recognize.
Here are several tips for making the most of LinkedIn introductions:
• Talk to your 1st degree connection before sending an introduction request on LinkedIn. Your connection might have information that’s pertinent to your request. For example, if you’re trying to reach someone about job opportunities, your connection might know if your target is hiring or if there’s a more suitable person to contact.
• Focus on introductions to 2nd degree connections for best results. Although you can request an introduction to a 3rd degree connection, this requires two intermediaries. In many cases, the second intermediary (your 2nd degree connection passing on your request to your 3rd degree connection) might not even know you.
• Make your introduction request concise and specific. A vague request to “get to know” someone isn’t nearly as effective as stating your specific purpose, such as seeking employment, recruiting for a job, offering consulting services, and so forth.
• Keep in mind that you can have only five open introductions at one time with a free LinkedIn personal account. Find out how many introductions you still have available by clicking the Account & Settings link in the top navigation menu and viewing your account summary. To increase your number of open introductions, you need to upgrade to a premium account. LinkedIn recommends using introductions judiciously rather than as a tool to contact hundreds of members.
To request an introduction, follow these steps:
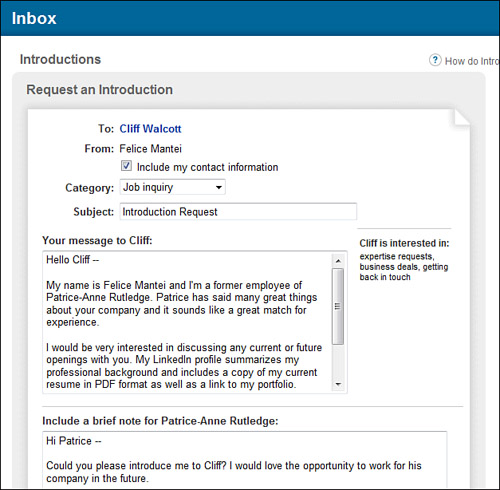
- Click the Get Introduced Through a Connection link on the profile of the person you want to reach. The Introductions page opens, shown in Figure 6.7.
- If you don’t want to share your contact information with the person you want to reach, remove the check mark from the Include My Contact Information check box (selected by default). In general, it’s a good idea to share contact information.
- From the Category drop-down list, select the reason for your introduction request. Options include career opportunity, consulting offer, new venture, job inquiry, expertise request, business deal, reference request, or get back in touch.
- In the Subject field, enter the subject of your request.
- In the first text box, enter your message to the person you want to be introduced to.
- In the second text box, enter a brief note to the person you want to make the referral (your 1st degree connection).
- Click the Send button to send your introduction request.
Your 1st degree connection receives your request and can choose to forward it to your target connection with comments or decline your request. If your request wasn’t clear, your connection might ask you for more information.
See the following section, “Managing Introduction Requests,” for more information about the next step in the process.
In addition to requesting your own introductions to others, you might also receive introduction requests. For example, LinkedIn members might ask you to facilitate an introduction to one of your connections or might ask your connection to facilitate an introduction to you.
To review and respond to introduction requests, follow these steps:
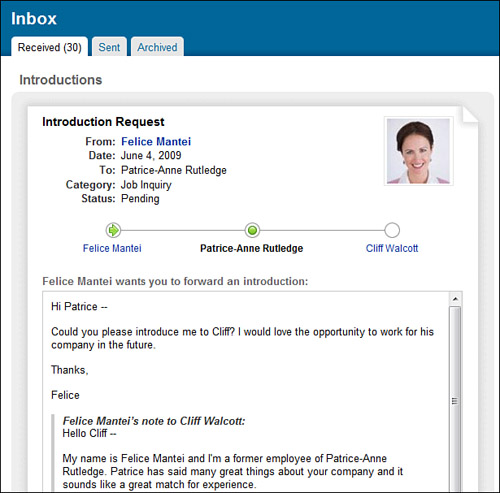
- Click the Inbox link on the left navigation menu to open your Inbox.
- If you have many messages in your Inbox, select Introductions from the Received drop-down list. Your Inbox displays only your introduction requests. Alternatively, you can also view new introduction requests in your Inbox preview on your home page or receive them by email. (Specify this on the Account & Settings page.)
- To open the request, click the subject line link. Figure 6.8 illustrates a sample introduction request.
- Click the Forward Introduction button to forward the request to your connection.
Note: Declining or Archiving an Introduction Request
If you don’t want to make the introduction, click the Decline Introduction button. Alternatively, click the Archive button to move the request to your Archive folder where you can take action on the request later. Introduction requests remain active for six months.
- Enter any additional comments in the text box and click the Forward Message button.
The target recipient receives your forwarded introduction request and can accept, decline, or archive it. Accepting the introduction enables the requestor and target to communicate with each other, but they still need to send an invitation request to become connections.