
In this lesson, you’ll learn how to request, provide, manage, and revise professional recommendations on LinkedIn.
LinkedIn enables you to request recommendations from and provide recommendations to the people in your professional network. Recommendations are a powerful networking tool, so consider carefully whom you want to ask for a recommendation and whom you want to recommend as part of your overall LinkedIn strategy.
LinkedIn offers four types of recommendations:
• Colleague. You worked with this person at the same company as a manager, peer, or employee.
• Business Partner. You worked with this person in another capacity, not as a colleague or client. For example, you worked at partner companies, performed volunteer or association work together, and so forth.
• Student. You were a teacher, advisor, or fellow student at the same school.
• Service Provider. You hired this person to perform services. Service Provider recommendations differ from the other recommendation types in that they also appear in the LinkedIn Service Providers directory. See Lesson 14, “Using LinkedIn Service Providers,” for more information about service provider recommendations.
The recommendation process involves several steps between two people to ensure that both approve the recommendation before it is final. For example, if Anne wants to request a recommendation from her former manager, Sophie—a common type of request—the process requires four steps:
• Step 1. Anne sends a recommendation request to Sophie.
• Step 2. Sophie receives the request and submits a recommendation for Anne.
• Step 3. Anne receives a notification about Sophie’s recommendation and accepts the recommendation.
• Step 4. LinkedIn displays the recommendation on Anne’s profile.
Obviously, this process assumes that both Anne and Sophie approve each step. LinkedIn also offers options for you to request clarifications and changes. If you write an unsolicited recommendation for a connection without receiving a recommendation request, your process starts at step 2 with submitting the recommendation.
Receiving recommendations from managers, colleagues, and clients can help you achieve your networking goals on LinkedIn. LinkedIn suggests that a complete profile should include at least three recommendations for maximum effectiveness.
Before you send your requests, however, think about what you want to achieve. Be clear about your goals so that your connections write recommendations that help you achieve them. For example, if you want to move into a management position, you should request a recommendation that discusses your leadership abilities. If you want to change careers, emphasize crossover skills.
Tip: Let Your Connections Know You Want a Recommendation
Although LinkedIn notifies your connections that you’ve requested a recommendation, it’s a good idea that this message doesn’t come as a surprise. Talk to the people you want to recommend you so that they’re aware of your request and know what to emphasize in their recommendation.
To request a recommendation from one of your connections, follow these steps:
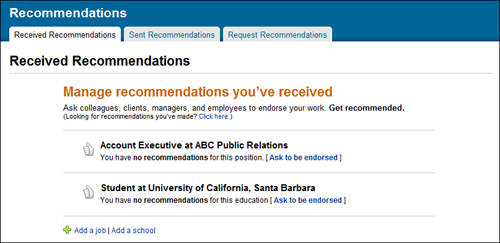
- Click the Recommendations link on the expanded left navigation menu. The Received Recommendations page opens, shown in Figure 10.1.
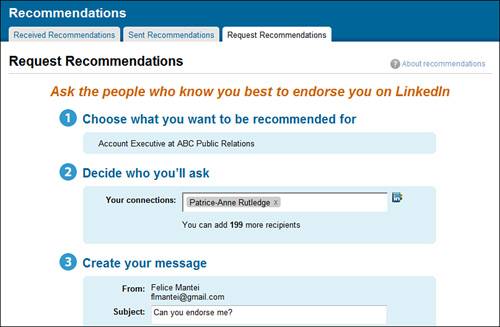
- Click the Ask to Be Endorsed link next to the related position or school. The Request Recommendations page opens, shown in Figure 10.2.
Tip: Keep Your Profile Up-to-Date
The Received Recommendations page displays only positions and schools you’ve already entered on your profile. If you haven’t done this, click the Add a Job or Add a School link to complete this step first.
Note: Request a Recommendation from Your Profile
You can also request a recommendation on the Edit My Profile page. To do so, click the Request Recommendations link below the related position or school in the Experience or Education section. If you already have one recommendation, this link is called the Manage link.
- In step 1, the position or school you selected appears by default. To change this, return to the previous page.
- In step 2, start typing the name of the connection you want to ask for a recommendation. Select the correct name from the drop-down list of options that appear.
Caution: Don’t Mass Produce Recommendation Requests
Although you can request a recommendation from up to 200 connections at a time, it’s a much better practice to personalize each recommendation request you send. If you really want to send your request to more than one person, however, click the View All Connections button to select your recipients.
- In step 3, create your message asking for a recommendation. LinkedIn provides sample text for you, but you should customize this for each request. Be specific and let your connection know what you want to achieve with this recommendation. You don’t need to add a salutation; LinkedIn does this automatically.
- Click the Send button. LinkedIn sends your recommendation request to its target recipient. If you selected more than one person in step 2, each person receives an individual message.
See “Responding to Recommendation Requests,” to learn what happens when a connection receives your recommendation request.
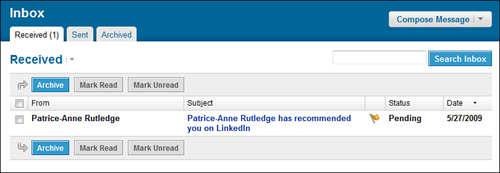
After you send a recommendation request, the Received Recommendations tab indicates that you have a pending request (see Figure 10.3). This text remains until your connection submits a recommendation for you.
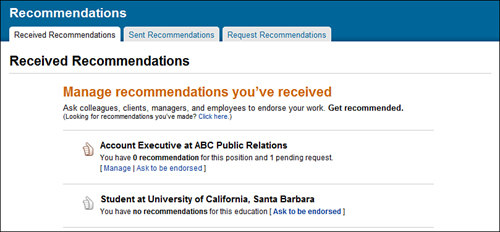
To review your request, click the Manage link below the related position or school. The Manage Received Recommendations page opens, shown in Figure 10.4.
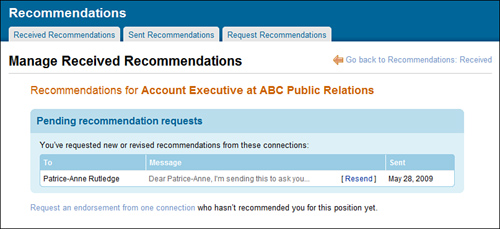
On this page, you can view a list of the recommendations you’ve requested and the date you requested them. If your request has been pending for more than a week, click the Resend link to send your request again with a message to the recipient. It’s also a good idea to contact this person directly.
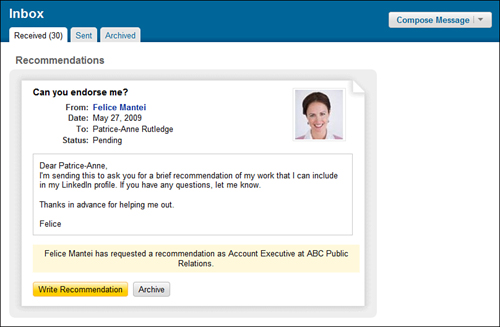
LinkedIn sends a message to your Inbox when you receive recommendation requests. The default subject line for these messages is “Can You Endorse Me?” unless the person requesting the recommendation modified this text.
To respond to a recommendation request, follow these steps:
- Click the Inbox link on your expanded left navigation menu. See Lesson 6, “Communicating with Other LinkedIn Members,” for more information about working with your Inbox.
- Select the message that contains the recommendation request. Figure 10.5 illustrates a sample recommendation request.
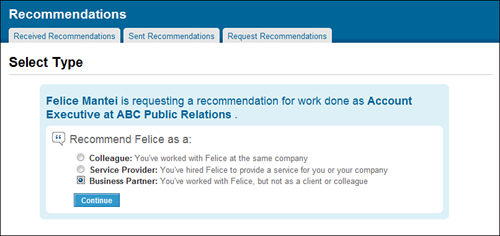
- Click the Write Recommendation button to write your recommendation. The Select Type page opens, shown in Figure 10.6.
- If this recommendation is for a position, select from the following options: Colleague, Service Provider, or Business Partner. See “Understanding LinkedIn Recommendations,” earlier in this lesson for more information about these recommendation types.
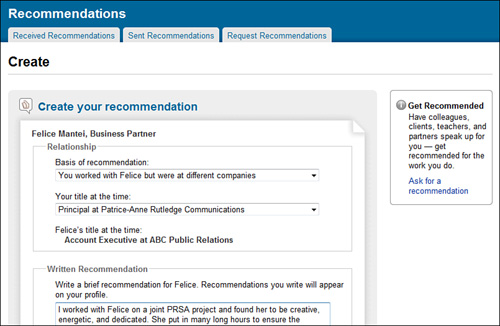
- Click the Continue button to open the Create Your Recommendation page, shown in Figure 10.7.
- Select a Basis of Recommendation from the drop-down list. Depending on the type of recommendation you’re giving these options could include
• Colleague. Specify whether you managed this person; reported to this person; were senior to this person, but didn’t manage this person directly; held a lower position, but didn’t report to this person; worked in the same group; or worked in different groups.
• Business Partner. Specify whether you worked together at different companies or whether the person was your client.
• Student. Specify whether you were a teacher, advisor, or fellow student.
- Select Your Title at the Time from the drop-down list, which includes the positions on your profile.
- Enter your recommendation in the Written Recommendation box. Write a concise, specific recommendation that relates to the position and the goals of the person you’re recommending.
- Click the View/Edit button to display the Personalize This Message text box, where you can personalize the message you send to the person requesting your recommendation. This text doesn’t appear on the recommendation itself.
- Click the Send button to send the recommendation and accompanying message to the requestor.
Tip: Consider Carefully Who You Recommend
Consider carefully before recommending someone on LinkedIn. Remember that your reputation is based not only on who recommends you, but also on who you recommend. Is this someone you would recommend in the real world? If not, reply privately to the person explaining that you don’t feel comfortable giving the recommendation. For example, you might not know the person well enough for a recommendation, or your experience working together might not have been a positive one.
At times, you might want to recommend your connections even if they don’t send you a recommendation request. To make a recommendation, follow these steps:
- Click the Recommendations link on the expanded left navigation menu.
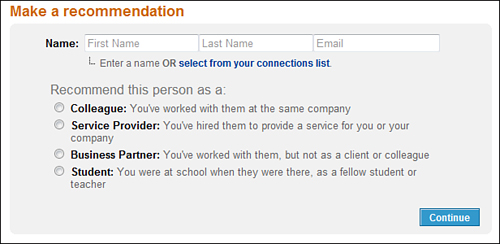
- Scroll down the Received Recommendations page to the Make a Recommendation box, shown in Figure 10.8.
- Click the Select from Your Connections List link to select your target recipient. Alternatively, enter a person’s name and email address.
- Select the type of recommendation you want to write. Options include Colleague, Service Provider, Business Partner, or Student. See Lesson 14 for more information about service provider recommendations.
- Click the Continue button to open the Create Your Recommendation page.
See “Responding to Recommendation Requests,” earlier in this lesson for more information on completing the Create Your Recommendation page. The process is the same whether you respond to a recommendation request or initiate it yourself.
When someone recommends you, LinkedIn sends you a notification message (see Figure 10.9). If you indicate that you want to receive email notifications on the Account & Settings page, LinkedIn also notifies you by email.
Open the message to view the complete recommendation. Figure 10.10 illustrates a sample message.
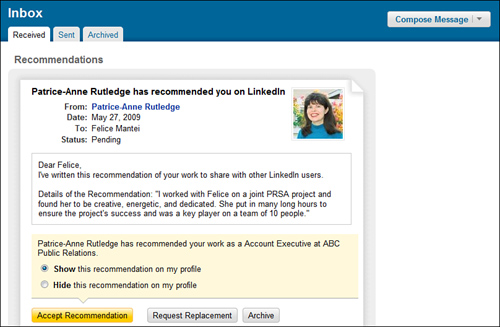
On this page, you can:
• Select Show This Recommendation on My Profile if you want to display the recommendation.
• Select Hide This Recommendation on My Profile if you want to hide the recommendation. In general, displaying your recommendations is a good promotional tool. You should hide unsolicited recommendations you don’t want others to view.
• Click the Accept Recommendation button to accept the recommendation.
• Click the Request Replacement button to ask for a revised recommendation. This option is useful if the recommendation isn’t accurate, contains misspellings, or doesn’t focus on your current goals or accomplishments. To ensure you receive a more appropriate recommendation, be sure to specify why you need a replacement.
If you accept your recommendation and choose to show it on your profile, you can view it below its related position or school (see Figure 10.11).

Several times a year, you should review your recommendations to verify that they’re still relevant to your current goals. You might want to hide a recommendation that’s no longer relevant or request updated recommendations from those who have recommended you in the past.
To manage your recommendations, click the Recommendations link on the expanded left navigation menu.
On the Received Recommendations page, click the Manage link below the recommendation you want to change. The Manage Received Recommendations page opens, shown in Figure 10.12.
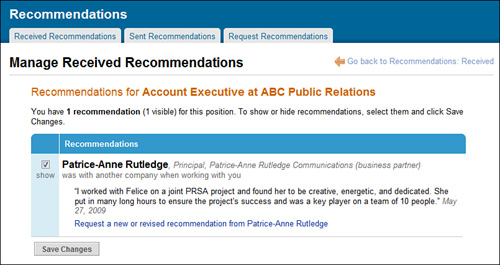
To hide a recommendation from your profile, remove the check mark next to the Show check box. Click the Save Changes button to save this change.
To ask a connection for a revised recommendation, click the Request a New or Revised Recommendation From [name] link. LinkedIn sends a message to this connection asking for a revision. Be sure to communicate clearly what you’re looking for in your revised recommendation. For example, you might want to revise a recommendation if your job duties for the same position have changed or you want to emphasize a different aspect of your job for future career growth.
To manage the recommendations you give others, click the Recommendations link on the expanded left navigation menu. Click the Sent Recommendations tab to open the Sent Recommendations page, shown in Figure 10.13.
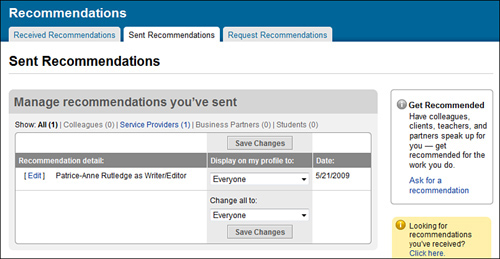
On this page, you can
• Change the display options for a recommendation. By default, the recommendations you give your connections appear on your profile for all LinkedIn members to see. Click the Display on My Profile To drop-down list, and choose either Connections Only or No One to change this.
• Revise a recommendation. Click the Edit link next to the recommendation you want to revise and make your changes on the Edit Your Recommendation page. Click the Send button to make your changes and notify your connection.
• Withdraw a recommendation. Click the Click the Edit link next to the recommendation you want to withdraw. On the Edit Your Recommendation page, click the Withdraw This Recommendation link. A pop-up box asks you to confirm that you want to withdraw the recommendation.