Hour 11. Declaring Actions in an Interface File
What You’ll Learn in This Hour
![]() Comparing actions and methods
Comparing actions and methods
![]() Creating actions with Xcode
Creating actions with Xcode
![]() Connecting interface elements to actions
Connecting interface elements to actions
Introducing Actions
Hour 10, “Declaring Methods in an Interface File,” covered the basics of declaring methods. There is a great deal of flexibility in the Objective-C method declaration structure, and you can use it to make your code easy to read and reuse (not to mention easy for users to use). In this hour, you learn how to create and use actions—a special type of method that is a key part of the Cocoa frameworks. Actions make it possible to connect interface elements such as buttons and menu commands to code that is triggered when the action is invoked by a user. In a very real sense, almost the entire user interface of Cocoa and Cocoa Touch rests on actions.
Without a doubt, actions are part of the Cocoa frameworks; however, they are implemented by writing Objective-C code, and their interactions with interface elements are created in most cases using Xcode. This hour shows you the basics of actions in both the frameworks and in the language contexts.
It might seem a little strange to have both the very flexible structure for building methods you saw in Hour 10 as well as a far more specialized structure to build actions. The reason for this is that by having this highly specialized structure for actions, you gain a great deal of flexibility in developing apps based on Cocoa and Cocoa Touch.
Regardless of the status of the terminology, the specific concepts are easy to implement in Objective-C and the Cocoa frameworks, and they are widely used in those contexts.
The easiest way to introduce actions is to demonstrate how you can use them to build an app with a graphical user interface that requires next to no programming. Much of the work is done by dynamic and runtime features of Objective-C as well as by the Cocoa frameworks. A key part of the demonstration involves the target-action paradigm (or design pattern, if you prefer that term).
What Actions Can Do for You
To demonstrate what actions can do for you, the developer, you will see how to build an OS X app and a comparable iOS app with next to no programming. It all relies on actions and Interface Builder in Xcode.
Note: Where to Connect Your Actions
In the OS X Cocoa Application template, you connect your actions to AppDelegate. In the iOS Single View Application template, you connect your actions to ViewController. Both of these are shown in the steps that follow. As you explore Cocoa and Cocoa Touch, you will find other objects to which you can connect actions, but that is beyond the scope of this book. The process, however, is exactly the same.
Try it Yourself: Build an OS X App with an Action
1. Create a new Xcode project from the OS X Cocoa Application template. If you want, you can run it at this point; you have an empty window and a menu bar. The relevant menu commands, such as Quit, work.
2. Select MainMenu.xib in the project navigator. This opens Interface Builder in the editor, as shown in Figure 11.1. At the left side of the editor, you can show or hide the document outline (you can also use Editor, Show/Hide Document Structure).
At the top of the canvas, you see the menu bar that is created as part of the template. Do not confuse this with the Xcode menu bar. The template menu bar consists of Template Mac 11 (the name of the project), File, Edit, Format, View, Window, and Help.
3. If necessary, show the utility area at the right.
4. Locate the Menu and Menu Item objects from the Object library, as shown in Figure 11.1.
5. Drag the Menu object from the Object library and place it between View and Window on the menu bar.
6. Select the Menu Item. You should see a menu with three menu items within it.
7. Select one of the menu items and change its name in the Attributes inspector to Experiment. Delete the other two items. (You can also just double-click the menu item and type the new name in without bothering with the Attributes inspector.)
8. Switch to the Assistant editor. Use the jump bars to set one pane to MainMenu.xib and the other pane to AppDelegate.h.
9. Control-drag from the menu command to the interface of AppDelegate.h. An insertion indicator shows you where the outlet or action will be placed.
10. When you release the mouse button, the small dialog shown in Figure 11.2 displays. Note that this is where the target action paradigm comes into play: Instead of constructing a method as described in Hour 10, you are limited to the choices in the small dialog.
Select Action (the other choice is Outlet to create a property) and name the action you are creating (experimentMenuItem is a good choice). By default, the AppDelegate placeholder in Interface Builder is filled in, and the return type of the action (id) is filled in.
11. Click Connect.
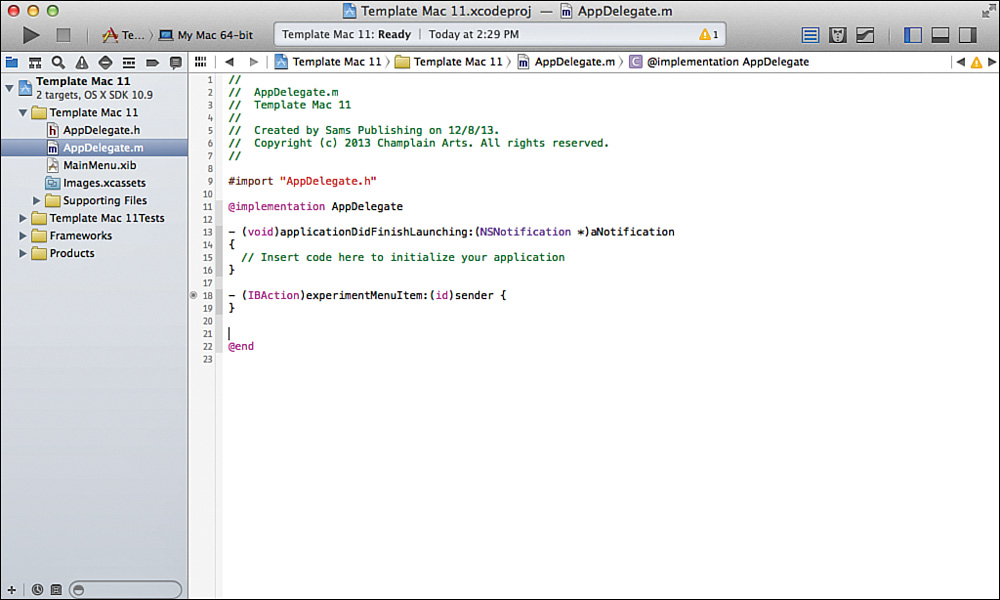
12. The declaration of the action is created for you, as shown in Figure 11.3.
Tip
One of the reasons Xcode can do this is that the header of an action is specified in the target action paradigm. On OS X, it returns void, and it takes one argument, sender, which is type id.
IBAction is handled by the compiler and converted to void. While you are using Interface Builder, Xcode uses IBAction to indicate action methods, but once the compiler takes over, it is changed to void.
The structure is slightly different for iOS, as you will see in the next “Try It Yourself” activity.
13. Show AppDelegate.m either in the Standard or Assistant editor. A shell for the action definition has been created (see Figure 11.4).
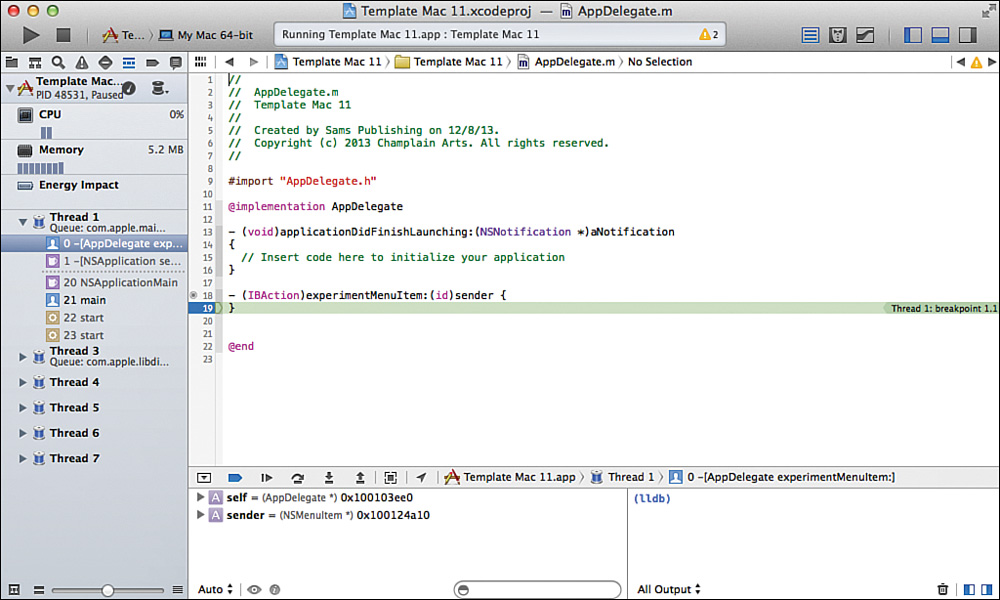
14. Set a breakpoint on the action implementation and run the app. Select the Experiment command from the Test menu, and you drop into the debugger, as shown in Figure 11.5. You may want to use the Standard editor and show the debug area to make the window easier to view.
You have not actually written any code at this point. You have used a totally graphical interface to build your app and its interface. The only code you need to write is the app-specific implementation of the experiment command.
Try it Yourself: Build an iOS App with an Action
1. Create a new Xcode project from the iOS Single View Application template, as shown in Figure 11.6.
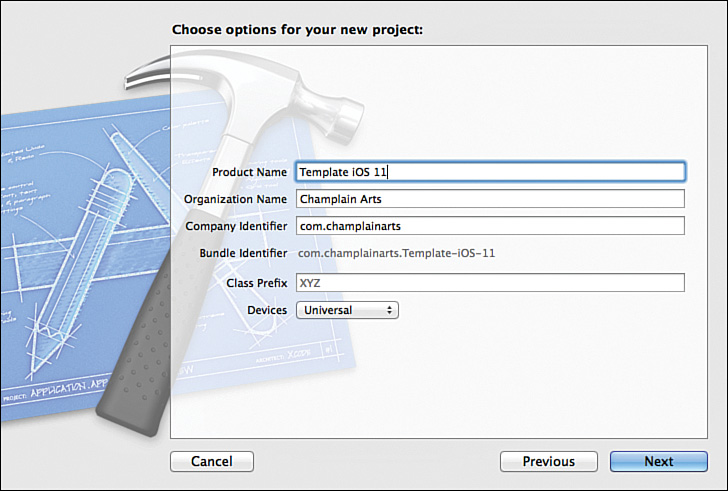
2. If you want to match the figures in this hour, select Universal or iPhone for Devices as shown in Figure 11.6.
3. When prompted, save the project.
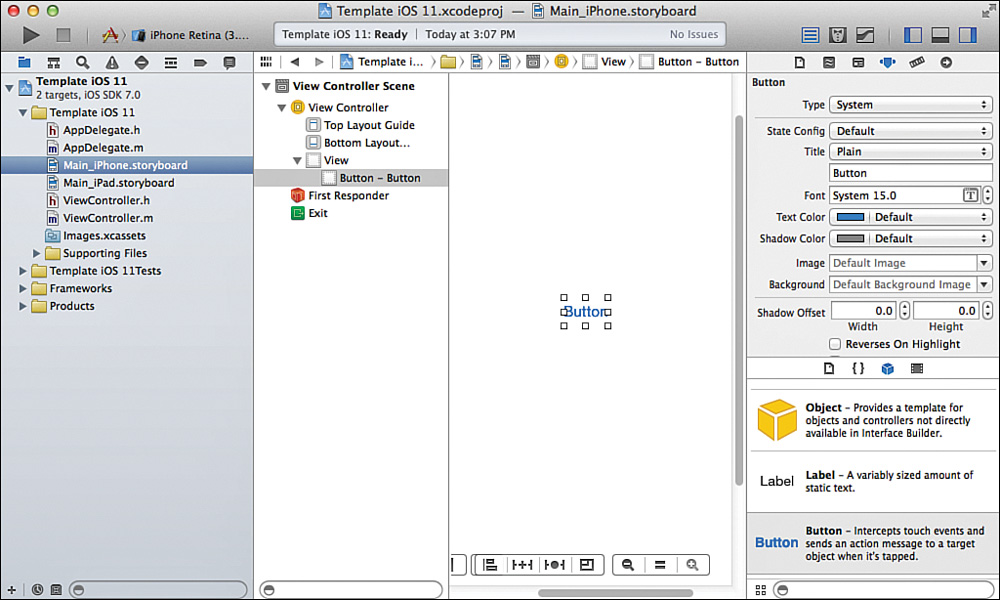
4. Select MainStoryboard_iPhone.storyboard from the project navigator.
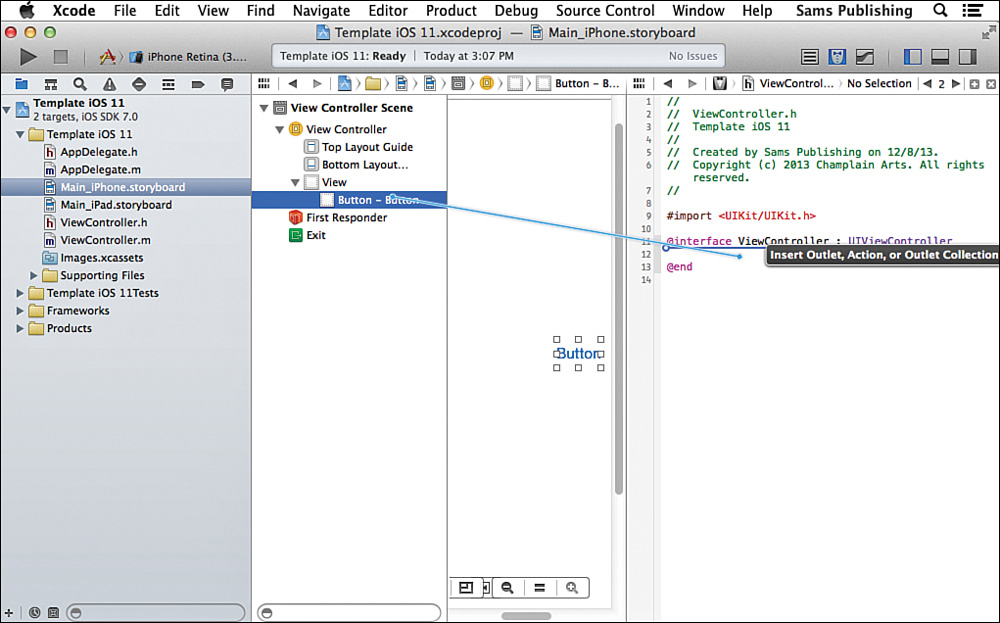
5. Drag a Button from the Object library into the canvas, as shown in Figure 11.7.
6. Using the Assistant editor, show ViewController.h in the other pane.
7. Control-drag from the button to the interface of ViewController.m (see Figure 11.8), and then release the mouse button.
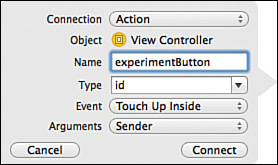
8. In the small dialog box, make certain the connection is set to Action and name it experimentButton, as shown in Figure 11.9.
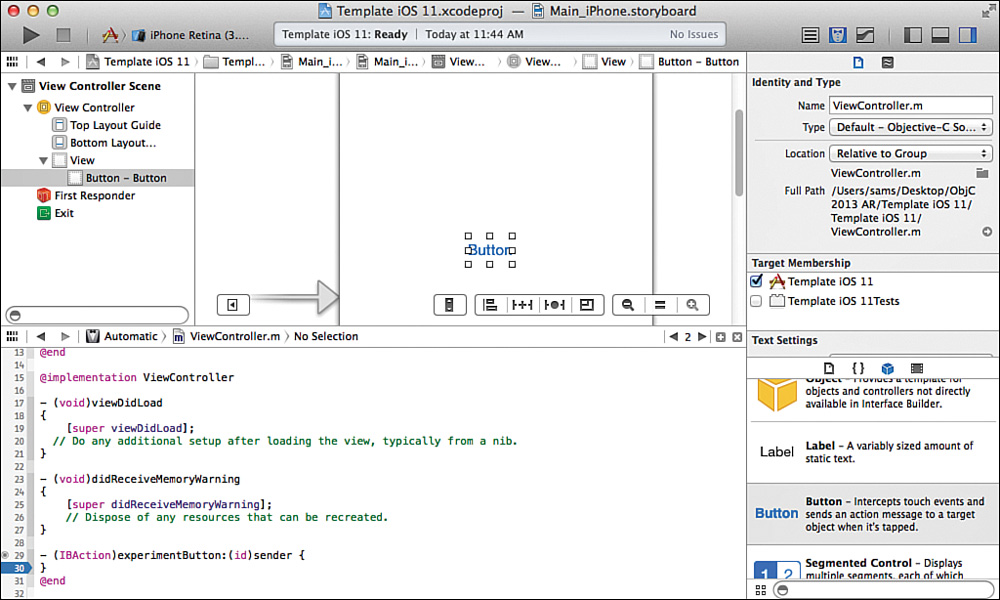
9. Scroll down to the bottom of ViewController.m to see that the definition of the action has been created for you. Set a breakpoint on it (see Figure 11.10).
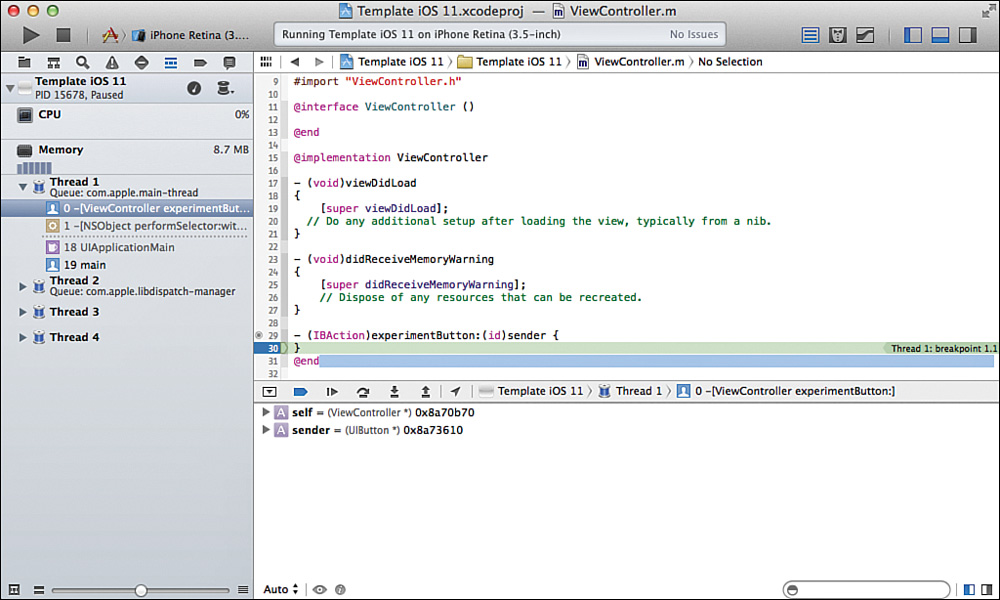
10. Run the app. When it opens in the simulator, tap the button (you use the mouse in the simulator to click it). The debugger should show you that you have called the action method, as shown in Figure 11.11.
Once again, without writing code, you have wired up an interface element to an action. In this case, it is a button rather than a menu command, but the process is the same.
Comparing Actions in OS X and iOS
As you have seen, actions are a specific type of method that are used primarily to implement the consequence of a user’s interaction with the user interface—often choosing a menu command or clicking a button or other interface control. Although you are free to name your action what you want, the format of its header is precise, which is one of the reasons it is easy to build the graphical user interface of Interface Builder.
GO TO ![]() Hour 12, “Routing Messages with Selectors,” p. 165, to learn more about how actions are dispatched.
Hour 12, “Routing Messages with Selectors,” p. 165, to learn more about how actions are dispatched.
The header for an action looks like this in both OS X and iOS:
– (IBAction)experimentButton:(id)sender;
As you see in the debugger at the bottom of Figure 11.11, although sender is typed as id (a generic object), when it is passed into the action, the actual type of the object is available (a UIButton in this case). This is the standard behavior.
Tip
An id can be of any type, but at runtime its actual type is available to you.
As noted previously, IBAction is used by Interface Builder to help you build the interface. It signifies an action that can be connected to a control. The compiler defines IBAction as void, so by compile time this looks like a standard method.
In iOS, there are two variants on action signatures in addition to the one shown previously. You need not pass in a sender, but you can also pass in both a sender and an event as in the following methods:
– (IBAction)experimentButton2:(id)sender forEvent:(UIEvent *)event;
– (IBAction)experimentButton3;
You choose the type of action you want to create from the small dialog box in which you also name the action. Figure 11.12 provides a close-up view of this dialog box if you follow the previous steps to create a second button and a new action called experimentButton2. In this example, both the sender and event are chosen.
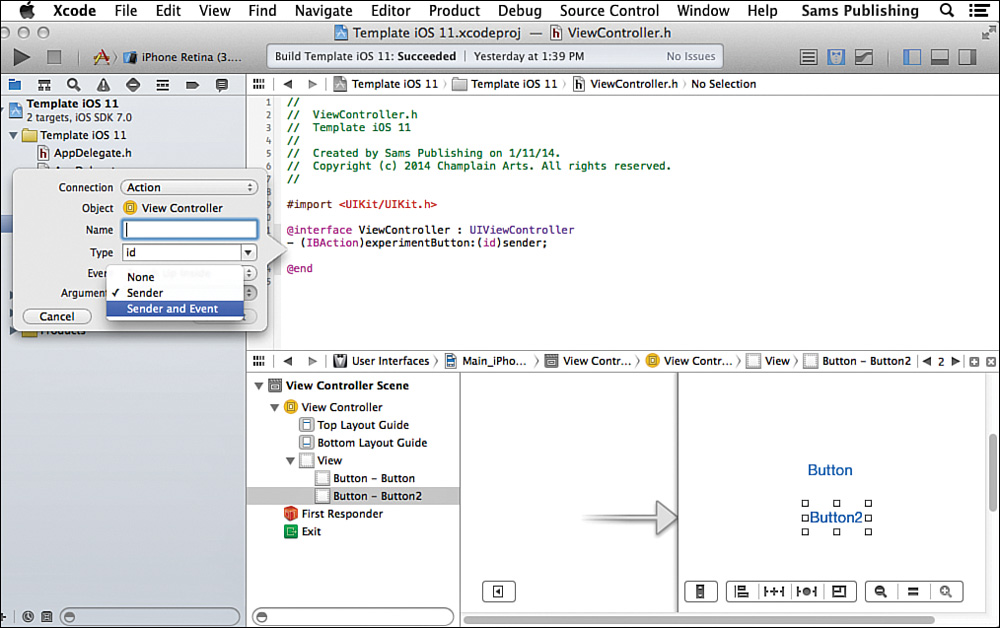
The choices for the Arguments pop-up menu are as follows:
![]() None
None
![]() Sender
Sender
![]() Sender and Event
Sender and Event
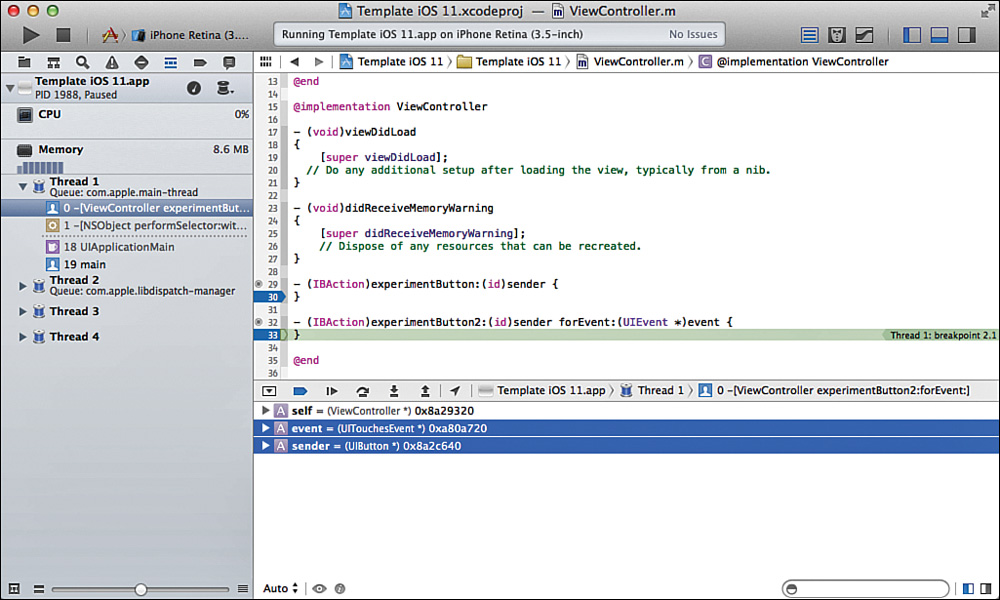
Set a breakpoint on the new action method and run the app. As you can see in the debugger at the bottom of Figure 11.13, this enables you to see both the object that was acted upon and what the action was. In the case of Figure 11.13, it is the UIButton that is the sender, and the event is UITouchesEvent. (Those lines in the debugger are highlighted.)
Make your choice, and Xcode does the rest.
If you choose one of the signatures that includes sender, you can check sender to see which interface element has prompted the action. You can then provide variations within the action.
Disconnecting Actions
You have seen how to connect an interface element to an action that you create in Xcode. Here’s how to do the reverse: disconnect an action.
Select the object that is currently connected (it might be a UIButton). Open the Connections inspector in the utility area, as shown in Figure 11.14.
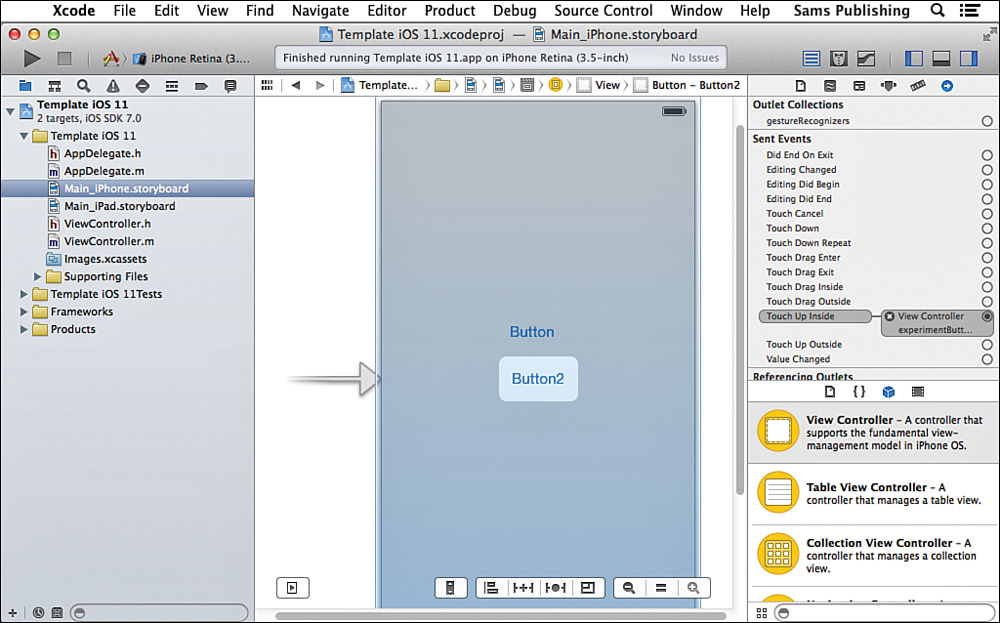
You see the connection to your action in Figure 11.14. To its left, there is a small X. Click it to remove the connection. You can now create a new connection to a new or existing action.
Summary
In this hour, you have seen how to create actions—the special type of methods that provide most of an app’s functionality. You’ve also seen how to connect interface elements such as buttons to those actions.
For many developers, these features (actions, interface elements, and the connections between them) represent the major part of an app’s design and development.
Q&A
Q. What makes actions different from methods?
A. Actions use a constrained version of general method syntax. This makes it easy for Xcode to implement automated tools to create actions. It also makes it easier to dispatch varied actions at runtime.
Q. What is one of the reasons why iOS actions can have both a sender and an event?
A. On OS X, user events for controls are primarily mouse clicks. With Cocoa Touch, a wider variety of taps and gestures can be used. The event argument lets you find out more about how an action was triggered.
Workshop
Quiz
1. How many actions should be connected to an interface element?
2. How do you choose a name for an action?
Quiz Answers
1. At least one action should be connected to an interface element if it is enabled. Remember to differentiate enabled from disabled interface elements so that users don’t wander around clicking on everything on the screen.
2. Use the standard naming convention for methods that you have adopted for your project. Action names are not subject to additional constraints; it is the arguments that must adhere to specific names and types.
Activities
Use the examples in this hour to build an interface with menus (OS X) or controls such as buttons (iOS). This is a good way to start exploring the Cocoa frameworks with the debugger and, if you want to, with interface elements such as text fields. They all use the same basic pattern: Create an object such as a button or menu command and Control-drag to the interface file. This hour showed you how to create actions. Just choose Outlet instead of Action in the small dialog and you will have created a property that you can use to modify the behavior and appearance of the interface element.