Hour 5. Using Compiler Directives
What You’ll Learn in This Hour
![]() Exploring code from a template
Exploring code from a template
![]() Working with prefix headers
Working with prefix headers
![]() Controlling compilation with compiler directives
Controlling compilation with compiler directives
![]() Reviewing the file structures of your code
Reviewing the file structures of your code
Exploring Your Projects
If you have followed the steps in Hour 4, “Using Xcode 5,” you now have your first Xcode project built in Objective-C. It doesn’t do much, but it’s a start. If opens a split-view controller that lets you enter data. The built-in functionalities are quite impressive when you think about it. Between the frameworks and the templates, you’ve got code to handle rotation of the iOS mobile devices (not to mention the fact that a single codebase can be used for both iPhone and iPad).
If you built Simple Mac App as described in Exercises in Hour 4 (you should build it to continue on), you’ll have an app that implements a menu bar and basic commands as well as a window—all without writing any code beyond the templates.
The structure of the projects is the same as most of the projects you will build with Xcode, so this hour walks you through the few lines of code that have been generated for you. When you understand the structure, you can start to add your own code.
The iOS and OS X apps have many similarities, but they are described in separate sections in this hour. As you become more adept at Objective-C and the frameworks, it can be very useful to compare how similar things are done differently in iOS and in OS X. However, most people who are just starting out (like you) find it easier to focus on the specific operating system they want to work with, so the iOS and OS X sections are presented separately.
Looking at the iOS Project
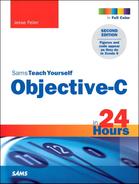
When you have created your project from a template, look at it in the project navigator. Figure 5.1 shows the Simple iOS App. You might have to open a few of the groups (remember that the file folder icon represents an Xcode group and not a folder on a disk), but this is basically what you see. Over time, some of the files might have been renamed or replaced, and that might happen in the future (in fact, it is a good bet that it will happen), but the overall structure remains as you see it in Figure 5.1.
The basics of the project, including its bundle identifier and build and version numbers, are shown at the top. They are all editable. If you followed the steps in Hour 4, you will see that no signing identity has been found. The project can be built and run on the simulator without being signed, so this warning is not dealt with in this book. You can find more information on code signing at developer.apple.com if you are a registered developer.
Looking at the OS X Project
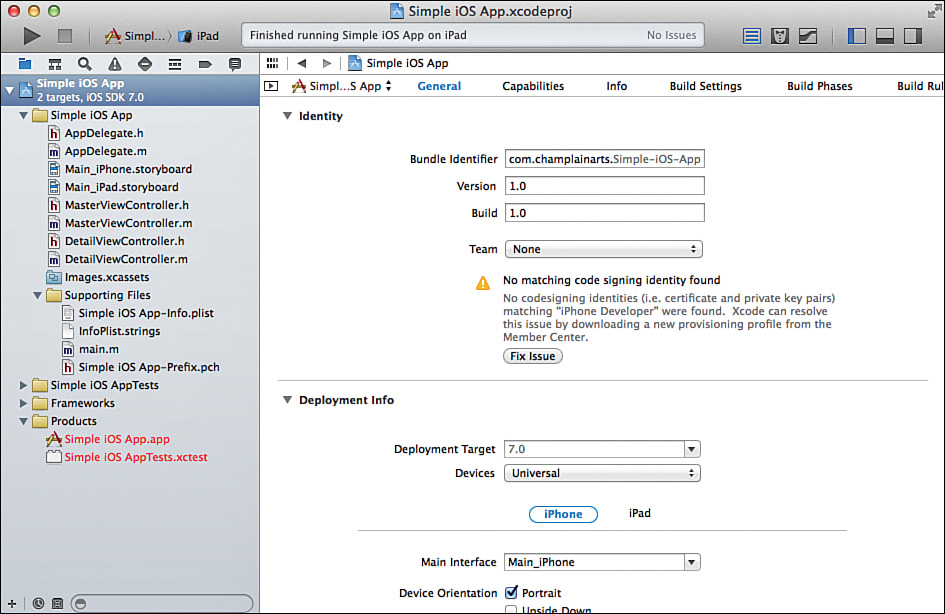
In the case of Simple Mac App, your project will look like Figure 5.2.
You’ll see that there is no code signing identity for the Mac version. As is the case with iOS and the simulator, you can proceed with the rest of the book and come back to code signing when you want to distribute your app. Your app must be signed to use the Mac App Store and certain capabilities that require the security of code signing such as iCloud. Find more information on code signing at developer.apple.com.
Looking at Both Projects
The Products group might show your app in red. Red filenames indicate that the files are missing. After you build your project, the app file turns to black to indicate that it now exists on disk.
Caution: Watch Out for Missing Files
It’s a warning sign if other files are shown in red. If you have created a new project from a template and any of the files other than the products are missing, something is wrong. Quit Xcode and delete the project. Then re-create it.
Your project contains a variety of files. The extensions indicate what types of files they are. This book focuses on the Objective-C language itself, so you can skip over the framework files (although they must be there for you to build and run your code). You can also ignore the .xib files on OS X, which specify the user interface to your app, including the menu commands on OS X. .strings and .rtf files contain text that might appear in the app. Similarly, you can skip over the storyboard files on iOS, which also provide the interface.
plist files are property lists. These are XML files containing a dictionary with key-value pairs. plist files are used extensively to store settings for apps. You update these files indirectly as you set your project’s settings, as was shown in Figure 5.1.
Precompiled headers (.pch) can contain prefix headers that are automatically included in each file’s compilation. As with the plist files, you update them through the project interface. And, as with the plist files, you rarely need to change the default settings.
The .pch files demonstrate compiler directives, which are the primary topic of this hour, but before moving on to the files themselves, note the two other file types in the project navigator: .h and .m.
.h has commonly been used for header files in C (and other languages), and that is also the role of the .h files in Objective-C. Objective-C is built on messaging, and originally the files that implemented the actual message instructions (that is, the files with the code for the header files) were given the extension .m.
Almost all of the files that you write are these Objective-C .h and .m files.
Working with Compiler Directives
The files for your project are short, and they make it easy for you to look at the structure and contents. All of the files use compiler directives, so that is a good place to start your analysis.
Compiler directives are instructions to the compiler that are processed before the actual compilation of the file. For this reason, they are sometimes referred to as preprocessor directives or preprocessor commands.
Working with Basic Directives
The building block for many of the directives described in this section is the macro definition directive: #define. In its simplest form, a macro defines a replacement for a string. For example,
#define pi 3.14159265
enables you to write code such as
x = pi * 2;
Before compilation begins, that line of code is converted to
x = 3.14159265 * 2;
Another form of macro definition enables you to define a function-like macro in which one or more values are included in the macro. You can supply values in your code as you invoke the macro.
Tip
Although macro definitions are convenient ways for hard-coding unchanging values such as pi, they are also used as flags to indicate the presence or absence of certain features.
When used in this way, all you care about is whether or not a certain identifier has been defined as a macro. Thus the line
#ifdef pi
merely tells you whether or not pi has been defined as a macro. It tells you nothing about its value. When used as a flag in this way, a section of code is typically processed or not based on whether or not some identifier is defined. You can use both #ifdef or #ifndef depending on whether you want to test the positive or negative outcome.
You introduce the conditional with a test such as the one shown earlier. You then follow it with lines of code (the controller text) and #endif statement as in the following:
#ifdef pi
//do something with pi
#endif
All of this is standard C practice, and, in fact, it is common in one form or another in almost every programming language today.
Looking at Prefix Headers
You now know enough to look at the prefix headers. They are automatically prefixed to all source files. They’re a good place to insert customized logging macros that you may create as well as global version controls. They often check to see if something is defined; if it is, certain files are imported. The prefix headers are part of the templates, and the versioning and importing in them can be used in most cases without modification.
The convention of a double-underscore at the beginning and end of an identifier is used to indicate that this is an internal value.
A common C directive is #include. It is used to include an external file in the compilation just as if it were part of the file being processed. A problem with #include is that it is very easy to get circular references that result in code (particularly declarations) being included more than once and thereby generating compiler errors.
Tip
With Xcode, you can use #import instead of #include to avoid these issues. If a file has already been imported, a second #import directive has no effect.
Listing 5.1 shows the .pch file for an iOS app.
LISTING 5.1 Prefix Header for Simple iOS App
//
// Prefix header for all source files of the 'Simple iOS App'
// target in the 'Simple iOS App' project
//
#import <Availability.h>
#ifndef __IPHONE_5_0
#warning "This project uses features only available in iOS SDK
5.0 and later."
#endif
#ifdef __OBJC__
#import <UIKit/UIKit.h>
#import <Foundation/Foundation.h>
#endif
This prefix header begins by unconditionally importing a file that happens to have the version defined in it. Note that the test is for a definition of __IPHONE_5_0, which is the definition for IOS SDK 5.0 and later. This is actually a fairly common type of collision between an internal term (__IPHONE_5_0) and a marketing term (iOS 5.0).
If __IPHONE_5_0 is not defined, a warning is presented that something is missing.
Then, to see if Objective-C is available the test is if __OBJC__ is defined. If it is, the Cocoa Touch files are imported.
Listing 5.2 shows the automatically generated .pch file for the simple Mac app used in Hour 4.
LISTING 5.2 Prefix Header for Simple Mac App
//
// Prefix header for all source files of the 'Simple Mac App'
// target in the 'Simple Mac App' project
//
#ifdef __OBJC__
#import <Cocoa/Cocoa.h>
#endif
This code checks to see if __OBJC__ is defined. In this case, __OBJC__ is defined when you are working in an Objective-C environment. If it is defined, then the Cocoa framework is imported, and that brings up the next directive: #import.
Thus, in Listing 5.2, if you have an Objective-C compiler, the Cocoa.h file from the Cocoa framework is imported. The < and > indicate a file that is taken from a framework—in this case, Cocoa.
Looking at Plain C Code in main.m
As noted previously, you can compile ordinary C code through the Objective-C compiler. That happens in both the OS X and the iOS versions of the template. In both cases, a function called main in a file called main.m starts the app running.
Listing 5.3 shows the code for iOS. The names of the functions are different for iOS and OS X, but the functionality is basically the same.
//
// main.m
// Simple iOS App
//
// Created by Jesse Feiler on 11/10/13.
// Copyright (c) 2013 Champlain Arts Corp. All rights reserved.
//
#import <UIKit/UIKit.h>
#import "AppDelegate.h"
int main(int argc, char *argv[])
{
@autoreleasepool {
return UIApplicationMain(argc, argv, nil,
NSStringFromClass([AppDelegate class]));
}
}
Listing 5.4 shows this bootstrap code in OS X.
//
// main.m
// Simple Mac App
//
// Created by Jesse Feiler on 11/10/13.
// Copyright (c) 2013 Champlain Arts Corp. All rights reserved.
//
#import <Cocoa/Cocoa.h>
int main(int argc, const char *argv[])
{
return NSApplicationMain(argc, (const char **)argv);
}
Note: File Header Information
The information at the top of the files in Listings 5.3 and 5.4 is omitted from the other listings in this book, but it is always produced in the files themselves. It is text drawn from the name of the file, the name of the project, the clock, and other user information. Because it is all a comment, you can modify it if you want.
Investigating Header (.h) Files
You have already seen the basics of the files in your project. In this section, you look at the header (.h) files and discover a new compiler directive syntax.
The first Objective-C class in your project for both iOS and OS X is AppDelegate. In keeping with convention, the class has two files—AppDelegate.h and AppDelegate.m.
Listing 5.5 shows the AppDelegate header file for iOS.
The template imports the UIKit framework, which is the basic framework for Cocoa Touch. After that, you have three Objective-C compiler directives. Objective-C compiler directives begin with @ rather than the # for C compiler directives. (Although #import is an extension to the C compiler directives implemented with Xcode, it is treated as the other C compiler extensions and so begins with #.)
GO TO ![]()
@interface and @end are described later in this hour in “Using Objective-C Compiler Directives.” @property is described in Hour 9, “Declaring Properties in an Interface File,” p. 127.
LISTING 5.5 AppDelegate.h (iOS)
#import <UIKit/UIKit.h>
@interface AppDelegate : UIResponder <UIApplicationDelegate>
@property (strong, nonatomic) UIWindow *window;
@end
Listing 5.6 shows the AppDelegate header file for OS X. It begins by importing Cocoa.h from the Cocoa framework. You do not have to worry about duplicate declarations because #import takes care of that for you.
LISTING 5.6 AppDelegate.h (OS X)
#import <Cocoa/Cocoa.h>
@interface AppDelegate : NSObject <NSApplicationDelegate>
@property (assign) IBOutlet NSWindow *window;
@end
Looking Inside Message (.m) Files
The companion .m files to the .h files are described in this section. There is not much new to note except that @implementation is discussed later in this hour in the “Using Objective-C Compiler Directives” section.
In Listing 5.7, you see the AppDelegate.m file for iOS. It’s a lengthy listing, but notice that most of it consists of commented-out code for methods you typically implement. All of those methods contain nothing except the comments with the exception of application:didFinishLaunchingWithOptions:. If you compare that line of code with the comparable code in Listing 5.8, you see that it is structured differently.
GO TO ![]() Hour 17, “Extending a Class with Protocols and Delegates,” explores the reasons for that difference.
Hour 17, “Extending a Class with Protocols and Delegates,” explores the reasons for that difference.
The code inside that method in Listing 5.7 implements some window handling on iOS that is managed differently on OS X.
LISTING 5.7 AppDelegate.m (iOS)
#import "AppDelegate.h"
@implementation AppDelegate
– (BOOL)application:(UIApplication *)application
didFinishLaunchingWithOptions:(NSDictionary *)launchOptions
{
self.window = [[UIWindow alloc] initWithFrame:
[[UIScreen mainScreen] bounds]];
// Override point for customization after application launch.
self.window.backgroundColor = [UIColor whiteColor];
[self.window makeKeyAndVisible];
return YES;
}
– (void)applicationWillResignActive:(UIApplication *)application
{
/*
Sent when the application is about to move from active to inactive state. This
can occur for certain types of temporary interruptions (such as an incoming
phone call or SMS message) or when the user quits the application and it begins
the transition to the background state.
Use this method to pause ongoing tasks, disable timers, and throttle down OpenGL
ES frame rates. Games should use this method to pause the game.
*/
}
– (void)applicationDidEnterBackground:(UIApplication *)application
{
/*
Use this method to release shared resources, save user data, invalidate timers,
and store enough application state information to restore your application to
its current state in case it is terminated later.
If your application supports background execution, this method is called instead
of applicationWillTerminate: when the user quits.
*/
}
– (void)applicationWillEnterForeground:(UIApplication *)application
{
/*
Called as part of the transition from the background to the inactive state; here
you can undo many of the changes made on entering the background.
*/
}
– (void)applicationDidBecomeActive:(UIApplication *)application
{
/*
Restart any tasks that were paused (or not yet started) while the application
was inactive. If the application was previously in the background, optionally
refresh the user interface.
*/
}
– (void)applicationWillTerminate:(UIApplication *)application
{
/*
Called when the application is about to terminate.
Save data if appropriate.
See also applicationDidEnterBackground:.
*/
}
@end
In Listing 5.8, you see the .m AppDelegate file for OS X.
LISTING 5.8 AppDelegate.m (OS X)
#import "AppDelegate.h"
@implementation AppDelegate
– (void)applicationDidFinishLaunching:
(NSNotification *)aNotification
{
// Insert code here to initialize your application
}
@end
Using Objective-C Compiler Directives
Objective-C compiler directives begin with @. You often use them to describe portions of a file. In the .h files, for example, @interface marks the beginning of the header interface code. That section is terminated by @end.
In the .m files, @implementation marks the beginning of the implementation, and it is terminated by @end.
Other common Objective-C compiler directives are used to introduce forward declarations such as @class MyClass or @protocol MyProtocol, which are defined in other parts of your code. (Forward declarations are promises that something will be declared later on; but in the meantime, you can use it in the code you are writing.)
Strings in Objective-C are delimited with
@"this is a string"
where the @ alerts the compiler that a string follows.
Summary
In this hour, you have seen the compiler directives that let you communicate with the preprocessor. You have also seen the basic structure of interface (.h) and message (.m) files.
Q&A
Q. What do prefix headers do?
A. They usually contain defines that determine what gets compiled. Frequently they control conditional compilation based on what versions of SDKs are installed.
Q. How do you include C code in an Objective-C project?
A. C code is placed in a file with the extension .m just like any other Objective-C source code you write to implement a method. You can also use it inside other files. C compiles without issues (providing there are no syntax errors) in the compilers used in Xcode.
Workshop
Quiz
1. What is the difference between #include and #import?
2. How do you specify a string literal in Objective-C?
3. What is the significance of files shown in red in the project navigator?
Quiz Answers
1. #include includes the specified file without regard for whether or not it has already been included. This can lead to duplicate declarations if a file is included twice. #import only imports the file once, and it ignores subsequent #import directives for the same file.
2. Use the Objective-C compiler directive symbol @ as in x = @"mystring";.
3. Files in red are missing. They might have been moved on disk, or they might be not-yet-built project files.
Activities
Explore one of the other templates for either iOS or OS X. Build and run it to see what happens. Test to see what commands are built in.