Hour 14. Defining a Class in an Implementation File
What You’ll Learn in This Hour
![]() Cleaning up the Converter app
Cleaning up the Converter app
![]() Adding debugging code
Adding debugging code
![]() Refining the method
Refining the method
Working with a New Project
So far in this part of the book, you have explored many of the Objective-C basics—messaging and selectors; declarations of classes, instance variables, properties, methods, and actions; and building on Foundation. In this hour, you pull those concepts together as you define classes in their implementation files. After all, the definition of classes consists of the executable code rather than the declarations that set up the app’s structure.
In the two hours that remain in this part of the book, you will see how to work with the collection classes and how to manage memory. For now, though, it is time to pull the threads together to get an app running. The app that you create does not focus on the user interface frameworks, but it shows you how to use the features of the Objective-C language in a prototype of a real-world app.
This hour is somewhat different from most of the other hours in this book. It does give you details of Objective-C syntax as well as tips for implementation. However, in addition, it walks you through a realistic process for building a class. That process starts with a simple idea for a class and steps through the iterations that occur as the idea evolves into a usable and reusable class.
Note: Currency Converter History
The basic idea for this app has been used to demonstrate Cocoa app development for many years. Each iteration by each author has emphasized different aspects of the code and the frameworks.
Reconsidering Dynamic Typing
In Hour 6, “Exploring Messaging and a Testbed App,” you first explored the concept of a Testbed app that has been used to experiment with the Objective-C basics. Over the course of the hours between Hour 6 and this one, you have seen how various Objective-C features refine and extend the basic concepts. As an example, in “Reviewing the Message Syntax” at the end of Hour 6, you used dynamic typing in declaring
id myObject;
Dynamic typing provides a great deal of flexibility, which carries with it a trade-off with type checking at compile time (rather than at runtime). There have been many discussions about this trade-off, but today consensus has formed around the use of static typing, in part so that errors are caught by the compiler and presented to the developer rather than being caught by the runtime and presented to the end user.
Note: The Static Versus Dynamic Typing Discussion
This is still an ongoing conversation with regard to many programming languages as you can discover in this article: http://en.wikipedia.org/wiki/Type_system#Static_and_dynamic_type_checking_in_practice on Wikipedia.
The flexibility of dynamic typing makes it easier to use in some cases, and one of those cases is in simplified demonstration code such as that used in the previous chapters as the Objective-C concepts have been introduced. Before moving on, it is appropriate to clean up the code that you have been experimenting with in the Testbed app.
This new app has an app delegate created automatically as part of the template. You add a currency converter class to it. The currency converter is stored in an instance variable of the app delegate.
Designing the (Currency) Converter
Designing software is a linear process at each step of the way, but the lines are not continuous. For example, when you send a message to a method (or call a function in another programming language), control passes to the beginning of the method and continues sequentially through each subsequent line until the end of the method is reached or some other event (perhaps a return statement or even an error) interrupts it. After the method has completed, you move on to another set of linear steps. This means that you have to simultaneously jump back and forth to figure out how your app will work.
The heart of the app is the CurrencyConverter class, and the heart of that class is a method that converts currency. Putting together what you have learned in previous hours such as Hour 10, “Declaring Methods in an Interface File,” you can jump ahead and start planning what this critical method looks like. (Not only can you do this, you should get in the habit of doing so.)
Implementing the Method
This critical method returns the computed value. It needs to work with the exchange rate and the number of units of currency to be converted. To make the most flexible method, you can pass the number of units and the exchange rate in as parameters. That structure enables you to call this method from a user interface in which the user enters the rate and the number of units. It also enables you to create an interface in which the user enters the number of units and the type of currency; an intermediate method can look up the current exchange rate and pass it along with the number of units into the method. In that way, your conversion method does double duty for an interactive interface as well as for one with an online database access for the exchange rate. The heart of the computation is the same in both cases.
Take another step and think about what the method looks like. It returns the computed value and accepts two parameters—the units of currency to convert and the exchange rate to use. In Objective-C, each parameter has a keyword, so you may start thinking about what they are. Because exchange rates are rarely integers, you may think that your return value is a float. This would give you a method header such as this:
– (float) convertCurrency: (float)units withRate: (float)exchangeRate;
Note: Floats, Decimals, and Currencies
Calculations on currencies other than simple addition and subtraction need to take into account the issues involved with rounding fractions particularly when multiplication and division are involved. As you will see, Objective-C can help you out further.
That is a good start, and it is one that many people would use. This means that the code inside the method practically writes itself:
return units * exchangeRate;
But remember that in Objective-C it is often preferable to use the Objective-C classes rather than raw C types. A better method header might be the following:
– (NSNumber *) convertCurrency: (NSNumber *)units
withRate: (NSNumber *)exchangeRate;
The difference between the first version in which the arguments and return value are all float types and the second in which they are NSNumber objects is that that the latter is more generalized. NSNumber objects can be creavted from and returned as a multitude of different types. Here are the getters for NSNumber:
![]()
boolValue
![]()
charValue
![]()
decimalValue
![]()
doubleValue
![]()
floatValue
![]()
intValue
![]()
integerValue
![]()
longLongValue
![]()
longValue
![]()
shortValue
![]()
unsignedCharValue
![]()
unsignedIntegerValue
![]()
unsignedIntValue
![]()
unsignedLongLongValue
![]()
unsignedLongValue
![]()
unsignedShortValue
This allows any necessary conversions to happen internally to the NSNumber arguments. You can use and reuse the method. If some types of values are going to be problematic, you can manage them inside the conversion method where they are used.
That said, there is a certain overhead for using the objects as opposed to the scalar values. In many cases, you wind up using both because some of the framework methods you use as well as others that you write might have been written in one form or the other. The efficiency issue tends to be minimal in a large number of cases. Yes, it may take a dozen operations to access a value from an object rather than a single operation, but if you actually do careful analysis of the impact on the user experience and on the overall device performance, it may not matter.
The sample code in this chapter uses NSNumber objects and converts them to floats as needed. This has the benefit of introducing you to how to function in a heterogeneous environment of objects and scalars.
While you are thinking of generalizing the method, consider the fact that the name is more specific than needed. As implemented at this point, the method works for currency conversion as well as conversions of units of measure. Why limit its usefulness only to currency conversion if it is not necessary? You can always come back later and change the generalized method to a more specific one. Going in the other direction can be a bit more work.
Tip: Balancing Generality and Specificity
You always have to strike a balance between writing generalizable code and code that is specific to the task at hand. What may be most productive is to keep a mental eye out for issues such as this one (the fact that this is a generalized conversion method and not just one for currencies). If making methods more generalized does not involve additional coding, it often is useful to take that route so that you have code that is more easily reused. If writing a generalized method entails extra effort or complexity that future developers have to understand, it might not be worth pursuing.
Recapping the New Method Terminology
If you walk through a design process such as this, you can see that generalizing the method does not require extra work and might make it easier to reuse in the future. Incorporating these changes means that the method header now looks like this:
– (NSNumber *) convertUnits: (NSNumber *)units
withFactor: (NSNumber *)factor;
A method such as this is now referred to as
convertUnits:withFactor:
The colons indicate that there are two arguments, and the keyword as well as the method name help to form a meaningful phrase.
Creating a New App
Now that you have thought about the naming of methods, you can create a new app from scratch using standard techniques as shown in this section.
Try it Yourself: Build an iOS App with Best Practices
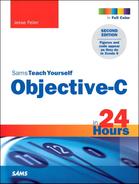
1. Create a new Xcode project from the iOS Single View Application template, as shown in Figure 14.1.
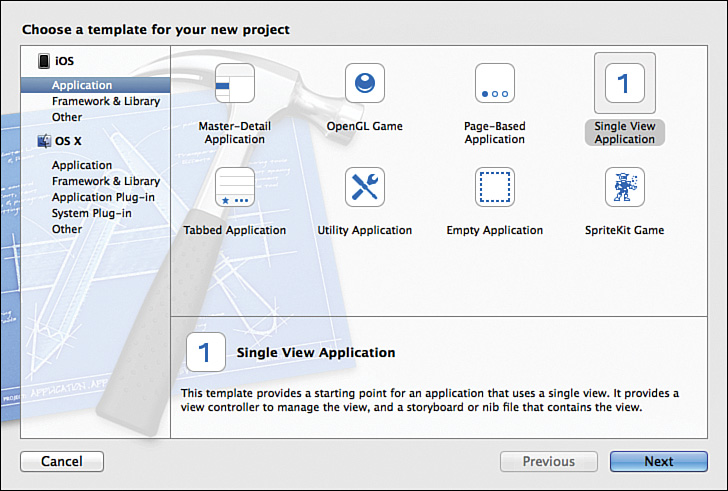
2. Name it Testbed in the project options as shown in Figure 14.2.
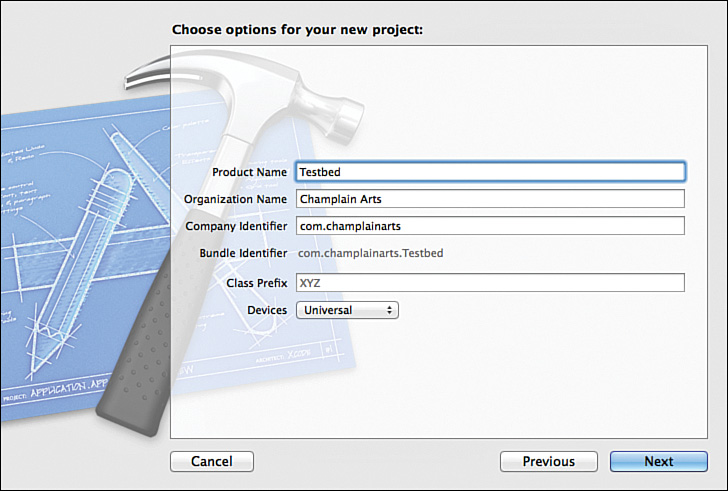
3. Open AppDelegate.h and add a forward @class declaration for Converter. (It goes just before the @interface line.)
4. Add an instance declared property for the converter:
@property (strong) Converter *converter;
AppDelegate.h should look like Figure 14.3 at this point.
Go To ![]() The
The strong attribute is explained in Hour 16, “Managing Memory and Runtime Objects,” p. 221.
Tip
Note that you may have a warning until after you complete the following step.
5. Create the Converter class. Use File, New, File, Objective-C Class and make it a subclass of NSObject, as shown in Figure 14.4. Save it in your project’s folder.

6. Create a Converter instance and assign it to the converter property in AppDelegate.m with this code. Place it in applicationDidFinishLaunchingWithOptions: just before the return statement.
_converter = [[Converter alloc] init ];
7. You must import Converter.h into AppDelegate.m. So add the #import statement to the top of the file.
8. Set a breakpoint on the assignment statement created in step 6, and run the app on any of the simulators you have installed. You should see that converter is not allocated when the breakpoint is reached; if you step over that line, you should see that it is now created, as shown in Figure 14.5.

Implementing a Method
The Converter class can create an instance, as you have just seen, but it cannot do much of anything except perform the instance methods specified in the NSObject class and protocol. You need to implement a converter method to make it useful.
If you have gone through a process of analysis and design similar to “Working with a New Project” at the beginning of this hour, you know what you have to do inside the convertUnits:withFactor: method: Multiply units by factor.
In this section, you see two ways of doing this. The first method is a detailed step-by-step method that shows you how to manage the conversion to and from NSNumber objects and arithmetic float values. The second method is a concise one-line compression of the step-by-step method.
Tip
As you work through code such as this, you might want to use a step-by-step method until you are familiar with the various type and class conversion routines.
Try it Yourself: Build a Step-by-Step Conversion Routine
1. Declare the convertUnits method in Converter.h. When you add the declaration, the file looks like this:
@interface Converter: NSObject
– (NSNumber *) convertUnits: (NSNumber *)units withFactor: (NSNumber *)factor;
@end
2. Add the definition to Converter.m. Add the method header and brackets to begin. You can copy the declaration from the interface file and just change the semicolon at the end to brackets. When you have added the method header to the interface file, the file should look like this:
#import "Converter.h"
@implementation Converter
– (NSNumber *) convertUnits: (NSNumber *)units withFactor: (NSNumber *)factor{
}
@end
3. For debugging, declare float variables inside the convertUnits:withFactor: method and set them to the arguments:
float f1 = [units floatValue];
float f2 = [factor floatValue];
4. Do the arithmetic and return the result as an NSNumber:
return [NSNumber numberWithFloat: (f1 * f2) ];
5. In AppDelegate.m, locate applicationDidFinishLaunchingWithOptions:. Before allocating the Converter (step 5 in “Build an iOS App with Best Practices”), create local NSNumber variables to use as the arguments to the new method. Set them to any test values you want to use:
NSNumber * myUnits = [NSNumber numberWithFloat:5];
NSNumber * myFactor = [NSNumber numberWithFloat:10];
_converter = [[Converter alloc] init ];
6. You may still have a breakpoint set on the line that allocates the Converter instance. If not, set one there.
7. Add the invocation of convertUnits:withFactor: to applicationDidFinishLaunchingWithOptions:. It should now look like Figure 14.6.

Tip
In step 7, you will have a warning because result is not used.
GO TO ![]() Hour 23, “Working with the Debugger,” p. 293, explains how to use
Hour 23, “Working with the Debugger,” p. 293, explains how to use NSLog to write a value to the log rather than storing it in a variable that you declare only for the purpose of debugging.
8. Set a breakpoint on the invocation of convertUnits:withFactor: and run it. When execution stops, you should be able to see your debugging variables set properly. Use the controls as shown in the debug pane at the bottom of the workspace window in Figure 14.6 to step into convertUnits:withFactor:.
9. Monitor the variables you created in step 3 to make certain that the arguments are passed in properly. You can create temporary variables for them to view in the debugger.
GO TO ![]() Hour 23, “Working with the Debugger,” p. 293, for techniques to write variables to
Hour 23, “Working with the Debugger,” p. 293, for techniques to write variables to NSLog.
10. Eliminate any debugging code, and you’re done.
Remember that this process is painstakingly slow and pedantic to show you how you can use the debugger and temporary variables to track the app’s execution. Many people find that this step-by-step process is the only way to track down certain types of bugs that are caused by careless typing. Xcode is very good at catching mistakes as you make them, but some types of errors slip past. And, because the eye and brain work together to help you process what you see, you (and perhaps several colleagues) can look at code with a dash instead of a minus sign and never notice that the symbol is a fraction of an inch too big for a minus sign.
Expanding the Class with init Methods
This is an example of how you can develop a method in a real-life project. The method started as a currency converter, and it performs the conversion task well; you just pass in the units to convert and the conversion factor.
Some conversions do not require a conversion factor to be passed in each time. Feet to meters, for example, can be done with a constant. Even currency conversion is often done with a relatively constant value such as the real-time value from the close of yesterday’s foreign exchange trading.
Note
For currency conversion for a specific business, the conversion factor is often set periodically to a value that reflects both the real-time value on foreign exchange markets as well as a markup for the business.
Just as you refined the syntax of the method in order to create convertUnits:withFactor, you can also refine the functionality so that you can store the conversion factor inside the Converter instance. That requires three changes:
![]() Add a declared property for the factor.
Add a declared property for the factor.
![]() Create an
Create an init method that takes the factor as an argument and sets the property.
![]() Add a new method that uses the declared property for the factor. It is
Add a new method that uses the declared property for the factor. It is units: because it already has the factor.
You also need accessors for the factor (both a getter and a setter), but they come for free with the synthesis of a declared property.
Summary
This hour has shown you how to define a class and its methods in an implementation (.m) file. It has walked you through the details of typical debugging of new code as well as a real-life example of how your classes and methods can evolve as you work on them.
Q&A
Q. Why is it important to consider and reconsider the keywords and method names in your method headers?
A. You want them to be clear and understandable. In addition, as you and others use your new class and its methods, you are creating brief phrases that are able to be self-documenting to a large extent. You want to avoid method and keywords that give a false impression of the method and what it does. Implying that it does more or less than what it does can lead to confusion and mistakes down the line.
Q. Can you find a potential runtime error in both convertUnits:withFactor: and units:?
A. If a value for exchangeFactor is not passed in or has not been set with the initWithFactor: method, the result is undefined.
Workshop
Quiz
1. Where does [super init] go in your override?
2. What do you do about warnings regarding the debug variable?
Quiz Answers
1. [super init] goes at the beginning of your override.
2. Ignore them.