Hour 9. Declaring Properties in an Interface File
What You’ll Learn in This Hour
![]() Determining when to use declared properties and when to use instance variables
Determining when to use declared properties and when to use instance variables
![]() Exploring attributes for declared properties
Exploring attributes for declared properties
![]() Using declared properties to manage memory
Using declared properties to manage memory
![]() Backing declared properties with instance variables
Backing declared properties with instance variables
Comparing Interface Variables and Properties
There are two ways of declaring the data elements that are part of a class. You can declare them as instance variables in the same way that you declare integers and floats. You can also declare them as properties of the class. The previous hour, Hour 8, “Declaring Instance Variables in an Interface File,” explored the use of interface variables. In this hour, you see how to use properties to accomplish the same results. Behind the scene, Xcode creates the instance variables you saw in Hour 8.
Tip: Another Way of Referring to Instance Variables
Instance variables are often referred to as ivars.
The objective in this hour is the same as in the previous one: Be able to use the CurrencyConverter class that you created in Hour 7, “Declaring a Class in an Interface File.” To be able to use the class, you need to be able to reference it from AppDelegate either with an instance variable (Hour 8) or with a declared property (this hour). The goal is the same, but the method of getting there is different.
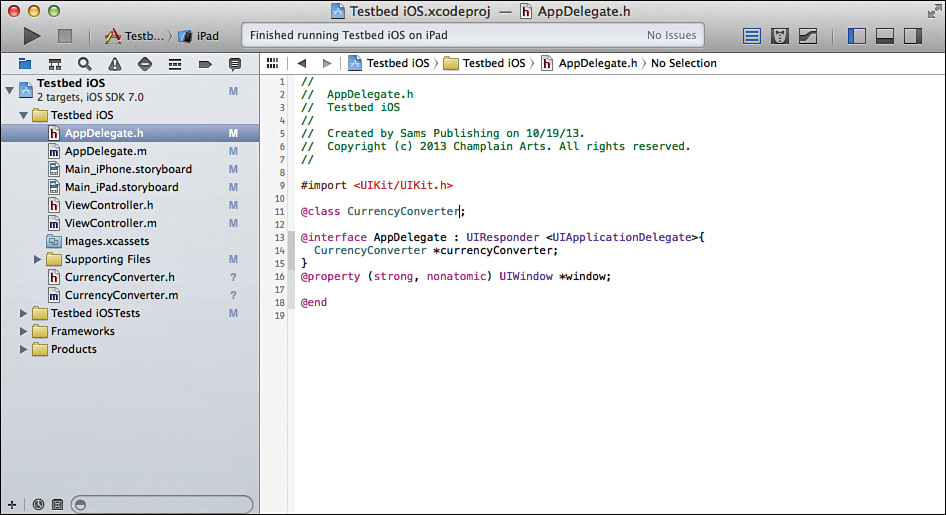
You have already seen both interface variables and properties in action in the code example. Figure 9.1 shows one of the experiments from Hour 8.
Note: A Word About the Code Chronology
Objective-C has evolved over the years from the initial C-style implementation to declared properties in Objective-C 2.0. In the example code on developer.apple.com, on the web, and in other code you may run across, you will see instance variables (as described in Hour 8) as well as properties (as described in this hour). Both styles exist today, but declared properties are the preferred style moving forward. This hour basically follows the chronological evolution. The advantage of this is that you can follow the different stages of declaration syntax and see what each new stage added to improve the development process. The disadvantage of this sequence is that you see the old and no-longer-recommended styles first. They are marked as no longer recommended, but they are an important part not just of the history but also of the evolving best practices in Objective-C development.
Reviewing Basic Variable Declarations
The most basic variable declaration consists of a type and an identifier as follows:
id currencyConverter;
id is used in this section as the most basic type for an object in Objective-C. Static typing (that is, declaring a property or variable as something such as UIWindow rather than id) is preferred in most cases.
You can expand on a basic declaration by declaring several identifiers that use the same type, as in the following:
id currencyConverter, somethingElse;
Array declarations can add a bit more complexity, as in the following:
id currencyConverter[15], somethingElse[100];
But that is about it for variable declarations in C. Because C is valid syntax inside Objective-C code, all of them are usable in Objective-C.
Beyond the declarations, you should consider the basic object-oriented principle of encapsulation. Many people believe that the instance variables of a class should not be directly accessible. They prefer to hide the instance variables themselves to enforce the use of accessors—utility methods that get an instance variable’s value (getter) or set an instance variable’s value (setter).
Because the use of accessors is an implementation standard in these cases, accessors are designed according to the needs of the project. A very common standard (and one that is used in many Objective-C projects) is to declare accessors such as the following:
– (int)value //getter
– (void)setValue: (int)newValue; //setter
You can then write the following code:
int localValue = [myObject value]; //use the getter
[localObject setValue: localValue]; //use the setter
But this use of accessors to achieve the goal of encapsulation is a convention or standard; it is not enforced in any way. You can write all the accessors you want, but if you have an instance variable declared in this way,
id currencyConverter;
you can use it directly. You can write
currencyConverter = nil;
or
currencyConverter = myObject;
These lines of code bypass accessors and break the encapsulation concept.
Creating Declared Properties: The Basics
In the simplest view, declared properties enable you to require the use of accessors, thus enforcing encapsulation instead of relying on coding conventions or standards. This section shows you this simplest scenario; the later section, “Working with Attributes for Declared Properties,” shows you the variety of advanced features.
Using More Than @synthesize
@synthesize is one of several ways you can implement declared properties. There are other directives and options that are described later in this hour in “Implementing Properties,” but @synthesize is the most basic of the directives. That’s one of the reasons that Xcode can provide the basic @synthesize code for you automatically and behind the scenes. In this section, you start to see how you can create your own @synthesize statements that go beyond the basics.
Listing 9.1 shows the declaration from Hour 8 using a traditional instance variable along with getter and setter accessors.
LISTING 9.1 Instance Variable Declarations
#import <UIKit/UIKit.h>
#import "CurrencyConverter.h"
@interface AppDelegate : UIResponder <UIApplicationDelegate>{
CurrencyConverter *currencyConverter;
}
– (CurrencyConverter *)currencyConverter; //getter
– (void)setCurrencyConverter: (CurrencyConverter *)newValue; //setter
@end
Listing 9.2 shows the instance variable declaration converted to a declared property. Xcode now has enough information to generate the traditional instance variable declarations as well as the same accessors that you could write for yourself in Listing 9.1. As previously noted, this now happens automatically, so all you have to write is the code in Listing 9.2; but the accessors and instance variable are present behind the scenes.
LISTING 9.2 Instance Declared Properties
#import <UIKit/UIKit.h>
#import "CurrencyConverter.h"
@interface AppDelegate : UIResponder <UIApplicationDelegate>
@property CurrencyConverter *currencyConverter;
@end
Note that in Listing 9.2 there are no instance variables. The brackets enclosing the instance variables are removed. As you see in the next section, this is not always the case.
Dealing with Memory for Objects
The simplicity of these declarations (type and identifier) can become a weakness when dealing with objects. One of the challenges of developing object-oriented languages and compilers has always been managing memory. If you declare an int in a section of code such as a function or block, when control is passed out of that block, the int is undefined. In most implementations, a location in memory has been assigned to each variable declared in the block; often these variables are stored in a stack. When control passes out of the block, because those variables are undefined, the entire section of the stack that was allocated for the block’s variable is deleted.
Note
Cut back is a term used particularly in Burroughs large systems—the first major operating system written in a high-level language.
Because you know that your local variables disappear on exit from the block, if you want to preserve their values, you need to somehow preserve them before leaving the block. A common way of doing this is to set a variable that is outside the block to the value of the variable that will be cut back, possibly by passing the value out as a result of a function call.
Objects are not simple variables such as an int or float. Moving them around in memory can require a good deal of manipulation to find space for these often large objects. More important, in most object-oriented languages, objects such as class instances that are declared in a block are not automatically cut back. Thus, in many object-oriented languages, it is not enough just to declare a variable: If it is an object, you also have to create it and delete it.
Note
An int that is declared in a block may be initialized to nil or just left undefined depending on the language, operating system, and compiler. But nil or not, it usually takes the same amount of space when it is uninitialized or initialized to a value.
You have seen this code already in calls to alloc and init. If you do not use Automatic Reference Counting (ARC), you would add a call to dealloc to the standard alloc and init calls to handle releasing memory for objects. (Although ARC is the standard today, you may encounter other memory management techniques in legacy code.)
Working with Attributes for Declared Properties
After you start dealing with memory issues, you see one of the weaknesses of traditional declarations: It is not enough just to specify a type and identifier. When dealing with objects, you need to provide additional information such as how they will be managed in memory. The declared property syntax allows for attributes to be placed in parentheses, and you can use them to specify a number of attributes about the property you are declaring.
One property that is used with ARC is strong. You see it defined in “Setter Semantics” later in this hour. For now, just use it in your declaration as follows (this avoids a compiler error).
@property (strong) CurrencyConverter *currencyConverter;
Using Declared Properties
Remember, if you are modifying legacy code, you need to add an @synthesize directive in your implementation file. By convention, it is placed at the top of the implementation file right after @implementation.
@synthesize myCurrencyConverter;
Note: What Should calculate Do?
In practice, this method might return a value. In another scenario, the calculate method might do nothing more than calculate (as its name suggests) but not return it. It may perform additional tasks such as notifying other objects that the value has been calculated. If you want to retrieve the calculated value, you might call another method or use the getter for CurrencyConverter. This would be a good implementation if the method uses real-time foreign trade conversion values. The getter might return the value as well as the time stamp and source of the conversion value. Your choice depends on the requirements of the app you want to build.
There are two ways to use the declared properties: message syntax and dot syntax.
Accessing the Property with Message Syntax
If you write the code shown in Listing 9.1, you can send a message to the self object (the current class) requesting the value of a property. If you have let Xcode create the default getter, here is what you would write to get the value of exchangeRate:
float f = [self exchangeRate];
You can try this out in the didFinishLaunchingWithOptions: method of the app delegate. Place it right after the comment indicating the override point.
Accessing the Property with Dot Syntax
Dot syntax uses the standard C syntax used for working with structs. When you are working with a declared property, dot syntax uses the accessors that have been created behind the scenes by Xcode. This means that when you use dot syntax and declared properties, as shown in Listing 9.2, you preserve encapsulation and can write:
float f = self.exchangeRate;
Here is the dot syntax to set a value:
float f = 5.0;
self.exchangeRate = f;
Preserving encapsulation is not just a matter of design purity or some abstract concept. It means that the accessor can include various types of error checking to prevent accidents from happening.
Given the declared property and its accessor, you can get to the calculate method in your implementation by using this code that combines dot and messaging syntaxes:
[self.currencyConverter calculate];
Using Attributes
As you have seen, the attributes section of declared properties lets you add a variable number of attributes to the basic type and identifier of an instance variable. This section explores those attributes. Most of the attributes consist of a keyword that turns the attribute on or off or to a specific value. Some of them consist of a keyword and a variable. Unless otherwise noted, each of the attributes that follows can have one (or sometimes zero) values in a list of attributes.
Attributes add additional dimensions to properties (and, thus, to variables). Although Objective-C is a dynamic language in which as much as possible is done at runtime rather than at compile time (thus allowing for greater runtime flexibility), some of these attributes allow the compiler to perform more traditional compile-time checking.
Note: Striking a Balance Between Runtime and Compile-Time Error Checking
The philosophical differences between compile- and runtime error checking are joined in the practical world by the fact that runtime errors are generally discovered by the user rather than by the developer. The fact that they may be caused by user errors is irrelevant. Developers and users want apps to run successfully despite what a user may do. These issues have been a topic of discussion in the world of dynamic languages for many years. A lot of people feel that the balance achieved in Objective-C 2.0 is appropriate, useful, and beneficial to both users and developers.
You have two choices for writing your own accessors. You can simply implement the accessors that will be looked for using the naming conventions:
– (CurrencyConverter *)currencyConverter; //getter
– (void)setCurrencyConverter: (CurrencyConverter *)newValue; //setter
You can also create accessors using different names from the naming conventions. If you choose to do so, you use one or both of the following attribute settings. The default is to use the automatically generated getter and setter.
![]()
getter = getterName—This method must return a result with a type that matches the property type; it must not have any parameters. Beyond these descriptions, you can do anything you want. You can perform calculations to modify the raw result, for example.
![]()
setter = setterName—This method must return void and take a single parameter that matches the property type. As with getters, you can do any additional processing you want. You get a compiler error if you specify a setter for a readonly attribute (see the following section).
Note: Using a Custom Getter for a BOOL
A custom getter is often used for a BOOL property. Consider the following case:
@property (readwrite) BOOL readyForInput;
The default getter will let you write code like this:
[myProperty readyForInput];
You can improve readability by using a custom getter as in the following:
@property (readwrite, getter = isReadyForInput) BOOL readyForInput;
...
[myProperty isReadyForInput];
Writability
Your choices for writability are simple:
![]()
readwrite [default]—Both a getter and setter are generated by Xcode or you.
![]()
readonly—You or Xcode must supply a getter. Attempts to use dot syntax to set a value are caught by the compiler.
Setter Semantics
You have your choice of several values that let you handle how references to objects are tracked in a reference-counting environment. Typically, if you take ownership of an object, you need to bump up the reference count when you take it and then bump it down when you are finished. The runtime software watches to see when a reference count hits zero and, at that time, cleans up memory. ARC takes care of this for you.
Here are the two most frequently used values for ARC:
![]()
weak (formerly assign) [default]—This is the typical assignment paradigm. It simply assigns a value to the property and leaves the reference count untouched. If the object itself disappears (see the next bullet) the value is set to nil.
![]()
strong (formerly retain)—This calls retain on the new value that is being set. It then calls release on the previous value, thus bumping its reference count down by one. All of this happens inside the Automatic Reference Counting (ARC) code. When the last strong property is no longer in use, the object itself may be deallocated and weak references to it are set to nil.
Atomicity
It is possible under some circumstances for properties to have partially set values. By making a property atomic, extra instructions are added so that the object is locked before its value is retrieved, and then unlocked afterward. There is a performance penalty for this added security: it is measured in hundredths of a second, but can be significant particularly in loops that execute many times. The default value is to treat properties atomically, but you can specific the nonatomic attribute to eliminate this locking.
GO TO ![]() Hour 22, “Grand Central Dispatch: Using Queues and Threading,” p. 283, for more information on this concept.
Hour 22, “Grand Central Dispatch: Using Queues and Threading,” p. 283, for more information on this concept.
Using Other Attribute Decorators
You can use any C-style decorators. In addition, you can use IBOutlet. These do not appear in the attributes’ parentheses. If used, they appear before the type name.
You can use IBOutlet to indicate that the property can be used by Interface Builder as an outlet in the interface. This means that the property can be accessed from an interface element such as a button.
Implementing Properties
As noted previously, @synthesize is only one of the implementations you can supply for a declared property. @synthesize and @dynamic are discussed in this section.
Creating Accessors with @synthesize
After you have declared a property, Xcode can generate the appropriate backing variable as well as the getter and setter automatically (getter only for the case of readonly properties). By default, the backing variable is the name of the property preceded by an underscore. Thus, you can also create your own @synthesize directives to customize the process. One of the most frequently used variations of the @synthesize directive is to set the property to an instance value of your own. The default @synthesize statement is effectively
@synthesize myProperty = _myProperty;
The backing variable is the property name preceded by an underscore. However, you can create any backing variable you want and use it for the property by adding an @synthesize directive like this to the top of your @implementation.
In certain circumstances, you may want to refer directly to the backing variable (most commonly, these are situations such as an init method, and, if you are still using reference counting, a dealloc call). If you do not use a backing variable with a different name from the property, you can reference the instance variable from your code with
_myProperty
whereas
self.myProperty
goes through the property to the same instance variable.
Note: Legacy Instance Variable Declarations
The ability of the compiler and runtime to dynamically create instance variables is relatively new; it has required changes in the runtime of Objective-C 2.0 as well as more recently in Xcode. If you are dealing with legacy code, you may see instance variable declarations that are used automatically in the @synthesize directive for a property with the same name. You may be tempted to convert all of them to use declared properties and automatic creation of instance variables, but experiment before doing a wholesale conversion. Precisely because of the possibility of confusion between properties and instance variables with the same name as just described, you may break existing code. Going forward, it is a good practice to use properties and backing variables with a different name (such as starting with an underscore).
Promising Data with @dynamic
This directive is most often used with NSManagedObject. It indicates that the information otherwise provided by @synthesize and its getters and setters will be provided dynamically. @dynamic is frequently used with Core Data managed objects.
Summary
This hour described the processes you use to declare properties rather than instance variables for your class. The use of properties helps to encapsulate the data for your class by making it accessible only through accessors. In addition, attributes let you specify more features of the data than simply a type as in a traditional declaration.
Q&A
Q. What are the advantages of using declared properties?
A. By automatically creating accessors that you can use with dot syntax, the instance variables are more securely encapsulated. In addition, attributes of declared properties let you set more than just the type of the property; you can control its writability as well as features such as memory management.
Q. What are the advantages of using dot syntax with declared properties?
A. You may have less typing to do because you can use the synthesized accessors. In addition, it can make your code more readable.
Workshop
Quiz
1. What should you do if you are revising an app that uses declared instance variables?
2. Why would you create your own accessors for declared properties?
Quiz Answers
1. For new variables, consider using declared properties. Existing variables may be changed, but be careful that you do not introduce errors. The tighter syntax of declared properties may cause sloppily written code to break.
2. Create your own accessors if you want to do additional processing before or after accessing the backing variable.