
Using Namespaces in Your Applications
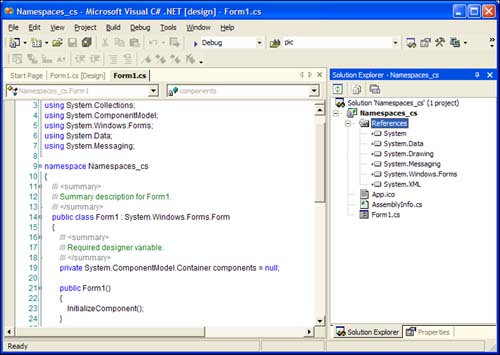
Each time you create a new application using Visual Studio .NET, default namespaces are added to the application based on the default functionality of the project type you selected. For example, if you create a Windows Forms application, the System.Windows.Forms namespace is automatically added to your project. To see what's added by default to each project you create, you can drill into the References node of the Solution Explorer. An example of the references for a new C# Windows Forms application is shown in Figure 9.3.
Figure 9.3. The default references for a C# Windows Forms application.
By adding references by default, you can use the Imports statement in Visual Basic .NET classes or the using statement in C# classes to reference the namespaces that are referenced in your project. That means you can avoid using the fully qualified name every time you're trying to use an object.
However, you can't use the Imports or using statement on a namespace or class without it first being referenced in the project. So, if you're trying to use a namespace that's not referenced by default, you must add a reference manually. Then you can use the Imports or using statement to access the object.
To break this down, work through the following steps to see how referencing namespaces matters:
1. | Create a new Windows Forms application and call it Namespaces_vb or Namespaces_cs, depending on whether you're using Visual Basic .NET or C#. I refer to this project as the Namespaces project for the rest of this section. |
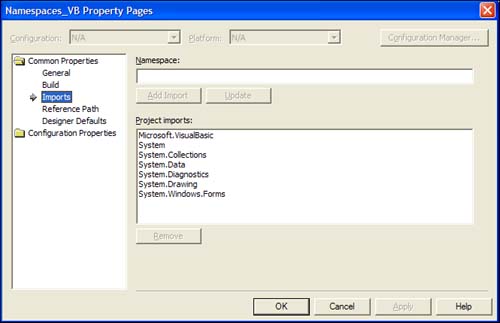
2. | On the default Form1, double-click the form and scroll to the very top of the class file. If you created a C# application, you'll see the following items: using System; using System.Drawing; using System.Collections; using System.ComponentModel; using System.Windows.Forms; using System.Data; If you created a Visual Basic .NET application, you'll see no Imports statements at the top of your class file for the default Form1. This is because C# and Visual Basic .NET behave differently in Visual Studio .NET when it comes to how they reference the default namespaces. In C#, the using statement appears at the top of each class file. In Visual Basic .NET, the defaults are kept on a per-project basis. If you've created a Visual Basic .NET project, you can right-click the project name and select Properties from the contextual menu. When the Properties page pops up for your project, select the Imports node under the Common Properties tree view node. Figure 9.4 shows the default Imports statements that appear on each class for this project. |
From this properties page, you can also add additional namespaces that you want to include in your class files for the project you're working on.
When you're writing an application and realize that a namespace you need isn't added, you can add additional namespace references to your application by right-clicking the References node in the Solution Explorer and selecting Add Reference from the pop-up contextual menu. As a test, you need to reference a type from a namespace that isn't added by default to a new project. To demonstrate this, you'll attempt to write some code that references the System.Messaging namespace.
In the default form of the Namespaces project you created earlier, double-click the form to get to the code-behind file's Form1_Load event. In the Form1_Load event, type the following code:
Dim m as MessageQueue = New MessageQueue()
MessageQueue m = new MessageQueue();
Notice that the MessageQueue object didn't appear in the auto-list members options when you were typing in the Form1_Load event. To make this work, you must do two things:
Add a reference to the System.Messaging namespace to your application
Reference the System.Messaging namespace using an Imports or using statement at the top of your class file
To add a reference to your application, do the following:
1. | Right-click the References node of your project in the Solution Explorer. |
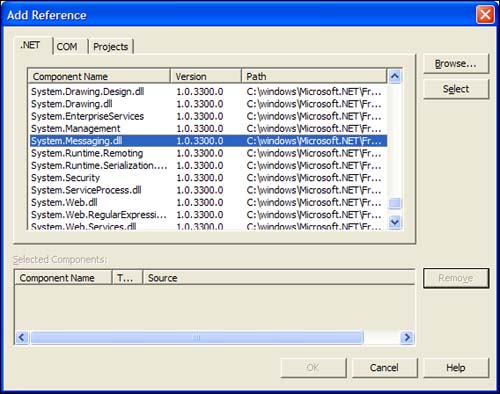
2. | Select Add Reference from the pop-up contextual menu. The Add Reference dialog shown in Figure 9.5 should pop up. Figure 9.5. The Add Reference dialog box.
|
3. | Scroll down on the .NET tab until you see System.Messaging.Dll in the list. Select this assembly and click the Select button. You should now see the System.Messaging.Dll in the Selected Components list view. |
4. | Click the OK button. |
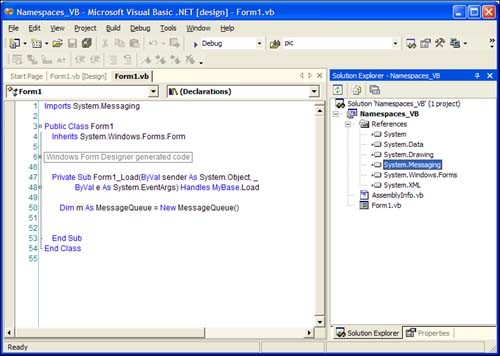
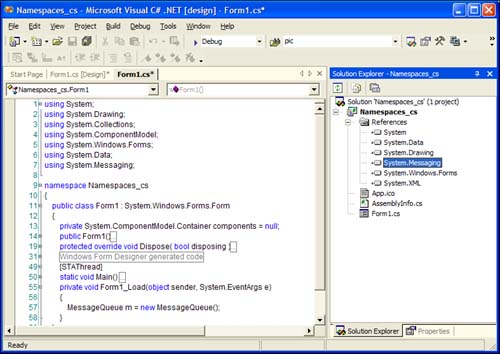
5. | In your code-behind file for Form1, alias the System.Messaging namespace with the Imports statement in Visual Basic .NET or the using statement in C#. Figures 9.6 and 9.7 show you what your C# and Visual Basic .NET solutions should look like when the System.Messaging.Dll is added to your solution and aliased in your class file. Figure 9.6. Visual Basic .NET solution after referencing a new System.Messaging.dll assembly.
Figure 9.7. C# solution after referencing a new System.Messaging.dll assembly.
|
Note
As shown in Figure 9.6, you used the first tab of the Add Reference dialog box to add the System.Messaging.dll .NET assembly to your application. The second tab, labeled COM, lists all the COM components registered on your machine and enables you to add them to your application in the same way as a .NET component. When a COM component is added, Visual Studio .NET creates a wrapper called a runtime callable wrapper (RCW) around the COM object, which enables you to reference the component as if it were a managed assembly. You learn the details of the RCW on Day 14. The third tab, labeled Projects, enables you to add references to other applications in your solution. For example, if you're creating a separate assembly for a data access layer that contains all your data logic, you can work on both projects in the same solution and reference the data access layer project in the active project.
Notice that you can now declare new MessageQueue objects, and you have the full support of Visual Studio .NET with auto-list members.
Tip
If you're a Visual Basic 6 developer, you can think of the Add Reference dialog in Visual Studio .NET as analogous to the Add Reference dialog in Visual Basic 6. They accomplish the same thing: They enable you to reference types that aren't part of your application. The underlying difference between them is that when you referenced a new type in Visual Basic 6, the auto list members of the type were the result of the Visual Basic 6 IDE reading information supplied by the COM type library. In .NET, the Visual Studio .NET IDE reads information from the metadata of the assembly by using reflection, which you can learn more about by looking up the System.Reflection namespace.
You now have an understanding of what namespaces are and how you can use them in your application. You also know how to alias namespaces in your classes and import new namespaces into your solution. Next, you learn about the Environment class of the System namespace and the IO namespace of the System namespace.