
Building Data-Driven Forms with the Server Explorer
As you learned yesterday, databinding is everywhere in .NET. You can literally bind any type of data source to any type of object. Using the Server Explorer in .NET, you can set up quick-and-dirty data entry forms with just a few lines of code.
To see how to use the Server Explorer to create a data entry form, double-click the default Form1 in the DataTools project that you've been working with.
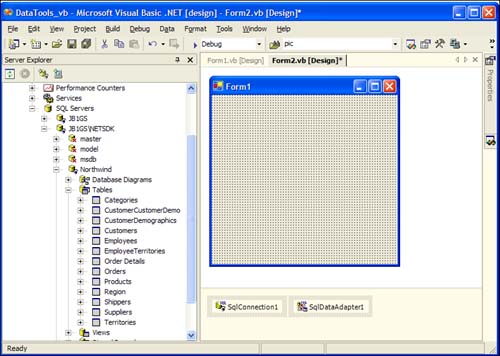
After the form is in the Forms Designer, drag the Categories table from the Northwind database in the Server Explorer onto the form. A SqlConnection object and a SqlDataAdapter object are added automatically to your form. Figure 11.11 is what your project should look like at this point.
Figure 11.11. Project after Categories is added from the Server Explorer.
Note
The SqlConnection and SqlDataAdapter objects that were added to your form are the same objects you learned about yesterday. Yesterday, you created these objects in code; today, you're using them as design-time components. On the Data tab of the Toolbox, you'll notice there are design-time components for each of the SQL and OLE DB objects you created programmatically yesterday. There's no difference between creating ADO.NET objects through code and using them as components from the Toolbox. If you use the components from the Toolbox, you have more design-time visual tools to work with the ADO.NET objects and data sources.
Now that the Connection object and DataAdapter object have been added automatically, you have the connection to the database and the object that you can use in conjunction with a DataSet to move data back and forth between SQL Server.
To see what actually happened, double-click on the form, and drill into the Windows Forms Designer region in the Code window. You'll see lines and lines of code that you didn't write. A snapshot of what was generated is shown in Figure 11.12.
Figure 11.12. ADO.NET code generated by Server Explorer objects.

All the ADO.NET code that you would have otherwise had to write yourself was generated by simply dragging the table from the Server Explorer onto the form. The Select, Insert, Update, and Delete SQL statements were created along with the SqlCommand Parameters collection for each field in the Categories table.
Next, you must create a DataSet to hold the data that the DataAdapter is going to retrieve for you. In ADO.NET, there are two types of DataSets: typed and nontyped. A typed DataSet contains strong type information about the fields and the allowable data types. When you create a typed DataSet, you can reference the field names in the DataSet as you would any other property—by using the dot syntax.
A nontyped DataSet does not contain strong type information about the fields in the DataSet. The main difference to you is how the field names are referenced when working with the DataSet. When using the SqlDataAdapter component from the Toolbox or when it's automatically generated for you by the Server Explorer, you can easily generate a typed DataSet for the DataAdapter.
To generate a typed DataSet for the SqlDataAdapter1 that was added to Form1, right-click SqlDataAdapter1 and select Generate DataSet from the contextual menu. The Generate Dataset dialog box now pops up. You should see something like Figure 11.13.
Figure 11.13. The Generate Dataset Dialog box.

Because DataSets can contain data from multiple sources, you're given the option either to use an existing DataSet in your project or to create a new DataSet. For this exercise, select the New option and type DataSet1 in the Name box. Leave the Categories (SqlDataAdapter1) option checked, and leave Add This Dataset to the Designer checked. After you click the OK button, you'll notice a new Dataset11 object is added to your form.
If you look in your Solution Explorer, you'll see the DataSet1.xsd file has been added to your solution. This is the XML schema that represents the typed dataset for the DataSet component that the Generate DataSet tool just created. If you double-click the DataSet1.xsd file, you'll see the XML schema that represents your data. If you see the Dataset schema, but not as an XML schema, click the XML button at the bottom of the Schema Designer to view the actual XML representation of the schema for the typed DataSet component. Figure 11.14 shows the auto-generated schema.
Figure 11.14. XSD schema generated from the SqlDataAdapter for the DataSet.

Notice that the XSD file defines the field names, data types, and primary key constraints. The DataSet uses this file to know what kind of data is allowed and how it should store that data. Tomorrow, when you learn about XML in .NET, you'll create your own XSD files and use them with XML files that you create to validate data types against XML data. Because the data format being marshaled by ADO.NET is XML, it's only natural that it would use XML schemas to dictate the data types and rules for the data.
Now that the XSD file is generated, you have Connection, DataAdapter, and DataSet components ready to go for this form, but you haven't done any coding.
Before you write the four lines of code to actually use the data you have just created, right-click on SqlDataAdapter and select Preview Data from the contextual menu. The Data Adapter Preview window pops up. This window enables you to view the actual data before using it. Figure 11.15 shows the output after clicking the Fill Dataset button on the Preview form.
Figure 11.15. Previewing data from the DataAdapter.

If you have multiple DataSets on the form, they show up in the Target dataset drop-down list. This form is useful for simply viewing the data that's available from the DataAdapter object. Click the Close button to close the Preview dialog.
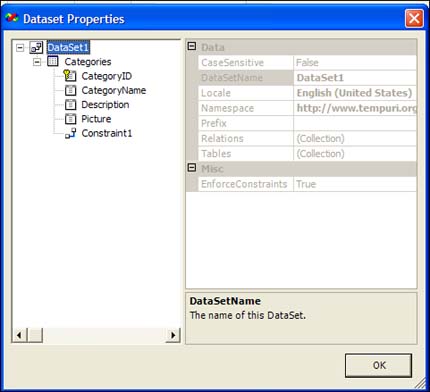
Next, right-click the DataSet11 component on your form and select Dataset Properties from the context menu. The Dataset Properties dialog pops up. This dialog, shown in Figure 11.16, contains the field details that the DataSet uses, based on the strongly typed dataset you created from the SqlDataAdapter. You can drill into the table and select the fields to view the properties. If you modify the XSD file, the Dataset Properties dialog box reflects those changes.
Figure 11.16. The Dataset Properties dialog box.
Tip
When you're working with the data components shown in the nonvisible controls area of your forms, the Data menu on the main menu changes its options based on the object you select. If you click the DataSet11 component, the Data menu has all the options for working with DataSets. If you select SqlDataAdapter1, the menu options change to those for DataAdapters. The same is true for all the components from the Data tab in the Toolbox.
To finish up this section, you must add a DataGrid control from the Toolbox to your Form1. After you've added the DataGrid to the form, modify the Anchor properties of the DataGrid so that it automatically resizes with the form.
Now you must write the code that loads the grid with the data from the dataset. As you learned yesterday, you must call the Fill method of the DataAdapter to load data into a DataSet. The following code must be added to the Load event of your form to fill the dataset with the data from the DataAdapter:
SqlDataAdapter1.Fill(DataSet11, "Categories")
DataGrid1.DataSource = DataSet11
sqlDataAdapter1.Fill(DataSet11, "Categories");
dataGrid1.DataSource = DdataSset11;
You're simply filling the dataset and setting the DataSource property of the grid to the dataset.
Before you run the application, you must add code to the Closing event to the form. This code calls the Update method of the DataGrid and the Update method of the DataAdapter. By calling Update in the Closing event of the form, you're telling the DataAdapter to use the auto-generated Update command that was created to send the changed data to the database, thus persisting your changes that you make in the grid. The following code should be added to the Closing event of the form:
DataGrid1.Update()
SqlDataAdapter1.Update(DataSet11)
dataGrid1.Update();
sqlDataAdapter1.Update(DataSet11);
Now, run the application by pressing the F5 key. You should see something like Figure 11.17.
Figure 11.17. The Categories form generated by the Server Explorer.

If you modify some of the data, close the form, and rerun the application, you'll see that your changes are saved to the database. If you compare the data in Figure 11.15 to the data in Figure 11.17, you'll notice that I've changed some of the data, and it has successfully persisted to the database.
To recap what just happened:
You dragged the Categories table from the Server Explorer on to your form.
Visual Studio .NET auto-generated a SqlConnection component, a SqlDataAdapter component, and all the ADO.NET code that's necessary to select, insert, update, and delete data from the Categories table.
You used the built-in Generate DataSet tool in Visual Studio .NET to create a strongly typed dataset based on the information in the DataAdapter.
You added a DataGrid to your form to display the Categories table data.
You added two lines of code to fill the dataset from the DataAdapter and bind the dataset to the DataGrid control.
You added two lines of code to call the Update method on the DataAdapter, which in turn executed the auto-generated Update command for the fields that you modified in the DataGrid.
Creating quick-and-dirty forms from the Server Explorer is extremely simple, but the results are extremely useful. Next, you're going to learn how to create slightly more functional forms without writing any code at all—not even four lines.
Note
In the next section, you learn about the DataForm Wizard. The code generated by the DataForm Wizard can be used to extend the exercise you just completed by implementing Insert and Delete functionality.