
Understanding Windows Forms
Each form you add to a Windows Forms application is simply a class file. In fact, every single object that exists in the .NET Framework is a class file. What differentiates each class file is the base class that it inherits. Visual Basic .NET and C# are object-oriented programming languages, and as you learned on Day 1, “Introduction to the Microsoft .NET Framework,” all languages in .NET are on an equal standing with each other. This is because they all share the same base classes in the framework class library. A Windows Form is a Windows Form because it inherits its functionality from the System.Windows.Forms namespace. This namespace is used across all .NET languages that must implement Windows Forms applications. If you double-click Form1 of the HelloNET application, you'll see the following code, which tells the class file it's a Windows Form:
Public Class frmMain
    Inherits System.Windows.Forms.Form
public class frmMain : System.Windows.Forms.Form
The class name in this case is frmMain, which is the Name property of the form you set in the Properties window. The class file is inheriting the System.Windows.Forms.Form class. By inheriting this class, the frmMain class now has all the base class events that you saw earlier when you learned how to add events to the frmMain form. Anytime you inherit a class, you're exposing its functionality to your class.
When working with classes, an object lifetime is predefined by events that are part of all objects. Because a form is a class, it has predefined events that dictate its lifetime. The difference between a Windows Form and a class in a DLL is that a user decides when to close a form. In a DLL, a class instance is created, some code is run, and the class instance is destroyed. To understand this better and to get an understanding of the lifetime of a Windows Form, lets examine the lifecycle of an object.
The Life Cycle of an Object
Every object has a constructor that fires when an object is instantiated and a destructor that fires before it's destroyed.
An object's life begins when an instance of a class is created using the New keyword. New objects often require initialization tasks to be performed before they're used for the first time. Some common initialization tasks include connecting to a database, opening files, or checking configuration settings. In Windows Forms, this initialization occurs in the constructor for the form, which is the Sub New event in VB.NET and the Main event in C#. In VB.NET, when the Sub New event is fired, the InitializeComponent method is called, which handles the initialization of the form's controls. In the InitializeComponent event, controls you added at design time are created and the properties of those controls are set. In C#, the Main method creates the class instance by calling the Application.Run method, which passes a new instance of the class being created. This is the form that will load first in a C# application.
When an object is destroyed, the memory it was consuming is given back to the operating system. In Windows Forms, the Closed event calls the destructor for forms that aren't shown modally. If you're showing a form modally, you'll need to call the Dispose method of the form to release the form's memory back to the operating system.
Note
Calling Dispose on a nonmodal form doesn't call the Closing and Closed events, so use caution when calling Dispose—you might miss your cleanup code!
To see this happening in your application, drill into the Windows Form Designer generated code region in frmMain. You'll see New and Dispose events shown in Listing 3.3. Notice the New method calls the InitializeComponent method.
Listing 3.3. Examining Sub New and Sub Dispose in Windows Forms
Note
Regions are a way of separating code in class files. Using the #Region and #End Region syntax, you can create a tree-like structure of your code in the Code Editor. In Windows Forms and ASP.NET, regions are used to differentiate the code generated by the designer and the code you're writing. You can create your own regions to further define a structure for your code.
The Life Cycle of a Windows Form
To get a handle on the events that occur when you're working with forms, you'll write some code that fires at each stage of a form's lifetime.
To start, add two new forms to your HelloNET application. To do so, right-click on the HelloNET project name in the Solution Explorer and select Add, Add Windows Form from the contextual menu. You're now prompted with the Add New Item dialog shown in Figure 3.9.
Figure 3.9. Adding a new form to the HelloNET application.

Change the Name to firstForm and click the OK button. You should see firstForm in the Solution Explorer. Next, add another form and name it secondForm.
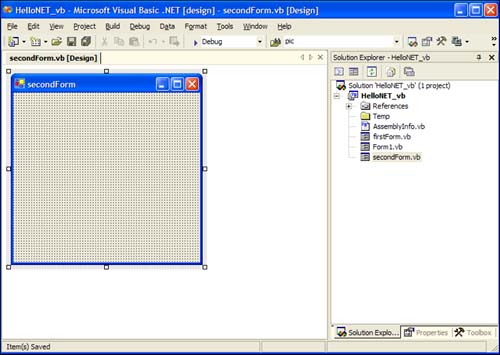
In the Windows Forms Designer, secondForm is now visible. Your IDE should look something like Figure 3.10.
Figure 3.10. The HelloNET application after adding two new forms.
Follow these steps to set up the application:
- Double-click firstForm in the Solution Explorer to make it the active form in the designer.
- Drag a Button control from the Toolbox onto the form. Change its Name property to showSecondForm and its Text property to Show Second Form.
- Double-click the showSecondForm button and add the following code to the showSecondForm_click
event:
MessageBox.Show("Attempting to Load Second Form")
Dim f As New secondForm()
MessageBox.Show("Second Form Created")
f.Show()
MessageBox.Show("Second Form Loaded")
MessageBox.Show("Attempting to Load Second Form"); secondForm f = new secondForm(); MessageBox.Show("Second Form Created"); f.Show(); MessageBox.Show("Second Form Loaded"); - Double-click the secondForm file in the Solution Explorer to make it active in the designer. Double-click the form to get to the code-behind class file.
- Locate the method call to InitializeComponent in the secondForm class file. In Visual Basic .NET, this would be the Sub New event; in C#, syntax does not use a New keyword, it's just the instance declaration of the form. Add the following code to the New event, directly above the call to the InitializeComponent.
MessageBox.Show("Initializing from Second Form")MessageBox.Show("Initializing from Second Form"); - Add the event handler for the Activated event to the secondForm class file. In Visual Basic .NET, you can click the Class Name drop-down box and select (Base Class Events) and then click the Method Name drop-down box and select Activated. In C#, switch to the Form view, press F4 to get the Properties window, and click the Events button to add the Activated event procedure. In the secondForm_Activated event, enter the following code:
Me.Text = "Activated from Second Form"
this.Text = "Activated from Second Form";
- Add an event handler for the Load event of the secondForm class file and add the following code:
MessageBox.Show("Load from Second Form")MessageBox.Show("Load from Second Form"); - Add an event handler for the Deactivate event of the secondForm class file and add the following code:
Me.Text = "Deactivate from Second Form"
this.Text = "Deactivate from Second Form";
- Add an event handler for the Closing event of the
secondForm class file and add the following code:
If MessageBox.Show("Are you sure you want to close?", "HelloNET!", _
    MessageBoxButtons.YesNo, MessageBoxIcon.Question) = _
    DialogResult.No Then

    e.Cancel = True
    MessageBox.Show("Canceled Closing from Second Form")

Else
    MessageBox.Show("Closing from Second Form")
End If
if (MessageBox.Show ("Are you sure you want to close?", "HelloNET!", MessageBoxButtons.YesNo, MessageBoxIcon.Question) == DialogResult.No) { e.Cancel = true; MessageBox.Show("Canceled Closing from Second Form"); } else { MessageBox.Show("Closing from Second Form"); } - Add an event handler for the Closed event of the secondForm class file and add the following code:
MessageBox.Show("Closed from Second Form")MessageBox.Show("Closed from Second Form"); - Set the StartUp object for this application to firstForm. You can do this in Visual Basic .NET by right-clicking on the HelloNET project name in the Solution Explorer and selecting Properties from the contextual menu. In the Properties dialog, select firstForm from the StartUp object drop-down list.
In C#, change the code in the Sub Main routine of frmMain to look like this:
[STAThread]
static void Main()
{
   Application.Run(new firstForm());
}
You can finally press the F5 key to run the application. After firstForm is loaded, click the Show Second Form button. You are prompted for each stage of the form's creation. After secondForm in loaded, click back on firstForm. Notice the Text property of the secondForm has changed to Deactivated. Next, click the x on secondForm to close the form. You're prompted with a MessageBox asking whether you want to close the form. This is the same as the QueryUnload event in Visual Basic 6, except that in .NET you're reacting to the CancelEventArgs event. If you click Yes, you'll notice the Closing and Closed events firing. If you click No, the Closing and Closed events don't fire.
Remembering that forms are just classes, click the Show Second Form button again. After the secondForm loads, click the Show Second Form button again. You now should have two instances of secondForm running. As you click between the forms, observe that the Text property of the form changes if the form is or is not active. Because each form is a class, each time you declare a new instance of secondForm, a new copy of the form is made in memory, and the form events occur independent of each other.
To use the events in a real-life scenario, if you need to perform a task every time a form gets the focus, you must put your code in the Activated event. If you want to set some default properties for your controls, you might do it in the form Load event or, if you want to set values for global variables, you could do it in the constructor for the class.
Note
In Visual Basic 6, the Activate event occurred when a form was activated within the Visual Basic 6 application it was running in. In Windows Forms, the Activate event is independent of the application. For example, if you maximize Outlook or Word over your form, the Deactivate event occurs. When the form gets the focus again, the Activate event fires.
In the exercise you just completed, secondForm was shown nonmodally. In Visual Basic 6, you passed the vbModal constant to the Show method to display a modal form. In .NET, you simply call ShowDialog instead of the Show method. In this way, messages can be passed back to the form that called the ShowModal. For example, to retrieve a message back from a form shown with ShowDialog, you could use the following code:
If f.ShowDialog() = DialogResult.Cancel Then
The DialogResult property of a Button control determines what value is passed back to the calling form.