
Using the DataForm Wizard to Create Data Entry Forms
The Data Form template for Windows Forms applications is an extremely powerful tool for creating full-featured data access forms. This section walks you through the wizard and available options for creating a new data entry form for the Customers table in the Northwind database.
Note
ASP.NET applications also have a DataForm Wizard, but it isn't as robust as the Windows Forms wizard. In the exercises at the end of the day, you create an ASP.NET application that uses the DataForm Wizard to create a Web page, but the databinding technology between the Internet and Windows is different. Because the Web is stateless, it's more efficient to use DataReaders to bind data. ASPX pages are read-only in essence, so binding data to a Web form is a one-way street—you're outputting data for display. There's no efficient way to keep track of the contents of a dataset over HTTP calls. You would need to store the dataset in a viewstate for each Web form, which could become very inefficient for large datasets. For this reason, the DataForm Wizard for Windows Forms is much more robust than the Web Forms DataForm Wizard.
Using the DataForm Wizard
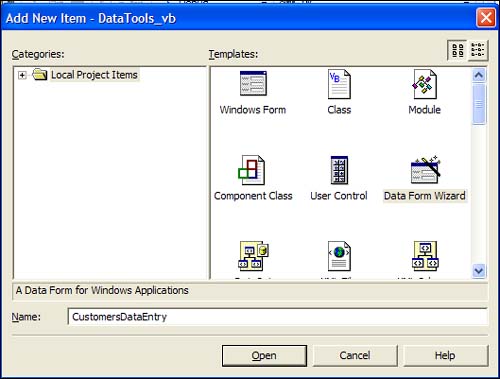
In your DataTools application, right-click the project name in the Solution Explorer and select Add New Item from the contextual menu. Select Data Form Wizard from the Add New Item dialog, and name it CustomersDataEntry, as shown in Figure 11.18.
Figure 11.18. Adding the Data Form Wizard to your application.
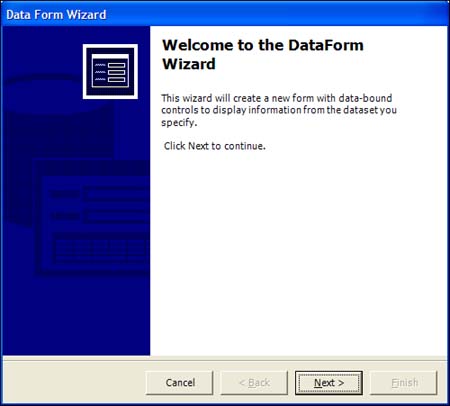
After you click the OK button, the Welcome to the DataForm Wizard dialog appears. You should see something like Figure 11.19.
Figure 11.19. The DataForm Wizard Welcome Screen.
Click the Next button to begin the wizard.
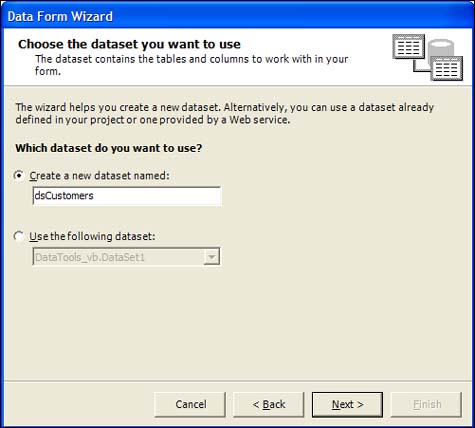
The first step in the wizard is to choose the dataset that will hold the databinding. You have two options on this screen: Either create a new dataset or use an existing dataset. As you saw earlier in the day, you're offered the datasets that exist in your project.
As a rule of thumb, you should use separate DataAdapters and DataSets for each table that you work with. Because a DataAdapter generates SQL commands for Insert, Update, and Delete, it can do so for single tables. In the past, you created joins to work with multiple tables. Now, you create multiple datasets that are linked together by a DataRelation object. The DataRelation object links multiple tables in multiple DataSets and enforces constraints as if you were working directly with the database server. Because the DataSet object can be strongly typed and it's essentially an in-memory cache of the database, the DataRelation can enforce rules set up by the schemas or you can programmatically define constraints that the DataRelation must enforce. For the purpose of our data entry form, you're going to create a new DataSet named dsCustomers, as Figure 11.20 demonstrates.
Figure 11.20. Choosing the dataset from the Data Form Wizard.
Now that you've named the DataSet, click the Next button to select a Connection object. At this point, you might or might not have connections available. At the very beginning of today's lesson, I mentioned the top-level node in the Server Explorer, named Data Connections. The Data Connections node keeps track of Connection objects that have been added through using the data components in the Toolbox. After you create a connection, you can reuse it for other forms and it is available in other projects. Because this is just a reference to a connection, you aren't actually using it unless you reference it. If you've used the Data Form Wizard before or have dragged a Connection object onto a form, you'll most likely see a connection in the Available Connections drop-down list. If there are no connections to choose, you must click the New Connection button, which brings up the Data Link Properties dialog shown in Figure 11.21.
Figure 11.21. Adding a new connection with the Data Form Wizard.
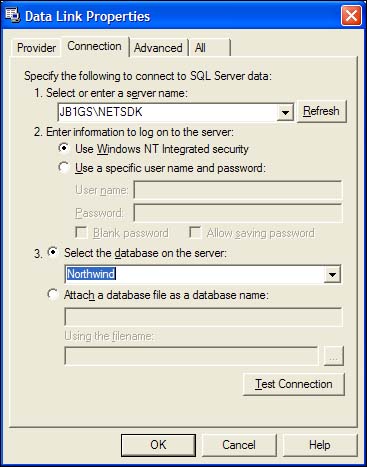
This is the same connection properties dialog used for all data and ODBC connections in Windows. Select the name of your server from the Server Name drop-down. Click the Use Windows NT Integrated Security option button, and then select the Northwind database from the Select the Database on the Server drop-down.
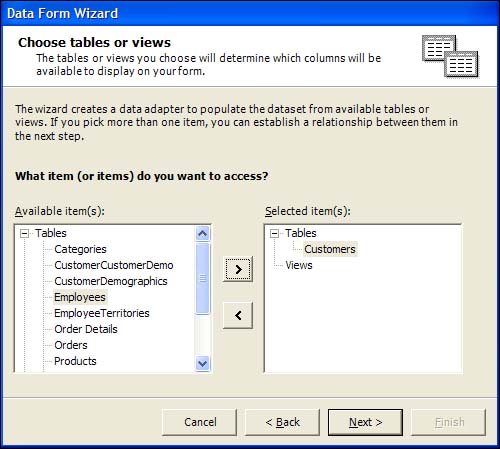
Click the Test Connection button just to make sure that it works, and then click the OK button to close the dialog. Next, you must choose the tables or views that this form will use. Because we're creating a data entry form for customers, select the Customers table from the left-side tree view and move it to the Selected Items node, as Figure 11.22 shows.
Figure 11.22. Selecting the table or view in the Data Form Wizard.
After you click the Next button, you'll notice a slight delay, and you'll see a new XSD file named dsCustomers.xsd in your solution. Because you have the main ingredients that Visual Studio .NET needed to create the typed dataset, it went ahead and created the XSD file and added it to your solution.
Figure 11.23 is the next step in the wizard, which enables you to choose which fields you want displayed on the form.
Figure 11.23. Choosing the fields to display on the form.

Notice that you have the option for master and detail tables. If you created a DataSet that had more than one table, the TableRelation would be set up at this point. Because you're using only one table, the detail table option is disabled.
Click the Next button to get to the final step of the wizard. At this point, you decide what type of form you want to create. Figure 11.24 shows the available options.
Figure 11.24. Choosing the display style of the Data Form Wizard–generated form.
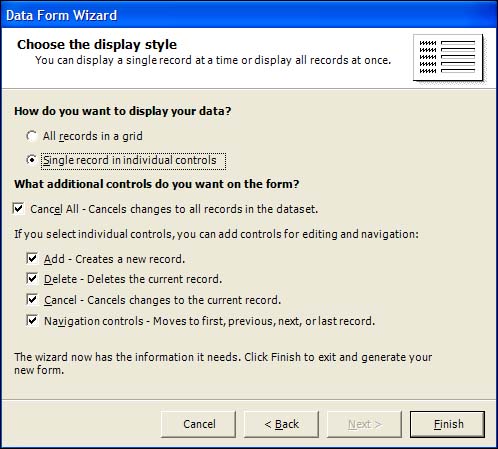
At this point, you have several options based on what functionality you want to give to the end user. Select the Single Record in Individual Controls option for this form. After you click the Finish button, the form is created and you should have something that looks very close to Figure 11.25.
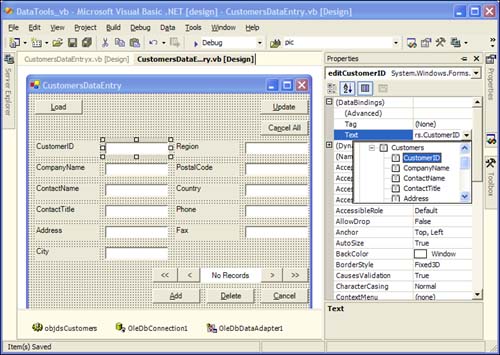
Figure 11.25. The results of running the Data Form Wizard.

You can see that the Connection, DataAdapter, and DataSet objects were added to the form, and that all of the correct controls needed to make the form functional have been added.
If you click on the TextBox associated with the CustomerID field and view the DataBindings property in the Properties window, you'll see that the fields available in objdsCustomers are listed as available bindable fields. Figure 11.26 shows the DataBindings property in the Properties window.
Figure 11.26. Viewing the DataBindings properties.
When you add DataSets to a form, the fields from the strongly typed dataset are automatically available as bindable objects for all controls on the form. Because each control has a DataBindings property, you can bind the fields from the DataSet to any control on the form.
To run the application, you must change the StartUp object to the CustomersDataEntry form. Because you added the form after Form1, Form1 starts when you run the application. To change the startup form in Visual Basic .NET, right-click on the project name in the Solution Explorer and select Properties. In the Properties dialog, change the Startup object in the drop-down list from Form1 to CustomersDataEntry and click the OK button to close the Properties dialog. In C#, you can simply change the code that loads the correct form in the Main procedure of the default Form1. If you press F5 to run the application, you can click the Load button and the form is loaded with the data from the Customers table.
Your final output should look like Figure 11.27.
Figure 11.27. Final output from the Data Form Wizard.
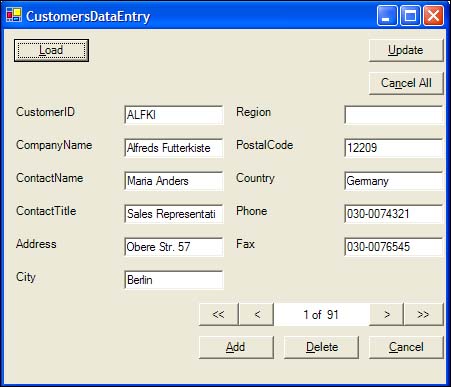
If you change some data and click the Update button, the new data is persisted back to the database. The Data Form Wizard writes all the code that you need to create a fully functional data-driven form.
To understand what's going on behind the scenes, you need to understand what is happening with databinding in Windows Forms.