
Working with Files and Directories
The System.IO namespace contains the basic file I/O functions that enable you to read and write files, list directories, get file information, and manipulate files and directories. Most applications interact with a file in one way or another, and the System.IO namespace helps you do so.
In this section, you learn how to
List directories and files
Read and write simple text files
Note
In JScript, VBScript, and Visual Basic, you use the FileSystemObject to work with files and directories. You can use the FileSystemObject in .NET, but because it's a COM object, there's additional resource overhead when calling the FileSystemObject's properties and methods. For this reason, you should always use the managed System.IO namespace for all file and directory code.
Inside the System.IO Namespace
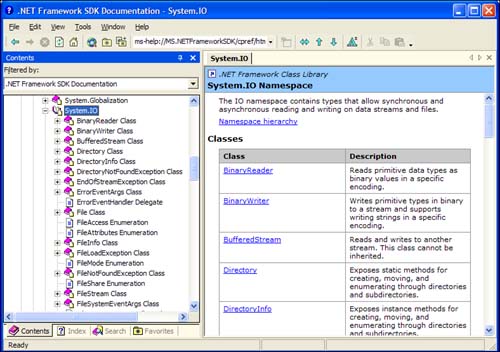
The System.IO namespace contains static (or shared) classes and instance classes that enable you to interact with files, paths, directories, and streams. Streams can be from any type of resource, such as a file on the file system, a network stream, or even a URL from the Internet. You determine which classes in the System.IO namespace to use based on the type of stream you're accessing. If you look up the System.IO namespace in the SDK help file, you'll see something similar to Figure 9.12, which is a long list of the classes and namespaces that make up the System.IO namespace.
Figure 9.12. The System.IO namespace in the .NET Framework SDK.
Note
Static and shared have the same meaning. In Visual Basic .NET, noninstance classes are called shared. In C#, noninstance classes are called static. All shared or static members are shared across all instances on a class, meaning that you can reference the member without using the New constructor for the member you're accessing.
Figure 9.13 is a compact representation of the hierarchy of the System.IO namespace. You can see the static (shared) classes and the instance classes in the figure.
Figure 9.13. Compact representation of the System.IO namespace.

As you can see in Figure 9.13, the System.IO namespace hierarchy contains many objects that interact with files and the file system. We'll discuss the File, Path, and Directory classes, and the StreamReader and StreamWriter classes. These are common classes for basic file I/O.
Understanding the File Class
The File class provides static methods that give you access to files. The instance class FileInfo gives you functionality similar to the static File class. But because the File class is static, it performs security checks each time you access a file object. If you're going to access the same file objects more than once, you should use the FileInfo class to avoid the overhead of performing security checks on the same objects each time. Table 9.3 lists the methods of the File class and their descriptions.
Using the methods of the File class is straightforward. The following snippets use some of the methods to get you familiar with the syntax:
Imports System.IO

Public Class Class1

 Sub FileClassStuff()

  ' using Exists, Move, SetCreationTime,
  ' SetLastAccessTime, SetLastWriteTime

  If File.Exists("C:Junk.txt") Then
   File.Move("C:Junk.txt", "D:Junk.txt")
   File.SetCreationTime("D:Junk.txt", Date.Now)
   File.SetLastAccessTime("D:Junk.txt", Date.Now)
   File.SetLastWriteTime("D:Junk.txt", Date.Now)
  End If

  ' using Exists and Delete methods

  If File.Exists("C:Junk.txt") Then
   File.Delete("C:Junk.txt")
  End If

 End Sub
End Class
using System;
using System.IO;

namespace IO_FileClass_CS
{
 public class Class1
 {
  static void Main()
  {

  // using Exists, Move, SetCreationTime,
  // SetLastAccessTime, SetLastWriteTime

  if (File.Exists(@"C:Junk.txt"))
  {
   File.Move(@"C:Junk.txt", @"D:Junk.txt");
   File.SetCreationTime(@"D:Junk.txt", Date.Now);
   File.SetLastAccessTime(@"D:Junk.txt", Date.Now);
   File.SetLastWriteTime(@"D:Junk.txt", Date.Now);
  }

  // using Exists and Delete methods

  if (File.Exists(@"C:Junk.txt"))
  {
   File.Delete(@"C:Junk.txt");
  }
  }
 }
}
Note
You should always use the File.Exists method to check for the existence of files instead of using a Try/Catch block to trap the FileNotFoundException if the file doesn't exists. This eliminates any of the overhead that might be introduced by using exception handling for actions that could be handled in the language, and not through the use for exceptions.
Understanding the Path Class
The Path class has methods that enable you to retrieve or modify paths on the operating system. When working with the Path class, the methods are smart enough to realize the rules of the operating system that your code is running on. For example, if an OS only allows 256-character pathnames with a 3-character extension, the Path class returns ArgumentException to let you know that you're doing something wrong. The same code might work perfectly on a system such as Windows XP, which has greater flexibility when working with file paths. Table 9.4 lists the more common available methods to you in the Path class.
As is the File class, working with the Path class is very straightforward. All methods can be called directly without creating an instance of the Path class.
Understanding the Directory Class
The Directory class exposes methods that enable you to create, delete, move, rename, and enumerate directories and subdirectories. The Directory class is also a static class. The DirectoryInfo class is the instance class that enables you to create directory instances. Using the DirectoryInfo class avoids the overhead of security checks for each directory reference. Table 9.5 lists the common methods of the Directory class.
You'll notice that some of these methods are similar to the methods of the Environment class (for example, GetLogicalDrives, which returns a string array of drives). Methods such as SetLastWriteTime and GetLastWriteTime are also similar to the methods of the File class. Because files and directories are similar object types, they share methods that perform similar operations.
In the next section, you create a sample application that uses some of the methods of the Directory class.
Creating an I/O Sample Application
To use some of the classes in the System.IO namespace, you're going to write a Windows Forms application that lists directories and files, writes a list of items from a list box to a text file, and then reads the text file back into a list box. To achieve this, you
Use the StreamWriter class of the System.IO namespace to write to a file
Use the StreamReader class of the System.IO namespace to read from a file
Use arrays
Use the ListBox control
Follow these steps to set up the new application. But before you start, look at Figure 9.14 to see what the end result of your form should look like.
1. | Create a new Windows Forms application named IO_VB (if you're using Visual Basic .NET) or IO_CS (if you're using C#). |
2. | On the default form1, change the following properties using the Properties window: Text = "Using the System.IO Namespace" StartupPosition = CenterScreen |
3. | |
4. | |
5. | Drag another button from the Toolbox onto the form, and change these properties: Name = WriteToFile Text = "Write To ListBox File" |
6. | Drag another button from the Toolbox onto the form, and change these properties: Name = ReadFromFile Text = "Read ListBox From File" |
7. | Drag a ListBox from the Toolbox onto the form, and change these properties: Anchor = Top, Bottom, Left, Right |
Figure 9.14. Form1.vb from the IO application.
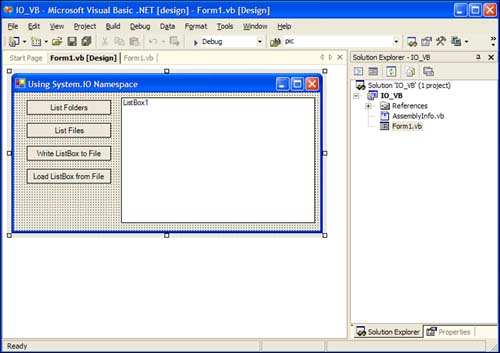
Your completed form should look like Figure 9.14.
Writing the IO Application Code
Now that you have the project set up, you can start writing the code to retrieve directory information. Double-click the List Folders button and add the code in Listing 9.4 to the code-behind for the ListFolders_Click event. This code uses the Directory.GetDirectories methods to return an array of directories.
Listing 9.4. ListFolders_Click Event Code
If you press the F5 key to run the application and click the Get List Folders button, you should see a listing of the subdirectories of your Program Files folder. My output looks like Figure 9.15.

In Listing 9.4, you build on techniques you used in the Environment application you created earlier today. You use the GetFolderpath method of the Environment class to return the location of the Program Files folder. The Directory.GetDirectories method returns a string array of folders in the Program Files directory. You then loop through and add them to the list box using the Items.Add method. Using the GetFolderPath method of the Environment class ensures that you won't get an error if the user has a path for Program Files other than C:Program Files.
To get folders and files, you use the GetFileSystemEntries method of the Directory class. Double-click the List Files button and add the code in Listing 9.5 to the ListFiles_Click event.
Listing 9.5. Using the GetFileSystemEntries Method
Now you can run the application by pressing F5 and observe the output. In Listing 9.5, you use the GetFileSystemEntries method to return an array of files and directories in the My Documents directory. The Environment.SpecialFolder.Personal enumeration returns the correct location of the My Documents folder to list the files and folders. You could also replace the GetFileSystemEntries method with the GetFiles method to return only the files in the My Documents folder.
Using the StreamWriter and StreamReader Classes
Up to now, you've used the classes of the System.IO namespace to access file system objects. But to read and write data, you must use the methods of the StreamReader and StreamWriter classes.
In Figure 9.13, you saw a representation of the System.IO namespaces and its members. There are classes that handle network streams, crypto streams, binary streams, text streams, and buffered streams. To accomplish basic reading and writing of files, you use the methods of the StreamReader and StreamWriter classes to complete the I/O project you started earlier. But before we write that code, examine Tables 9.6 and 9.7 to get an idea of what methods are available in the StreamReader and StreamWriter classes.
The StreamReader class gives you all the read methods to accomplish reads on a stream after you've opened it. Read, Peek, ReadToEnd, ReadLine, and ReadBlock all read data from a stream. The StreamWriter methods perform the task of writing data to a stream.
Write and WriteLine are the methods to write data, with the only difference being that the WriteLine method adds a line terminator to the end of the line of data you're writing.
To implement the code to loop through the items in the ListBox control on your form, double-click the Write To File button, and add the code in Listing 9.6 to the WriteToFile_Click event.
Listing 9.6. Using the StreamWriter Class
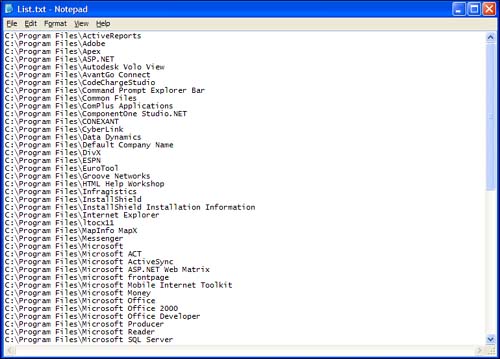
After you run the application, you can check the List.txt file in the C drive. It lists the files that are also listed in the ListBox in a nice text format. Using the WriteLine method of the StreamWriter class adds the line terminator after each item it writes out in the List.txt file. Figure 9.16 shows the List.txt file from my machine.
The last step in the code for the I/O application is writing the code-behind for the Read From File button. Listing 9.7 has the code that uses the StreamReader class to create a new stream object based on the List.txt file you just created in Listing 9.6. Add the code in Listing 9.7 to the code-behind for the ReadFromFile_Click event to see this in action.
Listing 9.7. Using the StreamReader Class
Now run the application to read the data from the file. The first line of code in Listing 9.7 clears the ListBox, and then the new StreamReader is created based on the file previously created. Using a loop, you're peeking into the file, one line at a time, using the Peek method. The ReadLine method reads the next line, and adds the string it reads into the ListBox. Because Peek doesn't consume the bytes of data that it reads, you can keep peeking into a stream while consuming its data with any of the read methods of the stream class. You finally call the Close method of the StreamReader to release the resource. You should always be diligent about using Close on resources that have a Close method. Not using Close could keep the stream handle open or waste unnecessary resources.