
Managing Databases with the Server Explorer
The Server Explorer in Visual Studio .NET is your door to server resources on your local machine or other network computers that you have the authority to connect to. In Day 2, “Introduction to Visual Studio .NET,” you got a rundown on the different parts of the Server Explorer, but we held off on anything that has to do with databases until today.
To start working with the Server Explorer, create a new Visual Basic .NET or C# Windows Forms application called DataTools_vb or Datatools_cs, depending on what language you're using. I refer to the application as simply DataTools throughout the rest of the day. After your project is open, you should see the Server Explorer on the left side of your screen. If you don't, select Server Explorer from the View pull-down menu or use the Ctrl+Alt+S keyboard shortcut.
Note
The Server Explorer isn't included in the Standard Edition of Visual Studio .NET.
As you learned earlier in Week 1, the Server Explorer contains nodes that enable you to drill into the enterprise features of your machine. The design goal of the Server Explorer is to make your life easy—to give you access to all the servers and services you need when writing enterprise applications. If the Server Explorer didn't exist, you'd need to have several Microsoft Management Console sessions open to view SQL Server databases, message queues, event logs, performance counters, and services. You might not use those features in every application, but having them handy is an extremely nice feature.
The top-level node of the Server Explorer is Data Connections. The Data Connections node is responsible for handling the OleDbConnection and SqlConnection controls on the Data tab in the toolbox. You learn more about managing items in the node later today.
If you drill into the Servers node, you'll see the SQL Servers node for the SQL Servers on your machine. Figure 11.1 shows what the SQL Server nodes looks like on my computer.
Figure 11.1. The SQL Servers node of the Server Explorer.

On my computer, I've installed SQL Server 2000 Developer Edition as well as the .NET SDK MSDE database. The nice thing about the Server Explorer is that if you don't have SQL Server installed, you still have a great management tool for MSDE databases because MSDE doesn't come with the Enterprise Manager tool that SQL Server has. You can see in Figure 11.1 that each node under the server instance name contains the names of all the databases in this instance of SQL Server. If you're attempting to connect to another server, you must right-click the top-level Servers node. This prompts you for the server name to connect to. If you're attempting to connect to other servers, you must be on the same domain, but you can change the security context with which to log in to the server. This maintains security across network resources.
If you have multiple instances of SQL Server installed on your machine, you can right-click the SQL Servers node and connect to as many instances of SQL Server as you want. More nodes are added for each server instance, as shown in Figure 11.1.
When you click any of the nodes under the Server Explorer, you can right-click any of the objects to get the available options for working with the selected item. You also have a new menu item on the main menu—Database—which gives you the same options as right-clicking on the nodes for the individual databases. To see this in action, drill into the Northwind database, and then drill into tables and right-click on the Categories table, as Figure 11.2 demonstrates.
Figure 11.2. Context menu for database options.
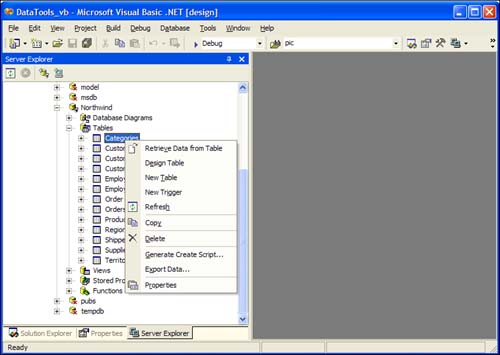
If you select the Retrieve Data from Table item from the contextual menu, you'll see something like Figure 11.3.
Figure 11.3. Opening a table from the Server Explorer.
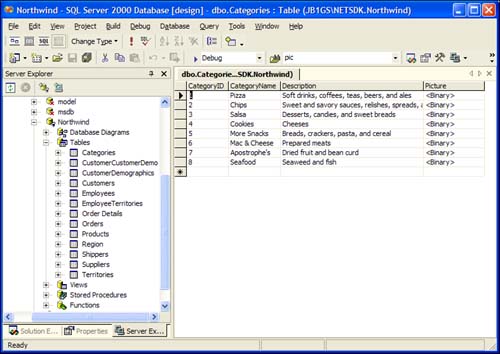
From here, you can add, edit, and delete records from the Categories table. Table 11.1 describes what you can do from the Server Explorer for each type of object in SQL Server.
If you've ever used the SQL Server Enterprise Manager, you'll notice that the functionality and designers are almost identical in Visual Studio .NET. With the exception of defining users and roles, you can do almost the same things with Visual Studio .NET that you can with Enterprise Manager.
Using the Table Designer
To see how the Table Designer works, right-click on the Categories table and select Design Table from the contextual menu. The Table Designer should appear as shown in Figure 11.4.
Figure 11.4. Table Designer in Server Explorer.
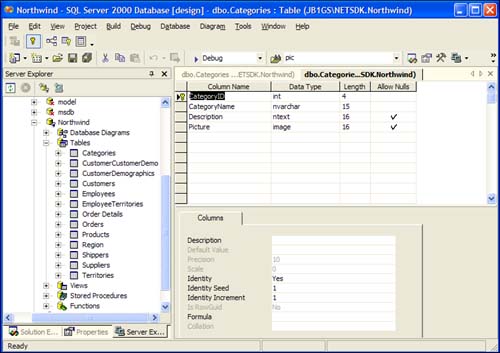
The Table Designer for altering tables and adding new tables is identical. Some of the key capabilities you have are
Add and modify column names
Modify data types for columns
Modify the precision and scale for numeric types
Set identity fields and the identity increment and identity seed
Set the IsRowGuid property to define the row's data type as GUID
Set the default collation for the table
Set the primary key, foreign keys, and clustered and nonclustered indexes for the table
Set relationship properties between the selected table and other tables
Define check constraints for the columns in the table
When using the Table Designer, changes you make aren't applied unless you save the table. If this is the first time you've seen the Table Designer, you can play around with the different available options without affecting anything.
Tip
When using the Table Designer, you can either right-click when you're inside the designer to get the contextual menu with available options, or you can use the Table toolbar that opens when you're in Table Design mode.
Using the View and Query Designer
The View and Query Designer enables you to easily create queries and views visually. Views are useful objects in SQL Server that enable you to create complex queries with multiple tables and joins. After the view is saved, you reference it as if it were a single table. For example, consider the following complex Select query:
SELECT dbo.[Order Details].OrderID, dbo.[Order Details].ProductID,
dbo.Products.ProductName, dbo.[Order Details].UnitPrice,
dbo.[Order Details].Quantity, dbo.[Order Details].Discount,
CONVERT(money, (dbo.[Order Details].UnitPrice *
dbo.[Order Details].Quantity) *
(1 - dbo.[Order Details].Discount) / 100) * 100 AS ExtendedPrice
FROM
dbo.Products INNER JOIN dbo.[Order Details] ON
dbo.Products.ProductID = dbo.[Order Details].ProductID
If you had to use it over and over in your application, it could become difficult to remember the exact syntax. If you save this query as a view named vw_GetOrderDetailsExtended, you can simply use this in your code:
Select * from vw_ GetOrderDetailsExtended
Using views can separate your data access functionality from your data access code. To test the creation of a new view, right-click the Views node and select New View. The Add Table dialog shown in Figure 11.5 is the first thing to pop up.
Figure 11.5. Add Table dialog for the Query Designer.
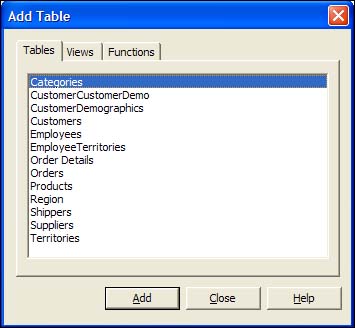
From the Add Table dialog, select the Customers table and click Add, and then select the Orders table and click Add. Now that both tables are added, click the Close button to close the Add Table dialog.
Now the Query Designer appears with the Customers and Orders table added. To select the columns that will be in your query output, simply choose them by checking the box to the left of the column name. The Query Designer is broken up into the four panes described in Table 11.2.
| Pane Name | Description |
|---|---|
| Diagram pane | Displays the tables and joins between tables that are added to the query. |
| Grid pane | Creates a data grid that displays selected columns, sorts, and filters for the query. |
| SQL pane | Displays the auto-generated SQL statement as you select and deselect column names from the Diagram pane. You can also type SQL statements that otherwise would not be able to be created visually, such as union joins. |
| Results pane | Shows the output of the query in a data grid. |
Tip
You can add additional tables, views, and functions to the query you're designing by dragging and dropping from the Server Explorer onto the Diagram pane.
By either right-clicking anywhere in the designer or using the Query drop-down menu from the main menu, you can
Execute the query by selecting Run
Verify the SQL syntax of the query
Add additional tables to the query
Get the Properties page for the query to define Group By clauses, Distinct clauses, encrypt the view, bind the view to a table schema, or modify the view's indexes
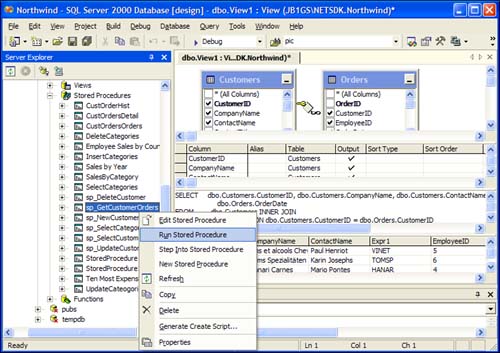
Figure 11.6 shows the Query and View Designer in action after adding the Customers and Orders table, selecting some fields, and selecting Run from the Query drop-down menu.
Figure 11.6. Query and View Designer after executing Customers and Orders query.

After running the View and making sure it's okay, you can close the designer window. As the designer window closes, it prompts you to save the view as ViewX, where X is a number. If you click Yes, you're prompted for a more friendly name. Give the view you just created the name vw_CustomerOrders when prompted. After the view is saved, it appears under the Views node of your Northwind database.
Caution
If you aren't familiar with the encryption options in views and stored procedures in SQL Server, don't mess with them. When you encrypt a view or stored procedure, you can't decrypt it. There's no such thing as decrypting an object in SQL. You would have to use the Alter statement with the original SQL statement with the With Encryption option commented-out of the SQL statement. So, unless you remember the exact syntax of your SQL statements, it's best not to encrypt your views or stored procedures.
Using the Stored Procedure Designer and Debugger
Stored procedures are the best way to access your data to improve performance and scalability. Every time you run a query against SQL Server, it goes through several steps to parse and analyze the query. The internal SQL Server Query Analyzer determines the best options based on the tables in your query on getting the data back to you. This consumes resources on the database server.
By saving your queries as stored procedures, you can avoid this overhead because stored procedures are compiled in SQL Server. The first time a stored procedure executes, it's compiled and the query plan for procedure is added to the stored procedure cache in SQL Server. When subsequent calls are made to the stored procedure, it can grab the optimized and compiled query plan from the cache, giving you massive performance gains.
To create a stored procedure, right-click on the Stored Procedures node for the Northwind database in the Server Explorer, and select New Stored Procedure. The designer for creating the stored procedure appears. Figure 11.7 shows a newly created stored procedure called sp_GetCustomerOrders.
Figure 11.7. Using the Stored Procedure Designer to create a new stored procedure.

The SQL statement in Figure 11.7 is as follows:
Create Procedure sp_GetCustomerOrders
  @ID varchar(10)
AS
  Select * from vw_CustomerOrders where CustomerID = @ID
Return
This procedure gets all the records from the view you created earlier whose CustomerID matches the @ID parameter being passed to the stored procedure.
Before you run the stored procedure, you must save it. You can either click the Save button on the main toolbar, or select Save sp_GetCustomerOrders from the File menu.
Now you can right-click in the designer window and select Run Stored Procedure, as Figure 11.8 demonstrates.
Figure 11.8. Running the stored procedure from the Stored Procedure Designer.
Notice the other options available in the context menu. You have the ability to use all the robust debugging tools in Visual Studio .NET to set breakpoints and step through your stored procedures. This is an extremely powerful feature that can save you hours of time when working with stored procedures.
There's also an Insert SQL option on the contextual menu. If you click it, the View and Query designer pops up so that you can visually create stored procedures just as you can views.
When you run this stored procedure, the Run Stored Procedure dialog pops up and asks you for the @ID parameter. Type in ALFKI for the @ID parameter as shown in Figure 11.9.
Figure 11.9. Dialog box for running stored procedures.

After you click the OK button, the stored procedure executes, and the results are displayed in the Database Output window as Figure 11.10 shows.
Figure 11.10. Stored procedure results in the Database Output window.
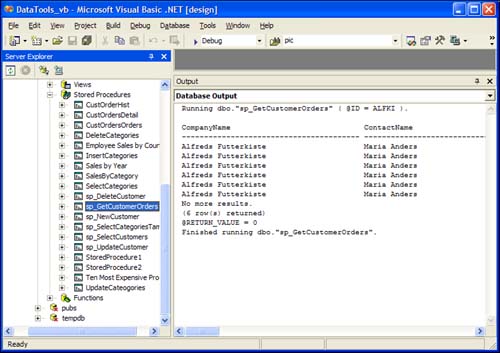
Like magic, your stored procedure executes and you see the results. Visual Studio .NET could not have made creating views and stored procedures any easier.
Tip
When creating views and stored procedures, you should prefix them with vw for a view or sp for a stored procedure. This enables you and others to know they're not actually accessing a table, which is useful because there are rules for running updates, inserts, and deletes against views.
Note
By default, MSSDI98.DLL (which is needed to attach to the SQL Debugger) isn't installed in the correct path when MSDE is installed. This means stored procedure debugging doesn't work until you copy MSSDI98.DLL to the BINN directory of the SQL Server Desktop Engine directory. This is normally under Program FilesMicrosoft SQL Server. If you can't find it, perform a search for BINN—it's the only directory named BINN on your computer.
Also, if SQL Server 2000 is already installed and you're using the MSDE database, as I am, debugging won't work. The DLL versions installed with SQL Server and MSDE are different, so you must make sure that the latest version of MSSDI98.DLL is in your BINN directory.
Now that you have a handle on how to use the database tools in the Server Explorer, you can create data-driven forms that take advantage of the features in the Server Explorer.