
Creating Your First Web Service
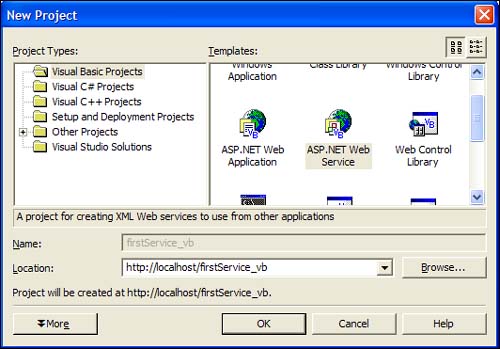
Creating a Web service is as easy as creating any other type of application using Visual Studio .NET. To create your first Web service project, start Visual Studio .NET and select New Project from the Start Page. Select the Visual Basic Projects or C# Projects folder from the New Project dialog, depending on what language you're writing in, and then scroll down and select ASP.NET Web Service. Change the project name from http://localhost/WebService1 to http://localhost/firstService_vb or http://localhost/firstService_cs, depending on what language you're using. Figure 13.1 demonstrates what you should be looking at right now.
Figure 13.1. New Project dialog box.
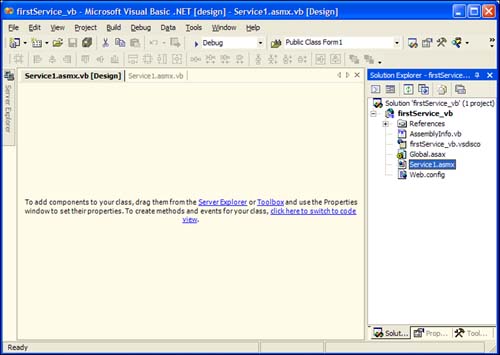
If you click OK, the new project is created and you're presented with the Web services component designer as Figure 13.2 shows.
Figure 13.2. Web services designer surface.
From this point, you can modify properties, add items from the toolbox, or switch to the Code view. If you look at the Properties window for this new Web service, you'll notice the name isn't firstService, it's Service1. Service1 is the default name for all new Web services added to a project. When you created the project firstService, you created the Internet Information Server (IIS) virtual directory named firstService to contain the Web service named Service1. For now, you can leave the name Service1 as it is.
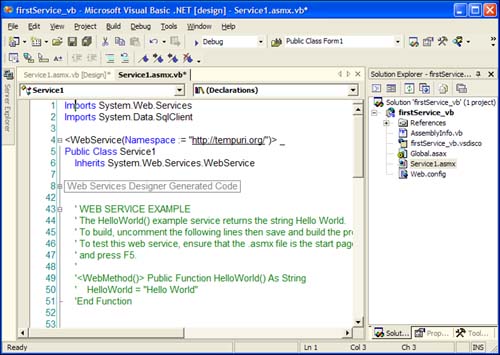
On the designer, click the link that switches you to Code view. You should see something similar to Figure 13.3 if you created a Visual Basic .NET project.
Figure 13.3. The Code view of an XML Web service.
You're now in the code-behind file for the Web service named Service1. Web services in Visual Studio .NET have a .ASMX extension, so naturally the code-behind would be either ASMX.VB (for Visual Basic .NET) or ASMX.CS (for C#). It follows the same pattern as ASPX pages in Web applications. The code-behind file simply tacks on the language extension to the designer file.
If you look at the code in the class file, you'll notice that the System.Web.Services namespace is imported into this class.
The System.Web.Services namespace contains classes that enable you to create Web services using Visual Studio .NET that work with the ASP.NET engine and allow ASP.NET and Windows Forms applications to consume Web services. The four main classes in the System.Web.Services namespace are listed in Table 13.1.
Simply importing the System.Web.Services namespace doesn't make this a Web service. The class file must inherit the WebService class. So, in the Service1.asmx file, the following code makes this class a Web service:
Imports System.Web.Services

<WebService(Namespace := "http://tempuri.org/")> _
Public Class Service1
    Inherits System.Web.Services.WebService
using System.Web.Services;

namespace firstService_cs
{
   public class Service1 : System.Web.Services.WebService
All this is done automatically by Visual Studio .NET when you create a new Web service project or you add an ASMX file to your application.
The Namespace attribute points to http://www.tempuri.org/. This is the default namespace for all new Web services created with Visual Studio .NET. You should change it before you deploy your Web service application. The namespace defines what data is in the Web service and what rules the data should follow. It's the same concept that you learned about yesterday when you created XML schema definition (XSD) files for the XML files in your project. In that case, the namespace defined what the XML should look like; the namespace for a Web service defines what the Web service should look like.
Notice the commented-out HelloWorld method in the Service1 class. This sample method is in every new ASMX file in Visual Studio .NET. The HelloWorld method looks like any other method in the class files you worked with until today, with the exception of the WebMethod attribute. By prefixing a method name with the WebMethod attribute, it becomes available to the outside world.
Note
Attributes are tags that enable you to further define objects in an application. The attribute information is then examined at runtime through reflection, letting the language-specific compiler determine what to do with the attribute information. In the case of the WebMethod attribute, the ASP.NET engine knows to make the method available to remote callers. In C#, attributes are enclosed in brackets, [attributename], and in Visual Basic .NET, they're enclosed by less-than/greater-than signs, <attributename>.
To make the HelloWorld method available to the outside world, uncomment the method. Make sure that you also uncomment the WebMethod attribute. Before you run the application, you must add two more methods that you'll consume later—it'll also give you an idea of how to use Web services in a real-world scenario.
Listing 13.1 has two methods: GetCustomers and GetCustomerByID. Both use ADO.NET that you learned about over the past few days. Add these methods to the class file for Service1.asmx.
Listing 13.1. Code to Get SQL Data from the Service1.asmx File
Note
In version 1.0 of the .NET Framework, the HTTP-GET, HTTP-POST and SOAP protocols were enabled by default for accessing Web Services when Visual Studio .NET was installed. In version 1.1 of the .NET Framework, the HTTP-POST and SOAP protocols are enabled by default, but not the HTTP-GET protocol. This was done for security reasons. To enable HTTP-GET for your Web Services, and to successfully do the exercises today, you need to modify the Web.Config file to allow the HTTP-GET protocol to be used. To do this, open the Web.Config file, and add the following section to after the <globalization> tag at the end of the Web.Config file:
<webServices>
    <protocols>
        <add name="HttpGet"/>
    </protocols>
</webServices>
You can also enable and disable specific protocols in the machine.config file, which will affect all projects for an entire machine. To learn more about the configuration files, and how they can affect your applications, look up Configuration Options under XML Web Services in the Dynamic Help file.
Press F5 to run the application. The browser now opens with the auto-generated Service Help Page, as shown in Figure 13.4.
Figure 13.4. Service Help page for a Web service.
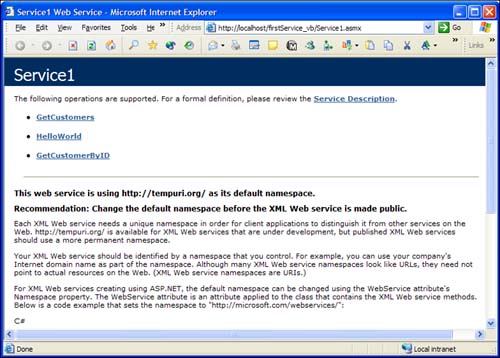
The Service Help Page provides you with a list of all the methods that are available in the Web service and some sample code that shows the implementation of the Web service in C# and Visual Basic .NET. Any time you reference an ASMX file without any parameters, you get the Service Help Page. Notice that the three methods you added to the class file are listed. If you didn't include the WebMethod attribute in one of the method declarations, you won't see it in the list.
The URL that the browser is pointing to is simply the name of the server, the project name, and then the ASMX filename.
If you click the GetCustomerByID link, you're taken to the Service Description page. The Service Description page gives you the WSDL grammar of how to access this method via SOAP, HTTP-GET, or HTTP-POST. That's a nice feature, but you really don't need to know any of that if you're using Visual Studio .NET to consume the Web service. Figure 13.5 is what the Service Help page looks like for the GetCustomerByID method.
Figure 13.5. The Service Help page.
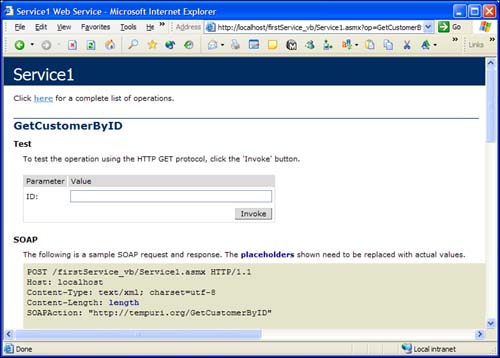
Notice that because the method accepts a parameter, you're given a text box to fill in the CustomerID parameter. If your Web service methods accept parameters, there will be a text box for each parameter. This is a great feature that makes it very easy to test your methods before you deploy your Web services.
For the CustomerID method, type in ALFKI. Now, you can click the Invoke button to actually run the GetCustomerID method.
The results are an XML file that's returned through the browser, as Figure 13.6 demonstrates.
Figure 13.6. XML returned from the HelloWorld Web service.

Notice that the URL has the name of the ASMX file and then the method name you're trying to call:
http://localhost/firstService_vb/Service1.asmx/HelloWorld
This is the standard syntax to reference a method in a Web service. If the method expects parameters, you use the same query string syntax that you use for any URL that expects parameters. As an example, the following code assumes that a parameter named ID and a parameter named ZipCode are being passed to the HelloWorld method:
http://localhost/firstService_vb/Service1.asmx/HelloWorld?ID=1&ZipCode=33486
The next step is to consume the Web service from a client application and do something useful with the XML that's returned.