
Interoperating with Unmanaged Code
Chances are fairly high that you have lots of code that isn't written in .NET. If this code is compiled to a DLL, it can be consumed by a .NET application almost transparently.
Note
Remember that .NET code is considered managed code, running in the managed environment of the .NET Framework. Any code that isn't written in a .NET language and doesn't natively run in the .NET Framework is considered unmanaged code.
The .NET Framework can access unmanaged code through a proxy called the runtime callable wrapper (RCW). The RCW is a proxy class that defines how the types should be marshaled from the unmanaged component to the managed application. The process of creating the RCW can be automatic, done via Visual Studio .NET, or manual, using a command-line tool named tlbimp.exe. tlbimp of the tool's name is short for type library importer.
After the RCW has been created, the .NET application that's accessing the COM component has no idea that it isn't interacting with a managed assembly. Because the RCW handles all the plumbing with the common language runtime and your application, all you must do is reference the component as you would any other assembly. The .NET Framework handles the hard part of marshaling types and objects between two different infrastructures. This includes COM errors, which are thrown in COM as HRESULT, and translated to managed exceptions in .NET.
Another term for the RCW is interop assembly. When you create the RCW via the tlbimp.exe utility, you're creating a managed assembly, known as the interop assembly, which is built using metadata from the COM components type library. Because most COM objects expose their functionality through type libraries, the type information that .NET needs to interact with the component can be retrieved without much difficulty.
Creating an Interop Assembly with tlbimp.exe
The tlbimp.exe utility is a console application that creates an interop assembly based on the type library of a COM DLL. The tlbimp.exe utility is located in the Framework SDK directory in Program Files. Or you can access it by opening the Visual Studio .NET command prompt from the Start menu.
The following code demonstrates the usage of tlbimp:
tlbimp [COM-Dll-Filename] /[options]
Based on what you're trying to accomplish with the interop assembly, you can pass different switches to the command line for tlbimp.exe. Table 14.1 lists the options for tlbimp.exe.
After you run tlbimp.exe and pass it the COM component and the desired interop assembly output filename, you have a .NET assembly, as the following snippet demonstrates:
tlbimp ComComponent.dll /out:dotNetInteropAsembly.dll
After the interop assembly is created, it can be referenced in a .NET application like any other assembly. But for it to work, the COM component still needs to be registered on the client machine that's accessing the interop assembly. The tlbimp.exe utility does not convert the DLL to a managed assembly; it simply reads the type library of the COM component and creates an assembly with enough metadata for the common language runtime to use the COM component. Calls made to the interop assembly from a .NET application are actually passed from the interop assembly to the COM component, and the common language runtime marshals the correct data types to your managed code.
When you create an interop assembly using tlbimp.exe, you're most likely going to install the interop assembly to the global application cache (GAC) so that it can be used across multiple applications.
If you want to use the COM component in only a single application, you can directly reference the COM component in your Visual Studio .NET solution.
Referencing a COM Component Directly with Visual Studio .NET
To see how to use a COM component in .NET by using the power of Visual Studio .NET, you'll create and directly reference a COM component using the Visual Studio .NET IDE. This process is different from using tlbimp.exe because it creates a managed assembly for you. So, you reference the managed assembly as a .NET component, not as a COM component.
To make this work, follow these steps:
1. | Create a Visual Basic 6 ActiveX DLL project named MyComComponent. |
2. | Rename the default Class1 file to MyComClassFile. |
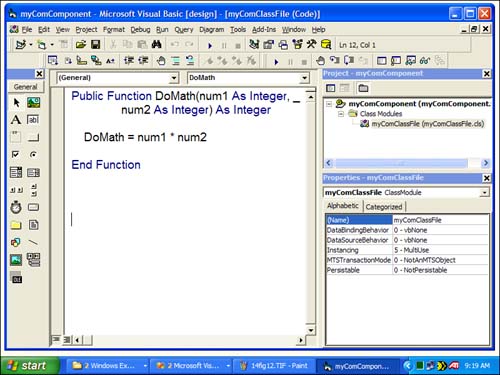
3. | Add the following method to the MyComClassFile: Public Function DoMath(num1 As Integer, _
num2 As Integer) As Integer
DoMath = num1 * num2
End Function
|
4. | Compile the DLL to your C:drive. |
Note
If you don't have Visual Basic 6 on your machine, I've included the DLL in the Day14 folder of the downloadable code.
Your Visual Basic 6 application should look like Figure 14.13.
Figure 14.13. Creating an ActiveX DLL in Visual Basic 6.
Next, open Visual Studio .NET and create a new Windows Forms application and call it COMConsumer_vb or COMConsumer_cs, depending on the language you're writing in.
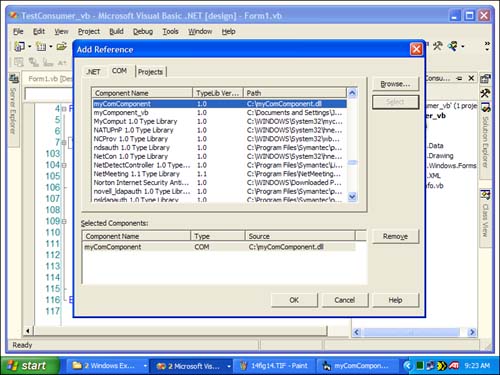
When the application is open, right-click the References node in the Solution Explorer and select Add Reference.
When the Add Reference dialog pops up, click the COM tab. Scroll down until you find MyComComponent. Highlight it and click Select as Figure 14.14 demonstrates.
Figure 14.14. Adding a COM component to a Visual Studio .NET solution.
After you click the OK button to close the Add Reference dialog, the component is visible in the References node of your solution.
The process you have just gone through created the RCW and exposed this component to the managed application. To verify this, right-click on the MyComComponent in the References node and select Properties from the contextual menu. The Properties window displays a few key items that differentiate this from managed .NET assemblies: The Type is ActiveX, there's a GUID associated with the component, and the Name property is prefixed with Interop. Figure 14.15 shows you what the properties look like on my machine.
Figure 14.15. Properties of a COM component referenced through Visual Studio .NET.
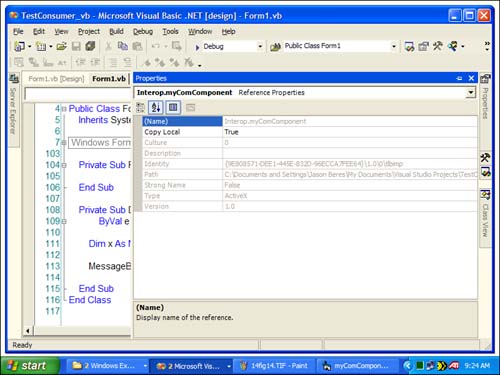
If you look at the properties for any of the other assemblies in the References node, you'll notice that the type is Assembly, and the name is the namespace that the assembly represents.
You can now consume this component from your application. Double-click the default Form1 to get to the code window and add an alias to the COM component using the Imports statement in Visual Basic .NET or the using statement in C#. The syntax for this component is
Imports myComComponent

using myComComponent;
In the Form_Load event, add the code in Listing 14.5.
Listing 14.5. Calling a COM Component from .NET
If you run the application by pressing the F5 key, you get a MessageBox that returns the value 30, which is what the COM component was supposed to do: multiply two numbers.
As you can see, exposing a COM component to a .NET application is very simple. You can either create an interop assembly using the tlbimp.exe utility, or you can directly reference a COM DLL through the Add References dialog in Visual Studio .NET.