
Managing Resource Files with Visual Studio .NET
Built into the Visual Studio .NET IDE is the ability to write completely global applications through the use of resource files.
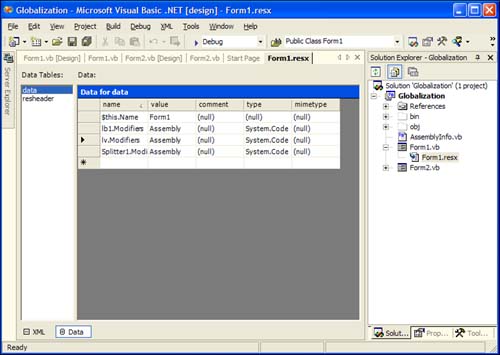
Resource files are XML-based files that describe a form. Each time you add a new form to an application, a .resx file accompanies the form in the Solution Explorer. Normally, this file contains only basic information about the form, and doesn't do a whole lot. Figure 15.7 is the form1.resx file for the Culture Info Browser form you wrote earlier.
Figure 15.7. The form1.resx file in the XML Designer.
When you add controls to a form, the Windows Forms Designer adds code to the class file to set the various properties that you set in the Properties window. For the form1.vb file in the Culture Info Browser, the Windows Forms Designer–generated code looks like Listing 15.5.
Listing 15.5. Windows Forms Designer–Generated Code for the form1.vb Class File
Each time a control is added or a property is set, the designer updates the code in the class file automatically. That works very well when you're writing applications that will be used in one language and one locale. However, it doesn't work well when you consider that your application might be running all around the world.
To solve this problem, each form you add to a project has a Localizable property. When set to True, Localizable alters the way the designer keeps track of the objects on your forms.
Creating the Resources Project
To test this out, create a new project named Resources_vb or Resources_cs, depending on your language. Drag two Label controls, two Button controls, and two TextBox controls to the form and arrange them as they're shown in Figure 15.8.
Figure 15.8. Form1 of the Resources application.

If you examine the code in the form1 class file that was generated by the Windows Forms Designer, you'll notice nothing unusual. The controls are added, and the names and locations of the controls on the form are coded into the class file.
Your goal is to make this form work for the default locale of your operating system and the fr-FR locale. That means when an end user in France sees your form, the controls must display different information based on the language and formatting of the French end user's locale. The layout of the controls must also change for the French locale because the words are comprised of more characters in French than they are in English.
To make this work, change the following properties in the default form1:
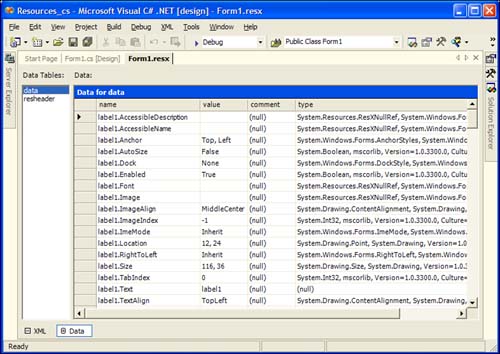
You've now told the IDE that this form uses resource files to manage the objects on the form. If you drill open the form1.resx file in the XML Designer, you'll notice that instead of just keeping track of the basic form information, it now keeps track of all properties of all the objects on the form. Your form1.resx should resemble Figure 15.9.
Figure 15.9. form1.resx after setting Localizable to True.
If you drill into the Windows Forms Designer–generated code in the form1 class file now, you'll see something much different from normal. Listing 15.6 is a portion of the designer-generated code for the C# version of the project.
Listing 15.6. C# Windows Forms Designer–Generated Code for the Form1.cs Class
Because the form is localizable, the objects' properties are being tracked in the .resx file. The class knows where to get the information it needs at runtime by creating an instance of the ResourceManager class, as this code demonstrates:
System.Resources.ResourceManager resources =
   new System.Resources.ResourceManager(typeof(Form1));
After the ResourceManager is created, the GetString or GetObject method is called to retrieve the correct property settings at runtime.
To see how this works, change the controls of the default form1 to look like Figure 15.10. The idea here is that you're creating an English version of your application, and then creating a French version.
Figure 15.10. form1 after changing controls to the French version.
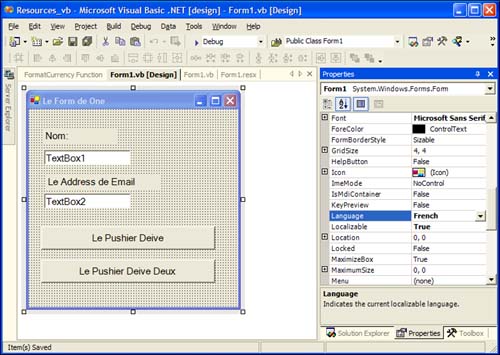
Notice that you've moved the controls on the form and modified the text. The key is in the Properties window. Localizable is set to True, and Language is set to French.
If you change the Language property back to (default), the form defaults back to its original layout, as Figure 15.11 demonstrates.
Figure 15.11. Default form1 after switching back to the default locale.

In the Solution Explorer, expand all the nodes as I did in Figure 15.11. You'll see an additional .resx file under form1. You'll also see an additional folder created with the locale name in the Bin directory and a Resources.dll for the folder.
Visual Studio .NET tracks each locale that you add to the form, and creates satellite assemblies that are deployed to the end user's machine based on the locale she's using.
When you modify the culture for the current thread of the application, the correct form is displayed, and you don't have to worry about how culture-specific information will look on the forms you're creating.
In Visual Studio .NET, the default locale is the locale set in the Control Panel for the operating system that your application is running on. This is important to understand. I'm in the English (United States) locale, which is not the default locale for someone running my application in Spain. The default locale is known as the fallback locale, meaning that if the .NET runtime can't determine the locale of the system running your application, the defaults that you set at design time will be used.
If you really want your application to work on en-US and fr-FR, you must explicitly select the English (United States) locale from the list, and then select the French (France) locale.
You now need to add some code to the form so that you can test the different locales. Add the code in Listing 15.6 to the Form_Load event of the default form1. This code simply displays the date and a number in the currency of the current thread's locale. Make sure that you add the System.Threading and System.Globalization namespaces to the top of your class file before you add the code in Listing 15.7.
Listing 15.7. Displaying the Correct Date and Time Format for the Current Locale
By getting the CurrentUICultureNumberFormat and CurrentUICultureDateTimeFormat, you're globalizing the application. You aren't dependent on anything, except what you dictate should be the current culture. That means your application is 100% portable to any locale setting in the world. If you press F5 to run the application, you should see something similar to Figure 15.12.
Figure 15.12. Running the Resources application with the fallback locale.
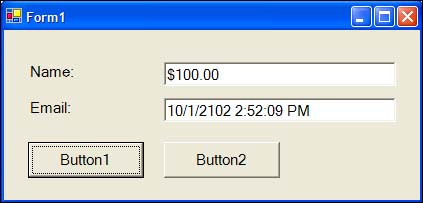
What you actually did was format the date and time using the fallback locale, which would be whatever the Control Panel happens to be set to.
To force the French locale, modify the Sub New in the default form1 to look like Listing 15.8. This code modifies the current thread's locale setting.
Listing 15.8. Modifying the CurrentUICulture in the Form1 Class Constructor
If you press F5 to run the application now, you'll see something like Figure 15.13.
Figure 15.13. Running the Resources application after modifying the locale.
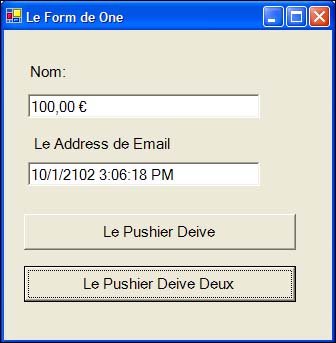
By forcing the locale to French (French), the correct form is displayed. You did nothing special to completely change the look and feel of the application except modify the Language property at design time.
Using Other Resource Managers
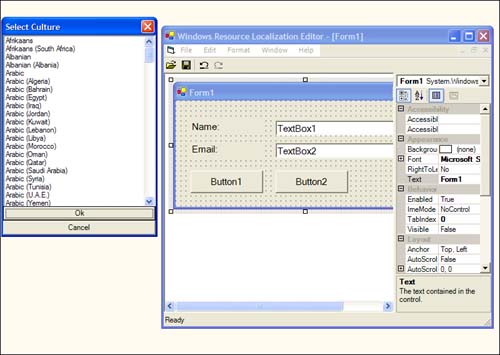
There are two other ways to implement the resource files for creating global applications. The first method is the use of the WinRes Resource File Editor. This is a Windows Forms tool that enables you to open the .resx file of a form, modify the properties of the form, and save the .resx file as a different locale. This is an immensely powerful tool when multiple developers are working on different locales for different forms. WinRes can be accessed by typing WinRes.exe at the Visual Studio command prompt, or by navigating to the Bin directory of the Visual Studio .NET SDK on your hard drive. Figure 15.14 shows the default form1.resx file opened in the WinRes tool, and the Save As dialog prompting for the correct locale to which to save the .resx file.
Figure 15.14. The WinRes tool in action.
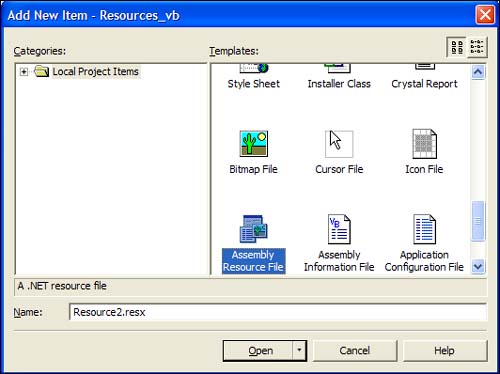
The second method for separating out the locale-specific data from the user interface is to add an assembly resource file to your project. You can do this through the standard Add New Item dialog, as Figure 15.15 demonstrates.
Figure 15.15. Adding a resource assembly file to your application.
A resource assembly file is an-XML based file that contains the same information that's tracked automatically by the Windows Forms Designer when Localizable is set to True. The only drawback is that you're entering the data into the XML file manually, and then writing all the code using the ResourceManager class's GetString and GetObject methods to display the correct data based on the locale. This is a flexible alternative, but of the three approaches to globalizing an application, it's by far the most tedious.