
Creating a Windows Installer Package
The easiest way to create a new MSI package is from an existing application. To see this work, you need to create a new Windows Forms project.
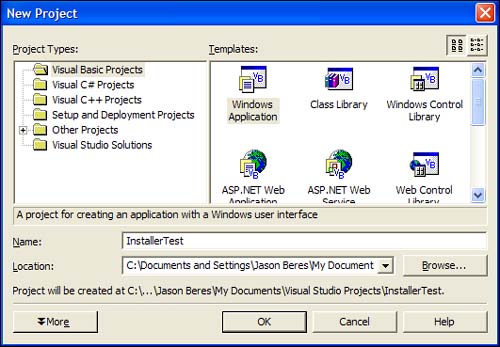
Open Visual Studio .NET, create a new Windows Forms Application project, and name it InstallerTest as shown in Figure 4.2.
Figure 4.2. Creating the InstallerTest application.
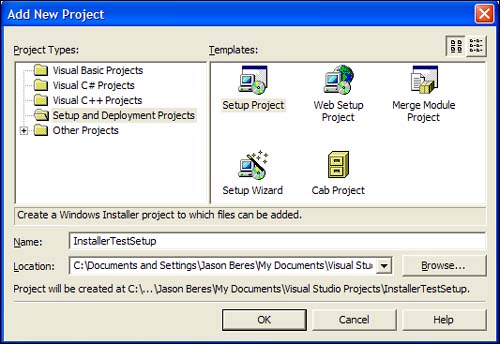
After the project is created, you can add a deployment template to your solution. To do so, right-click the InstallerTest solution name in the Solution Explorer, and select Add, Add New Project from the contextual menu. When the New Project dialog pops up, select the Setup and Deployment Projects node, and then Setup Project. Change the name to InstallerTestSetup as shown in Figure 4.3, and click the OK button to add the new project to your solution.
Figure 4.3. Adding a new setup project to your solution.
After the new project is created, your Solution Explorer and main window should look like Figure 4.4.
Figure 4.4. The InstallerTest solution after adding a setup project.
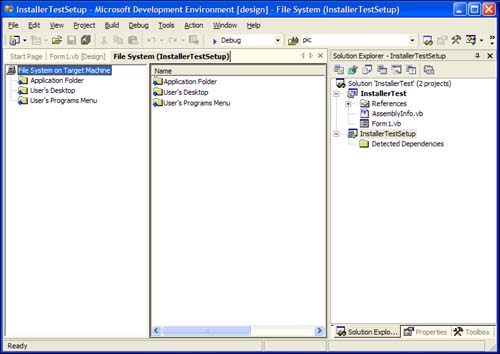
You're now looking at the interface that you'll use to create the MSI package. Everything that you need to create the setup project can be done with this designer, which is known as the File System Editor (FSE).
Using the FSE, you create virtual objects that are stored in the MSI package you create. During the installation of your MSI package, the files and directories created using the FSE are created on the target machine. The navigation of the FSE is the same as using Windows Explorer: The left pane contains the hierarchy of the directory, and the right pane contains the details. Each item in both panes has a contextual menu that pops up with a right-click, giving you action options to perform, such as creating directories, adding files, creating shortcuts, and specifying build options.
Setting Properties on the Installer Package
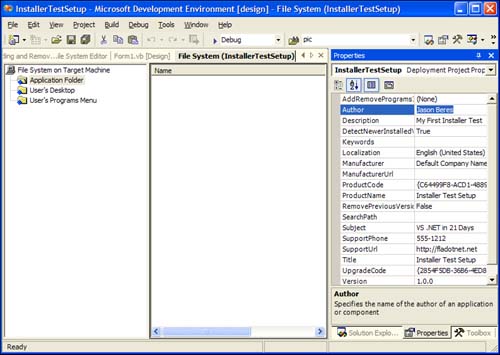
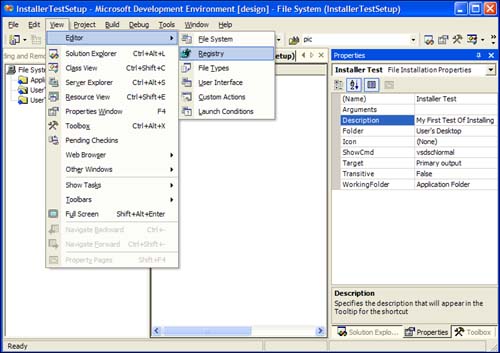
The next step is to set properties on the installation project. To do so, select the InstallerTestSetup project name in the Solution Explorer, and press the F4 key to get to the Properties window. The properties you set here define what information is displayed in dialogs during the setup, and what information is displayed in the Add/Remove Programs applet of Control Panel. Figure 4.5 shows the Properties window after I customized it with my own information. Do the same to your properties.
Figure 4.5. Setting properties in the InstallerTestSetup project.
Adding the Application Output to the Installer Package
Now that some properties are set, you must tell the Installer project what the primary output is to install. In this case, it's your InstallerTest Windows Forms project. Note that the project wasn't automatically added when you added the deployment project to your solution. You must always add the files to be installed.
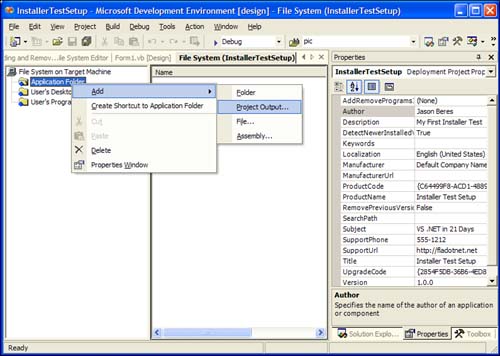
To add the InstallerTest application to this installer package, right-click on Application Folder on the File System Editor. From the contextual menu, select Add, Project Output, as Figure 4.6 demonstrates.
Figure 4.6. The Add Project Output menu selection.
When you select the Add Project Output option, you're prompted with the Add Project Output Group dialog, as Figure 4.7 shows.
Figure 4.7. The Add Project Output Group dialog.
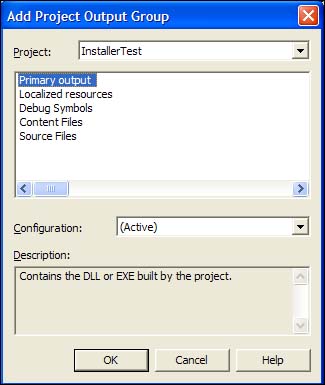
By default, the active project in the solution is in the Project drop-down list. Click the OK button on the Add Project Output Group dialog box to add the InstallerTest application to this setup package.
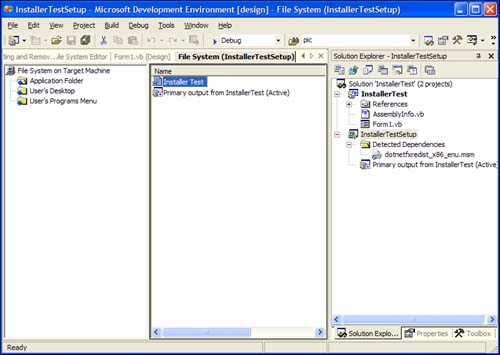
At this point, the primary output has been added to the InstallerTestSetup project. Your application should look like Figure 4.8.
Figure 4.8. Solution after adding the primary output.

If you right-click on the primary output in the right pane of the File System Editor, you can see the available options for the output assembly. From the contextual menu, click the Create Shortcut menu item. Change the shortcut name to Installer Test. Your File System Editor should now look like Figure 4.9.
Figure 4.9. File System Editor after creating a shortcut for the primary output.
After you create the shortcut, you can drag it to the folders in the left pane of the File System Editor. Anything you add to the folders, be it a file, shortcut, or anything, will be added during the installation. Remember that the File System Editor is a virtual view of the target machine. Drag the shortcut to the User's Desktop node in the left pane.
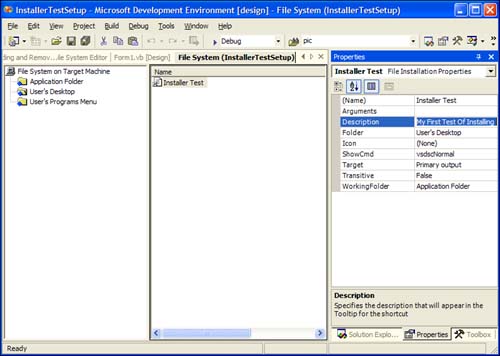
If you right-click the shortcut, and select Properties from the contextual menu, you'll see some of the available properties that you can set. Change the Description property to My First Test Of Installing, as Figure 4.10 demonstrates.
Figure 4.10. Setting properties on a shortcut.
Creating Custom Actions
One of the key features that deployment projects offer is the ability to create custom actions for your installation package. Some of the features are
Associating a file extension with your application
Adding Registry keys based on user input
Setting launch conditions, such as file dependencies or version requirements for dependent applications
Installing custom files based on user selections during setup
Creating databases or other objects programmatically
Launching applications when installation is complete
To test this, you're going to create a Registry key and a version launch condition, specifying that Microsoft Word version 9.0 or greater is required by your application.
Creating a Registry Key
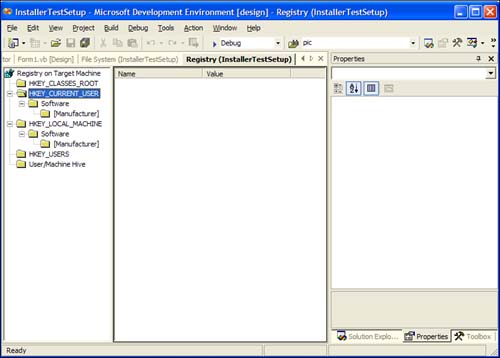
To create a Registry key, click the View main menu, and then select Editor, Registry as Figure 4.11 demonstrates.
Figure 4.11. Getting to the Registry Editor.
You're now in the virtual Registry Editor. From this screen, you have complete control over what Registry keys you add to your application. Figure 4.12 demonstrates the Registry Editor.
Figure 4.12. The virtual Registry Editor.
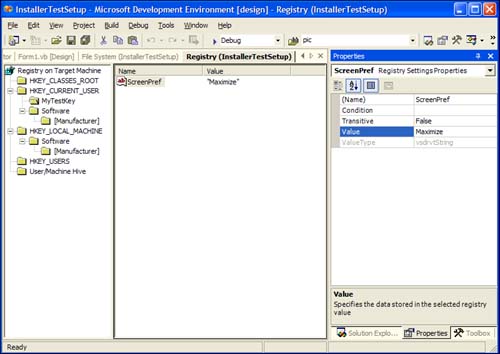
Right-click the HKEY_CURRENT_USER node and select Add Key from the contextual menu. Add a key named TestKey.
After the key is added, right-click on TestKey and select New, String Value from the contextual menu. Name the new string value ScreenPref. In the Properties window, change the Value property to Maximize. Your Registry Editor should now look like Figure 4.13.
Figure 4.13. Registry Editor after entering ScreenPref key.
After you add keys and values to the Registry, you can access them using the classes in the .NET Framework. Using the Registry Editor is a great way to set default user preferences. In your application, you can enable the user to modify the user preferences as needed.
Adding a Launch Condition
Adding a launch condition forces the installer to check for the existence of a file, application, or dependency before installation starts. In this step of setting up the test installer, you're going to make sure that Microsoft Word version 9.0 is installed on the deployment target. This is just an example of what you can do with a launch condition, but there are hundreds of reasons why this is a great feature. The following list should give you some ideas:
If you're doing any Microsoft Office automation, the type libraries for Office aren't always compatible. You might specifically need the Word 9.0 type library to make sure that your Word Merge code doesn't crash.
If you depend on a specific browser version, such as Internet Explorer 5.0 or higher, you can stop the installation if that version does not exist on the machine.
If you're using a specific version of Microsoft Data Access Components (MDAC), you can ensure that they're on the machine before installation.
If the machine doesn't have the .NET Framework installed, your application won't run, so you need a launch condition to check this.
If your application uses Active Directory, it will work only on Windows XP or greater, so you must check the OS version before installing.
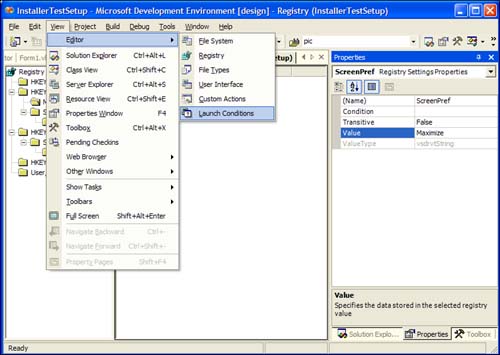
To test this, select Editor, Launch Conditions from the View menu, as demonstrated in Figure 4.14.
Figure 4.14. The Launch Conditions menu selection.
When the Launch Condition Editor is open, right-click on the Requirements for Target Machine node and select Add File Launch Condition, as Figure 4.15 demonstrates.
Figure 4.15. Adding a file launch condition.
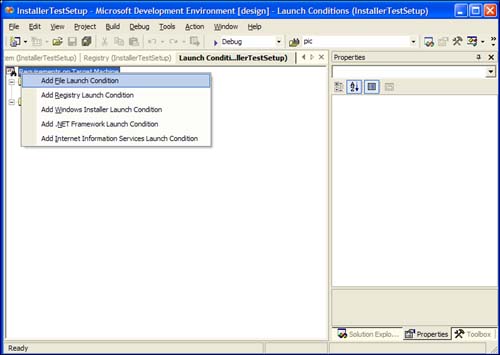
Take note of the other launch conditions. From this menu, you can create conditions for checking the existence of the .NET Framework, specific Registry settings, specific IIS settings, and Windows Installer version launch conditions.
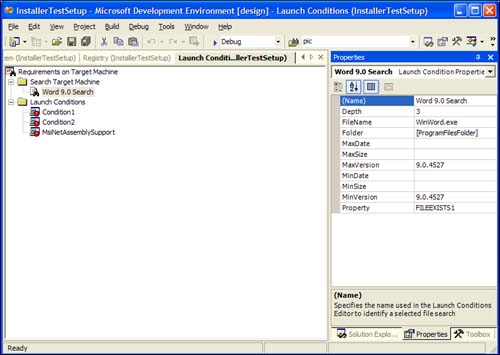
After you add the file launch condition, a new item named Search For File1 is placed under the Search Target Machine node. If you select this item, you'll notice the Properties window appears, and you can set the conditions for the file search.
Figure 4.16 demonstrates how to add version information, filename, and directory information for this search. Notice the Depth property is changed to 2. That means I want the installer to search two levels deep inside the Program Files folder. The more depth you specify, the longer the search will take to complete.
Figure 4.16. Setting the Word Search launch conditions.
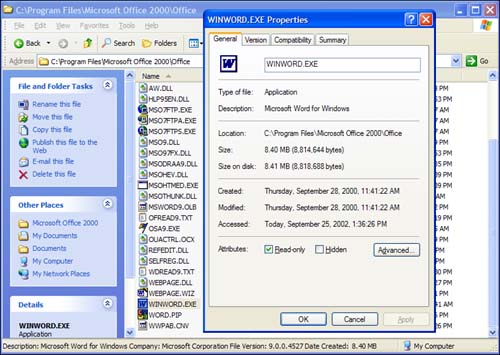
Because I know that Word 9.0 is on my machine, my install will succeed when I test it. You should change the Word 9.0 file search to another file and set the properties accordingly if you want to attempt another search. To verify the FileName, MinVersion, and MaxVersion properties, I used my Windows Explorer to find WinWord.exe and viewed its properties, as Figure 4.17 demonstrates.
Figure 4.17. Filename and version information for MS Word.
To complete the version and file search for Word, you need to change the Condition1 item that was added under the Launch Conditions node when you added the file search. Condition1 has an Error property that you can set to prompt the user if the installation will fail. You can also set the Property property in the Word 9.0 Search node to a friendlier name, and use that Property name as the Condition property for the launch condition. Change the Error property to a useful error message based on the file you're searching for.
Using Custom Dialogs During Installation
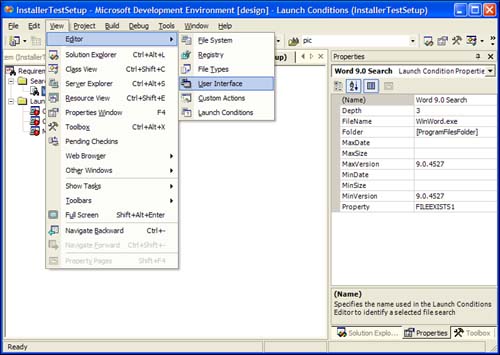
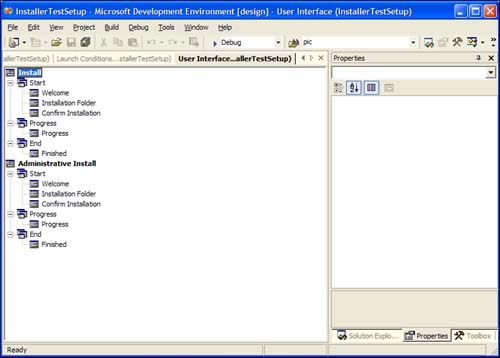
The Dialog Editor enables you to add custom dialog options for the installation package. These could range from simple license agreement prompts to complex installation options. To see what options are available, select Editor, User Interface from the View menu to get the Dialog Editor, as shown in Figure 4.18.
Figure 4.18. The User Interface menu selection.
You can see in Figure 4.19 that the standard dialog boxes already exist in the setup package. To add custom dialogs, you can right-click the node that you want the dialog box to appear under and select Add Dialog.
Figure 4.19. Standard dialog boxes are already added.
After you select Add Dialog from the contextual menu, you are prompted with the Add Dialog dialog box, as Figure 4.20 demonstrates.
Figure 4.20. The Add Dialog dialog box.
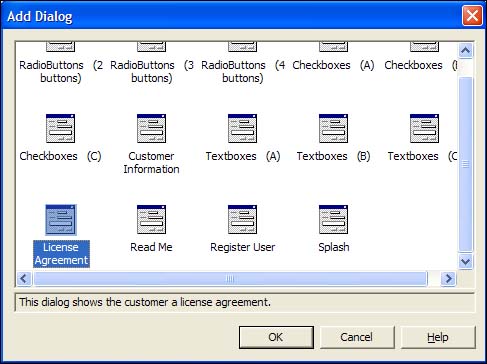
From the Add Dialog dialog box, select the License Agreement dialog box. This adds the default license agreement screen to your installation. The license agreement dialog has a LicenseFile property that you can select to indicate what the license file is. This file must be a rich text format (RTF) file, and must be included with the installation. For this example, you don't need to add a license agreement, so you can just leave the LicenseFile property blank. My goal is to get you comfortable with the different available options.
When you add the custom dialog, it ends up as the last dialog in the node you added it to. Because a license agreement should logically appear before the installation actually begins, you should right-click the License Agreement node, and select Move Up from the contextual menu. You can manipulate the order in which all screens appear by moving them up or down.
Building the Application
You've now completed the basics in building a solid installation package. The next step is to build the MSI package. Within the Visual Studio .NET integrated development environment (IDE), select the Install menu item from the Project menu. This enables you to test the installation as you're creating it. If you're testing different launch conditions and dialogs, using the Install and Uninstall menu items is a good idea. You're going to be brave and just build the whole solution, and test it from the command line.
Before you select Build Solution from the Build menu, right-click on the TestInstallerSetup project in the Solution Explorer and select Properties from the contextual menu. Figure 4.21 is the properties dialog for the installer solution.
Figure 4.21. Build configuration properties.
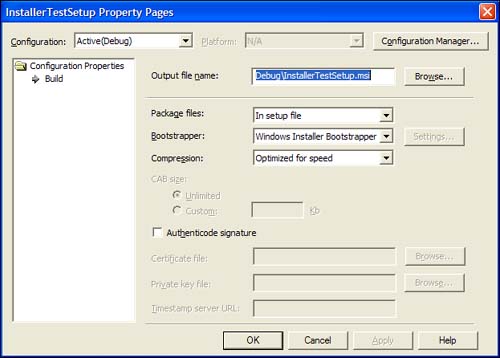
Notice the various configurations you can set. You can also include an Authenticode certificate for your installation. This guarantees the source of your installation if you need it to be trusted by a client machine.
To build the package, select Build Solution from the Build menu. Doing so builds the TestInstaller.exe file and it creates TestInstallerSetup.msi. If you view the results of the build in the Output window, you'll notice a message that the .NET Framework is required to make this installation work. By default, the 20MB redistribution package for the .NET Framework isn't included in the output. You'll learn how to factor that in during the next section. If any errors are encountered during the build, you're notified of them through the Task Window.
After the project is built, you can navigate to the folder where the MSI package was created to view the output. Figure 4.22 is where the MSI output was put on my machine.
Figure 4.22. Browsing to the setup files.
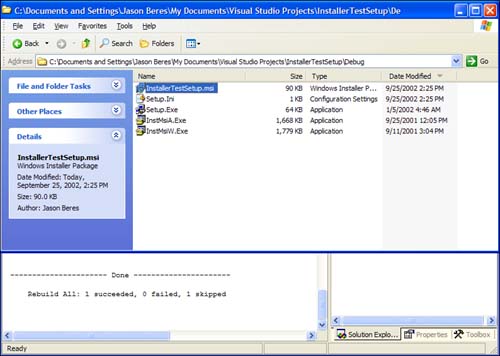
You'll notice that there's an MSI package, a Setup.exe file, and two other EXE files. The files named InstMisA.exe and InstMsiW.exe are version-specific Windows Installer setup packages. When you deploy an application, the launch condition for the Windows Installer makes sure that the target machine has the correct Windows Installer version installed.
Running the MSI Package
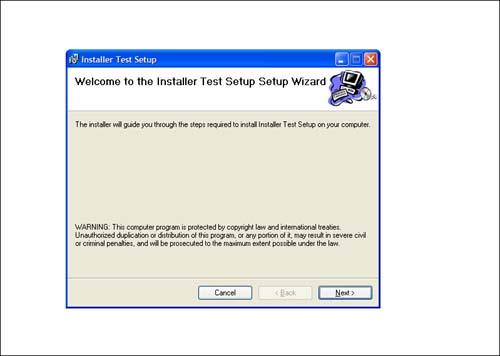
Now you can run the MSI package you just built to view the dialogs and the behavior of the installation. So, double-click the TestInstallerSetup.msi file in the file system. The first screen you should see is shown in Figure 4.23, which welcomes you to the setup for your project.
Figure 4.23. The Welcome screen for TestInstallerSetup.
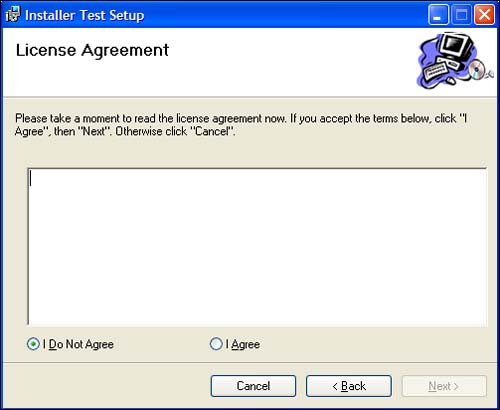
If you click Next, you'll see the custom dialog box you added that makes the user select I Agree in order to continue. Figure 4.24 shows the License Agreement dialog.
Figure 4.24. The custom License Agreement dialog box.
Finish the installation by clicking Next for each screen you're given. These are the default dialogs that always appear unless you explicitly delete them from the Dialogs Editor. If you want an installation to occur with no user interaction, you can delete the dialogs from the Dialog Editor, and the setup will still be functional.
After the setup is complete, you should have a new shortcut on your desktop for the application. If you double-click the shortcut, you should see the single form of your application pop up.
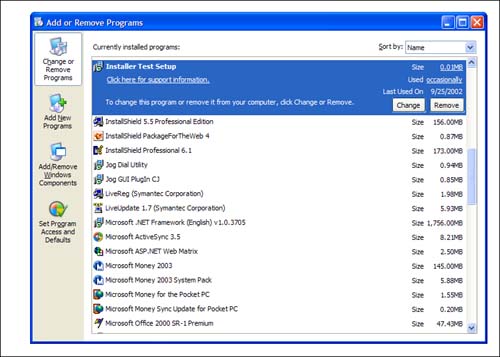
Just like that, you have a complete installation package. Now open up the Control Panel, and select the Add or Remove Programs icon. If you scroll down, you'll see the Test Setup Installer as Figure 4.25 shows.
Figure 4.25. Your application in Add or Remove Programs.
If you click the hyperlink that says Click Here for Support Information, you'll see something like Figure 4.26.
Figure 4.26. The Support page for your application.
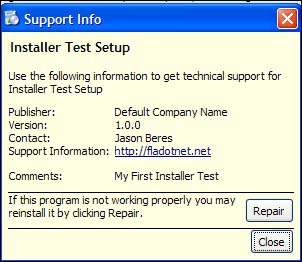
The properties that you set during the creation of the installation package can be seen. So, it's important that you fill out support information details because they're now part of the Windows Installer package.