
Chapter 7. Policies
7.0. Introduction
Policies are a fundamental building block of implementing a security configuration in ScreenOS. Policies are used by the stateful firewall/Network Address Translation (NAT) engine, the Content Security engine, authentication, and Quality of Service (QoS) configuration, and for building policy-based IP Security (IPSec) virtual private networks (VPNs).
ScreenOS policies contain various elements that help categorize a packet and take several actions on it. ScreenOS policy elements include zones, source and destination address objects, and services. Actions on a packet can include permit, tunnel (IPSec encrypt), deny, reject, authenticate, log, count, schedule, apply QoS, and perform deep inspection, web filtering, and antispam functions. A multitude of actions can be taken on a single policy.
Address Objects
Address objects are a key component of ScreenOS policies. An address object can define a single host or a classless inter-domain routing (CIDR) network address block that “resides” in a zone. An example of an address object that defines a single host, a workstation named Orion, in the Trust zone is as follows:
Internal_fw-> set address Trust Orion 192.168.4.10/32 "Orion Wkstn"The address object Orion can, thus, be referenced in any ScreenOS policy. The string Orion Wkstn is an optional description of the address object.
Here is an example of an address object that defines a CIDR network address block, 192.168.3.16/29, in the DMZ zone:
	Internal_fw-> set address DMZ DMZ_Subnet 192.168.3.16/29
	All DMZ Hosts"
The address object DMZ_Subnet represents any host/address in the 192.168.3.16/29 address block (i.e., 192.168.3.16–192.168.3.23).
You can view the address objects currently defined in a ScreenOS security zone by using the get address <zone_name> command:
	Internal_fw-> get address trust
	Total 3 addresses and 0 user groups in the address book.

	Trust Addresses:
	Name              Address/Prefix-length      Flag  Comments
	Any               0.0.0.0/0                  0202  All Addr
	Dial-Up VPN       255.255.255.255/32         0202  Dial-Up VPN Addr
	Orion             192.168.4.10/32            0200  Orion Wkstn

	Internal_fw->
You can combine several ScreenOS address objects into a group called an address group. We will discuss address objects further in Recipe 7.13.
Service Objects
Like address objects, service objects are a basic building block of ScreenOS policies. All IP-based applications, ranging from the World Wide Web to Internet email, rely on protocols such as the HyperText Transfer Protocol (HTTP) and Simple Mail Transfer Protocol (SMTP) that typically run on a single defined Transmission Control Protocol (TCP) or User Datagram Protocol (UDP) port. A service object defines a “service,” typically an application, and its associated TCP, UDP, or IP port number.
Tip
Many modern applications such as IP telephony and peer-to-peer applications can initiate communications on a well-known port and then open additional communication channels on different ports. ScreenOS has the capability to parse the application traffic, identify the additional communication channels, and dynamically open firewall pinholes to permit such communication. Chapter 11 focuses on this capability and the various application layer gateways (ALGs) currently supported by ScreenOS.
ScreenOS systems ship with a large set of predefined service objects. You can verify the predefined services on your system by using the get service pre-defined command:
Internal_fw-> get service pre-definedJust like address objects, you can combine several ScreenOS service objects into a single custom service group. We discuss service groups further in Recipe 7.13.
Intra-Zone, Inter-Zone, and Global Policies
ScreenOS policies are typically defined between two security zones: the source zone and the destination zone. We discussed ScreenOS security zones in Chapter 2.
Policies whose source and destination zones are different are termed inter-zone policies. Inter-zone policies are the most common type of policy on ScreenOS gateways.
In certain situations, a firewall administrator may choose to use a ScreenOS gateway to inspect traffic within the same zone. In such instances, the source and destination zones are the same, and the policy is termed an intra-zone policy.
Finally, ScreenOS supports the concept of global policies that can apply to multiple zones. The “any” address object in the Global zone refers to any object in any zone.
ScreenOS maintains three policy set lists: one for inter-zone policies, another for intra-zone policies, and a third for global policies.
The order of the processing of policies in ScreenOS is as follows:
Based on the source and destination zones binding for the inbound packet, which establishes whether this is an intra-zone or inter-zone packet, process the packet using the intra-zone or inter-zone policy set list.
If there is no match on the intra-zone and inter-zone policy set lists, check for a match against the global policy set list.
If there is no match against the global policy set list, apply the default deny policy to inter-zone packets. For intra-zone packets, examine the intra-zone block setting. If the intra-zone block is enabled for this particular zone, drop the packet; otherwise, permit this intra-zone packet.
ACL Rules
A single ScreenOS policy can consist of several address and service objects with an associated action. Internally, ScreenOS breaks out the components of these policies into flattened-out, linear rules known as ACL rules or logical rules, each consisting of a single source, single destination, and single service. When ACL rules are discussed in the context of ASIC-based ScreenOS gateways, such as the ISG-1000/2000 and NS5200/5400, they are sometimes referred to as ASIC rules.
Default Policies
As of ScreenOS 6.0, all ScreenOS hardware platforms ship with a default deny policy. You can verify this by using the get policy command to check the current policies:
	nsisg2000-> get policy
	No policy!Default deny.
	nsisg2000->
In addition to the default deny policy, the SSG-5 and SSG-20 Series ship from the factory with a policy that permits traffic from the Trust zone to the Untrust zone:
	ssg5-serial-> get policy
	Total regular policies 1, Default deny.
	ID From     To  Src-address Dst-address Service Action State   ASTLCB
	 1 Trust  Untrust  Any         Any        ANY   Permit enabled -----X
	 ssg5-serial->
7.1. Configure an Inter-Zone Firewall Policy
Problem
You want to configure a basic firewall policy that permits specific traffic between two zones.
Solution
Figure 7-1 shows the Internal_fw gateway and its interfaces in the context of an inter-zone firewall policy that permits the Orion host to initiate HTTP (web) connections from the Trust zone to the Secure_Servers zone.
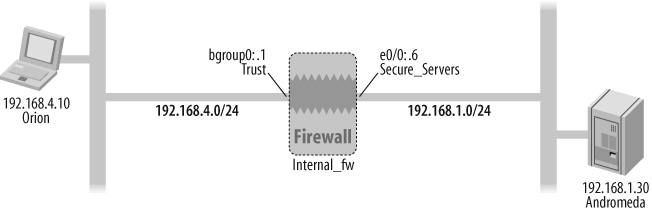
First, make sure you have correctly assigned the interface zones, IP addresses, and modes of the interfaces:
Internal_fw->set interface bgroup0 zone TrustInternal_fw->set interface bgroup0 ip 192.168.4.1/24Internal_fw->set interface bgroup0 routeInternal_fw->set zone name Secure_ServersInternal_fw->set interface e0/0 zone Secure_ServersInternal_fw->set interface e0/0 ip 192.168.1.6/24
You can replace the bgroup0 and e0/0 interface names with your ScreenOS firewall’s interface.
Next, define the address objects:
Internal_fw->set address Trust Orion 192.168.4.10/32 "Orion Wkstn"Internal_fw->set address Secure_Servers Andromeda 192.168.1.30/32"Web Server"
Finally, configure the inter-zone firewall policies using the zones, address objects, and predefined HTTP service object:
Internal_fw->set policy from Trust to Secure_Servers Orion Andromedahttp permit logInternal_fw->set policy from Secure_Servers to Trust Andromeda Orionany deny log
Discussion
A basic inter-zone firewall policy consists of a source zone, destination zone, source object, destination object, service, and access control firewall action (permit, deny, or reject). One of several additional keywords that you can add to this basic policy is the log keyword that maintains a count of the number of times this policy is referenced since the last power up or counter reset.
Table 7-1 outlines some of the other parameters that represent an action you can take on a matched policy.
|
Action |
Description | |
|
Count |
Count the number of octets that match this policy and record in a historical graph. | |
|
Schedule |
Define a scheduler that makes this policy active only during a specified time window. | |
|
Alert |
Generate a syslog alert on policy match. | |
|
Traffic |
Define traffic-shaping/QoS on this policy (discussed in Chapter 14). | |
|
No-session-backup |
Do not copy this session’s information to a peer NetScreen Redundancy Protocol (NSRP) device (discussed in Chapter 18). | |
|
URL-filter |
Enable web filtering for this policy (discussed in Chapter 12). |
Zone-based policies are a powerful tool that enable firewall administrators to manage firewall policies more easily by limiting a security policy to specific source and destination zones. Furthermore, zone-based policies enable the use of the wildcard “any” address object with an explicit understanding that the traffic will be limited to the specific security zone.
As discussed in this chapter’s Introduction section and in the solution to this recipe, the explicit address objects used in ScreenOS gateway policies need to be defined in the address book on the gateway. The only predefined address objects in the default ScreenOS factory configuration are the wildcard “any” address object that matches any host in the specific security zone, and the “Dial-Up VPN” object that is relevant to IPSec VPNs terminating on the gateway.
In addition to the list of predefined services, you can define custom services in ScreenOS that are specific to custom applications.
You can check the current set of policies defined on a ScreenOS gateway using the get policy command:
	Internal_fw-> get policy
	Total regular policies 2, Default deny.
	ID From     To       Src-addr  Dst-addr  Service Action State   ASTLCB

	2 Trust    Secure_~ Orion     Andromeda HTTP    Permit enabled ---X-X
	4 Secure_~ Trust    Andromeda Orion     ANY     Deny   enabled ---X-X
	Internal_fw->
As seen in the output, ScreenOS automatically assigns a policy ID to each defined policy. Although it is optional, you can define a policy with an explicit policy ID.
The ASTLCB header at the end of the get policy output represents whether the actions listed in Table 7-2 are enabled on the policy.
|
Header entry |
Label |
Description |
|
|
Attack |
Attack protection enabled via deep inspection on this policy. See Chapter 12 for additional details. |
|
|
Scheduled policy |
This policy is active only during specified periods. See Recipe 7.3 for additional details. |
|
|
Traffic shaping |
Enable prioritization and/or bandwidth parameters for this policy. |
|
|
Logging |
Count the hits on this policy. |
|
|
Counting |
Maintain historical statistics on the amount of traffic hitting this policy. |
|
|
Session backup |
Install the sessions associated with this policy to the NSRP peer. |
Because the get policy output truncates zone names that are longer than 8 characters and address object names that are longer than 12 characters, another way to view the policy is by viewing the firewall configuration and including only policy components:
	Internal_fw-> get config | include policy
	set policy id 2 from "Trust" to "Secure_Servers"  "Orion" "Andromeda"
	"HTTP" permit log
	set policy id 2
	set policy id 4 from "Secure_Servers" to "Trust" "Andromeda" "Orion"
	"ANY" deny log
	set policy id 4
	Internal_fw->
Finally, as your policy base grows, when you’re examining policies, you can limit the output to policies between two zones:
Internal_fw->get policy from Trust to Secure_ServersID From To Src-addr Dst-address Service Action State ASTLCB 2 Trust Secure_~ Orion Andromeda HTTP Permit enabled ---X-X Internal_fw->
See Also
7.2. Log Hits on ScreenOS Policies
Problem
You want to log the hits on a ScreenOS policy and send the log data to the local traffic log, a syslog server, or a NetScreen Security Manager (NSM) server.
Solution
The log keyword at the end of a policy maintains a count of the number of times this policy has been referenced since the last power up or counter reset. Furthermore, when the log keyword is defined on a policy, a local traffic log entry is written to the ScreenOS gateway and is sent to any defined syslog servers and NSMs. Using the inter-zone policy configuration scenario in the solution to Recipe 7.1 as a reference, you configure the log keyword on a policy as follows:
Internal_fw->set policy from Trust to Secure_Servers Orion Andromedahttp permit log
Discussion
Enabling the log keyword on a ScreenOS policy kicks off traffic logging on several fronts:
Maintaining a counter of the number of “hits” on the policy
Writing a detailed traffic log entry in the ScreenOS gateway’s local traffic log memory space
Sending a traffic log entry to a syslog server if a syslog server is configured and traffic logging to syslog is enabled
Sending a traffic log entry to NSM if the ScreenOS gateway is under NSM management
You can view the number of hits on this policy, registered when the log keyword is configured, by checking the policy ID and then running a get policy id <policy id> command. The policy ID is checked:
Internal_fw-> get policy from Trust to Secure_Servers
ID From To Src-address Dst-address Service Action State ASTLCB
2 Trust Secure_~ Orion Andromeda HTTP Permit enabled ---X-X
Internal_fw->The get policy id <policy id> command is issued:
Internal_fw-> get policy id 2
name:"none" (id 2), zone Trust -> Secure_Servers,action Permit, status
"enabled"
src "Orion", dst "Andromeda", serv "HTTP"
Policies on this vpn tunnel: 0
nat off, Web filtering : disabled
vpn unknown vpn, policy flag 00010000, session backup: on, idle reset:
on
traffic shapping off, scheduler n/a, serv flag 00
log close, log count 3, alert no, counter no(0) byte rate(sec/min) 0/0
total octets 341740, counter(session/packet/octet) 0/0/0
priority 7, diffserv marking Off
tadapter: state off, gbw/mbw 0/0 policing (no)
No Authentication
No User, User Group or Group expression set
Internal_fw->The line of output beginning with log close indicates that traffic logs are generated at session close and shows three hits on this policy in the log count 3 field. The next line shows that these three hits represented 341,740 bytes of traffic traversing the firewall.
The local traffic log entry that is written on the ScreenOS gateway shows the following:
Internal_fw-> get log traffic policy 2
PID 2, from Trust to Secure_Servers, src Orion, dst Andromeda, service
HTTP, action Permit
======================================================================
Date Time Duration Source IP Port Destination IP Port Service
Reason Xlated Src IP Port Xlated Dst IP Port ID
======================================================================
2007-07-31 17:40:57 0:05:11 192.168.4.10 2830 192.168.1.30 80 HTTP
Close - AGE OUT 192.168.4.10 2830 192.168.1.30 80
2007-07-31 17:35:58 0:00:04 192.168.4.10 2839 192.168.1.30 80 HTTP
Close - TCP FIN 192.168.4.10 2839 192.168.1.30 80
2007-07-31 17:35:52 0:00:01 192.168.4.10 2838 192.168.1.30 80 HTTP
Close - TCP FIN 192.168.4.10 2838 192.168.1.30 80
Total entries matched = 3
Internal_fw->Log hits are written to the local traffic log when a session is closed. Furthermore, the close (e.g., Age Out or TCP FIN) is specified in the log entry.
In addition to the default setting of generating log hits and local traffic log entries on session close, log entries can also be generated at session open. See Recipe 7.3 for additional details.
The log keyword on a policy has a very different function than the count keyword. Whereas the log keyword on a policy tracks policy hits, generates local and syslog/ NSM log entries, and keeps track of the aggregate number of octets hitting the policy, the count keyword configures the gateway to maintain historical statistics on the amount of traffic hitting the policy. You can view the statistics maintained with the count keyword enabled in the ScreenOS WebUI (select Reports → Policies → Counting); they are available per policy in levels of bytes per second, KB per minute, KB per hour, MB per day, and MB per month.
When the log keyword is specified on a policy, in addition to being written to the local traffic log on the ScreenOS gateway, the traffic log is sent to a syslog server if traffic logging to syslog is enabled (set syslog config <syslog_server> log traffic). See the solution to Recipe 7.4 for additional syslog configuration details.
Here is sample output of the syslog entry received by a syslog server for a hit on policy ID 2 from the code shown earlier:
Syslog Priority: Local0.Notice Hostname: 192.168.4.1 Message entry: Internal_fw: NetScreen device_id=Internal_fw [Root]system-notification-00257(traffic): start_time= "2007-07-31 19:14:13" duration=2policy_id=2 service=httpproto=6src zone=Trust dst zone=Secure_Servers action=Permitsent=4629 rcvd=45754 src=192.168.4.10 dst=192.168.1.30 src_port=2168 dst_port=80 src-xlated ip=192.168.4.10 port=2168 dst-xlated ip=192.168.1.30 port=80 session_id=4061 reason=Close - TCP FIN<000>
See Also
7.3. Generate Log Entries at Session Initiation
Solution
Although the default ScreenOS behavior is to generate a traffic log entry upon session close, the following configuration augments the session-close traffic log entry, with a log entry on session initiation for an existing policy with an ID of 2 that has logging enabled:
Internal_fw->set policy id 2Internal_fw(policy:2)->set log session-initInternal_fw(policy:2)->exitInternal_fw->
Discussion
The following policy, also referenced in Recipe 7.2, is used for this discussion:
Internal_fw-> set policy id 2 from Trust to Secure_Servers Orion
Andromeda http permit logWith session logging at initiation enabled per the preceding “Solution” section, a refreshed traffic log for policy ID 2 is as follows:
Internal_fw-> get log traffic policy 2
PID 2, from Trust to Secure_Servers, src Orion, dst Andromeda, service
HTTP, action Permit
======================================================================
Date Time Duration Source IP Port Destination IP Port Svc
Reason Xlated Src IP Port Xlated Dst IP Port ID
======================================================================
2007-07-31 18:20:03 0:00:03 192.168.4.10 4292 192.168.1.30 80 HTTP
Close - TCP FIN 192.168.4.10 4292 192.168.1.30 80
2007-07-31 18:20:00 0:00:00 192.168.4.10 4292 192.168.1.30 80 HTTP
Creation 192.168.4.10 4292 192.168.1.30 80
Total entries matched = 2
Internal_fw->Here, the session with source port 4292 is logged at creation as well as at close.
Furthermore, when the policy is viewed with the get policy command, the output field beginning with log now shows init and close:
Internal_fw->get policy id 2name:"none" (id 2), zone Trust -> Secure_Servers,action Permit, status "enabled" src "Orion", dst "Andromeda", serv "HTTP" Policies on this vpn tunnel: 0 nat off, Web filtering : disabled vpn unknown vpn, policy flag 00010400, session backup: on, idle reset: on traffic shapping off, scheduler n/a, serv flag 00log init close,log count 22, alert no, counter no(0) byte rate(sec/min) 0/0 total octets 1216636, counter(session/packet/octet) 0/0/0 priority 7, diffserv marking Off tadapter: state off, gbw/mbw 0/0 policing (no) No Authentication No User, User Group or Group expression set Internal_fw->
See Also
7.4. Configure a Syslog Server
Solution
The following configuration enables traffic and event log entries to be sent to a syslog server running on host 192.168.4.10:
Internal_fw->set syslog config 192.168.4.10 log allInternal_fw->set syslog enable
Discussion
The current syslog configuration can be verified:
Internal_fw -> get syslog
Syslog Configuration:
Hostname: 192.168.4.10
Host port: 514
Security Facility: local0
Facility: local0
Traffic log: enabled
Event log: enabled
Transport: udp
Socket number: 88
module=system: emer, alert, crit, error, warn, notif, info,
debug
Syslog is enabled.
Internal_fw ->Each syslog message has a severity level associated with it, ranging from Debug (lowest severity) to Emergency (highest severity). Table 7-3 shows a sampling of severity levels that ScreenOS assigns to different event and traffic log entries.
|
Event type |
Event description |
Severity level assigned by ScreenOS |
|
Event log |
An administrator disables an ALG |
Alert |
|
Event log |
Multiple login failures |
Critical |
|
Event log |
Login success |
Warning |
|
Traffic log |
Traffic permitted by policy match |
Notification |
If you would like to send only traffic log entries to the syslog server, you can configure the syslog config entry as follows:
Internal_fw-> set syslog config 192.168.4.10 log trafficAlthough the default transport for syslog traffic is UDP destination port 514, ScreenOS supports TCP-based syslog:
Internal_fw-> set syslog config 192.168.4.10 transport tcpTo revert back from TCP- to UDP-based syslog, use the unset command:
Internal_fw-> unset syslog config 192.168.4.10 transportSyslog messages have a facility field that the syslog server can use to identify the daemon or service on a system that generated the syslog event. Many syslog server administrators, in turn, send messages from different facilities to different directories or files. The default facility for syslog messages generated by ScreenOS is local0 and it handles messages up to the Critical severity level. Messages with severity levels of Alert or Emergency use a security facility in ScreenOS. You can modify the security facility and regular facility, respectively, so that the messages go out with a different facility name, such as local2 for the security facility and local1 for the regular facility, as follows:
Internal_fw-> set syslog config 192.168.4.10 facilities local2 local1See Also
7.5. Configure an Explicit Deny Policy
Problem
You want to configure a policy that explicitly denies traffic and logs the denied traffic to the local traffic log/syslog/NSM servers.
Solution
Figure 7-2 shows the Internal_fw gateway and its interfaces in the context of an inter-zone firewall policy that drops any traffic initiated from the Andromeda server to the Orion host.

Although ScreenOS has an implicit deny policy at the end of every inter-zone policy set, the implicit deny policy does not log the packets that are dropped. An explicit inter-zone deny policy needs to be configured with the log parameter to log dropped packets:
Internal_fw->set policy from Secure_Servers to Trust Andromeda Orionany deny log
Discussion
A deny policy drops packets that match it, and logs the packet drop when the log keyword is explicitly defined in the policy. However, it does not return a ScreenOS gateway-generated response, such as a TCP RST or an Internet Control Message Protocol (ICMP) Destination Unreachable, to the source. The following debug capture shows an attempt from Andromeda to initiate a Telnet session to Orion—the packet matches the deny policy, and is dropped:
Internal_fw->debug flow basicInternal_fw-> get dbuf stream ****** 16274.0: <Secure_Servers/ethernet0/0> packet received [48]****** ipid = 23012(59e4), @02f81270 packet passed sanity check.ethernet0/0:192.168.1.30/1429->192.168.4.10/23,6<Root>no session found flow_first_sanity_check: in <ethernet0/0>, out <N/A> chose interface ethernet0/0 as incoming nat if. flow_first_routing: in >ethernet0/0>, out <N/A> search route to (ethernet0/0, 192.168.1.30->192.168.4.10) in vr trust-vr for vsd-0/flag-0/ifp-null [ Dest] 3.route 192.168.4.10->192.168.4.10, to bgroup0 routed (x_dst_ip 192.168.4.10) from ethernet0/0 (ethernet0/0 in 0) to bgroup0 policy search from zone 100-> zone 2 policy_flow_search policy search nat_crt from zone 100-> zone 2 RPC Mapping Table search returned 0 matched service(s) for (vsys Root, ip 192.168.4.10, port 23, proto 6) No SW RPC rule match, search HW rulelog this session (pid=9) packet dropped, denied by policyInternal_fw->undebug all
ScreenOS has a default terminating deny policy. The default deny policy, however, does not log dropped packets. Hence, to log dropped packets, it is advisable to have explicit inter-zone/intra-zone deny policies if you do not have any global policies. If you use global policies in your configuration, you can terminate them with a terminating global deny policy with logging enabled.
See Also
7.6. Configure a Reject Policy
Problem
You want to configure a ScreenOS policy that drops a packet and returns a notification to the source.
Solution
Figure 7-3 shows the Internal_fw gateway and its interfaces in the context of an inter-zone firewall policy that rejects any traffic initiated from the Andromeda server to the Orion host.

The reject policy, thus, is configured as follows:
Internal_fw->set policy from Secure_Servers to Trust Andromeda Orionany reject log
Discussion
Although the more commonly used ScreenOS deny policy drops unwanted traffic without notifying the source, using the reject action instead of deny returns a TCP Reset response to the source for TCP connection requests and an ICMP Destination Unreachable response back for UDP connection requests. Thus, a reject policy introduces an additional step for the ScreenOS gateway in having to respond back to unwanted packets instead of silently dropping them.
In the solution to this recipe, if Andromeda (192.168.1.30) initiates a Telnet session to Orion (192.168.4.10), the Internal_fw ScreenOS gateway rejects the packets and returns a TCP packet to Orion with the RST flag set. A debug flow basic debug capture of this transaction is as follows:
Internal_fw->debug flow basicInternal_fw->get dbuf stream**** 13542.0: <Secure_Servers/ethernet0/0> packet received [48]**** ipid = 62612(f494), @02ff9a70 packet passed sanity check.ethernet0/0:192.168.1.30/3924->192.168.4.10/23,6<Root>no session found flow_first_sanity_check: in <ethernet0/0>, out <N/A> chose interface ethernet0/0 as incoming nat if. flow_first_routing: in <ethernet0/0>, out <N/A> search route to (ethernet0/0, 192.168.1.30->192.168.4.10) in vr trust-vr for vsd-0/flag-0/ifp-null [ Dest] 3.route 192.168.4.10->192.168.4.10, to bgroup0 routed (x_dst_ip 192.168.4.10) from ethernet0/0 (ethernet0/0 in 0) to bgroup0 policy search from zone 100-> zone 2 policy_flow_search policy search nat_crt from zone 100-> zone 2 RPC Mapping Table search returned 0 matched service(s) for (vsys Root, ip 192.168.4.10, port 23, proto 6) No SW RPC rule match, search HW rule **** jump to packet:192.168.4.10->192.168.1.30 skipping pre-frag no more encapping needed send out through normal path.flow_ip_send: 49aa:192.168.4.10->192.168.1.30,6 => ethernet0/0(40)flag 0x0, vlan 0 no l2info for packet. no route for packet search route to (null, 0.0.0.0->192.168.1.30) in vr trust-vr for vsd-0/flag-2000/ifp-ethernet0/0 [ Dest] 1.route 192.168.1.30->192.168.1.30, to ethernet0/0 route to 192.168.1.30 arp entry found for 192.168.1.30 mac 001125150ccd **** pak processing end.log this session (pid=7) packet dropped, denied by policyInternal_fw->undebug all
The debug output shows the response packet with the TCP RST flag generated by the ScreenOS gateway in the ****jump to packet section with the flow_ip_send.
In contrast, a deny policy that silently drops and logs a packet, but does not return a ScreenOS gateway-generated response to the source, has the following debug capture:
Internal_fw->debug flow basicInternal_fw->get dbuf stream**** 16274.0: <Secure_Servers/ethernet0/0> packet received [48]**** ipid = 23012(59e4), @02f81270 packet passed sanity check. ethernet0/0:192.168.1.30/1429->192.168.4.10/23,6<Root> no session found flow_first_sanity_check: in <ethernet0/0>, out <N/A> chose interface ethernet0/0 as incoming nat if. flow_first_routing: in <ethernet0/0>, out <N/A> search route to (ethernet0/0, 192.168.1.30->192.168.4.10) in vr trust-vr for vsd-0/flag-0/ifp-null [ Dest] 3.route 192.168.4.10->192.168.4.10, to bgroup0 routed (x_dst_ip 192.168.4.10) from ethernet0/0 (ethernet0/0 in 0) to bgroup0 policy search from zone 100-> zone 2 policy_flow_search policy search nat_crt from zone 100-> zone 2 RPC Mapping Table search returned 0 matched service(s) for (vsys Root, ip 192.168.4.10, port 23, proto 6) No SW RPC rule match, search HW rulelog this session (pid=9) packet dropped, denied by policyInternal_fw->undebug all
Similarly, with the same reject policy as specified in the solution to this recipe, if Andromeda (192.168.1.30) initiates a DNS query to Orion (192.168.4.10), the Internal_fw ScreenOS gateway rejects the packets and returns an ICMP Destination Port Unreachable response to Orion. A debug flow basic debug capture of this transaction is as follows:
Internal_fw->debug flow basicInternal_fw->get dbuf stream**** 01530.0: <Secure_Servers/ethernet0/0> packet received [71]**** ipid = 3168(0c60), @02f05a50 packet passed sanity check. ethernet0/0:192.168.1.30/4465->192.168.4.10/53,17<Root> no session found <Additional_output_truncated>**** jump to packet:192.168.1.1->192.168.1.30skipping pre-frag no more encapping needed send out through normal path.flow_ip_send: 060b:192.168.1.1->192.168.1.30,1 => ethernet0/0(56) flag 0x0, vlan 0<Additional_Output_Truncated> [ Dest] 1.route 192.168.1.30->192.168.1.30, to ethernet0/0 route to 192.168.1.30 arp entry found for 192.168.1.30 mac 001125150ccd**** pak processing end. log this session (pid=7) packet dropped, denied by policy
As a complement to the debug flow basic capture in the preceding code, a tcpdump packet capture on the Andromeda (192.168.1.30) system confirms that a DNS query to 192.168.4.10 on UDP/53 results in an immediate ICMP Port Unreachable response from 192.168.1.1, the ScreenOS gateway:
IP 192.168.1.30.4545 > 192.168.4.10.53: 4+ A? www.google.com. (41)
IP 192.168.1.1 > 192.168.1.30: ICMP 192.168.4.10 udp port 53
unreachable, length 36Finally, for ICMP connection requests, such as an ICMP Echo ping request to a destination that is protected by a reject policy, ScreenOS gateways do not generate any response back to the source.
See Also
7.7. Schedule Policies to Run at a Specified Time
Problem
You want to restrict a policy to be active at only a specified time.
Solution
You can restrict a policy to be active at a specified time by defining a scheduler that defines the time window in a 24-hour clock format, and then applying the scheduler to the policy:
Internal_fw->set scheduler Friday_Morning recurrent friday start 07:00 stop 10:00Internal_fw->set policy from trust to Secure_Servers orion andromeda ftp permit schedule Friday_Morning log
This policy permits a File Transfer Protocol (FTP) session from Orion to Andromeda every Friday morning between 7:00 and 10:00.
Discussion
Scheduled policies are active only during the period specified by the scheduler. ScreenOS represents the state of these policies to be enabled during active periods and hidden during inactive periods. The following output shows the state of policy ID 5, defined in the solution to this recipe, as hidden as the policy is not in its active window, per the ScreenOS gateway’s clock:
Internal_fw->get policyTotal regular policies 3, Default deny. ID From To Src-addr Dst-addr Service Action State ASTLCB 2 Trust Secure_~ Orion Andromeda HTTP Permit enabled ---X-X 5 Trust Secure_~ Orion Andromeda FTP Permithidden-X-X-X 4 Secure_~ Trust Andromeda Orion ANY Deny enabled ---X-X Internal_fw->
When the policy is active in its scheduled time window, it transitions from the hidden to the enabled state.
Further details on a scheduled policy’s associated scheduler and its current status are as follows:
Internal_fw->get policy id 5name:"none" (id 5), zone Trust -> Secure_Servers,action Permit,status "hidden" src "Orion", dst "Andromeda", serv "FTP"Policies on this vpn tunnel: 0 nat off, Web filtering : disabled vpn unknown vpn, policy flag 00010000, session backup: on, idle reset: on traffic shapping off,scheduler Friday_Morning(off), serv flag 00log close, log count 0, alert no, counter no(0) byte rate(sec/min) 0/0 total octets 0, counter(session/packet/octet) 0/0/0 priority 7, diffserv marking Off tadapter: state off, gbw/mbw 0/0 policing (no) No Authentication No User, User Group or Group expression set Internal_fw->
This policy is active per the schedule defined in the Friday_Morning scheduler and is currently off; therefore, it is not active.
The ScreenOS policy scheduler supports recurring as well as one-time schedules. Whereas the solution to this recipe defined a recurring Friday schedule, here is an example of a one-time schedule that will run once on New Year’s Eve in December 2010:
Internal_fw-> set scheduler Dec_31_2010 once start 12/31/2010 22:00
stop 01/01/2011 01:00Another example of a recurring scheduler that is active every Monday through Friday from 9:00 a.m. to 5:00 p.m. is as follows:
Internal_fw->set scheduler "Weekday_Biz_Hrs" recurrent Monday start 09:00 stop 17:00Internal_fw->set scheduler "Weekday_Biz_Hrs" recurrent Tuesday start 09:00 stop 17:00Internal_fw->set scheduler "Weekday_Biz_Hrs" recurrent Wednesday start 09:00 stop 17:00Internal_fw->set scheduler "Weekday_Biz_Hrs" recurrent Thursday start 09:00 stop 17:00Internal_fw->set scheduler "Weekday_Biz_Hrs" recurrent Friday start 09:00 stop 17:00
7.8. Change the Order of ScreenOS Policies
Solution
ScreenOS gateways process policies sequentially, beginning with the policy at the top. Thus, after ScreenOS policies have been defined, you can move them around at any time to change their order of processing. This is often required to prevent the shadowing of a new policy that is being added. The following policy already exists in a screenOS geteway:
Internal_fw-> get config | include policy
set policy id 2 from "Trust" to "Secure_Servers" "Orion" "Andromeda"
"HTTP" permit log
set policy id 3 from "Trust" to "Secure_Servers" "Any" "Any" "ANY"
deny log
Internal_fw->Next, add an additional policy to permit FTP traffic from Orion to Andromeda:
Internal_fw-> set policy id 4 from trust to secure_servers orion
andromeda ftp permit logNow, policy id 4 is getting shadowed by the explicit deny policy id 3. You can verify this by running the exec policy verify command:
Internal_fw-> exec policy verify
Rule 4 is shadowed by rule 3
Rulebase verification done: shadowed rules were found
Internal_fw->Hence, to move rule 4 ahead of rule 3 to prevent shadowing, you can use the set policy move command:
Internal_fw-> set policy move 4 before 3Discussion
Following a policy move, you can verify that there is no shadowing of policies:
Internal_fw-> exec policy verify
Rulebase verified successfully
Internal_fw->Also, following the policy move, you can see the new policy order:
Internal_fw-> get policy
Total regular policies 3, Default deny.
ID From To Src-addr Dst-addr Service Action State ASTLCB
2 Trust Secure_~ Orion Andromeda HTTP Permit enabled ---X-X
4 Trust Secure_~ Orion Andromeda FTP Permit enabled ---X-X
3 Trust Secure_~ Any Any ANY Deny enabled ---X-X
Internal_fw->Similar to moving one policy before another, you can use the set policy after command to move one policy after another one.
Finally, to create a new policy that goes to the top of the policy base, use the set policy top command:
Internal_fw-> set policy top from Trust to Secure_Servers Orion
Andromeda smtp permit log
policy id = 5
Internal_fw->Now, you can verify that this new policy is installed at the top of the policy set:
Internal_fw-> get policy Total regular policies 4, Default deny. ID From To Src-addr Dst-address Service Action State ASTLCB 5 Trust Secure_~ Orion Andromeda SMTP Permit enabled ---X-X 2 Trust Secure_~ Orion Andromeda HTTP Permit enabled ---X-X 4 Trust Secure_~ Orion Andromeda FTP Permit enabled ---X-X 3 Trust Secure_~ Any Any ANY Deny enabled ---X-X Internal_fw->
This scenario prevents the new policy entry from being shadowed by installing it at the top. Using the set policy top command is valuable in such scenarios where an explicit deny policy exists at the end.
See Also
7.9. Disable a ScreenOS Policy
Solution
You can temporarily disable an existing ScreenOS policy by using the set policy id <id number> disable command. However, you must first determine the policy ID:
	Internal_fw-> get policy from Trust to Secure_Servers
	ID From    To       Src-addr Dst-address Service Action State   ASTLCB
	 2 Trust   Secure_~ Orion    Andromeda   HTTP    Permit enabled ---X-X
Internal_fw->Now, you can disable the policy:
	Internal_fw-> set policy id 2 disable
	policy id = 2
	Internal_fw->
Discussion
A policy that has been disabled is still defined in the configuration, but it shows up with its state disabled in the get policy output as follows:
	Internal_fw-> get policy from Trust to Secure_Servers
	ID From  To       Src-addr Dst-address Service  Action State  ASTLCB
	 2 Trust Secure_~ Orion    Andromeda   HTTP     Permit disabl~ ---X-X
	Internal_fw->
You can reenable a disabled policy with the following:
Internal_fw-> unset policy id 2 disable7.10. Configure an Intra-Zone Firewall Policy
Problem
You want to configure a ScreenOS intra-zone policy that implements and logs secure firewall sessions between systems on the same security zone.
Solution
Figure 7-4 shows the Internal_fw gateway and its interfaces in the context of a firewall policy between devices on the same Trust zone that permits the Orion host to initiate ping and HTTP connections to Gemini but denies all other connections.

First, the required address book and service group entries are created:
Internal_fw->set address Trust Gemini 192.168.5.10/32Internal_fw->set group service ping_httpInternal_fw->set group service ping_http add pingInternal_fw->set group service ping_http add http
Next, intra-zone blocking is enabled on the Trust zone, and the intra-zone policy is configured:
Internal_fw->set zone Trust blockInternal_fw->set policy from Trust to Trust Orion Gemini ping_http permit logpolicy id = 20 Internal_fw->set policy from Trust to Trust Orion Gemini any deny logpolicy id = 21 Internal_fw->
Discussion
In the solution to this recipe, the two distinct IP interfaces, bgroup0 and ethernet0/1, on the Internal_fw gateway are in the same Trust security zone. To enable stateful firewalling between devices on these separate interfaces on the same zone, intra-zone policies are employed.
In its default configuration, ScreenOS does not deny intra-zone traffic on the Trust zone or other custom zones. It does, however, deny intra-zone traffic on the Untrust zone. To deny all intra-zone traffic on the Trust zone, you use the set zone <zone_name> block command. You can verify the block setting on a zone by using the get zone <zone_name> command:
	Internal_fw-> get zone Trust | include block
	Intra-zone block: On, attrib: Non-shared, flag:0x6288
	Internal_fw->
Now, when an HTTP connection is attempted from Orion to Gemini, the associated intra-zone session that forms can be checked:
Internal_fw>get session id 4061id 4061(00000fdd), flag 08000040/0000/0001, vsys id 0(Root)policy id 20, application id 0, dip id 0, state 0 current timeout 300, max timeout 300 (second) status normal, start time 70990, duration 0 session id mask 0, app value 0 bgroup0(vsd 0):192.168.4.10/1640>192.168.5.10/80,protocol 6 session token 4 route 3 gtwy 192.168.5.10, mac 001125150ccd, nsptn info 0, pmtu 1500 flag 801801, diff 0/0 port seq 0, subif 0, cookie 0, fin seq 0, fin state 0 ethernet0/1(vsd 0): 192.168.4.10/1640<-192.168.5.10/80, protocol 6 session token 4 route 7 gtwy 192.168.4.10, mac 0017cbe1830b, nsptn info 0, pmtu 1500 mac 0017cbe1830b, nsptn info 0 flag 801800, diff 0/0 port seq 0, subif 0, cookie 0, fin seq 0, fin state 0 Internal_fw>
Also, the traffic log entry that is generated for this session can be viewed:
	Internal_fw-> get log traffic policy 20
	PID 20, from Trust to Trust, src Orion, dst Gemini, service ping_http,
	action Permit
	=======================================================================
	Date       Time     Duration Source IP     Port Destination IP Port Svc
	Reason                       Xlated Src IP Port Xlated Dst IP  Port ID
	==================================================================================
	2007-08-16 16:21:48 0:00:43  192.168.4.10  1639 192.168.5.10   80 HTTP
	Close - CLI                  192.168.4.10  1639 192.168.5.10   80
The entry that is generated and sent to the syslog server, shown here, shows the source and destination zones as Trust:
	Syslog Priority:    Local0.Notice
	Hostname:           192.168.4.1
	Message entry:      Internal_fw: NetScreen device_id=Internal_fw [Root]
	system-notification-00257(traffic): start_time="2007-08-16 16:21:05"
	duration=43 policy_id=20 service=http proto=6 src zone=Trust dst
	zone=Trust action=Permit sent=2654 rcvd=51630 src=192.168.4.10
	dst=192.168.5.10 src_port=1639 dst_port=80 src-xlated ip=192.168.4.10
	port=1639 dst-xlated ip=192.168.5.10 port=80 session_id=4055
	reason=Close - CLI<000>
Finally, an attempt to telnet from Orion to Gemini fails as the firewall drops and logs the packet. The local traffic log shows the drop:
Internal_fw->get log traffic policy 21PID 21, from Trust to Trust, src Orion, dst Gemini, service ANY, action Deny ====================================================================== Date Time Duration Source IP Port Destination IP Port Svc Reason Xlated Src IP Port Xlated Dst IP Port ID ======================================================================= 2007-08-16 16:28:31 0:00:00 192.168.4.10 1648 192.168.5.10 23 TELNETTraffic Denied0.0.0.0 0 0.0.0.0 0 Internal_fw->
Once again, the log entry sent to the syslog server for this dropped packet displays the source and destination zones as Trust and denies action via a match on policy id 21:
	Syslog Priority:    Local0.Notice
	Hostname:           192.168.4.1
	Message entry:      Internal_fw: NetScreen device_id=Internal_fw [Root]
	system-notification-00257(traffic): start_time="2007-08-16 16:28:22"
	duration=0 policy_id=21 service=telnet proto=6 src zone=Trust dst
	zone=Trust action=Deny sent=0 rcvd=0 src=192.168.4.10 dst=192.168.5.10 src_port=1648
	dst_port=23 session_id=0<000>
See Also
This chapter’s Introduction section; Recipe 7.1; Recipe 7.11
7.11. Configure a Global Firewall Policy
Problem
You want to configure a ScreenOS global firewall policy that applies to all security zones and logs the matched traffic.
Solution
You can configure global policies using the set policy global command that does not reference any source or destination security zones. The following code is a sample global policy that permits and logs ICMP ping traffic from and to all security zones on a ScreenOS gateway:
	Internal_fw-> set policy global any any ping permit log
	policy id = 17
	Internal_fw->
As reviewed in greater detail in the following Discussion section, global policies are processed only for packets that have not already been matched by any intra-zone or inter-zone policies.
Discussion
As discussed in this chapter’s Introduction section, global policies are processed in ScreenOS after all the intra-zone and inter-zone policies. Furthermore, it should be noted that when ScreenOS goes through a policy list, it does not process policies any further as soon as a match is found. Hence, if your inter-zone or intra-zone policies have an explicit Source-Any to Destination-Any deny/reject policy at the end of the policy set, the global policies will never be reached in the ScreenOS processing order.
When you view your existing policy set using the get policy command, the output does not list the global policies. To list the global policies, you need to use the get policy all or get policy global command:
	Internal_fw-> get policy all
	Total regular policies 1, Default deny.
	ID From To       Src-addr  Dst-addr  Service Action State   ASTLCB
	2 Trust Secure_~ Orion     Andromeda HTTP    Permit enabled ---X-X

	Total global policies 1, Default deny.
	ID From   To     Src-address Dst-address Service Action State   ASTLCB
	17 Global Global Any         Any         PING    Permit enabled ---X-X
	Internal_fw->
The session associated with the global policy configured in the preceding code, showing a session for the ICMP ping initiated from Orion (192.168.4.10)to Andromeda (192.168.1.30), can be viewed as follows:
Internal_fw->get session id 4063id 4063(00000fdf), flag 00000050/0000/0001, vsys id 0(Root)policy id 17, application id 0, dip id 0, state 0 current timeout 10, max timeout 60 (second) status expired, start time 64447, duration 1 session id mask 0, app value 0 bgroup0(vsd 0):192.168.4.10/22020->192.168.1.30/1280, protocol 1session token 4 route 3 gtwy 192.168.1.30, mac 001125150ccd, nsptn info 0, pmtu 1500 flag 800801, diff 0/0 port seq 0, subif 0, cookie 0, fin seq 0, fin state 0 ethernet0/0(vsd 0):192.168.4.10/22020<-192.168.1.30/1280, protocol 1session token 26 route 5 gtwy 192.168.4.10, mac 0019b980c214, nsptn info 0, pmtu 1500 mac 0019b980c214, nsptn info 0 flag 800800, diff 0/0 port seq 0, subif 0, cookie 0, fin seq 0, fin state 0 Internal_fw->
Please note that log entries generated for packets that match global policies do not include specific source or destination zone information. Thus, a syslog entry for the earlier ICMP ping session shows a source and destination zone of Global as follows:
	Syslog Priority:    Local0.Notice
	Hostname:           192.168.4.1
	Message entry:      Internal_fw: NetScreen device_id=Internal_fw
	[Root]system-notification-00257(traffic): start_time="2007-08-16
	14:36:44" duration=4 policy_id=17 service=icmp proto=1
	src zone=Global dst zone=Global action=Permit sent=78 rcvd=78
	src=192.168.4.10 dst=192.168.1.30 icmp type=8
	src-xlated ip=192.168.4.10 dst-xlated ip=192.168.1.
	30 session_id=4061 reason=Close - RESP<000>
Because global policies are processed only for packets that do not match any explicit intra-zone or inter-zone deny/reject policies, dropped packets would not be logged unless you have an explicit global deny logging policy. Hence, such a policy that logs such dropped packets can be configured as follows:
	Internal_fw-> set policy global any any any deny log
	policy id = 18
	Internal_fw->
You can check the traffic log entries this policy generates on the syslog/NSM servers as well as on the local traffic log:
	Internal_fw-> get log traffic policy 18
	PID 18, from Global to Global, src Any, dst Any, service ANY, action
	 Deny
	======================================================================
	Date       Time      Duration Source IP     Port Dest IP      Port Svc
	Reason                        Xlated Src IP Port Xlated Dst IP Port ID
	======================================================================
	2007-08-16 14:47:31  0:00:00  192.168.4.10  1118 192.168.1.30  53 DNS
	Traffic Denied                0.0.0.0          0  0.0.0.0      0
Finally, if you would prefer not to log some of the traffic that hits the global deny logging policy, you can create a global policy that matches the traffic but does not log it. Hence, as an example, if you prefer not to log the Domain Name System (DNS) query traffic hitting the global policy, you can configure the following policy and move it above the terminating global deny logging policy in the policy search order:
Internal_fw->set policy global any any dns denypolicy id = 19 Internal_fw->set policy move 19 before 18
You can view the global policy search order, which shows that policy ID 19 will be processed before the global deny logging policy and, hence, traffic matching the deny DNS policy ID 19 will not be logged:
	Internal_fw-> get policy global
	Total global policies 3, Default deny.
	ID From    To      Src-addr  Dst-addr   Service Action State ASTLCB
	17 Global  Global  Any       Any        PING    Permit enabled ---X-X
	19 Global  Global  Any       Any        DNS     Deny   enabled -----X
	18 Global  Global  Any       Any        ANY     Deny   enabled ---X-X
	Internal_fw->
See Also
This chapter’s Introduction section; Recipe 7.1; Recipe 7.3; Recipe 7.4; Recipe 7.10
7.12. Configure Custom Services
Problem
You want to configure a custom service that is not on the predefined list of services in ScreenOS.
Solution
You can define a custom service in ScreenOS by specifying the service name, protocol (i.e., TCP, UDP, or ICMP), and destination port range or Remote Procedure Call (RPC) program number/Universally Unique Identifier (UUID). Thus, the following custom service represents the connection opened by an IBM Lotus Notes client to an IBM Domino server on port TCP 1352:
Internal_fw-> set service Lotus_Notes protocol tcp dst-port 1352-1352Discussion
Although ScreenOS ships with a large set of predefined services, in several instances, you may need to define custom services.
You can view the parameters of the custom service defined in this recipe’s Solution section as follows:
	Internal_fw-> get service Lotus_Notes
	Name:       Lotus_Notes
	Category:   other          ID:  0  Flag:  User-defined

	Transport Src port Dst port  ICMPtype, Timeout(min|10sec*) Application
	                                 code
	tcp       0/65535  1352/1352                     30

	Internal_fw->
As shown, the source ports for this service can span the entire range of TCP ports, from 0 –65535. The timeout for this service is 30 minutes, which is the default timeout for TCP connections in ScreenOS.
See Also
This chapter’s Introduction section
7.13. Configure Address and Service Groups
Solution
An address group in ScreenOS brings together a set of addresses under a common group name. Similarly, a service group can include a set of predefined and custom services under a single service group name. The following is an example of an address group, Main_Servers, which is defined in the Secure_Servers security zone:
Internal_fw->set group address Secure_Servers Main_ServersInternal_fw->set group address Secure_Servers Main_Servers add AndromedaInternal_fw->set group address Secure_Servers Main_Servers add FTP_ServInternal_fw->set group address Secure_Servers Main_Servers add Mail_Serv
The following example defines a service group that includes the HTTP, FTP, and SMTP (MAIL) services:
Internal_fw->set group service http_ftp_mailInternal_fw->set group service http_ftp_mail add httpInternal_fw->set group service http_ftp_mail add ftpInternal_fw->set group service http_ftp_mail add mail
Discussion
Address and service groups are frequently used to consolidate a large set of hosts that are permitted to communicate with each other on a range of services under a single consolidated policy.
Address groups, just like individual address book entries, are tied to a security zone. Hence, the Main_Servers address group in this recipe’s “Solution” section is tied to the Secure_Servers zone. Also, all of the individual address elements that are added to an address group already have to be defined in that specific security zone. You can view the members of an address group by using the get group address <zone> <address_group_name> command:
	Internal_fw-> get group address Secure_Servers Main_Servers
	 Group Name: Main_Servers              IP: v4           Comment:
	 Group Items:  3                Type: User-defined
	 Members: "Andromeda" "FTP_Serv" "Mail_Serv"
	Internal_fw->
Service groups—just like individual predefined and custom-defined services—are not tied to a specific zone. You can view the members of a service group by using the get group service <service_group_name> command:
With the address group and service group defined as indicated in the preceding code, you can define a new ScreenOS policy that uses these groups, permitting Orion to access the three Main_Servers on the HTTP, FTP, and mail applications:
	Internal_fw-> set policy from Trust to Secure_Servers Orion
	Main_Servers http_ftp_mail permit log
	policy id = 11
	Internal_fw->
See Also
This chapter’s Introduction section; Recipe 7.12; Recipe 7.14
7.14. Configure Service Timeouts
Solution
You can change the session timeout value on predefined as well as custom-defined services. You can modify the timeout value of a predefined service, such as HTTP, as follows:
Internal_fw-> set service http timeout 15This configuration changes the service timeout for HTTP to 15 minutes from the default value of five minutes.
Similarly, you can modify the timeout value of a custom-defined service, such as Lotus_Notes, to 45 minutes:
Internal_fw-> set service Lotus_Notes timeout 45In addition to using the set service command, you have to reference the particular service with the modified timeout in a firewall policy by its specific service name for this new timeout to take effect.
Discussion
The timeout value of a service represents the amount of time that can elapse with no packets transmitted while the session is maintained in the firewall session table.
Certain applications, such as web servers, rapidly close out a TCP connection by sending a TCP segment with the RST flag set after serving up a response to an HTTP request. ScreenOS gateways purge the session from the session table upon seeing a TCP FIN or a TCP RST, which signifies the end of the communication. Other applications deliberately keep a communication channel open by periodically sending application-specific keepalive messages. Finally, some applications do not explicitly close out a TCP connection by negotiating a TCP four-way close (FIN-ACK, ACK, FIN-ACK, ACK) and have to be timed out of the firewall session table to prevent the buildup of stale, unused sessions in the session table.
The default session timeout value for services in ScreenOS is typically based on the protocol. Table 7-4 shows the timeout values for some standard protocols.
|
Service type |
Timeout value (minutes) |
|
GRE tunnel (IP protocol 47) |
60 |
|
Generic TCP service |
30 |
|
HTTP |
5 |
|
Generic UDP service |
1 |
|
ICMP |
1 |
With the ability to configure session timeout values in ScreenOS, you may choose to lower the session timeout on a service to aggressively age out sessions from the session table. On the other hand, you may want to elongate the session timeout value if you have an application that sends packets sporadically but does not explicitly close out the TCP connection with an explicit TCP FIN or RST until a user-initiated event occurs.
You can view the configured timeout value of a service by using the get service <service_name> command. Thus, for the HTTP service whose timeout was modified in this recipe’s solution, you can view the timeout value as follows:
Internal_fw->get service httpName: HTTP Category: info seeking ID: 0 Flag: Pre-defined Transport Src port Dst port ICMPtype,Timeout(min|10sec*)Application code tcp 0/65535 80/8015HTTP Internal_fw->
Although the default method of defining the timeout value of a service is in minutes, an alternative method is to use 10 seconds as the unit. The 10-second unit is relevant when monitoring the firewall session table as it uses the same 10-second unit, also known in the ScreenOS world as a tick. Thus, you can change the timeout of the MAIL (SMTP) service to 300 seconds—therefore 30 10-second units—and apply it to a firewall policy:
External_fw->set service mail timeout unit 10secExternal_fw->set service mail timeout 30External_fw->set policy id 13 from trust to untrust any any mail permit log
Now, when you view the MAIL service using the get service command, the timeout is displayed in 10-second units:
	External_fw-> get service mail
	Name:       MAIL
	Category:   email          ID:  0   Flag:  Pre-defined


	Transport Src port  Dst port ICMPtype, Timeout(min|10sec*) Application
	                                 code
	tcp       0/65535    25/25                       30*         SMTP

	External_fw->
Hence, a new session that uses the MAIL service with the modified timeout value has a session timeout value of 300 seconds, or 30 ticks:
External_fw->get session service mailTotal mail sessions: 1 id 8052/s**,vsys 0,flag 08000000/0000/0001,policy 13,time 30, dip 2 module 0 if 11(nspflag 801801):192.168.4.36/1059->209.85.163.27/25,6, 001125150ccd,sess token 4,vlan 0,tun 0,vsd 0,route 3 if 0(nspflag 801800):192.168.1.6/4224<-209.85.163.27/25,6, 000fcc7cd338,sess token 6,vlan 0,tun 0,vsd 0,route 15 Total 1 sessions shown External_fw->
The session timeout value, indicated by the value time 30 in the preceding code, represents a session timeout of 30 ticks, or 300 seconds, per the modified service timeout. Please note that modified service timeouts do not apply unless the service is explicitly referenced in the policy. For instance, if the External_fw gateway has a generic trust to untrust policy that matches mail traffic and is used to build a firewall session, the default TCP service timeout of 1,800 seconds, or 180 ticks, will apply.
Finally, you can also specify a timeout value of never to a service:
External_fw-> set service mail timeout neverYou can verify the timeout value as follows:
External_fw->get service mailName: MAIL Category: email ID: 0 Flag: Pre-defined Transport Src port Dst port ICMPtype,Timeout(min|10sec*)Application code tcp 0/65535 25/25neverSMTP External_fw->
A session that references this service with an infinte timeout is shown with its time value:
External_fw->get session service mailTotal mail sessions: 1 id 7988/s**,vsys 0,flag 08000000/0000/0001,policy 13,time 2185, dip 2 module 0 if 11(nspflag 801801):192.168.4.36/1129->209.85.163.27/25,6, 001125150ccd,sess token 4,vlan 0,tun 0,vsd 0,route 3 if 0(nspflag 801800):192.168.1.6/4296<-209.85.163.27/25,6, 000fcc7cd338,sess token 6,vlan 0,tun 0,vsd 0,route 15 External_fw->
It should be noted from the preceding output that although this session is formed with a high timeout value of 21,850 seconds, this value remains constant and does not decrement as do other, normal-duration sessions.
When multiple services with different session timeout values are in a single service group, the ScreenOS gateway uses the individual matching service’s session timeout value for the specific session. Hence, for a service group that includes HTTP (session timeout 5 minutes) and FTP (session timeout 30 minutes), a matching HTTP session will time out after 5 minutes whereas the FTP session will time out after 30 minutes, unless the session is purged sooner due to a TCP RST from either host.
See Also
7.15. View and Use Microsoft RPC Services
Problem
You want to view the predefined Microsoft RPC services in ScreenOS and enable ScreenOS gateway-secured communication between Microsoft Windows hosts that use MS-RPC to connect with each other.
Solution
ScreenOS ships with a wide range of predefined individual Microsoft RPC services and service groups. You can view the exhaustive list of predefined Microsoft RPCspecific services in ScreenOS as follows:
Internal_fw-> get service | include "MS-"The three major Microsoft RPC service groups in ScreenOS are categorized based on their respective Windows applications, i.e., Active Directory, Exchange, and IIS (Internet Information Services).
You can view the service group that includes the RPC services for Microsoft Windows Active Directory communication and replication as follows:
	Internal_fw-> get group service MS-AD
	 Group Name: MS-AD              Comment: Microsoft Active Directory
	 Group Items:  4                Type: Pre-defined
	 Members: "MS-AD-BR" "MS-AD-DRSUAPI" "MS-AD-DSROLE" "MS-AD-DSSETUP"
	Internal_fw->
The MS-EXCHANGE service group includes the MS-RPC component services for Microsoft Exchange communication between Exchange servers, and between Out-look clients and Exchange servers:
	Internal_fw-> get group service MS-EXCHANGE
	Group Name: MS-EXCHANGE                 Comment: Microsoft Exchange
	Group Items:  6                 Type: Pre-defined
	Members: "MS-EXCHANGE-DATABASE" "MS-EXCHANGE-DIRECTORY"
	"MS-EXCHANGE-INFO-STORE" "MS-EXCHANGE-MTA" "MS-EXCHANGE-STORE"
	"MS-EXCHANGE-SYSATD"
	Internal_fw->
The MS-IIS service group includes the MS-RPC component services for the IIS application:
	Internal_fw-> get group service MS-IIS
	 Group Name: MS-IIS             Comment: Microsoft IIS Server
	 Group Items:  6                Type: Pre-defined
	 Members: "MS-IIS-COM" "MS-IIS-IMAP4" "MS-IIS-INETINFO" "MS-IIS-NNTP"
	 "MS-IIS-POP3" "MS-IIS-SMTP"
	Internal_fw->
As an example, building on the scenario from Recipe 7.1, the following sample policy enables the Sirius Windows Active Directory domain controller on the Trust zone to perform an Active Directory replication to the Andromeda Windows Active Directory domain controller in the Secure_Servers zone:
	Internal_fw-> set policy from Trust to Secure_Servers Sirius Andromeda
	 MS-AD permit log
	policy id = 15
	Internal_fw->
Discussion
Microsoft RPC is a technology that several Windows applications use to communicate with one another. MS-RPC applications typically listen on dynamic TCP or UDP ports. Hence, an RPC portmapper service, which runs on TCP and UDP port 135, provides the mapping between the application and the TCP or UDP port on which it’s listening.
All MS-RPC applications, such as the Windows Active Directory Replication Service, have a well-known but unique UUID associated with them. When an MS-RPC-dependent Windows service starts up on a host, it finds an available TCP or UDP port and registers that port with the UUID. Next, when a client application wants to communicate with that service, it first makes a connection to the RPC portmapper service on the server’s TCP or UDP port 135 and requests the service’s TCP/UDP port number by querying the UUID.
Then, the client application opens a connection to the port number obtained in the UUID query response. The ScreenOS MS-RPC services thus maintain the list of UUIDs associated with the various Microsoft applications. The MS-RPC ScreenOS ALG dynamically opens pinholes to permit connections to the TCP or UDP ports on which the service has registered itself. We discuss ALGs further in Chapter 11.
You can check the UUIDs associated with the individual MS-RPC services by viewing each individual service. This example shows the UUID associated with the MS-AD-DRSUAPI (AD Replication Service) service:
	Internal_fw-> get service MS-AD-DRSUAPI
	Name:       MS-AD-DRSUAPI
	Category:   other          ID:  0   Flag: Pre-defined


	Transport    UUID                             Timeout(min) Application
	MS-RPC       e3514235-4b06-11d1-ab04-00c04fc2dcd2       1

	Internal_fw->
ScreenOS also offers a generic MS-RPC service called MS-RPC-ANY that matches any UUID, thereby permitting communication between two hosts on all MS-RPC applications:
	Internal_fw-> get service MS-RPC-ANY
	Name:       MS-RPC-ANY
	Category:   other          ID:  0   Flag:  Pre-defined

	Transport   UUID                              Timeout(min) Application
	MS-RPC      ANY                                         1

	Internal_fw->
See Also
7.16. View and Use Sun-RPC Services
Problem
You want to view the predefined Sun-RPC services in ScreenOS and enable ScreenOS gateway-secured communication between hosts that use Sun-RPC to connect with one another.
Solution
ScreenOS ships with a wide range of predefined individual Sun-RPC services. You can view the exhaustive list of predefined Sun-RPC-specific services in ScreenOS as follows:
Internal_fw-> get service | include "SUN-"As an example, building on the scenario from Recipe 7.1, the following sample policy enables the gamma workstation on the Trust zone to make an NFS connection to the delta Unix server in the Secure_Servers zone:
	Internal_fw-> set policy from Trust to Secure_Servers gamma delta
	SUN-RPC-NFS permit log
	policy id = 16
	Internal_fw->
Discussion
Sun-RPC was originally defined in RFC 1050 and RFC 1057. This original specification has subsequently evolved into Open Network Computing (ONC) RPC version 2, defined in RFC 1831. Services on Unix hosts that rely on Sun-RPC use a well-known but unique program number as an identifier and register the dynamic TCP/UDP port they are listening on with the portmapper service on that host. The portmapper service runs on TCP/UDP 111.
Hence, a client application that needs to connect to a Sun-RPC service such as NFS first contacts the portmapper service on the server with the particular program number. The portmapper service returns the TCP/UDP port associated with the program number. Then, the client application connects to the service on the specific TCP/ UDP port number. The ScreenOS Sun-RPC services have the predefined, well-known program numbers for several applications, such as NFS. The ScreenOS Sun-RPC ALG dynamically opens pinholes to permit connections to the TCP or UDP ports on which the service has registered itself. We discuss ALGs further in Chapter 11.
You can check the program numbers associated with the individual Sun-RPC services by viewing the individual services. This example shows the program numbers associated with the SUN-RPC-NFS service:
	Internal_fw-> get service SUN-RPC-NFS
	Name:       SUN-RPC-NFS
	Category:   other          ID: 0 Flag: Pre-defined

	Transport   Program              Timeout(min) Application
	SUN-RPC     100003/100003                 40         None
	SUN-RPC     100227/100227                 40         None

	Internal_fw->
ScreenOS also offers a generic Sun-RPC service called SUN-RPC-ANY that matches any program number, thereby permitting communication between two hosts on all Sun-RPC applications:
	Internal_fw-> get service SUN-RPC-ANY
	Name:       SUN-RPC-ANY
	Category:   other          ID:  0   Flag:  Pre-defined

	Transport   Program              Timeout(min) Application
	SUN-RPC     ANY                            1

	Internal_fw->
On a Unix host, you can see the various RPC applications/services that have registered themselves with the rpcmapper and their respective program numbers and TCP/ UDP ports:
	# rpcinfo -p
	   program vers proto   port
	    100000    2   tcp    111  portmapper
	    100000    2   udp    111  portmapper
	    100003    2   udp   2049  nfs
	    100003    3   udp   2049  nfs
	    100021    1   udp  34361  nlockmgr
	    100021    3   udp  34361  nlockmgr
	    100021    4   udp  34361  nlockmgr
	    100005    1   udp  34362  mountd
	    100005    1   tcp  36542  mountd
	    100005    2   udp  34362  mountd
	    100005    2   tcp  36542  mountd
	    100005    3   udp  34362  mountd
	    100005    3   tcp  36542  mountd
	#
See Also
7.17. View the Session Table
Problem
You want to examine the session table to view all the active connections through the ScreenOS gateway.
Solution
You can view the session table in ScreenOS with the get session command:
Internal_fw-> get sessionDiscussion
The session table lists the active sessions that the ScreenOS gateway has permitted and is actively tracking.
Figure 7-5 illustrates a scenario, similar to Recipe 7.1, where an inter-zone policy from Trust to Secure_Servers permits Orion (192.168.4.10) to initiate an HTTP connection to the web server Andromeda (192.168.1.30).

You can view the detailed state of an active session in the session table using the get session id <session_id> command. First, to determine the session ID of the session for which you are seeking detailed information, you can use the get session command with some matching keywords:
Internal_fw>get session src-ip 192.168.4.10 dst-ip 192.168.1.30 dst-port 80alloc 1/max 4064, alloc failed 0, mcast alloc 0, di alloc failed 0 total reserved 0, free sessions in shared pool 4063 Total 1 sessions according filtering criteria.id 4057/s**,vsys 0,flag 48000040/0000/0001,policy 2,time 2, dip 0 module 0 if 11(nspflag 801801):192.168.4.10/4407>192.168.1.30/80,6, 001125150ccd,sess token 4,vlan 0,tun 0,vsd 0,route 3 if 0(nspflag 800800):192.168.4.10/4407<192.168.1.30/80,6, 0019b980c214,sess token 26,vlan 0,tun 0,vsd 0,route 1Total 1 sessions shown Internal_fw->
The summary session entry output shown, beginning with id 4057, has the following key components:
The
id 4057tag identifies the session ID.The
vsys 0tag specifies that the session is created in Virtual System (VSYS) 0, the root VSYS.The
policy 2tag identifies the matching policy ID that permitted this session to be created.The
time 2tag indicates the session timeout in ticks, where one tick is a unit of 10 seconds.The
dip 0tag specifies the dynamic IP (DIP) pool ID being used. A DIP ID of 0 represents no DIP pool usage.The
if 11tag specifies the interface ID of the interface on which the initial source packet was received. In this instance,if 11represents thebgroup0interface on the SSG-5 gateway. You can check theif IDto interface-name mapping with theget ifcommand.The
192.168.4.10/4407->192.168.1.30/80, 6tag represents the forward session, indicating that the flow is a TCP flow (represented by the terminating 6, which indicates the IP number where 6 represents TCP and 17 represents UDP), originated by 192.168.4.10 on source port 4407, and that the target host is 192.168.1.30 with destination port 80 (HTTP). The direction of the -> arrow indicates that this flow is representing the forward session from 192.168.4.10 to 192.168.1.30. The <- arrow in the complementary flow indicates the reverse session from 192.168.1.30 to 192.168.4.10.The
001125150ccdand0019b980c214fields, respectively, represent the Ethernet Layer 2 MAC addresses of the next-hop devices on either side of the ScreenOS gateway for this session.The
sess tokentag is an identifier for an internal hash table entry that maps sessions to security zones.The
vlan 0field identifies a virtual local area network (VLAN) ID for Ethernet interfaces with avlantag. Avlan 0field indicates that there is no VLAN ID configured on this interface.The
tun 0tag indicates the VPN tunnel ID, if applicable.The
vsd 0tag represents the NSRP virtual security device (VSD) group for this interface if an NSRP cluster is enabled.The
route 3tag specifies the route ID from the routing table that was used to route this flow.
Next, you can view detailed output of the specific session:
Internal_fw>get session id 4057id 4057(00000fd9), flag 48000040/0000/0001, vsys id 0(Root) policy id 2, application id 0, dip id 0, state 0current timeout 20, max timeout 300 (second) status normal, start time 3644, duration 0 session id mask 0, app value 0 bgroup0(vsd 0): 192.168.4.10/4407->192.168.1.30/80, protocol 6 session token 4 route 3 gtwy 192.168.1.30, mac 001125150ccd, nsptn info 0, pmtu 1500 flag 801801, diff 0/0 port seq 0, subif 0, cookie 0, fin seq 0, fin state 0 ethernet0/0(vsd 0): 192.168.4.10/4407<-192.168.1.30/80, protocol 6 session token 26 route 1 gtwy 192.168.4.10, mac 0019b980c214, nsptn info 0, pmtu 1500 mac 0019b980c214, nsptn info 0 flag 800800, diff 0/0 port seq 0, subif 0, cookie 0, fin seq 0, fin state 0 Internal_fw>
This session output shows a current timeout of 20 seconds, signifying that this is an ephemeral half-session, awaiting a SYN-ACK response from the web server. Typically, a TCP half-session is difficult to capture with an interactive, nonscripted get session command, as the target hosts respond in a subsecond duration whereupon the ephemeral session is converted into a full session. Your target host could be down or you could be under a SYN flood attack if your session table is displaying a large number of half-sessions.
The following output displays an HTTP full-session, with a 300-second timeout value, displayed by get session in 30 ticks:
Internal_fw>get sessionalloc 1/max 4064, alloc failed 0, mcast alloc 0, di alloc failed 0 total reserved 0, free sessions in shared pool 4063 id 4057/s**,vsys 0,flag 08000040/0000/0001,policy 2,time 30, dip 0 module 0 if 11(nspflag 801801):192.168.4.10/4454>192.168.1.30/80,6, 001125150ccd,sess token 4,vlan 0,tun 0,vsd 0,route 3 if 0(nspflag 801800):192.168.4.10/4454<192.168.1.30/80,6, 0019b980c214,sess token 26,vlan 0,tun 0,vsd 0,route 1 Total 1 sessions shown Internal_fw>
Here is a detailed view of the session entry, with an explicit timeout value of 300 seconds:
Internal_fw>get session id 4057id 4057(00000fd9), flag 08000040/0000/0001, vsys id 0(Root) policy id 2, application id 0, dip id 0, state 0current timeout 300, max timeout 300 (second)status normal, start time 5256, duration 0 session id mask 0, app value 0 bgroup0(vsd 0): 192.168.4.10/4454>192.168.1.30/80, protocol 6 session token 4 route 3 gtwy 192.168.1.30, mac 001125150ccd, nsptn info 0, pmtu 1500 flag 801801, diff 0/0 port seq 0, subif 0, cookie 0, fin seq 0, fin state 0 ethernet0/0(vsd 0): 192.168.4.10/4454<192.168.1.30/80, protocol 6 session token 26 route 1 gtwy 192.168.4.10, mac 0019b980c214, nsptn info 0, pmtu 1500 mac 0019b980c214, nsptn info 0 flag 801800, diff 0/0 port seq 0, subif 0, cookie 0, fin seq 0, fin state 0 Internal_fw>
A quick summary output shows the total number of active sessions through the ScreenOS gateway, indicated by the number following the alloc keyword:
	Internal_fw-> get session info
	alloc 1/max 4064, alloc failed 0, mcast alloc 0, di alloc failed 0
	total reserved 0, free sessions in shared pool 4063
	Internal_fw->
The get session info command also indicates the maximum number of sessions supported by the particular ScreenOS gateway, specified by the max field, in its current software release and licensing configuration. Thus, the SSG-5 gateway displayed in the preceding code snippet supports a maximum of 4,064 sessions.
Finally, you can export the entire session table from a ScreenOS gateway to a Trivial File Transfer Protocol (TFTP) server by using the redirect (>) field on the get session command and specifying the IP address of the TFTP server and name of the file:
	Internal_fw-> get session > tftp 192.168.4.10 Session_Table_File
	redirect to 192.168.4.10,Session_Table_File
	!!!!!!!!!!
	tftp transferred records = 4
	tftp success!
	Internal_fw->
See Also
7.18. Troubleshoot Traffic Flows
Solution
The debug flow basic ScreenOS command shows the debug mode processing of a packet beginning with its entry on an interface through the sequence of processing steps:
Internal_fw->clear dbufInternal_fw->debug flow basic...<wait for a few seconds to capture the stream> Internal_fw->undebug allInternal_fw->get dbuf stream
Discussion
The ScreenOS debug flow basic command provides extensive processing details on a packet, beginning with its entry on an interface through the steps of policy matching and the final forwarding decision.
When a packet enters a ScreenOS gateway, it goes through a sequence of processing steps. For packets that are permitted or tunneled through the gateway, the processing steps culminate in a firewall session table entry being generated and the packet being forwarded out. An incoming packet goes through the following processing steps:
Assign the packet a source security zone.
Match the packet against any of the screens defined in the ScreenOS configuration to check whether it represents a malicious attack such as a
SYNor ICMP flood. If yes, take the screen action on the packet. If the packet passes screen protection without being dropped, proceed to step 3.Match the packet against the session table of existing, active sessions. If yes, forward the packet based on the actions defined in the session’s state details. If not, proceed to step 4.
Perform mapped IP (MIP) or virtual IP (VIP) conversion on the packet. Please note that this is not an all-encompassing NAT step. During this step, the ScreenOS gateway simply converts the destination address to an internal address to assist with the subsequent route lookup, only if the packet’s destination address is a defined MIP or VIP. Proceed to step 5.
If policy-based routing (PBR) is configured on the incoming interface, apply the PBR policy on the packet. Otherwise, perform a destination route lookup on the packet to identify the exit interface.
Perform a policy lookup on the packet. If the resultant action is permit or tunnel, proceed to step 7. If the action is deny, drop the packet. If the action is reject, send back a TCP Reset or ICMP Destination Unreachable, as discussed in Recipe 7.6.
Perform src and/or destination NAT translation on the packet, as defined in the policy.
Install a detailed entry in the session table, including the results from steps 1–7, for all permitted and tunneled packets. If the packet is a TCP packet with the
SYNflag set, representing an initialSYNpacket in a TCP three-way handshake, andSYNcookies are not enabled, set up an ephemeral session with a lifetime of 20 seconds (two ticks) in the session table and wait for the target host behind the firewall to respond with aSYN-ACK. Once theSYN-ACKhas been sent back to the source and the source has responded with an ACK, the three-way handshake is complete. At this point, convert the ephemeral 20-second session to a full TCP session, which typically has a 30-minute (180-tick) session timeout. On ASIC-based high-throughput ScreenOS gateways, such as the ISG-1000/2000 and the NS5200/5400, the session table entry is pushed down to the ASIC, and subse-quent packets associated with this flow are processed directly in the ASIC with-out reaching the ScreenOS gateway’s CPU.Perform the various actions on the packet (e.g., perform the NAT operation) and forward the packet.
The debug flow basic command provides a navigation trail through the various processing steps outlined in the preceding list for a new packet entering a ScreenOS gateway.
Tip
Please note that for high-end, ASIC-based, high-throughput ScreenOS gateways such as the ISG-1000/2000 and the NS5200/5400, the out-put generated by debug flow basic only displays the initial packets for a given flow until a full session table entry is generated. On the other hand, the debug flow basic output on the lower-end SSG-5 through SSG-500 Series and the NS-5GT, NS-25/50, NS-200, and NS-500 Series shows all of the subsequent packets associated with the session flowing through the ScreenOS gateway.
The recommended and default method of capturing debug output is to write it to the ScreenOS debug buffer and then display the contents of the debug buffer either within ScreenOS or by exporting its contents to a TFTP server. Also, because a typical deployed ScreenOS gateway has a large volume of traffic traversing it, it’s a good idea to apply a flow filter to the debug flow basic command to restrict the flows that are captured.
You can capture the debug flow basic output for the HTTP session discussed in Recipe 7.12 with two bidirectional flow filters:
Internal_fw->clear dbufInternal_fw->debug flow basicInternal_fw->set ffilter src-ip 192.168.4.10 dst-ip 192.168.1.30Internal_fw->set ffilter src-ip 192.168.1.30 dst-ip 192.168.4.10...<wait for a few seconds to capture the stream> Internal_fw->undebug allInternal_fw->get dbuf stream ****** 09615.0: <Trust/bgroup0> packet received [48]******ipid = 7830(1e96), @03040770 packet passed sanity check.bgroup0:192.168.4.10/4519->192.168.1.30/80,6<Root>no session found flow_first_sanity_check: in <bgroup0>, out <N/A> chose interface bgroup0 as incoming nat if. flow_first_routing: in <bgroup0>, out <N/A> search route to (bgroup0, 192.168.4.10->192.168.1.30) in vr trust-vr for vsd-0/flag-0/ifp-null [ Dest] 1.route 192.168.1.30->192.168.1.30, to ethernet0/0 routed (x_dst_ip 192.168.1.30) from bgroup0 (bgroup0 in 0) to ethernet0/0 policy search from zone 2-> zone 100 policy_flow_search policy search nat_crt from zone 2-> zone 100 RPC Mapping Table search returned 0 matched service(s) for (vsys Root, ip 192.168.1.30, port 80, proto 6) No SW RPC rule match, search HW rulePermitted by policy 2No src xlate choose interface ethernet0/0 as outgoing phy if no loop on ifp ethernet0/0.session application type 6, name HTTP, nas_id 0, timeout 300secservice lookup identified service 0. flow_first_final_check: in <bgroup0>, out <ethernet0/0> existing vector list 103-2649484. Session (id:4057) created for first pak 103 flow_first_install_session======> route to 192.168.1.30 arp entry found for 192.168.1.30 ifp2 ethernet0/0, out_ifp ethernet0/0, flag 00800800, tunnel ffffffff, rc 1 outgoing wing prepared, ready handle cleartext reverse route search route to (ethernet0/0, 192.168.1.30->192.168.4.10) in vr trust-vr for vsd-0/flag-3000/ifp-bgroup0 [ Dest] 3.route 192.168.4.10->192.168.4.10, to bgroup0 route to 192.168.4.10 arp entry found for 192.168.4.10 ifp2 bgroup0, out_ifp bgroup0, flag 00800801, tunnel ffffffff, rc 1 flow got session. flow session id 4057 tcp seq check.Got syn, 192.168.4.10(4519)->192.168.1.30(80), nspflag 0x801801, 0x800800 post addr xlation: 192.168.4.10->192.168.1.30. flow_send_vector_, vid = 0, is_layer2_if=0****** 09615.0: <Secure_Servers/ethernet0/0> packet received [48]******ipid = 537(0219), @02f99a70 packet passed sanity check. ethernet0/0:192.168.1.30/80->192.168.4.10/4519,6<Root> existing session found. sess token 26 flow got session. flow session id 4057 tcp seq check.Got syn_ack, 192.168.1.30(80)->192.168.4.10(4519), nspflag 0x801800, 0x801801 post addr xlation: 192.168.1.30->192.168.4.10. flow_send_vector_, vid = 0, is_layer2_if=0****** 09615.0: <Trust/bgroup0> packet received [40]******ipid = 7831(1e97), @03040f70 packet passed sanity check. bgroup0:192.168.4.10/4519->192.168.1.30/80,6<Root> existing session found. sess token 4 flow got session. flow session id 4057 tcp seq check.Got ack, 192.168.4.10(4519)->192.168.1.30(80), natpflag 0x8000040, nspflag 0x801801, 0x801800, timeout=150 post addr xlation: 192.168.4.10->192.168.1.30. flow_send_vector_, vid = 0, is_layer2_if=0
The three packets shown in the debug flow basic output represent the TCP three-way handshake between Orion (192.168.4.10) and Andromeda (192.168.1.30) as Orion initiates an HTTP request to Andromeda, which can be parsed as follows:
The first line of debug output, ******
09615.0:<Trust/bgroup0>packet received[48]******, marks the beginning of the first received packet, indicating the zone (Trust) and interface (bgroup0) on which the packet was received. Also, the [48] represents the size of the IP packet in bytes. Please note that this is the IP packet size, excluding the size of the Ethernet header.The ScreenOS gateway goes through a policy match process for the first packet, creates a session, and verbosely records a
Got syn, 192.168.4.10 (4519) ->192.168. 1.30 (80)record in the debug.The second packet, beginning with ******
09615.0: <Secure_Servers/ethernet0/0> packet received [48]******, is another 48-byte IP packet received on theethernet0/0interface in zoneSecure_Servers. Theexisting session founddebug output confirms that this packet has been matched in the session table. TheGot syn_ack, 192.168.1.30(80) ->192.168.4.10 (4519)debug record validates that the received packet has the TCPSYN-ACKflags set and represents the packet flow from the Andromeda server on TCP source port 80 to the Orion workstation on destination port 4519.The third packet, beginning with ******
09615.0: <Trust/bgroup0> packet received [40]******, is a 40-byte IP packet received on thebgroup0interface, which matches the existing session ID of 4057. TheGot ack, 192.168.4.10 (4519)-> 192.168.1.30 (80)debug record confirms that the finalACKin the three-way hand-shake has been received.
The subsequent debug output shows the actual HTTP get request from 192.168.4.10 and the HTTP response from 192.168.1.30:
****** 09615.0: <Trust/bgroup0> packet received [487]******ipid = 7832(1e98), @03041770 packet passed sanity check.bgroup0:192.168.4.10/4519->192.168.1.30/80,6<Root>existing session found. sess token 4 flow got session.flow session id 4057tcp seq check. post addr xlation: 192.168.4.10->192.168.1.30. flow_send_vector_, vid = 0, is_layer2_if=0****** 09615.0: <Secure_Servers/ethernet0/0> packet received [368]******ipid = 538(021a), @02f9a270 packet passed sanity check.ethernet0/0:192.168.1.30/80->192.168.4.10/4519,6<Root>existing session found. sess token 26 flow got session. flow session id 4057 tcp seq check. post addr xlation: 192.168.1.30->192.168.4.10. flow_send_vector_, vid = 0, is_layer2_if=0****** 09615.0: <Trust/bgroup0> packet received [40]******ipid = 7835(1e9b), @03041f70 packet passed sanity check.bgroup0:192.168.4.10/4519->192.168.1.30/80,6<Root>existing session found. sess token 4 flow got session. flow session id 4057 tcp seq check. post addr xlation: 192.168.4.10->192.168.1.30. flow_send_vector_, vid = 0, is_layer2_if=0 Internal_fw->
The debug output, beginning with ******09615.0: <Trust/bgroup0> packetreceived [487]******, displays the ScreenOS processing of a 487-byte IP packet from Orion (192.168.4.10) to Andromeda (192.168.1.30). The packet matches the existing session id 4057, goes through a TCP sequence number check, and is then forwarded to the destination per the flow_send_vector. The Andromeda server responds back with the HTTP response with the web content in the 368-byte IP packet which, again, matches the existing session and is forwarded. Finally, Orion sends back the TCP ACK response packet that begins with ****** 09615.0: <Trust/bgroup0> packet received [40]******, which matches the session id 4057 and is forwarded out.
See Also
7.19. Configure a Packet Capture in ScreenOS
Solution
The snoop command enables packet captures on ScreenOS gateways. It captures packets to the debug buffer:
Internal_fw->clear dbufInternal_fw->snoopStart Snoop, type ESC or 'snoop off' to stop, continue? [y]/n y Internal_fw-> ...<wait for a few seconds to capture the stream> Internal_fw->snoop offSnoop off Internal_fw->
Discussion
The ScreenOS snoop command is similar to snoop and tcpdump commands in the Unix world. It captures packets as they traverse the firewall, but unlike debug flow basic,it does not show the processing that the ScreenOS gateway performed on them.
Tip
Please note that for high-end, ASIC-based, high-throughput ScreenOS gateways such as the ISG-1000/2000 and the NS5200/5400, the output generated by snoop, just like the debug flow basic output, only displays the initial packets for a given flow until a full session table entry is generated. Once a full session table entry is set up on the high-end platforms, and the subsequent packets for that session flow are pro-cessed directly by the ASIC fast-path, snoop does not capture those pack-ets. On the other hand, the snoop output on the lower-end SSG-5 through SSG-500 Series, and the NS-5GT, NS-25/50, NS-200, and NS-500 Series, shows all of the subsequent packets associated with the session flowing through the ScreenOS gateway.
Once the packets have been captured by running the snoop command as indicated, you can view the contents of the debug buffer:
Internal_fw->get dbuf stream01184.0: bgroup0(i) len=62:001125150ccd->0017cbe3f68b/0800 192.168.4.10 -> 192.168.1.30/6 vhl=45, tos=00, id=63151, frag=0000, ttl=128 tlen=48 tcp:ports 4233->80, seq=3062152252, ack=0,flag=7002/SYN01184.0: ethernet0/0(o) len=62:0017cbe3f680->0019b980c214/0800 192.168.4.10 -> 192.168.1.30/6 vhl=45, tos=00, id=63151, frag=0000, ttl=127 tlen=48 tcp:ports 4233->80, seq=3062152252, ack=0,flag=7002/SYN01184.0: ethernet0/0(i) len=62:0019b980c214->0017cbe3f680/0800 192.168.1.30 -> 192.168.4.10/6 vhl=45, tos=00, id=1789, frag=4000, ttl=128 tlen=48 tcp:ports 80->4233, seq=2010013138, ack=3062152253,flag=7012/SYN/ACK01184.0: bgroup0(o) len=62:0017cbe3f68b->001125150ccd/0800 192.168.1.30 -> 192.168.4.10/6 vhl=45, tos=00, id=1789, frag=4000, ttl=127 tlen=48 tcp:ports 80->4233, seq=2010013138, ack=3062152253,flag=7012/SYN/ACK01184.0: bgroup0(i) len=60:001125150ccd->0017cbe3f68b/0800 192.168.4.10 -> 192.168.1.30/6 vhl=45, tos=00, id=63152, frag=0000, ttl=128 tlen=40 tcp:ports 4233->80, seq=3062152253, ack=2010013139,flag=5010/ACK01184.0: ethernet0/0(o) len=54:0017cbe3f680->0019b980c214/0800 192.168.4.10 -> 192.168.1.30/6 vhl=45, tos=00, id=63152, frag=0000, ttl=127 tlen=40 tcp:ports 4233->80, seq=3062152253, ack=2010013139,flag=5010/ACK
This snoop output shows the TCP three-way handshake for an HTTP connection request from Orion (192.168.4.10) to Andromeda (192.168.1.30) as discussed in the context of a debug flow basic capture in Recipe 7.18. Because the snoop command was executed without any filters, traffic from all interfaces is captured by snoop. Thus, as you can see in the output, the TCP SYN packet is seen in the first line of the capture, 01184.0: bgroup0(i) len=62:001125150ccd->0017cbe3f68b/0800, coming into the bgroup0 interface, represented by the (i). The captured packet in the snoop stream, 01184.0:ethernet0/0(o)len=62:0017cbe3f680->0019b980c214/0800, shows the same IP packet being forwarded out of the ethernet0/0 interface, represented by the (o) next to the interface name. As shown in the preceding code, the snoop output, unlike debug flow basic, dumps the raw contents of the packets. To review the various fields captured by snoop, we can examine the first packet output shown in the preceding code.
The first line of the packet, 01184.0: bgroup0(i) len=62:001125150ccd->0017cbe3f68b/ 080, shows the time of arrival of the packet, 1184, the interface, and the direction of the packet, coming into the bgroup0 interface, with an Ethernet frame size of 62 bytes, and the source and destination Ethernet MAC addresses.
The second line of the packet, 192.168.4.10->192.168.1.30/6, shows the source and destination IP addresses and the IP number, 6, which represents TCP. An IP number of 17 would indicate UDP, whereas a 1 would indicate ICMP.
The third line of the packet, vhl=45, tos=00, id=63151, frag=0000, ttl=128tlen=48, captures various elements of the IP header, as shown in Table 7-5.
The fourth line of the packet, tcp:ports4233->80, seq=3062152252, ack=0, flag=7002/SYN, captures the elements of the TCP header, as shown in Table 7-6.
|
TCP header element/value |
Description | |
|
|
TCP stream; source port = 4233; destination port = 80 | |
|
|
Initial TCP sequence number | |
|
|
Initial TCP ACKnumber | |
|
|
TCP flags: SYN is set on this TCP segment |
When snoop is activated as in the output shown in this recipe’s solution, it captures traffic from all the interfaces, which can quickly fill up the debug buffer. Thus, you can apply a wide range of filters to snoop to selectively capture data. Here is an exam-ple of a filter that limits the capture to the bidirectional communication between 192.168.4.10 and 192.168.1.30:
	Internal_fw-> snoop filter ip src-ip 192.168.4.10 dst-ip 192.168.1.30direction both
	snoop filter added
	Internal_fw->
The debug buffer is carved out of the ScreenOS gateway’s DRAM. You can increase its size from the default value by using the set dbuf size <size_in_kbytes> command:
Internal_fw-> set dbuf size 4096You can filter output from the dbuf through the include or exclude matching command:
	Internal_fw-> get dbuf stream | include 5018
	              tcp:ports 4233->80, seq=3062152253, ack=2010013139,
	              flag=5018/ACK
	              tcp:ports 4233->80, seq=3062152253, ack=2010013139,
	              flag=5018/ACK
	              tcp:ports 80->4233, seq=2010013139, ack=3062152709,
	              flag=5018/ACK
	              tcp:ports 80->4233, seq=2010013139, ack=3062152709,
	              flag=5018/ACK
    Internal_fw->
Also, you can export the contents of the dbuf to a TFTP server. Please make sure you have a TFTP server running with the capability of accepting inbound files. The following command set sends the contents of the dbuf stream to a TFTP server running on the host 192.168.4.10:
	Internal_fw-> get dbuf stream > tftp 192.168.4.10 snoop_capture
	redirect to 192.168.4.10,snoop_capture
	!!!!!!!!!!!!!!!!!!
	tftp transferred records = 8
	tftp success!
	Internal_fw->
See Also
7.20. Determine Platform Limits on Address/Service Book Entries and Policies
Problem
You want to determine the maximum limit on the number of address/service book entries, address/service groups, and policies on your ScreenOS gateway.
Solution
You can determine the maximum number of address book, service book, address group, and service group entries, as well as the policies supported on your ScreenOS gateway, by using the get sys-cfg command and matching for the address, service, group, and policy keywords:
nsisg2000->get sys-cfg | include "total max address book" total max address book entries number: 20000nsisg2000-> nsisg2000->get sys-cfg | include "max custom service" max custom service number: 2048nsisg2000-> nsisg2000->get sys-cfg | include "total max addr group" total max addr group allowed number: 1024nsisg2000-> nsisg2000->get sys-cfg | include "max service groups" max service groups number: 512nsisg2000-> nsisg2000->get sys-cfg | include "policy number" policy number: 30000nsisg2000->
Discussion
The address/service book maximum entry limits, address and service group limits, and maximum policy limits on the ScreenOS gateways vary across hardware platforms. Furthermore, newer releases of ScreenOS often increase these limits further.
In addition to the per-platform limits seen in this recipe’s solution, there can be per-zone and per-VSYS limits on certain platforms that you can check with the get sys-cfg command as follows:
nsisg2000->get sys-cfg | include "policy entries per vsys" policy entries per vsys number: 15000nsisg2000-> nsisg2000->get sys-cfg | include "service entries per vsys" service entries per vsys number: 1024
In addition to the get sys-cfg command discussed in the solution to this recipe, the get license command shows a number of system maximum capacity levels, including the maximum number of sessions that the ScreenOS gateway supports:
	nsisg2000-> get license | include sessions
	Sessions:              500064 sessions
	nsisg2000->
Finally, in addition to ScreenOS policies, you can check the memory allocation for ACL rules on non-ASIC-based ScreenOS gateways such as the SSG Series and NS-5GT through NS-500 Series:
	ssg5-serial-> get sys-cfg | include acl
	acl rule mem size number: 16384
	ssg5-serial->
On ASIC-based ScreenOS gateways, such as the ISG Series, you can check the total number of ASIC rules by looking for the Total rules number in the get rms output:
nsisg2000->get rmsRMS internal information: - Saturn Total sectors: 1019 available: 1019Total rules: 65216used: 0 avail: 65216 Ctx created: 0 sectors used: 0 nsisg2000->
See Also
This chapter’s Introduction section