
Chapter 8. Load Balancing and Caching
This chapter looks at two important concepts for bringing a service-oriented design to production: load balancing and caching. First, load balancing is used to distribute the workload of service requests across multiple processes and servers to increase the reliability and capacity of a system. Second, services apply caching strategies, with HTTP headers and Memcached, to improve response times by reducing the amount of work the services have to perform.
Latency and Throughput
Before diving into the details of load balancing and caching, we need to establish the concepts of latency and throughput. Latency refers to the elapsed time per request, usually measured in milliseconds. Throughput refers to the number of requests a service can process over a period of time, usually measured in requests per second.
The latency of a service is also known as the response time, and it is one component of the overall perceived responsiveness of the applications that use the service. If latency is high, the application will feel slow. For this reason, you should monitor the latency of your services from day one, even before you start worrying about scaling your system.
The maximum throughput of a system can be thought of as one measure of its capacity. If a system cannot handle the rate of incoming requests, the response times will degrade, and eventually the service will fail. When latency is at an acceptable level, you spend a lot more time worrying about the throughput of the services as you scale the system to accommodate increasing load.
Under the simplest conditions, with a service that’s able to process one request at a time, the throughput is the reciprocal of the latency. For example, if the service can generate responses in 500 milliseconds, the throughput is two requests per second. In real life, services must process multiple requests at the same time, and the relationship between latency and throughput is more complex.
This chapter refers to these concepts often, as they are the building blocks of deploying distributed network services.
Load Balancing
Load balancing is a strategy for distributing requests from a single IP address and port to multiple processes across multiple servers. When it’s time to bring a service to production, it provides three essential benefits: failover, scalability, and decreased latency. First, even in the smallest deployment, load balancing ensures that a service remains available when a portion of a Ruby process is unable to process requests (a capability known as failover). Second, as you need to handle increased capacity, load balancing allows you to scale by adding processes. Third, with a good algorithm, load balancing helps maintain the best possible latencies in the face of response time variation.
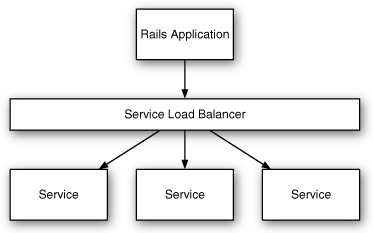
Services can be scaled horizontally or vertically. Vertical scaling works by increasing the resources (memory, CPU, I/O, and so on) of each server so each server can do more work. Horizontal scaling, on the other hand, means increasing capacity by adding more servers. Services are well suited to horizontal scaling; therefore, balancing the load across multiple servers is particularly important. In a service-oriented design, the load balancer sits between the application processes and the service processes. Figure 8.1 illustrates how the different pieces fit together.
Figure 8.1 Load balancing with a service tier.
Load Balancing Algorithms
As a load balancer receives each request, it must decide which process (or backend) should handle the request. The simplest algorithm a load balancer could implement might be to randomly select a known backend, but the result would not be very balanced. Some backends might receive too many requests while others sit idle. Fortunately, there are a number of better load balancing strategies that are easy to use, including round-robin, least-connections, and URI-based load balancing.
Round-Robin Load Balancing
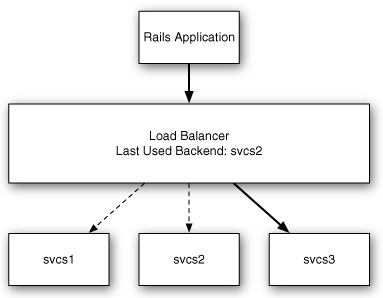
A load balancer operating using a round-robin algorithm keeps an internal counter of which backend was most recently used, and it uses the next choice from a sequential list of all known backends. As each request arrives, the next backend is selected, and the counter is incremented, looping back to the beginning of the list when necessary. If every request requires the same amount of computation to process, the workload is distributed evenly. Figure 8.2 shows how round-robin load balancing works.
Figure 8.2 A round-robin load balancer.
Round robin is straightforward and can provide two of the primary benefits of load balancing—horizontal scalability and failover—but it doesn’t perform well when there is variability in response times. If a single-threaded Ruby process is processing a slower request and a fast request is distributed to it, the fast request has to wait until the slower request is finished before it can start to be handled. In practice, most web services have some actions that respond much more quickly than others, so an algorithm that is designed to handle such situations gracefully is often preferable. The least-connections algorithm, discussed next, is designed specifically to handle the scenario of variable response times.
Least-Connections Load Balancing
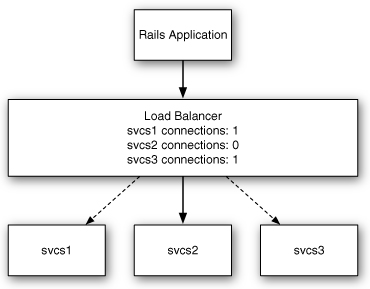
With the least-connections algorithm, the load balancer attempts to route requests based on the current amount of load on each backend. It accomplishes this by keeping track of the number of active connections for each backend. A backend’s connection counter is incremented as requests are dispatched to it and decremented as they complete. When a request arrives, the load balancer routes it to the backend with the fewest active connections. Figure 8.3 shows the operation of a least-connections load balancer.
Unlike round robin, least-connections algorithms avoid the problem of a request queuing behind another when a backend is available. The requests still take the same amount of time to process in the backend, but the latency, as seen by the service client, is more consistent.
Figure 8.3 A least-connections load balancer.
URI-Based Load Balancing
An alternative approach to load balancing relies on the data in the request rather than the state of the clusters processing the data. URI-based load balancers work by using a hash algorithm to map each path to a backend. In a service-based architecture that leverages REST-style URLs, this means all requests for a piece of data can be routed to the same backend (server) while it’s available. If the backend goes down, the load balancer adjusts by routing requests to available backends in the pool. Figure 8.4 shows how a URL-based load balancer distributes load.
Figure 8.4 A URL-based load balancer.
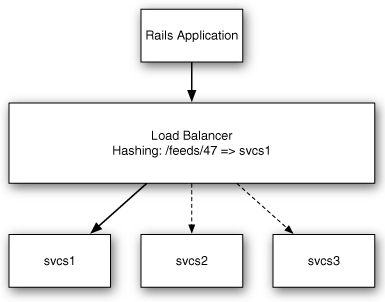
The question of why a service implementer would want to load balance based on URL instead of active connections is an interesting one. The answer usually relates to caching. If a given backend can cache the representations of N objects, where N is significantly smaller than the total number of objects in the system, then a URL-based load balancing strategy can significantly increase the number of requests that result in a cache hit (a metric known as cache hit ratio). Sacrificing connection-based load balancing for cache locality is a reasonable approach in some situations, but it is the sort of scaling consideration that should be carefully weighed and measured.
Implementing Load Balancing
Load balancers come in many forms but can be divided into two primary classifications: hardware and software. Hardware load balancers are network appliances that get racked in a data center. Because of their high cost, they are generally found in large-scale deployments. Software load balancers, on the other hand, are quite ubiquitous. A software load balancer may exist as a component of a larger piece of software, such as a web server or an application server, or it may be a proxy specifically designed to serve just that purpose.
Phusion Passenger and Unicorn
Newer Ruby application servers have load balancing baked in. Both Phusion Passenger and Unicorn maintain a pool of worker processes to service incoming requests. When a request comes in, it’s routed to the next available process, using a form of a least-connections algorithm. Passenger and Unicorn understand that a single-threaded Ruby process can handle only one request at a time, so they never ask it to process more than that. Additional requests queue outside the worker processes until a new worker becomes available. This provides a good load balancing strategy within an individual server, but it doesn’t provide any support for failover when someone invariably kicks out the power cord of an application server.
HAProxy
The HAProxy website describes HAProxy as a “reliable, high-performance TCP/HTTP load balancer,” and this praise is well deserved. This is a software-based, open source, and easy-to-configure load balancer. HAProxy also features an informative, web-based user interface for debugging or monitoring the traffic it’s handling in real time.
In Ruby service-oriented architectures, HAProxy is usually used one of two ways. If the services are being run with an application server such as Passenger or Unicorn that already handles ensuring that a single worker process receives only one request at a time, using HAProxy is a simple way to balance traffic across multiple hosts. If the services are being run with an application server such as Mongrel or Thin that doesn’t implement a worker pool, HAProxy can also be configured to route requests only to available processes.
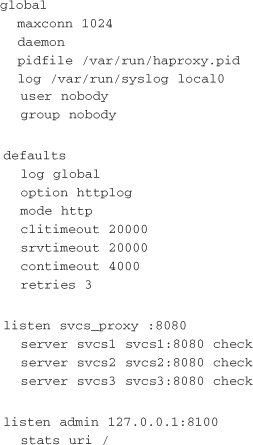
To get started with HAProxy, you install it on a new server using your system’s package management system. Next, you need to find and update the configuration file (often /etc/haproxy.cfg). The following is a basic HAProxy configuration file that round-robins traffic received on port 8080 to port 8080 on three servers. It also exposes the HAProxy monitoring interface on port 8100. You would use a configuration like this if the svcs1-3 servers were running Unicorn or Passenger on port 8080:
Now you just start up HAProxy and reconfigure your service clients to hit the load balancer. HAProxy balances traffic evenly across the three hosts and ensures that if one of the hosts goes down, it stops receiving traffic. The Passenger or Unicorn servers on the svcs hosts take care of making sure requests are never sent to a worker process that is already busy. Figure 8.5 shows the operation of HAProxy in front of Unicorn.
Figure 8.5 HAProxy in front of Unicorn.

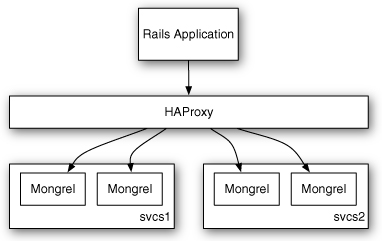
The other common way to use HAProxy in a service-oriented architecture is to place it in front of Mongrel or Thin processes that can handle only one request at a time. In this configuration, HAProxy handles failover if a Ruby process or host goes down. HAProxy also makes sure that requests are routed only to available backends. The key to this configuration is the maxconn 1 option, specified at the server level, which tells HAProxy to never allow more than one active connection to Mongrel or Thin at a time. Here is how the previous configuration could be updated to balance across two svcs hosts, each running Mongrels on ports 9001 and 9002:
Figure 8.6 shows the operation of HAProxy with Mongrel.
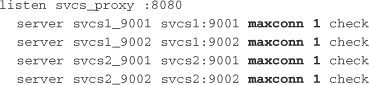
Figure 8.6 HAProxy in front of Mongrel.
Caching with Memcached
Caching, the act of storing the result of a computation for faster access later, can dramatically decrease a service’s latency and increase throughput while keeping the underlying code maintainable and clean. Broadly, services can cache two ways. They can implement caching internally by storing results in the Ruby processes memory or in Memcached. They can also leverage the caching support in the HTTP specification to cache data externally. In a service-oriented design under high scalability demands, it’s likely that the services would leverage both approaches.
Memcached is a scalable, open source system for caching objects in memory. It’s one of the simplest and fastest forms of a broader group of data storage implementations known as key/value stores. At its core, the Memcached daemon process provides a well-defined interface for reading and writing to memory from other processes, with a bit of caching-oriented convenience such as time-based expiration and least-recently used (LRU) eviction layered in (covered in the following sections). It’s completely temporal—no data will survive a server failure—but that’s just fine in most caching use cases where the source data is stored in a more durable data store. For these reasons, it’s a good first choice for implementing internal caching in a Ruby-based service.
The Memcached Client and ActiveRecord
A handful of Memcached clients are implemented for Ruby. The memcache-client library maintained by Mike Perham is the easiest to get started with and also the most popular, in part because it’s the default Memcached client used by ActiveSupport in Rails. It can be installed with RubyGems, using the following command:
$ gem install memcache-client
Once the memcache-client library is installed, you can create a connection to a local or remote Memcached process by instantiating the MemCache class. By default, Memcached runs on port 11211:
![]()
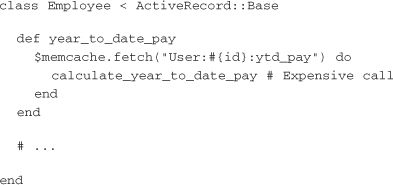
With a connection established and stored in a global variable, the cache can be used from anywhere in the service. The general pattern followed when implementing Memcached is to first check the cache for the desired value. If the value is present, return it; otherwise, compute the result and store it in Memcached so it’s available the next time it’s needed. Here’s how this might look in an ActiveRecord class:
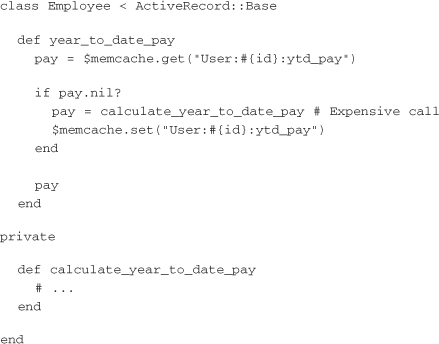
Memcached servers are aware of only strings, so a little bit of magic is necessary behind the scenes for them to store other types. The memcache-client library uses Ruby’s Marshal module to encode the integers returned from the calculate_year_to_date_pay method before sending them over the wire. It decodes the strings it receives into their native Ruby types when they are returned from the server. This allows Memcached to store most objects a Ruby process might use, from Booleans all the way up to arrays of ActiveRecord objects. The caveat is that when values are read from Memcached, the classes must already have been loaded into the Ruby process for Marshal.load to succeed. If the objects stored are core Ruby types, this isn’t a concern, but if they are application or library classes, they should be eagerly required when the process boots.
The previous example includes boilerplate code for the sake of illustration but can be improved with a simple abstraction. The pattern of computing a result and storing it only if it’s not available from the cache can be simplified by using Ruby blocks. The memcache-client library implements a fetch method that does just that. Here is how it could be applied to slim down the Employee class:
Adding a cache to an object is relatively easy, but cache invalidation can be a much trickier proposition. Fortunately, Memcached provides some tools to help. The simplest of these tools is time-based expiration.
Time-Based Expiration
Whenever a value is stored in Memcached, an expiration is included. The memcache-client library sends an expiration value of 0 by default, which informs Memcached that the key should not be expired after a set amount of time. If a duration (in seconds) is provided as the second argument to the fetch method, memcache-client uses it when storing the value on a cache miss, and the Memcached process expires the key after the given number of seconds has passed.
If a service is caching data that can be stale for some amount of time, a time-based expiration might be all that’s necessary for cache invalidation. The previous examples omit expirations, so the year-to-date pay data would be cached indefinitely. The following example shows how to set cache values that expire in five minutes:

If a call is made within five minutes of setting the cached value, it will be returned. If a request comes in after five minutes, the Memcached server responds that it doesn’t hold that cache key, at which time the calculation needs to be called again. Time-based cache expiration is simple and is automatically handled by the Memcached server, but it is limited in flexibility. For situations that require more control of cache invalidation, other strategies are necessary.
Manual Expiration
Another approach to cache invalidation is for the application code to explicitly delete the relevant keys from the Memcached server when conditions occur that might cause the cached values to be out of date. Building on the previous examples, if an employee’s year-to-date pay is modified only when a new paycheck is created, it may make sense to leave off a time-based expiration and delete the cache key in a callback:
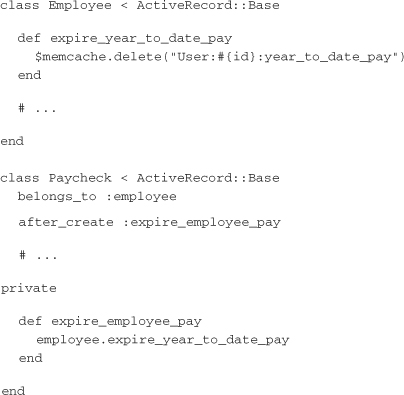
While this is seemingly straightforward, in practice it can be difficult to identify all the events that would cause a given key to be invalid. On the other hand, when an event occurs, it can be similarly difficult to identify all the cache keys that may include the data that has changed. When it’s possible to get away with time-based expiration, it should be preferred to manual expiration.
Generational Cache Keys
In many cases, a program can’t return out-of-date data from a cache, and manual expiration of cache keys would be cumbersome. Fortunately, there’s one last cache invalidation strategy that can help. Generational cache keys leverage an important property of Memcached only briefly mentioned up to this point: the least-recently used eviction algorithm.
Every Memcached server runs with a maximum memory limit that can be specified when it is booted with the –m flag. (The default is 64MB.) Up to that point, Memcached happily stores whatever keys and values are sent to it. Eventually, as the server approaches the limit, it starts to make decisions about which keys to evict. Every time a key is accessed, Memcached keeps track of the time. When it is time to start evicting data, the Memcached server makes an educated guess that dropping the data that was used least recently will yield the best performance. In practice, this means if you store data in Memcached and eventually stop accessing it, it will eventually be dropped from memory in favor of more valuable keys—without any intervention.
A service can implement a form of cache invalidation by changing the cache key based on the data used to compute the value. As the computed cache key changes, Memcached eventually evicts the old keys. As long as the cache key includes representations of all the source data that’s represented in the value, the cache will never return out-of-date data. The cache key might be composed of data already readily available to the service, or the service might store denormalized data like a version field on records in order to make computing the cache key as simple as possible later.
Consider again the example of the employee and paycheck models. Suppose the service has to calculate many year-to-date values for each employee. It’s possible for the Employee class to expire all those values when a paycheck is created, but it’s more complicated than necessary. Instead, you can leverage ActiveRecord’s counter cache feature by adding a paychecks_count column to the employees table and simply including that in all the paycheck-related cache keys:

With creatively composed cache keys, generational cache keys can replace manual expiration for most cache invalidation and leave the resulting code more maintainable.
HTTP Caching
The HTTP specification has caching support baked in. With a little extra work, this caching can be leveraged to drastically improve the latency and throughput of a Ruby web service. Most web developers are familiar with browser caches, but two other types of HTTP-based caches can affect the behavior of a given request: proxy caches and gateway caches. Network administrators deploy proxy caches between their users and the Internet, so they aren’t relevant to the implementation of web services. Gateway caches, also known as reverse-proxy caches, on the other hand, are deployed by application engineers and are quite useful for scaling web services. From the standpoint of a service client, the gateway cache looks like the actual service, and the client can receive the benefits of the cache without any modifications.
Expiration-Based Caching
The HTTP implementation of expiration-based caching is analogous to the time-based expiration functionality of Memcached described earlier. After computing a response, a service adds a Cache-Control header that specifies the number of seconds the gateway cache should wait before asking for the same data again. While the cache is valid, the gateway can return responses to the service client immediately. Because it’s much faster for the cache to return the response from memory than it is for the service to generate it, latencies and throughputs improve drastically.
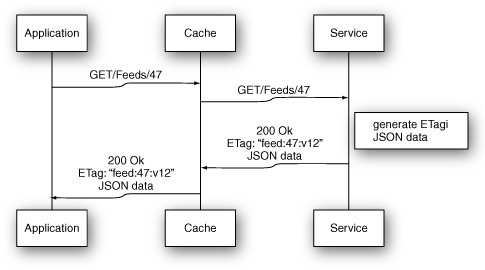
Imagine that you are implementing a service that stores data about RSS feeds. Because this data changes infrequently, it might be acceptable to cache responses for one minute. If the service returns an expiration-based caching header and you add a gateway cache between the service clients and the services, an initial request through the stack would still reach the backend, as shown in Figure 8.7.
Figure 8.7 A first request in expiration-based HTTP caching.
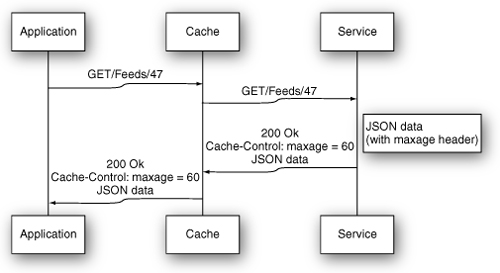
Because the gateway cache has no stored data for the given URI, it forwards the request. The response comes back from the Ruby process with a max-age caching directive, so the cache stores the response in memory. The benefit of this implementation kicks in with the next request a few seconds later, as shown in Figure 8.8.
Figure 8.8 A second request in expiration-based HTTP caching.
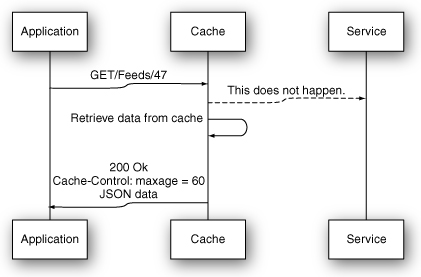
This time, the gateway cache sees that it has a cached, fresh response for the given URI. Instead of forwarding the request to the backend, it immediately returns the cached response to the service client. The service client receives its response faster, and the load on the Ruby services is reduced.
Validation-Based Caching
For cases in which expiration-based caching won’t suffice, HTTP also offers a validation-based caching model based on the Last-Modified and ETag headers. By adding either header to its responses, a service enables support for “conditional GETs” from clients that support it—like gateway caches. In the validation model, the gateway cache still has to forward a request to the backend in order to determine whether its cached response is valid. The efficiencies come when the service is able to identify that the gateway cache has a fresh response. Instead of regenerating the response, the service can respond with a 304 Not Modified status, which saves time and bandwidth.
To see this in action, suppose the RSS feed service from the previous example had to always return up-to-date information. To support this, a developer could add a version number to the feeds table that is incremented every time the RSS data changed. Figure 8.9 shows how the first request would look.
Figure 8.9 A first request in validation-based HTTP caching.
Again, because the gateway cache has no stored representation of the requested resource, the request is forwarded to the Ruby backend. The generated response is stored in the cache and returned to the service client. If the next request for the same feed occurs before the feed is updated, it can leverage the gateway cache as shown in Figure 8.10.
Figure 8.10 A second request in validation-based HTTP caching.
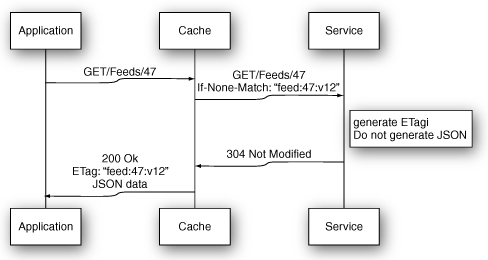
This time, the gateway cache still forwards the request to the service, but the service is able to determine that the cache is fresh. Instead of generating a response body and sending it back upstream, it immediately returns a 304 Not Modified status. As long as the service can determine whether the cache is valid or not in significantly less time than it would take to generate the full response, latencies will be reduced, along with the resources required to run the Ruby service processes.
Implementing HTTP Caching
There are a number of open source implementations of HTTP gateway caches to consider when deploying a Ruby web service. Most gateway cache implementations are run as processes between the application servers and a load balancer such as HAProxy. However, Rack-Cache is an interesting Ruby-based alternative that has emerged recently.
Rack-Cache
Rack-Cache is a gateway cache implemented as a Rack middleware. Ryan Tomayko wrote it in order to make it as easy as possible for Ruby developers to experiment with HTTP caching. It’s by far the most convenient gateway cache implementation to use when developing locally. To use Rack-Cache, you install the gem and insert it into a service’s middleware stack:
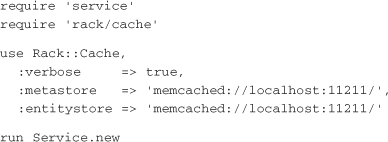
The metastore and entitystore configuration options tell Rack-Cache where to store the cache metadata and full response bodies, respectively. By default, Rack-Cache uses the heap, but this is just the sort of data that Memcached handles very well. This is all that’s necessary for Rack-Cache to start acting like a gateway cache. It supports both the expiration and validation caching models. The Rack-Cache source code is also an informative read for an interested Rubyist looking to better understand the mechanics of how gateway caches work.
Squid and Varnish
Out-of-process gateway caches such as Squid and Varnish are implemented in high-performance languages such as C and work with applications implemented in any language. They can be a bit more difficult to set up properly than Rack-Cache, but they also provide more performance than Rack-Cache in a production environment. By virtue of being around longer and supporting a larger number of users, they are also a bit more flexible and configurable than Rack-Cache. The details of configuring Squid and Varnish are beyond the scope of this book, but these tools are worth taking a look at for production once a service has HTTP caching logic built in and tested using Rack-Cache.
Conclusion
When it’s time to bring a service to production, latency and throughput are key concepts. Efficient load balancing enables a service to scale horizontally by adding additional servers to increase throughput (and thus capacity). Caching, both within a process and externally via HTTP headers, is a proven technique to reduce latency and increase throughput while still leaving the underlying code clean and maintainable. As you scale a service, you should regularly test your latency and capacity to ensure that you can meet the requirements of your environment and the demand you expect.